iGenix IG6550 User manual

- 1 -
COUNTER TOP DISHWASHER
Model Number: IG6550
INSTRUCTIONS FOR USE
Thank you for purchasing this product.
Please read these instructions carefully before use.

- 2 -
SAFETY INSTRUCTIONS
PLEASE READ ALL SAFETY INSTRUCTIONS CAREFULLY BEFORE INSTALLING OR OPERATING THIS APPLIANCE.
IMPORTANT: This appliance is not intended for use by persons including children with reduced physical,
sensory or mental capabilities, or lack of experience and knowledge, unless they have been given
supervision or instruction concerning use of the appliances by a person responsible for their safety.
•This product is intended for domestic use only. This product is for indoor use only.
•Do not use this dishwasher for commercial or industrial use.
•Ensure that the electricity supply in your home is rated at 220 -240 volts before operating the
appliance.
•Do not use the appliance if there is any damage to the power cord.
•Do not use an extension cable or cord.
•Children should be supervised to ensure that they do not play with the appliance.
•Always unplug the appliance before attempting to move.
•Use only detergents recommended for use in a dishwasher.
•Dishwasher detergent is a strong alkaline and can be extremely dangerous if swallowed. Avoid
contact with skin and eyes. Check that the detergent receptacle is empty at the end of the wash
cycle.
•Keep dishwasher detergents away from the reach of children.
•If the hot water exceeds 65
°
C adjust the water heater settings. If the hot water temperature cannot
be adjusted then the dishwasher must be connected to a cold water supply.
•Position sharp items (e.g. knives and forks) so that they are not likely to damage the door seal.
•Load sharp knives and items with points in the cutlery basket with the sharp blades and points facing
down.
•Do not wash plastic items unless they are marked as ‘Dishwasher Safe’.
•Do not touch the heating element located underneath the filter during or immediately after use.
•Do not operate the dishwasher unless all enclosure panels are properly in place.
•Remove the door to the washing compartment when disposing of an old dishwasher.
•If the door is opened during operation hot steam can escape.
•Do not remove dishes from the dishwasher while in operation.
•Do not use any kinds of solvents inside the dishwasher.
•Do not drink water from the dishwasher.
•Do not sit of stand on the open door.
•Do not attempt any repairs yourself. Only a qualified service engineer can repair this appliance.
Technical Data
Model IG6550
Power Input 1280W
Max Water Consumption 10.4L (Normal Setting)
Water Pressure 0.03 ~ 1MPa
Water Hardness <18dH
Control Manner Automatic
Detergent Requirement 12g (Normal Setting)
External Dimensions 570 x 480 x 436 mm
Refrigerant R600a / 25g
- 3 -
Installation
IMPORTANT: An electrical supply of 220-240V AC only, 50 Hz is required. For your personal safety, the
appliance must be grounded. This appliance is equipped with a power cord having a 3 pin grounding plug.
To minimize possible shock hazards it must be plugged into a matching 3 pin mains electrical outlet. If the
power cord is damaged, it must be replaced by a qualified person in order to reduce the risk or a hazard.
1. Remove all packaging carefully. Ensure that the mains plug is disconnected from the socket before
installation.
2. The minimum height clearance required to install your dishwasher on a countertop surface with overhead
cupboards is 48cm. The dishwasher must be situated on a ‘solid’ level surface. Place the dishwasher
adjacent to a water supply and drain. Make sure there is an electrical supply within reach of the electrical
power cord (max 6 feet). To level the dishwasher, adjust the 4 levelling feet underneath the dishwasher.
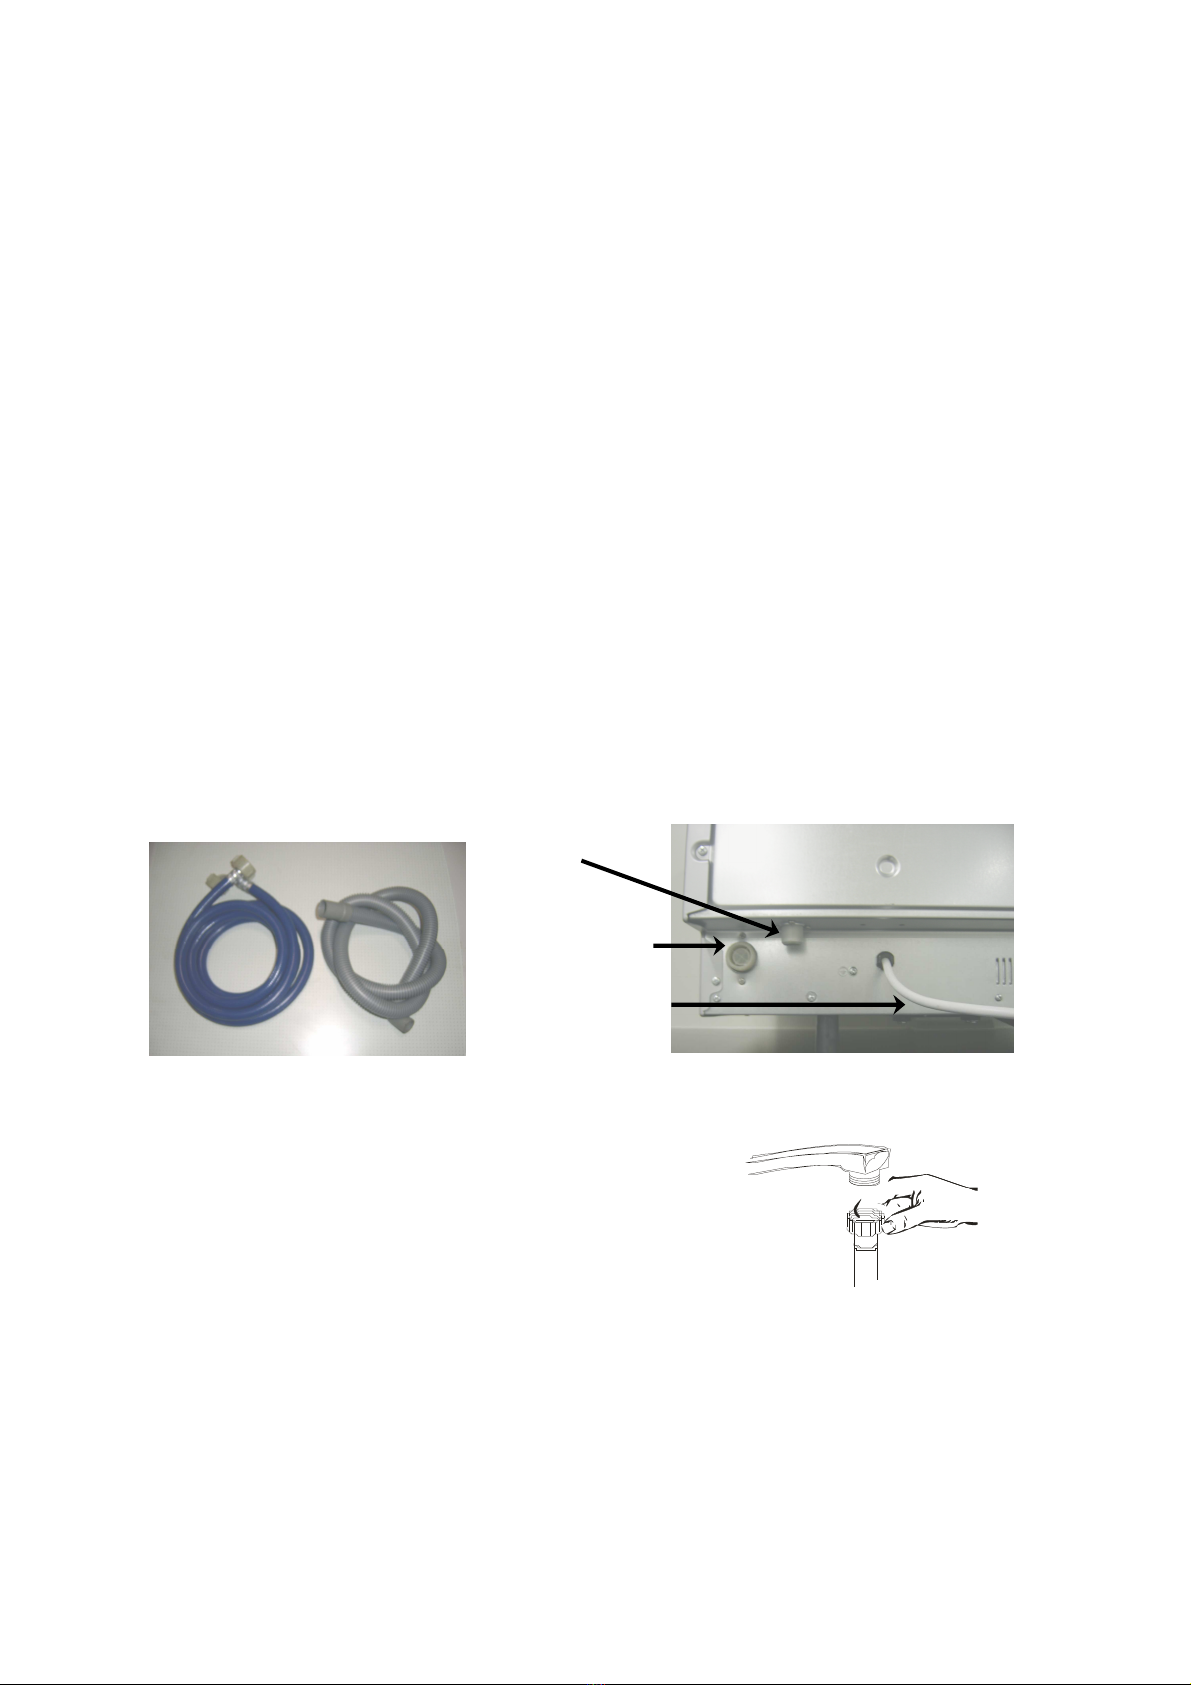
3. The water inlet hose from the machines terminates in a ¾” female connector. The water supply should
therefore terminate in a similar male connector and should have a stopcock close by in the pipe. It is
recommended to connect the machine to a hot water supply securely. Connect the other end of the drain
hose to the drain connection at the back of the dishwasher cabinet. Do not over tighten the connection as
this may cause damage to the threads.
4. Make a hooked end at the end of the drain hose with the plastic U-bend fitting (provided). The hooked end
should be dropped into a drainage standpipe between 30cm and 100cm from the floor level. The diameter of
the standpipe should be at least 3cm. Connect the other end of drain hose to the drain connection at the
back of the dishwasher cabinet. Tighten the drain hose end on to the drain port using the metal clip included
in the packaging.
5. Slowly open the water line and check for any signs of leaks. If any leaks are found, immediately shut off
the water supply and check the hose connections fully. Tighten connections if necessary. If you are unable to
stop the leak yourself please contact a qualified plumber.
Drain Hose
Connector
Inlet valve
Power cord
Inlet hose and Drain hose Back view
Alternative Installation
You may be able to connect the water inlet hose to the kitchen tap
if this tap has an external or internal thread.
Connect the water supply hose to a threaded ¾” connector and make
sure that it is secured tightly in place.
IMPORTANT: Once you open the water supply line, (even if it is closed immediately thereafter), the inlet
hose will be pressurized.
Disconnecting Your Dishwasher
1. Close the water supply at the stopcock.
2. Disconnect the power supply from the mains electric power outlet.
3. Disconnect the inlet hose assembly from the water supply.
4. When disposing of any appliances always remove the door and the plug.
- 4 -
Water Pressure
For best operating results, incoming water pressure should be between 0.03 ~1Mpa. It is important to
maintain the water supply. The water inlet hose will be pressurized during the washing cycle.
For Best Results
Your dishwasher cleans by spraying a mixture of hot clean water and detergent against the soiled surfaces
of the dishes. The water is pumped through a rotating spray arm, drained through a filter removing food and
soiled particles and pumped back through the spray arm.
Soiled water is pumped out and replaced with clean water at the end of each cycle (the number of times
depends on the programme being used).
For best cleaning results, the water temperature must be at least 45-55 °C. To prevent dishwasher dama ge,
the temperature of the incoming water supply should not exceed 60°C.
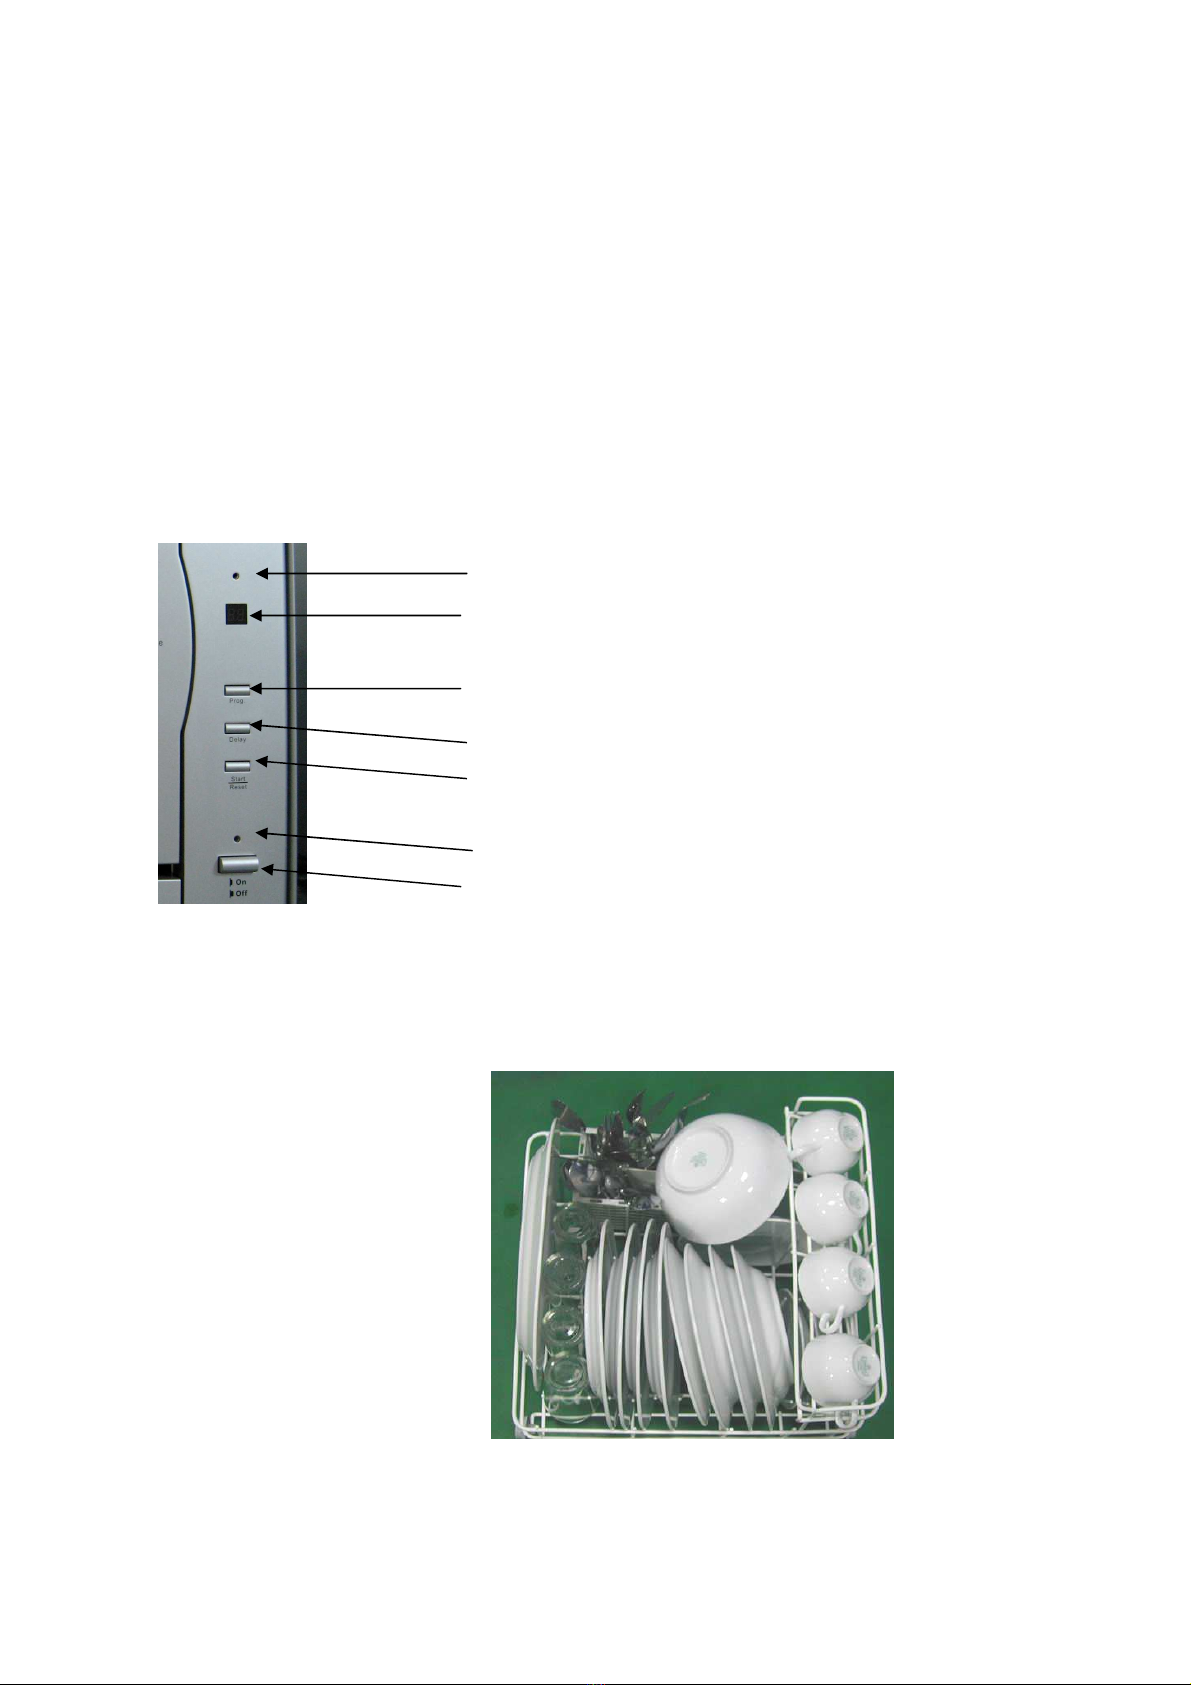
Control Panel
Salt Refill Indicator Light
Display Window
Program
Delay Start
Program Start/Reset
Power Indicator light
Power On / Off
Loading the Dishwasher
The dishwasher is designed to carry a standard “4 piece” plate setting consisting of the following:
●4 Dinner Plates
●4 Soup Plates
●4 Dessert dish
●4 Saucers
●4 Cups
●4 Tea spoons
●1 Oval platter
●1 Small serving
●1 Dish
●4 Glasses
●4 Soup Spoons
●4 Forks
●4 Knives
●4 Dessert Spoons
●2 Serving Spoons
●1 Serving Fork
●1 Gravy ladle
NOTE: For ease of loading/unloading large size dinner plates from the dish rack, it may be necessary to
temporarily remove the silverware basket. When loading/unloading is complete, return the silverware basket
to its original position.

- 5 -
Using Your Dishwasher
Ensure that you scrape off all solid food particles from dishes. Remove excessive quantities of oil or grease.
Empty any liquids from glasses and cups.
Please note that dishes with dried-on foods are more difficult to wash and may not come clean in a normal
wash cycle.
IMPORTANT: Use only detergent specifically made for use in dishwashers.
Using the 3 in 1 Program
Your dishwasher has a 3 in 1 program which needs not salt and rinse aid but a 3 In1Dishwasher tablet. This
dishwasher comes with a 3 in 1 tablet container.
Note: Only 3 in 1 program uses 3 in 1 tablet. If using 3 in 1 tablet in other programs, the appliance will not
achieve the best performance.
1. Hang the 3 in 1 tablet container on the basket.
2. Put the 3 in 1 tablet into the container then start the 3 in 1 program.
Using a Rinse Aid Agent
Using a rinse aid can help prevent water marks on dishes and
glassware and also reduce drying time.
A rinse agent is specially formulated to rinse away food
and detergent residues that can be left behind on your
dishes. Used regularly, a rinse agent will automatically provide
you with cleaner dishes every time you wash.
To fill the rinse agent dispenser unscrew the dispenser cap
located on the inner door. Add the rinse agent slowly into the
container until it just reaches the bottom of the filling cap inside
the dispenser opening. Replace the cap.
The dispenser automatically releases the rinse agent into the final rinse water at the end of the wash cycle.
The dispenser holds approximately 100 ml of rinse agent.
How to Use the Water Softener
The hardness of the water varies from place to place.
If hard water is used in the dishwasher, deposits will be formed
on the dishes and utensils. This appliance is equipped with a
water softener which uses a salt specifically designed to eliminate
the minerals from the water.
IMPORTANT: Only dishwasher salt can be used in this appliance.
How to Load the Salt into the Softener
●To unscrew the cap from the softener turn in an anti-clockwise direction, the salt container is located on the
right hand side of the inner tub.
●When filling for the first time pour half a pint of water in to the salt container.
●Load 500g of salt into the salt container. This will last for approximately 30 full wash loads.
●Fill the salt into the salt container until a small amount of water comes out. This is very important when
you use the dishwasher for the first time. When you have added all the 500 grams of salt and water still does
not come out add a little more water. The salt indicator light will go out after a few wash cycles.
●Screw the cap back carefully.
Please Note: Load the salt before the beginning of wash cycle so as to prevent corrosion to the tub.
Using the Intensive Wash Program
The Intensive wash feature gives you the option of washing and drying dishes at very high water
temperatures. When activated, the intensive wash feature energizes a heating element that will raise and
maintain the internal water temperature of the dishwasher at 69ºC.

- 6 -
Operating Instructions
1. Make sure the inlet and drain hoses are correctly and securely connected.
2. Press the door release button to open the door.
3. Check to make sure that the filter is in the right position.
4. Place the dishes on the dish rack and cutlery inside the cutlery basket.
5. Check to make sure that the rotating spray arm can turn freely all the way round. If necessary
remove any obstacles.
6. Fill the detergent in the recessed area on inner door panel. 12 grams could be added approximately
for a normal cycle. For pre-wash cycle you should not add detergent.
7. Close the door until you hear a ‘click’ sound.
8. Open the water supply.
9. Press the Power (On/Off) button.
10. The Power Indicator light will illuminate.
11. Select the desired program by press the program button. The program indicator light will light on.
P1 = Intensive Wash
P2 = Normal Wash
P3 = Rapid Wash
P4 = 3 in 1 Wash
P5 = Rinse
12. The appliance will run about 3 seconds later and the program light will flash during all the cycle.
13. At the end of the cycle the dishwasher will stop, the program light will stop flashing and the
dishwasher will beep for several seconds, then the light will go out .The power light will not be off
until the power (On/Off) button is switched off. The dishwasher is designed to stop if the door is
opened accidentally during the washing cycle.
14. You may select another program during operation by pressing the Program Start/Reset button and
hold for 3 seconds to cancel the program current program. Then press the Program button to the
desired program.
15. After washing, dishes should be allowed to cool down for about 15 minutes so that they are not too
hot to handle. Dishes will cool quicker if the door is opened slightly
16. After unloading the dishwasher, remove the filter, clean off any bits of food, and put the filter back in
its position.
Delay Start
You can delay the start of the washing cycle for up to 24 hours. One press of the ‘Delay Start’ button will
delay the start for 1 hour.
IMPORTANT
Do not open the door when dishwasher is running. The door could be allowed to open after pressing the
pause button.
At the beginning of each cycle, the dishwasher always starts in the “drain” mode. This is because the drain
pump always retains a small amount of water (in the sump) from the previous cycle. This is necessary to
keep the pump primed. Therefore, do not be alarmed if you see a small amount of water being pumped-out
from the drain hose prior to the start of the regular wash cycle.
For the drain system to operate properly, the highest
distance between the drain hose and the base of the
dishwasher should not exceed 15 cm (6 inches).
The free end of drain hose must not be in water
waste pipe

- 7 -
Program Summary / Selection
Intensive Wash
Water Temperature: Wash 54°C / Rinse 69 °C
Programme Duration + Heating Time: 125 minutes
Water Consumption: 10.4 Litres
Normal wash
Water Temperature: Wash 52°C / Rinse 67°C
Programme Duration + Heating Time: 130 minutes
Water Consumption: 10.4 Litres
Rapid wash
Water Temperature: Wash 49°C / Rinse 55°C
Programme Duration + Heating Time: 70 minutes
Water Consumption: 9.6 Litres
3 in 1 Wash
Water Temperature: Wash 54°C / Rinse 69°C
Programme Duration + Heating Time: 120 minutes
Water Consumption: 10.4 Litres
Rinse
Water Temperature: Incoming Water Supply
Programme Duration Time: 12 minutes
Water Consumption: 5.4 Litres
Please Note: Washing times may vary depending on the temperature of the incoming water and the environment temperature.
Troubleshooting
Problem Possible Causes Possible Solutions
Dishwasher not receiving
Electrical power. Check the dishwasher is plugged in and
switched on at the mains power supply.
Dishwasher will not start Door is unlatched. Close and latch door.
Arrange dishes so spray action reaches all
surfaces.
Improper loading Do not overload dishwasher.
Spray arm not rotating freely Check spray arm to make sure nothing (i.e.
cutlery) is obstructing spray arm rotation.
Check if filter screen has become dislodged
and obstructing spray arm rotation.
Use more dishwasher detergent.
Do not use detergent that is hard or cracked.
Not enough detergent and / or
improper detergent being used.
Use only dishwasher detergent.
Improperly prepared dishes. Excess food soil and liquids should be
removed from dishes before loading.
Water inlet hose kinked / bent due
to improper installation. Eliminate kink or bend from Inlet hose.
Dishes are not clean
The filter lose its position Ensure that the filter in the correct position.
Chipping or breaking glassware Improper loading of dishes. Do not overload dish rack. Load glasses on
the bottom rack only.
A small amount of water (in sump
area) is normal.
This is necessary to keep the pump primed
and is drained automatically at the beginning
of each cycle.
Water remains in bottom of
dishwasher Excessive amount of water, cycle
not completed. Allow dishwasher to complete full cycle.
Pump is blocked. Use clean water to clear the filter and water
sump by running a normal washing cycle.
Keeps draining water Too high water level Checking if there is something wrong with
inlet valve

- 8 -
Error Code
Your dishwasher has an error code indicator function. If the appliance falls into a certain malfunction, the
corresponding error code will be shown in the display window.
Code Meaning Possible Cause
E1 Longer inlet time Water supply is not open.
E2 Longer drain time The installation position of the drain pipe is too high.
E3 Longer heating time Malfunction of the temperature sensor or of the heating element.
E4 Abnormal water level Too much inlet water.
DISPOSAL INFORMATION
Do not dispose of electrical appliances as unsorted municipal waste, use separate collection facilities.
Contact your local government for information regarding the collection systems available. If electrical
appliances are disposed of in landfill or dumps, hazardous substances can leak into the groundwater and get
into the food chain, damaging your health and well-being.
GUARANTEE
This product carries a 1 Year Guarantee from the date of purchase. Should you experience any problems
with your Igenix appliance please contact our Customer Service Department on 01473 271 272.
Distributed by Pik-a-Pak Home Electrical
38 Bluestem Road, Ransomes Europark
Ipswich, IP3 9RR
Tel: 01473 271 272
Table of contents


