Igloo FR834B User manual

Refrigerator / Freezer
Réfrigérateur / Congélateur
User Manual
Model # FR832 FR834B
Guide de l’Utilisateur
Modéle # FR832 FR834B
Quality nInnovation nStyle

SAFETY PRECAUTIONS
WARNING: Read all of the instructions before using this appliance.
When using this appliance, always exercise basic safety
precautions, including the following:
NOTE: If the refrigerator/freezer has been placed in a horizontal or
tilted position for any period of time wait 24 hours before
plugging the unit in.
1) Use this appliance only for its intended purpose as described in this use
and care guide.
2) This refrigerator/freezer must be properly installed in accordance with
the installation instructions before it is used. See grounding instructions
in the installation section.
3) This refrigerator/freezer should not be recessed or built-in an enclosed
cabinet. It is designed for freestanding installation only.
4) Never unplug your refrigerator/freezer by pulling on the power cord.
Always grasp the plug firmly and pull straight out from the outlet.
5) Repair or replace immediately, all electric service cords that have
become frayed or otherwise damaged. Do not use a cord that shows
cracks or abrasion damage along its length, the plug or the connector
end.
6) If your old refrigerator/freezer is not being used, we recommend that
you remove the doors. This will reduce the possibility of danger to
children.
7)
WARNING:
After your refrigerator/freezer is in operation, do not
touch the cold surfaces in the freezer compartment,
particularly when hands are damp or wet. Skin may
adhere to these extremely cold surfaces.
8) Do not refreeze foods, which have been thawed completely. The United
States Department of Agriculture in Home and Garden Bulletin No. 69
reads: "…You may safely refreeze frozen foods that have thawed if
they still contain ice crystals or if they are still cold-below 40°F".
"…Thawed ground meats, poultry, or fish that have any off-odor or
offcolor should not be refrozen and should not be eaten. Thawed ice
cream should be discarded. If the odor or color of any food is poor or
questionable, discard it. The food may be dangerous to eat."
1

2
"…Even partial thawing and re-freezing reduce the eating quality of
foods, particularly fruits, vegetables, and prepared foods. The eating
quality of red meats is affected less than that of many other foods. Use
refrozen foods as soon as possible, to save as much of they’re
eating quality as you can."
9) Do not use any electrical device or any sharp instrument in defrosting
your refrigerator.
10) Unplug your refrigerator/freezer before cleaning or before making any
repairs.
Note: If for any reason this product requires service, we strongly
recommend that a certified technician perform service.
11) Do not operate your refrigerator in the presence of explosive fumes.
SAVE THESE INSTRUCTIONS
DANGER
Risk of child entrapment. Before you throw away your old
refrigerator or freezer, take off the doors. Leave the shelves
in place so that children may not easily climb inside.
English
Staple your receipt to your manual.
You will need it to obtain warranty service.
Thank you for purchasing our
product. This easy-to-use manual
will guide you in getting the best
use of your appliance.
Remember to record the model and
serial number. They are on a label
in back of the appliances.
Model number
Serial number
Date of purchase

English
TABLE OF CONTENTS
Safety Precautions........................................................................ 1
Parts And Features ....................................................................... 3
Installation Instructions ................................................................ 4
Unpacking Your Refrigerator ............................................................... 4
Leveling Your Refrigerator ................................................................... 4
Proper Air Circulation......................................................................... 4
Electrical Requirements ....................................................................... 4
Door Alignment ................................................................................. 5
Reversing the Door............................................................................. 5
Refrigerator Features and Use .................................................... 7
General Features ............................................................................... 7
Refrigerator Interior Shelves................................................................. 7
Using Dispense-A-Can™..................................................................... 7
Crisper ............................................................................................. 7
Defrosting Your Refrigerator ................................................................ 8
Food Storage Information .................................................................. 8
Normal Operating Sounds.................................................................. 9
Proper Refrigerator Care and Cleaning...................................... 9
Cleaning and Maintenance................................................................. 9
Light Bulb Replacement.....................................................................10
Power Interruptions........................................................................... 10
Vacations and Moving Care..............................................................10
Troubleshooting ..........................................................................11

3
1. Interior Light
2. Temperature Control
3. Refrigerator Shelves
4. Crisper
5. Front Leveling Legs
6. Refrigerator Door Shelves
7. "Dispense-A-Can™" Storage
8. Freezer Door Shelf
9. Ice Cube Tray
10. Ice Scraper
English
Parts And Features
910
1
2
7
8
46
3
5

4
English
Installing Your Refrigerator
Unpacking Your Refrigerator
1. Remove all packaging material. This includes the foam base and all adhesive
tape holding the refrigerator accessories inside and outside.
2. Inspect and remove any remains of packing, tape or printed materials before
powering on the refrigerator.
Leveling Your Refrigerator
• Your refrigerator has two leveling legs which are located in the front bottom
corners of your refrigerator. After properly placing your
refrigerator in its final position, you can level your refrigerator.
• Leveling legs can be adjusted by turning them counterclockwise to raise your
refrigerator or by turning them clockwise to lower your refrigerator. The
refrigerator door will close easier when the leveling legs are extended.
Proper Air Circulation
• To ensure your refrigerator works at the maximum efficiency it was designed for,
you should install it in a location where there is proper air circulation, plumbing
and electrical connections.
• The following are recommended clearances around the refrigerator:
Sides……………3/4" (19mm)
Top....................2" (50mm)
Back..................2" (50mm)
WARNING: ELECTRICAL REQUIREMENT - SHOCK HAZARD
Electrical Requirement
• Make sure there is a suitable power outlet (120 volts, 15 amps outlet) with proper
grounding to power the refrigerator.
• Avoid the use of three prong adapters or cutting off the third grounding prong
in order to accommodate a two prong outlet. This is a dangerous practice since
it provides no effective grounding for the refrigerator and may result in shock
hazard.
WARNING: USE OF EXTENSION CORDS- POTENTIAL SAFETY
HAZARD
Use of Extension Cords
• Avoid the use of an extension cord because of potential safety hazards under
certain conditions. If it is necessary to use an extension cord, use only a 3-wire
extension cord that has a 3-blade grounding plug and a 3-slot outlet that will
accept the plug. The marked rating of the extension cord must be equal to or
greater than the electrical rating of the appliance. DO NOT USE EXTENSION
CORD LONGER THAN 12 FT.

Installation Limitations
• Do not install your refrigerator in any location not properly insulated or heated,
e.g. garage, etc. Your refrigerator was not designed to operate in temperature
settings below 55˚ Fahrenheit.
• Select a suitable location for the refrigerator on a hard even surface away
from direct sunlight or heat source, e.g. radiators, baseboard heaters, cooking
appliances, etc. Any floor unevenness should be corrected with the leveling legs
located on the front bottom corners of the refrigerator.
Door Alignment
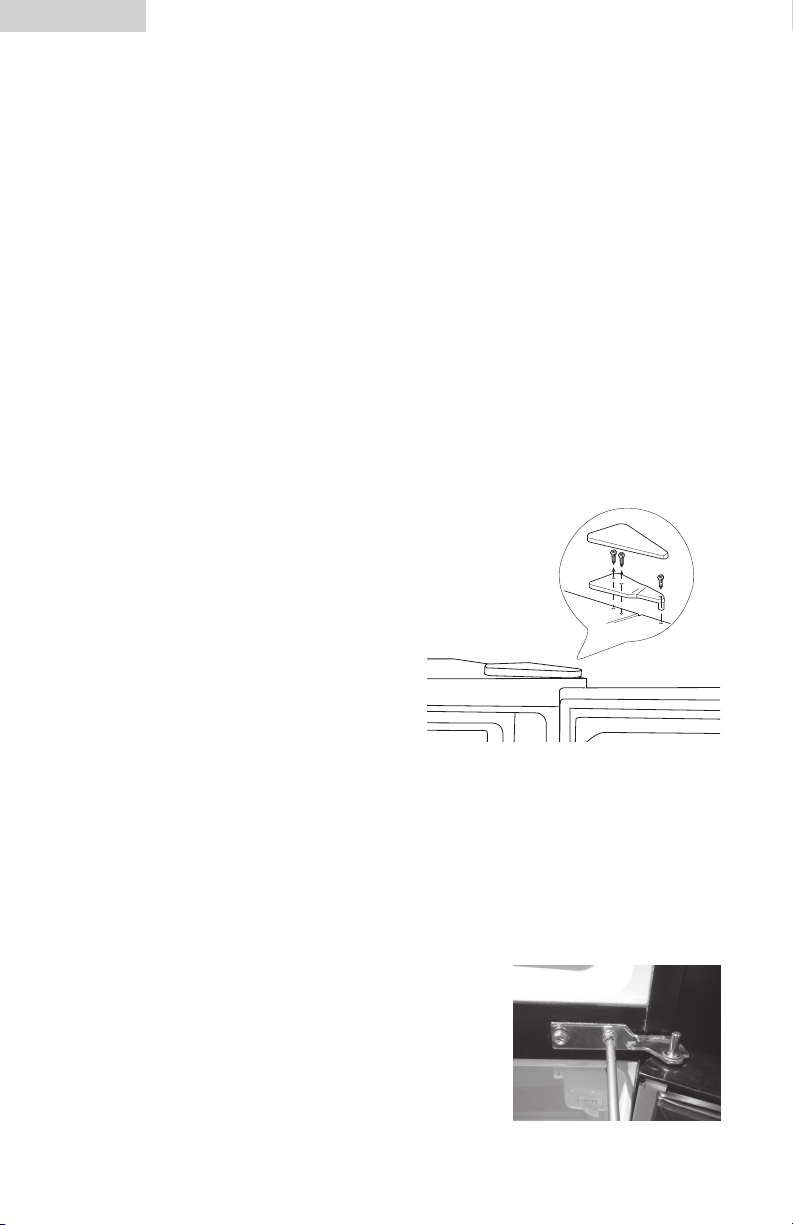
Freezer Door: (see fig. #1)
1. Remove the top hinge cover.
2. Loosen the top hinge screws using a phillips head screwdriver.
3. Adjust the door or put a spacer in between and then tighten the screws.
4. Replace the top hinge cover.
Reversing the Door (See Fig. #4)
1. Remove the top hinge cover. (See Fig. #1)
2. Using Phillips Head Screwdriver, loosen and remove the
screws holding the top hinge in place.
3. Remove top hinge and carefully lift off the
freezer door.
4. Remove the screw hole plugs from the
opposite side and insert the plugs in the
screw hole openings of the just removed
screws.
5. Open refrigerator Door and unscrew 2 screws from the center hinge bracket
while holding the open door in place. (See Fig. #2)
6. Remove bracket and lift off refrigerator door
7. While doors are removed unscrew the door stoppers and reinsert on opposite
side of door. (See Fig. #3)
8. Remove the screw hole plugs from the opposite side and insert the plugs in the
screw hole openings of the just removed screws.
9. Remove any loose items in the refrigerator and
carefully tilt refrigerator and lean against wall.
Remove both leveling legs and place in a secure
area.
10. Loosen the screws holding the lower hinge bracket
to the refrigerator door and remove screws and
bracket. Remove leveling leg
1
0
2
3
4
5
6
7
5
English
Fig. #1
Fig. #2

6
English
11. Remove screws from the other side and insert
in the previously removed screw holes. Remove
leveling leg.
12. Remove door pin by turning counter clockwise
and reinsert to the underside of the bracket and
tighten.
13. Align bracket and insert (2) remaining screws
into the holes provided . Tighten all the way.
Replace leveling legs and place refrigerator in
upright position.
14. Replace washers and cap over pin. Align hole in
the refrigerator door with the door pin and gently
push down until firm.
15. Insert pin from center hinge bracket into
refrigerator door hole and align center hinge
bracket holes to the screw holes in the cabinet.
16. Insert 2 screws and tighten.
17. Place washers on the center hinge bracket pin
and align the freezer door holes and insert into pin.
18. Replace screws on the top hinge cover, align door and tighten screws.
19. Replace top hinge cover.
Fig. #3
Fig. #4
Hole Plugs Door Axis
Hole Cover
Hole Plugs
Tall Leg Tall Leg
Screws
Screws
Short Leg
Bottom
Hinge
Middle
Hinge

7
English
Refrigerator Features And Use General Features
Adjustable temperature dial:
Your refrigerator will automatically maintain the temperature level you select.
The temperature control dial has 7 settings plus 0. 1 is the warmest. 7 is the
coldest. Turning the dial to 0 Stops cooling in both the refrigeration and freezer
sections. At first, set the dial to 4 and allow 24 hours to pass before adjusting the
temperature to your needs.
(Note: If the refrigerator has been placed in a horizontal or tilted position for
any period of time wait 24 hours before plugging the unit in.)
Freezer Compartment / Use of the Ice Cube Trays
This compartment is designed for making ice cubes and for short-term food stor-
age (a few days at most).
WARNING: This compartment is not cold enough to freeze foods safely
for more than 5 days.
• If ice cube tray freezes to the bottom of the compartment, pour a little
warm water around it to loosen it. Do not use boiling water, which can
damage plastic parts, or sharp metal objects such as a knife or screw-
driver, which can damage the cooling system tubing. Wash the ice
cube tray in lukewarm water only. Do not wash in the dishwasher.
Refrigerator Interior Shelves
To remove or replace a full-width
slide-out shelf:
(see fig. # 5)
1. Gently tilt the shelf up and slide
forward until the shelf has been
completely removed.
2. To replace the shelf, gently slide the
shelf back.
Using the Dispense-A-Can™
• Your refrigerator is equipped with the convenient “Dispense-
A-Can™” compartment. Each compartment will hold up to six
cans. Simply load the cans from the top. To dispense a can,
simply draw one out from the bottom. It is that easy.
Crisper
• Your refrigerator has a clear crisper. Grasp the top of the
crisper and gently slide our. Push back to replace.
fig. # 5
fig. # 6

English
8
Defrosting Your Refrigerator
• For maximum energy efficiency, defrost freezer
section whenever frost accumulates to a
thickness of 1/4" or more on freezer walls.
Note that frost tends to accumulate more
during the summer months.
• To defrost freezer, remove food and ice cube tray from the freezer section. Turn
temperature control dial to OFF position. Defrosting may take a few hours. To
speed up defrost time, keep the door open and place a bowl of warm water in
the freezer.
• During the defrost, water will accumulate. Use a towel to wipe off excess
dripping water. Do not leave unattended.
• After defrosting, empty and wipe down the interior of the freezer. You may now
reset your refrigerator to the desired temperature and return food.
• Your freezer has been equipped with an ice scraper for your convenience.
Food Storage Information
Fresh Food
• When storing fresh food that is not prepackaged, be sure to wrap or store food
in airtight and moisture proof material unless otherwise noted. This will ensure
proper shelf life and prevent the transfer of odors and tastes.
• Wipe containers before storing to avoid needless spills.
• Eggs should be stored in an upright position in their original carton to maximize
shelf life.
• Fruit should be washed and dried, then stored in sealed plastic bags before
storing in the refrigerator.
• Vegetables with skins should be stored in plastic bags or containers.
• Leafy vegetables should be washed and drained and then stored in plastic bags
or containers.
• Hot food should be allowed to cool before storing in the refrigeration. This will
prevent unnecessary energy use.
• Fresh seafood should be used the same day as purchased.
• When storing meats in the fresh food section, keep in the original packaging or
rewrap as necessary. Follow the suggestions below for safe storage:
• Chicken 1-2 Days
• Ground Beef 1-2 Days
• Cold Cuts 3-5 Days
• Steaks/Roasts 3-5 Days
• Smoked/Cured Meats 7-10 Days

9
English
Frozen Food
• Proper freezer storage requires correct packaging. All foods must be in
packages, which do not allow the flow of air or moisture in, or out. Improper
storage will result in odor and taste transfer and will result in the drying out of
the improperly packaged food.
• Follow package or container instructions for proper storage.
• Packaging Recommendations:
Plastic containers with air tight lids
Heavy duty aluminum foil
Plastic wrap made from saran film
Self-sealing plastic bags
• Do not refreeze defrosted/thawed foods.
• It is recommended that the freezing date be marked on the packaging.
Normal Operating Sounds You May Hear
• Boiling water, gurgling sounds or slight vibrations that are the result of
the refrigerant circulating through the cooling coils.
• The thermostat control will click when it cycles on and off.
Proper Refrigerator Care and Cleaning
Cleaning and Maintenance
WARNING: To avoid electric shock, always unplug your
refrigerator before cleaning. Ignoring this warning
may result in death or injury.
CAUTION: Before using cleaning products, always read and
follow manufacturer’s instructions and warnings to
avoid personal injury or product damage.
General: Prepare a cleaning solution of 3-4 tablespoons of baking soda
mixed with warm water. Use sponge or soft cloth, dampened
with the cleaning solution, to wipe down your refrigerator.
• Rinse with clean warm water and dry with a soft cloth.
• Do not use harsh chemicals, abrasives, ammonia, chlorine
bleach, concentrated detergents, solvents or metal scouring
pads. Some of these chemicals may dissolve, damage and/or
discolor your refrigerator.
Door Gaskets: Clean door gaskets every three months according to general
instructions. Gaskets must be kept clean and pliable to assure a
proper seal
• Petroleum jelly applied lightly on the hinge side of gaskets will
keep the gasket pliable and ensure a good seal.

10
English
Light Bulb Replacement
1. Switch off power to refrigerator.
2. Gently pull out the clear cover
3. Replace with same type light bulb rated at 10 watts.
4 . Push the clear cover back into place.
Power Interruptions
• Occasionally there may be power interruptions due to thunderstorms or
other causes. Remove the power cord from AC outlet when a power outage
occurs. When power has been restored, replug power cord to AC outlet.
If outage is for a prolonged period, inspect and discard spoiled or thawed
food in freezer and refrigerator. Clean refrigerator before reusing.
WARNING: IF OUTAGE IS FOR A PROLONGED PERIOD, INSPECT
AND DISCARD SPOILED OR THAWED FOOD IN
FREEZER AND REFRIGERATOR. CLEAN REFRIGERATOR
BEFORE REUSING.
Vacation and Moving Care
• For long vacations or absences, empty food from refrigerator and
freezer, move the temperature DIAL to the OFF position and clean the
refrigerator and door gaskets according to "General cleaning" section.
Prop doors open, so air can circulate inside.When moving always move
the refrigerator vertically. Do not move with the unit lying down. Possible
damage to the sealed system could occur.

Refrigerator does not operate:
• Check if thermostat control is not in the “0” position.
• Check if refrigerator is plugged in.
• Check if there is power at the AC outlet, by checking the circuit breaker.
Food temperature appears too warm:
• Frequent door openings.
• Allow time for recently added warm food to reach fresh food temperature.
• Check gaskets for proper seal.
• Adjust temperature control to colder setting.
Food temperature is too cold:
• If temperature control setting is too cold, adjust to a warmer setting and allow
several hours for temperature to adjust.
Refrigerator runs too frequently:
• This may be normal to maintain constant temperature during high temperature
and humid days.
• Doors may have been opened frequently or for an extended period of time.
• Check gasket for proper seal.
• Check to see if doors are completely closed.
Moisture build up on interior or exterior of the refrigerator:
• This is normal during high humidity periods.
• Prolonged or frequent door openings.
• Check door gaskets for proper seal.
Refrigerator has an odor:
• Interior needs cleaning.
• Foods improperly wrapped or sealed are giving off odors.
Refrigerator door does not shut properly:
• Level the refrigerator.
• Re-align refrigerator door.
• Check for blockages, e.g. food containers, crisper cover,shelves, bins, etc.
11
English
Troubleshooting

12
English
Popping or cracking sound when the compressor comes on:
• Check to ensure the refrigerator is level.
• The floor may be uneven or weak. The refrigerator rocks on the floor when it is
moved slightly. Be sure the floor can adequately support the refrigerator. Level the
refrigerator by putting wood or metal shims under part of the refrigerator.
• The refrigerator is touching the wall. re-level the refrigerator and move it from the
wall. See the “Installing Your Refrigerator” section.
Refrigerator light does not work
• Check power supply.
• Tighen bulb in socket.
• Replace burned out bulb.

1
Français
CONSIGNES GÉNÉRALES DE SECURITÉ
ATTENTION: Lire l’ensemble des instructions avant d’utiliser
l’appareil. Lors de l’utilisation de cet appareil,
prendre toutes les mesures de sécurité de base, y
compris les suivantes:
REMARQUE: Si le réfrigérateur a été placé en position horizontale ou
en position inclinée, que ce soit pour longtemps ou non,
attendez 24 heures avant de brancher l’appareil.
1) N’utiliser cet appareil que pour l’usage prévu, tel que décrit dans ce
guide d’utilisation et d’entretien.
2) Ce réfrigérateur doit être correctement installé, conformément aux
instructions d’installation avant d’être utilisé. Voir les instructions de
mise à la terre dans la section Installation.
3) Ce réfrigérateur ne doit être ni encastré, ni enclos dans un placard. Il
est uniquement conçu pour être installé tel qu’il se présente.
4) Ne jamais tirer sur le cordon d’alimentation pour débrancher le réfri-
gérateur. Toujours saisir fermement la fiche et la tirer tout droit hors de
la prise.
5) Réparer ou remplacer immédiatement tout cordon électrique effiloché
ou autrement endommagé. Ne pas utiliser un cordon fissuré, abrasé
ou dont la prise ou le connecteur est endommagé.
6) Si un ancien réfrigérateur n’est pas utilisé, nous recommandons d’en
retirer les portes afin de réduire le danger qu’il peut représenter pour
les enfants.
7) ATTENTION:
Une fois le réfrigérateur en fonctionnement, ne pas
toucher les surfaces froides du congélateur,
particulièrement avec des mains mouillées ou
humides. La peau peut adhérer à ces surfaces
extrêmement froides.
8) Ne pas recongeler les aliments qui ont été complètement décongelés.
Le bulletin maisons et jardins du ministère de l’agriculture des États-
Unis no. 69 stipule : « ..Les aliments congelés peuvent être recongelés
en toute sécurité s’ils contiennent toujours des cristaux de glace ou si
leur température est toujours inférieure à 4,5 °C (40 °F) ».
« …Les viandes hachées, la volaille et le poison présentant une odeur
ou une couleur suspecte ne doivent être ni recongelés, ni mangés.
La crème glacée dégelée doit être jetée. Tout aliment présentant une
odeur ou couleur douteuse doit être jeté cas son ingestion pourrait être
dangereuse.»

« …La décongélation ou la recongélation, même partielle réduit la quali
é gustative des aliments, en particulier des fruits, légumes et plats pré-
parés. La qualité gustative des viandes rouge est beaucoup moins affec-
tée que celle de nombreux autres aliments. Utiliser les aliments recongelés
dès que possible, afin de conserver un maximum de leur qualité gustat-
ive. »
9) Ne pas utiliser d’appareils électriques ou d’objets acérés pour dégivrer le
réfrigérateur.
10) Débrancher le réfrigérateur avant de le nettoyer ou d’effectuer toute
réparation. Remarque: si, pour une raison quelconque, ce produit devait
être dépanné, nous recommandons vivement de confier le travail à un
technicien certifié.
11) Ne pas utiliser le réfrigérateur en présence d’émanations explosives.
VEUILLEZ CONSERVER CES
INSTRUCTIONS
DANGER
Les enfants pourraient se retrouver coincés dans votre
réfrigérateur ou congélateur usagé avant que vous ne
puissiez vous en débarrasser. Retirer les portes. Laisser les
étagères en place de manière à ce que les enfants ne
puissent pas grimper facilement à l’intérieur.
Français
Agrafer le ticket de caisse au guide. Il devra être présenté pour tout
service après-vente sous garantie.
2

Français
TABLE OF CONTENTS
CONSIGNES GÉNÉRALES DE SECURITÉ......................................... 1
Parts And Features ....................................................................... 5
Installation du Réfrigérateur ....................................................... 6
Désemballage du Réfrigérateur............................................................ 6
Mise á Niveau du Réfrigérateur........................................................... 6
Circulation d’Air Adéquate ................................................................. 6
Caractéristiques Electriques................................................................. 6
Alignement de la Porte ....................................................................... 7
Changement de l’orientation de la porte .............................................. 7
Caractéristiques du Réfrigératuer et Utilisati............................. 9
Cadran de température réglable:......................................................... 9
Clayettes Intérieures ........................................................................... 9
Distributeur de Boîtes Dispense-A-Can™ ............................................... 9
Bac à légumes................................................................................... 9
Dégivrer votre réfrigérateur ............................................................... 10
Aliments Frais.................................................................................. 10
Bruits de fonctionnement normal que vous pouvez entendre.................. 11
Nettoyage et Maintenance ........................................................11
Nettoyage et Maintenance................................................................ 11
Remplacement de l’ampoule..............................................................12
Coupures de Courant ....................................................................... 12
Vacances et Déménagement.............................................................. 13
Dépannage.................................................................................. 14

5
Français
Piéces et Caractéristiques
1. Lumière intérieure
2. Contrôle de température
3. Étagères de réfrigérateur
4. Pac à légumes
5. Jambes de mise à niveau avant
6. Étagères de porte de réfrigérateur
7. "Dispense-A-Can™" Mémoire
8. Étagère de porte de congélateur
9. Bac à glaçons
10. Racleur de glace
910
1
2
7
8
46
3
5

6
Français
Installation du Réfrigérateur
Désemballage du Réfrigérateur
1. Retirer l’ensemble du matériel d’emballage. Ceci comprend la base en mousse
ainsi que l’ensemble du matériel adhésif qui maintient les accessoires du
réfrigérateur à l’intérieur tout comme à l’extérieur.
2. Inspecter et enlever tout restant d’emballage, de scotch ou de
matériaux imprimés avant de brancher le réfrigérateur.
Mise á Niveau du Réfrigérateur
• Your refrigerator has two leveling legs which are located in the front bottom
corners of your refrigerator. After properly placing your
refrigerator in its final position, you can level your refrigerator.
• Leveling legs can be adjusted by turning them counterclockwise to raise your
refrigerator or by turning them clockwise to lower your refrigerator. The
refrigerator door will close easier when the leveling legs are extended.
Circulation d’Air Adéquate
• Pour être sûr que le réfrigérateur fonctionne à son maximum d’efficacité, l’installer
dans un environnement favorable à une bonne circulation d’air et possédant des
connexions de plomberie et d’électricité saines.
• Les indications suivantes concernent l’espace recommandé autour du réfrigérateur:
Latéralement...................19mm (3/4")
Partie supérieure.............50mm (2")
Arrière...........................50 mm (2")
ATTENTION: EXIGENCES ÉLECTRIQUES – RISQUE DE CHOC
ÉLECTRIQUE
Caractéristiques Electriques
• Pour l’alimentation du réfrigérateur, veiller à utiliser une prise de courant
convenable (prise de 120 volts,15 amp) raccordée à la terre.
• Eviter d’utiliser des adaptateurs à trois fiches ou de sectionner la troisième
fiche reliée à la terre dans le but d’utiliser un branchement à deux fiches. Cette
pratique pourrait s’avérer dangereuse dans la mesure où le réfrigérateur n’est pas
relié convenablement à la terre, et risquerait de causer des risques d’électrocution.
ATTENTION: UTILISATION DE RALLONGES – RISQUE DE
DANGER POTENTIEL
Utilisation de Rallonges
• Éviter d’utiliser une rallonge électrique car, dans certains cas, cela peut entraîner
des risques pour la santé. S’il est nécessaire d’utiliser une rallonge, utiliser
uniquement une rallonge possédant une fiche male à deux broches plus terre à
une extrémité et une prise femelle de même type à l’autre extrémité. La capacité
électrique de la rallonge doit être égale ou supérieure à la capacité de l’appareil.
N’UTILISEZ PAS DE RALLONGES D’UNE LONGUEUR SUPÉRIEURE À
12 PIEDS/3,65 MÈTRES.

7
Français
Limitations relatives à l’Installation
• Ne pas installer le réfrigérateur dans un endroit qui n’est pas
convenablement isolé ou chauffé; comme par exemple un garage, etc. Le
réfrigérateur n’est pas conçu pour fonctionner à des températures inférieures à
12°C.
• Choisir un endroit convenable et placer le réfrigérateur sur une surface solide et
plane, loin de sources de chaleur telles que: les radiateurs, les éléments chauffants
à plinthes, les cuisinières, etc. Toute irrégularité au sol doit être corrigée à l’aide
des pieds de mise à niveau situés sur les coins avant de la partie inférieure
du réfrigérateur.
Alignement de la porte
Porte du congélateur : (Voir figure 1)
1. Retirez le cache-charnière supérieur.
2. À l’aide d’un tournevis Phillips desserrez et retirez les vis d’attache de la
charnière supérieure.
3. Ajustez la porte ou placez un espaceur au milieu et serrez ensuite les vis.
4. Replacez le cache-charnière supérieur.
Changement de l’orientation de la porte
(Voir figure 4)
1. Retirez le cache-charnière supérieur. (Voir figure 1)
2. À l’aide d’un tournevis Phillips desserrez et
retirez les vis d’attache de la charnière
supérieure.
3. Retirez la charnière supérieure et
soulevez doucement la porte du
congélateur.
4. Retirez doucement les vis de charnière
du côté opposé et insérez-les dans les ouvertures des vis venant d’être retirés.
5. Ouvrez la porte du réfrigérateur et dévissez 2 vis du support de la charnière
centrale tout en maintenant la porte ouverte en place. (Voir fig. 2)
6. Retirez le support et soulevez la porte du réfrigérateur.
7. Quand les portes sont retirées, dévissez les vis d’obturation et réinsérez sur le côté
opposé de la porte. (Voir fig. 3)
8. Retirez les chevilles du trou des vis du côté opposé et insérez les chevilles dans les
ouvertures des vis retirés auparavant.
9. Retirez tout article du réfrigérateur et inclinez-le avec
précaution et placez-le contre un mur. Retirez les
deux pieds réglables et placez-les en lieu sûr.
10. Desserrez les vis d’attache du support de la
charnière inférieure à la porte du réfrigérateur
1
0
2
3
4
5
6
7
Fig. #1
Fig. #2
This manual suits for next models
1
Table of contents
Languages:
Other Igloo Refrigerator manuals

Igloo
Igloo FR100 User manual

Igloo
Igloo FR115 User manual

Igloo
Igloo FR170 User manual

Igloo
Igloo FR946 User manual

Igloo
Igloo FR102UK User manual

Igloo
Igloo TATIANA 1.0 T User manual

Igloo
Igloo FR280 User manual

Igloo
Igloo IRF26EBBK User manual

Igloo
Igloo FR171 User manual

Igloo
Igloo IGLOO FR1008 User manual