Ignis Pixel BubblePoi 16 User manual

Manual for LED digital poi
Ignis Pixel BubblePoi / JellyPoi 16/24
Contents
Controls
1
Weight adjustment
2
3Using as a juggling ball
4Charging
5Bluetooth connection to a cellphone
6Taking photos and videos with your poi
7Maintenance. Temperature recommendations
8Warranty
9Control scheme
Controls for BubblePoi
to
red
- -
green
blue
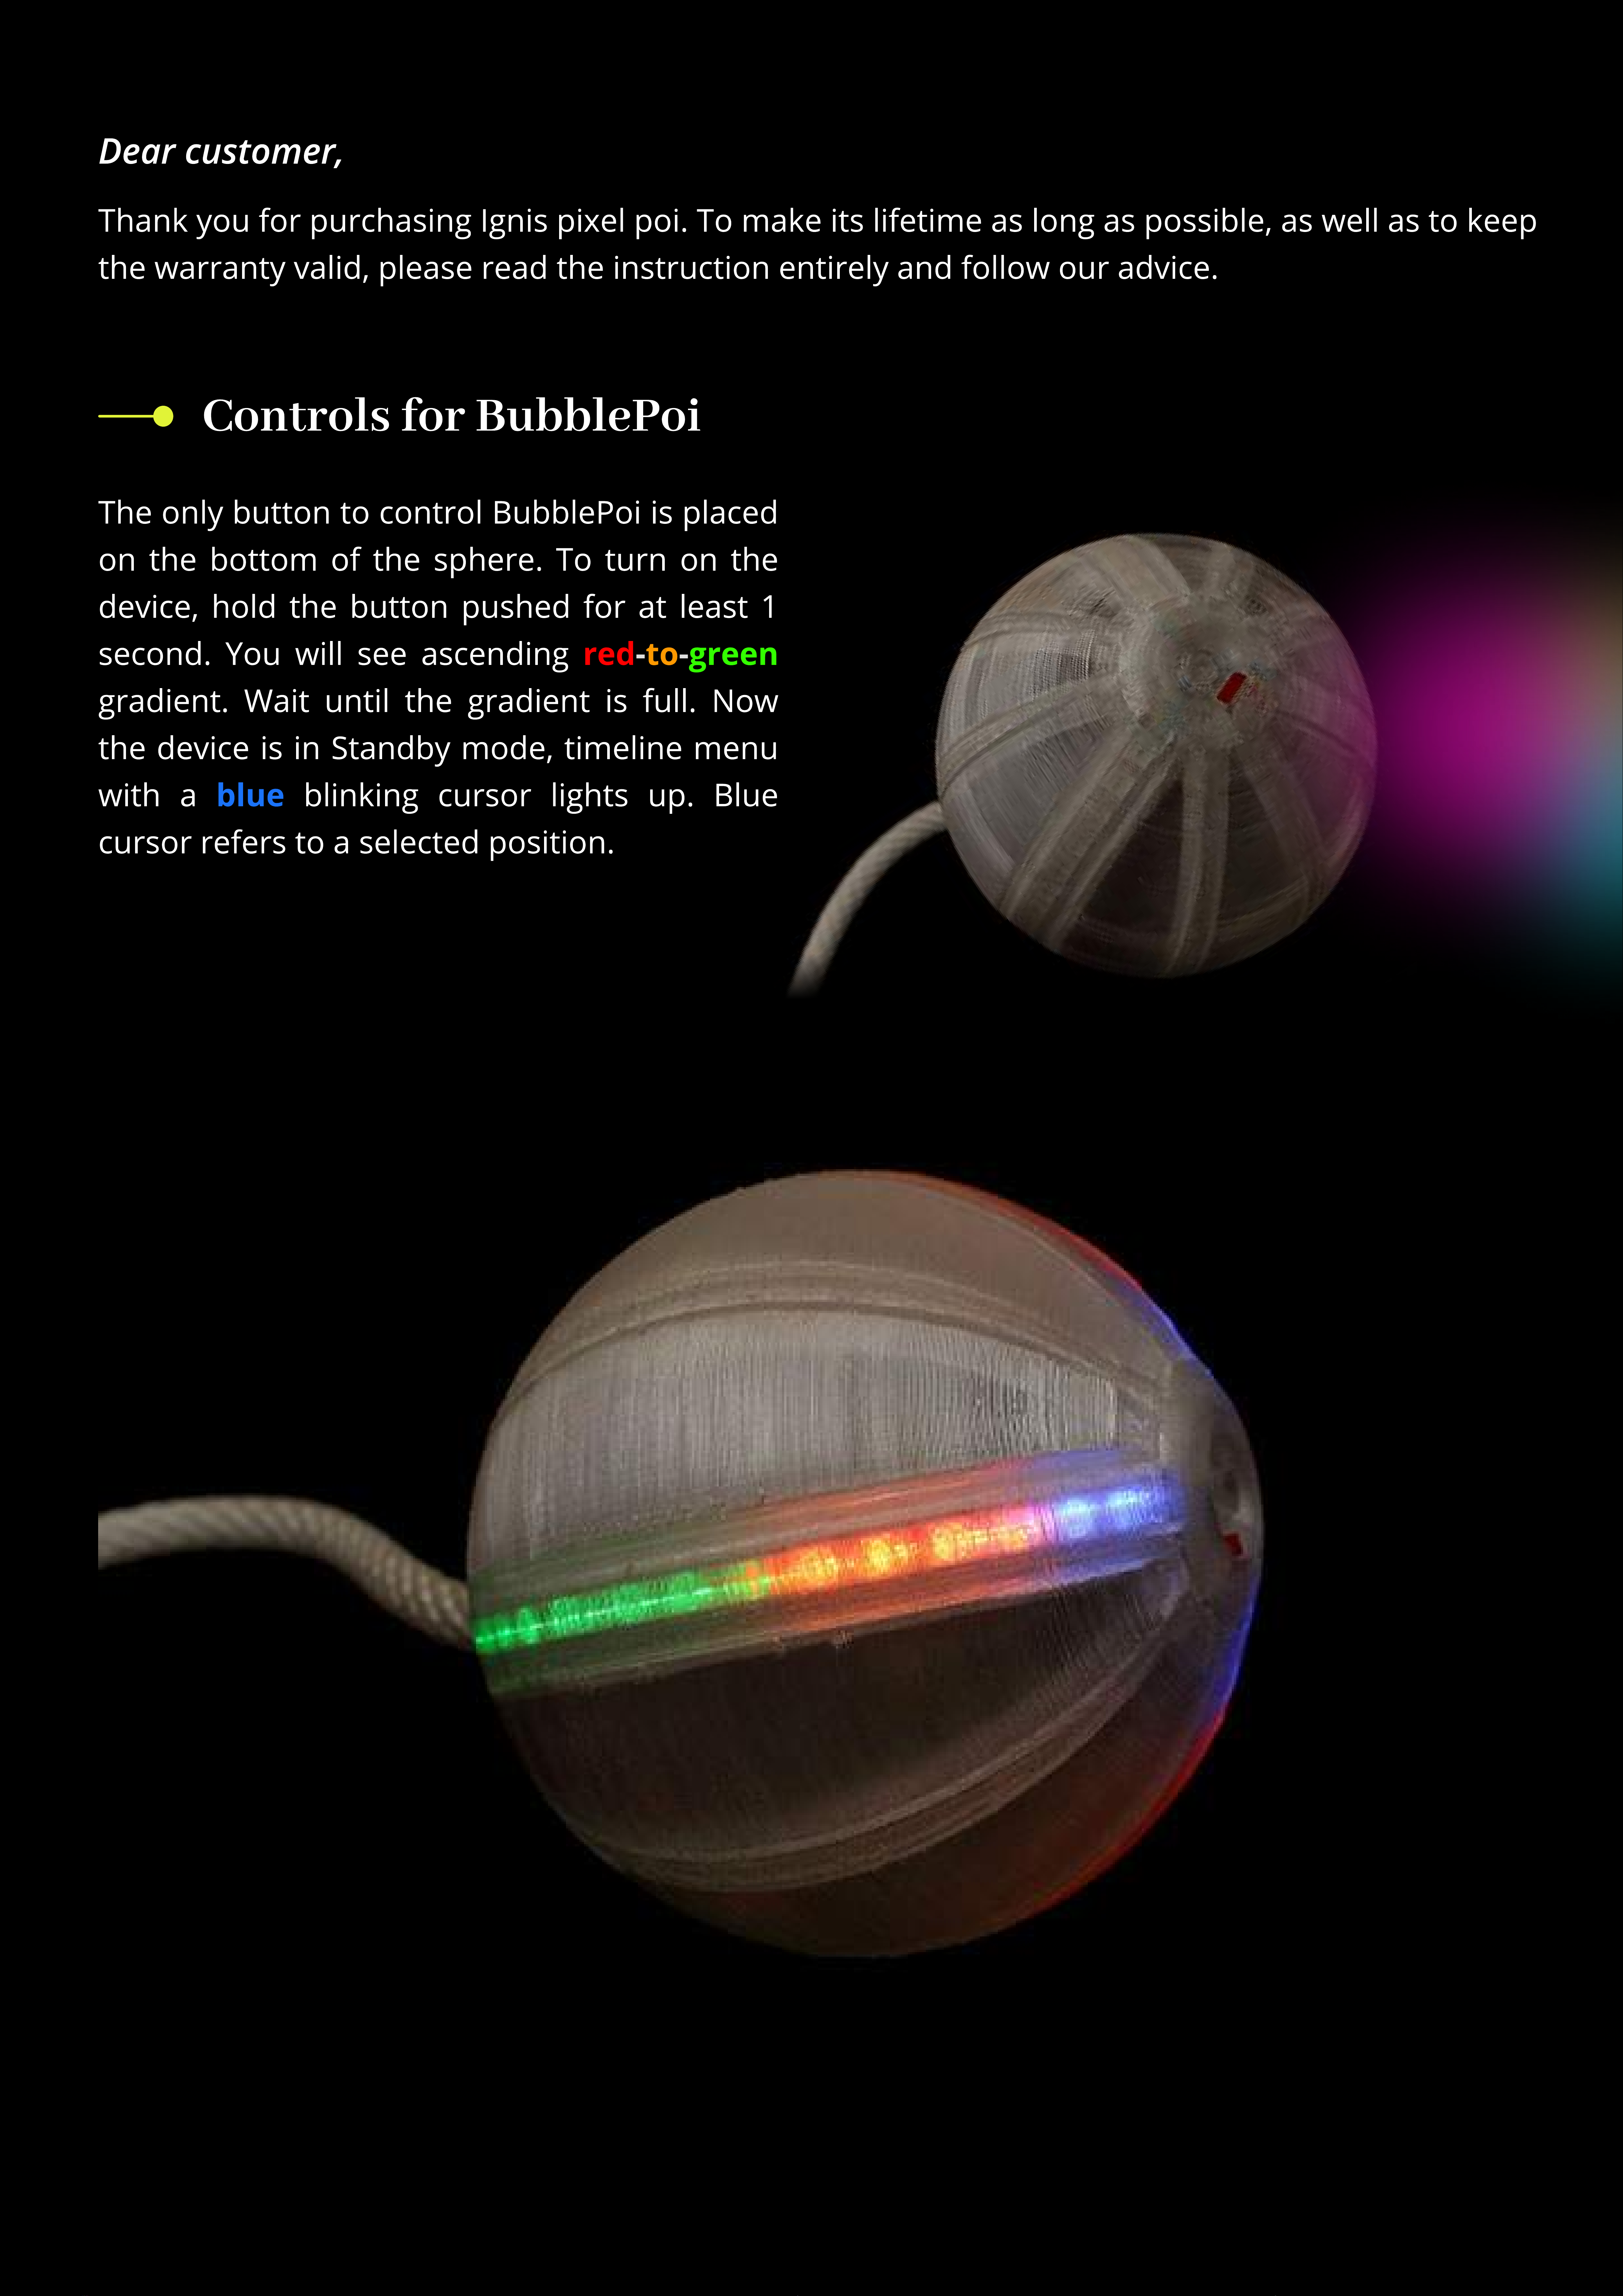
The only button to control BubblePoi is placed
on the bottom of the sphere. To turn on the
device, hold the button pushed for at least
second. You will see ascending
gradient. Wait until the gradient is full. Now
the device is in Standby mode, timeline menu
with a blinking cursor lights up. Blue
cursor refers to a selected position
Dear customer,
Thank you for purchasing Ignis pixel poi. To make its lifetime as long as possible, as well as to keep
the warranty valid, please read the instruction entirely and follow our advice.
Controls for JellyPoi
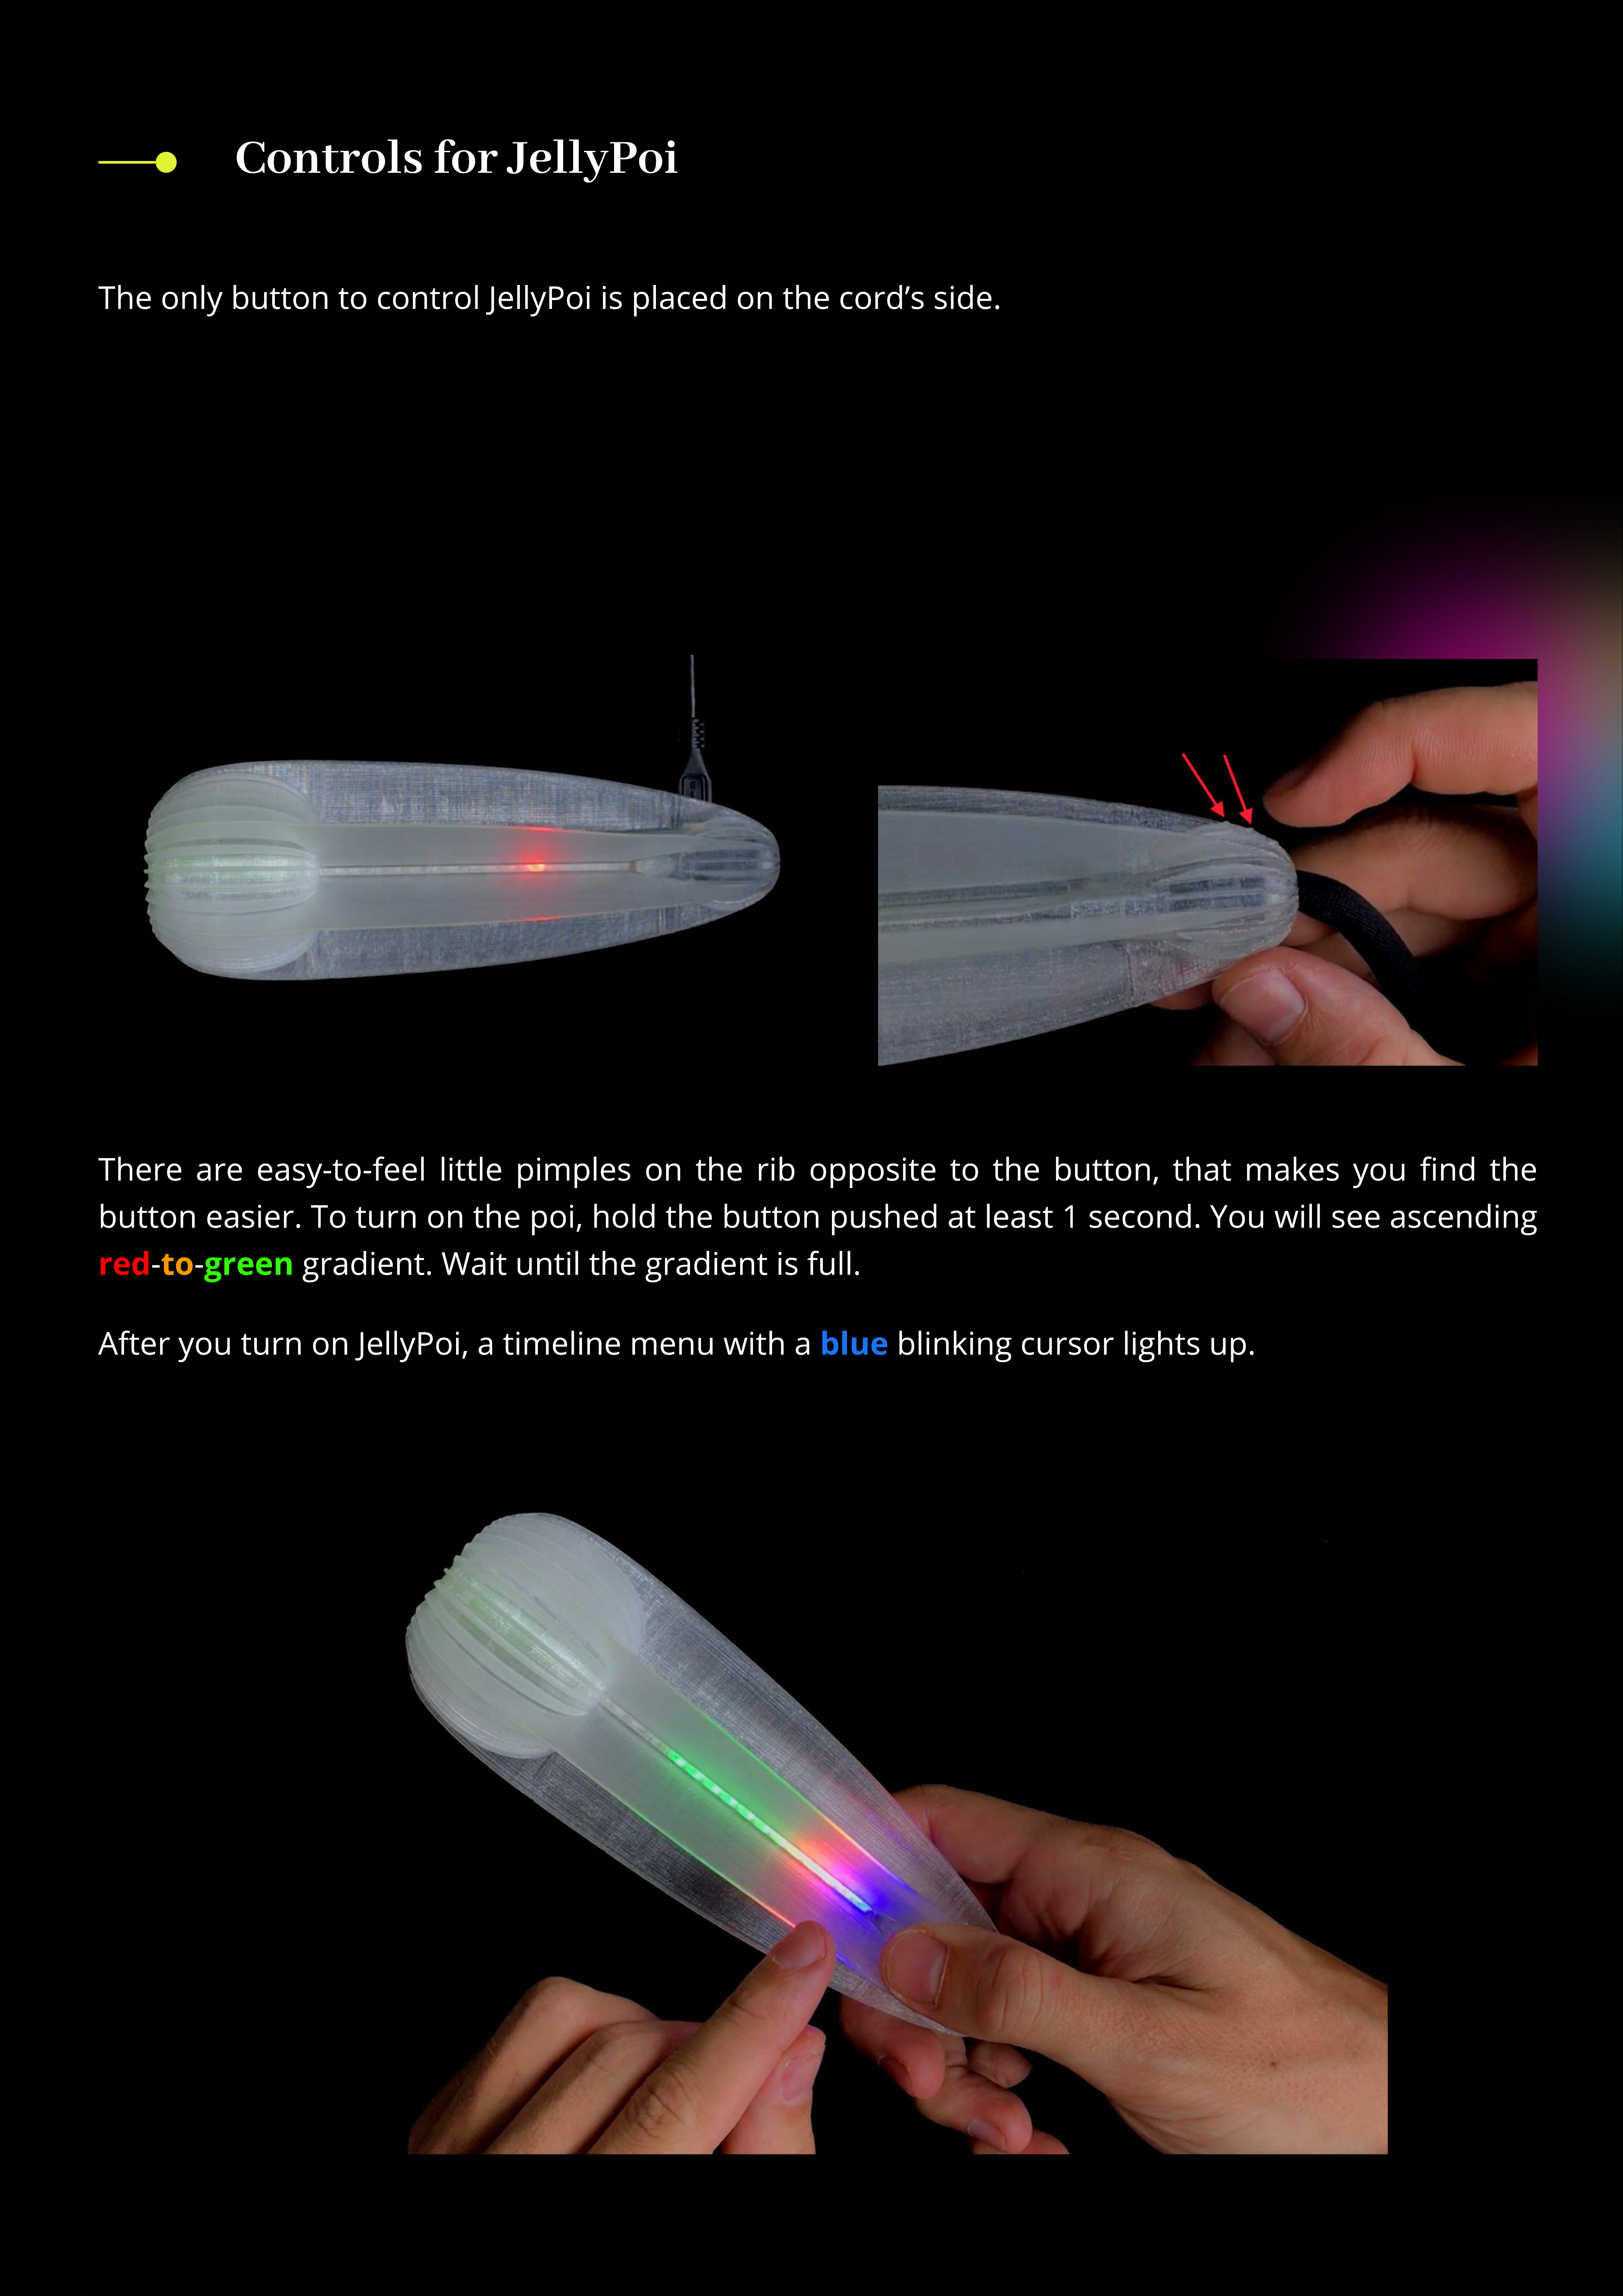
The only button to control JellyPoi is placed on the cord’s side.
to
red green
There are easy-to-feel little pimples on the rib opposite to the button, that makes you nd the
button easier. To turn on the poi, hold the button pushed at least 1 second. You will see ascending
- - gradient. Wait until the gradient is full.
blue
After you turn on JellyPoi, a timeline menu with a blinking cursor lights up.
orange green
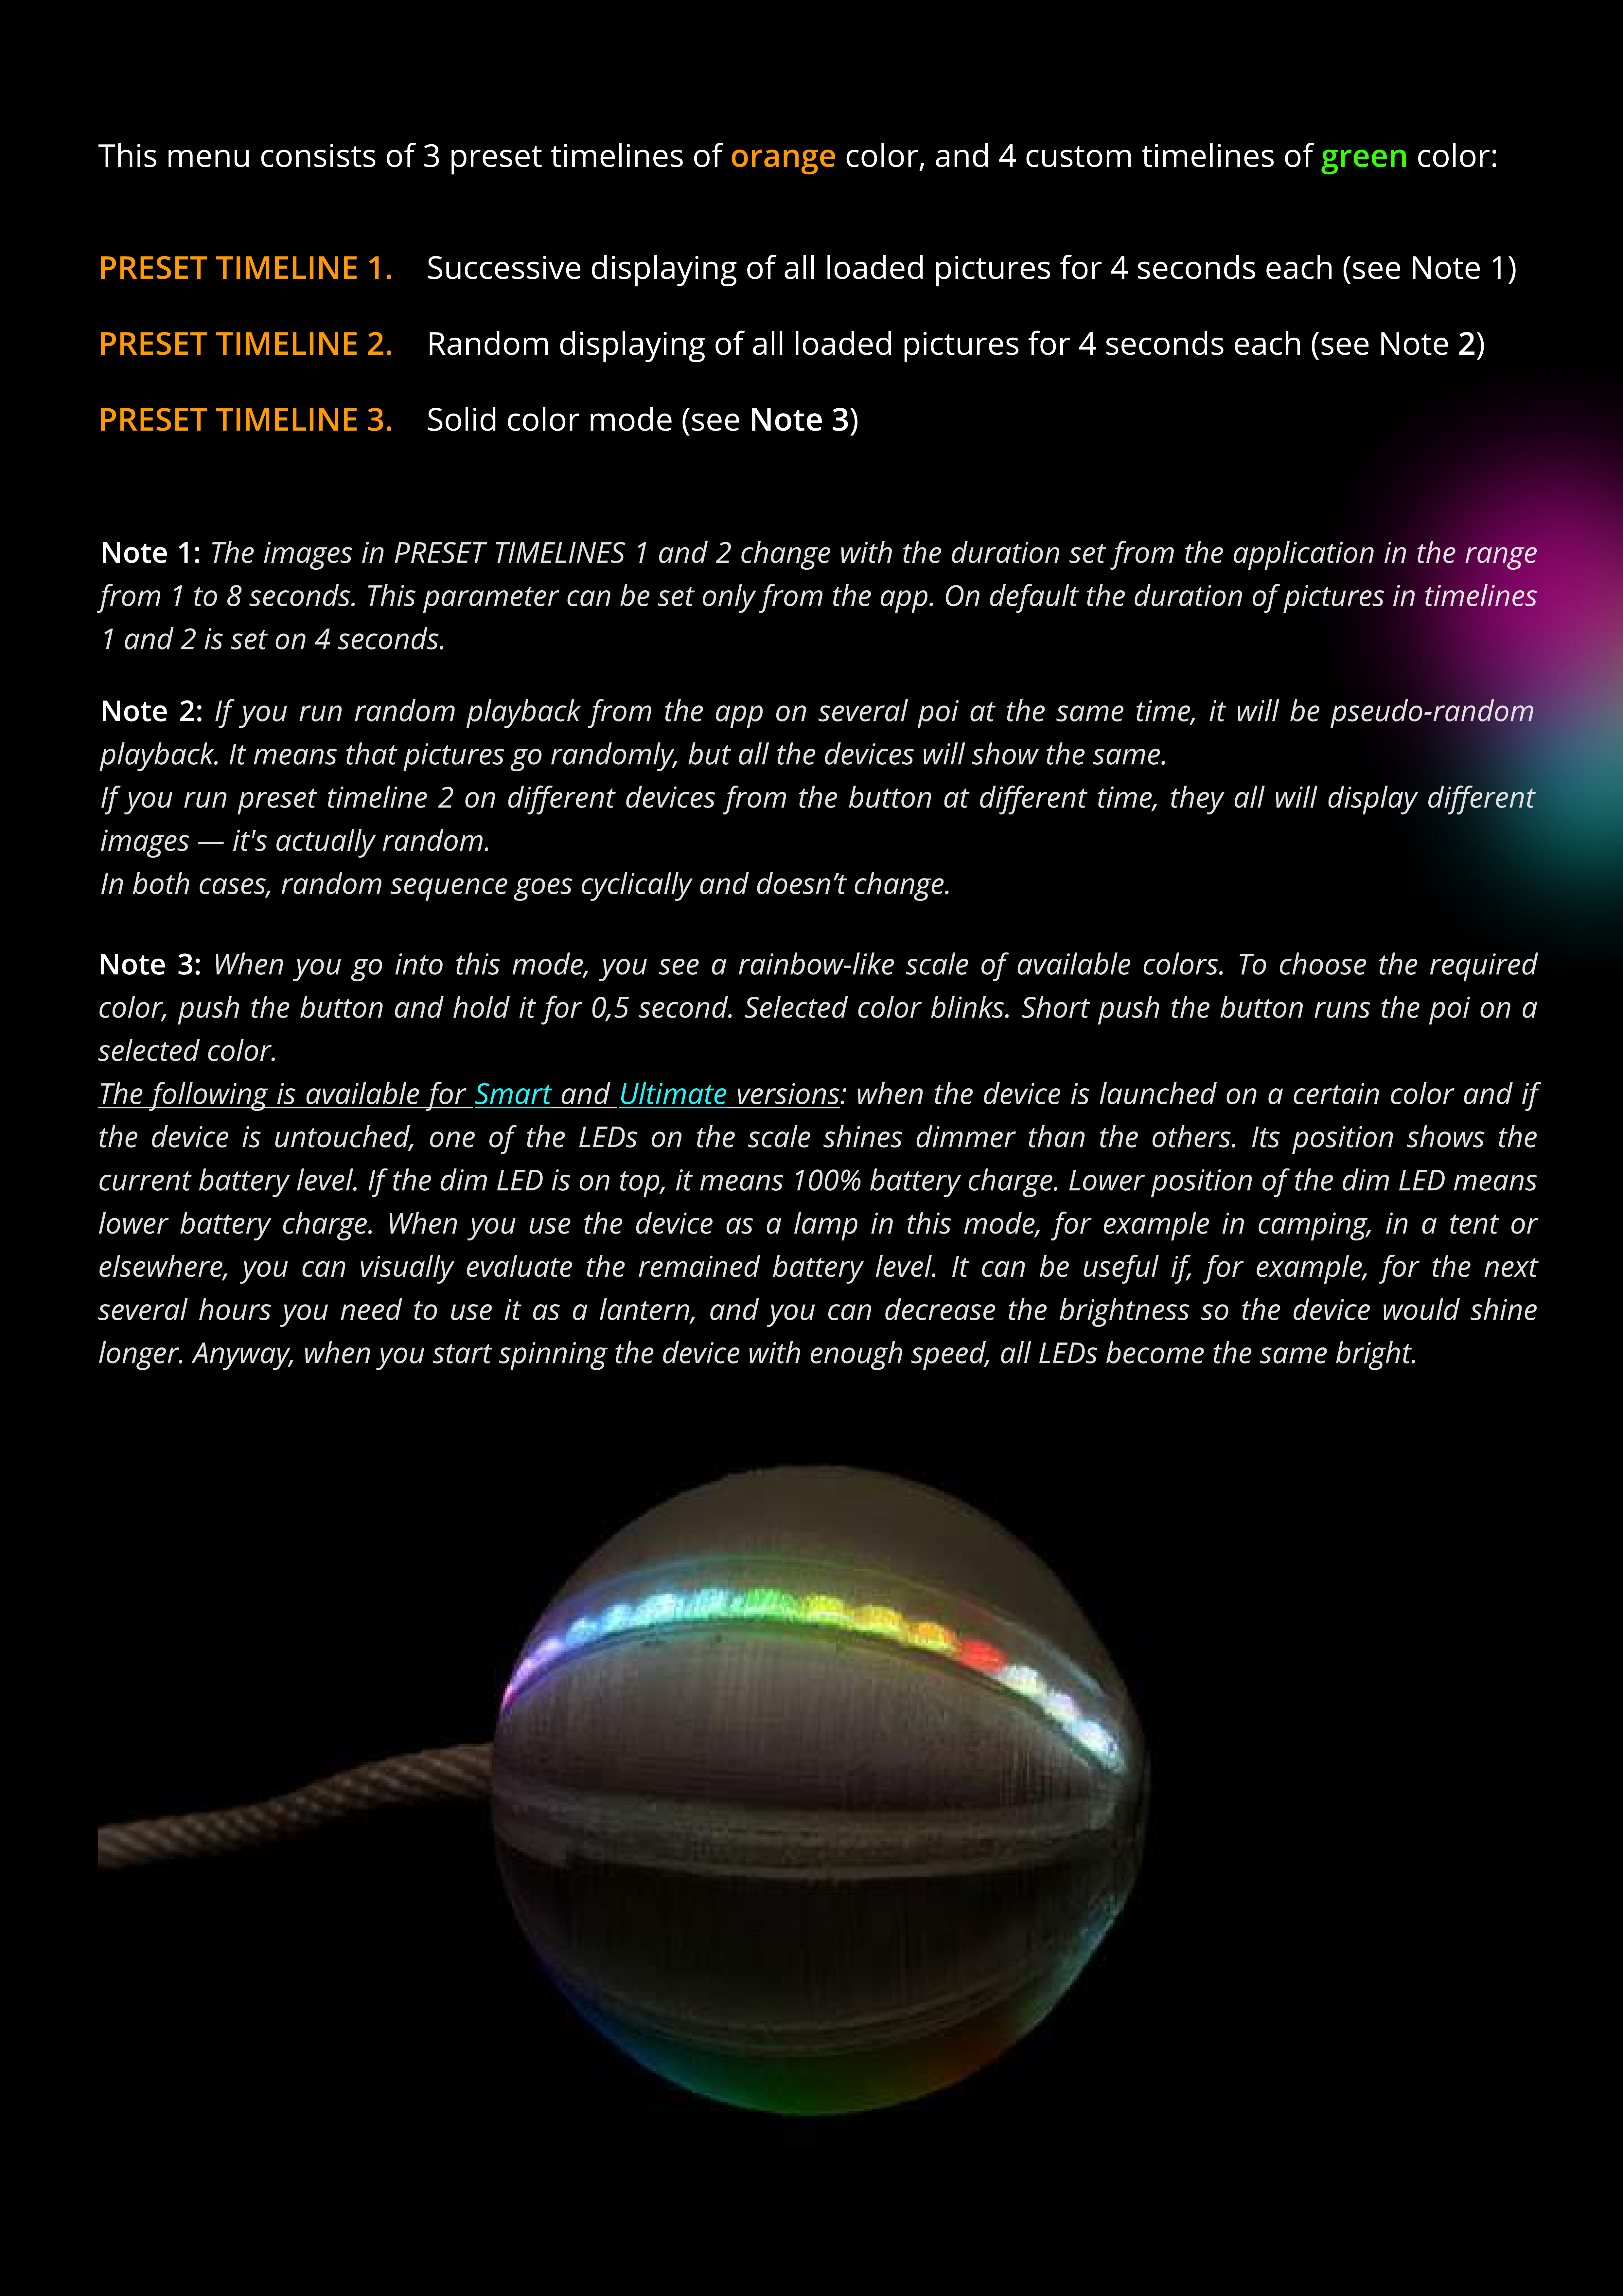
This menu consists of 3 preset timelines of color, and 4 custom timelines of color:
The images in PRESET TIMELINES 1 and 2 change ith the duration set from the application in the range
from 1 to 8 seconds. This parameter can be set only from the app. On default the duration of pictures in timelines
1 and 2 is set on 4 seconds.
Note 1:
If you run random playback from the app on several poi at the same time, it ill be pseudo-random
playback. It means that pictures go randomly, but all the devices ill sho the same
If you run preset timeline 2 on dierent devices from the button at dierent time, they all ill display dierent
images — it's actually random.
In both cases, random sequence goes cyclically and doesn’t change.
Note 2:
Smart Ultimate
When you go into this mode, you see a rainbo -like scale of available colors. To choose the required
color, push the button and hold it for 0,5 second. Selected color blinks. Short push the button runs the poi on a
selected color.
The follo ing is available for and versions: hen the device is launched on a certain color and if
the device is untouched, one of the LEDs on the scale shines dimmer than the others. Its position sho s the
current battery level. If the dim LED is on top, it means 100% battery charge. Lo er position of the dim LED means
lo er battery charge. When you use the device as a lamp in this mode, for example in camping, in a tent or
else here, you can visually evaluate the remained battery level. It can be useful if, for example, for the next
several hours you need to use it as a lantern, and you can decrease the brightness so the device ould shine
longer. Any ay, hen you start spinning the device ith enough speed, all LEDs become the same bright.
Note 3:
PRESET TIMELINE 1. Successive displaying of all loaded pictures for 4 seconds each (see Note 1)
PRESET TIMELINE 2. Random displaying of all loaded pictures for 4 seconds each (see Note 2)
PRESET TIMELINE 3. Solid color mode (see Note 3)
PRESET TIMELINE 3
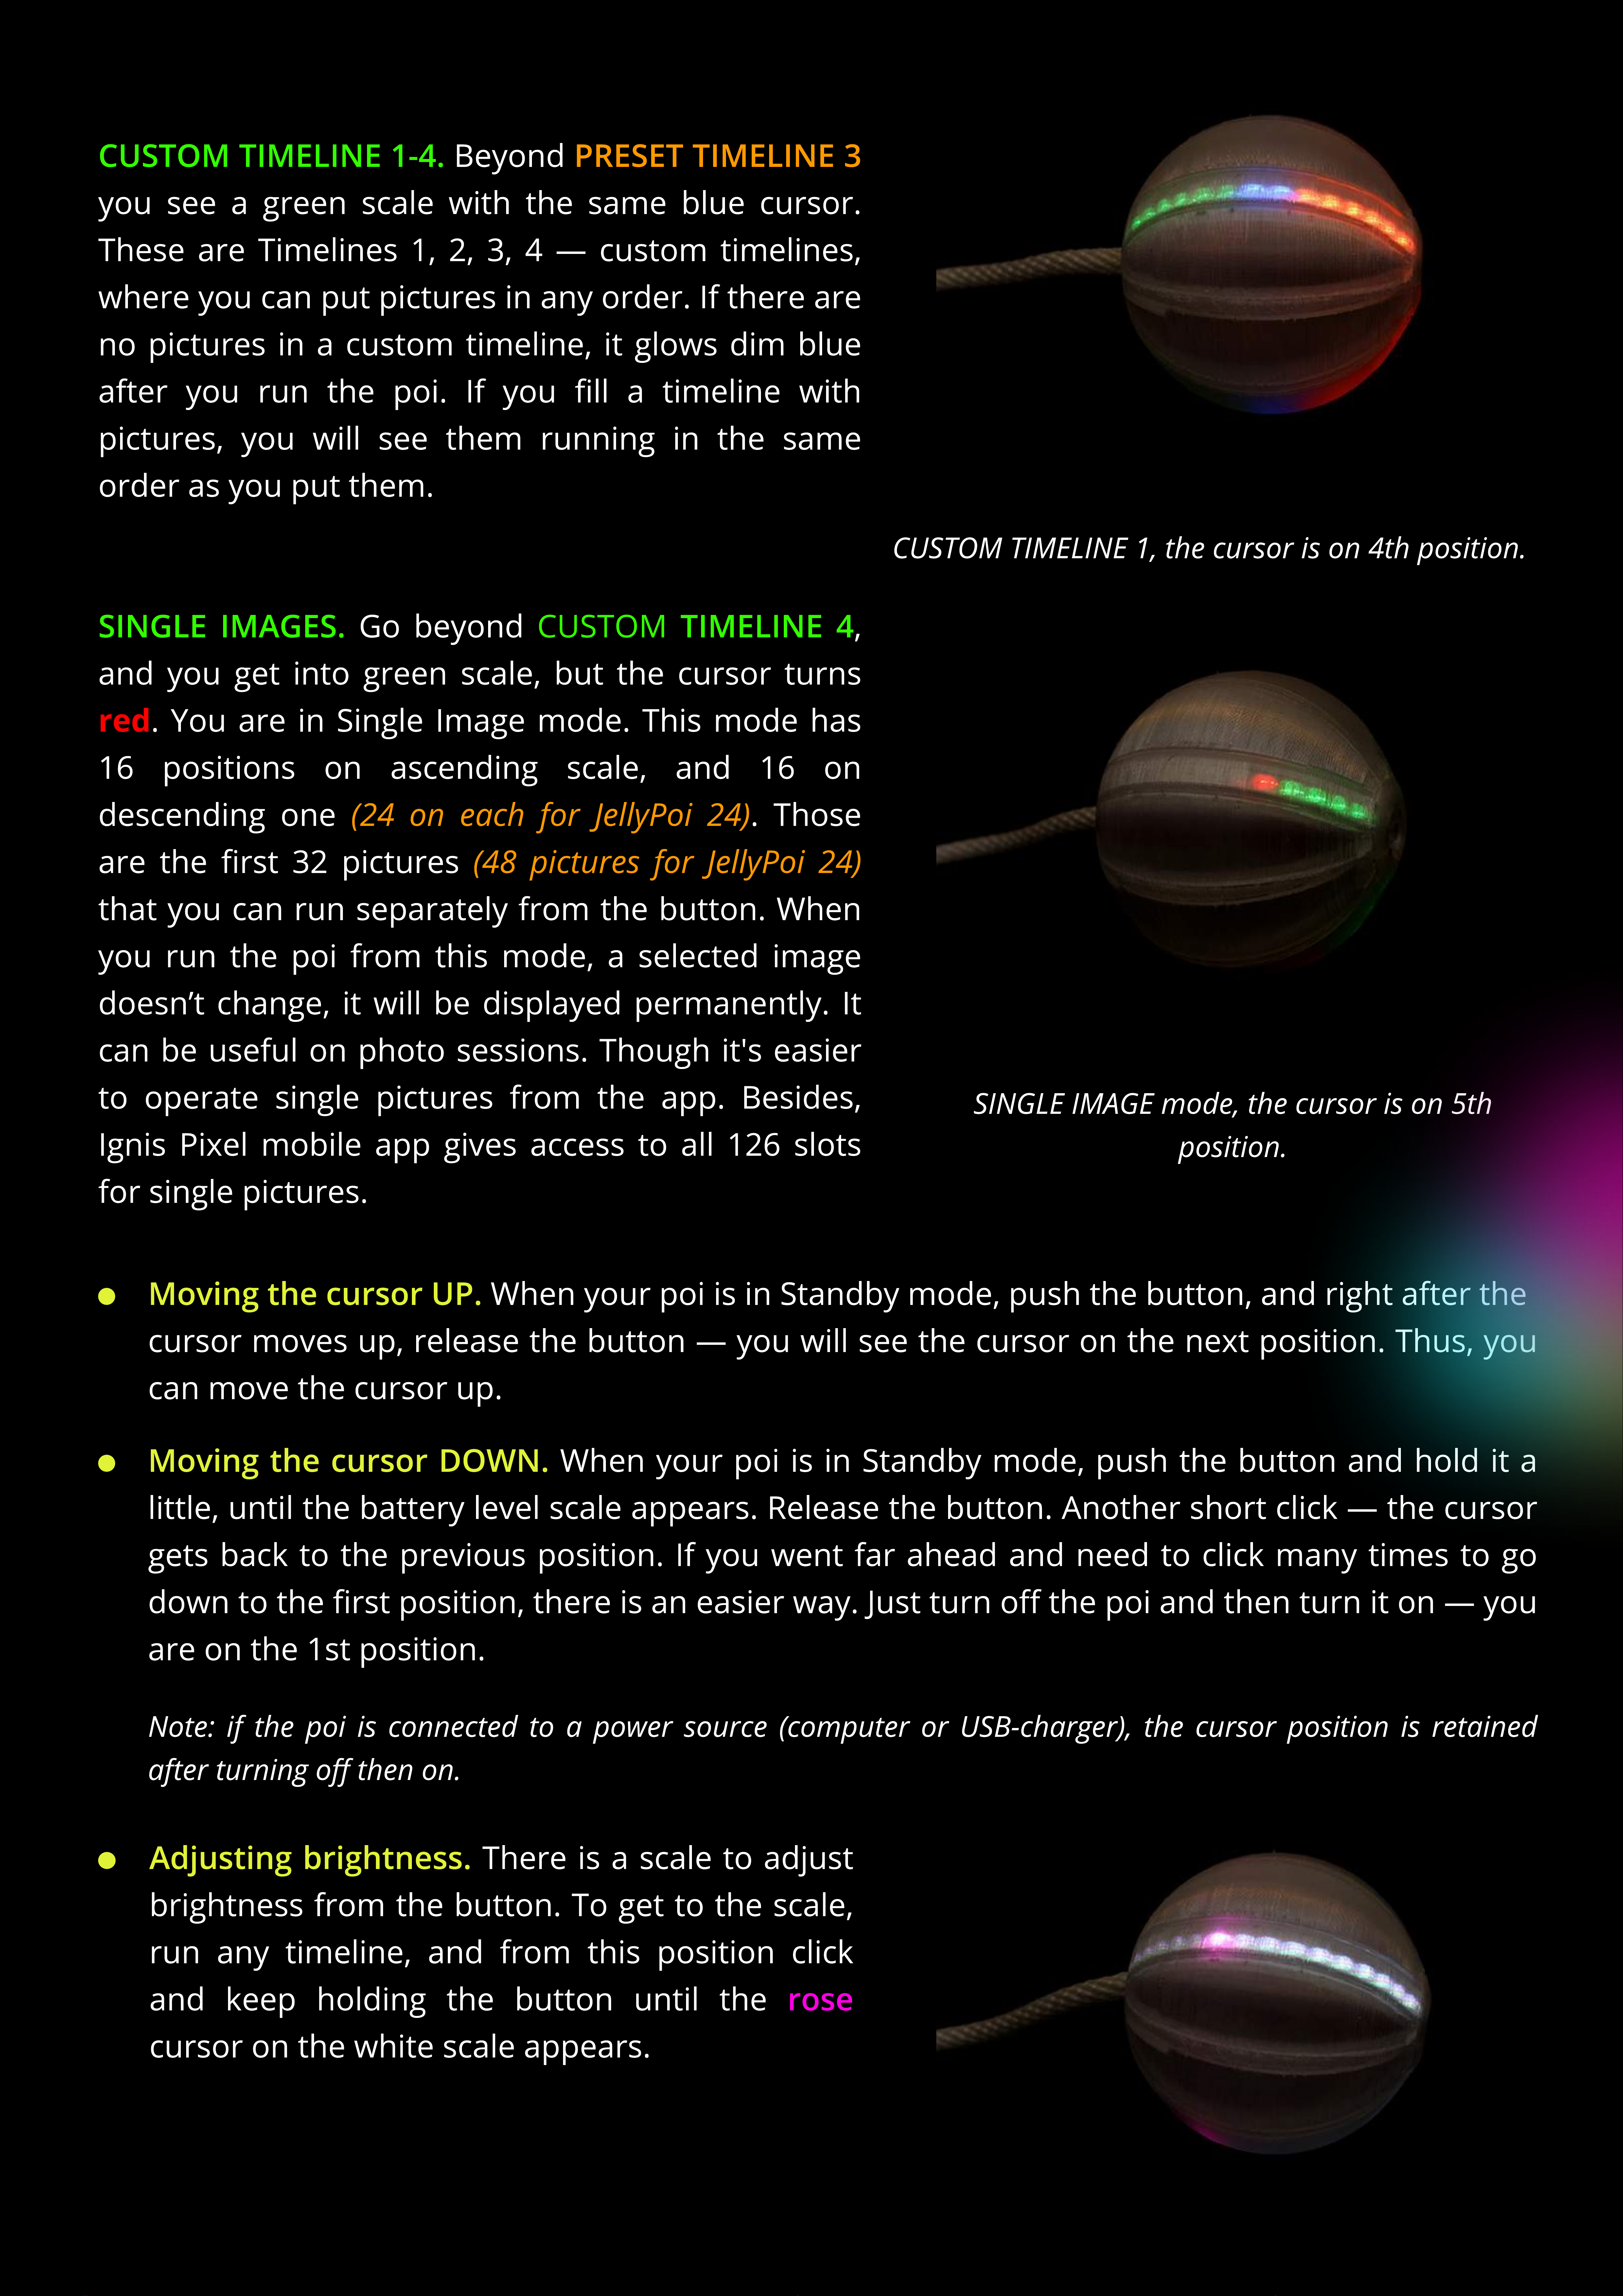
Beyond
you see a green scale with the same blue cursor.
These are Timelines 1, , 3, 4 — custom timelines,
where you can put pictures in any order. If there are
no pictures in a custom timeline, it glows dim blue
after you run the poi. If you ll a timeline with
pictures, you will see them running in the same
order as you put them.
CUSTOM TIMELINE 1-4.
CUSTOM TIMELINE 1, the cursor is on 4th position.
(24 on each for JellyPoi 24)
(48 pictures for JellyPoi 24)
red
Go beyond ,
and you get into green scale, but the cursor turns
. You are in Single Image mode. This mode has
16 positions on ascending scale, and 16 on
descending one . Those
are the rst 3 pictures
that you can run separately from the button. When
you run the poi from this mode, a selected image
doesn’t change, it will be displayed permanently. It
can be useful on photo sessions. Though it's easier
to operate single pictures from the app. Besides,
Ignis Pixel mobile app gives access to all 1 6 slots
for single pictures.
SINGLE IMAGES. CUSTOM TIMELINE 4
SINGLE IMAGE mode, the cursor is on 5th
position.
When your poi is in Standby mode, push the button, and right after the
cursor moves up, release the button — you will see the cursor on the next position. Thus, you
can move the cursor up
Moving the cursor UP.
When your poi is in Standby mode, push the button and hold it a
little, until the battery level scale appears.
R
elease the button.
A
nother short clic
k
— the cursor
gets bac
k
to the previous position. If you went far ahead and need to clic
k
many times to go
down to the rst position, there is an easier way.
J
ust turn o
the poi and then turn it on — you
are on the 1st position.
Note
:
if the poi is connected to a po
w
er source (computer or US
B-
char
g
er), the cursor position is retained
after turnin
g
o
then on.
Moving the cursor
D
O
W
N.
rose
There is a scale to ad
j
ust
brightness from the button. To get to the scale,
run any timeline, and from this position clic
k
and
k
eep holding the button until the
cursor on the white scale appears.
A
dj
usting
b
rightness.

Short clicks move the cursor through 6 levels of brightness. While you are moving the rose
cursor, you see how the brightness of the white scale changes. Higher position of the cursor
causes higher brightness. Conrm required brightness by 1-second push. he poi goes into
running mode, so you can see the current brightness right away.
(JellyPoi
(BubblePoi
https://youtu.be/R42gudSvO58
https://youtu.be/CiyDKVMA_z8
Watch a video guide of button operation for better understanding
(turn on English subtitles in Youtube settings)
To sum up the principal modes in operation with the button
o turn the poi o, press and hold the button for 3 seconds. From running mode,
you will see standby mode, then brightness level scale, then the device turns o
Turning o.
the poi: push the button for at least 1 second. You will see an ascending gradient,
then the poi gets to Standby mode with a blue blinking cursor;
Turn on
from selected timeline/image: short click the button (less than 0,5 second);
Run the poi
back to Standby mode: click the button and hold it for 1 second
(such delay protects from incidental clicks when you spin the poi)
G
o out o
f
Running
m
o
d
e
the poi: push the button and hold it for 3-
4
seconds until all lights fade away;
Turn o
in Standby mode: press and hold the button for at least 0,5 seconds.
A
s soon as the cursor shifts up, release the button.
S
hi
f
t the
c
ur
s
or up
in Standby mode: press and hold the button for at least 1 second until
B
attery level scale appears (red-to-green gradient), then release the button. he cursor shifts
down, you are in
B
attery level mode. Click the button short to get back to Standby mode. o go
one more step down, hold the button until
B
attery level scale appears again.
S
hi
f
t the
c
ur
s
or
d
o
w
n
from any position of the cursor:
j
ust turn o the poi and turn it on
(works only if the poi is not connected to a power source.
I
f otherwise, the cursor retains its
position after turning o and on)
Return to
1s
t po
s
ition
run any timeline, then click
the button and keep holding (around 3 seconds)
until the cursor on the white scale appears.
Choose required brightness.
ro
s
e
S
et re
q
uire
d
b
rightne
ss:
when you are in
Standby mode, push the button for 1 second. he
current battery level is displayed as a red-to-green
gradient. Full scale means 100
%
charge, half
—
50
%
,
etc.
C
he
c
k
c
urrent
b
a
tter
y
l
e
v
e
l
:
On
the
gure
the
poi
is
90%
charged
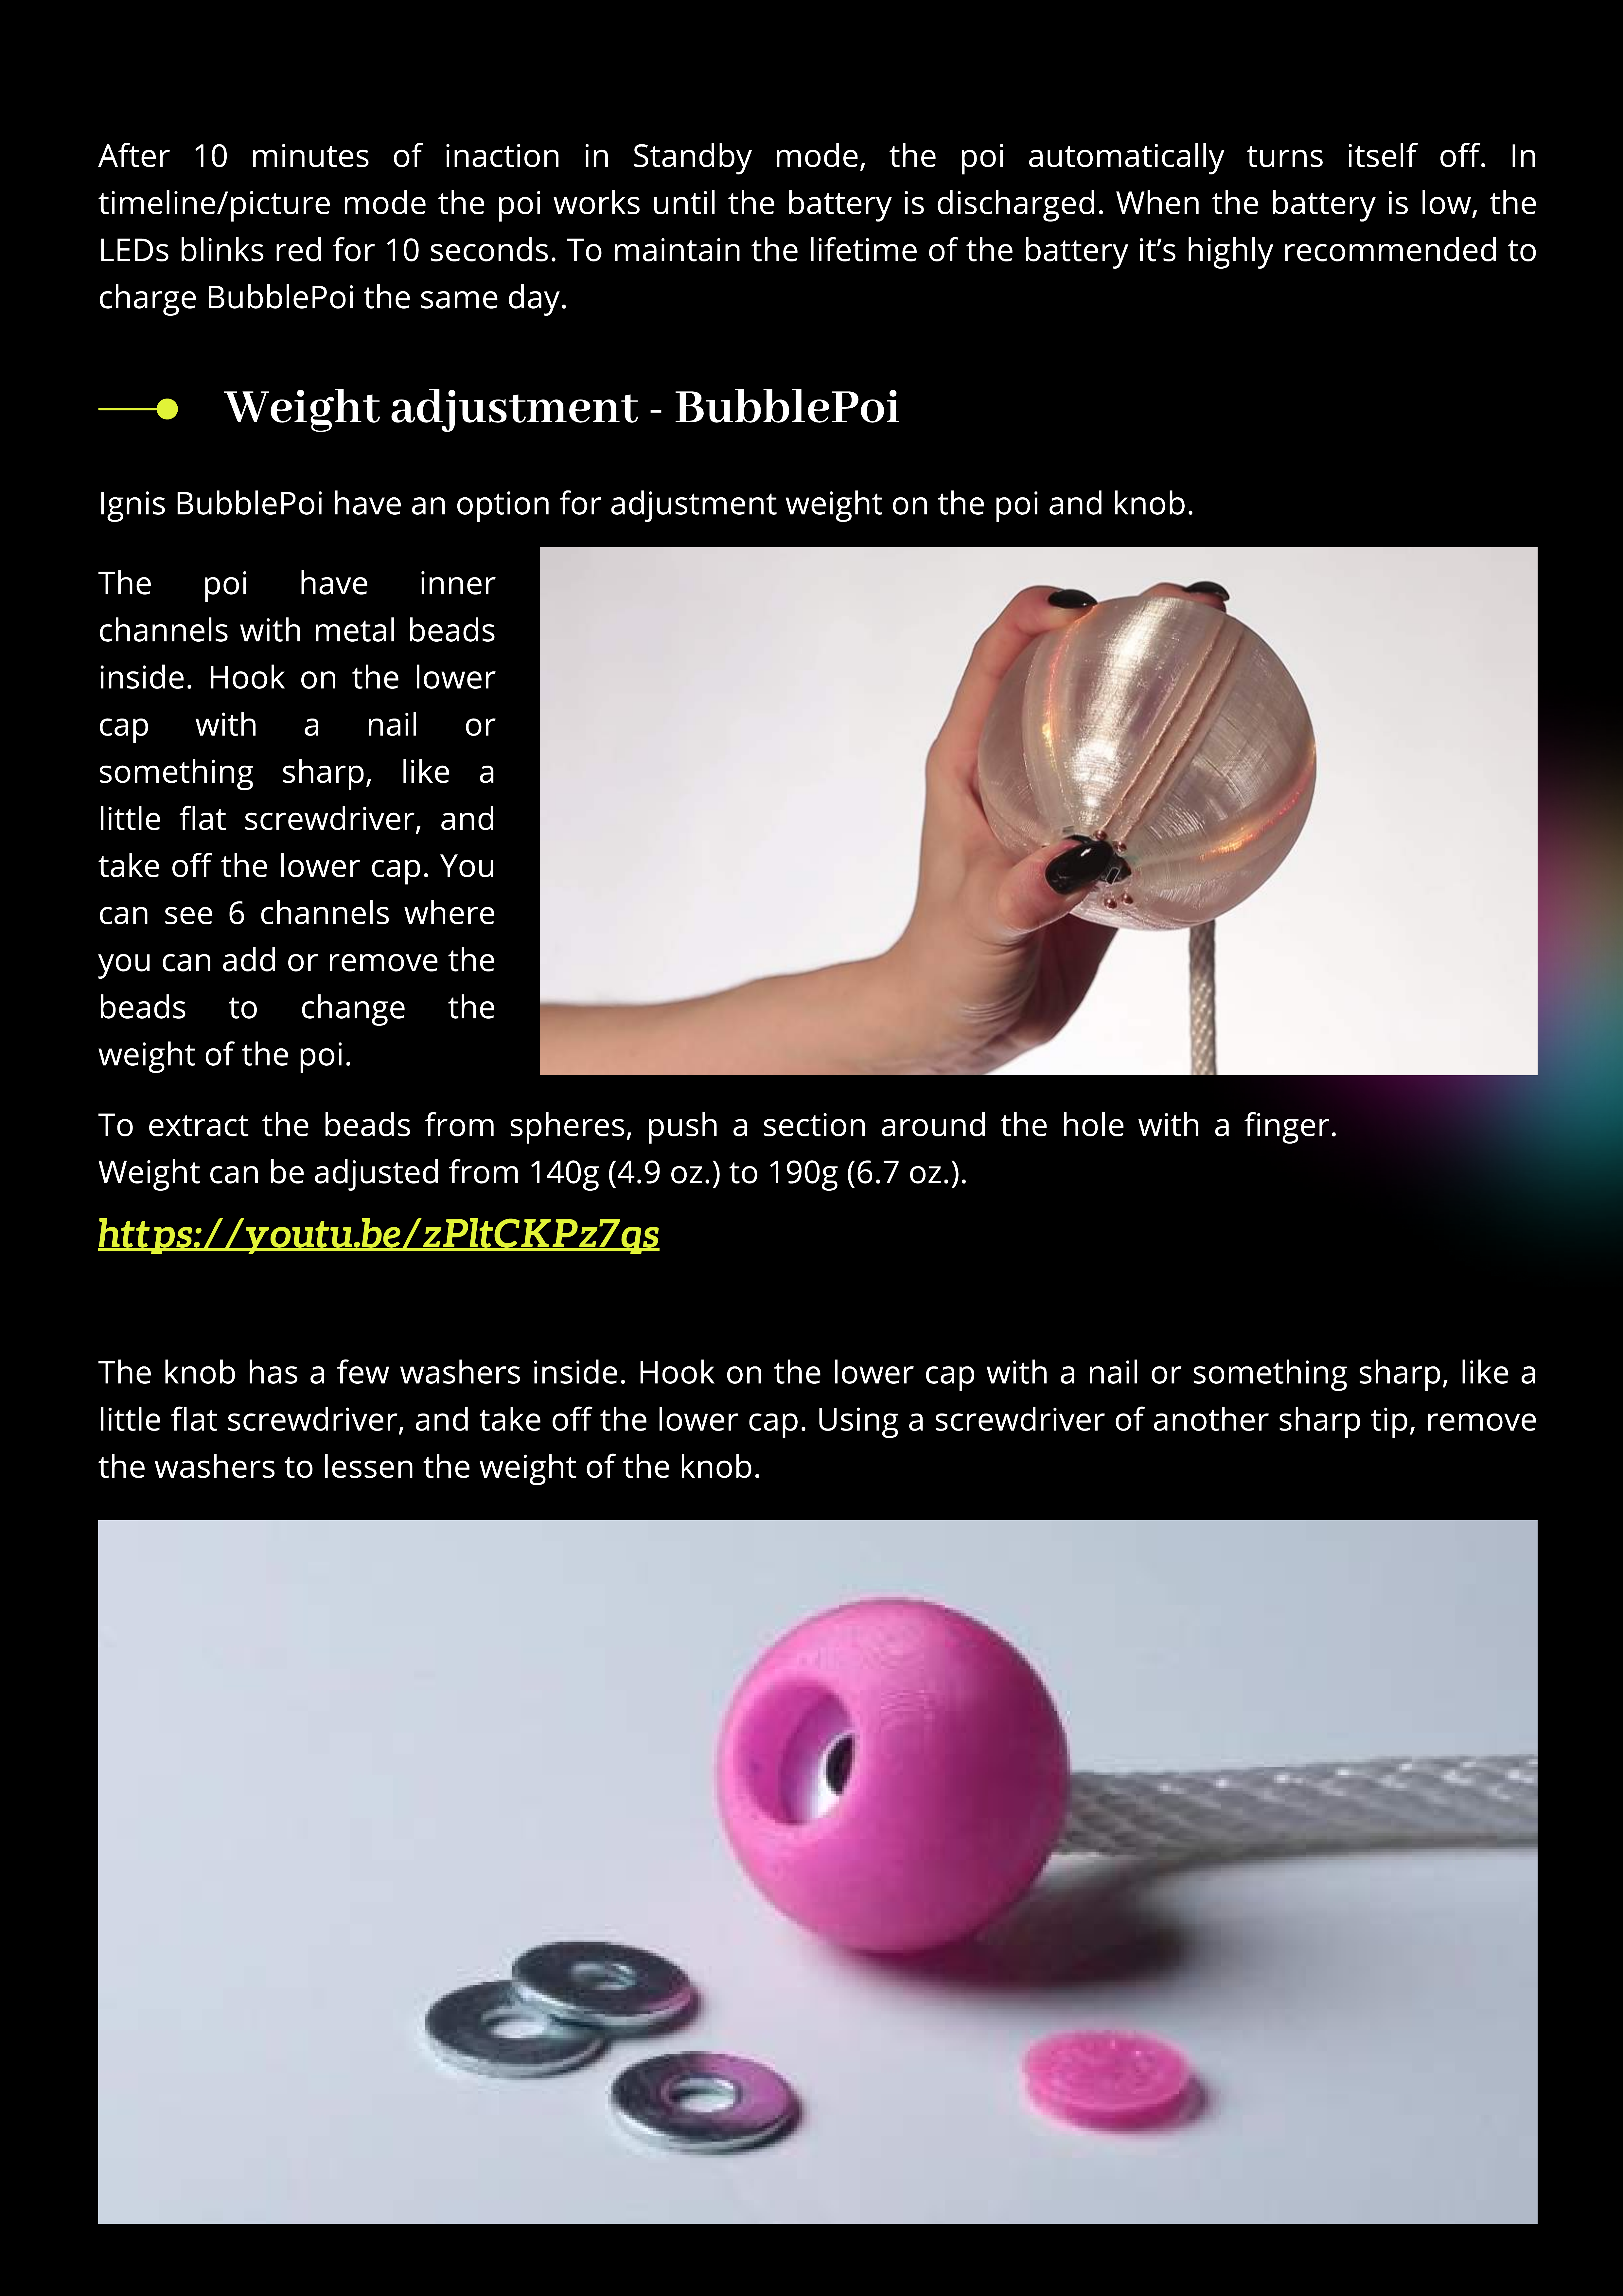
Weight adjustment - BubblePoi
Ignis BubblePoi have an option for adjustment weight on the poi and nob
The nob has a few washers inside. Hoo on the lower cap with a nail or something sharp, li e a
little at screwdriver, and ta e o the lower cap. Using a screwdriver of another sharp tip, remove
the washers to lessen the weight of the nob
After 10 minutes of inaction in Standby mode, the poi automatically turns itself o. In
timeline/picture mode the poi wor s until the battery is discharged. When the battery is low, the
LEDs blin s red for 10 seconds. To maintain the lifetime of the battery it’s highly recommended to
charge BubblePoi the same day.
To extract the beads from spheres, push a section around the hole with a nger.
Weight can be adjusted from 140g (4.9 oz.) to 190g (6.7 oz.).
The poi have inner
channels with metal beads
inside. Hoo on the lower
cap with a nail or
something sharp, li e a
little at screwdriver, and
ta e o the lower cap. You
can see 6 channels where
you can add or remove the
beads to change the
weight of the poi
https://youtu.be/zPltCKPz7qs

Weight adjustment - JellyPoi 16
Ignis JellylePoi have an option fo
adjustment weight on the poi and
knob
The poi have inne space fo metal
beads to add weight. Hook on the
uppe plug with something sha p, like
a little at sc ewd ive , and take o
the plug. Th ough little hole you can
add o emove the beads to change
weight. Watch a video how to do it
The knob has a few washe s inside.
Hook on the lowe cap with a nail o
something sha p, like a little at
sc ewd ive , and take o the lowe
cap. Using a sc ewd ive o anothe
sha p tip, emove the washe s to
lessen the weight of the knob. Watch
a video how to do this. Also you can
see how to sho ten the co d if it feels
too long
https://youtu.be/BvUxiLqYuEk
https://youtu.be/CWs_qt7PVY4https://youtu.be/CWs_qt7PVY4
Weight adjustment - JellyPoi 24
It’s simila to BubblePoi. Hook on the
lowe cap with a nail o something
sha p, like a little at sc ewd ive , and
take o the lowe cap. You can see 6
channels whe e you can add o
emove the beads to change the
weight of the poi To ext act the
beads f om sphe es, push a section
a ound the hole with a nge . Weight
can be adjusted f om 115 g. (4 oz.) to
195 g. (6.9 oz.

Using as a juggling
ball (only BubblePoi)
http ://youtu.be/JO_k_xEKT7
Ignis BubblePoi can be also used as
juggling balls. For this, just disconnect
the cord – pull the cord hard, the cord
will go out of the ball. To attach the
cord, lean the low tip of the cord on
some hard surface and press the poi,
holding the hole against the bearing.
Charging
The position of the red light roughly shows 90% charge.
The position of the red light roughly shows 30% charge.
Lithium batteries don’t have a
memory eect, that is why we
recommend charging the poi every
time after using them; don’t wait
till they are totally discharged. If
you charge the poi every time, it
makes the lifetime of the battery
longer.
Avoid deep discharge of your
digital poi! Otherwise, it may result
in loss of battery capacity and
reduction of working time.
To charge the Bubblepoi/JellyPoi, plug
them to a USB-charger or computer —
you will see a red light. You can see
the level of charge by position of the
red light. The level of charge
corresponds to its position. If it’s in the
middle, the poi is 50% charged, if on
top — it refers to full charge, etc.
When the poi is on charge, the red
light slowly moves towards the top.
When the poi is completely charged,
the light nally turns green
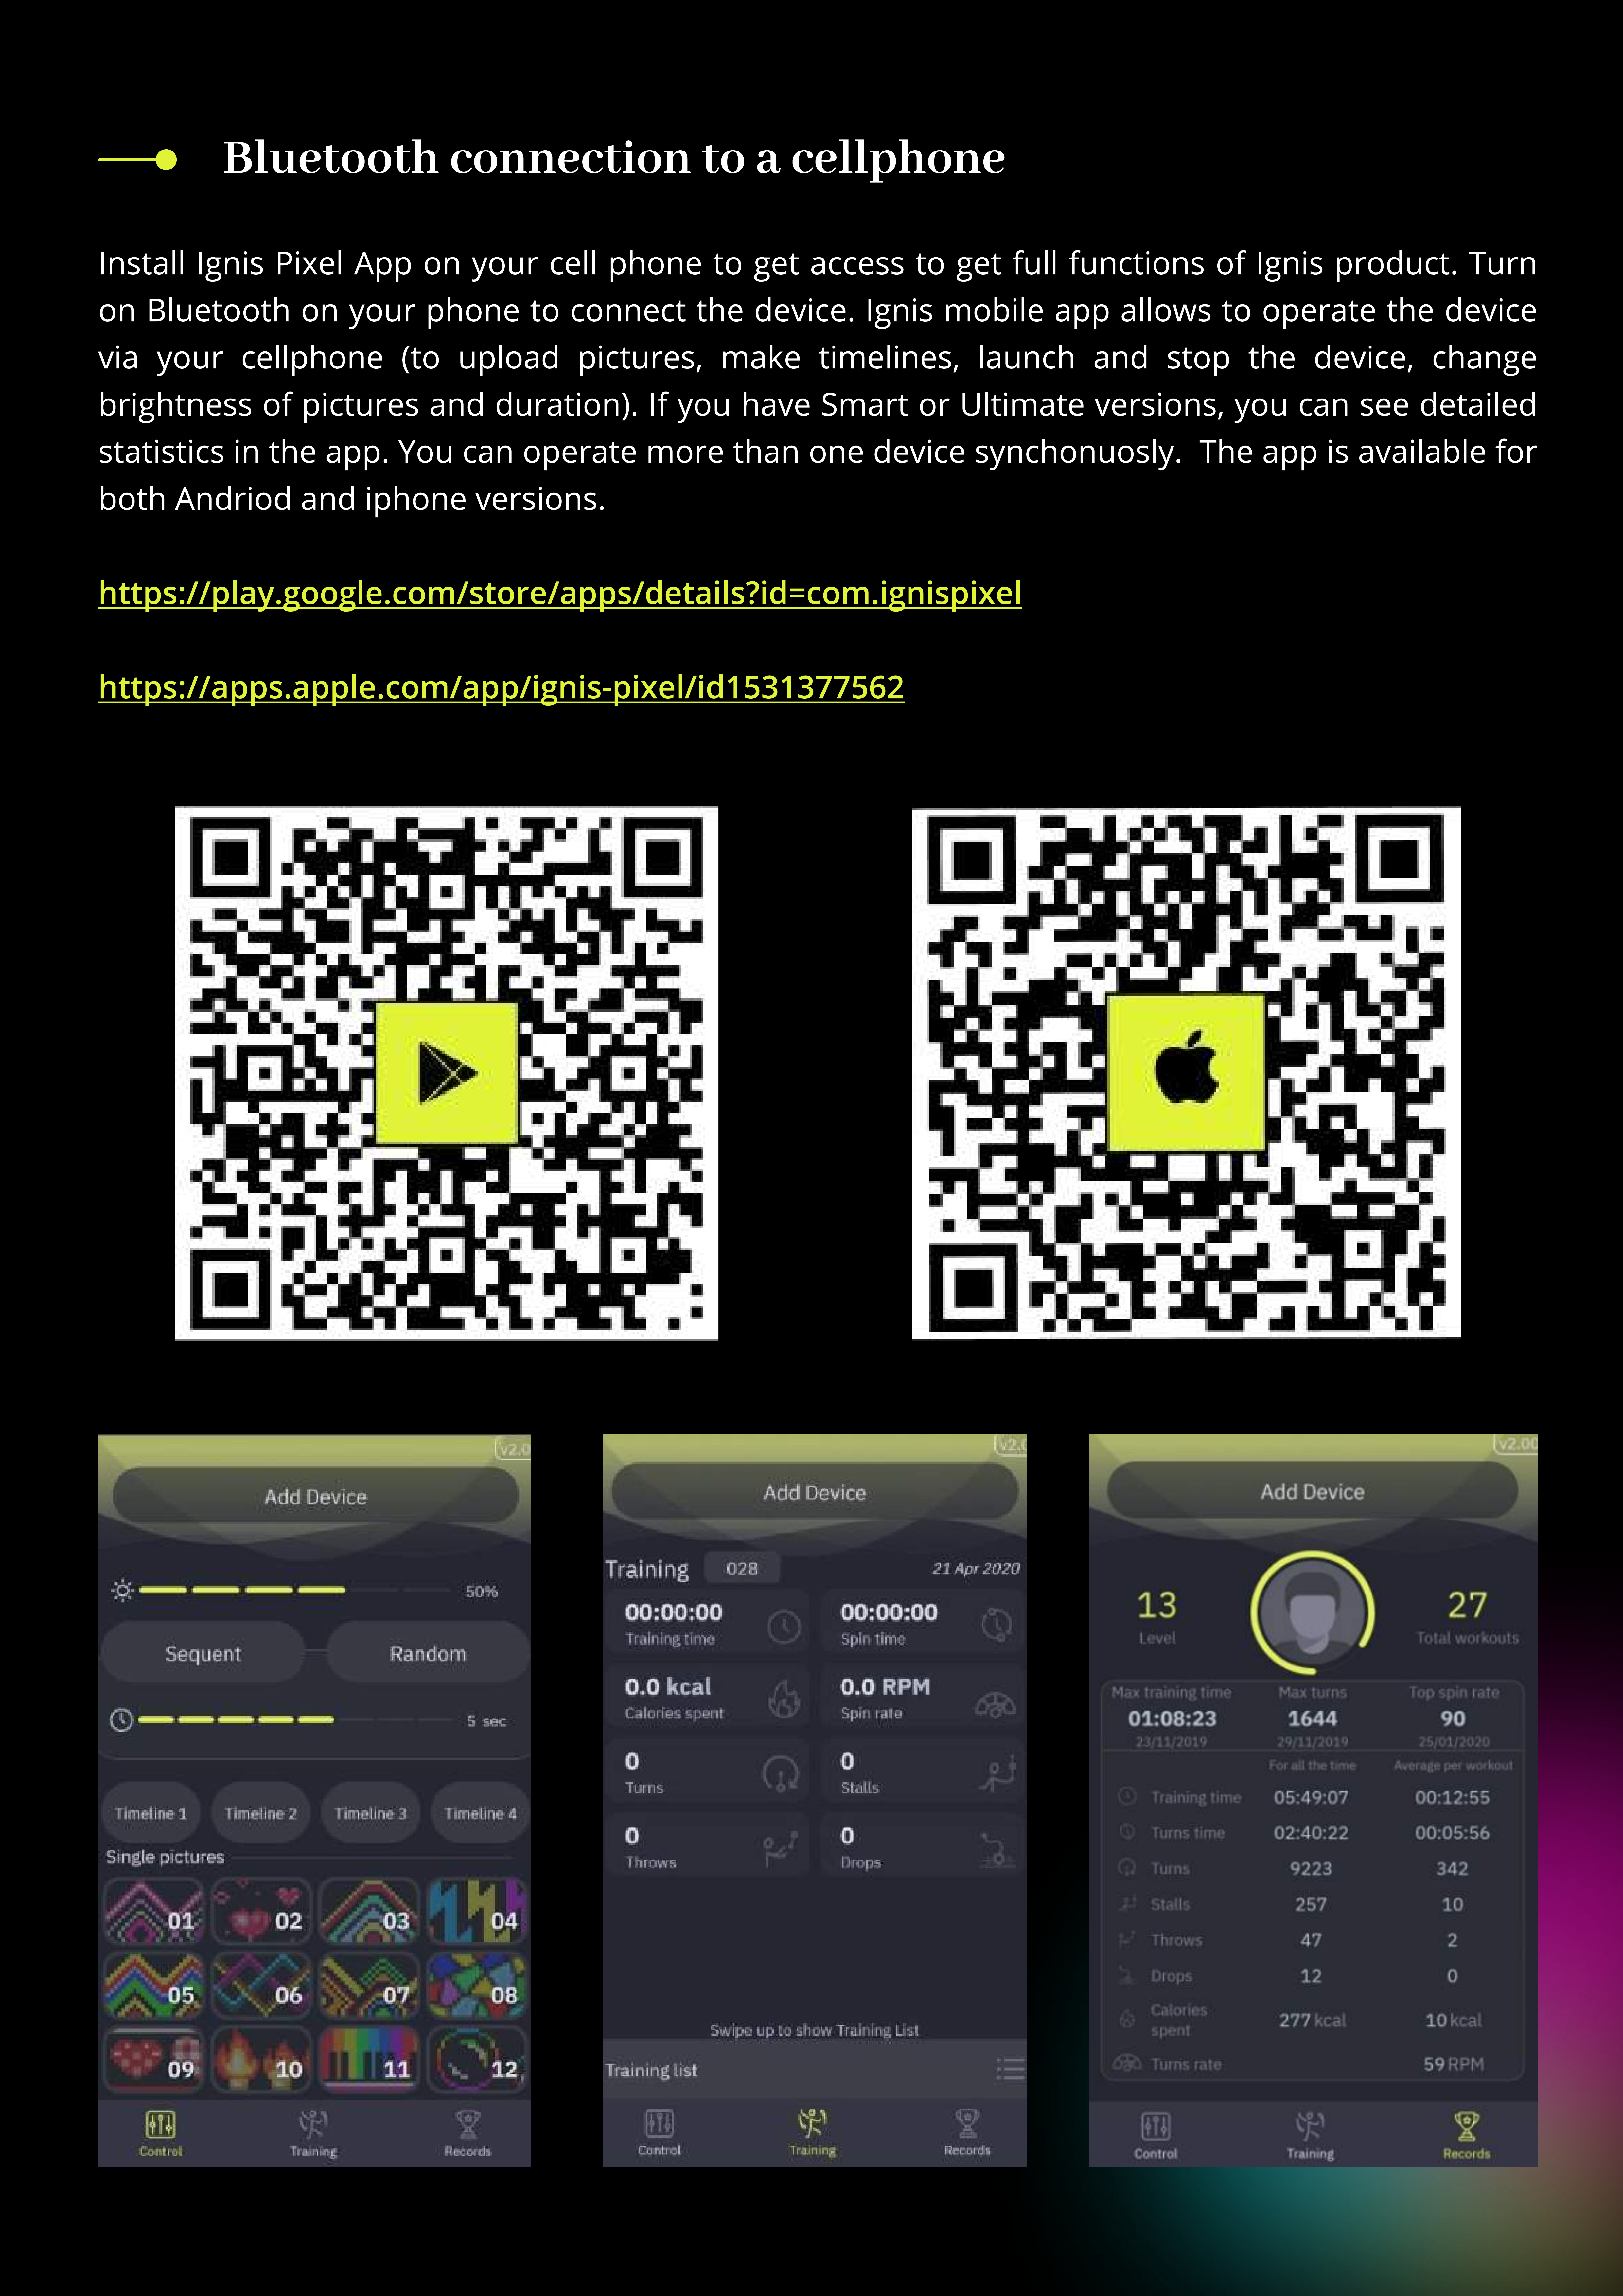
https://play.google.com/store/apps/details?id=com.ignispixe
https://apps.apple.com/app/ignis-pixel/id153137756
Install Ignis Pixel App on your cell phone to get access to get full functions of Ignis product. Turn
on Bluetooth on your phone to connect the device. Ignis mobile app allows to operate the device
via your cellphone (to upload pictures make timelines launch and stop the device change
brightness of pictures and duration). If you have Smart or Ultimate versions you can see detailed
statistics in the app. You can operate more than one device synchonuosly. The app is available for
both Andriod and iphone versions
Bluetooth connection to a cellphone
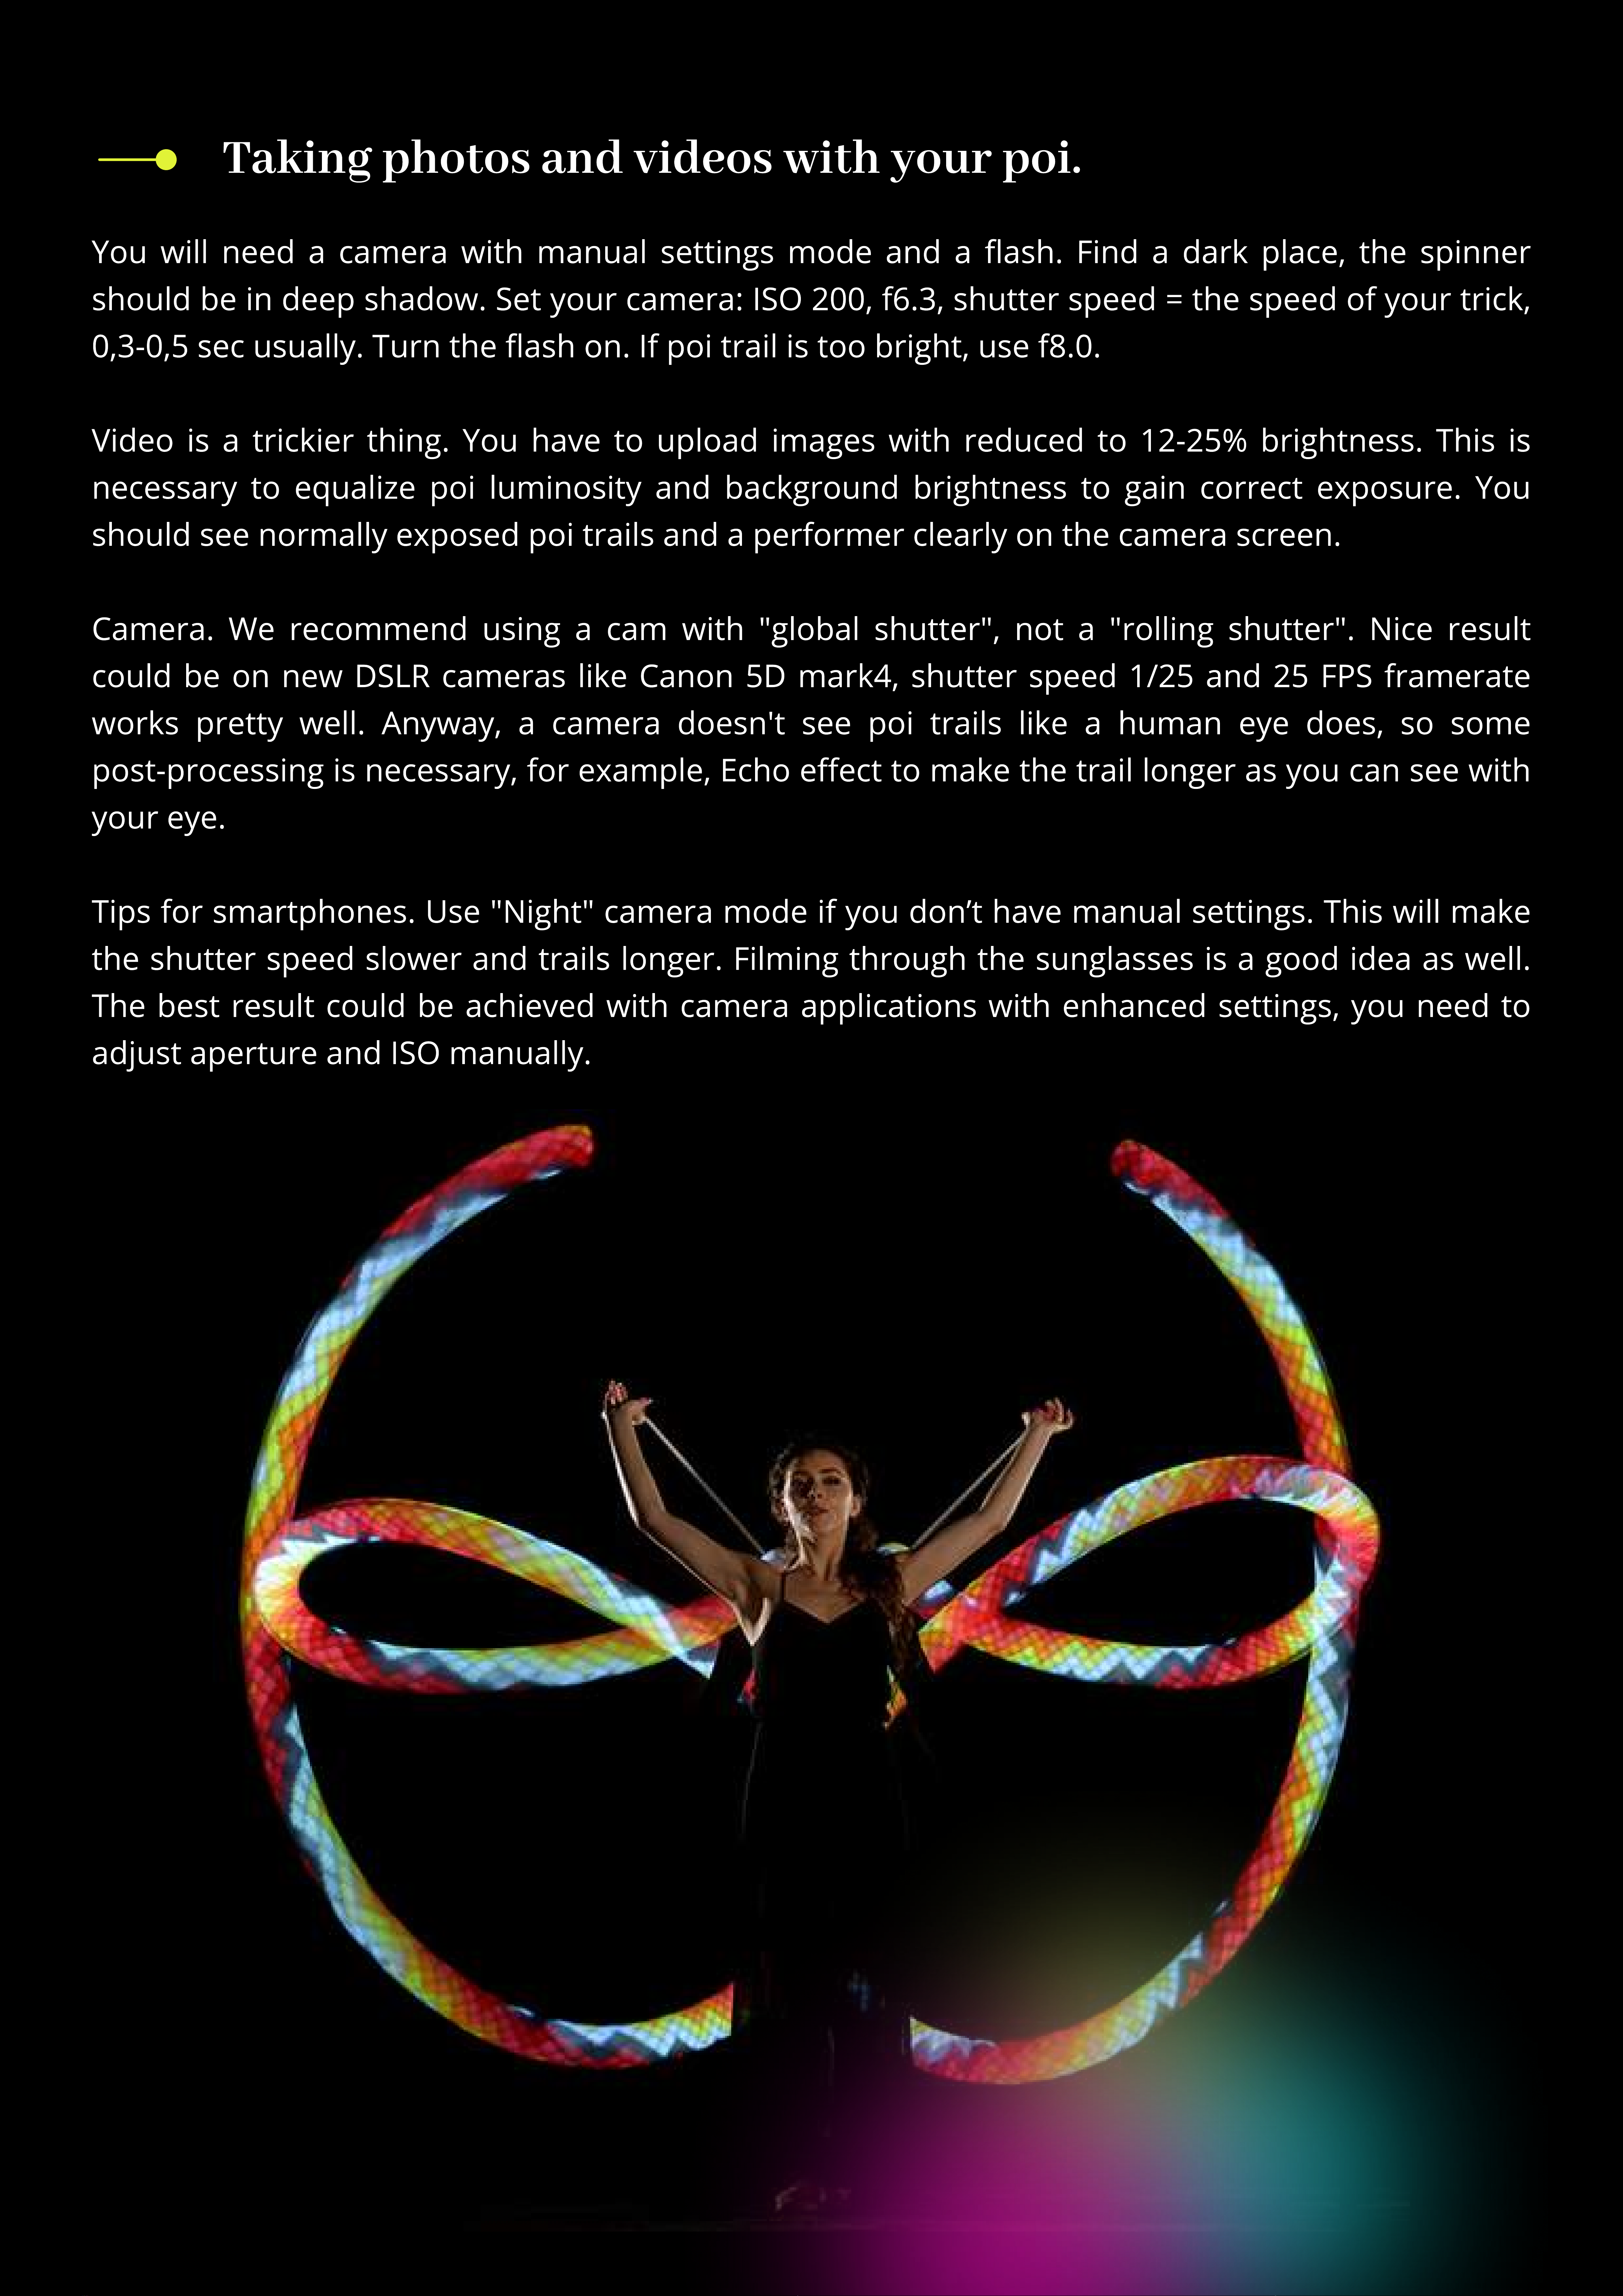
Taking photos and videos with your poi
You will need a camera with manual settings mode and a ash. Find a dark place, the spinner
should be in deep shadow. Set your camera: ISO 200, f6.3, shutter speed = the speed of your trick,
0,3-0,5 sec usually. Turn the ash on. If poi trail is too bright, use f8.0
Video is a trickier thing. You have to upload images with reduced to 2-25% brightness. This is
necessary to equalize poi luminosity and background brightness to gain correct exposure. You
should see normally exposed poi trails and a performer clearly on the camera screen
Camera. We recommend using a cam with "global shutter", not a "rolling shutter". Nice result
could be on new DSLR cameras like Canon 5D mark4, shutter speed /25 and 25 FPS framerate
works pretty well. Anyway, a camera doesn't see poi trails like a human eye does, so some
post-processing is necessary, for example, Echo eect to make the trail longer as you can see with
your eye
Tips for smartphones. Use "Night" camera mode if you don’t have manual settings. This will make
the shutter speed slower and trails longer. Filming through the sunglasses is a good idea as well.
The best result could be achieved with camera applications with enhanced settings, you need to
adjust aperture and ISO manually
Maintenance
Keep the battery charged. Lithium batteries don’t have a memory eect, that is why we
recommend charging the props every time after using them don’t wait till they are totally
discharged. If you charge them every time, it makes the lifetime of the battery longer. This
advice works for your smartphone, laptop, and for any gadgets with Li-ion batteries inside.
Optimal is to keep your battery above 70%.
Water. The props will be damaged for sure if some water gets inside. If you feel you have no
chance to keep them dry under the rain, for example, take sticky tape and cover USB port,
buttons, and other spots where the water may go inside. Water damage is not covered by the
warranty. Feel free to contact us if issues pop up.
Temperature recommendations
Operating temperature to keep and use pixel equipment is from -20 °C to 50 °C (from -4 °F to
122 °F). On low temperature, the time of working can be diminished due to reduced battery
capacity when a battery is kept on cold. When you come back to room temperature, all
characteristics get back to the normal level.
If you really need to perform in freezing cold, keep the devices in a warm place and take them
right before the show. In this case the batteries don’t have enough time to cool o, and the
working time remains almost the same.
Selfheating by bright modes can also be used when performing in the cold — it doesn’t allow
the battery to freeze during the performance.
Warranty
We give 2-year warranty for our pixel equipment. If during this time some defect or malfunction
comes out, we either x it or make a free replacement of a faulty element. All shipping charges are
laid upon a customer, except cases when a device came initially defected or a failure was revealed
right after using the device.
Ignis pixel equipment is strong enough to survive collisions on normal spinning speed (about 2
revs per sec). Anyway, it cannot be called indestructible. Warranty does not cover damages
caused by hard collisions, drops, and water.
E
stimated lifetime of Ignis
ixel equipment is 5-10 years and limited only by battery life (like in
mobile phones). If the battery becomes worthless, get in touch with us to replace it with a new
one, or we can tell how to change it by yourself.
support@ignispixel.com
If the equipment shows any failure, rst and foremost reach us out by email
and tell what happened. In most cases, a failure is possible to on
place, without sending back to us — this will save you a lot of time and money to send it to and
fro.
It’s really important for us to know all weak spots of our equipment, so we could make it even
more reliable and durable. We would appreciate if thus you help us to evolve.
To get in touch with us and ask questions about the props, go to contacts area on our website:
https://ignispi el.com/contacts
pixel@ignispixel.com
Email:
Kindest regards
Ignis team
Для включения устройства удерживайте кнопку более 1 сек.
1. еню
Синий курсор мигает на первой позиции.
Для перемещения курсора вперед удерживайте кнопку 0,5-1 сек.
Для перемещения курсора назад удерживайте кнопку 1-2 сек
до появления уровня заряда. Нажмите кнопку повторно
вы вернетесь в меню и курсор переместится на шаг назад.
Для выключения удерживайте кнопку более 2 сек.
2. Рабочий режим - воспроизведение картинок
Проигрывается выбранная последовательность картино
(таймлайн) или одиночная картинка.
Для выключения удерживайте кнопку более 3 сек.
3. Регулировка яркости
М
игающий курсор показывает выбранный уровень яркости.
ороткое нажатие меняет уровень яркости.
Для возврата в мен
удерживайте кнопк
1-2 сек.
оротким нажатие
запустите воспроизведени
картинок
Для возврата в режи
воспроизведени
удерживайте кнопк
более 1 сек
У
держивайте кнопк
2-3 сек.
У
ровен
ь
заряда
В
ысота шкалы показывае
уровень заряда батареи.
Для возврата в мен
нажмите кнопку (пр
э
том курсор переместитс
на 1 шаг назад)
У
держивайте кнопку 1-2 сек.
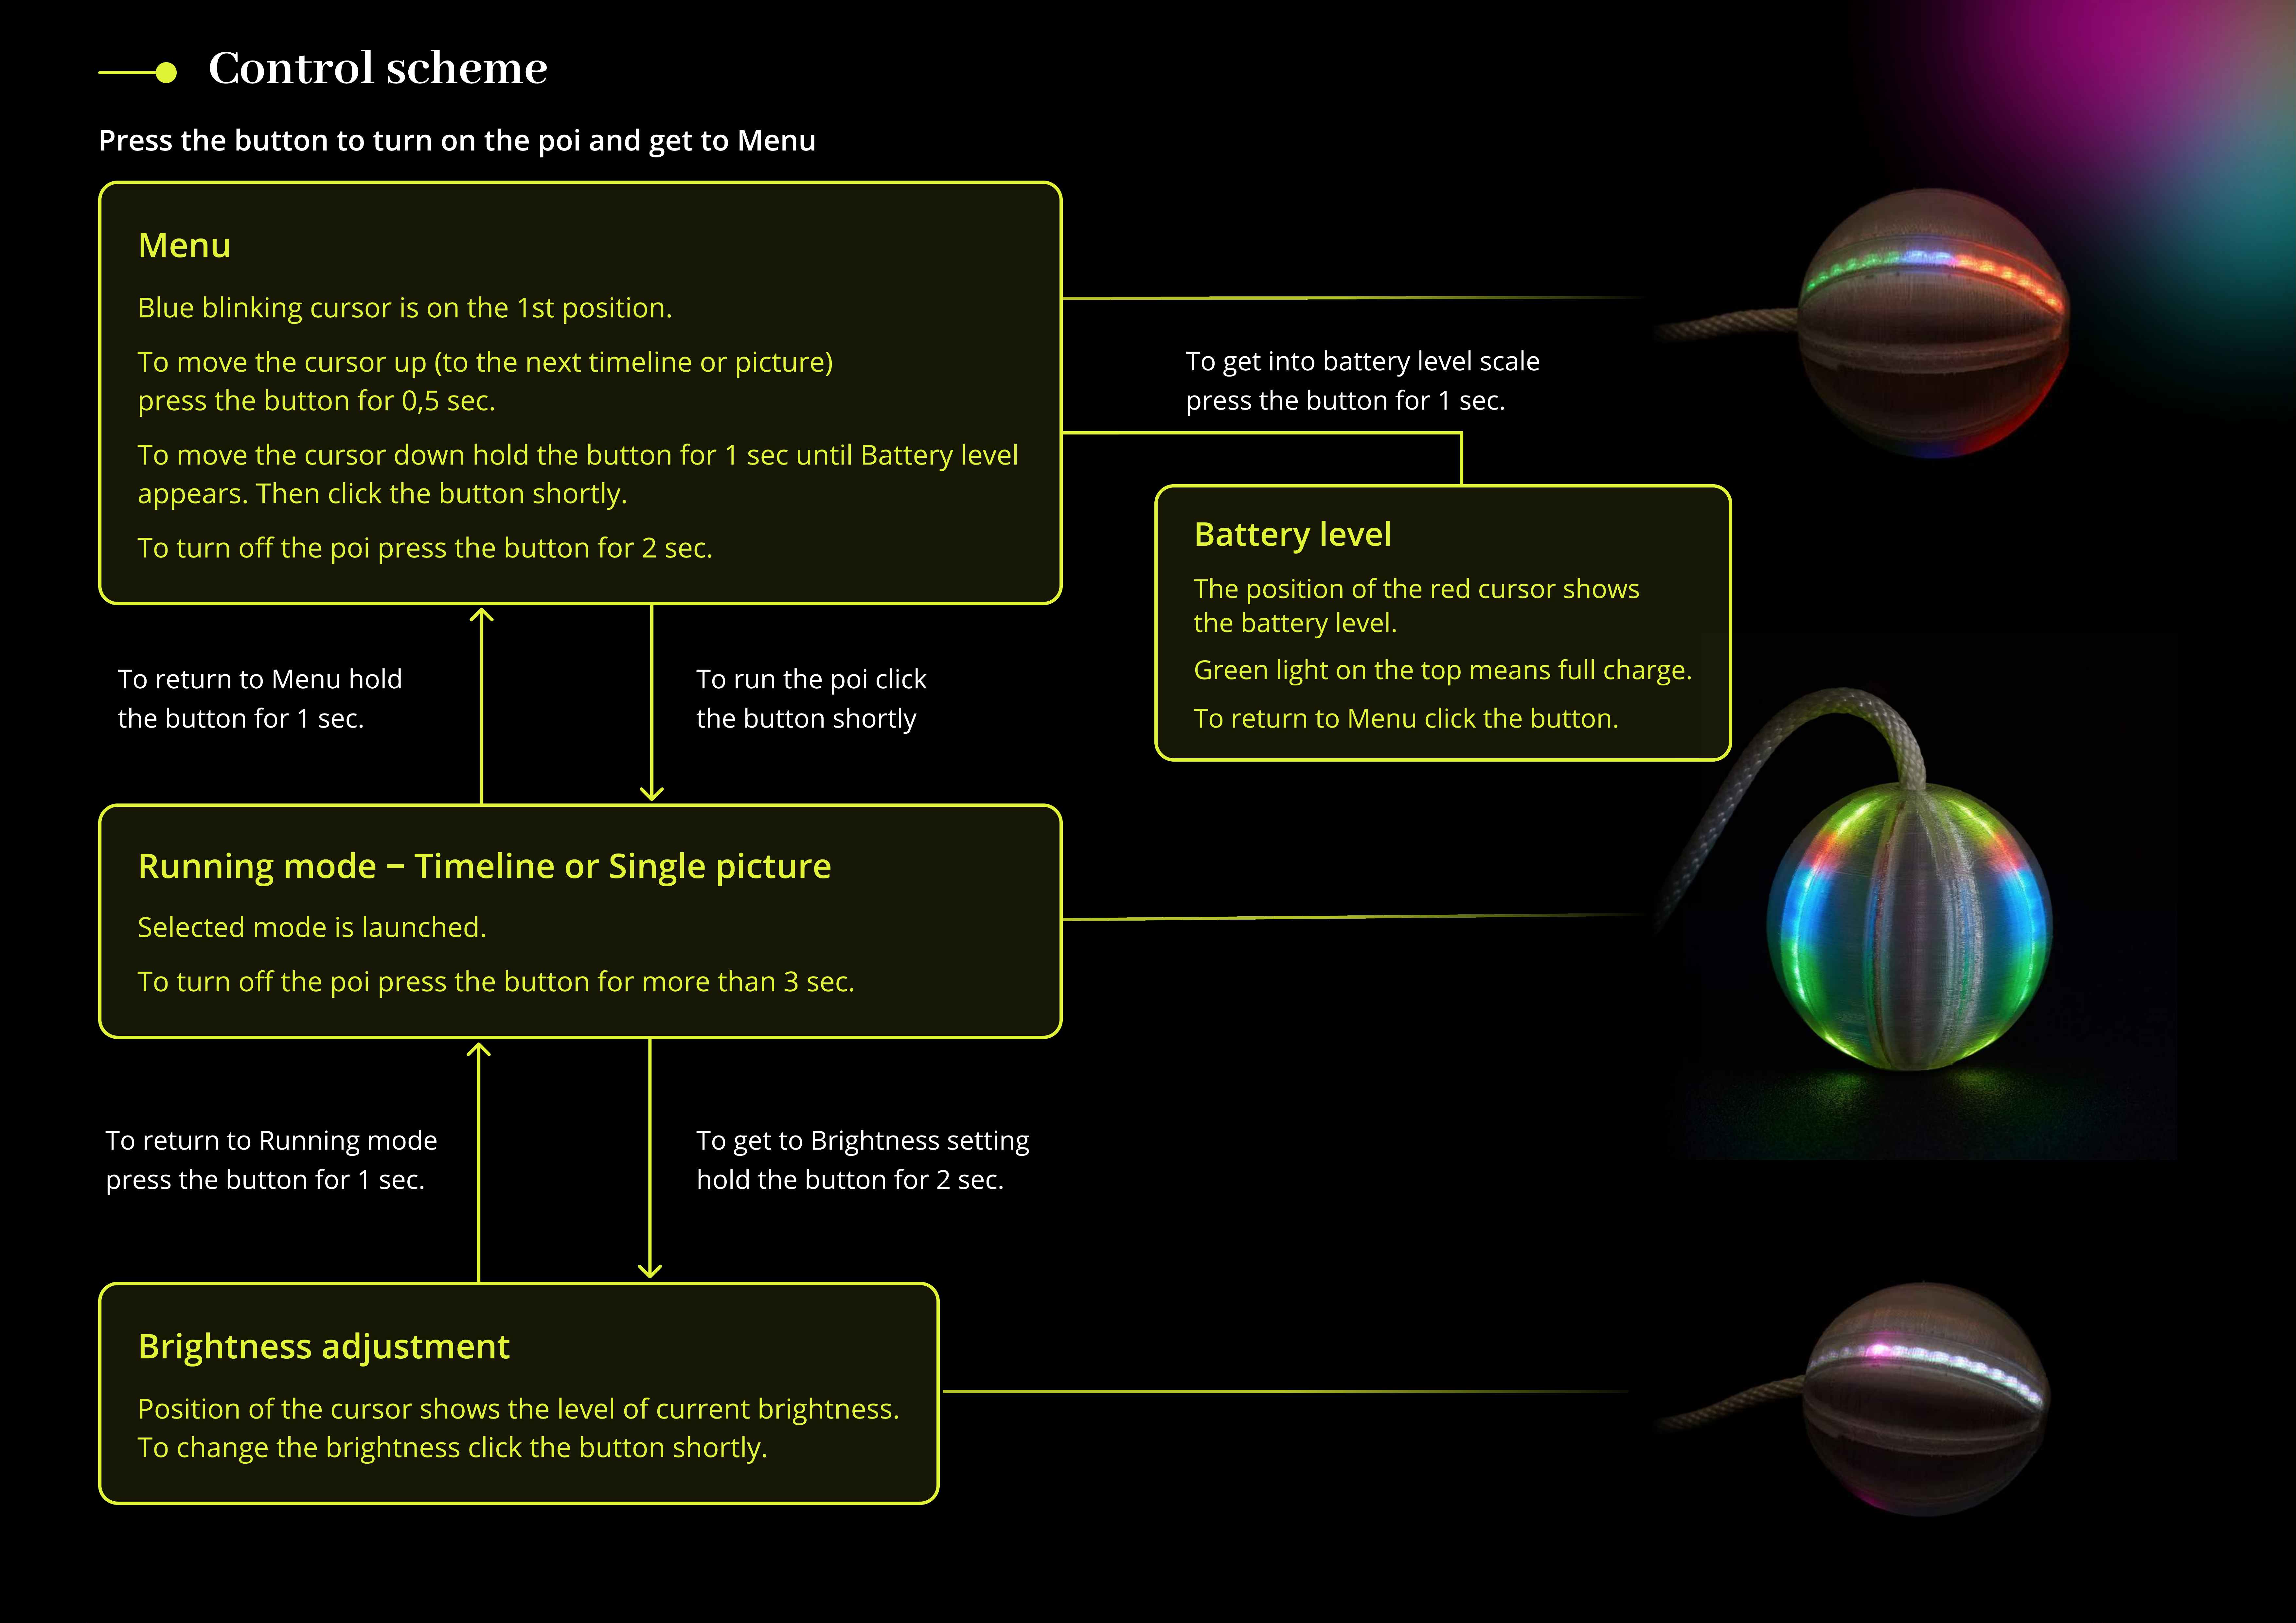
Press
the
button
to
turn
on
the
poi
and
get
to
Menu
Menu
Blue
blinking
cursor
is
on
the
1
st
position
.
o
move
the
cursor
up
(
to
the
next
timeline
or
picture
)
press
the
button
for
0,5
sec
.
o
move
the
cursor
down
hold
the
button
for
1
sec
until
Battery
level
appears
.
hen
click
the
button
shortly
.
o
turn
o
the
poi
press
the
button
for
2
sec
.
R
unning
m
ode
‒
T
i
m
e
l
ine
or
S
ing
l
e
pi
c
ture
Selected
mode
is
launched
.
o
turn
o
the
poi
press
the
button
for
more
than
3
sec
.
B
rightness
ad
j
ust
m
ent
Position
of
the
cursor
shows
the
level
of
current
brightness
o
change
the
brightness
click
the
button
shortly
.
o
return
to
Menu
hold
the
button
for
1
sec
.
o
run
the
poi
clic
the
button
shortly
o
return
to
Running
mod
press
the
button
for
1
sec
.
o
get
to
Brightness
setting
hold
the
button
for
2
sec
.
B
atter
y
l
e
v
e
l
he
position
of
the
red
cursor
show
the
battery
level
.
G
reen
light
on
the
top
means
full
charge
.
o
return
to
Menu
click
the
button
.
o
get
into
battery
level
scal
press
the
button
for
1
sec
.
Control scheme
This manual suits for next models
3
Other Ignis Pixel Lighting Equipment manuals


