iGuard IP-220E User manual

iGuard
IP-220E
IP/Network Camera
User’s Manual
Version 2.5

i
CONTENTS
Chapter 1 Introduction_________________________________________ 3
1.1 Features ________________________________________________ 3
1.2 Function ________________________________________________ 3
1.3 Package Contents_________________________________________ 4
Chapter 2 iGuard IP-220E Hardware______________________________ 5
Chapter 3 Hardware Installation _________________________________ 6
3.1 Installation Procedure______________________________________ 7
Chapter 4: iGuardware_________________________________________ 8
4.1 Installing iGuardware ______________________________________ 8
4.2 Using iGuardware_________________________________________ 9
4.2.1 iGuard Utility ___________________________________________ 9
4.2.1.1 Setup Wizard ________________________________________ 10
4.2.1.2 Launch iGuard _______________________________________ 13
4.2.1.3 IP Configuration ______________________________________ 15
4.2.1.4 Upgrade Firmware ____________________________________ 18
4.2.2 iGuardView ___________________________________________ 20
4.2.2.1 Device Setting________________________________________ 21
4.2.2.2 Camera Setting_______________________________________ 23
4.2.2.3 Motion Detection Setting________________________________ 24
4.2.2.4 Email Notification Setting _______________________________ 26
4.2.2.5 SNMP Setting ________________________________________ 27
4.2.2.6 Camera Monitor ______________________________________ 28
4.2.2.7 View _______________________________________________ 31
4.2.2.8 System _____________________________________________ 31
4.2.2.9 Help________________________________________________ 32
Chapter 5: iGuard Web Manager________________________________ 33
5.1 Introduction_____________________________________________ 33
5.2 iGuard Web Manager Interface______________________________ 33
5.2.2 Information____________________________________________ 36
5.2.2.1 System Status________________________________________ 36
5.2.2.2 Current Connections___________________________________ 37
5.2.2.3 Event Log ___________________________________________ 38
5.2.3 Basic Settings _________________________________________ 39
5.2.3.1 Camera Settings______________________________________ 39

ii
5.2.3.2 Network_____________________________________________ 41
5.2.3.3 Account Settings______________________________________ 44
5.2.4 Advanced Settings______________________________________ 46
5.2.4.1 Event Notification _____________________________________ 46
5.2.4.2 Motion Detection______________________________________ 50
5.2.4.3 Image Recording _____________________________________ 53
5.2.4.4 E-mail / FTP _________________________________________ 54
5.2.4.5 System Settings ______________________________________ 57
5. 2.4.7 About ______________________________________________ 59
Appendix A: Router Configuration ______________________________ 61
Appendix B: IP Address, Subnet and Gateway____________________ 79
Appendix C: Glossary ________________________________________ 81
Appendix D: Q&A ____________________________________________ 82

3
Chapter 1. Introduction
Chapter 1 Introduction
1.1 Features
iGuard-IP-220E is an affordable, versatile and flexible remote monitoring solution for
small business, retail store, and residential applications. It can be accessed from
anywhere in the world via a standard browser by entering the IP, account and
password. Each system can simultaneously support any one combinations of USB PC
cameras be it regular, infrared or pan-tilt. With its built-in web-server, iGuard-IP-220E
can stream video images directly to the Internet without have to go through a
computer.iGuard-IP-220E features a Windows-based software that allows the user to
archive streaming video directly into the hard-drive. The same software also allows
the user to monitor multiple cameras on one screen.
Features:
•Built-in USB port for additional camera expansion
•Support Pan/Tilt and Infrared USB PC Cameras
•Built-in Web Server
•10/100Mbps Fast Ethernet Network Access
•Support Any Java-Enabled Web Browser
•32-Bit RISC CPU
•1MB Flash Memory
•8MB Dynamic Memory
•Support Up to 30 Remote Viewers for each camera
•Allow Up to 8 User Accounts and Passwords
•5.3VDC 1A Maximum
•Operating Temperature: 0°C ~ 60°C
•Operating Humidity: 10% ~ 90%
•Dimensions: 127.5mm x65.5mm x 58.5mm
•Weight: 331g
•Network Protocol: HTTP, TCP/IP, UDP, SMTP, PPPoE, Dynamic DNS, DNS
Client, SNTP, BOOTP, DHCP, FTP, SNMP
•Support All USB PC Camera with VIMICRO ZC0301+DSP processor
•Resolution: 640 x 480, 320 x 240, 160 x 120.
•Frame Rate: Up to 20fps in 320 x 240
•MJPEG compression
•USB 1.1 & 2.0 compliant
•Detailed Event Log with ability to sort and save
1.2 Function
The most important function of iGuard is for remote surveillance. Once iGuard is
installed, the user can check any of the connected PC cameras via any web browser.
The user can monitor and control these cameras simply by entering the IP address of
the iGuard from anywhere in the world as long as there is an Internet connection. For
instance, the user can be in Australia but he or she can monitor the production facility
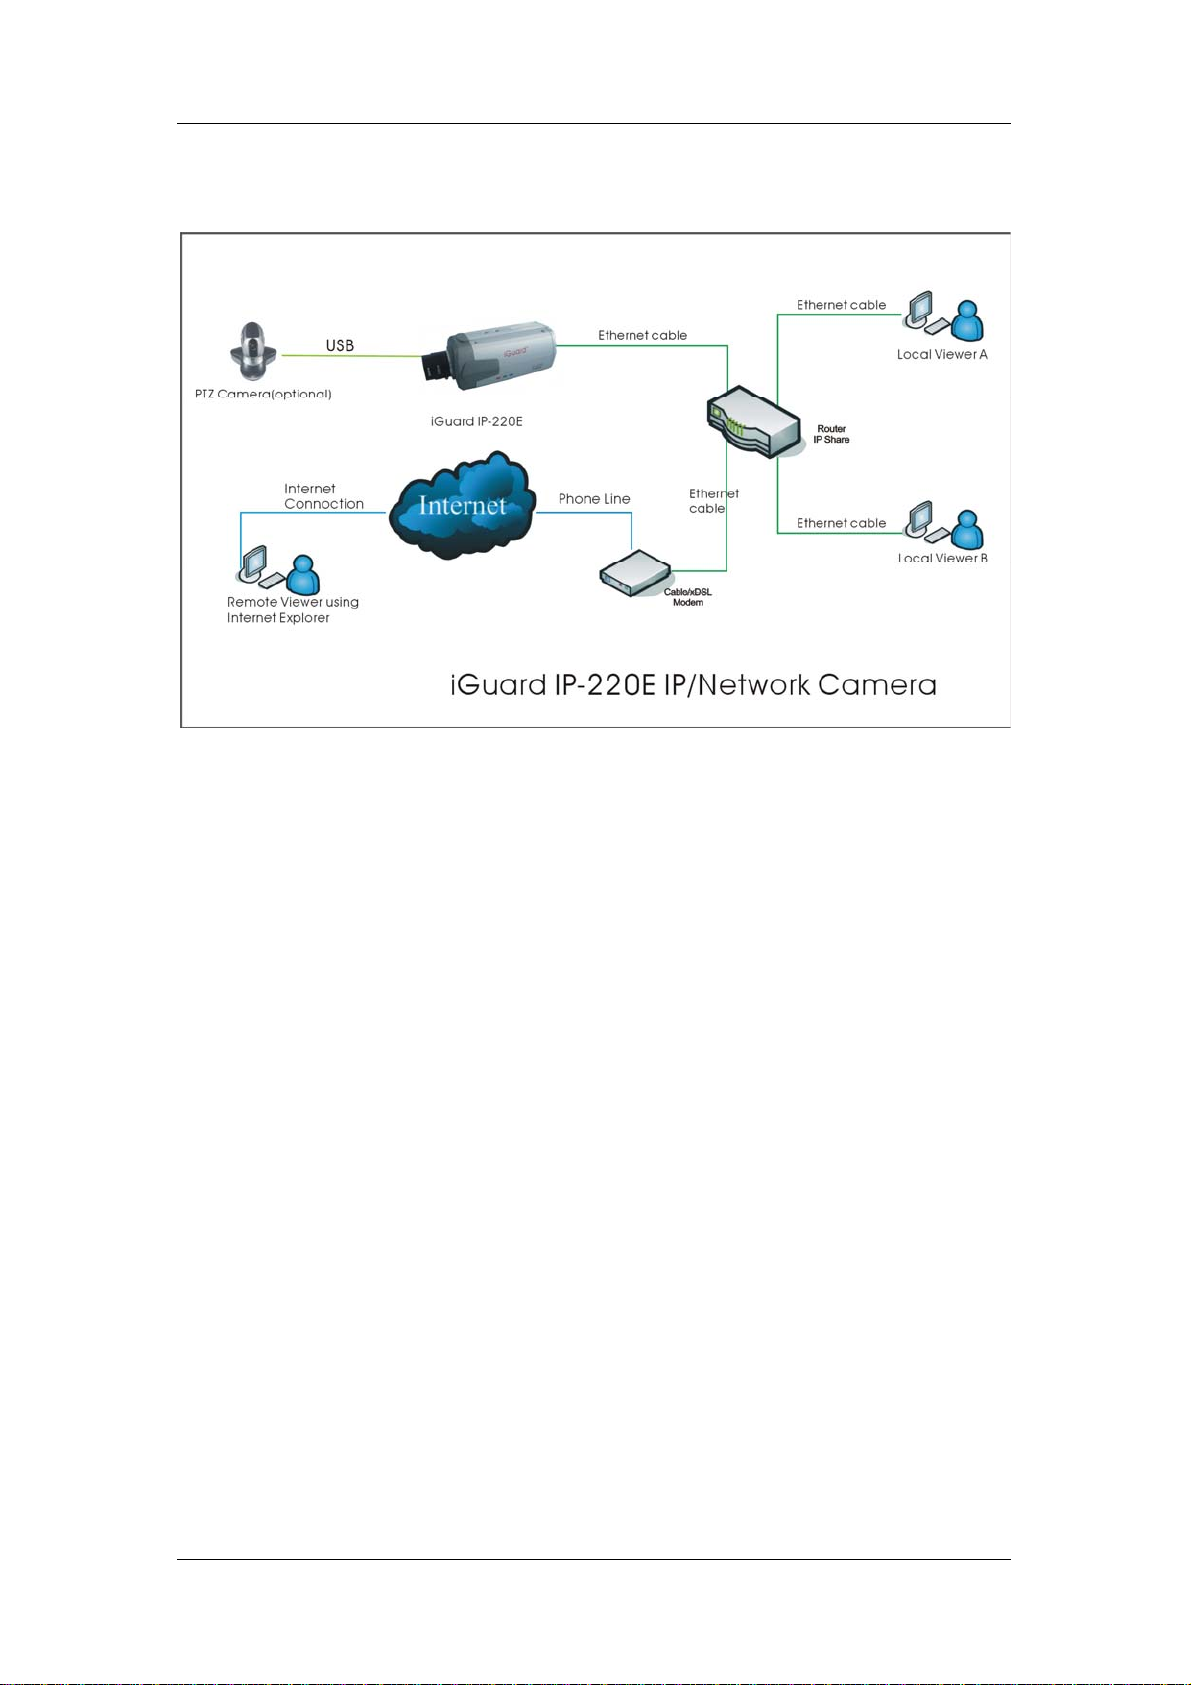
4
Chapter 1. Introduction
in China, and if he or she likes, also check on the branch office in Singapore at the
same time.
Fig.1 iGuard Network Diagram
1.3 Package Contents
Your iGuard package should contain the following items;
1. iGuard IP-220E Network Camera,
2. Ethernet Cable
3. iGuard Utility CD/Software
4. Quick Installation Guide
5. 5.3V DC Adapter
5
Chapter 2. :iGuard IP-220E Hardware
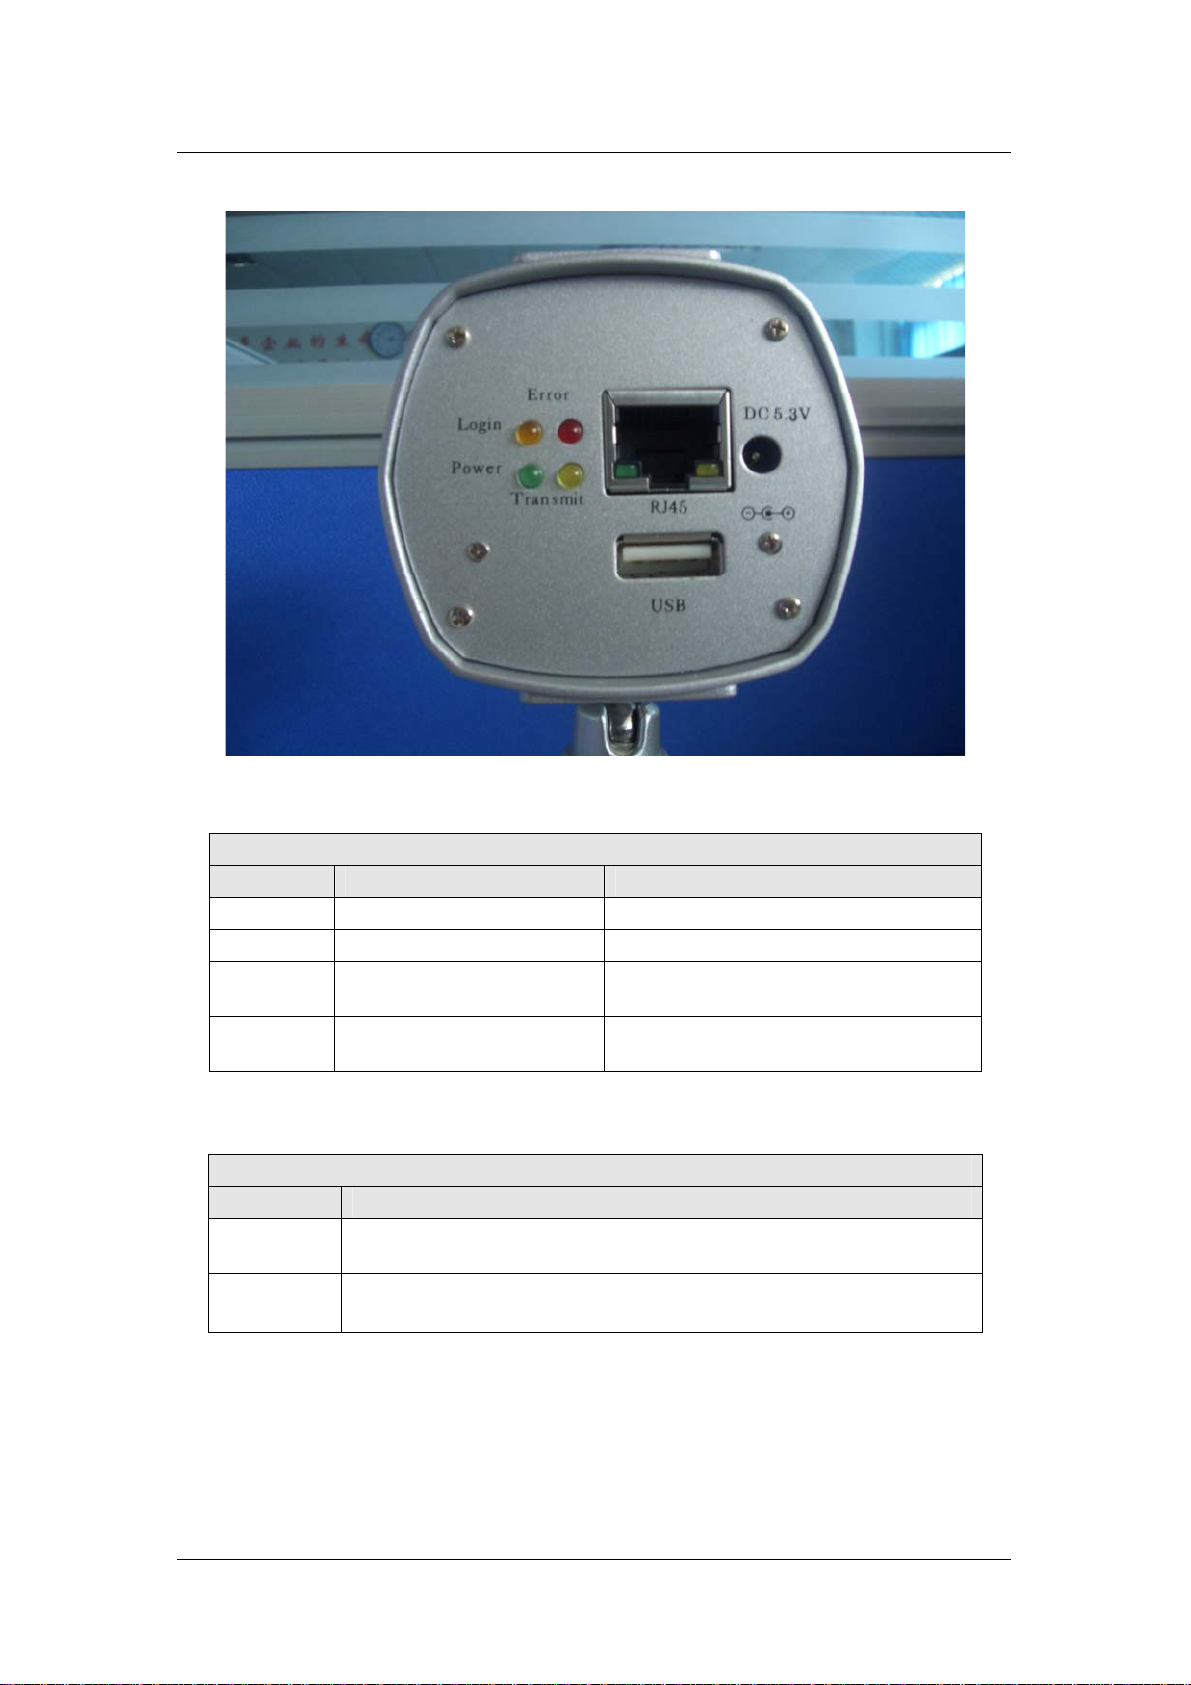
Chapter 2 iGuard IP-220E Hardware
Fig.2 iGuard IP-220E Camera
LED Status Indicators on iGuard
Light color Signal definition Condition description
Green Power state On: Normal power
Red Error Condition On: Error condition occurred
Orange Logon state On: When there is user logon and
receive the image.
Yellow USB data activity Flash when there is data
transmit/receive on the USB.
Table.1 iGuard Status LED Indicator
Light indicators on iGuard LAN Port LED
Light color Condition description
Green On: Internet correspond speed is 100M
Flash: Data transmitting/receiving
Yellow On: Internet correspond speed is 10M
Flash: Data transmitting/receiving
Table.2 iGuard LAN LED Indicators

6
Chapter 3: Hardware Installation
Chapter 3 Hardware Installation
Before you start using the iGuard IP-220E network camera, you will need to set-up
both the hardware and software. The following is a flow chart on the installation
procedure:
Connect network cable, and power
Adapter
To iGuard IP-220E
Connect Network cable to ROUTER
/ DSL or Cable modem
Setup iGuard Web Manager
(Chapter 4) and iGuard-Viewer
(Cha
pter5) (Otional)
Router Programming (Appendix).
iGuard set-up completed
1
2
3
4
5

7
Chapter 3: Hardware Installation
3.1 Installation Procedure
Step 1:
Connect one end of the
Ethernet cable to any
available port on your hub,
router, or cable/dsl modem.
Step 2:
Plug the other end of the
Ethernet cable to the
network port on the iGuard
IP-220E.
Step 3:
Connect DC power adapter
output into iGuard IP-220E
socket.
Warning:
Please make sure the input Voltage and Frequency of the DC power adapter (DC
5.3V) is correct before plugging into the power outlet!

8
Chapter 4: iGuardware
Chapter 4: iGuardware
iGuardware is a collection of two utility programs: iGuard Utility and iGuardview. You
can use the iGuard Utility to quickly setup multiple iGuard units and you can use
iGuardview to monitor multiple cameras, and maybe most importantly to perform
motion tracking (V2.5 and above only). If you have a DHCP server on the network, the
iGuard will obtain an IP address automatically, and you can enter this IP address in IE
to launch the web manager (Chapter 5).
4.1 Installing iGuardware
Insert the software CD (or download from www.iguard.com) and click on setup if
autorun does not start.
Fig.3 iGuardware Installation
"iGuard Utility - This is a program that helps the user perform quick
installation. It will detect the current configuration and take the user through
the necessary network setup.
a. Click the ‘iGuard Utility’ button to start installation.
b. After the step by step installation is completed, the iGuard Utility group
will appear in Windows ’Start’ ‘Program Group’. “iGuard” Click this to
start the program.
"iGuardView - This is a windows based program designed to allow user to
control a large number of iGuard module located either in a LAN or on a
WAN.
"Read User’s Manual - Click to read iGuard’s User Manual. You will need
Adobe Acrobat Reader v5.0 or higher.

9
Chapter 4: iGuardware
"Adobe Acrobat Reader v5.0 - This will install Acrobat Reader v5.0 on your
local hard drive.
"Sun Java / ActiveX - Install Sun Java for viewing the video image by Java, or
install the OCX for viewing by ActiveX
4.2 Using iGuardware
4.2.1 iGuard Utility
The iGuard Utility main menu is shown below. The selection menu is located on the
left. The Serial Number, current Firmware and IP Address of every iGuard connected
to the LAN will be displayed on the table to the right.
Fig.4 iGuard Utility Main Menu
If the Devise Password is enabled at the factory, the IP address will be hidden and
you will need to use the device password to launch the setup wizard, where you can
reset the password.
If the password on your unit is disabled by your dealer and you are on the same LAN
(same subnet) then you can use the web manager to configure the iGuard IP-220E
camera by simply double click on the serial # of the camera. Everything discussed in
this chapter can be repeated in Chap.5
If Devise
Password
is enabled.
IP Address
hidden.
Table of contents


