IIDA art editions YAYOI KUSAMA User manual

For general information and charges (toll free)
EZau one Topauお客さまサポート(au Customer Support)お問い合わせ (Inquiries)
※Menus are subject to change without prior notice.
For loss, theft or damage and
operation information (toll free)
From fixed-line phones:
From au Cell phones:
From fixed-line phones:
From au Cell phones:
0077-7-111
157 area code not required
0077-7-113
113 area code not required
For inquiries, call: au Customer Service Center
From EZweb:
PRESSING ZERO WILL CONNECT YOU
TO AN OPERATOR AFTER CALLING 157
ON YOUR au CELL PHONE.
Access Method
EZau one Topauお客さまサポート(au Customer Support)みんなでQ&A なるほど!au (au User's Forum)
Read this code for an easy access to なるほど! au (au User's Forum).
※The packet communication charge applies.
なるほど! auみんなでつくる、auQ&AサイトAccess Method
Sales: KDDI CORPORATION・OKINAWA CELLULAR TELEPHONE COMPANY Manufactured by: TOSHIBACORPORATION
July 2009 Edition
Basic Manual
Cell phone and PHS operators collect and recycle unused telephones,
batteries and battery chargers at stores bearing the logo regardless of brand
and manufacturer to protect the environment and reuse valuable resources.
Read this code for an easy access to au Online
Manual.
※The au Online Manual accessible from this
product are those for the T001.
Illustrations and
Screenshots
in This Manual
Notes on
Cell Phone Use
Contents
Getting Ready
Making and
Answering Calls
Character Input
Global Function
Phone Book
Pair Function
Mail
Camera
EZweb
EZ News Flash/
au one Gadget
EZ Navi
TV (1Seg)
In Case of
Loss of Your cell phone
Troubleshooting
Index
Art Editions |YAYOI KUSAMA Basic Manual
Dots Obsession, Full Happiness with Dots Hand Bag for Space Travel My Doggie Ring-Ring
Introduction
Thank you for purchasing the Art Editions YAYOI KUSAMA. Before using your cell phone, be sure to read the Art Editions
YAYOI KUSAMA Basic Manual (this PDF manual) to ensure correct usage. After you have finished reading this manual, store
this PDF manual and the printed manuals in safe places so you can retrieve them whenever you need them.
Manuals for the Art Editions YAYOI KUSAMA
The Art Editions YAYOI KUSAMA comes with the Basic Manual and Instruction Manual.
●For learning the basics:
Read the Art Editions YAYOI KUSAMA Basic Manual (this manual).
●For learning details on using each function:
Read the supplied Art Editions YAYOI KUSAMA Instruction Manual (Japanese). Be sure to read the Safety Precautions
“安全上のご注意” to ensure proper usage of the cell phone.
The keyword searchable au Online Manual is also available on the au homepage:
http://www.au.kddi.com/manual/index.html
To access from EZweb: M⇒au one Top ⇒
auお客さまサポート
(au Customer Support) ⇒
オンラインマニュアル
(Online Manual)
※The au Online Manual accessible from this product are those for the T001.
Scan this QR code to access the au Online Manual. ▶
About This Product
There are the following three design variations of this product:
My Doggie Ring-Ring
Dots Obsession, Full Happiness with Dots
Hand Bag for Space Travel
Illustrations for the My Doggie Ring-Ring are used in this manual. Although each of the three models has a different
appearance from the other two models, the key layout and operations are basically the same.
•
•
•
•
KDFCKYBasic.indbiiKDFCKYBasic.indbii 09.6.181:38:39PM09.6.181:38:39PM
1
Illustrations and Screenshots in This Manual
Illustrations and Screenshots in This Manual
Note on Illustrations
The illustrations in this manual may look different from the actual cell phone in shape, color and typeface. The key
illustrations are also simplified as shown below.
Key Illustration Key Illustration
①K⑧M
②L⑨R
③Q⑩S
④
123
456
789
*0;
⑪
⑤!⑫T
⑥[GF ⑬U
⑦J⑭N
Note on Screenshots
The screenshots in this manual are simplified and may look different from the actual cell phone screens.
■
■
①
②
③
⑤
⑨
⑩
⑪
④
⑥
⑧
⑦
⑫
⑬
⑭
①
②
③
⑤
⑨
⑩
⑪
④
⑥
⑧
⑦
⑫
⑬
⑭
KDFCKYBasic.indb1KDFCKYBasic.indb1 09.6.181:38:41PM09.6.181:38:41PM

2
Notes on Cell Phone Use
Notes on Cell Phone Use
Cell Phone Etiquette
The cell phone always emits weak radio waves when power
is on.
Use the cell phone in an enjoyable and safe manner without
forgetting to be considerate of others around you.
Use of cell phones is not allowed in some places.
Do not use the cell phone while you are driving. Doing
so is both dangerous and prohibited by law.
Using a cell phone in an aircraft is prohibited by law.
Set Airplane Mode to ON and turn the cell phone
power off.
Radio waves from cell phones may interfere with
medical electrical equipment.
Some people close to you in crowded places such
as packed trains may be using a cardiac pacemaker.
Turn the cell phone off in such places.
Abide by the rules of hospitals and other medical
institutions where it is forbidden to use or carry cell phones.
Be considerate of where you use the cell phone and
how loudly you talk.
Do not make calls in theaters, museums, libraries, and
other similar places. Turn power off or turn on manner
mode not to disturb others around you by ring tones.
Do not use the cell phone on a street where you might
interrupt the flow of pedestrians.
Move to areas where you will not inconvenience others
on trains or in hotel lobbies.
Refrain from talking in a loud voice.
●
•
•
●
•
•
●
•
•
•
•
Obtain the permission of other people before you take
their photos with the cell phone's camera.
Do not record information with the cell phone's camera
in bookstores and other locations where taking photos
is not permitted.
Do Not Use the Cell Phone While Driving!
Turn off your cell phone or put it in Drive Mode while
driving.
Do not use the cell phone while driving a car/motorcycle
or riding a bicycle. It may result in a traffic accident. Using
a cell phone while driving is prohibited by law. Using a
cell phone while riding a bicycle may also be punishable
by law.
Prohibited!
Looking at a cell phone display
Talking on a cell phone while holding it
Drive Mode
In Drive Mode, a Japanese message meaning "I'm
driving now, so I can't answer your call." is played
when a call is received, and asks the caller to leave a
message on the answer memo.
When the standby screen is displayed, press tT, use
gGto select Drive and then press {[(Set).
•
•
•
•
KDFCKYBasic.indb2KDFCKYBasic.indb2 09.6.181:38:45PM09.6.181:38:45PM

3
Notes on Cell Phone Use
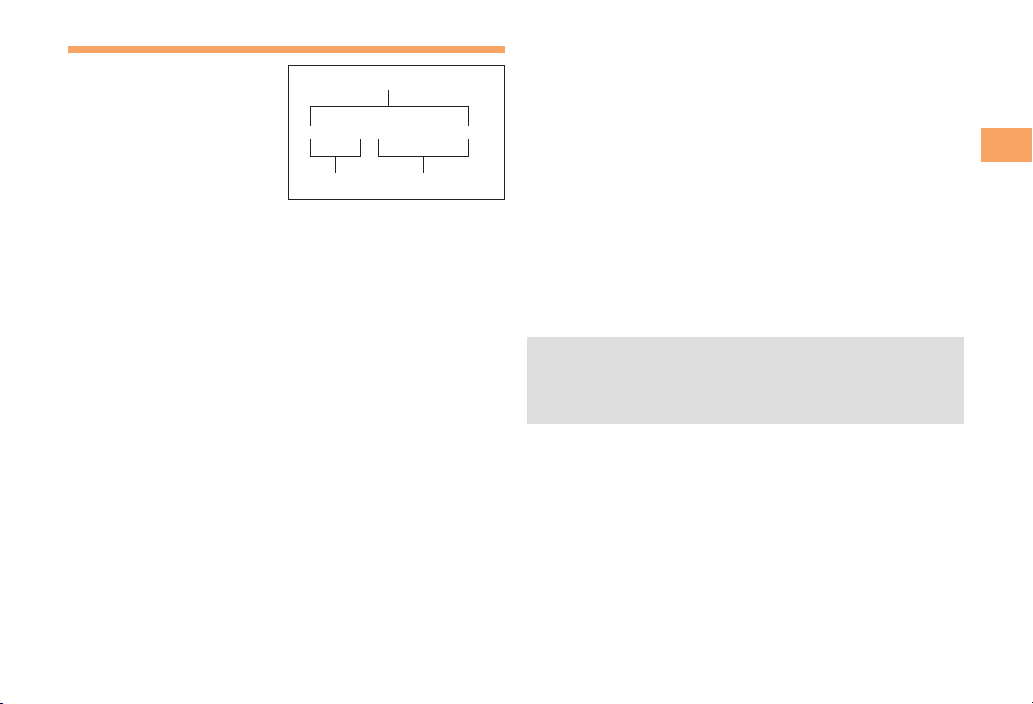
Disaster Message Board Service
When a large scale disaster occurs, you can register
your safety information from EZweb. The registered
information can be referred from anywhere in Japan from
EZweb or Internet.
When a large scale disaster occurs,
from an au phone, you can register your
safety information (i.e. your condition
and comments) to the 災害用伝言板
(Disaster Message Board) created on
the EZweb.
After registration of your safety
information, e-mail is sent to your family
or acquaintances you have previously
designated to notify that your safety
information has been uploaded to
the 災害用伝言板 (Disaster Message
Board).
You can inquire for safety information
of a person by entering his/her phone
number from EZweb or Internet.*
* To inquire from other carriers' cell
phone, a PHS or PC, access
"http://dengon.ezweb.ne.jp/".
Access
M⇒au one Top ⇒
災害用伝言板
(Disaster
Message Board)
http://dengon.ezweb.ne.jp/
•
•
•
The maximum storage period of the registered
information is 72 hours.
The maximum available number of registrations is 10
per phone number. When the number of registrations
exceeds 10, the oldest one is overwritten.
The demonstration of this service can be referred to
anytime by pressing mM⇒au one Top ⇒
auお客さま
サポート
(au Customer Support) ⇒
調べる
(Search)
⇒
災害用伝言板(デモ版)
(Disaster Message Board
(Demo Version)).
To view the Disaster Message Board in English, select
English from the top menu of the Disaster Message Board.
Notes on the Device Name
This product uses a common USB driver with the T001, and
is recognized as "T001" when connected to a PC or other
external equipment, or in the following cases:
"T001" is displayed when installing the USB driver.
"T001" is used as the device name in AT command (ATI)
strings.
"T001" is displayed in Device Manager of a PC.
"T001" is displayed as the device name when using the
LISMO Port.
This product is displayed as "T001" on the device list of a
paired Bluetooth device.
This product is displayed as "T001" on external equipment
connected via infrared communication.
"T001" is displayed as the device name when
downloading contents from websites.
Note that the au Online Manual and Toshiba User Club Site
accessible from this product are those for the T001.
•
•
•
•
•
•
•
•
•
•
•
Registering
safety
information
Registering
safety
information
Inquiring
for safety
information
Inquiring
for safety
information
KDFCKYBasic.indb3KDFCKYBasic.indb3 09.6.181:38:46PM09.6.181:38:46PM

4
Contents
Contents
Introduction
Illustrations and Screenshots in This Manual
1
Notes on Cell Phone Use 2
Cell Phone Etiquette …………………………………… 2
Do Not Use the Cell Phone While Driving!…………… 2
Disaster Message Board Service …………………… 3
Notes on the Device Name …………………………… 3
Contents 4
Getting Ready 6
Checking the Contents of the Box …………………… 6
Names of Parts ………………………………………… 7
Charging the Battery Pack …………………………… 8
Learning the Basics …………………………………… 9
Turning On Power ……………………………………… 10
Switching the Display Language to English ………… 10
Initial Setup of E-mail and EZweb …………………… 10
Checking Your Phone Number and E-mail Address
…10
Display Indicators ……………………………………… 11
Using Main Menu ……………………………………… 12
Changing Your E-mail Address ……………………… 13
Security Code and Passwords………………………… 14
Making and Answering Calls 15
Making a Call …………………………………………… 15
Making an International Call…………………………… 15
Answering a Call ……………………………………… 16
Returning a Call (Outgoing History/Incoming History
) … 17
One-ring Calls…………………………………………… 17
Adjusting the Earpiece Volume during a Call ……… 17
Turning On Manner Mode……………………………… 17
Changing the Incoming Ring Tone …………………… 18
Adjusting the Incoming Ring Tone Volume ………… 18
Turning On the Answer Memo………………………… 19
Global Function 20
Setting the Area ………………………………………… 20
Obtaining the Latest PRL (Preferred Roaming List)… 20
Calling Japan from Overseas ………………………… 21
Character Input 22
Character Entry Modes ………………………………… 22
Entering Alphanumeric Characters …………………… 22
Entering E-mail Addresses …………………………… 23
Entering Pictograms …………………………………… 24
Phone Book 25
Saving a Phone Book Entry …………………………… 25
Dialing from the Phone Book ………………………… 25
Editing Phone Book Entries …………………………… 25
Saving a Phone Number from the Incoming
or Outgoing History …………………………………… 26
Pair Function 27
Registering a Pair Partner …………………………… 27
Making a Call to a Pair Partner ……………………… 27
Sending Mail to a Pair Partner………………………… 27
KDFCKYBasic.indb4KDFCKYBasic.indb4 09.6.181:38:47PM09.6.181:38:47PM

5
Contents
Mail 28
Using E-mail …………………………………………… 28
Creating and Sending E-mail Messages …………… 28
Reading Received E-mail Messages ………………… 29
Reading an E-mail Message
with an Attached Photo or Movie……………………… 29
Replying to Received E-mail Messages……………… 29
Rejecting Spam ………………………………………… 30
Using C-mail …………………………………………… 31
Creating and Sending C-mail Messages …………… 31
Reading Received C-mail Messages ………………… 31
Camera 32
Photo Taking Tips ……………………………………… 32
About Photo Modes …………………………………… 32
Taking a Photo ………………………………………… 33
Viewing Photos ………………………………………… 33
EZweb 34
Accessing Sites ………………………………………… 35
Bookmarking Frequently Accessed Pages ………… 36
Viewing Bookmarked Pages ………………………… 36
Checking Charges ……………………………………… 37
Downloading Chaku-Uta-Full®/Chaku-Uta®………… 37
EZ News Flash/au one Gadget
38
Basic Operations ……………………………………… 38
Setting EZ News Flash ………………………………… 38
EZ Navi 40
Passenger Seat Navi for People
in the Passenger Seat to Check the Route ………… 40
Security Navi to Check Where Your Kids Are ……… 40
EZ Navi Walk for When You Go Out ………………… 41
Evacuate Navi to Guide You Home or to Nearby
Evacuation Areas during Disasters…………………… 42
TV (1Seg)
43
Initial Setup of au Media Tuner ……………………… 43
Watching TV (1Seg) …………………………………… 44
Basic Operations ……………………………………… 44
Exiting the au Media Tuner …………………………… 44
In Case of Loss of Your Cell Phone 45
Setting Conditions for Activating the Remote Ctrl Lock ……
45
Remotely Activating the Remote Ctrl Lock on
Your Cell Phone ………………………………………… 45
Activating the Remote Ctrl Lock
by the Security Lock Service ………………………… 46
Troubleshooting 47
Index 49
KDFCKYBasic.indb5KDFCKYBasic.indb5 09.6.181:38:48PM09.6.181:38:48PM

6
Getting Ready
Getting Ready
Checking the Contents of the Box
The box contains the cell phone and accessories.
Cell phone• Battery pack• Toshiba earphone conversion adapter 01
for external connection jack
•
CD-ROM
Instruction Manual (Japanese)
Warranty (Japanese)
Safety Precautions (Japanese)
Global Passport CDMA Owner’s Guide (Japanese)
Osaifu-Keitai®Guide (Japanese)
JIBUN BANK Launcher Operation Guide (Japanese)
Guaranty Card
•
•
•
•
•
•
•
•
Purchase a specified AC adapter, microSD memory card, stereo earphones or USB cable as required as they are not
included in the box (sold separately).
•
KDFCKYBasic05getting.indd6KDFCKYBasic05getting.indd6 09.6.229:32:08AM09.6.229:32:08AM

7
Getting Ready
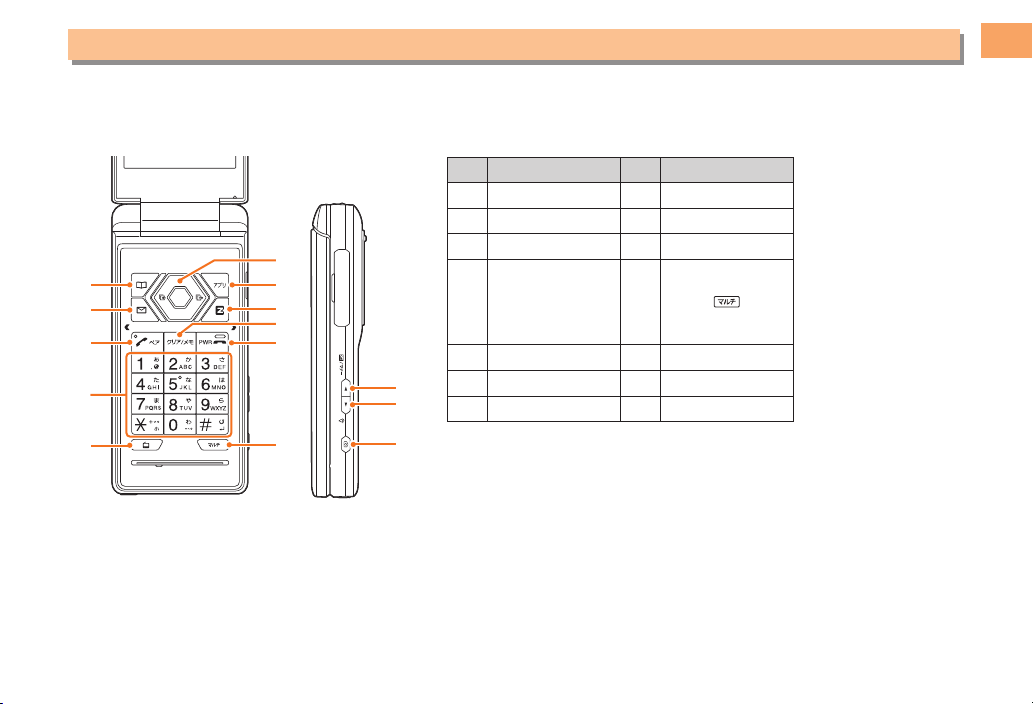
Names of Parts
Open Position■Closed Position
From the Front
■
From the Back
From the Sides
Camera lamp
Mobile light
Camera (lens)
Built-in
antenna
Battery
pack
Built-in
antenna
Power key/
End key
EZapps key/
Soft key 2
Speaker
Sub-display
Incoming
LED
Charge
indicator
EZ key
Infrared port
Multi key
au IC-Card*
Battery pack cover lock
release button Battery pack cover
Memory card slot
Handle
eyelets
Camera key
Side key 2
Earpiece
Side key 1
External
connection
jack
Hand strap
eyelet
Phone book key/
Soft key 1
Microphone
Clear key/
Memo key
Mail key
Send key/
Pair key
Keypad,
key,
key
One-touch TV
key
Display
Lux Sensor
Warp function
key
* Do not remove this
card unnecessarily as
your phone number is
recorded on it.
Hand Bag for Space Travel
KDFCKYBasic.indb7KDFCKYBasic.indb7 09.6.181:38:49PM09.6.181:38:49PM

8
Getting Ready
Charging the Battery Pack
The battery pack is not fully charged at the time of purchase.
Be sure to charge the battery pack before using the cell
phone for the first time.
An AC adapter is not included. Purchase a specified AC
adapter (sold separately).
Connect a specified AC adapter to the cell
phone with the battery pack attached.
Open the cover of the external connection jack. Check
the shape of the connector of the AC adapter, and
plug it straight into the external connection jack.
Unfold the power plug of the AC adapter and
plug it into a 100 V AC power outlet.
Confirm that the charge indicator lights.
Charging: The charge indicator lights.
Charging finished: The charge indicator goes out.
•
➡
•
➡
➡
•
•
Be sure to close the cover of the external connection
jack when charging is finished.
Do not pull or twist the cover of the external
connection jack forcibly.
Be sure to use the common AC adapter 02 (sold
separately) when charging overseas.
•
•
•
Common
AC adapter
01/02
100 V AC
power outlet
Power
plug
Charge indicator
Connector
External
connection jack
Common
AC adapter
01/02
100 V AC
power outlet
Power
plug
Charge indicator
Connector
External
connection jack
KDFCKYBasic.indb8KDFCKYBasic.indb8 09.6.181:38:52PM09.6.181:38:52PM

9
Getting Ready
Learning the Basics
Key Assignments
Side Key Assignments
If you lose track of where you are or if you make a mistake, press rRto return to the previous screen. Return to the
standby screen by holding down sSfor at least one second.
■
■
•
〜:
: Display Notification
window/Shortcut menu.
: Make/answer calls.
Use the Pair function.
: Activate au Media Tuner.
: Set/cancel Answer memo.
Delete characters.
Cancel operation.
: Display Incoming History. : Display the ticker field, info pane and
gadget (setting icon).
: Display Main menu.
: Display EZ Service menu.
: Turn power on/off.
End call/communication.
Cancel operation.
Input phone numbers and characters.
: Display Outgoing History.
: Display EZapps menu.
: Use Phone Book.
: Display E-mail/C-mail menu.
: Activate Camera.
: Set/cancel manner mode. : Activate Camera.
: Set/cancel manner mode.
KDFCKYBasic.indb9KDFCKYBasic.indb9 09.6.181:38:53PM09.6.181:38:53PM
10
Getting Ready
Hiding/Redisplaying the
Notification Window
When the Notification window is
displayed on the standby screen, you
can temporarily hide it by pressing K
(Back) and then display the Main menu
by pressing [.
To redisplay the hidden Notification
window, press Bwhen the standby
screen is displayed.
Turning On Power
Hold down Sfor at least one second.
You cannot receive or make calls if (out of range
indicator) is displayed.
Turning Off Power
When the standby screen is displayed, hold down Sfor
at least one second.
Switching the Display Language
to English
You can switch the display language for function names
and other items to English.
When the standby screen is displayed, press [.
Use Eto select
機能
(Function) and then
press [(選択 [Select]).
■
•
■
➡
Use Gto select
画面表示
(Screen Display) and
then press [(選択 [Select]).
Use Gto select Set Language and then press
[(選択 [Select]).
Use Gto select English and then press
[(Set).
Initial Setup of E-mail and EZweb
To use e-mail and EZweb, you need to apply for an EZweb
subscription. If you did not apply for an EZweb subscription
at the time of purchase, contact an au shop or the au
Customer Service Center.
Also, before use, you need to configure initial settings. Your
e-mail address is assigned automatically in the initial setup.
When the standby screen is displayed, press L.
Press [(OK).
After a short while, your e-mail address is displayed.
Press [(OK).
The initial settings are complete.
You can also configure initial settings by pressing mM
or jJ.
Checking Your Phone Number
and E-mail Address
When the standby screen is displayed, press [
and then 0.
➡
➡
➡
➡
➡
•
Notification windowNotification window
KDFCKYBasic.indb10KDFCKYBasic.indb10 09.6.181:38:55PM09.6.181:38:55PM
11
Getting Ready
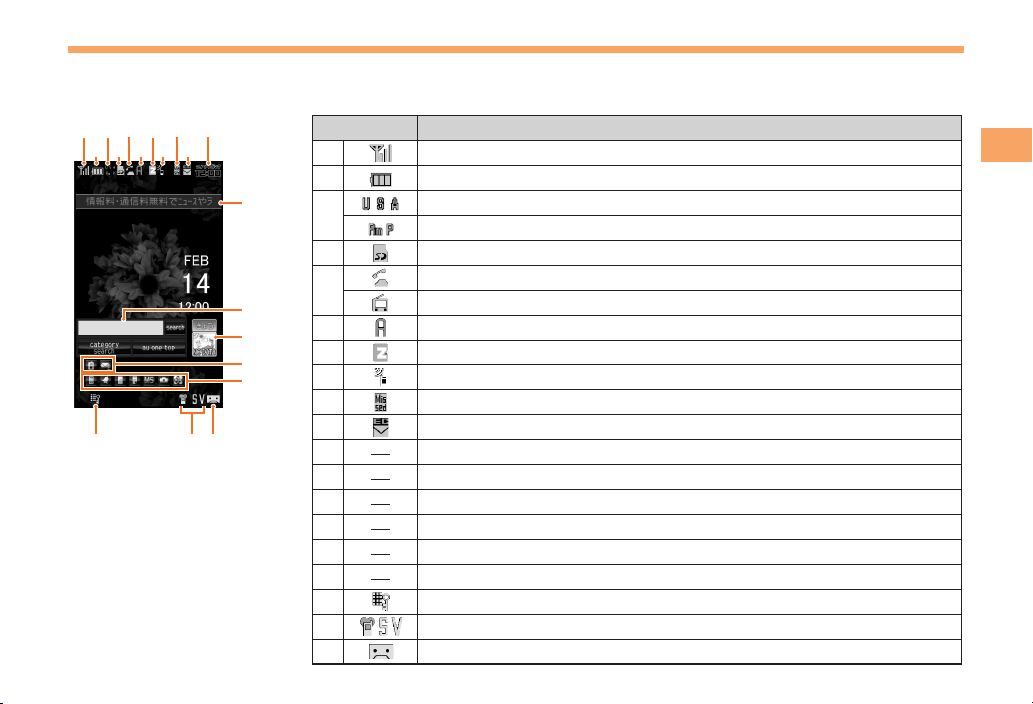
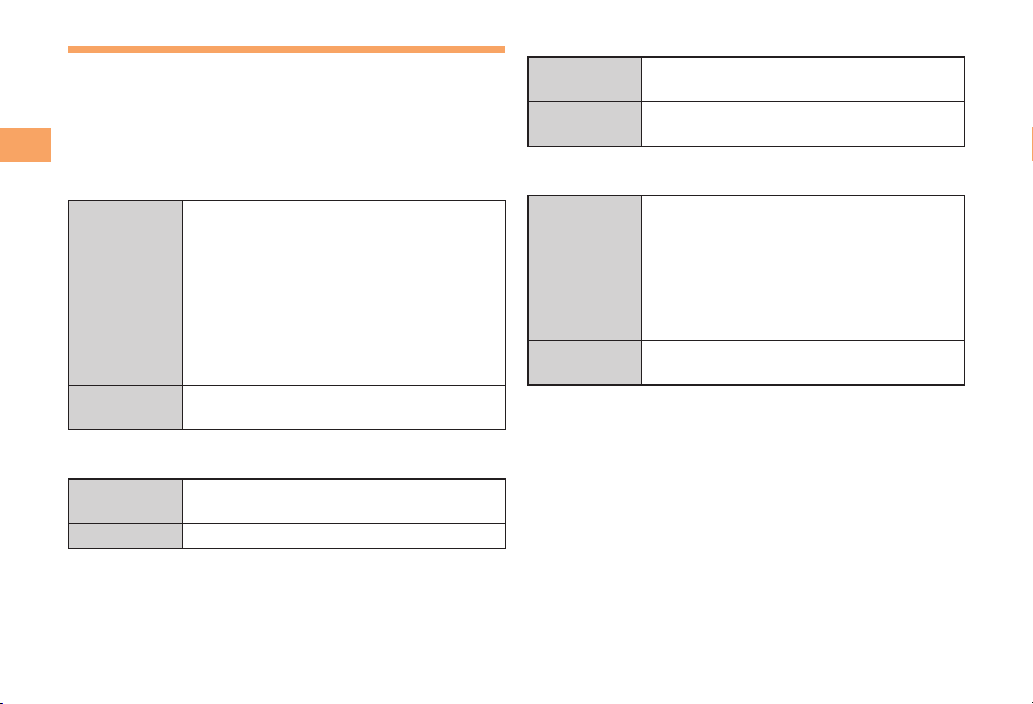
Display Indicators
Display indicators inform you of mail arrival, current settings, etc.
Display
Indicator Description
①Signal strength
②Battery level
③Roaming area
Calling/packet communication available
④A microSD memory card (commercially available) inserted
⑤During a call
au Media Tuner activated
⑥EZapps activated
⑦Connecting to EZweb
⑧Receiving EZ News Flash information
⑨Missed calls
⑩New or unread e-mail/C-mail
⑪Current date and time
⑫Ticker field
⑬Search window
⑭Info pane
⑮Notification icon
⑯Shortcut menu
⑰Auto Lock activated
⑱Manner mode set
⑲Answer memo or manner mode set
■
①
⑰⑱⑲
⑫
⑭
⑬
②
③
④
⑦
⑥ ⑩⑧
⑨ ⑪⑤
⑯
⑮
①
⑰⑱⑲
⑫
⑭
⑬
②
③
④
⑦
⑥ ⑩⑧
⑨ ⑪⑤
⑯
⑮
KDFCKYBasic.indb11KDFCKYBasic.indb11 09.6.181:38:56PM09.6.181:38:56PM

12
Getting Ready
Sub-display
Indicator Description
①Signal strength
②Battery level
③Current date and time
④Manner mode set
⑤
Auto Lock activated
au Media Tuner activated
Roaming area
The date and time are set automatically.
You can hide the ticker field, info pane and search
window by pressing sS. To redisplay the hidden
items, press gGand then press sS.
Using Main Menu
The Main menu has three possible patterns. The "Scent"
pattern is set at the time of purchase.
■
•
•
Each Main menu pattern has a different set of items.
Scent Clock Air
JIBUN BANK Jump to Uta-tomo Camera
LISMO Player TV/Radio LISMO Player
Camera Camera TV/Radio
Seasonal Info. Seasonal Info. Seasonal Info.
TV/Radio LISMO Player Run&Walk
Tool Tool Tool
EZ FeliCa Jump to LISMO
Music Search Personal Trainer
Data Folder Data Folder Data Folder
Infrared
Jump to EZ Machi-Uta
Daily Life
Bluetooth Jump to au one
Music Jump to au
Smart Sports
Global Function Jump to au Records Bluetooth
Function Function Function
Change to list
menu/Change
to tile menu
Change to list
menu/Change to tile
menu
Change to list
menu/Change
to tile menu
①
④⑤
②③①
④⑤
②③
KDFCKYBasic.indb12KDFCKYBasic.indb12 09.6.181:39:02PM09.6.181:39:02PM
13
Getting Ready
Changing Your E-mail Address
You can change the account
name of your e-mail address.
When the standby screen is displayed, press L.
Use Gto select E-mail Setup and then press
[(Select).
Use Gto select Other and then press
[(Select).
The cell phone connects to the server.
Use Gto select
Eメールアドレスの変更
(Change
E-mail Address) and then press [(Select).
Use Gto select the entry box, press [(Input),
enter your security code, and then press [(OK).
Your security code is the four-digit number you wrote
on your subscription form.
If the security code is incorrectly entered three times
consecutively during a single day, the e-mail address
change operation will be disabled until the next day.
Use Gto select
送信
(Send) and then press
[(Select).
➡
➡
➡
➡
•
•
➡
Use Gto select
承諾する
(Accept) and then
press [(Select).
Use Gto select the entry box, press [(Input),
enter an e-mail address using single-byte
alphanumeric characters, and then press
[(OK).
For details on entering e-mail addresses, see page 22.
Use Gto select
送信
(Send) and then press
[(Select).
Use Gto select OK, press [(Select) and then
[(OK).
Check that the e-mail address has been updated
before pressing [(OK).
Your e-mail address cannot be changed if the new
address you enter in the above procedure is already
being used. In this case, enter a different e-mail
address.
➡
➡
•
➡
➡
•
•
△△△@ezweb.ne.jp
Account name Domain name
E-mail address
△△△@ezweb.ne.jp
Account name Domain name
E-mail address
KDFCKYBasic.indb13KDFCKYBasic.indb13 09.6.181:39:04PM09.6.181:39:04PM
14
Getting Ready
Security Code and Passwords
You can use a security code and other passwords
described below.
Take care not to forget your security code and passwords,
because they are required for performing various
operations and using subscription services.
Security Code
Usage
Example
①Using the Answering Service (Voice
Mail) and Call Transfer remotely from a
fixed-line phone
②Making inquiries, applications, and
changes while using au Customer
Service Center voice guidance, au web
pages, and EZweb
③Changing the settings of Mail Filter or
Other under E-mail Setup
Initial Setting The four-digit number you wrote on your
subscription form
Lock No.
Usage
Example
Changing various settings of the cell
phone
Initial Setting 1234
■
■
EZ Password
Usage
Example
Subscribing or canceling subscriptions to
EZweb fee-based contents
Initial Setting The four-digit number you wrote on your
subscription form
Premium EZ Password
Usage
Example
①Subscribing or canceling subscriptions
to EZweb fee-based contents paid
by
まとめて
au
支払い
(au Collective
Payment Service)
②Purchasing products from EZweb sites
using
まとめて
au
支払い
(au Collective
Payment Service)
Initial Setting The four-digit number you wrote on your
subscription form
■
■
KDFCKYBasic.indb14KDFCKYBasic.indb14 09.6.181:39:05PM09.6.181:39:05PM

15
Making and Answering Calls
Making and Answering Calls
Making a Call
When the standby screen is displayed, use 0
to 9to enter a phone number.
When calling to a fixed-line phone, you also need to enter
the area code.
Press Q.
To end the call, press S.
After you enter a phone number, you can add 184 or
186 to the phone number as follows:
Press {[(Call).
Use gGto select Add Special No. and then press
{[(OK).
Use gGto select 184 or 186 and then press
{[(Add).
184: When you do not want to inform the other party of
your phone number.
186: When you want to inform the other party of your
phone number.
•
➡
•
•
➡
➡
➡
Making an International Call
001 International Call Service
Available without any additional application
Example: To call 212-123-△△△△ in the USA
Enter the access code, a country code, area code
and phone number, and then press Q.
International call charges are billed together with
monthly local call charges.
For more information on 001 International Call Service,
dial either of the following numbers:
From au cell phones (toll-free):
157 (area code not required)
From fixed-line phones (toll-free):
0077-7-111
(Open 9:00 to 20:00 everyday)
■
•
•
001
↑
KDDIInternational
accesscode
↑
Country
code
(USA)
↑
Areacode
↑
Phonenumber
010 212 123
-
XXXX1001
↑
KDDIInternational
accesscode
↑
Country
code
(USA)
↑
Areacode
↑
Phonenumber
010 212 123
-
XXXX1
KDFCKYBasic06Call.indd15KDFCKYBasic06Call.indd15 09.6.229:34:07AM09.6.229:34:07AM
16
Making and Answering Calls
Answering a Call
To answer a call, press Q.
To end the call, press S.
Display When a Call is Received
The phone number of the caller appears.
If the caller's phone number and name are in the phone
book, the name is also displayed.
When the phone number of the caller is not displayed, one
of the following indicators may appear.
Indicator Meaning
ID Unsent The caller did not send a Caller ID.
Payphone The call is from a pay phone.
Not Support The call is from a phone that does not
support Caller ID.
Missed Call Notification
If you did not answer a call, and Missed Call are displayed
to let you know that you missed a call.
To check the caller's phone number, use Fto select
Missed Call and then press [(Select). You can then return
the call (see the procedure on the right).
•
■
■
Returning a Call (Outgoing History/
Incoming History)
Example: Returning a call to a phone number in the
incoming history
When the standby screen is displayed, press D.
Press Cwhile the standby screen is displayed to display
the Outgoing History screen.
Use Gto select the phone number you want
to call and then press [(Detail).
Press Cto display the Outgoing History screen.
Press Q.
The cell phone can store up to 50 phone numbers in
each of the incoming and outgoing history.
One-ring Calls
What is a One-ring Call?
A one-ring call is a call from an unknown caller that only
rings once, causing it to be stored in the incoming history.
One-ring calls are often used to get you to return the call,
which will connect you to a dating service or some other
service that charges you at high rates.
•
➡
•
➡
•
■
KDFCKYBasic.indb16KDFCKYBasic.indb16 09.6.181:39:06PM09.6.181:39:06PM

17
Making and Answering Calls
One-ring Indicator
(Red) indicator on the Incoming History screen indicates
you have received a one-ring call (a call rang for three
seconds or shorter). Be careful when you return a call to an
unknown caller.
Adjusting the Earpiece Volume
during a Call
During a call, use G.
A: Increases the volume.
B: Decreases the volume.
Press [(OK).
Turning On Manner Mode
When the standby screen is displayed, hold down
Tfor at least one second.
This turns on manner mode, and displays , and on
the standby screen. This also turns on Answer memo,
which is indicated by on the standby screen.
Turning Off Manner Mode
When the standby screen is displayed, hold down Tfor
at least one second.
Turning off manner mode causes , and to disappear
from the standby screen. Answer memo is also turned off,
which is indicated by disappearing from the standby
screen.
■
•
•
➡
■
Even in manner mode, the cell phone still emits a
sound when autofocusing, a shutter sound when you
take a photo.
Changing the Incoming Ring Tone
When the standby screen is displayed, press [.
Use Eto select Function and then press
[(Select).
Use Gto select Sound/Vib/Lamp and then
press [(Select).
Use Gto select Incoming Setup and then press
[(Select).
Use Gto select Incoming Call and then press
[(Select).
Use Gto select (Ringtone) and then press
[(Select).
Use Gto select Original and then press
[(Select).
Use Gto select a ring tone and then press
[(Set).
The incoming ring tone is set.
If you press K(Play), the tone plays.
Press J(OK).
•
➡
➡
➡
➡
➡
➡
➡
•
➡
KDFCKYBasic.indb17KDFCKYBasic.indb17 09.6.181:39:07PM09.6.181:39:07PM
18
Making and Answering Calls
Adjusting the Incoming Ring
Tone Volume
When the standby screen is displayed, press [.
Use Eto select Function and then press
[(Select).
Use Gto select Sound/Vib/Lamp and then
press [(Select).
Use Gto select Incoming Setup and then press
[(Select).
Use Gto select Incoming Call and then press
[(Select).
Use Gto select (Ringtone Volume) and
then press [(Select).
Use Gto adjust the volume and then press
[(Set).
Each press of Gchanges the volume one step.
STEP ↑The ring tone volume gradually increases.
STEP↓ The ring tone volume gradually decreases.
Maximum
↑
Standard
↓
Minimum
The ring tone sounds at the set volume.
OFF The ring tone does not sound.
Press J(OK).
➡
➡
➡
➡
➡
➡
•
➡
Turning On the Answer Memo
When the standby screen is displayed, hold down
Rfor at least one second.
is displayed on the standby screen.
Turning Off the Answer Memo
When the standby screen is displayed, hold down Rfor
at least one second. The answer memo is turned off and
disappears from the standby screen.
The cell phone can record a maximum of ten
messages, each up to 60 seconds long.
Answer memo is a function that automatically answers
calls and allows callers to record messages. Use the
Answering Service (Voice Mail) when your phone is
turned off or when you are in a location where a signal
cannot be received.
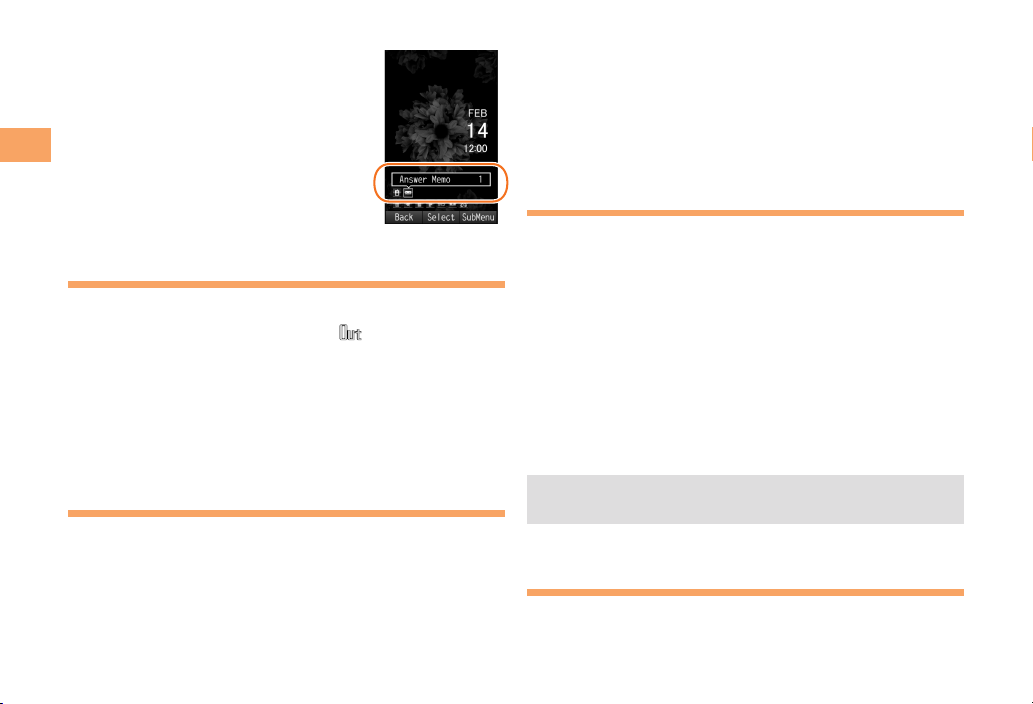
Playing a Message
If a message is recorded, Answer Memo appears
on the standby screen.
Use Fto select Answer Memo and then press
[(Select).
Use Gto select the message you want to play
and then press [(Play).
To stop playing the message, press [(Stop).
■
•
•
■
➡
➡
•
KDFCKYBasic.indb18KDFCKYBasic.indb18 09.6.181:39:08PM09.6.181:39:08PM
Table of contents
Other IIDA Cell Phone manuals


