IIDA INFOBAR A01 Installation guide

June 2011 Edition

ii
ue00_as35_9e.fm
[ii/ii] ~~~~<MFZ>
Thank you for purchasing the INFOBAR A01.
Before using your INFOBAR A01, be sure to read the Basic Manual
(this PDF manual) to ensure correct usage. After you have finished
reading this manual, store this PDF manual and the printed manuals in
safe places so you can retrieve them whenever you need them. If the
printed manuals are lost, please contact an au shop or Customer
Service Center.
Be sure to read the Safety Precautions “安全上のご注意” in the
Instruction Manual (Japanese) to ensure proper usage of the
INFOBAR A01.
For troubleshooting, check the symptom of your INFOBAR A01 in
auお客さまサポート (au Customer Support) on the au homepage.
http://www.kddi.com/customer/service/au/trouble/kosho/
index.html
•You cannot receive or make calls in a location where the signal
cannot be received, even within the service area. Calling may not be
available in a location where the signal is weak. If you move to a
location where the signal is weak during a call, the call may be
interrupted.
•The au phone is a digital cell phone and can maintain a high call
quality until the signal weakness reaches its limit. Therefore, once
the limit has been reached, the call may be disconnected suddenly.
•Note that the au phone uses signals which may be intercepted by a
third party. (However, the CDMA/GSM system enables highly
confidential call communications.)
•The au phone is a wireless station which is compliant with the Radio
Act, and may be subject to inspections regulated by the Radio Act.
•When you insert the au IC-Card, the product number information of
your au phone is sent to the au server for the security and operation
status notification of the au phone.
•Always be considerate of others around you when using your au
phone in public places.
•For a child’s use, read the Basic Manual and give your child
instructions on proper use.
•The INFOBAR A01 is a cell phone compatible with the international
roaming service. Each network service which is described in the
Basic Manual varies depending on the area or service. For details,
refer to supplied Global Passport Owner’s Guide (Japanese).
Preface
Basic Manual (this PDF manual) describes basic operations of major functions
of the INFOBAR A01.
For detailed descriptions on various functions, refer to the Instruction Manual
(Japanese).
Downloading Manuals
You can download the Basic Manual (this manual) and the Instruction Manual
(Japanese) in PDF format from the au homepage.
http://www.au.kddi.com/torisetsu/index.html
•To display the Basic Manual (this manual) and the Instruction Manual
(Japanese) in PDF format on the INFOBAR A01, purchase the full version of
Documents To Go or install an application which allows you to display PDF
files.
Online Manual
Online manuals are also provided on the au homepage, which are from the
Instruction Manual (Japanese) and are reorganized in a searchable format.
http://www.au.kddi.com/manual/index.html
Safety Precautions
Before Using an au Phone
as35_ue.book ii ページ 2011年7月20日 水曜日 午後2時26分

1
Introduction
~~~~<MFZ>
ue01_as35_9e.fm
[1/3]
Cell phones always emit weak radio waves when power is on. Use cell
phones in an enjoyable and safe manner without forgetting to be
considerate of others around you.
■Use of cell phones is not allowed in some places.
•Using a cell phone while driving a car/motorcycle is dangerous and
is prohibited by law. Also, using a cell phone while riding a bicycle
may be punished by law.
•Using a cell phone in an aircraft is prohibited.
■Be considerate of where you use the cell phone and
how loudly you talk.
Do not make calls in theaters, museums, libraries, and other similar
places. Turn power off or turn on manner mode so as not to disturb
others around you by ring tones.
•Do not use the cell phone on a street where you might interrupt the
flow of pedestrians.
•Move to areas where you will not inconvenience others on trains or in
hotel lobbies.
•Refrain from talking in a loud voice.
•Obtain the permission of other people before you take their photos
with the cell phone’s camera.
■Be considerate of people around you.
•Some people close to you in crowded places such as packed trains
may be using a cardiac pacemaker. Turn the cell phone off in such
places.
•Abide by the rules of hospitals and other medical institutions where
it is forbidden to use or carry cell phones.
Check all the contents are included.
●Instruction Manual (Japanese)
●Safety Precautions (Japanese)
●Notice Sheet (Japanese)
●Setting Guide (Japanese)
●JIBUN BANK Service Guide (Japanese)
●Global Passport Owner’s Guide (Japanese)
●au International Call Guide (Japanese)
The following items are not included.
•Purchase a specified charger (sold separately).
•The illustrations in this manual may look different from the actual
product.
Cell Phone Etiquette Accessories
•AC adapter
•Earphone
•microUSB cable
INFOBAR A01
Warranty
(Japanese) Battery pack
(SHX11UAA)
microSD memory card
(2 GB) (Sample)
* This is inserted in the
INFOBAR A01 at the time
of purchase.
SHARP microUSB-3.5φ
conversion cable 01
(SHX11QVA)
as35_ue.book 1 ページ 2011年7月20日 水曜日 午後2時26分

2
Introduction
~~~~<MFZ>
ue01_as35_9e.fm
[2/3]
■Note on Key Illustrations
In this manual, the key illustrations are simplified as shown below.
■Description of Operations for Selecting Item/Icon/
Key etc.
In this manual, operation steps are described as below.
■Note on Screenshots
The screenshots in this manual are simplified and may look different
from the actual screens.
You have to use each security code for using the INFOBAR A01.
You can use a security code and other passwords described below.
Take care not to forget your security code and passwords because
they are required for performing various operations and using
subscription services.
●Security Code
Illustrations and Descriptions in This
Manual
Description Explanation
On the character entry
screen,
[Input mode.
Tap on the character entry screen.
Then tap Input mode.
On the widget Home,
e[Add.
Press eon the widget Home. Then tap
Add.
•This manual refers to “SHARP microUSB-3.5φconversion cable 01” as
“microUSB-3.5φconversion cable”.
Security Code and PIN Code
Security Code and Passwords
Usage
Example
AUsing the Answering Service (Voice Mail) and Call Transfer
remotely from a fixed-line phone
BMaking inquiries, applications, and changes while using
Customer Service Center voice guidance, and au homepage
Initial
Setting
The four-digit number you wrote on your subscription form
●Lock No. ●PIN Code
Usage
Example
Setting/Canceling Screen
lock, Remote lock, Restrict
address book, etc.
Usage
Example
Preventing unauthorized
use of the au IC-Card by a
third party
Initial
Setting
1234 Initial
Setting
1234
as35_ue.book 2 ページ 2011年7月20日 水曜日 午後2時26分

3
Introduction
~~~~<MFZ>
ue01_as35_9e.fm
[3/3]
If the PIN code is incorrectly entered three times consecutively, the
PIN code will be locked. Use the PUK code to unlock the PIN code.
■PIN Code
You can set the INFOBAR A01 to require PIN code entry every time
the power is turned on, to prevent unauthorized use of the au IC-Card
by a third party.
•At the time of purchase, the PIN code is not to be required to use
phone. On the iida Home, tap Settings [Location & security
[Set up UIM card lock [Mark Lock UIM card to set the PIN code to
be required.
The PIN code is also required when setting Lock UIM card.
•The initial setting of the PIN code is “1234”. On the iida Home,
tap Settings [Location & security [Set up UIM card lock
[Change UIM PIN to change the PIN code to a four- to eight- digit
number.
■PUK Code
Enter the PUK code when the PIN code is locked.
•PUK code is an eight-digit number given at the time of purchase,
and is printed on the back side of the plastic card where your au
IC-Card is attached.
•When you enter the PUK code, set the new PIN code with Change
UIM PIN.
•If the PUK code is incorrectly entered ten times consecutively,
contact an au shop, PiPit or the Customer Service Center.
PIN Code
•When the PIN code is locked, the INFOBAR A01 may be restarted for the
security reasons.
as35_ue.book 3 ページ 2011年7月20日 水曜日 午後2時26分

4
Contents
~~~~<MFZ>
ue02_as35_9e.fm
[4/5]
Preface............................................................ ii
Safety Precautions.......................................... ii
Before Using an au Phone.............................. ii
Cell Phone Etiquette ...............................................1
Accessories.............................................................1
Illustrations and Descriptions in This Manual..........2
Security Code and PIN Code ..................................2
Security Code and Passwords................................2
PIN Code.................................................................3
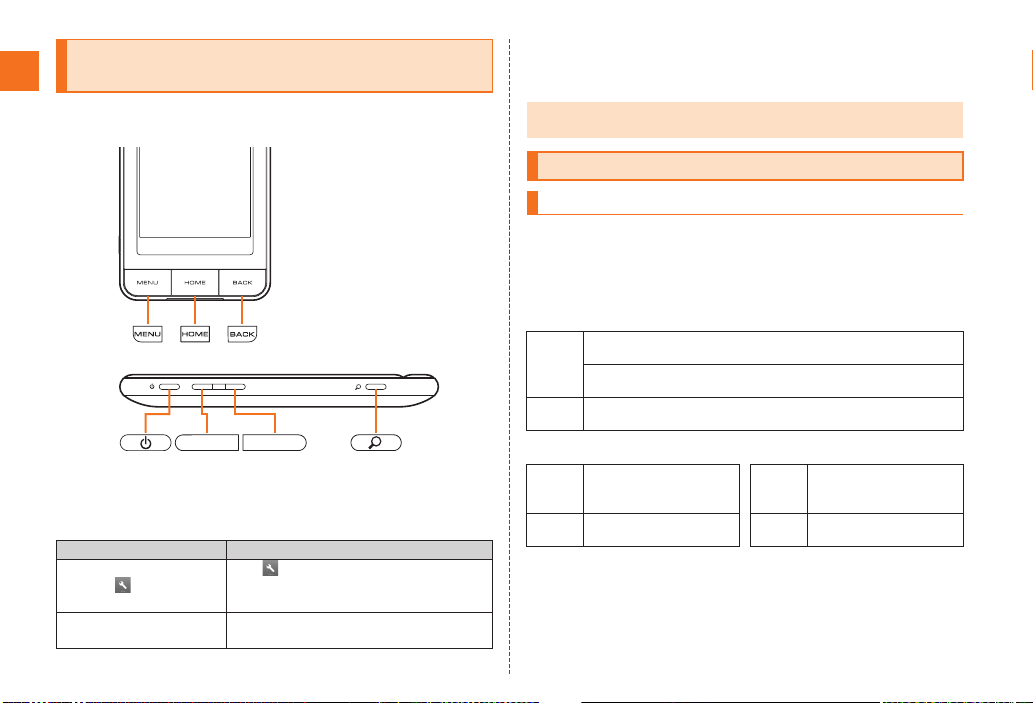
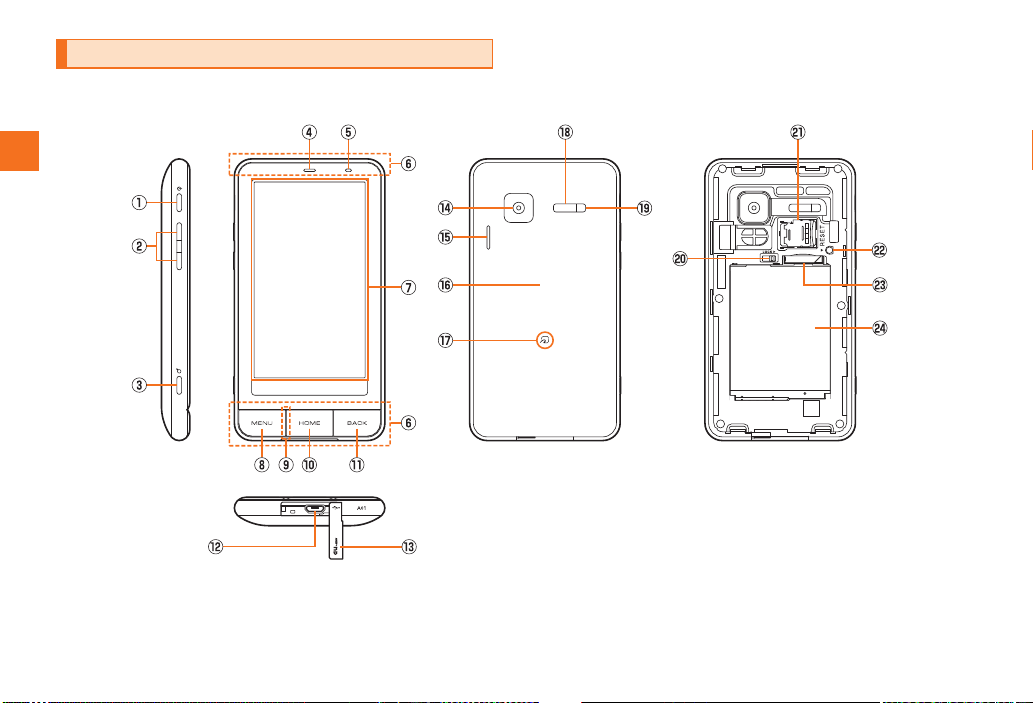
Names and Functions of Parts................................6
Charging the Battery Pack ......................................8
Turning the Power On/Off .......................................9
Turning the Power On .............................................9
Turning the Power Off .............................................9
Restarting the INFOBAR A01................................10
Sleep Mode...........................................................10
Switching the Display Language to English ..........10
Initial Setup ...........................................................10
Removing/Attaching the Battery Pack...................11
Removing the Battery Pack...................................11
Attaching the Battery Pack ...................................11
au IC-Card.............................................................12
Removing au IC-Card ...........................................12
Inserting au IC-Card .............................................13
Using microSD Memory Card ...............................13
Removing microSD Memory Card ........................14
Inserting microSD Memory Card ..........................15
Operating the Touch Panel................................... 16
iida Home and widget Home................................. 17
Viewing the iida Home .......................................... 17
Using Status Bar................................................... 18
Using the iida Home ............................................. 20
Moving the panels ................................................ 20
Adding the panels ................................................ 21
Using the widget Home......................................... 21
Moving/Deleting the widgets ................................ 21
Adding the widgets .............................................. 21
Application list ....................................................... 21
Switching Orientation............................................ 23
Displaying Available Menu.................................... 24
Character Input ..................................................... 25
Switching Software Keyboards............................. 25
Viewing the Character Entry Screen..................... 26
Switching Character Entry Modes ........................ 27
Entering Emoji/D-Emoji/Symbol/Facemark ........... 27
Switching Input Software ...................................... 28
Making a Call ........................................................ 29
Making an International Call (001 International Call
Service)................................................................. 30
Answering a Call................................................... 30
Putting the Call on Hold........................................ 30
Answering with the Message of Answering Memo
.............................................................................. 30
Returning a Call (Outgoing History/Incoming
History) ................................................................. 31
Turning On Manner Mode..................................... 31
Turning On the Answering Memo ......................... 32
Playing a Message in Answering Memo............... 32
Adding an Address Book Entry............................. 33
Using an Address Book.........................................33
Using Phone Number............................................33
Using Mail Address...............................................34
Using E-mail/C-mail...............................................35
Sending E-mail Messages.....................................35
Sending C-mail Messages ....................................35
Receiving E-mail/C-mail Messages.......................36
Reading E-mail/C-mail Messages .........................36
Setting Mail Filters.................................................37
Rejecting Spam C-mail Messages ........................38
Using PC-mail .......................................................39
Registering Another PC-mail Account...................39
Sending PC-mail Messages ..................................40
Receiving PC-mail Messages................................40
Using Gmail...........................................................40
Sending Gmail.......................................................41
Receiving Gmail ....................................................41
Replying/Forwarding Gmail...................................41
Viewing Sites with Browser ...................................42
Using Bookmarks/History ......................................42
Bookmarking a Web Page ....................................42
Using the Camera .................................................43
Cautions for Using the Camera .............................43
Taking Photos .......................................................43
Recording Movies..................................................44
Using Photo...........................................................44
Using Contents Manager.......................................45
Playing/Displaying Data ........................................45
Using Menu in the Contents Screen .....................45
Contents
Introduction
Getting Ready
Learning the Basics
Phone
Address Book
Mail
Internet
Multimedia
as35_ue.book 4 ページ 2011年7月20日 水曜日 午後2時26分

5
Contents
~~~~<MFZ>
ue02_as35_9e.fm
[5/5]
Cautions for Using TV (1Seg)............................... 46
Initial Setup of TV (1Seg)...................................... 46
Watching TV (1Seg) ............................................. 47
Operations on the 1Seg screen............................ 47
Using Android Market ........................................... 49
Using au one Market............................................. 49
Using GREE Market ............................................. 50
Managing Applications.......................................... 50
Checking Your Profile ........................................... 51
Changing the Incoming Ring Tone ....................... 51
Changing the Wallpaper ....................................... 51
Initializing microSD Memory Card ........................ 51
Using Global Passport CDMA/GSM ..................... 52
GLOBAL PASSPORT ............................................ 52
For overseas use without anxiety ......................... 53
Configuring the Overseas Settings....................... 53
Making a Call at Your Travel Destination.............. 54
Receiving a Call at Your Travel Destination ......... 55
Setting Conditions for Activating the Remote Lock
.............................................................................. 56
Troubleshooting .................................................... 57
Index ..................................................................... 59
TV (1Seg)
Applications
Settings of INFOBAR A01
Global Function
In Case of Loss of Your INFOBAR A01
Appendix/Index
as35_ue.book 5 ページ 2011年7月20日 水曜日 午後2時26分

6
~~~~<MFZ>
ue03_as35_9e.fm
[6/15]
Getting Ready
Names and Functions of Parts
as35_ue.book 6 ページ 2011年7月20日 水曜日 午後2時26分

7
Getting Ready
~~~~<MFZ>
ue03_as35_9e.fm
[7/15]
AfPower key
Turns on/off the power, and sets/disables sleep mode.
Bud Volume up/down key
Adjusts volume.
Hold ddown on the unlock screen, to enable/disable
manner mode.
CmSearch key
Use it to display the Quick Search Box etc.
DEarpiece (Receiver)
Emits voice of other party during a call, messages in Answering
memo, etc.
ECharging/Incoming indicator, Light sensor
Illuminates in red while charging.
Flashes according to the settings when receiving a call or mail
message.
Light sensor detects the ambient brightness and adjusts the
brightness of display.
FInternal antennas
Do not cover the internal antennas with your hand when you call,
use the Internet, Wi-Fi or Bluetooth®or retrieve GPS information.
GDisplay
HeMenu key
Displays the option menu.
IMouthpiece (Microphone)
Transmits your voice to the other party during a call. It is also used
for recording sounds. Take care not to cover the microphone with
your fingers etc.
J#Home key
Use it to display the iida Home etc.
K^Back key
Returns to the previous screen.
LExternal connection jack
Use it to connect the INFOBAR A01 to the microUSB-3.5φ
conversion cable, the common AC adapter 03 (sold separately),
the microUSB cable 01 (sold separately), the 18 pin-microUSB
conversion adapter 01 (sold separately), the microUSB stereo
earphone conversion adapter 01 (sold separately), etc.
MExternal connection jack cover
NCamera lens
OSpeaker
Emits ring tones, alarm tones, etc.
PBattery pack cover
QFeliCa mark
Hold it over a reader/writer when using Osaifu-Keitai®.
Sends and receives data via IC communication.
RInfrared port
Sends and receives data via infrared communication.
SMobile light
TLock slider
Locks/Unlocks the battery pack.
UmicroSD memory card slot
VReset button
If operations become unstable or unavailable, press the reset
button with a pointed end of an object for at least two seconds to
restart the INFOBAR A01. Restarting with the reset button does not
delete any saved data or application.
Wau IC-Card
XBattery pack
as35_ue.book 7 ページ 2011年7月20日 水曜日 午後2時26分

8
Getting Ready
~~~~<MFZ>
ue03_as35_9e.fm
[8/15]
The battery pack is not fully charged at the time of purchase. Charge
the battery pack when you use the INFOBAR A01 for the first time or
the battery level becomes low. Charging is finished when the red
charging/incoming indicator goes out.
■Charging the Battery Pack with the Specified AC
Adapter (sold separately)/DC Adapter (sold
separately)
The followings are the explanation of how to connect the common AC
adapter 03 (sold separately)/the common DC adapter 03 (sold
separately) to charge.
Charging time is as shown below.
* These times are based on the case when you use the common AC adapter 03 (sold separately)/
the common DC adapter 03 (sold separately).
AOpen the external connection jack cover of the
INFOBAR A01.
BInsert the microUSB plug of the common AC adapter
03 (sold separately)/the common DC adapter 03 (sold
separately) to the external connection jack of the
INFOBAR A01.
Charging the Battery Pack
•When the battery pack has less than approximately 15 percent of the
battery level, the message Please connect charger appears on the screen.
Charge the battery pack after tapping OK, or exchange it for another one
fully charged.
•Be sure to close the external connection jack cover securely, and do not
pull or twist it forcefully.
Specified AC adapter
(sold separately)
Approx. 150 min
Specified DC adapter
(sold separately)
Approx. 200 min
A
B
Check the
orientation
External
connection jack
Common AC adapter 03 (sold separately)/
Common DC adapter 03 (sold separately)
as35_ue.book 8 ページ 2011年7月20日 水曜日 午後2時26分

9
Getting Ready
~~~~<MFZ>
ue03_as35_9e.fm
[9/15]
CPlug the common AC adapter 03 (sold separately)
power plug into a 100 V AC power outlet/Plug the
common DC adapter 03 (sold separately) plug into a
cigarette lighter socket.
Charging/Incoming indicator illuminates in red, and appears. When
charging is finished, the charging/incoming indicator goes out.
AHold down ffor at least two
seconds.
The unlock screen is displayed.
Slide to to unlock. Precautions on
inserting or removing the microSD memory
card appear each time the power is turned
on.
s
AHold down ffor at least two seconds.
The phone options screen is displayed.
If you hold down fon the unlock screen, the power is turned off
without the phone options screen being displayed.
BPower off [OK.
•Charging is available by connecting the INFOBAR A01 to a PC with the
microUSB cable 01 (sold separately). On the iida Home, tap Settings [USB
connection [Mark USB battery charge to enable the setting.
Common AC adapter 03
(sold separately)
Common DC adapter 03
(sold separately)
Turning the Power On/Off
Turning the Power On
•The initial setting of the touch panel is executed while the logo is displayed
after the power is turned on. Do not touch the screen, otherwise touch panel
operations may not be performed properly.
Turning the Power Off
《Unlock screen》
as35_ue.book 9 ページ 2011年7月20日 水曜日 午後2時26分

10
Getting Ready
~~~~<MFZ>
ue03_as35_9e.fm
[10/15]
Turn off the INFOBAR A01 once and restart.
AHold down ffor at least two seconds.
The phone options screen is displayed.
BReboot [OK.
If you press for no operation is made for a while, the screen is
turned off temporarily, and then sleep mode is set. You can disable
sleep mode if you execute the following operation.
Afwhile sleep mode is set.
The unlock screen is displayed.
s
You can switch the display language for function names and other
items to English.
AOn the iida Home, (Settings).
B(Language & keyboard).
C(Select language).
DEnglish.
After you purchase the INFOBAR A01, the initial setup screen is
displayed automatically when turning on the power or inserting
another’s au IC-Card.
For detailed operations on the initial setup, refer to the supplied
Setting Guide (Japanese).
ASet Date & time [Next.
BSet Location [Next.
CSet Other.
Set Wi-Fi settings, au one-ID setting, Google account, Text font or Profile
settings.
DDone.
EYes/No.
If you tap No, the initial setup screen is not displayed from the next
startup.
Restarting the INFOBAR A01
Sleep Mode
•In some applications in use, the screen which was displayed before sleep
mode is set may be displayed when sleep mode is disabled.
•Do not touch the screen when you display the screen by pressing the power
key during sleep mode. Otherwise touch panel operations may not be
performed properly.
Switching the Display Language to English
設定
言語とキーボード
言語(Language)を選択
Initial Setup
•Alternatively, on the iida Home, tap Settings [Default settings to set up.
as35_ue.book 10 ページ 2011年7月20日 水曜日 午後2時26分

11
Getting Ready
~~~~<MFZ>
ue03_as35_9e.fm
[11/15]
When removing the battery pack, turn off the INFOBAR A01.
ARemove the battery pack cover on the back of the
INFOBAR A01.
Hook a fingertip (nail) on the concave portion with the center of the
battery pack cover pressed (A-1), and then remove the battery pack
cover by pulling up in the direction of the arrow (A-2).
BUnlock the battery pack.
Slide the lock slider in the direction of the arrow.
CRemove the battery pack.
Remove the battery pack by holding the protruding edge and lifting it
upward.
Use the specified battery pack for the INFOBAR A01 and attach it
properly.
AAlign the contacts on the battery pack with those of
the INFOBAR A01 and then insert the battery pack
securely with the protruding edge facing up on the
battery pack.
Removing/Attaching the Battery Pack
Removing the Battery Pack
Concave portion
•When removing the battery pack, always pull up on the protruding edge.
Doing otherwise may result in damage to the INFOBAR A01 or the battery
contacts.
Attaching the Battery Pack
Battery pack
Protruding edge
Protruding edge
Contacts on
INFOBAR A01
as35_ue.book 11 ページ 2011年7月20日 水曜日 午後2時26分

12
Getting Ready
~~~~<MFZ>
ue03_as35_9e.fm
[12/15]
BLock the battery pack.
Slide the lock slider in the direction of the arrow.
CAfter attaching the battery pack cover, press the
battery pack cover while tracing the periphery of it,
and make sure that it is closed properly.
Trace the battery pack cover, starting from the center of the right side.
An au IC-Card records your personal information
such as phone numbers.
Turn off the power and remove the battery pack before removing or
inserting the au IC-Card.
ARemove the tray straight out by pulling the tab of it
and remove the au IC-Card.
•Before attaching the battery pack, make sure that the au IC-Card is inserted
properly.
•Failure to follow the correct procedure when attaching the battery pack may
result in damage to the battery pack or the battery pack cover.
Center of the right side
au IC-Card
•Confirm the correct direction when you insert the au IC-Card.
Removing au IC-Card
au IC-Card
IC (metal
surface) part
Tab
as35_ue.book 12 ページ 2011年7月20日 水曜日 午後2時26分

13
Getting Ready
~~~~<MFZ>
ue03_as35_9e.fm
[13/15]
ARemove the tray straight out by pulling the tab of it.
BAttach the au IC-Card on the tray with the IC (metal
surface) side down.
Adjust the orientation of the cutout of the au IC-Card to that of the tray,
and attach the au IC-Card by sliding it onto the tray.
CConfirm that the au IC-Card is caught by three ribs of
the tray.
DInsert the tray into the INFOBAR A01.
You can set microSD memory card (including microSDHC memory
card) to the INFOBAR A01, and save data. And also you can save
address book, mail messages, bookmarks, etc. in microSD memory
card.
Inserting au IC-Card
Attaching the au IC-Card on
the tray from above may
damage the ribs for fixing the
card.
Tab
Cutout
Cutout
Using microSD Memory Card
•Some applications may not be available when a microSD memory card is
not inserted.
•The maximum file size available on a microSD memory card is 2 GB per file
when saving data to microSD memory card.
•A microSD memory card initialized on other devices may not be used on the
INFOBAR A01 properly. Initialize it on the INFOBAR A01. For operations to
initialize the microSD memory card, refer to “Initializing microSD Memory
Card”.
•For operations to play/display data in the microSD memory card, refer to
“Playing/Displaying Data” and “Using Menu in the Contents Screen”.
•Some files such as copyright protected data may not be played on the
INFOBAR A01 even if they are moved/copied from the PC etc. to a microSD
memory card successfully.
Tab
as35_ue.book 13 ページ 2011年7月20日 水曜日 午後2時26分

14
Getting Ready
~~~~<MFZ>
ue03_as35_9e.fm
[14/15]
■Handling Precautions
•Do not remove microSD memory card or the battery pack and do not
turn off the INFOBAR A01 and other equipment while reading,
writing, playing, saving or moving/copying data. It may result in
damage to data in the INFOBAR A01 or microSD memory card or
data loss.
•Do not drop or subject the INFOBAR A01 to vibration or impact with
a microSD memory card inserted. It may result in damage to
recorded data or data loss.
•Do not insert objects other than microSD memory card such as
liquid, metals or flammable items into the microSD memory card
slot. It may result in a fire, electric shock or malfunction.
•Do not apply excessive force to open or close the microSD memory
card slot.
•The following microSD memory cards have been confirmed for
operation based on the criteria by au. For operation confirmation
results of other microSD memory cards, contact each microSD
memory card manufacturer.
<microSD/microSDHCMemoryCard>
○: Confirmed operation
−: Unconfirmed operation or not for sale
As of May 2011
* 4 GB or more are for microSDHC memory card.
* Operation is confirmed for microSD memory cards that are sold as of May 2011. For the
latest information on operation confirmation, visit the au homepage or contact the Customer
Service Center.
ATurn off the INFOBAR A01 and remove the battery
pack cover.
BSlide the microSD memory card slot in the direction
of the arrow to unlock.
COpen the microSD memory card slot and remove the
microSD memory card.
Slowly pull the microSD memory card straight out.
DClose the microSD memory card slot and slide it in
the direction of the arrow to lock.
Manufacturer 2 GB 4 GB 8 GB 16 GB 32 GB
Toshiba ○○○○○
Panasonic ○○○○−
SanDisk ○○○○○
ADTEC ○○○−−
Buffalo ○○○○−
Sony ○○○−−
Removing microSD Memory Card
BC D
as35_ue.book 14 ページ 2011年7月20日 水曜日 午後2時26分

15
Getting Ready
~~~~<MFZ>
ue03_as35_9e.fm
[15/15]
EAttach the battery pack cover.
ATurn off the INFOBAR A01 and remove the battery
pack cover.
BSlide the microSD memory card slot in the direction
of the arrow to unlock.
COpen the microSD memory card slot, confirm the
direction of the terminal side of the microSD memory
card and slowly insert it straight into the slot.
DClose the microSD memory card slot slowly and slide
it in the direction of the arrow to lock.
EAttach the battery pack cover.
•Do not touch the terminal part of microSD memory card.
•Do not remove the microSD memory card forcefully. It may result in damage
to the microSD memory card or the INFOBAR A01 or data loss.
•Application installed to microSD memory card cannot be used once you
removed microSD memory card.
•The microSD memory card may be warm after a long time use. It is normal.
Inserting microSD Memory Card
BC D
Terminal side
•Insert a microSD memory card with the right side up in the appropriate
direction.
Inserting a microSD memory card forcefully into the slot could result in
failure to remove the microSD memory card or damage to the microSD
memory card or the INFOBAR A01.
•Do not insert the microSD memory card too deeply when attaching it.
as35_ue.book 15 ページ 2011年7月20日 水曜日 午後2時26分

16
Learning the Basics
~~~~<MFZ>
ue04_as35_9e.fm
[16/28]
The display of the INFOBAR A01 is a touch panel. You can operate
the INFOBAR A01 by directly touching the screen.
■Tap/Double-Tap
Tap: Gently touch a screen and then immediately
release your finger.
Double-tap: Tap quickly twice on the same
position.
■Main purpose of this operation
Select an item or icon displayed on the screen.
Double-tap to enlarge/reduce the screen.
■Long-Touch
Keep touching an item or key.
■Main purpose of this operation
Display context menu etc.
■Slide
Gently touch a screen and then trace it to the
desired direction.
■Main purpose of this operation
Scroll screen or switch pages.
In addition, operate gauge and bar when adjusting
volume and brightness.
■Flick
Touch a screen and then quickly flick your finger
up, down, left or right.
■Main purpose of this operation
Switch pages or enter characters by flick input.
■Pinch
Touch a screen with two of your fingers and then
move them apart or closer together.
■Main purpose of this operation
Enlarge/Reduce the screen.
■Drag
Gently touch a screen and then trace it to the
desired position.
■Main purpose of this operation
Move an icon on the screen to the desired position.
Operating the Touch Panel
as35_ue.book 16 ページ 2011年7月20日 水曜日 午後2時26分

17
Learning the Basics
~~~~<MFZ>
ue04_as35_9e.fm
[17/28]
Home consists of two screens which are the iida Home and widget
Home. You can paste applications, shortcuts, etc. on the iida Home
and you can paste widgets on the widget Home.
Flick the screen to the left/right to switch the iida Home and widget
Home. Also, slide the iida Home or widget Home to up/down to scroll
the screen or switch pages.
Applications, shortcuts, etc. are displayed in panels. The panels are
positioned section by section. Select a panel to activate the
application.
AStatus bar
BApplication/Shortcut panel
CSection bar
Displays a section title and
classifies the section.
Long-touch a section bar to
display the section bar list.
Drag it to any section bar and
release your finger to scroll the
iida Home to the selected
section bar position.
DBottom key
Operate with the same method
as section bar.
EOpening/Closing section key
FPanel operation key
While the key is displayed on the enlarged panel, tap the key to
operate the displayed contents of the panel.
iida Home and widget Home
Flick to the left
《widget Home》
Flick to the right
Widget
《iida Home》
Viewing the iida Home
《iidaHome》
A
B
E
D
F
C
as35_ue.book 17 ページ 2011年7月20日 水曜日 午後2時26分

18
Learning the Basics
~~~~<MFZ>
ue04_as35_9e.fm
[18/28]
The notification indicators to notify you of a missed call, a new mail
message or a running operation are displayed on the left side of the
status bar, while the status indicators to show the status of the
INFOBAR A01 are on the right side.
Also, tap the status bar to display the notification/status panel.
■Examples of notification indicator
■Examples of status indicator
Using Status Bar
Indicator Description
Missed call
New mail message (Mail)
New mail message (PC-mail)
New mail message (Gmail)
Alarm terminated
•Appears when the alarm is terminated without the
operation for terminating the alarm.
Schedule notification of the calendar
1Seg information
Watching information, Playing TV (1Seg) sounds
as BGM/ Recording information
Playing music
USB debug connecting
Dialing, Calling
Putting a call on hold
Answering memo
Skype™ status
Signed in/ New event
Few space available in the INFOBAR A01
Bluetooth®file receiving request
USB connecting
Card reader mode/ Fast transfer mode/
USB connecting (in Card reader mode connecting)
Data upload, File sending
Uploading data, Sending file, Finished sending file,
Failed to send file/ Finished uploading data/
Waiting to upload data
•The Uploading data indicator and Sending file
indicator are displayed as animations.
Downloading, Finished downloading, Installing data or
application, Receiving, Finished receiving file, Failed to
receive file
•The Downloading indicator and Receiving file indicator
are displayed as animations.
Finished installing
Connected, Unconnected to VPN
Update available
Major Update (OS Update) available
Indicators collected
•When multiple notifications of the same type exist, the number of them is
displayed on the lower right of the indicator.
Indicator Description
Time
Alarm set
()
()
()
()
()
()
Battery level (While charging)
( ) Full/ ( ) Approx. 80 % remaining/
( ) Approx. 60 % remaining/
( ) Approx. 40 % remaining/
( ) Approx. 20 % remaining/
( ) Approx. 10 % remaining/ Battery level 0 %
•The charge indicator other than “Full” is displayed as
an animation.
Offline mode set
Indicator Description
as35_ue.book 18 ページ 2011年7月20日 水曜日 午後2時26分
Table of contents
Other IIDA Cell Phone manuals