iio RM1 Quick reference guide

RM1
(ALBR1372-11)
Use & Care Instructions

2
TABLE OF CONTENTS
1. Welcome to iio ........................ page 2
2. Product overview .................... page 3
3. Important safety notes ........... page 4
4. Installation ............................... page 6
5. Product dimensions ............... page 8
6. Operation ................................. page 10
7. Energy saving tips ............................ page 13
8. Cleaning ............................................. page 14
9. Troubleshooting ................................ page 16
10. Warranty ............................................. page 17
11.Your appliance information .............. page 18
WELCOME TO iio!
Congratulations and thank you for your purchase! We truly appreciate your
business and are grateful for the trust you have placed in us and our products.
You have purchased one of the most efficient refrigeration products available
today. We are proud of this beautifully designed refrigerator and believe it will
bring you years of reliable service.
At iio, we design our appliances for both space and energy efficiency. Our
mission is to create a range of stylish home appliances that fit your life, your
style, space parameters, taste, eco aspirations, functional needs, budget and
way of shopping. We want to help turn any space where you live, into a home.
Please register your refrigerator at www.iiokitchen.com.
For any inquiries, please contact us at: 1-833-446-4461 or visit
www.iiokitchen.com for additional information regarding your appliance.
Extend your warranty today!
•Receive up to 1 month of extended warranty for submitting a photo and 2 months of extended
warranty by submitting a video (pending review).
To be considered for approval:
•Photo upload must demonstrate the product's use or application in a natural setting, and should
clearly show the product from a perspective not already shown on the site.
•Video review must be at least 30 seconds in duration, clearly show the product in use in a natural
setting, and include insightful product-specific audio commentary.
•The photo or video must be of sufficient quality, in the opinion of the iio™ management, that it can be
used on our website and in other promotional materials.
•Submitting the photo and video represents your permission that we may have unlimited use of these
materials wherever we require, at no additional cost.

3
PRODUCT OVERVIEW
Control
Panel
Bottle
Holder
Glass
Shelves
Crisper
Freezer
Drawers
Bottom
Shelf
Upper
Shelves
Glass Crisper
Cover
•The images in this guide may differ from the actual components and accessories, which are subject to
change without prior notice for product improvement purposes.
Note: The appearance of components of the appliance may differ from model to model.
•The refrigerator is intended for storing fresh food at temperatures above 32° F (0° C).
•Appliance temperature may be changed by adjusting the control panel settings.
•The freezer section is intended for freezing fresh and already frozen food and for long-term storage.
Length of storage time is dependent on the type of food being stored.

4
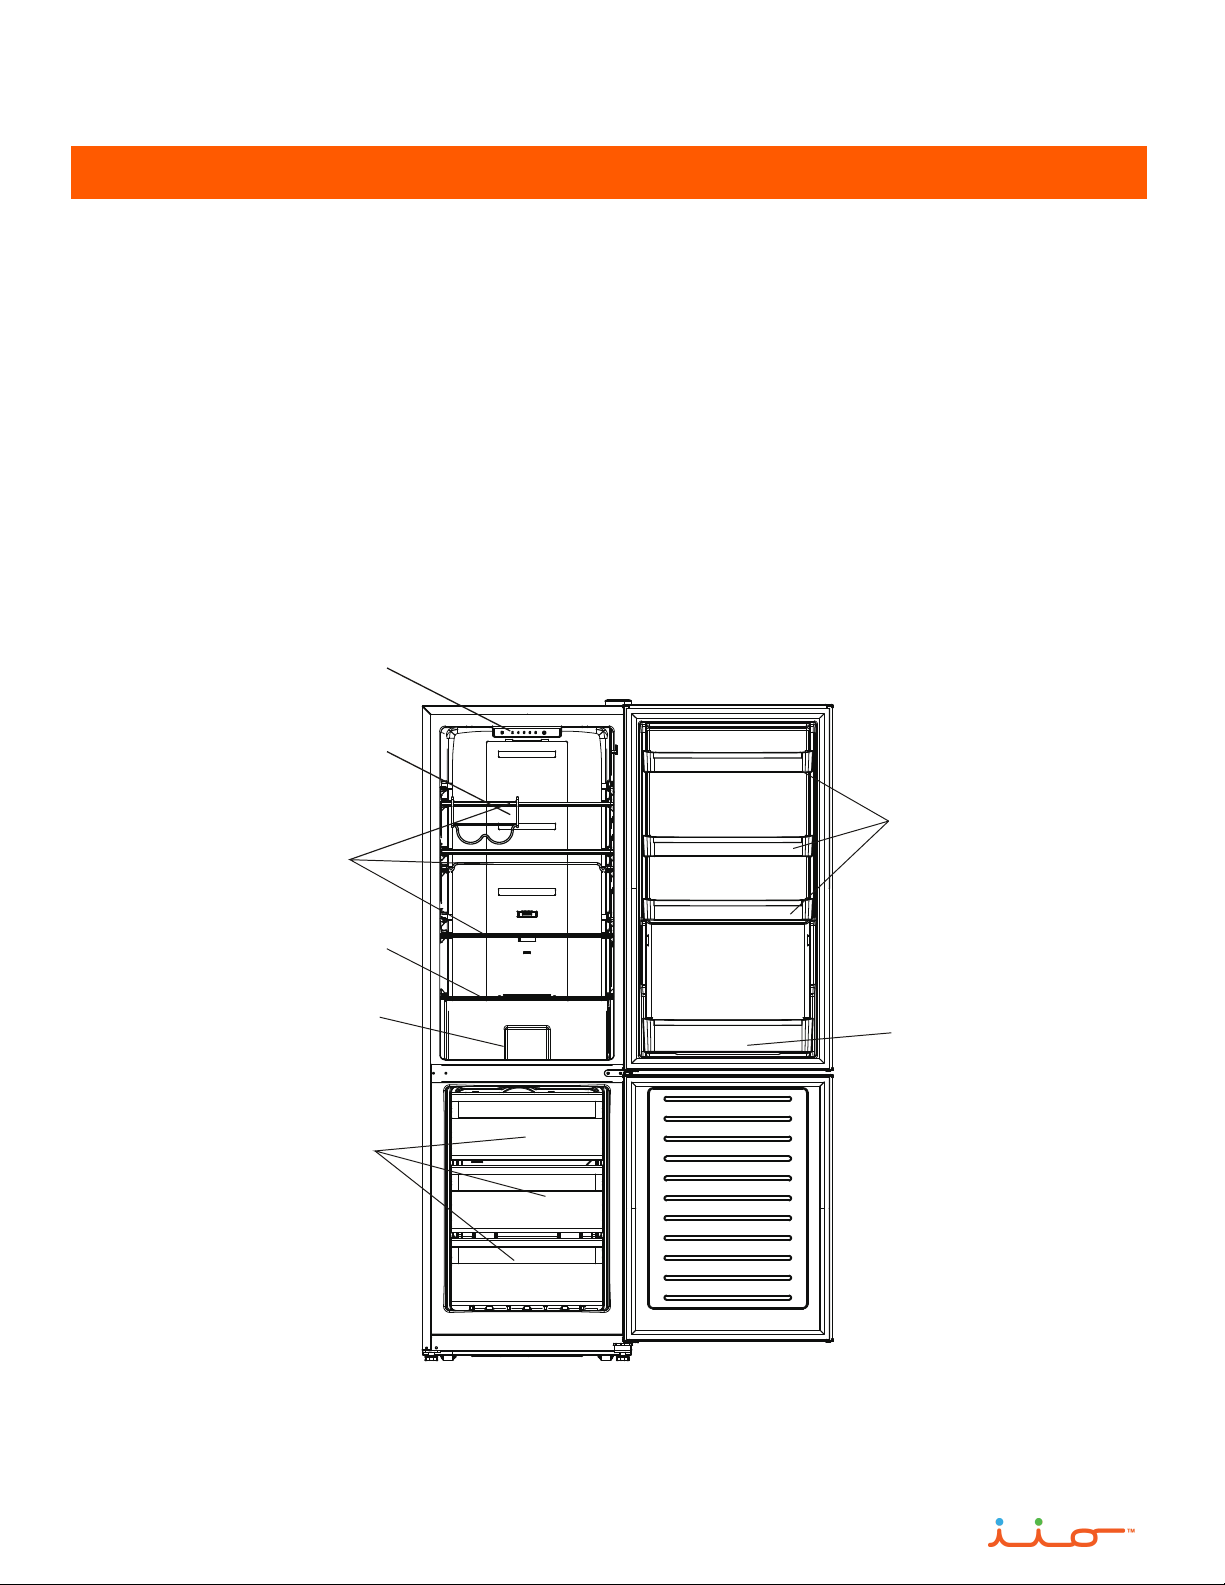
IMPORTANT SAFETY NOTES
WARNING – YOU MAY BE KILLED, SERIOUSLY INJURED OR DAMAGE THE APPLIANCE IF
THE INSTRUCTION IS NOT FOLLOWED.
CAUTION – YOU MAY BE INJURED OR DAMAGE THE APPLIANCE IF THE INSTRUCTION IS
NOT FOLLOWED.`
Always read and follow all safety messages.
READ ALL INSTRUCTIONS BEFORE USE.
Alert Symbol – will display WARNING or CAUTION beside the instruction.
Messages with the Alert Symbol will inform you of the potential hazard, provide
guidance for reducing the hazard, and inform of the possible outcome if the
instruction is not followed.
WARNING
not in use, secure or remove the doors to prevent children from
playing inside the cabinets.
Flammable refrigerant used. To be repaired by trained service personnel only. Do
not puncture refrigerant tubing or other parts that use refrigerant. Consult user
manual before attempting any repairs. All safety precautions must be followed.
When using this appliance follow basic precautions to reduce the risk of electrical
shock, explosion, fire, serious injury or death.
Do not put flammable, explosive, volatile and highly corrosive items in the appliance
to prevent damage to the appliance and prevent injury or death. Keep materials and
vapors, such as gasoline and alcohol, away from appliance.
Use non-flammable cleaner to clean the appliance.
Do not use electrical appliances (i.e. hair dryer or fan) inside the appliance
compartments.
Disconnect the power before servicing or cleaning.
This appliance is not intended to be used by children under the age of 8.
Children shall not play with the appliance. Do not allow any child to get into, climb
the appliance or play with the appliance doors.
Do not allow children to play in, on or around the fridge. It is not a toy. THERE IS A
DANGER OF SUFFOCATION IF A CHILD BECOMES TRAPPED INSIDE.
When the appliance is not in use, secure or remove the doors to prevent children
from playing inside the cabinets.
Risk of child entrapment. Before throwing away an old appliance remove the
door(s), remove the shelves to prevent children from climbing inside.
This appliance is not intended for use by persons (including children) whose
physical, sensory or mental capabilities may be different or reduced, or who lack
experience or knowledge, unless such persons receive supervision or training to
operate the appliance by a person responsible for their safety.
Cleaning and user maintenance shall not be made by children without supervision.

5
Dispose of properly in accordance with federal and/or local regulations.
In case of punctured tubing follow all handling instructions carefully.
WARNING: This product may contain chemicals known to
the State of California to cause cancer, birth defects, or
other reproductive harm.
Appliance MUST be in a vertical position for 24 hours before being connected to
power.
Replace all appliance parts and panels before operation.
To avoid injury two or more people are required to move and install the appliance.
CAUTION
Prop. 65 Warning for California Residents

6
INSTALLATION
When using this appliance follow basic precautions to reduce the risk of electrical
shock, explosion, fire, serious injury or death.
Only connect this product to a dedicated grounded electrical outlet rated for use
with this product (110-125V, 1.0A, 60Hz, AC only). It is the user’s responsibility to
replace a standard 2-prong wall outlet with a standard 3-prong (grounded) wall
outlet. Ensure that the grounding electrode is equipped with a reliable grounding
line.
Do not damage the refrigerant circuit.
Never attempt to operate this appliance if it is damaged, malfunctioning, partially
disassembled, or has missing or broken parts, including a damaged cord or plug.
Do not remove the ground prong from the power cord.
Do not use an extension cord.
Do not use an adapter on the wall socket.
Do not pull out plug using the power cord. Firmly grasp the plug and pull it out
from the socket.
When moving the appliance, be careful not to roll, bend, pinch or damage the
power cord.
Do not install the appliance in a damp or dusty place where insulation or electrical
parts may deteriorate.
Do not place electrical appliances on top of the appliance.
Keep packing materials out of the reach of children. Packaging material can be
dangerous for children as there is a risk of suffocation.
Do not place the appliance in direct sunlight or expose it to the heat from heating
appliances such as stoves or heaters.
Do not place heavy objects on top of the appliance as they may fall and cause
injury when the appliance door is opened.
Do not use sharp instruments, rubbing alcohol, flammable fluids, or abrasive
cleaners to remove tape or glue. These products can damage the surface of your
appliance.
WARNING
Do not use an outlet that can be turned off with a switch.
Appliance MUST be in a vertical position for 24 hours before being connected to
the power outlet.
Install the appliance in a dry and well ventilated room. Ambient temperature
should be between 18 °C ~ 38 °C (64 °F ~ 100 °F).
To avoid injury or damage to the appliance, installation should be carried out by
two people.
The appliance is heavy. Protect the floor when moving the appliance for cleaning
or servicing.
Always pull the appliance straight out when moving it. Do not wiggle or walk the
appliance as floor damage could occur.
Keep ventilation openings clear of obstructions.
Never pick up or move the refrigerator by the door.
CAUTION

7
UNPACK CHOOSE LOCATION LEVEL LEGS
•Remove tape and any temporary labels from your refrigerator before use. Do not
remove any warning labels, the model and serial number labels, or the circuit
diagram from the appliance as this will void the warranty.
•Carefully remove the protective plastic film on the doors and refrigerator body.
•If required, carefully use tweezers or other small instruments to start the peeling
at the corners.
Remove the Packaging
•To avoid noise and vibration, the appliance must be installed and leveled on a
solidly constructed floor. If required, adjust the leveling legs to compensate for the
unevenness of the floor.
•Keep away from heat and avoid direct sunlight.
•Do not place the appliance in humid or watery places to prevent corrosion or
reduced insulation efficiency.
•Ensure that the appliance is placed in a well-ventilated indoor location.
•Ensure that there is enough space around the appliance, as indicated in diagram
(pg. 8), to allow for proper ventilation.
Note: Installation on carpeting, soft tile surfaces, a platform or weakly supported
structure is not recommended. Surface shall be flat and sturdy (rotate left and
right to adjust the wheel for levelling if unsteady).
Appliance Location

8
PRODUCT DIMENSIONS
Your refrigerator should be installed on a flat and even floor. Keep the refrigerator
•Your refrigerator should be installed on a flat and even floor. Keep the refrigerator
level by adjusting the front leg levers.

Dimensions and Clearances
Check the dimensions of the appliance and the installation path to ensure there is sufficient
room to move the appliance through doors or narrow openings.
The installation location chosen for the appliance should allow space behind the unit for
connections and airflow as well as space in front to open the doors.
Too small of a distance from adjacent items may result in reduced cooling and freezing
capability and increased power consumption. Allow at least 29 1/8” inches (740 mm) in front of
the appliance to open the doors, and at least 2 inches (50 mm) between the back of the
appliance and the wall.
Levelling
•The refrigerator has two front leveling legs. Adjust the legs to alter the tilt from front-to back or
side-to side. If the refrigerator seems unsteady, or the doors do not close easily, adjust the
refrigerator’s tilt using the instructions below:
1. Turn the leveling leg counterclockwise to raise that side of the refrigerator or clockwise
to lower it. It may take several turns of the leveling leg to adjust the height of the
appliance.
2. Open the door and check to make sure that it closes easily. If the door does not close
easily, tilt the refrigerator slightly more to the rear by turning both leveling legs
counterclockwise. It may take several more turns.
Positioning the Refrigerator
•Arrange the refrigerator so that it does not vibrate against adjoining surfaces or against the
wall. Be sure to maintain a 2” clearance between the back of the appliance, sides and wall.
9

OPERATION
Before Use
Do not scratch the appliance with a sharp object or use a detergent that contains
alcohol, a flammable liquid or an abrasive when removing any tape or adhesive
from the appliance.
Do not peel off the model or serial number label or the wiring diagram on the rear
surface of the appliance as this will void the warranty.
Open appliance doors to ventilate the interior as the appliance may have a "new
car smell".
Clean the appliance thoroughly by wiping off all surfaces with a soft cloth and mild
detergent.
The appliance may make a loud noise after initial operation. This is normal and will
decrease as the temperature decreases.
Remove any adhesive tape from inside the appliance and open the doors for
ventilation.
Depending on the model, some of the following functions may not be available. The control panel
display may differ from model to model.
Control Panel Display
•The control panel regulates the appliance temperature. There are five (5) settings to choose from.
The lowest number (2) provides the coldest temperature, the highest number (8) provides the
warmest temperature.
•The default temperature setting is 5.
•Cycle through the different temperature settings by pressing and releasing the SET button until the
desired setting has been reached.
•As you cycle through the different temperature settings the illuminated number for each setting will
flash several times and will stop flashing once it has been set.
Coldest Warmest
FAST
COOL
SET
10
CAUTION

FAST COOL
•FAST COOL Function - operates the appliance at maximum cooling for 30 hours. This feature can
be used after placing a large quantity of food in the fridge.
•To activate the FAST COOL function press and release the SET button to cycle through the
settings until the FAST COOL setting is illuminated. FAST COOL will flash and then stop flashing
once it sets.
•To exit the FAST COOL setting press the SET button.
•After 30 hours FAST COOL mode will revert to the previous setting if it is not exited by the user.
•An audible alarm will sound if the appliance door is kept open for more than 3
minutes. Close the door to deactivate the alarm. If the door is kept open for more
than 10 minutes the interior lighting will turn off.
Open Door Alarm (Refrigerator Door Only)
•The bottle holder is used to hold bottles and cans and can be positioned on the
glass shelves.
Bottle Holder Feature
•Glass shelves can be positioned to the desired height by the user.
•To reposition a shelf, place one hand in the back of the shelf and one at the
front of the shelf. Gently lift the back of the shelf and carefully pull the shelf out
towards you.
•Tilt the front of the shelf up about 60° and completely pull out the shelf.
•Gently re-install the shelf at the desired position by reversing these steps.
•Ensure that the shelf is gently pushed towards the back of the refrigerator and
that the tabs on either side of the shelf are properly seated in their slots located
at the back of the refrigerator.
Glass Shelves
CAUTION
Exercise care when moving shelves, drawers, and door shelves to avoid breakage.
Crisper
•The crisper is typically used to hold vegetables and fruit.
•Preferably, place the items in a sealed bag or container to maintain the proper humidity levels.
11

•The upper and lower door shelves are used to hold smaller items such as
drinks, eggs, cheese, etc.
•The third upper shelf can be adjusted higher to allow taller containers to be
placed in the bottom shelf. Gently lift up the third upper shelf and re-install it in
the holding slot above.
•All of the four door shelves can be removed for cleaning. Gently lift up the shelf
using both hands placed on both ends of the shelf. Lift both sides the same
amount to avoid jamming or causing damage to the shelf or refrigerator panel.
•Re-install the shelf ensuring that it is lowered evenly and horizontally. Tap the
shelf gently to ensure it is properly seated.
Door Shelves
Freezer Drawers
Ice Cube Tray
•The ice cube tray may be placed in a freezer drawer for making ice.
Defrosting the Refrigerator
•This appliance is frost free but occasionally a buildup of frost may occur. This is dependent on
a variety of reasons such as frequent opening of the door or seasonal changes.
•If defrosting is required disconnect the appliance from the power supply and gently wipe down
surfaces with a dry cloth and place a towel in the appliance to collect any excess water.
12
•Freezer drawers are used for storing frozen food and for freezing fresh food.

13
ENERGY SAVINGS TIPS
Do not install the fridge close to sources of heat, such as a stove, boiler, heater, chimney, etc, and
avoid exposure of the appliance to direct sunlight.
Locate the appliance in a cool well-ventilated room and make sure that the air vents of the
compressor housing cover are not obstructed. Also allow adequate spacing around the cabinet for
air circulation (2”).
Avoid unnecessary frosting in the cabinet by packing all food and liquids in airtight packages or
containers.
Always keep food stored in tightly sealed packaging or containers, and allow some space for air to
circulate around each item.
Avoid keeping the door open for extended periods of time or opening the door too frequently as
warm air will enter the cabinet and cause the compressor to run unnecessarily.
Ensure there are no obstructions preventing the doors from closing properly and forming a tight seal.
To ensure a safe food storage temperature, maintain an operating temperature inside the fridge
cabinet of 2˚C/36˚F to 4˚C/39˚F. Fridge temperatures warmer than 4˚C/39˚F can promote unsafe
bacterial growth in food.

CLEANING
Unplug the appliance from the power source before cleaning.
Do not use large amounts of water or liquid when cleaning the appliance as this
may affect electrical components and insulating properties of the appliance.
WARNING
Do not use any detergents or flammable substances such as alcohol, thinner,
bleach, or other flammable liquids to clean the appliance.
Cleaning solutions that contain abrasives, acids or solvents are not suitable for
cleaning and may damage the fridge and cause discoloration. Do not use these
types of cleaners.
Do not use sharp objects when cleaning the appliance as these may scratch the
appliance.
Do not peel off or damage the model or serial number labels on the surfaces of
the appliance as this will void the warranty.
Regular cleaning of the appliance is recommended to prevent odors and ensure
efficient operation of the unit. This includes interior surfaces such as interior
walls, shelves, and door shelves as well as exterior components such as door
gaskets, handles, sides, and the condenser unit.
Use a soft damp cloth with mild detergent to clean all surfaces.
Removable parts such as shelves, drawers and door shelves may be taken out
for cleaning.
Wipe up spills immediately.
Surfaces should be dried after being wiped.
CAUTION
CAUTION
Exercise care when moving shelves, drawers, and door shelves to avoid breakage.
•Freezer drawers can be pulled out for cleaning.
•Hold the handle of the drawer and gently pull it out until it stops.
•Tilt the drawer upwards about 30° up to be able to remove it completely.
•Gently reinstall the drawer by reversing these steps.
Freezer Drawers
14

Exterior Cleaning
•Check and clean the door gasket regularly to ensure that there is no debris on it.
•Exterior surfaces of the appliance can also be cleaned with a soft damp cloth with mild
detergent.
•Periodically clean the dust that accumulates under and behind the appliance to improve the
cooling efficiency.
WARNING
Compressor Cavity
Turn off the appliance and unplug the appliance from the power source before
attempting to clean the compressor cavity.
Take extreme care when cleaning this section of the appliance as it contains
electrical and mechanical components as well as delicate refrigerant tubes that
must not be damaged.
•Check and clean the door gasket regularly to ensure that there is no debris
on it.
•Exterior surfaces of the appliance can also be cleaned with a soft damp
cloth with mild detergent.
•Periodically clean the dust that accumulates under and behind the
appliance to improve the cooling efficiency.
15

16
TROUBLESHOOTING
PROBLEM POSSIBLE CAUSE OR REMEDY
Appliance is
connected
but does not
work:
Ensure that the appliance is plugged in and there is power in the
outlet.
Confirm that circuit breaker or fuse has not tripped.
Cooling system
operates
continuously
for extended
periods of time:
Ambient temperature too high.
Door opened frequently or for too long.
Door not closed properly (misaligned, damaged or dirty door seals).
Large load of food added at once.
Temperature sensor blocked by food, preventing proper air
circulation.
Ensure recommended clearances are adhered to.
Ensure there is adequate air circulation behind the appliance.
Excessive ice
build up on the
back wall:
(Note: some
moisture buildup is
normal)
Temperature setting is too cold.
Door not shut properly or opened excessively.
Recently added a large quantity of warm food to the cabinet.
Close proximity to heat source or direct sunlight.
Ambient temperature or humidity is very high.
Ice or frost
build up in the
freezer:
Door opened too frequently or for too long.
Door not closed properly.
Poor door sealing.
Door seal damaged or dirty, replace or clean seal.
Extremely humid environment.
Door will not
close:
Check and clean the door gasket regularly to ensure that there
is no debris on it.
Door difficult to
open:
Clean door gaskets and contact surfaces with
mild soap and warm water.
LED lighting
does not
work:
Call a service technician. Do not attempt to repair this yourself as
there is danger of making contact with high voltage.
For other troubleshooting inquiries or for an iio™ authorized repair center please contact us
at: 1--833-446-4461 or email us a [email protected].

17
WARRANTY
iio™ warrants all refrigerators will be free from defects in materials or workmanship for a period of TWO
YEARS from the date of original purchase.
THERE ARE NO OTHER WARRANTIES, EXPRESSED OR IMPLIED, INCLUDING BUT NOT LIMITED
TO, WARRANTIES OR MERCHANT ABILITY OR FITNESS FOR A PARTICULAR PURPOSE. Proof of
purchase/original invoice may be required to claim warranty. Keep a photocopy easily accessible.
If the home in which the refrigerator is installed is sold within the warranty period, the new owner is
protected until the expiration of the original purchaser’s warranty. During this two-year period, iio™ will at
its option, repair or replace, without charges, any product or part which is found to be defective under
normal use and service.
This warranty does not cover:
a) normal maintenance and service;
b) any products or parts which have been subject to misuse, negligence, accident, improper
maintenance, or repair (except by an authorized iio™ repair center), faulty installation or installation
contrary to recommended installation instructions;
c) cosmetic damage.
iio™ OBLIGATION TO REPAIR OR REPLACE, AT iio™ OPTION, SHALL BE THE PURCHASER’S SOLE
AND EXCLUSIVE REMEDY UNDER THIS WARRANTY. iio™ SHALL NOT BE LIABLE FOR INCIDENTAL,
CONSEQUENTIAL OR SPECIAL DAMAGES ARISING OUT OF, OR IN CONNECTION WITH, PRODUCT
USE OR PERFORMANCE.
This warranty applies only within North America, to refrigerators installed for use for PRIVATE SINGLE
FAMILY USE. If used for COMMERCIAL, MULTI-FAMILY USE or any other purpose, the warranty will be
voided.
Removal or disfigurement of the serial plate, will void the warranty. The purchaser will be responsible for
any extra expenses involved in making the refrigerator readily accessible for servicing. The purchaser will
be responsible for any extra charges where the installation is in a remote location such as un-assumed
roads, islands, and areas known as cottage country, 20 km outside a Metropolitan area or where a
technician is not available. Freight damage is not covered by this warranty.
For a iio™ authorized repair center please contact us at: 1-833-446-4461 or you can visit
www.iiokitchen.com for more information.

We do the utmost to ensure that the provided information is complete and accurate, however, images and
specifications are subject to change without notice.
Visit www.iiokitchen.com to download the latest version of the user manual.
RM1 (ALBR1372-11) Use and Care Instructions Manual 20210219V10
Other manuals for RM1
1
This manual suits for next models
1
Table of contents
Other iio Refrigerator manuals
Popular Refrigerator manuals by other brands

Electrolux
Electrolux EI23BC65KS Guide d’utilisation et d’entretien

AEG
AEG OSK5O12ES user manual

Frigidaire
Frigidaire GLRT218WD Factory parts catalog

Beko
Beko BLSA210M2S Instructions of use

Küppersbusch
Küppersbusch FKE 157-5 Instructions for installation and use

Caple
Caple QFF158/91F Operation instructions