IKEA FOLKVANLIG User manual

FOLKVÄNLIG
Design and Quality
IKEA of Sweden


ENGLISH 4
DEUTSCH 19
FRANÇAIS 34
NEDERLANDS 49
ÍSLENSKA 64
NORSK 79
SUOMI 94
SVENSKA 109
ESPAÑOL 124
PORTUGUÊS 139

4
TABLE OF CONTENTS
1. IMPORTANT INFORMATION BEFORE YOU START BIKING 5
2. INTRODUCTION 6
3. INSPECTION AND SETTINGS BEFORE YOU START RIDING 7
4. YOUR FIRST RIDE 8
5. USING YOUR E-BIKE 9
6. BATTERY CHARGING INSTRUCTION 13
7. SAFETY INSTRUCTIONS FOR THE BATTERY AND CHARGER 14
8. TECHNICAL SPECIFICATIONS 15
9. CONTROLS SETTINGS 16
10. MAINTENANCE 17
OPERATING INSTRUCTIONS FOR ELECTRIC BIKES

5
• Before your rst ride, please read the operating instructions
carefully and check that all parts are in good condition.
• Please slow down in slippery conditions, e.g. in rain or snow,
and consider that you will need greater braking distances to
guarantee stopping safely.
• This e-bike works reliably under all weather conditions
although excessive water exposure could damage the
electronics and/or the electric motor.
• Never touch the electronics on the e-bike with wet hands and
never touch the plus and minus poles at the same time, as
the strong short-circuit current could cause injury.
• Never attempt to repair electronics on the e-bike yourself,
always ask a specialist retailer.
• The battery performance can vary depending on the
temperature. Temperatures below 0°C will decrease the
distance you can ride the e-bike without recharging. The
battery performs the best in temperatures above 0°C.
1. IMPORTANT INFORMATION BEFORE YOU START BIKING

6
Frame material: Aluminum
Wheel size: 29"
Front fork: Steel with Suspension
Gears: 21 speed
Rims: Double-wall alloy
Brakes: Disc brakes
Motor: 36 Volts - 250 Watts
Assembly: 95 % (stem turned)
Gross weight: 30 kg.
Net weight of bicycle: 28 kg including
battery.
Battery weight: 1.90 kg
Battery dimensions: 170x100x80 mm
Battery power: 36V 8,7AH
Max load of the bike: 120 kg
2. INTRODUCTION
18
10
3
2
19
17
16
32
30
33
4
21
23
24
39
25
37 22
35
34
27
15
40
41 13
7
8
6
1
36
14
29
4
38
26
5
31
9
44
11
12
20 42
43
1) Frame
2) Fork-
3) Seat post
4) Mudguard
5) Kick stand
6) Head set
7) Handle bar
8) Adjustable stem
9) Grip
10) Saddle
11) F.Disc brake
12) R.Disc brake
13) Brake lever
14) F.Derailleur
15) R.Derailleur
16) Shift lever
17) Bb parts (bottom bracket)
18) Chain wheel&crank
19) Chain
20) Pedal
21) Battery
22) Charger
23) Display
24) Sensor
25) Controller
26) Integrated line
27) Engine
28) Rim
29) Spoke
30) Tire
31) Inner tube
32) Rim tape
33) Front hub
34) Freewheel
35) Quick release
36) Front light
37) Rear light
38) Bell
39) Reector
40) Brake line
41) Derailleur line
42) Screws
43) Tool set
44) Crank cover

7
3. INSPECTION AND SETTINGS BEFORE YOU START RIDING
Tighten the screws:

8
4. YOUR FIRST RIDE
• Be very careful the rst time you ride your e-bike! In power
mode, the e-bike is considerably faster than a normal bike!
• Take your rst ride on open land so you can get used to the
improved acceleration.
• The control unit has a low-voltage protection system which
automatically switches off the power assist if the battery
voltage falls below a certain level.
• Be careful when braking. Always brake with the rear wheel
brake rst, it is less aggressive than the front wheel brake.
• The power assist is deactivated at 25 km/h. It is
automatically switched back on again once the speed drops
below 25 km/h.
• Do not use power assist on slippery surfaces and gravel.
• Switch power assist off if the e-bike is not behaving normally
to avoid damaging electrical components.

9
• Start pedalling; the electric motor will only assist you while
you are pedalling.
• If you wish to change the assist level, press the plus or minus
buttons.
• The power assists stops when you use the brakes.
• The power assists stops when you reach 25km/h.
• If you leave the e-bike unattended, lock the battery with the
key, or take the battery with you.
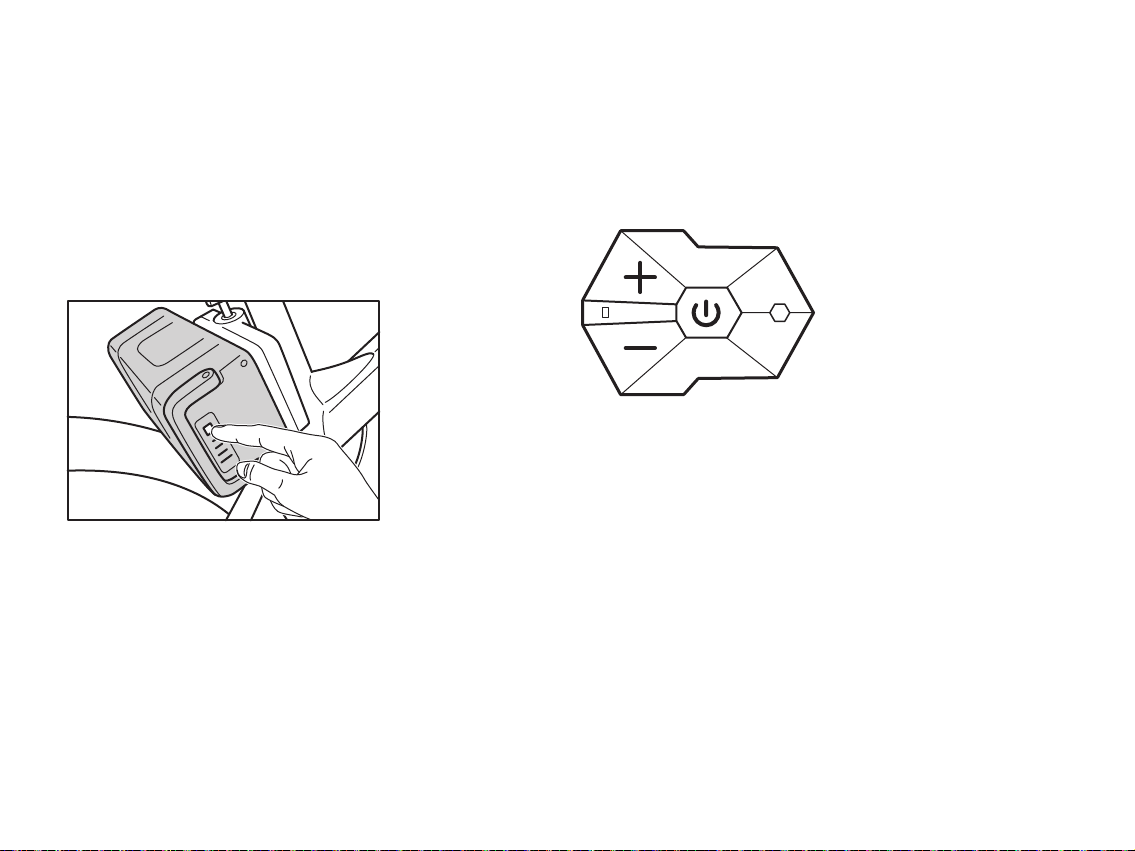
To start the battery, use the ON button.
Control panel:
The engine is controlled by the control panel on the handle bar.
There are six different speed levels. To reach optimal function
you should chose a low speed on the control panel and set the
gear switch in level 1 when you start pedalling.
ON/OFF:
Push and keep the ON/OFF button pressed for about 2 seconds.
The LCD display lights up. To shut the display down manually,
press the ON/OFF button for 2 seconds.
1. To start the display, use the ON/OFF button.
2. Keep the plus button down for a couple of second to turn on
the display light. Do the same thing to turn OFF the display
light.
3. The assistance levels are changed with the plus and minus
buttons. There are 6 levels available.
4. If you need support with leading your e-bike, keep the
minus button pressed down and your e-bike will reach 6
km/h.
5. USING YOUR E-BIKE

10
RANGE OVERVIEW
Condition: Battery is fully charged and new (313Wh, 36V, 8.7Ah)
Driver approximately 74 kg
Distance
Road conditions 10 km 20 km 30 km 40 km 50 km 60 km 70 km
Flat roads Light tailwind
28 degrees Celsius
Dry roads
Slightly hilly terrain Light tailwind
28 degrees Celsius
Dry roads
Strong hilly terrain Light tailwind
28 degrees Celsius
Dry roads
Medium assist - maximum help from own pedalling
Medium assist - low to medium help from own pedalling
Maximum assist - maximum help from own pedalling
Maximum assist - low to medium help from own pedalling

11
Please note the following reservations:
• The bike's tyres should be inated to the proper tyre
pressure.
• If the weather temperature drops - the range will be reduced.
• If the rider's weight increases - the range will be reduced.
• If the roads are wet or icy - the range will be reduced.
Maximising your range
Many factors inuence the performance of the battery which
has impact on your range.
• Charge the battery completely before a long ride.
• More energy is required on uneven roads and hilly conditions.
• Frequent speed changes use up more energy.
• Heavier loads use up more energy.
• Make sure your tyre pressure is OK and always keep the
e-bike clean and well lubricated, as this helps save energy.
• Make sure both wheels can move freely, it helps save energy
if brake linings are not sticking. Check brake linings regularly.
• Vigorous pedalling helps save the battery and increases your
range.

12
REMOVING AND REATTACHING THE BATTERY
1. Switch off the display.
2. Turn the key left to unlock the battery.
3. Lift the battery up out of the holder and remove it.
Parking
Gently press the ON/OFF button on the battery for 3-5 seconds
to turn it ON/OFF.
Battery diodes ON: Battery is ON
Battery diodes OFF: Battery is OFF
• Avoid leaving the e-bike unprotected in rain or snow.
• If the e-bike gets wet, dry it off with a dry towel at the end of
your ride.
• Don’t forget to turn off the front and rear lights separately.
•When the bike is used on salted road, clean the bike
with clean water immediately.

13
• Always switch the battery off before charging it.
• The battery gets hot while charging. For safety reasons,
never cover the battery.
• Place the charger on an even surface.
• You can either charge the battery on the e-bike or removed it
from the e-bike.
Battery
Charger
1. Connect the charger to the battery and then plug in the
charger. A completely empty battery will take approximately
6 hours to fully charge.
2. When the battery is fully charged, the LED on the charger
switches from red to green. For safety reasons, unplug the
battery as soon it is fully charged.
3. Unplug the charger and then disconnect it from the battery.
24 3 1
1. Battery
2. Battery charging connector
3. Charger
4. 230V
6. BATTERY CHARGING INSTRUCTION

14
Your e-bike has a lithium-ion battery. Never charge the battery
with a replacement charger which is not designed for this
purpose. Using an unsuitable charger on a lithium-ion battery
could lead to overheating, re or explosion. If your charger
gets lost or damaged, contact your local IKEA store to order a
replacement.
• The battery is half charged when new. The rst three times,
charge the battery for at least 12 hours.
• Please make sure that the charger voltage matches your
mains voltage.
• The charger must always be used indoors.
• Don’t open the charger, it is a high-voltage unit.
• Never touch the two battery electrodes at the same time as
this could cause an electric shock.
• Never take the battery out of the e-bike while it is charging.
•Please charge the battery for at least 2 hours every 3
months, otherwise we can accept no liability for the
battery guarantee.
• Never charge the battery with other chargers.
• Don’t allow liquids or metals to penetrate into the charger.
• Never charge the battery near infants and small children.
• Never use the charger in oily, dusty, dirty or damp
environments and avoid direct sunlight.
• Avoid using the charger in thunderstorms.
• Always use the charger in cool, well ventilated places.
• Do not hit the battery and avoid strong vibrations.
• The guarantee is voided if the battery is opened or damaged.
• Your e-bike is designed for normal road trafc and for a single
person. Never use your e-bike for extreme manoeuvers, such
as extreme off-road use, jumps or excess load. This could
damage the e-bike and cause serious injuries.
• Only to be used with charger model C060L1001E.001.
• As a road user you have to abide by the trafc regulations in
your country.
7. SAFETY INSTRUCTIONS FOR THE BATTERY AND CHARGER

15
E-bike parameters
Dimensions (L × W × H) 1865 × 1140 × 630 mm
Weight ≤ 23 kg
Maximum speed 25 km/h
Maximum load ≤ 120 kg
Wheelbase between front/rear
wheel hubs 1123 ± 5 mm
Power consumption per 1000 km 1.2 kW/h
Charger parameters
Full Charging time 6,3 hours
Input voltage 100 V - 240 V~50-60 Hz
Maximum performance 60 Watts
Control unit parameters
Low voltage protection 30 ± 0.5 Volts
Over-voltage protection 12 ± 1 Amperes
Battery parameters
Battery type Lithium-ion battery
Capacity 8.7 Ah
Battery voltage 36 Volts
Battery fuse 15Ax2 total 30A
Motor parameters
Motor type Brushless permanent magnet motor
Rated output 250 Watts
Rated voltage 36 Volts
Rated torque 6.5 Nm/40 Nm
Motor effectiveness >78%
Torque moments
Stem 14-15 Nm
Handlebar 9-10 Nm
Seat clamp 7 Nm
Pedals 25 Nm
Maximum tire pressure 40-65 PSI / 2.8-4,.5 BAR
8. TECHNICAL SPECIFICATIONS

16
Average speed
Max speed
Speed
Battery indication
Backlight
Brake indication
PAS speed mode, 6 levels
Warning lamp
Tripmeter (kilometer/mile)
Total distance (not resettable)
Cycled time/round (h:s)
Error codes
LCD800S will alarm when a problem occurs. Following error
codes will be visible in the display together with the symbol for
warning lamp : to .
If the warning lamp is turned on, together with an error code,
please contact an IKEA store, for control.
Remove the display if you want to turn the bike upside down for
maintenance.
9. CONTROLS SETTINGS

17
Make sure you carry out the following safety checks before
riding you E-bike:
Brakes
• Check that the brakes are working properly.
• Visual inspection of the brake linings to check that they are
not worn and that they are aligned to the wheels.
• Make sure that the handbrake cables are attached properly
and that there is no evidence of wear.
Crank and pedals
• Check that the pedals and crank are seated correctly.
• Check that the crank arm is properly tted to the axle.
Other information
• Make sure that all reectors are properly tted and not
covered.
• Note that there is a small box inside main bike box which
includes the front light.
• Do not clean your e-bike with a pressure washer. Water could
penetrate into the motor, cause short circuits and damage
electrical components. Only ever use a damp cloth with a
neutral detergent to clean your e-bike. Do not use acidic
detergents as these could damage the e-bike.
• Do not over-lubricate. If oil gets onto the wheels or the brake
pads, it reduces the performance of the brakes and increases
braking distances.
• Never oil the tread of the pedals. Wash excess oil from the
wheels or brake pads with soapy water. Dry the e-bike before
using it again.
• When you fold the bike and put it in to your car trunk, make
sure you don't damage the front reector.
• The front and rear light has 2 modes; rm and blinking.
• We recommend you to use a helmet.
Adjustment of brakes
The following tools are required: Allen key 5 mm.
1. Make sure that the wheels are centred and tightened.
2. Loosen or tighten the screw (1) so that the brake pad on
the brake disc comes closer to the inside (more braking
power) - or further away (less braking power) of the brake
disc. A suitable distance is 0,3 mm.
3. The distance to the brake pad on the brake disc surface is
adjusted by tensioning or releasing the cable at the hub (3).
Fine adjustment of the brake lining is made by turning the
wire screw (2) on the handbrake lever. The distance should
be the same, about 0.3 mm.
4. Test the brakes before you start biking.
10. MAINTENANCE

18
The crossed-out wheeled bin symbol indicates that the item should
be disposed of separately from household waste. The item should
be handed in for recycling in accordance with local environmental
regulations for waste disposal. By separating a marked item from
household waste, you will help reduce the volume of waste sent to
incinerators or land-ll and minimize any potential negative impact
on human health and the environment. For more information, please
contact your IKEA store.

19
INHALTSVERZEICHNIS
1. WICHTIGE INFORMATIONEN VOR DEM START 20
2. EINLEITUNG 21
3. DURCHSICHT UND EINSTELLUNGEN VOR DEM START 22
4. DIE ERSTE FAHRT 23
5. FAHREN MIT DEM ELEKTROFAHRRAD 24
6. ANLEITUNG ZUM AKKULADEN 28
7. SICHERHEITSHINWEISE ZU AKKU UND LADEGERÄT 29
8. TECHNISCHE DATEN 30
9. SYMBOLE UND FEHLERCODES 31
10. UNTERHALTSÜBERSICHT 32
GEBRAUCHSANLEITUNG ELEKTROFAHRRÄDER

20
18
10
3
2
19
17
16
32
30
33
4
21
23
24
39
25
37 22
35
34
27
15
40
41 13
7
8
6
1
36
14
29
4
38
26
5
31
9
44
11
12
20 42
43
• Vor ersten Fahrt bitte unbedingt die Gebrauchsanleitung
sorgfältig durchlesen und sicherstellen, dass alle Teile im
besten Zustand sind
• Auf glatten Wegen, z. B. bei Regen oder Schnee langsam
fahren und damit rechnen, dass bei schlechter Weglage
sicheres Anhalten länger dauert.
• Dieses elektrounterstützte Fahrrad funktioniert bei allen
Wetterlagen.
• Doch wenn Wasser in den Elektromotor dringt, kann dies
die Elektronik und/oder den Elektromotor beschädigen.
Die Elektronik des Elektrofahrrads niemals mit feuchten
Händen berühren und auf keinen Fall den Plus- und Minuspol
gleichzeitig anfassen. Das kann zu Kurzschluss und damit zu
Personenschäden führen.
• Niemals versuchen, das Elektrofahrrad selbst zu reparieren.
Immer einen Spezialisten zu Rate ziehen.
• Die Akkuleistung wird von Kälte negativ beeinusst. Bei
Temperaturen unter 0°C vermindert sich die Reichweite
auch bei vollgeladenem Akku. Der Akku erreicht seine volle
Kapazität bei Temperaturen über 0°C.
1. WICHTIGE INFORMATIONEN VOR DEM START
Table of contents
Languages: