Ikegami IPD-BX11 User manual

Carefully read this manual before use in order to keep these products at full capacity.

This manual explains how to configure the following cameras through Network from PC.
●IPD-BX11(Box-type IP Network Camera) without Audio, SD card slot, and DI/DO functions.
●IPD-DM11(Dome-type IP Network Camera) with Audio, SD card slot, and DI/DO functions.
●IPD-VR11(Vandal Resistant Dome-type IP Network Camera)with Audio, SD card slot, and DI/DO
functions.
This manual can be downloaded from the following URL:
http://www.ikegami.co.jp/en/products/download/security.html
Concerning installation and the set-up procedure for the camera, please see the Operating procedure and
Camera Installation on the Instruction Manual (Basic) is supplied with the camera.
To browse PDF files, Adobe Reader English Edition is required. Please download and install the
latest edition from the Adobe Systems site.
●Microsoft Windows and Internet Explorer are registered trademarks of Microsoft Corporation in the USA
and other countries.
●Adobe Reader is a registered trademark of Adobe Systems in the USA and other countries.
●Other corporate names and proprietary names are trademarks or registered trademarks of their
corporations.
●The symbols ® and ™ are not included in the text.
●Microsoft product screen shots reprinted with permission from Microsoft Corporation.
●To see camera images, "Network Camera Viewer" software is prepared in addition.
Please contact your dealer for this software "Network Camera Viewer".
Concerning software for viewing and tool for network connection
Concerning trademark and registered trademark
Concerning the Instruction manual (Application)

INDEX
1. Camera Login and Login Screen............................................................................................... 1
2.Quick Configuration.................................................................................................................... 4
2-1.Step 1:Server Name.............................................................................................................. 4
2-2.Step 2:Local Date & Time Configuration............................................................................ 4
2-3.Step 3:Network Configuration : Static IP........................................................................... 4
2-4.Step 4:IP-CCTV DNS Setup(This function is not supported) ........................................... 4
2-5.Step 5:Recording Configuration .......................................................................................... 4
2-6.Finish:Save Configuration ................................................................................................... 4
3.Live Viewer .................................................................................................................................. 5
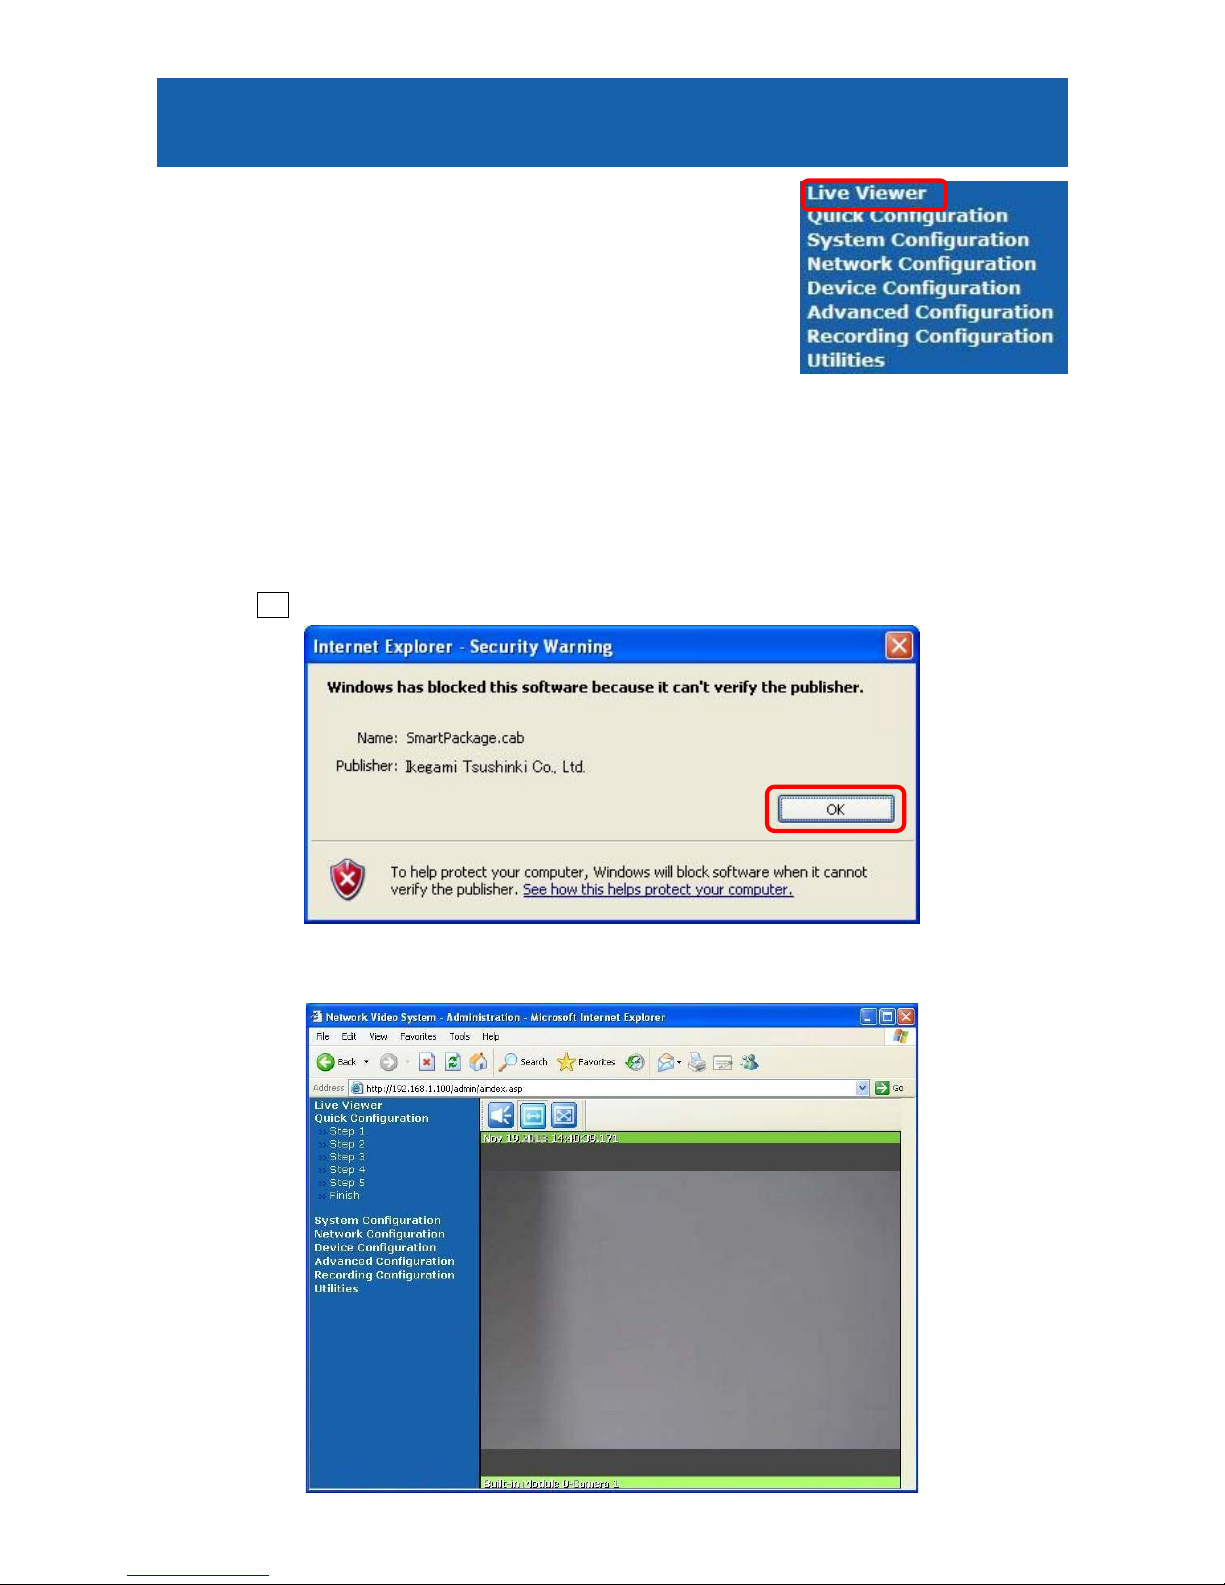
3-1. ActiveX installation............................................................................................................. 5
3-2.Live Viewer Screen ............................................................................................................... 6
3-3.Video and Audio Control ...................................................................................................... 6
3-3-1. Video Display and Audio control (Audio function only for IPD-DM11,IPD-VR11) .. 6
3-3-2.Mouseover buttons......................................................................................................... 7
3-3-3.Mouse Right button click Menu.................................................................................... 9
4.System Configuration ................................................................................................................11
4-1.Server Name ........................................................................................................................11
4-2.Date & Time........................................................................................................................ 12
4-3.Admin. Password................................................................................................................ 13
4-4.Access Control..................................................................................................................... 13
4-5.User Registration(Limited Access).................................................................................... 14
4-5-1.Add................................................................................................................................ 14
4-5-2.Edit ............................................................................................................................... 16
4-5-3.Delete............................................................................................................................ 16
5.Network Configuration ............................................................................................................. 17
5-1.Network Configuration ...................................................................................................... 17
5-1-1.Static IP........................................................................................................................ 17
5-1-2.DHCP Client ................................................................................................................ 18
5-1-3.PPPoE........................................................................................................................... 18
5-2.Network Ports..................................................................................................................... 19
5-3.Bandwidth Control ............................................................................................................. 19
5-4.View Network Status ......................................................................................................... 20
5-5.Network Status Notification.............................................................................................. 21
5-6.IP-CCTV DNS Setup.......................................................................................................... 22
5-7.Port Forwarding & UpnP................................................................................................... 23
5-8.RTP/RTSP ........................................................................................................................... 24
5-9.SNMP .................................................................................................................................. 25
INDEX

6.Device Configuration................................................................................................................. 26
6-1.Serial Ports ......................................................................................................................... 26
6-2.Privacy Zone........................................................................................................................ 26
6-2-1.Add Privacy Zone......................................................................................................... 26
6-2-2.Delete Privacy Zone ..................................................................................................... 27
6-3.Camera & Motion ............................................................................................................... 27
6-3-1.Camera & Motion ........................................................................................................ 28
6-3-2.Camera Control............................................................................................................ 29
6-3-3.Motion Detection.......................................................................................................... 30
6-3-4.PrimaryStream とSecondaryStream......................................................................... 31
6-4.DI (Sensor Input) / DO (Alarm Output)............................................................................ 32
6-5. DI(Sensor Input ) Status / DO(Alarm Output ) Control................................................. 33
7.Advanced Configuration ........................................................................................................... 34
7-1.Advanced Services.............................................................................................................. 34
7-2.E-mail .................................................................................................................................. 35
7-2-1.E-mail(E-mail Service Configuration)................................................................... 35
7-2-2.Camera(E-mail Service Setup for Each Channel)................................................ 36
7-2-3.Condition...................................................................................................................... 37
7-3.FTP(Buffered) ..................................................................................................................... 38
7-3-1.FTP(Buffered) .............................................................................................................. 38
7-3-2.Camera(FTP Service Configuration).......................................................................... 39
7-3-3.Condition...................................................................................................................... 40
7-4.FTP(Periodic) ...................................................................................................................... 41
7-4-1.FTP(Periodic) ............................................................................................................... 41
7-4-2.Camera(FTP Service Configuration)..................................................................... 42
7-4-3.Condition...................................................................................................................... 43
7-5.Sensor Notification............................................................................................................. 44
7-5-1.Sensor Notification ...................................................................................................... 44
7-5-2.Input ............................................................................................................................. 45
7-5-3.Condition...................................................................................................................... 46
7-6.Alarm Output...................................................................................................................... 47
7-6-1.Alarm Output............................................................................................................... 47
7-6-2.Output .......................................................................................................................... 47
7-6-3.Condition...................................................................................................................... 48
INDEX

8.Recording Configuration........................................................................................................... 49
8-1.SD Configuration................................................................................................................ 49
8-2.Recording Configuration.................................................................................................... 52
8-2-1.Camera ......................................................................................................................... 53
8-2-2. Condition 1.................................................................................................................. 54
8-2-3.Pre-Alarm & Post-Alarm Configuration Example .................................................... 58
8-3.Recording Profile ................................................................................................................ 59
8-4.Recording Mode .................................................................................................................. 59
8-5.SD Status Report................................................................................................................ 60
8-6.Clear Recording Config ...................................................................................................... 61
8-7.Delete Recorded Data......................................................................................................... 61
9.Utilities ...................................................................................................................................... 62
9-1.System Log.......................................................................................................................... 62
9-2.Save Configuration............................................................................................................. 63
9-3.Reboot.................................................................................................................................. 63
9-4.Factory Default................................................................................................................... 64
9-5.System Update.................................................................................................................... 64
9-5-1.All(Firmware, RAM disk, System, Web) Update....................................................... 65
9-5-2.System and Web Update ............................................................................................. 68
9-5-3.Web Only Update......................................................................................................... 68
9-5-4.Sensor Device Driver Update ..................................................................................... 68
9-5-5.Flexible Extra system.................................................................................................. 68
INDEX

1. Camera Login and Login Screen
①Start Internet Explorer(IE),input the URL of network camera as below.
Then click the
Go
button.
●The initial setting of the camera is http://192.168.1.100/ .
②Input the Login Name(User Name) and Password of administrator.
●The initial setting are Login Name(User Name) "
root
" and Password "
root
".
③After input Login Name(User Name) and Password, press OK button. Once logged in, the
Password can be changed to new one.
Now the Configuration screen is displayed as below. The left of screen is displaying Main menu.
Each Item can be clicked and showing Setup Menu with details on the left of screen.
(Below screen is e.g. for "Quick Configuration" )
①
②
③
1. Camera Login and Login Screen
Notes:
IE Pop Up blocker should be released ,if not it may happened unable to set up the camera
causing to block the setup communication.
1

Configuration (Set up) Screen Structure
The following table shows Configuration (Setup) menu structure hierarchy for IPD-DM11 and
IPD-VR11 which have additional menu than IPD-BX11.
Main Menu
Setup Menu
Sub-Menu 1
Sub-Menu2
Live Viewer
なし
なし
なし
Quick
configuration
Step 1
n/a n/a
Step 2
Step 3
Step 4
Step 5
(IPD-DM11,IPD-V11)
Finish
System
Configuration
Server Name
n/a n/a
Date & Time
Admin. Password
Access Control
User Registration
Network
Configuration
Network
Configuration
n/a n/a
Network Ports
Bandwidth Control
View Network Status
NetworkStatus
Notify
IP-CCTV DNS
™
Port Forwarding &
UPnP
RTP/RTSP
SNMP
Device
Configuration
Serial Ports
Serial Input Mode
n/aSerial Output Mode
Transparent Mode
Privacy Zone n/a n/a
Camera & Motion
Camera Control
n/a
2

Main Menu
Setup Menu
Sub-Menu 1
Sub-Menu2
Motion Detection
Primary Stream
Secondary Stream
DI/DO n/a n/a
DI Status / DO
Control n/a n/a
Advanced
Configuration Advanced Services
E-mail
Camera 1
Camera 2
FTP(Buffered) Camera 1
Camera 2
FTP(Periodic)
Camera 1
Camera 2
Sensor Notification Input 1
Input 2
Alarm Output Output 1
Recording
Configuration
SD Configuration
SD Status & Format
SD Information n/a
Recording
Configuration Built-in Module 0 Camera 1
Camera 2
Recording Profile
n/a n/a
Recording Mode
SD Status Report
Clear Recording
Config.
Delete Recorded Data
Utilities
Player
(Displayed only
IPD-DM11/IPD-VR11
with SD card)
n/a n/a
System Log
Save Configuration
Reboot
Factory Default
System Update
3

2.Quick Configuration
Quick Configuration Menu is to help the configuration for camera easily. Set up Menu Step5 is
only display for IPD-DM11 and IPD-VR11.
2-1.Step 1:Server Name
Click
Step 1
, the Setup Menu for
4-1.Server Name
is displayed.
2-2.Step 2:Local Date & Time Configuration
Click
Step 2
, the Setup Menu for
4-2.Date & Time
is displayed.
2-3.Step 3:Network Configuration : Static IP
Click
Step 3
, the Setup Menu for
5-1-1.Static IP
is displayed.
2-4.Step 4:IP-CCTV DNS Setup(This function is not supported)
Click
Step 4
, the Setup Menu for
5-6.IP-CCTV DNS Setup
is displayed.
2-5.Step 5:Recording Configuration
Click
Step 5
,the Setup Menu for
8-2.Recording Configuration
is displayed. This function is only
for IPD-DM11 and IPD-VR1 . When it is connected with IPD-BX11, this menu is not displayed.
2-6.Finish:Save Configuration
Save the setup data for above each step with this menu.
2. Quick Configuration
IPD-DM11, IPD-VR11
IPD-BX11
4

3.Live Viewer
This Live Viewer enable to control the video and audio of IPD-
BX11, IPD-DM11, and IPD-VR11 over the TCP/IP network on IE.
It works with cameras to display streaming live video and to record
the snap shot and/or AVI for streaming video on PC.
When the Micro SD card (SD card) is inserted into SD card slot of
IPD-DM11 and /or IPD-VR11, it is able to record and replay to/from
SD card by Live Viewer. (IPD-BX 11 has no SD card slot)
3-1. ActiveX installation
Connect to the camera on IE, click the Live Viewer on Configuration screen, then below window
screen is displayed.(If confirmation window for ActiveX install is displayed, select Install)
Click the OK button then Active X is automatically installing.
Finished installing ActiveX, below Live Viewer screen is displayed.
3. Live Viewer
5

3-2.Live Viewer Screen
The ActiveX installed PC can display the Live Viewer screen by login the camera and click the Live
Viewer on the Configuration Menu on Live Viewer. Also the Icons and buttons on screen are able to
operate as explained below.
3-3.Video and Audio Control
3-3-1. Video Display and Audio control (Audio function only for IPD-DM11,IPD-VR11)
Icon operation (Each Icon is shown the details by mouseover each icon)
Display or Hide the Audio Control bar (shown below) which can control the Audio level
and line on/off by click this button.
This icon also displayed to connect IPD-BX11 but it is not functioned
Ratio Mode:
If live video is smaller than the screen, it is displayed as original size. If live
video is larger than screen, it is adjusted to fit the screen with original aspect ratio by
Stretch Mode:
Live video is resized to fill the entire screen by click this button.
Audio control bar operation
When it is needed to use Audio for IPD-DM11,IPD-VR11, click the Connect
button. The Audio volume is controlled by move the knob of Slider.(Right side is
Max.) Mute ON-OFF function is shown
3-3-3.Mouse Right button click Menu
4)
.
If Audio line is needed to, cut click the Disconnect button.
6

If below popup alert window is displayed by click the Connect button, refer the
6-3-1.Camera &
Motion
and click the
Enable
radio button of
Audio
line.
3-3-2.Mouseover buttons
When mouseover the live video screen, control buttons displayed on left -up of live video screen as
below. These control buttons displaying is different between IPD-BX11(w/o SD card slot)and
IPD-DM11/IPD-VR11 (with SD card slot).
If Each button is mouseovered, the function of each button is shown on screen as below-right
screen(e.g. AVI button function).
1)
Snap shot button
It can be captured for currently displayed live video and saved it as image file either in
JPEG or BMP format in PC. When click the Snap shot button, below saving screen is
displayed with captured image.Enter the folder and file name, and click the Save button.
IPD-BX11
IPD-DM11/IPD-VR11
Note:
If live video is in MJPEG format, saved image will be JPEG file. If the live video is in MPEG -4 or
H.264 format, saved image will be BMP file.
7

2)AVI button
It can be captured for currently displayed live video and saved it as video AVI format in
PC. Select live video to save and click AVI button for saving start, and click again for
saving stop. Then saving screen is displayed, enter the folder also file name, and click the
Save button.
3)Force Recording (Only for IPD-DM11, IPD-VR11 with SD card)
When IPD-DM11 and/or IPD-VR11 are/is inserted SD card into SD card slot(SD card is
option), live video can be recorded in the SD card by click this button. To stop recording,
click again this button.
The maximum duration is 1 minute and recording will be stopped automatically after 1 minute.
If it is needed to record again, click this button again.
The recorded video files (Max.1 minute/file) are saved in the SD every start/stop the recording.
Also Player of Utilities menu of Configuration menu (only shown when
SD card inserted) can playback above 3)recorded video files and backup
it. Please refer INSTRUCTION MANUAL (PLAYER INSTRUCTION) as
separate volume.
4)
Instant Play back(Only for IPD-DM11, IPD-VR11 with SD card)
When IPD-DM11 and/or IPD-VR11 are/is inserted SD card into SD card slot(SD card
is option),recorded video in the SD card can be done the playback by click this button. To
click this button, below window will open.
Instant playback will scan the video data up to 1minute before it was execute. And scanned data
will be played automatically.
Note:
When you play back the saved video from H.264 format live video, it is needed the proper CODEC.
8

Set the beginning of video file data. Instant playback
will scan 1minute after set time
Set the playback speed.
Start searching data
Play
Reverse playback
1frame playback every click
1frame reverse playback every click
Pause
Stop
3-3-3.Mouse Right button click Menu
When the right button of Mouse is clicked on the Live Viewer window, below pop-up menu will be
displayed as extended menu.
1)
Pause
Click Pause button to stop and resume live view video.
2)FPS(Frame/Sec)
Not supported.
9

3)Flip
Click this button to invert the direction of video image, if select Mirror then original image
invert horizontally as mirror, and select Flip then original image flipped vertically.
4)Mute Audio(Only for IPD-DM11, IPD-VR11 )
Click this button to make on and off Mute the Audio. Also please refer
3-3-1. Video Display and
Audio control.
5)Do1(Set Alarm output On/Off for only IPD-DM11,IPD-VR11)
Click this button to control relay output is On or Off for checking connected lighting, alarm
products and etc.
6)
Navigation(Live view position navigation)
When click the Time Stamp, below saving screen is displayed with captured image attach
TimeStamp. Enter the folder and file name, and click the Save button.
10

4.System Configuration
Click
System Configuration
item, the below setup menu is displayed.
It can be setup for camera system.
4-1.Server Name
Click
Server Name
item, below Server Name Setup screen is displayed (Same as Quick
Configuration Step1).
It can be changed the name on
Server name
field, but other item name/values are not allowed to
change. Enter the new server name in the Server Name field which can be used up to 21
alphanumeric or up to 10 Unicode characters.
Finished the name print, click the Apply button to save the setting and it will take effect
immediately.
If click Back button, new setting data will be cancelled and the setup screen will be back to
previous setup screen .
4. System Configuration
11

4-2.Date & Time
Click
Time & Date
item ,below Local Date & Time Configuration screen is displayed(Same as
2-2.Step 2:Local Date & Time Configuration
).
Date(yyyy/mm/dd)
Set the date
Time(hh:mm:ss) Set the Local time
Time Zone
Select and set the Time Zone for this system location.
Service Enable:NTP Server service used
Disable:NTP Server service not used
NTP server address
Set NTP Server address
NTP server time Click button to get synchronized time from NTP server
If
Time Zone
is not corrected, tick
Change Time Zone
and select the right time zone area ,then set
the date and time. For save changed date and time, click Apply button.
When it is needed exact correct time, use NTP server service and click Get NTP Server Time
button.
Click Refresh button, it will be displayed the Date & Time retrieved.
If click Back button, new setting data will be cancelled and the screen will be back to previous
screen .
Note:
In order to retrieve Time and Date data from NTP server, it is needed to put address of NTP server
in advance of setting up , such as above "pool.ntp.org "
12

4-3.Admin. Password
Click
Admin Password
, then Administrator Password can be changed on below displayed screen.
Administrator’s ID
"root" fixed , not allowed to change
Old Password
Enter current password (Factory default "root")
New Password
Enter new password between 4 and 23 alphanumeric .This password is
also used for Login on IE and Authentication of RTSP streaming.
Confirm Password
After set the new password, click the Apply button to save and take into effect it.
4-4.Access Control
Click
Access Control
item, below Access Control Configuration screen is displayed
Full Access
Any user can access the camera and use all futures without limit through
RTSP Streaming.
Limited Access Only registered users can access the
camera and have limit privileges
through RTSP streaming.
After set this click the Apply button to save this selection.
Note:
The existing camera network connection was made up with login by old Admin Password ,thus it is
lost connections for camera caused to changed password. It must be reconnected for camera with
using new password login.
Note:
If this setting is not done, it is not able to enable the setting for item
4-5-1.Add
System Resource
Access Permission
.
13

4-5.User Registration(Limited Access)
Click
User Registration
item, below User Registration setting menu
screen is displayed.
It is able to setup for Limited access User(add, edit, delete) through
RTSP streaming.
4-5-1.Add
Click Add radio button, the below screen is displayed.
User ID
Enter up to 23 alphanumeric characters
Password Enter same password between 4 and 23 alphanumeric.
Confirm Password
Name Enter up to 31 alphanumeric characters
Now select one of
System Resource Access Permission
on below screen
All Channels Access User can use all function except Administration setup page.
General Access
(only live viewing access) User can use only Live View video.
No Access User is not permitted of any function.
Selective Access
User is allowed to use only selected functions which is setup on below
screen.
Note:
The registration for user of RTSP streaming can be done on this screen, but it is unable if the
Limited Access item is not selected on screen of
4-4.Access Control (Limited Access)
.
Displayed on Menu, but function is not implemented
14

VS Module ID Built-in Module0 is set (fixed).
Camera No
Select Access stream between Camera No.1:Primary Stream, Camera
No.2 :Secondary Stream and All: Both Stream.
Alarm Control Set the permission to access for control Alarm system part.
PTZ Control
Set the permission to access for PTZ control(Not supported)
Audio Control Set the permission to access for Audio control(Only IPD-DM11/VR11)
Playback
Set the permission to access for Playback control of recorded video.
(Only IPD-DM11 and IPD-VR11)
After finished above all registration process for Add, click Apply
button to save the added the user.
If click Back button, new setting data will be cancelled and the screen will be back to previous
screen.
15
Other manuals for IPD-BX11
2
This manual suits for next models
2
Table of contents
Other Ikegami IP Camera manuals