iKEY-AUDIO iCONNEX User manual

QUICK SETUP GUIDE
SETUP FOR ICONNEX SOUNDCARD
AND AUDACITY RECORDING SOFTWARE
SETUP GUIDE
Congratulations on your purchase of the iKey Audio iConnex soundcard.
This guide will help you setup the iConnex soundcard as well as the included
Audacity software. Please take the time to carefully read through this guide
as it will help you better understand how to use your new iConnex soundcard.
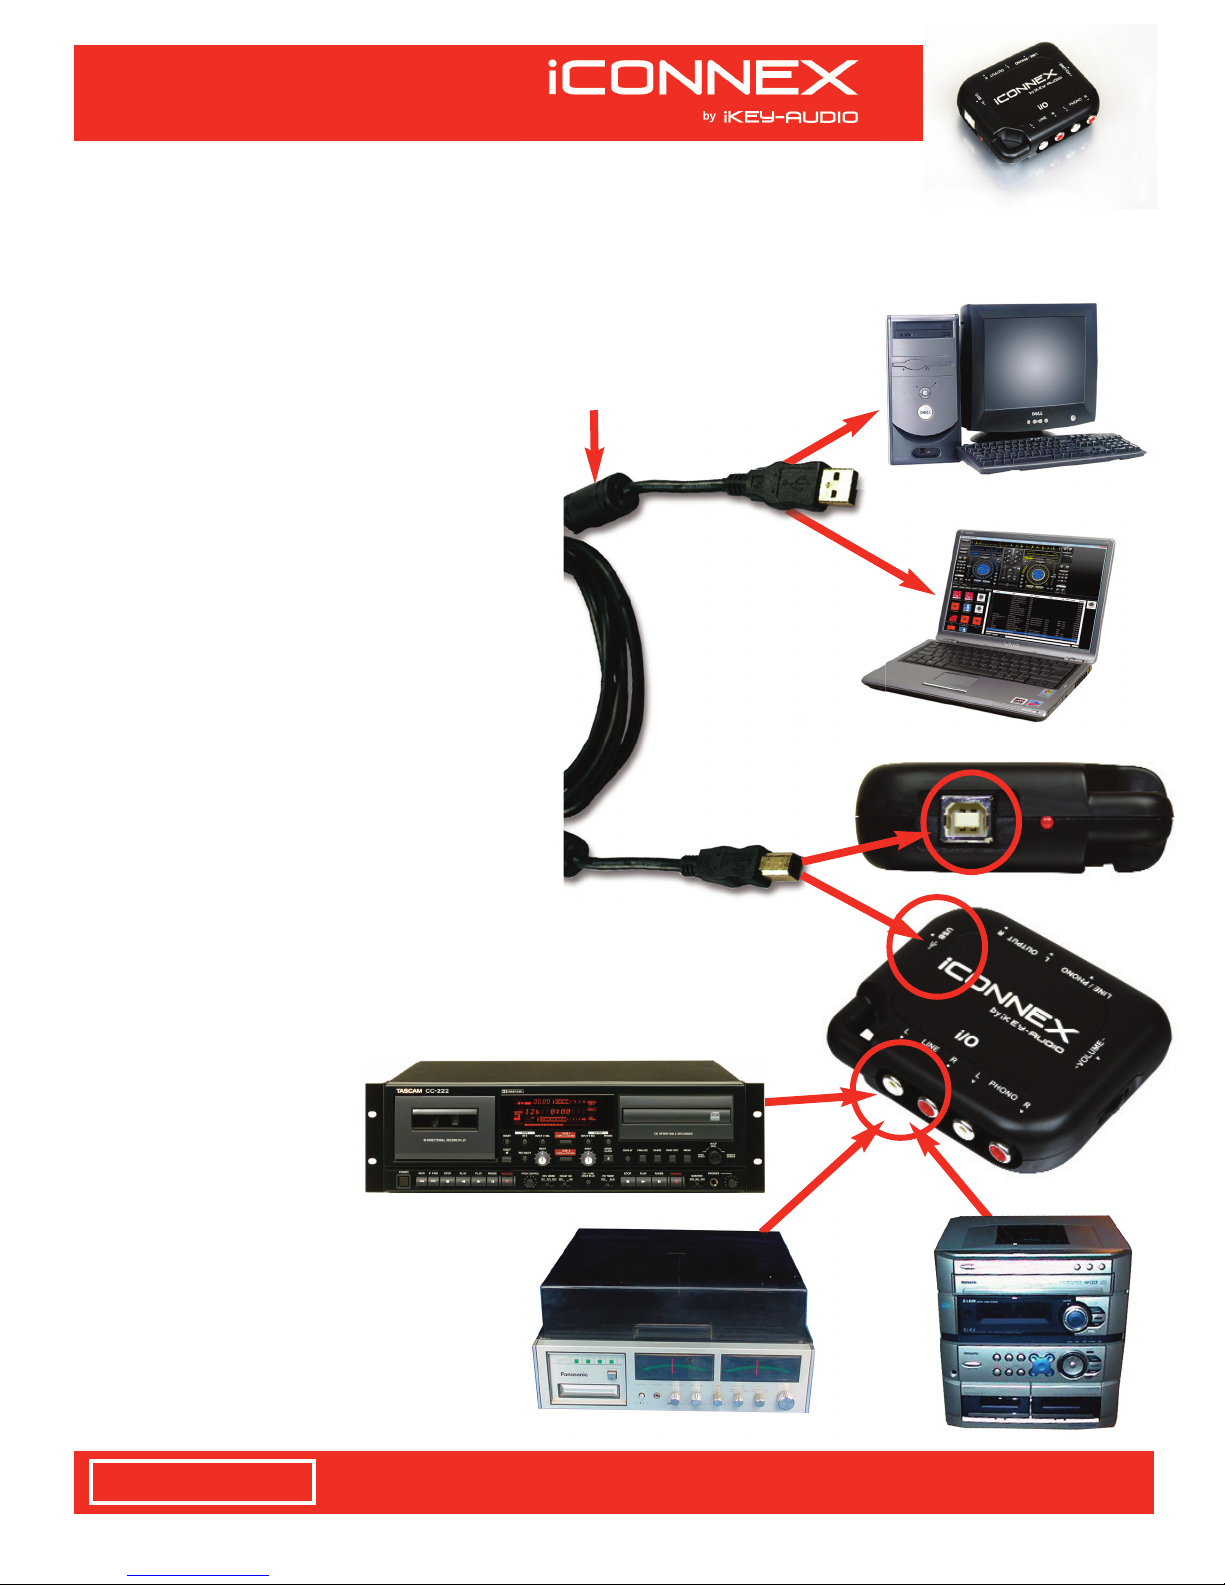
COMPUTER HOOK UP:
First you should connect your iConnex to
your laptop or desktop computer using the
USB cable that came in the iConnex
package, making sure to connect the
smaller SQUARE end of the USB cable to
the iConnex. Then connect the other larger
FLAT end to the USB port on the back, side
or front of your desktop or laptop computer.
INPUTS:
The iConnex can be connected to most of
your Tape, Phonograph (Turntable), and
Stereo receivers as long as they have a
phono or line level TAPE/RECORD output,
these INPUTS are divided into two sperate
types and both accept standard RCA type
cables (not included).
INPUT (LINE):
The line level input accepts any line level
source such as CASSETTE TAPE PLAYER,
DJ MIXER, CD PLAYER or even an all in
one stereo system that has a RECORD
output. You may use a
standard pair of RCA type
cables to connect your
stereo/mixer/tape player to
the iConnex line input.
If your record player is attached to a
whole stereo system you must make
sure that the system has a RECORD,
TAPE or LINE output making sure to
connect this output using the LINE
input as described above.
STEP 1 CONNECTIONS:
OR
USB cable
Included
DO NOT CONNECT A LINE LEVEL OUTPUT TO THE PHONO INPUT AS WELL AS NEVER
CONNECT A SPEAKER OUTPUT TO ANY INPUT AS IT MAY DAMAGE THE ICONNEX.
WARNING!

INPUT (PHONO):
The PHONO input accepts any standard
magnetic cartridge, stand alone turntable or
record player.
Connect your record player to the PHONO
input making sure to connect the thin black
GROUND wire to the silver GROUND
SCREW located on the bottom of the
iConnex, failure to connect the ground wire
will cause a humming to be present in your
recordings.
Once you have chosen which INPUT you are
going to use, make sure that the INPUT
SELECTOR SWITCH is in the appropriate po-
sition, LINE if you are using the LINE input or
PHONO if you are using the PHONO input.
OUTPUT:
The OUTPUT section allows you to use
the iConnex as an output for your computer
and can be used instead of your computers
built in output. You may then connect the
OUTPUT of the iConnex to any Mixer, Stereo
Receiver, Amplifier or any system with a LINE
level or AUX input. Then use the built in
THUMB WHEEL volume control located on
the side of the iConnex to adjust the volume
of the iConnex output.
Once you have made all the proper
connections you may then setup your
computer, although the iConnex is a PLUG
AND PLAY device there may be some
settings you need to go over depending on
your computers configuration.
For your computer settings and an Audacity RECORDING
SOFTWARE overview please continue to the next page.
SETUP GUIDE
CONNECTIONS (continued) BOTTOM TOP
Ground Screw
WARNING!
IF YOUR TURNTABLE
IS MISSING A GROUND
WIRE YOU MUST RE-
ATTACH ONE OR THE
TURNTABLE OUTPUT
WILL EMIT A HUM!
Make sure the
input select
switch is set to
the input you
are using.
Use the built in
THUMB WHEEL
to adjust the
output volume
VOLUME

YOUR COMPUTERS SETTINGS
Setting up your computer to work with the
iConnex is a simple task as the iConnex
needs no driver or program to work, Simply
connect the USB cable from your desktop
computer or Laptop Computer to the iConnex,
and should be ready to go. If you have a
desktop computer Please make sure that
you connect the iConnex to a USB port on
the back of your computer as it may not
work with the USB input located on the front.
If you wish to check and make sure that the
settings are correct, go to your START
menu then your choose CONTROL panel.
Look for the SOUND control panel, choose
it, a dialogue box will pop up. Check and
make sure that the USB codec is chosen on
both the INPUT and the OUTPUT tabs.
After all your connections and settings are
in order you are now ready to install the
Audacity recording software that came
include inwith your iConnex soundcard.
INSTALLING AND SETTING UP AUDACITY
Audacity is the software that is bundled with
the iConnex and allows you to record your old
RECORDS or TAPES, although we do not
manufacture the AUDACITY software we
have included it along with your iConnex as a
courtesy and convenience to our customers.
To install AUDACITY insert the disk into your
computers CD-ROM drive, go to your start
menu and open MY COMPUTER and choose
the AUDACITY CD. Open the AUDACITY
folder and choose SETUP this opens the
install wizard, follow the prompts and the
wizard will install AUDACITY and create an
ICON on your desktop. when the install
wizard finishes, look for the AUDACITY icon
on your desktop and click it this will open
AUDACITY.
AUDACITY is a freeware program and has no relation to
iKey audio, any and all customer service issues should be
directed to AUDACITY at audacity.sourceforge.net.
SETUP GUIDE
COMPUTER SETUP
Check the Sound
control panel to make
sure that the input
and outputs are set
to USB codec.
Choose Start menu
then Control panel to
set audio
NOTICE!
SETUP GUIDE
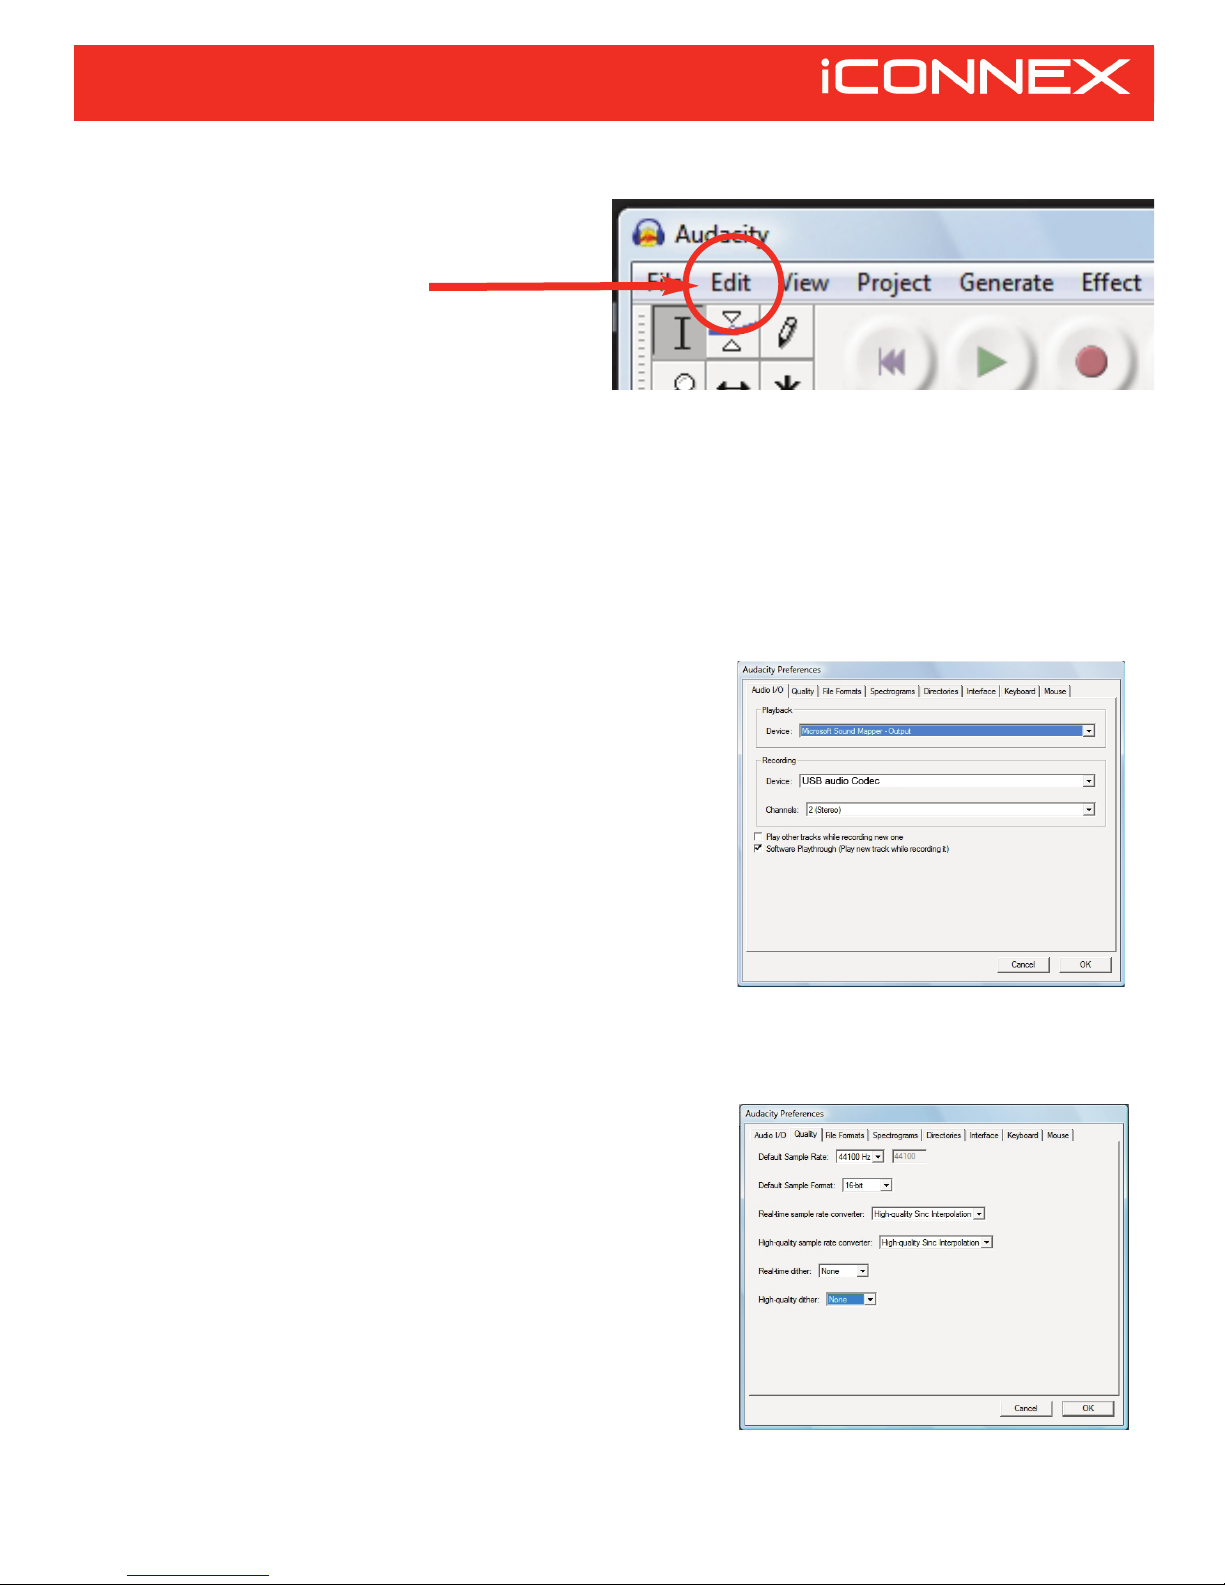
Once the program is open choose the EDIT
pull down menu and choose PROPERTIES
This will open a PREFERENCES dialogue
box.
AUDACITY SETTINGS
Although the PREFERENCES box has 7
different tabs you need to only worry about the
first three, lets go over those settings now.
AUDIO I/O
The Audio I/O tab is where you choose how
AUDACITY sends and receives audio for
most computers this is automaticaly set once
you plug in the iConnex sound card.
These settings are as follows:
“Playback” Determines which output Audacity
will play out of. Choose Microsoft sound
manager if you wish for Audacity to play out of
your computers speakers. Or choose “USB
audio Codec” if you are going to be using the
iConnex soundcard as your output device.
“Recording” The “DEVICE” should be set to
“USB audio Codec” Audacity will then be set
to record from either the LINE or PHONO
input of the iConnex soundcard, depending on
which one you are using. “Channels should be
set to the default “2 (Stereo)“ then there are
two extra features that can be chosen, the first
box “Play other tracks while recording new
one” should be UNCHECKED. The second
box “Software play through (play new track
while recording it)“ should be CHECKED.
Once you have made these settings you can
click the next TAB.
QUALITY TAB
The “The Default Sample Rate” should be set
to 44.100Hz, the “Default Sample Format
should be 16-bit. Both the Real-time sample
rate converter, and the Real-time sample rate
converter should be set to “High-quality Sinc
Interpolation. Then also both the-real time
dither or the HIgh-quality dither should be at
none.
COMPUTER SETUP (CONTINUED)
AUDACITY HAS 7 DIFFERENT SETTINGS
TABS YOU WILL ONLY NEED TO WORRY
ABOUT 3 OF THEM.
TAB
1
TAB
2
AUDIO I/O
QUALITY

Horizontal Stereo
Vertical Stereo
Linear
dB
Monitor Input
Disable
Choose the
Monitor Input
so you can
hear the music
that is being
recorded
SETUP GUIDE
COMPUTER SETUP (CONTINUED)
FILE FORMATS TAB
In the “When importing uncompressed audio
files into Audacity” section of this TAB only the
“Read directly from the original file “ should be
checked.
In the “Uncompressed Export Format” section
you should chose WAV (microsoft 16bit PCM).
and although you could chose a compressed
format like Mp3 we recommend that you used
an uncompressed format like WAV when
preserving your RARE Records or Tapes.
The other two sections “OGG export setup”
and MP3 export setup should be left at their
default setting.
Once you have completed your settings you
may chose OK and the settings box will close
automatically saving the new settings.
RECORDING
To monitor the audio signal that you are
sending to the iConnex you must set the
pulldown menu that is located next to the right
of the little MICROPHONE icon to “MONITOR
INPUT”You should now be able to hear the
signal coming from your iConnex, use the
input volume control knob on the iConnex to
set your input level, now you can begin
recording.
Press the RECORD button to start recording,
You will see a waveform being created as Au-
dacity records. when you are done press the
STOP button, to save your recording, simply
choose (EXPORT WAVE FORMAT) under the
”FILE” pull down menu, choose the drive you
wish to save the file to and press OK.
Repeat this process for every new recording.
You are now ready to use the iConnex to
transfer all of your records and tapes!
TAB
3
FILE FORMATS
Table of contents


