Ectiva OPTiSound EV1933 User manual

OPTiSound
EV1933
Deluxe User's Manual
Revision: 1.0
May , 1998

Plug-and-Play 3D Sound Controller
Page ii
Copyright
Copyright © 1997. All rights reserved. No part of this publica-
tion may be reproduced, transmitted, transcribed, stored in a
retrieval system, or translated into any language or computer
language, in any form or by any means, electronic, mechani-
cal, magnetic, optical, chemical, manual, or otherwise, without
the prior written permission from the manufacturer.
Disclaimer
The publisher makes no representations or warranties with re-
spect to the design and documentation herein described and
especially disclaims any implied warranties of merchantability
or fitness for any particular purpose. Furthermore, the pub-
lisher reserves the right to revise the design and associated
documentation and to make changes from time to time in the
content without obligation to notify any person of such revi-
sions or changes.
Trademarks
All trademarks and copyrights are the property of their respec-
tive holders.

Plug-and-Play 3D Sound Controller
Page iii
Table of Contents
I. Introduction v
I.i Features ......................................................................................... v
I.ii What is in your package?..............................................................vi
I.iii System Requirements...................................................................vi
I.iv Latest Information.........................................................................vi
II. Quick Installation Windows 3.1 vii
III. Quick Installation Windows 95 ix
1. Hardware Installation 1
1.1. Default Configuration............................................................... 1
1.2. Installing the <Product> Sound Controller............................... 2
1.3. Connecting External Devices...................................................3
1.4. CD-ROM Hardware Installation................................................5
2. Windows 3.1 Software Installation 8
2.1. Device Driver Installation.........................................................8
2.2. Windows 3.1 Configuration.................................................... 12
2.3. Windows 3.1 Applications......................................................15
2.3.1. Audio Mixer.....................................................................15
2.3.2. Advanced........................................................................ 16
2.3.3. Read Me File ..................................................................16
2.3.4. 933 Uninstall...................................................................16
2.4. DOS Configuration and Utilities.............................................16
2.4.1. SNDINIT.EXE .................................................................16
2.4.2. Volume TSR Utility..........................................................19
2.5. Notes on Software Installation...............................................19
2.5.1. Read the README.TXT file............................................19
2.5.2. Changes to AUTOEXEC.BAT.........................................19
2.5.3. Changes to CONFIG.SYS .............................................. 20
3. Windows 95 Software Installation 21
3.1. Windows 95 Mode.................................................................21
3.2. Real Mode DOS..................................................................... 23
3.3. Windows 95 Uninstallation ....................................................26
4. Troubleshooting 28
4.1. Resolving Hardware Conflicts................................................28

Plug-and-Play 3D Sound Controller
Page iv
List of Figures
Figure 1-1 Sound Controller Layout........................................... 2
Figure 1-2 Sound Card Installed on Motherboard ..................... 3
Figure 1-3 External Connector Locations.................................. 4

Plug-and-Play 3D Sound Controller
Page v
I. Introduction
The <Product> Audio Controller is a 16-bit stereo sound card
based on the ECTIVA EV1933 Plug-and-Play 3D Integrated
Audio controller chip. The <Product> is compatible with all
major PC sound standards, including Sound Blaster™ Pro, Ad
Lib™, MPU-401 and Windows Sound System™. The <Prod-
uct> provides an integrated sound solution for business audio,
educational and entertainment sound, and other multimedia
applications.
The <Product> Sound Controller card will let you run thou-
sands of Sound Blaster and Sound Blaster Pro compatible
games and applications, including a rapidly growing number of
Windows business applications that are compatible with the
Windows Sound System.
Included with full support for these popular PC sound stan-
dards, the <Product> Sound Controller card includes an IDE
CD-ROM interface. The <Product> Sound Controller card also
has multiple input and output ports for recording and playback
of stereo sound.
I.i Features
The <Product> Sound Controller card is a full-featured sound
card that includes the following:
•ISA Plug and Play (PnP)—Supports the Plug and Play
Specification 1.0a which allows the system to automatically
detect and configure devices that conform to the standard.
This eliminates the user having to know and configure the
correct IRQ, DMA and I/O channel settings.
•3D Sound Enhancement—Supports 3D spatial
enhancement and effects tuning (Windows 95 only).
•Wave Audio—Maximum recording and playback sampling
rate of up to 48 KHz stereo.
•Sixteen-bit digital-to-analog and analog-to-digital con-
verter—16-bit and 8-bit digitizing in stereo and mono
mode.
•Twenty-two Voice FM Music Synthesizer—Yamaha
OPL3 FM Synthesizer technology. Play up to 22
instruments simultaneously to deliver a high quality of rich
and crisp music.

Plug-and-Play 3D Sound Controller
Page vi
•Digital/Analog Mixer—Mix analog stereo from CD-audio,
Line-In, FM music and digitized voice sources. Digital
stereo mixing from Microphone, Line-in, CD-audio and
Line-out Master volume control.
•Built-in Stereo Power Amplifier—4-watt per channel
stereo power amplifier.
•MIDI Interface/Joystick Port—Built-in integrated MIDI
MPU-401 interface with FIFO, IBM PC joystick/game port.
•Interfaces—Wave table synthesizer interface, Speakers
Out, Line Out, Line In, and Microphone In.
I.ii What is in your package?
You should have the following items in your package:
•<Product> Sound Controller Card
•<Product> Device Driver Installation Disk (Windows 3.1
and Windows 95)
•<Product> Sound Controller User Manual (this document)
I.iii System Requirements
The <Product> Sound Controller is manufactured for IBM PC
compatible computers, software, and related computer com-
ponents:
•IBM - compatible computer models AT, 286, 386, 486,
Pentium, PS/2 (model 25/30) and compatibles (486
minimum for Windows 95)
•At least 4MB RAM, 8MB for Windows 95
•VGA or SVGA graphics adapter and monitor
•2MB free on hard disk for installing all <Product> Sound
Controller software
•Windows 95 or Windows 3.1
•External speakers, microphone or headphones
(ECTIVAonal)
I.iv Latest Information
Please read the README.TXT file on the installation disk for
any changes made after this manual was printed.

Plug-and-Play 3D Sound Controller
Page vii
II. Quick Installation Windows 3.1
This section is for those who are familiar with the hardware
and software installation of PC peripherals, especially PC
compatible sound cards, and the Windows 3.1 operating sys-
tem.
If you run into difficulties, please see the full instructions pro-
vided in Chapter 1 (Hardware Installation) and Chapter 2
(Software Installation). These Quick Installation instructions
are intended to be brief and do not cover all of the <Product>
Sound Controller ECTIVAons and configurations.
II.i Hardware Installation
1. Power down your computer, remove the cover and find an
empty 16-bit expansion slot.
2. Install the <Product> Sound Controller into the open slot
and secure it.
3. Connect a pair of speakers to the Speaker Out connector
on the <Product> Sound Controller bracket. Refer to Sec-
tion 1.3 for details concerning connecting other external
devices.
WARNING! To avoid temporary or permanent hearing loss or impair-
ment due to unexpected noise or static, always hold your
headphones away from your ears before turning on the
computer. You should also lower your speaker's volume
before testing.
4. For details on CD-ROM installation refer to Section 1.4.
5. Replace your computer's cover. Hardware installation is
complete.
II.ii Software Installation
1. After installing the hardware as explained above, turn the
computer back on and start Windows.
2. Insert the <Product> Sound Controller Installation disk in
your floppy drive.
3. Select File and Run.
4. Type a:\setup and click OK.

Plug-and-Play 3D Sound Controller
Page viii
5. The <Product> Sound Controller InstallShield Wizard pro-
gram will start and guide you through the installation pro-
cess. Follow the on-screen prompts to configure the
<Product> Sound Controller for your system.
6. The end of the installation program will prompt you to
REBOOT your system, be sure to select OK and then
press Ctr-Alt-Del when prompted. This will insure that the
<Product> Sound Controller is properly configured.
WARNING! If you experience compatibility problems after running
through this quick installation guide, please refer to the full
installation instructions in Chapter 2 and the trouble-
shooting section in Chapter 4.
The software installation will then be completed and a new
product group will be visible in Windows. The utilities in this
group allow you to reconfigure the settings of the card and
configure the audio mixer features.

Plug-and-Play 3D Sound Controller
Page ix
III. Quick Installation Windows 95
This section is for those who are familiar with the hardware
and software installation of PC peripherals, especially PC
compatible sound cards.
III.i Hardware Installation
You must already have Windows 95 installed on your com-
puter and running properly before continuing.
1. Power down your computer, remove the cover and find an
empty 16-bit expansion slot.
2. Install the <Product> Sound Controller into the open slot
and secure it.
3. Connect a pair of speakers to the Speaker Out connector
on the <Product> Sound Controller bracket. Refer to Sec-
tion 1.3 for details concerning connecting other external
devices.
WARNING! To avoid temporary or permanent hearing loss or impair-
ment due to unexpected noise or static, always hold your
headphones away from your ears before turning on the
computer. You should also lower your speaker's volume
before testing.
4. For details on CD-ROM installation refer to Section 1.4.
5. Replace your computer's cover. Hardware installation is
complete.
III.ii Software Installation
Please follow the steps below for a proper installation of the
drivers for Windows 95. It is assumed that you already have
Windows 95 installed and have properly plugged in your
Sound Card.
1. Turn your computer on. The system will boot the Windows
95 operating system.
2. The Windows 95 Plug-and-Play capabilities will detect the
<Product> card and ask you to install the driver. Select lo-
cation of the driver files (diskette or CD-ROM) click “Fin-
ish”.

Plug-and-Play 3D Sound Controller
Page x
3. After reading the diskette, Windows 95 will find the instal-
lation information for the ECTIVA Plug and Play devices
and install the software.
This will complete the Windows 95 installation. The program
will continue to load and when it is complete, you should hear
the Windows 95 start up wave file.
Warning! If you experience compatibility problems after running
through this quick installation guide, please refer to the full
installation instructions in Chapter 3 and the trouble-
shooting section in Chapter 4.

Plug-and-Play 3D Sound Controller
Page 1
1. Hardware Installation
The hardware installation of the <Product> Sound Controller is
easy and can be performed in just a few steps. The sound
controller has no switches (see Figure 1-1). The sound con-
troller installation program configures all of the settings. This
section will describe the hardware installation and configura-
tion options using the sound controller installation program.
Note: This section presumes that you are familiar with your
particular PC compatible computer and with DOS and
Windows terminology.
Note: If you are installing the <Product> into a system that is
running Windows 95, you must already have Windows
95 installed on your computer and running properly be-
fore installing the hardware.
1.1. Default Configuration
The <Product> Sound Controller sound card supports both
Sound Blaster Pro and Windows Sound System applications.
The <Product> Sound Controller defaults to Sound Blaster Pro
mode when the system is booted up in DOS. It switches to
Windows Sound System mode when Windows 3.1 is
launched. The default configuration of a system that supports
the Plug and Play 1.0a specification will depend on the avail-
able system resources.
If your system is not PnP compatible the default configuration
is as follows:
Operation Mode Sound Blaster Pro Compatible
IRQ 5
DMA Channel 1
I/O Port Address 220h
CD-ROM Interface None
Warning! The <Product> Sound Controller is susceptible to damage
from electrostatic discharge. Please make sure you are
properly grounded before proceeding with these installa-
tion instructions.
Plug-and-Play 3D Sound Controller
Page 2
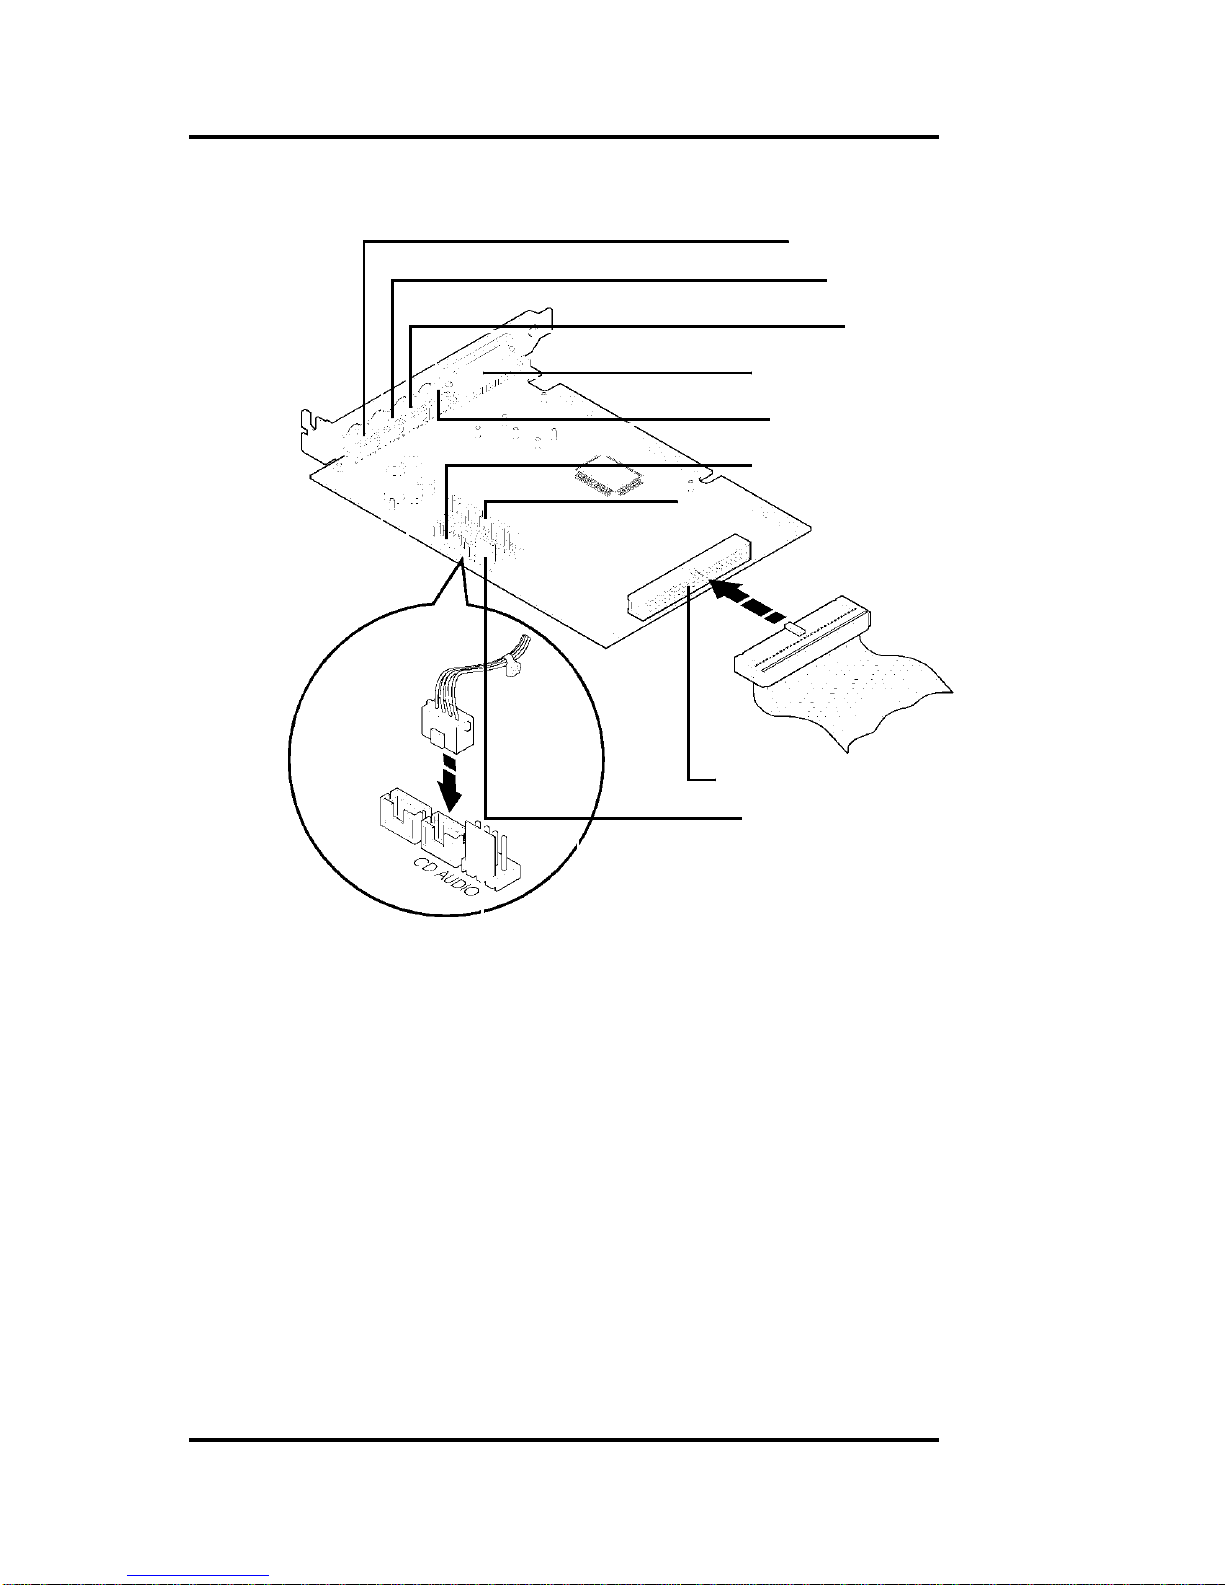
Figure 1-1 Sound Controller Layout
Speaker Out
Line Out
Line In
Microphone In
Game Port/MIDI
MPEG Connect
Wave table synthesizer
CD ROM Connect
CD ROM Audio
1.2. Installing the <Product> Sound Controller
To install the board:
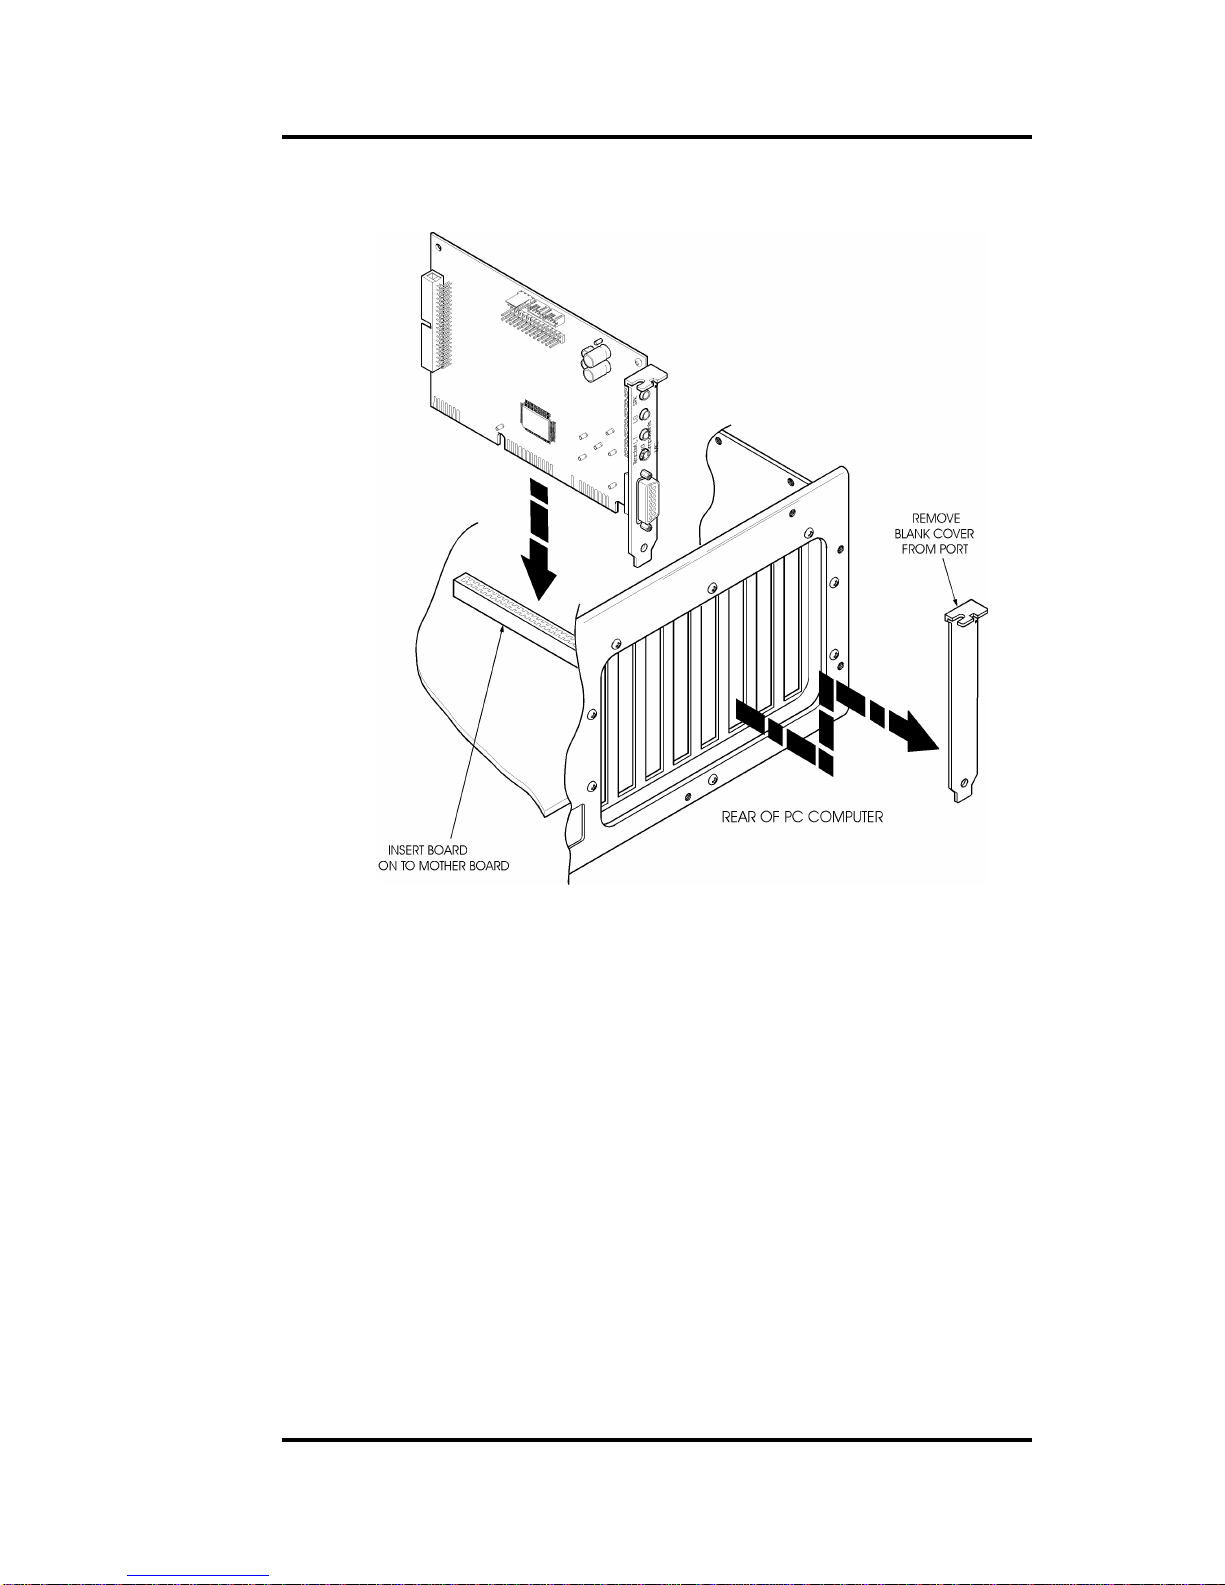
1. With your computer system's power off, remove the cover,
find an empty 16-bit expansion slot, and remove the metal
bracket.
2. Insert the <Product> Sound Controller into the expansion
slot firmly and evenly (see Figure 1-2). Take care not to
force it into the slot. Once you have properly positioned
the <Product> Sound Controller into the slot, secure the
<Product> Sound Controller with the bracket screw.
Plug-and-Play 3D Sound Controller
Page 3
Figure 1-2 Sound Card Installed on Motherboard
1. Replace the cover of the computer.
2. Connect your speaker or headphones to the external out-
put connections on the <Product> Sound Controller
bracket. For more information on connecting external de-
vices, see Section 1.3, Connecting External Devices.
Hardware installation is complete.
1.3. Connecting External Devices
The <Product> Sound Controller provides a number of ways
for you to connect external devices to it, such as headphones,
microphones and speakers. This chapter will describe the
<Product> Sound Controller connectors and the process of
connecting external devices. The <Product> Sound Controller
supports the following external devices:
•Speakers
•Headphones

Plug-and-Play 3D Sound Controller
Page 4
•Power amplifier
•Microphone
•Joystick
•MIDI adapter
Please have the user reference manuals of the external de-
vices on hand for reference.
Figure 1-3 shows the different external device connectors on
the sound card.
Warning! Use the configuration program, SNDINIT.EXE, to adjust
the volume to mid-range before connecting any speakers
to the sound card to avoid damaging your hearing or your
equipment.
Figure 1-3 External Connector Locations
Speaker Out
Line Out
Line In
Microphone
Game Port/MIDI
Speaker Connection: Speakers are connected to the
Speaker Out connector. This is the top most connector on the
right side of the sound card.
Line-Out/Headphones Connector: The Line-Out connector is
located below the Speaker Out connector. You can connect
this to the Line-In connector of any external amplified speakers
or to a set of headphones.
Line In/CD-Player/Hi-Fi Connection: Below the Line Out
connector is the Line-In connector. Connect this to the Line-

Plug-and-Play 3D Sound Controller
Page 5
Out connector of any hi-fi set, radio set, CD-player, synthe-
sizer, Walkman™, etc.
Microphone In Connection: A microphone can be connected
to the Microphone In connector on the sound card. Use a dy-
namic monaural or stereo microphone with a resistance of not
more than 600 ohms.
Joystick Connector: The Joystick/MIDI port is a 15-pin fe-
male connector located just below the Microphone In connec-
tor. This port can be connected to any IBM PC compatible
joystick with a 15-pin D-sub connector. Disable the joystick
port on the sound card (using the SNDINIT.EXE program) if
you already have a game port or game card.
MIDI Instrument Connection: You need a MIDI adapter to
connect a MIDI instrument to the sound card. The MIDI
adapter can be connected to the Joystick/MIDI port. You will
also need MIDI sequencing software to run MIDI instruments
with your computer.
1.4. CD-ROM Hardware Installation
This section describes how to attach the CD-ROM hardware.
Once it is attached, you need to refer to the software installa-
tion section for details on installing the drivers and configuring
the drive
Before proceeding, make sure you have installed your CD-
ROM drive hardware into your computer system as well as the
CD-ROM Drive's device driver and related software success-
fully.
The CD-ROM interface connector is located on the back end
of the <Product> Sound Controller (see Figure 1-1).
Note You should have your CD-ROM drive user guide handy
during this installation. It may have information not cov-
ered here.
Your internal CD-ROM drive should have come with an appro-
priate CD-ROM ribbon cable. The cable will connect to the
<Product> Sound Controller.
If you have a separate CD-ROM controller card, and you do
not wish to use the built-in CD-ROM interface on the <Prod-
uct> Sound Controller, you do not have to make any changes
to your existing environment. Make sure that you choose
Plug-and-Play 3D Sound Controller
Page 6
"None" from the configuration list for the CD-ROM drive during
the software installation.
To connect an IDE CD-ROM:
1. Install the CD-ROM drive into your system. Refer to the
documentation that comes with your CD-ROM drive for in-
stallation.
2. Connect the interface cable from the CD-ROM drive to the
40-pin IDE CD-ROM interface connector on the sound
card.
WARNING! Make sure that the color-coded line on your CD-ROM in-
terface cable is connected to Pin 1 of the interface con-
nector on the sound card.
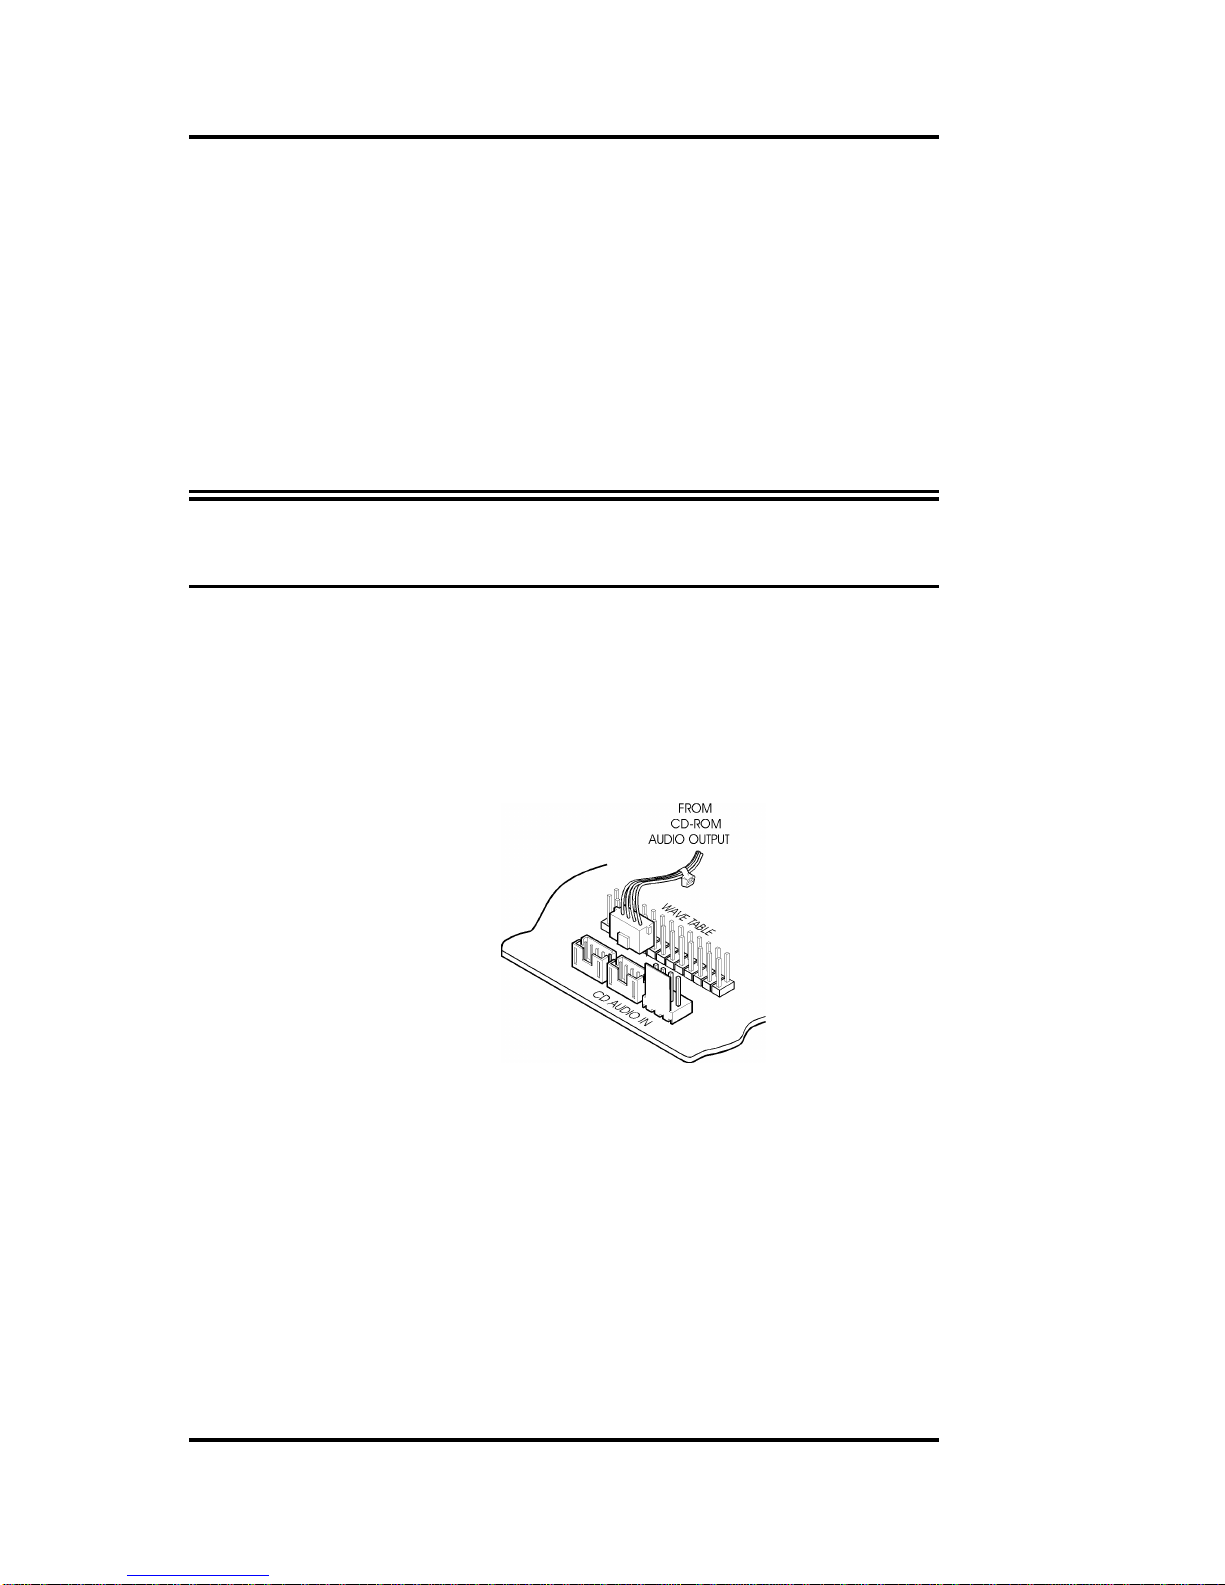
3. If an audio cable is included with your CD-ROM drive,
determine which audio connection interface (Sony, Mit-
sumi or Panasonic) it conforms to. You will need to con-
tact your IDE CD-ROM drive dealer or manufacturer for
that information. Once you know connect it from the CD-
ROM drive to the correct audio input connector on the
<Product> Sound Controller.
4. When everything is securely connected, put the cover of
your computer back on and power on your computer and
start installing your IDE CD-ROM drive's device driver
(MSCDEX.EXE) and related software as instructed by
your IDE CD-ROM drive's user manual.
Your CD-ROM will require that the proper MSCDEX driver
is loaded on system boot-up. During installation, the
<Product> Sound Controller installation program will take
several steps to insure that the proper MSCDEX is used
for your system.

Plug-and-Play 3D Sound Controller
Page 7
First, the <Product> Sound Controller installation program
will look at your AUTOEXEC.BAT file for an existing
MSCDEX driver. If it finds one, it will use it.
If it doesn't find it there, it will scan your hard drive to find
the MSCDEX.EXE program. Usually this will be found with
your DOS operating system programs. If the <Product>
Sound Controller installation program finds the
MSCDEX.EXE program it will use it. If more than one copy
of MSCDEX.EXE exist on your system, the <Product>
Sound Controller installation program will display all
known files on your system, and ask you to select the one
you want to use.
If the <Product> Sound Controller installation program
determines that your DOS version is earlier than 5.0 or
there is no MSCDEX.EXE installed in your system, it will
request that you use the MSCDEX program that came
with your CD-ROM drive (available from your CD-ROM
manufacturer). The following line will be added to your
AUTOEXEC.BAT file:
REM C:\OPTI933\MSCDEX.EXE
When you copy the proper MSCDEX.EXE program that
works with your CD-ROM into the C:\ev1933 subdirectory,
edit the above line in your AUTOEXEC.BAT file by re-
moving the word "REM" so that the line looks as follows:
C:\OPTI933\MSCDEX.EXE
The proper MSCDEX.EXE program will then be loaded
when you reboot your system.
After you have installed your IDE CD-ROM drive's software,
you will need to install the ECTIVA <Product> Controller soft-
ware. Refer to Chapter 2 or 3 for more information on doing
this for your operating system environment.
Plug-and-Play 3D Sound Controller
Page 8
2. Windows 3.1 Software Installation
The <Product> Sound Controller installation program
(SETUP.EXE) will install all of the software drivers and appli-
cations needed to achieve both Sound Blaster Pro and Win-
dows Sound System compatible operation.
2.1. Device Driver Installation
The following steps will guide you through the full software in-
stallation and configuration for the <Product> Sound Control-
ler. We recommend that you read through them now, and
become familiar with them before installing the software.
1. After installing the hardware and the CD-ROM device
driver (MSCDEX.EXE) as explained in Chapter 1, turn the
computer back on and start Windows 3.1.
2. Insert the <Product> Sound Controller Installation disk in
your floppy drive.
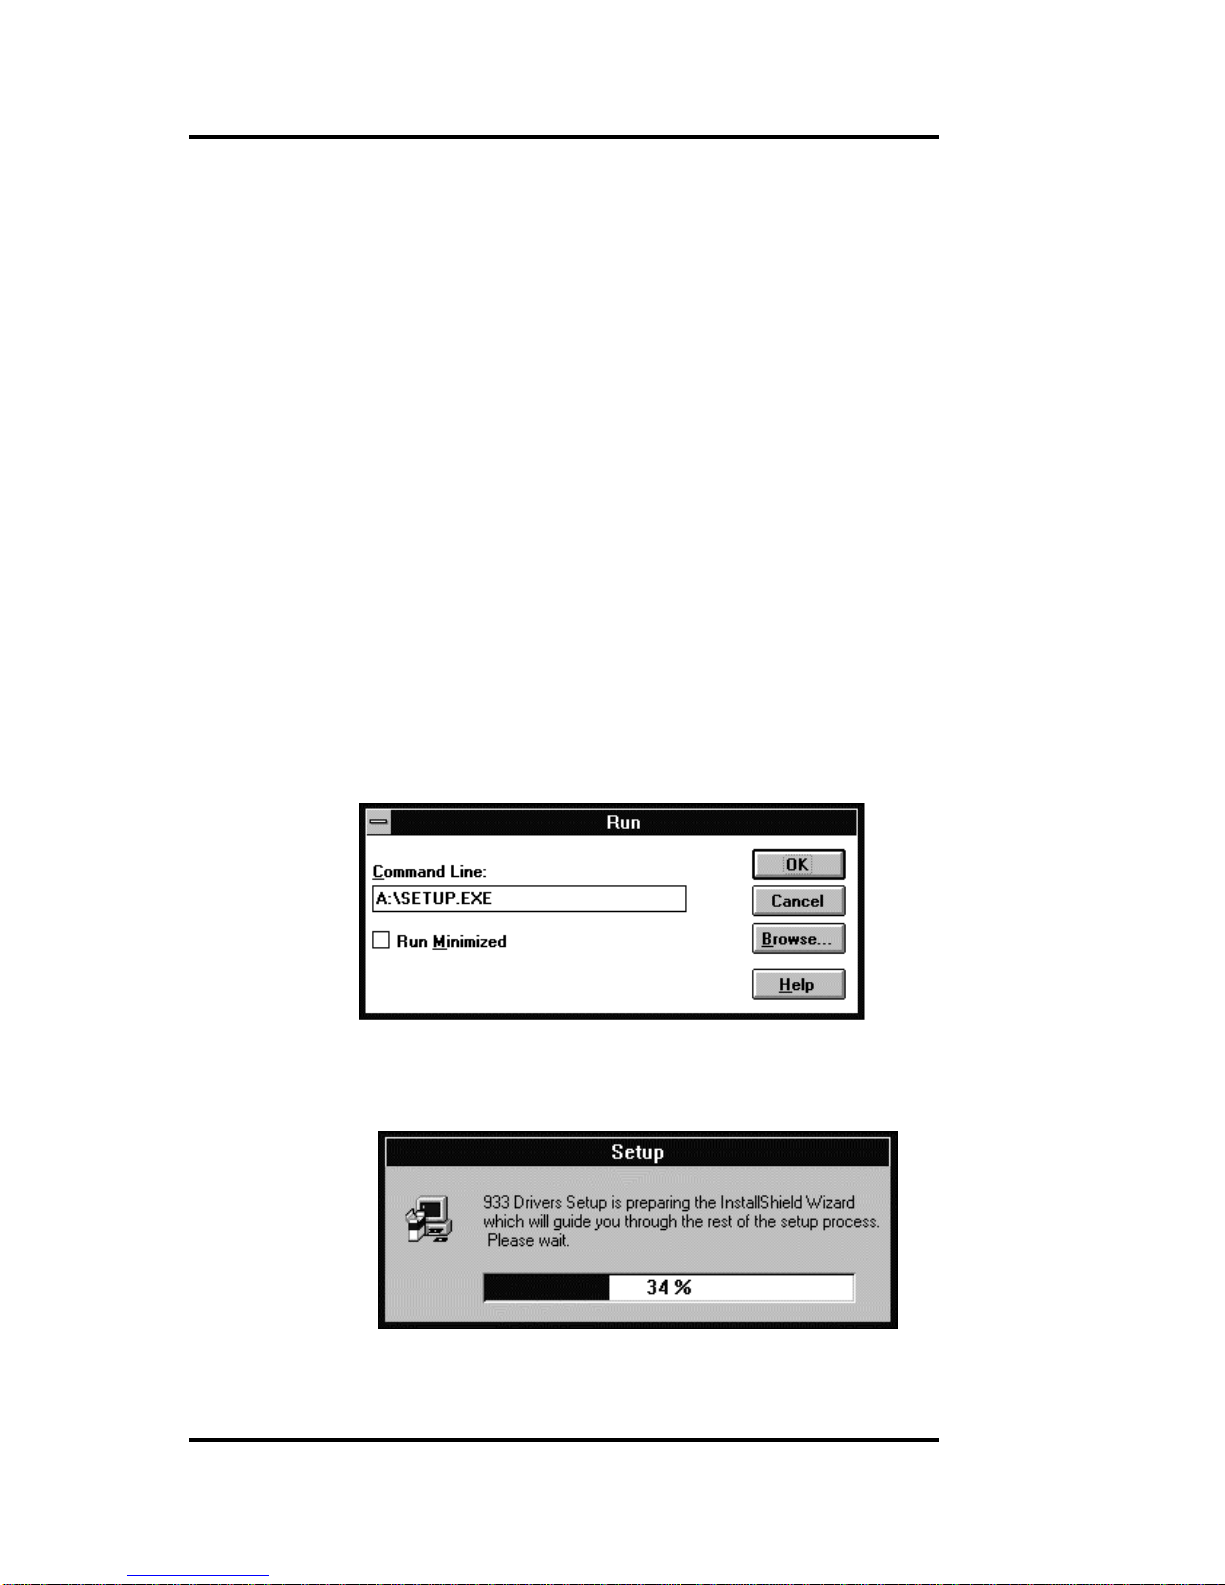
3. Select File and Run.
4. Type A:\SETUP and click OK as shown.
5. The <Product> Sound Controller menu driven installation
program will copy the installation files to your hard drive.

Plug-and-Play 3D Sound Controller
Page 9
6. After the install files are copied, the installation program
will start.
It is strongly recommended that you exit all Windows pro-
grams before running this Setup Program.
Click Cancel to quit Setup and then close any programs
you have running. Click Next to continue with the Setup
program.
7. The next screen lets you select a directory to install the
software. The default is OPTi933.

Plug-and-Play 3D Sound Controller
Page 10
If you want to install the files in other directory, click on
Browse to change it. You will see the following screen
8. From here, either select a directory that exists or type in
the name of a new directory. If you type in a new directory
you will be asked:
Choose Yes.
9. Select Next to continue the installation. The install pro-
gram will begin copying the files to the directory you se-
lected.
Table of contents
Popular Sound Card manuals by other brands

Creative
Creative Sound Blaster X3 manual

VIA Technologies
VIA Technologies VT1723 user manual

Creative
Creative X-FI FATAL1TY - SB X-FI PLATINIUM FATAL1TY QUICKSTART FRONT EN FR DE IT ES... quick start guide

AOpen
AOpen AW-850 user manual

Audiotrak
Audiotrak Maya U5 user guide

Yamaha
Yamaha HY144-D-SRC owner's manual


