IKI Mini-IKI User manual

Instructions for installation and use
IKI Wood burning stoves
Mini-IKI
Original IKI
Maxi-IKI
Löyly-IKI jr.
Löyly-IKI
6/2023

Page | 1
IKI Wood burning stoves | Instructions for installation and use
IKI Wood burning stoves | Finnish high-quality craftsmanship
•The stove must not be used for any other purpose than heating a sauna, for example
drying clothes, using it as a heater in a building site, etc.
•Covering the stove during use or when it is hot is strictly prohibited.
•Throwing sea water or other salty water on the stones is prohibited and will cause the
warranty to become void and will cause early rusting.
•Beware of the blast connection, hatch, or other metal surfaces of the stove and the stones,
THEY MAY BE HOT! Always wear protective gloves, mittens, etc. With children, take special
precautions in the sauna!
In addition to this instruction, the EU heater standard 15821, local fire rescue authorities rules and
regulations must be taken into account when installing and using the stove.
NOTE!
Beware of the sharp edges of the mesh and other parts. Always wear protective
gloves and a long-sleeved shirt when handling the mesh of the stove and piling in
stones.
Contacts
Technical support
+358 40 196 4567
IKI-Kiuas Oy
Hakaniemenkatu 11
00530 Helsinki
ikikiuas@ikikiuas.fi
Production / Pieksämäki
Niilontie 10
76150 Pieksämäki
tuotanto@ikikiuas.fi

Page | 2
IKI Wood burning stoves | Instructions for installation and use
IKI Wood burning stoves | Finnish high-quality craftsmanship
Table of contents
Table of contents........................................................................................................................................... 2
1. Contents of delivery .................................................................................................................................. 7
2. Installation of the stove............................................................................................................................. 8
2.1 Mini-IKI and Original IKI........................................................................................................................... 8
2.2 Setting the stones into stove:.................................................................................................................. 9
2.3 Plus part installation instructions.......................................................................................................... 10
2.4 Modifying a chimney connection to a non-standard height ................................................................. 10
3. Safety distances to flammable structures ............................................................................................... 11
3.1 Reducing the safety distances ......................................................................................................... 11
3.2 Protective base for the stove .......................................................................................................... 11
4. Connection heights with 90-degree smoke pipe..................................................................................... 12
5. Connection heights with 100 cm Plus part.............................................................................................. 13
6. Model table ............................................................................................................................................. 13
7. Instructions for using the stove............................................................................................................... 14
7.1 Initial load and lighting the fire ....................................................................................................... 14
8. Troubleshooting ...................................................................................................................................... 14
9. The water quality for the stove............................................................................................................... 15
10. Dimensional drawings ......................................................................................................................... 15
11. Sweeping instructions ......................................................................................................................... 16
12. Ventilation of the sauna and getting compensation air...................................................................... 17
12.1 Tips for ventilation........................................................................................................................... 17
12.2 Automatic ventilation...................................................................................................................... 17
12.3 Using a chimney ventilator and several furnaces in the same room .............................................. 17
13. Example pictures of a correct air ventilation ...................................................................................... 18
14. Warranty.............................................................................................................................................. 19

Page | 3
IKI Wood burning stoves | Instructions for installation and use
IKI Wood burning stoves | Finnish high-quality craftsmanship
IKI-Kiuas Ltd.
15
EN 15821:2010
NB 2450
AVCP3
Multi firing sauna stoves fired by solid wood fuel
Mini-IKI / (Plus) DoP 07122015
Fire safety
(initiation, risk to adjacent elements)
Passed
Safety distances to
combustile materials*
to the back
to the sides
up to the ceiling
100 mm
100 mm
1100 mm
Emission of combustible products
Passed
Surface temperature
Passed
Release of dangerous substances
NPD
Cleanability
Passed
Flue gas temperature (average)
346 ° C
Mechanical resistance
Passed
Sauna room heating output
16,6 kW
- carbon monoxide emission 13 % O
2
- CO-emission 13 % O2
Passed
(867 mg/ m³)
- cardon monoxide emission (%) at 13 % O
2
- CO-emission (%) 13 % O2
Passed
(0,069%)
- total efficiency
Passed
(74,2%)
- flue draught
12 Pa
- refuelling loads
2,9 kg
- flue gas mass flow
17,7 g/s
Durability
Passed
Flue gas temperature (max.)
588,9 °C
* Follow the safety information in the installation instructions

Page | 4
IKI Wood burning stoves | Instructions for installation and use
IKI Wood burning stoves | Finnish high-quality craftsmanship
IKI-Kiuas Ltd.
15
EN 15821:2010
NB 2450
AVCP3
Multi firing sauna stoves fired by solid wood fuel
Original IKI / (Plus) DoP 10252015
Maxi-IKI / (Plus)
Fire safety
(initiation, risk to adjacent elements)
Passed
Safety distances to
combustile materials*
to the back
to the sides
up to the ceiling
100 mm
100 mm
1100 mm
Emission of combustible products
Passed
Surface temperature
Passed
Release of dangerous substances
NPD
Cleanability
Passed
Flue gas temperature (average)
411,7 ° C
Mechanical resistance
Passed
Sauna room heating output
15,1 kW
- carbon monoxide emission 13 % O
2
- CO-emission 13 % O2
Passed
(1242 mg/ m³)
- cardon monoxide emission (%) at 13 % O
2
- CO-emission (%) 13 % O2
Passed
(0,10%)
- total efficiency
Passed
(65,2%)
- flue draught
12 Pa
- refuelling loads
3,5 kg
- flue gas mass flow
17,7 g/s
Durability
Passed
Flue gas temperature (max.)
539,2 °C
* Follow the safety information in the installation instructions

Page | 5
IKI Wood burning stoves | Instructions for installation and use
IKI Wood burning stoves | Finnish high-quality craftsmanship
IKI-Kiuas Ltd.
13
EN 15821:2010
NB 2450
AVCP3
Multi firing sauna stoves fired by solid wood fuel
Löyly-IKI jr. DoP OL9182013
Fire safety
(initiation, risk to adjacent elements)
Passed
Safety distances to
combustile materials*
to the back
to the sides
up to the ceiling
100 mm
100 mm
1000 mm
Emission of combustible products
Passed
Surface temperature
Passed
Release of dangerous substances
NPD
Cleanability
Passed
Flue gas temperature (average)
393,8 ° C
Mechanical resistance
Passed
Sauna room heating output
17,2 kW
- carbon monoxide emission 13 % O
2
- CO-emission 13 % O
2
Passed
(6657 mg/ m³)
- cardon monoxide emission (%) at 13 % O
2
- CO-emission (%) 13 % O
2
Passed
(0,53%)
- total efficiency
Passed
(72%)
- flue draught
11.5 Pa
- refuelling loads
3,5 kg
- flue gas mass flow
12,9 g/s
Durability
Passed
Flue gas temperature (max.)
503,7 °C
* Follow the safety information in the installation instructions

Page | 6
IKI Wood burning stoves | Instructions for installation and use
IKI Wood burning stoves | Finnish high-quality craftsmanship
IKI-Kiuas Ltd.
16
EN 15821:2010
NB 2450
AVCP3
Multi firing sauna stoves fired by solid wood fuel
Löyly-IKI DoP 20402016
Fire safety
(initiation, risk to adjacent elements)
Passed
Safety distances to
combustile materials*
to the back
to the sides
up to the ceiling
100 mm
100 mm
1100 mm
Emission of combustible products
Passed
Surface temperature
Passed
Release of dangerous substances
NPD
Cleanability
Passed
Flue gas temperature (average)
386 ° C
Mechanical resistance
Passed
Sauna room heating output
17,2 kW
- carbon monoxide emission 13 % O
2
- CO-emission 13 % O2
Passed
(1439 mg/ m³)
- cardon monoxide emission (%) at 13 % O
2
- CO-emission (%) 13 % O2
Passed
(0,12%)
- total efficiency
Passed
(65,2 %)
- flue draught
12 Pa
- refuelling loads
4 kg
- flue gas mass flow
21,6 g/s
Durability
Passed
Flue gas temperature (max.)
598,03 °C
* Follow the safety information in the installation instructions

Page | 7
IKI Wood burning stoves | Instructions for installation and use
IKI Wood burning stoves | Finnish high-quality craftsmanship
1. Contents of delivery
Please check that all parts belonging to the stove are included in the delivery (See section 5.2
picture 1.):
1 pc Stove
1 pc Stove hatch (glass door)
1 pc smoke pipe(s), ordered separately
1 pc Ash tool
1 pc Accessory box including:
•1 pcs fire plate (to be installed in the front of the furnace)
•gloves
•instructions for installation and use
•hinge for the hatch
Plus part delivery includes:
•1 pc upper mesh for the stove
•1 pc straight smoke pipe or 90 degree smoke pipe or both
Before installation make check the following:
•Safety distances to inflammable surfaces and incombustible structures
•The connection height of a possible old chimney and installation route of a new chimney that will
possibly be installed
•Floor material and weight capacity (inflammable, incombustible, tiled and waterproof)
•Note that IKI stoves have a lot of stones and are heavy
•IKI wood burning stoves are recommended to be installed primarily either in a brick chimney,
ceramic chimney or an air-cooled chimney. The outer diameter of the stove’s smoke pipe is 115
mm.

Page | 8
IKI Wood burning stoves | Instructions for installation and use
IKI Wood burning stoves | Finnish high-quality craftsmanship
2. Installation of the stove
2.1 Mini-IKI and Original IKI
1. Check that all parts belonging to the stove are
included in the delivery.
2. Set the furnace on a solid and fireproof base
on two footings in the middle of the
installation place of the stove.
3. Remove the white protective plastic from the
mesh frame.
4. Set the mesh frame around the stove furnace.
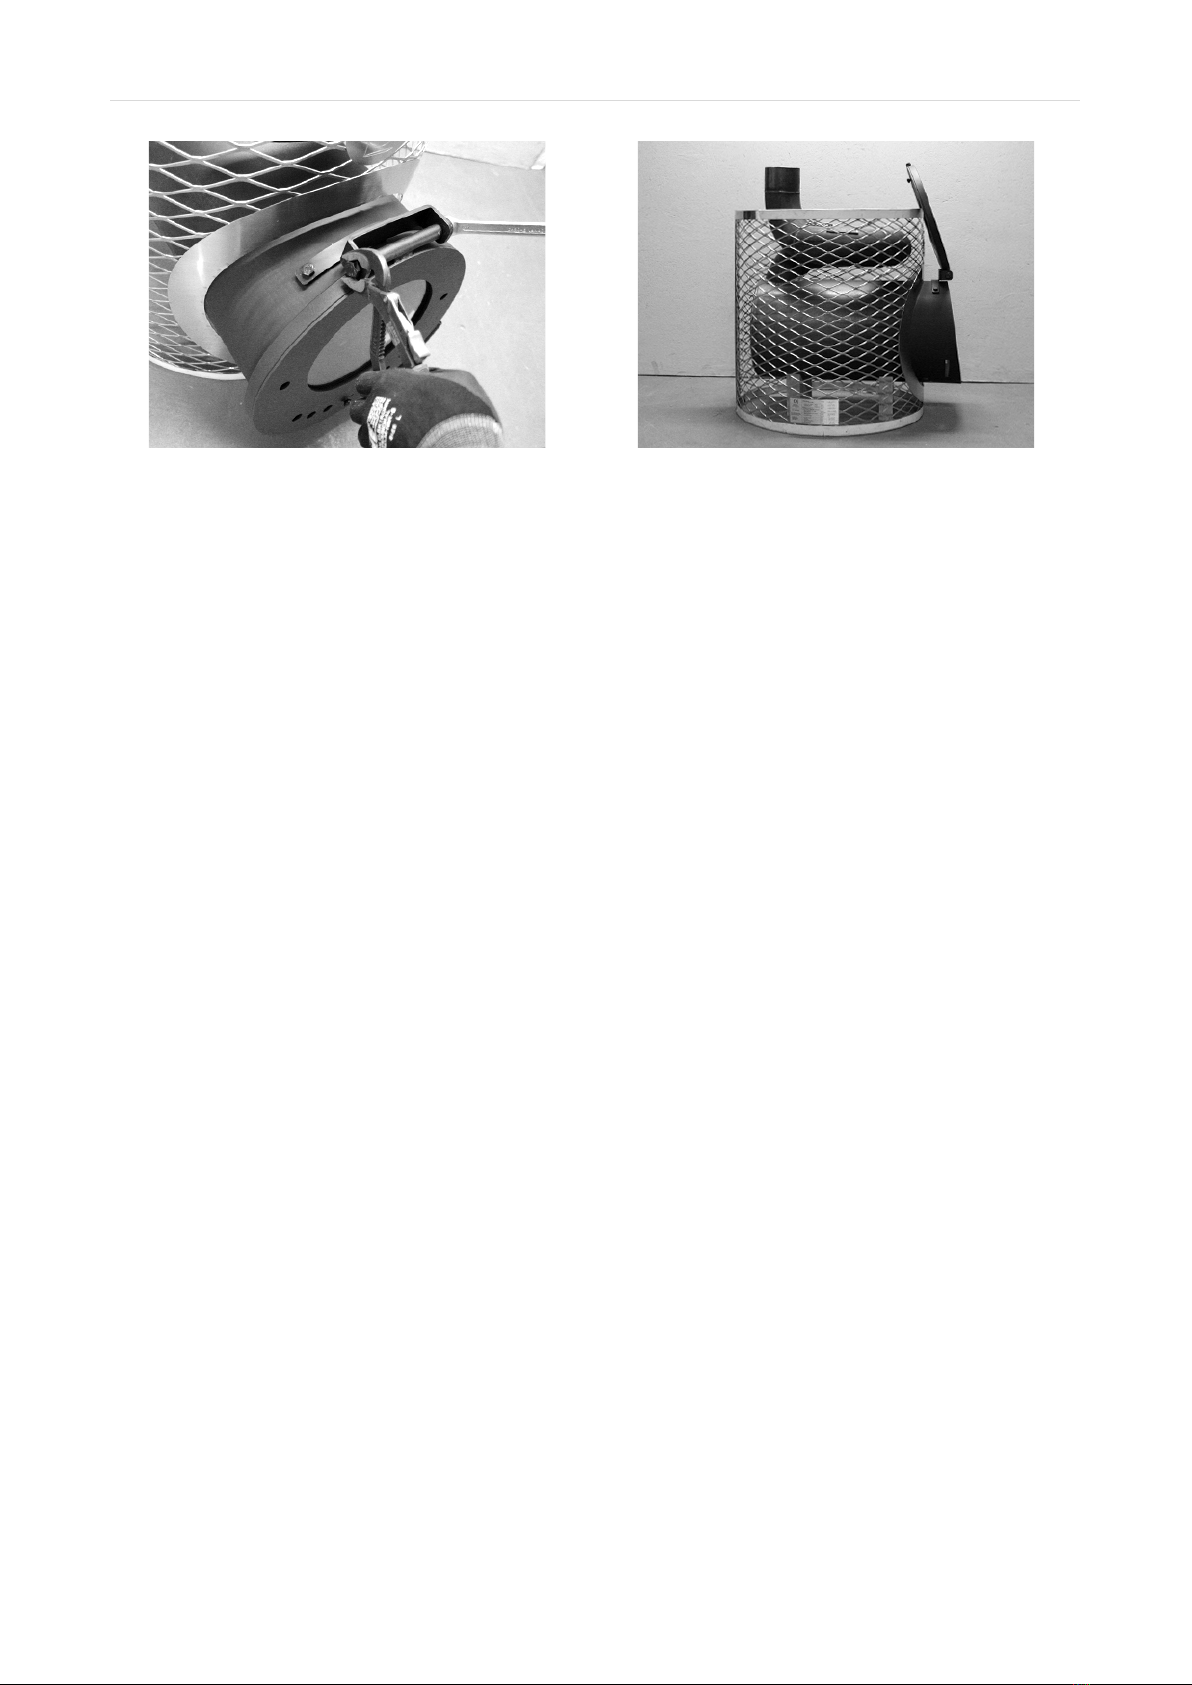
5. Remove the wing nuts on the back of the net
and fasten the nails of the net sheath together.
Put the wing nuts in place and tighten them.
6. Attach the hinge to the furnace (A.)
Install the fireplate that prevents the cinders
falling to the floor (B.)
Page | 9
IKI Wood burning stoves | Instructions for installation and use
IKI Wood burning stoves | Finnish high-quality craftsmanship
7. Install the hatch to the hinge.
8. Check that the distance between the frame and
the front part of the coil is approximately 5-7 cm,
to have space for the stones. Make sure that the
furnace stands horizontally. When the hatch is
open, it must lean back so that it will not fall down
by itself.
2.2 Setting the stones into stove:
Stones smaller than 10 cm in diameter are recommended. Ordinary stones with a rough finished surface
are suitable for a stove. For example, peridotite, olivine-dolerite stones. The stones should not be placed
too tightly together, allowing for free air flow between the stones. Even natural stones can be loaded in the
outer edges where the stones are not in touch with the heating surfaces.
Fill the space between the mesh frame and the furnace with stones carefully, one stone at a time. The first
20-30 cm from the floor are the most crucial ones while setting the stones into the stove. Then the mesh
takes its final round form. The mesh and the furnace intermediate space must be stoned as accurately as
possible so that the stones will cover the furnace.
If the stove is for professional usage (public bath etc.), IKI recommends KERKES-ceramic sauna stones
(www.kerkes.fi) on the surfaces that touch directly the heart of the stove.
NOTE: Stones will descent from time when heated regularly. Stones change interval depends on the quality
of the stone and the stove utilization. Check the condition of the stones in normal operation each year, if
necessary, remove the broken stones and replace them with new ones.

Page | 10
IKI Wood burning stoves | Instructions for installation and use
IKI Wood burning stoves | Finnish high-quality craftsmanship
2.3 Plus part installation instructions
As the stove consists of a separate furnace and fire tube and two separate frames, the installation is done
in phases as follows:
1. Assemble the lower part of the stove as in Mini-IKI, Original-IKI and Maxi-IKI, instructions without
setting the stones yet to the top part.
2. Adjust the connection smokepipe and the upper mesh in the connection point of the chimney
(picture 1.). If the connection point is deviant from the standard connection point of an IKI stove,
use a suitable sidecutter to shorten/adjust the tube and mesh.
3. Pile the stones to the lower part of the stove. The mesh should lie against the circular firetube. The
piling of stones in the space between the upper mesh frame and the smokepipe is done one stone
at a time. When loading the stones try to cover the smokepipe as well as possible. The mesh frame
settles in its place when approximately 10 cm of stones have been loaded from the surface of the
furnace. It is recommended that two people do the loading of the stones of the upper
mesh(pictures 2. and 3.).
2.4 Modifying a chimney connection to a non-standard height
The chimney connection of the plus model can be made even lower in i.e. the following
• Cut smokepipe to a desired height with i.e. with a sidecutter
• Cut the upper mesh from below and cut the straight smokepipe in proportion to match the
smokepipe accordingly. Leave the “cut part” of the upper mesh to lean against the lower part of the stove

Page | 11
IKI Wood burning stoves | Instructions for installation and use
IKI Wood burning stoves | Finnish high-quality craftsmanship
3. Safety distances to flammable structures
Please note that the gap between the furnace and the stone
mesh must
be loaded carefully with stones.
•A. From a smoke pipe without stones to the
side 500 mm
•B. From the stone mesh full of stones to
the side 100 mm
•From the solid hatch to the front 500 mm
(Tip! Leave 1000 mm to have service space)
•C. From the neck of the furnace to the side 250 mm
•D. From the smoke pipe loaded with stones and
equipped with a mesh to the side 250 mm
•From the smoke pipe loaded with stones and equipped
with a mesh upward 500 mm
•From a smoke pipe without stones upward 1000 mm
3.1 Reducing the safety distances
•50 % when using simple protection (i.e. 1mm metal/fiber board and a 30mm cavity)
•75 % when using double protection (double protection board and a cavity)
ATTN! The Plus part version of the smokepipe loaded with stones reduces the safety distances 50 %
compared to plain smokepipe without stones.
3.2 Protective base for the stove
IKI stoves also have a “IKI protective base” for the stove (IKI accessories). If that is used the stove can also
be installed to the floor with flammable surface. A protective base for the stove also reduces the thermal
radiation that a tiled and waterproof floor is possibly exposed to.

Page | 12
IKI Wood burning stoves | Instructions for installation and use
IKI Wood burning stoves | Finnish high-quality craftsmanship
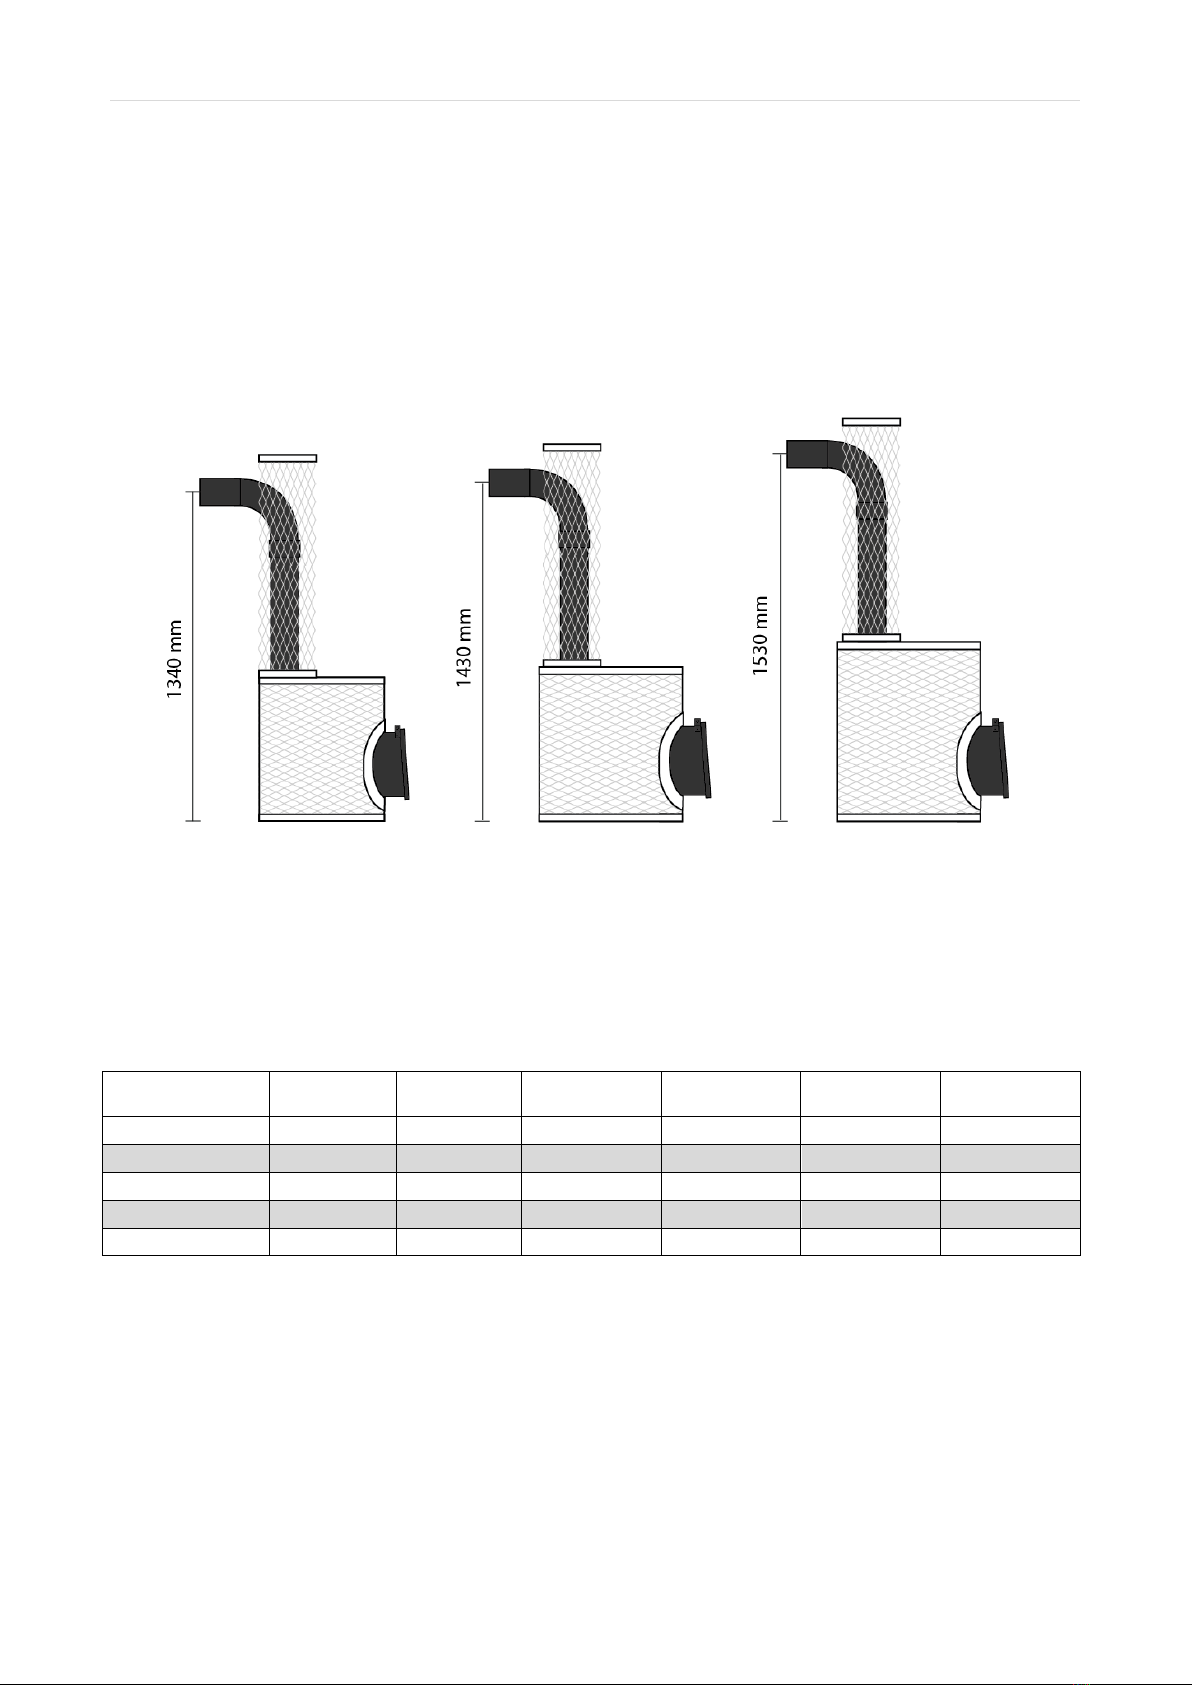
4. Connection heights with 90-degree smoke pipe
The connection height of the stoves is given from the floor to the center of the chimney when stove
furnace is installed on its stone legs. ATTN! When using the “IKI protective base” the height of the connection
point rises 70 mm accordingly.
Page | 13
IKI Wood burning stoves | Instructions for installation and use
IKI Wood burning stoves | Finnish high-quality craftsmanship
5. Connection heights with 100 cm Plus part
With the 50 cm Plus part, the chimney connection heights are the same as with the 90-degree exhaust pipe
alone. The mesh’s of the 50 and 100 cm Plus part have an opening that can be closed with a flange for the
outlet pipe. If the flue connection is upwards, e.g. to an IKI T600 stove chimney, the mesh can be stoned
from the opening. The chimney connection height of the 100 cm Plus part can be lowered by shortening
the mesh at the lower end and shortening the straight exhaust pipe in the same proportion.
6. Model table
Size of sauna
Max. amount
of stones
Weight
(w/o stones)
Height of stove
Diameter of
stove
Depth of
furnace
Mini-IKI
5-12 m3
120 kg
45 kg
58 cm
48 cm
50 cm
Original IKI
10-25 m3
240 kg
65 kg
65 cm
60 cm
60 cm
Maxi-IKI
20-30 m3
300 kg
70 kg
75 cm
60 cm
60 cm
Löyly-IKI jr.
8-16 m3
160 kg
65 kg
75,5 cm
48 cm
50 cm
Löyly-IKI
20-40 m3
400 kg
90 kg
95 cm
60 cm
60 cm
Mini-IKI and
100 cm Plus part
Original IKI and
100 cm Plus part
Maxi-IKI and
100 cmPlus part

Page | 14
IKI Wood burning stoves | Instructions for installation and use
IKI Wood burning stoves | Finnish high-quality craftsmanship
7. Instructions for using the stove
The heating time of an IKI stove is approximately one hour, depending on the size of the sauna room and
the stove. The correct bathing temperature for the IKI stoves is approximately 55-70 degrees.
7.1 Initial load and lighting the fire
•Clean the ashes from the furnace and remnants from the previous time you used the stove.
•Open the damper of the chimney, the knob on the stove hatch and ash box under the furnace to
get incoming compensation air to maximum amount.
•Set the wood (max. 2/3 of the height of the furnace) lengthwise in the front/middle part of the
furnace, the bigger wood under and the smaller wood on top.
•Light the fire on the top of the woodpile, for example with a lighter piece, cardboard packages,
birch bark or chopped firewood. Keep the draft in fully open position at that moment.
•There is a knob
in the stove hatch that allows you to regulate the draft. The regulation is
done by moving the knob to the right (open) and to the left (shut).
•You can also regulate the draft by opening the ash box under the
furnace.
•When adding wood to the furnace during heating, pull the ember to
the front of the furnace against the fire plate and add 2-3 pieces of
chopped wood on top of the ember in front/middle part of the
furnace. IKI recommends that the maximum amount of firewood
should be 2/3 of the space in the furnace.
•NOTE! The hatch of the stove may change color with time, or the
paint may wear out. The hatch can be repair painted using 600-
degree heat resistant paint, if needed. Before painting the hatch should be polished and cleaned
with a degreasant.
8. Troubleshooting
Description of the problem
Instructions to solve the problem
No draft is produced in the chimney
Sends smoke back into the room
1. Check the chimney (block, birds nest), check that the
damper is open.
2. Has the chimney been sooted according to the
instructions?
3. Are you in a region of low pressure? Burn some paper in
the furnace first, keeping the hatch open.
4. Check that the fire lighters are dry.
The draft is too strong
1. Regulate the draft with the hatch and, if needed
2. If the chimney is high, regulate the damper

Page | 15
IKI Wood burning stoves | Instructions for installation and use
IKI Wood burning stoves | Finnish high-quality craftsmanship
The sauna does not heat up
correctly
1. Is the stove correctly measured with regard to the sauna
room? (space, level of insulation, are there many log walls
or a lot of stone surfaces)
2. Is the ventilation correctly measured?
3. Are there enough stones, have they been loaded correctly?
4. Check the condition and quality of the stones (Olivine-
dolerite stones, smaller than 10 cm in diameter)
The stones do not heat up enough
1. Are there enough stones, have they been loaded correctly?
2. Check the condition and quality of the stones
(Olivine-dolerite stones, smaller than 10 cm in diameter)
3. Is the firewood dry and has it been loaded according to the
instructions?
9. The water quality for the stove
Features of the water
Effect
Recommendation
Humus content
Color, taste, precipitation
< 12 mg / l
Iron in the water
Color, smell, taste, precipitation
< 0,2 mg / l
Hardness: The main ingredients
manganese (Mn) and calcium (Ca)
precipitation
Mn < 0,05 mg / l
Ca < 100 mg / l
Chlorinated water
Health hazard
PROHIBITED!
Sea water / salt water
Fast corrosion
PROHIBITED!
10. Dimensional drawings
The outer diameter of the stove’s smokepipe is 115 mm.
The distance from the center of the smokepipe to the back of the heater rim is in MINI-IKI 130 mm and
in Original,Maxi-IKI and Löyly-IKI 150 mm.

Page | 16
IKI Wood burning stoves | Instructions for installation and use
IKI Wood burning stoves | Finnish high-quality craftsmanship
11. Sweeping instructions
1. Start by removing the stones from the stove.
2. Open the hatch in the chimney pipe on the stove (as seen in picture below). This does not require
any tools.
3. Sweep the chimney using bendable nylon brush. DO NOT USE metal brush! It might damage the
pipe from inside.
4. Other option is to use industrial vacuum cleaner to clean up the spiral.
5. Finally spray or pour some water and/or use the brush to clean up the detachable smoke pipe (not
the spiral!)
Chimney door closed
Chimney door open

Page | 17
IKI Wood burning stoves | Instructions for installation and use
IKI Wood burning stoves | Finnish high-quality craftsmanship
12. Ventilation of the sauna and getting compensation air
A wood burning stove needs sufficiently compensation air in order to burn well. A sauna room also requires
oxygen-rich breathing air for the sauna bathers. Also, the drying of the sauna room after bathing requires a
functional ventilation system. There are several ventilation systems provided by manufacturers, but there is
probably no system that would be the only correct one. It is most important to have fire ventilation near
the stove and some fresh air for the bathers to breath.
12.1 Tips for ventilation
Fire ventilation can work near the stove from outside, for example through a pipe equipped with a 50-100
mm grate and a disc valve beside the stove on the floor (for example a 50-100 mm pipe 50-100mm above
the floor). Fresh bathing air is directed beside the stove for example with a 100 mm pipe 50-100 mm above
the stone pocket of the stove.
The flow out of the sauna is preferably between the lower and upper bench through a disc valve equipped
with an adjustable grid on the wall. The air valve can also be placed on the ceiling or on the wall up close to
the ceiling, opposite the stove. The stove makes the air rotate inside the sauna room and the oxygen-rich
compensation air moves upward and heats up in the process.
12.2 Automatic ventilation
In automatic ventilation the air circulation and ventilation is assisted with an IV machine, otherwise the
principle is the same as in the natural ventilation.
12.3 Using a chimney ventilator and several furnaces in the same room
•A chimney ventilator is not recommended to be used with the woodburning sauna stoves. The
temperatures of the combustion gases may break the ventilator
•If there is more than one furnace in the same room, their combustion gases must be directed to their
own exhaust ducts. For example a cauldron and stove require a 2-passage chimney
•The fire ventilation and compensation air inlets must be measured as per situation (capacity for two
furnaces, adjustable valve for the amount of air)

Page | 18
IKI Wood burning stoves | Instructions for installation and use
IKI Wood burning stoves | Finnish high-quality craftsmanship
13. Example pictures of a correct air ventilation

Page | 19
IKI Wood burning stoves | Instructions for installation and use
IKI Wood burning stoves | Finnish high-quality craftsmanship
14. Warranty
IKI-Kiuas Ltd. grants its products a warranty according to the following conditions. The manufacturer
guarantees the quality and functionality of its products for the duration of the warranty period. The
warranty applies to products sold and in use within EU Region. The warranty requires that the buyer of the
product follows the manufacturer’s instructions regarding the placement of the heater, its installation, use
and maintenance as well as those regarding the qualities of the stones used in the heater. The warranty
duration is two (2) years from the date of purchase of the product. For spa-and public saunas the warranty
period is one (1) year, or is determined based on the rate of usage. More information from the
manufacturer.
Wood burning Warranty is subject to the following:
1. In case of defect or malfunction, the buyer must always contact the manufacturer or sales agent
first before searching for the cause or attempting to repair it.
2. Stones are laid during the warranty period at least once a year and damaged stones replaced.
3. Institutional and professional use the stones have to be set again three times a year and replace
them at least once a year. Proof of the operation must be presented at request. Valid guarantee of
the product proof of purchase, construction works on the reception protocol, or a similar
document. Ceramic heater stones are prohibited (except KERKES stones). If they are used, the
warranty is not binding on the manufacturer.
4. Warranty does not cover the benches dismantling and reassembly of the stove or unloading stones
and replacing.
5. The spare part warranty is valid for one (1) year from the date of purchase. The broken part of the
corresponding replacement will be shipped free of charge to the seller or the buyer directly. The
manufacturer is not responsible for the failed component removal and installation of the new part
of the costs. The broken part must be sent to the manufacturer. Contact the manufacturer of your
contract of carriage number before you return the part. Valid guarantee is the dealership's sales
receipt, or a certificate issued by an authorized installer. The use of an authorized mechanic is
required for installation of the replacement part
6. Warranty Limitations of Liability: The product owner must take good care of the product. On
receiving the product, check that there is no transport or storage damage. In case of such damage,
immediately inform the seller of the product or the shipping company. The manufacturer is not
responsible for any errors, malfunctions, or defects caused by transport or by improper storage,
contrary to the manufacturer's instructions for installation, operation, maintenance, or failure to
product placement in a state where the circumstances do not meet the manufacturer's
recommendations.
7. Error reporting: The buyer is the product of the error or malfunction as soon as it has occurred, and
no later than within 14 days. Notification is made to the seller of the product. Warranty
requirements shall be made no later than 14 days from the date of the product of the warranty
period has expired.
Other manuals for Mini-IKI
1
This manual suits for next models
4
Table of contents
Other IKI Wood Stove manuals

Popular Wood Stove manuals by other brands

Osburn
Osburn Beyond Fire 1700 Installation and operation manual

Vogelzang International
Vogelzang International TR001B owner's manual

Osburn
Osburn 1600 owner's manual

Blaze King
Blaze King PE1006 Operation & installation manual

Dovre
Dovre 225CB Installation instructions and operating guide

Palazzetti
Palazzetti NICOLE PRODUCT TECHNICAL DETAILS


HWAM
HWAM I 30/65 user manual

OZpig
OZpig OZP001-01 Handbook

LA NORDICA
LA NORDICA FORTUNA user manual

Warmington
Warmington Studio Stove 14 installation instructions

Enviro
Enviro ASCOT VENTED GAS FIREPLACE HEATER owner's manual

Sierra Products
Sierra Products EF-4001B AutoLite Installation & operating instructions