Ildvr Digital Technology USA IL6004HA User manual

User Manual
For IL6000HA NetDVR

Directory
1. Features and Specifications……………………………………………………………………………………………………………………………………………………………………………………….1
2. Physical Interface………………………………………………………………………………………………………………………………………………………………………………………………………2
2.1 Front Panel and Interior of Product……………………………………………………………………………………………………………………………………………………………………………2
2.2 Rear Panel of Product………………………………………………………………………………………………………………………………………………………………………………………………..4
2.3 IR Remote Controller……………………………………………………………………………………………………………………………………………………………………………………………….5
2.4 Mouse Operation………………………………………………………………………………………………………………………………………………………………………………………………………………….6
3. Main Interface………………………………………………………………………………………………………………………………………………………………………………………………….6
3.1 Log in…………………………………………………………………………………………………………………………………………………………………………………………………………………………6
3.2 Camera Status Icon…………………………………………………………………………………………………………………………………………………………………………………………………….7
4. System Menu………………………………………………………………………………………………………………………………………………………………..…………………………..8
4.1 Camera……………………………………………………………………………………………………………………………………………………………………………………………………………………….9
4.2 Record…………………………………………………………………………………………………………………………………………………………………………………………………………………….10
4.3 Network………………………………………………………………………………………………………………………………………………………………………………………………..11
4.4 Search………………………………………………………………………………………………………………………………………………………………………………………………………12
4.5 Device…………………………………………………………………………………………………………………………………………………………………………………………………………………13
4.6 System……………………………………………………………………………………………………………………………………………………………………………………………………………………..16
5. PTZ Control…………………………………………………………………………………………………………………………………………………………………………………………………18
6. Backup Player……………………………………………………………………………………………………………………………………………………………………………………………………18
7. IE Web Client…………………………………………………………………………………………………………………………………………………………………………………………………19
8. Mobile Phone Viewer………………………………………………………………………………………………………………………………………………………………………………………..24

1
1. Features and Specifications
Local Function
4/8 channel real time (25FPS @PAL, 30FPS @ NTSC) D1 resolution preview and H.264 compression
4 channel high quality D1 or CIF real time (25FPS @PAL, 30FPS @ NTSC) playback.
4 channel audio ADPCM synchronous compression.
Auto adapted bit-rate and frame rate.
Support OSD and multiple areas motion detection.
Support manual record, schedule record and event record.
Support USB backup and USB upgrade system.
Status displays local record, alarm and motion detection
Control
Support PTZ control
Support preset, sequence and tour
Alarm
Local alarm includes exception and motion detection (Alarm pops up full screen image).
Alarm linkage triggered record, linkage alarm output and sound alarm.
Email alarm notification
Network
Support TC P / I P, DHCP, PPPoE, DDNS.
Support Internet Explorer, easy to use such as remote configuration, remote control and network record.
Support mobile phone surveillance
Specification
Model Name IL6004HA IL6008HA
Video compression H.264
Preview resolution PAL 704*576, NTSC 704*480
Playback resolution Total 120fps@CIF / 30fps@D1 Total 240fps@CIF / 60fps@D1
Video input 4 BNC 8 BNC

2
Audio input 4 RCA 1 RCA
Audio output 2 RCA 1 RCA
External alarm input 4 8
Relay output 1 1
Video input interface BNC (Electrical Level 1.0Vp-p, resistance 75Ω)
Video output 1 VGA interface, support resolution 800×600, 1024×768, 1280×1024, 1440×900, 1920×1200
2 channel BNC (Electrical Level 1.0Vp-p, resistance 75Ω)
Frame rate CIF 120fps, D1 30fps auto fit
Stream type Video/Video & Audio
Max bit rate 2MB
Audio compression ADPCM
Audio compression rate 24Kbps
Communication interface 1 RJ45 10M/100M Self-adaptive Ethernet Interface
1 RS485 (PTZ port)
HDD interface 1 SATA HDD can support 2TB
USB interface 1*USB 2.0 (below), 1*USB1.1(upper)
Power supply 12V DC/ 3A
Power consumption <10W (without HDD)
Working temperature -10°C ~ 40°C
Working humidity 10% ~ 90%
Size 340mm × 270mm × 55mm
Weight 1800g (without HDD)
2. Physical Interface
2.1 Front Panel and HDD Installation

3
Index Type Name/Icon Description Index Name Description
1 Remote Controller Sensor Don’t cover this area 3 Hard Disk Drive Please use dashpot & gasket to fix the HDD
2 LED Indicator
PW Power indicator. Turn green when DVR power on. 4 HDD SATA Po r t Connect to HDD
HDD Hard disk indicator. Blinks when reading/writing. 5 HDD Power
Connecter Connect to HDD
4
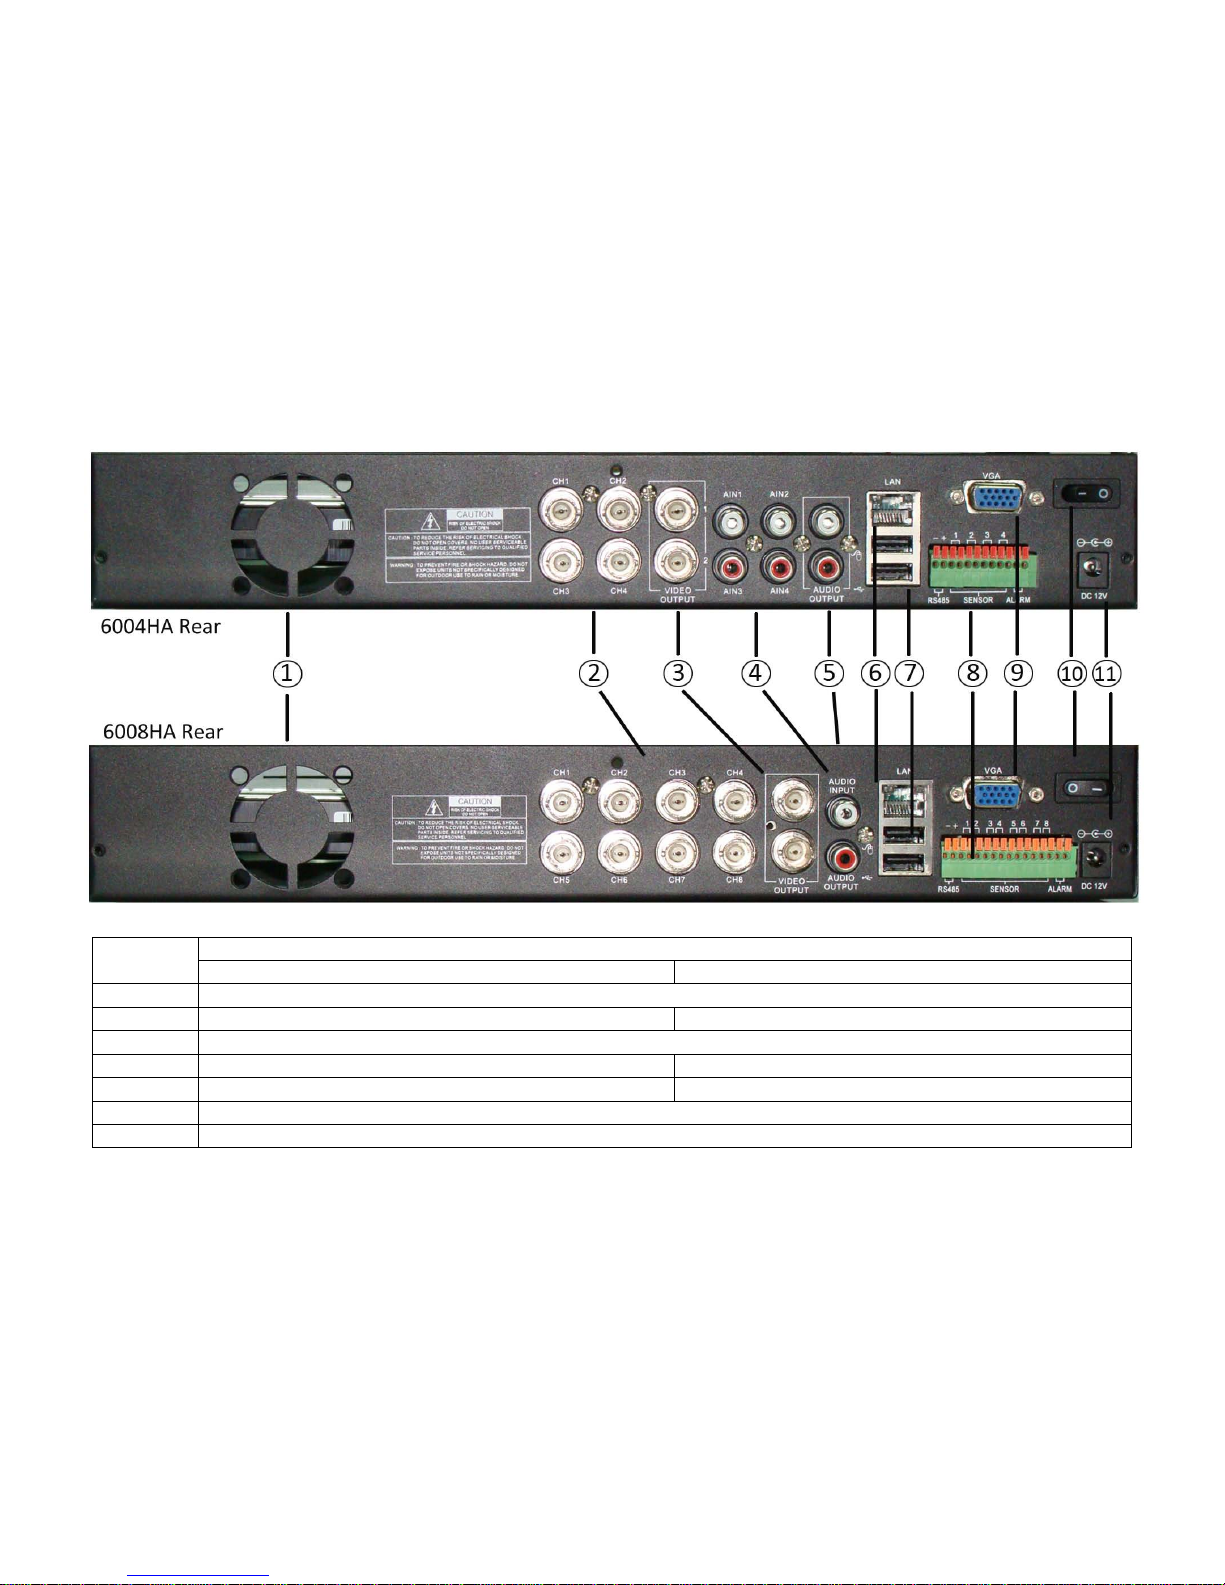
2.2 Rear Panel of Product
Item Description
4 CH DVR 8 CH DVR
1 Fan vent (reserved)
2 4 channel video input, BNC 8 channel video input, BNC
3 Video Output (TV out), 2 BNC
4 Audio In: (4 channels), RCA Audio In: (only 1 channel), RCA
5 Audio Out: (2 channels), RCA Audio Out: ( only 1 channel ), RCA
6 2 USB port, USB 2.0
7 Network RJ45, 10/100M self-adaptive
5
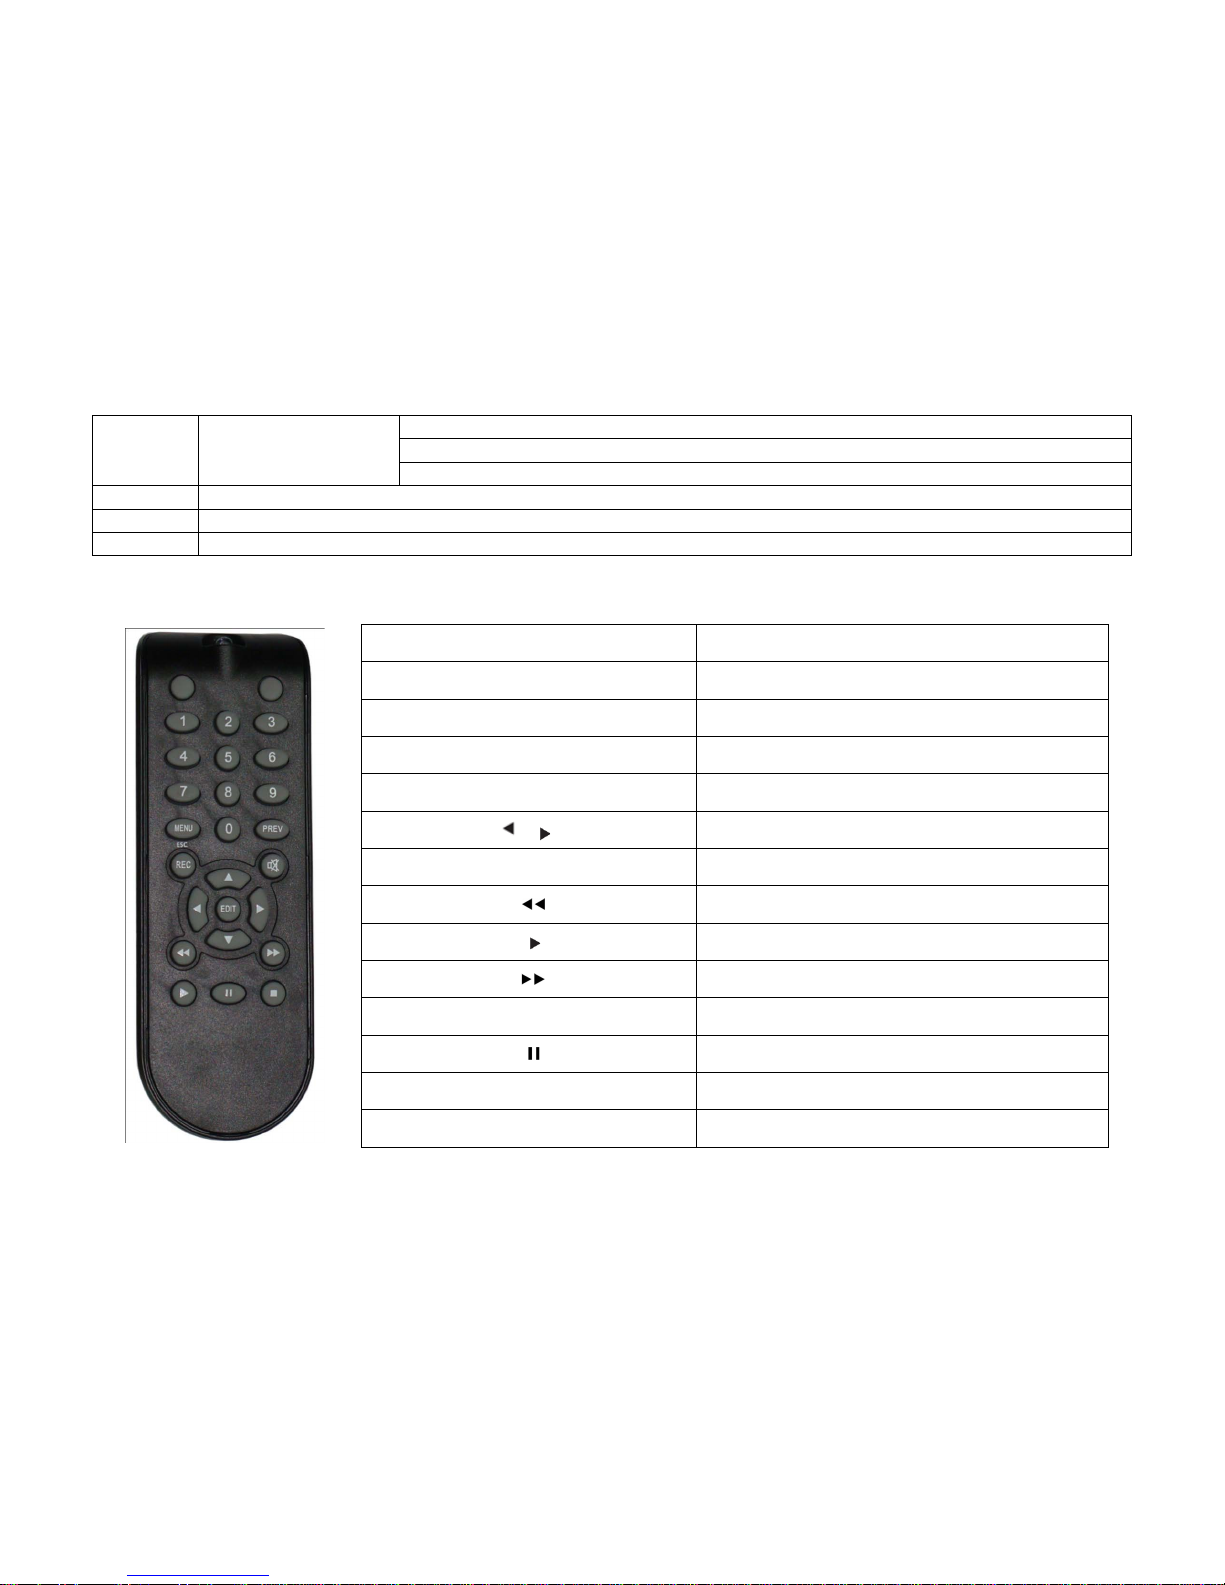
2.3 IR Remote Controller
1-9 Channel Select 1-9
0 Numeric Key
PREV Preview all Channel
MENU / ESC Enter/Exit Menu
▲▼Up / Down Key
Left /Right Key
EDIT Select Key
Reverse play key
Play Key
Forward Key
REC Manual Recording
Pause / Dwell Time key
■Stop
Mute Testing
8 Communication Port
RS485: PTZ connection port
SENSOR: 4/8 channel switch-level input, N/O. or N/C.
ALARM: 1 channel switch-level alarm output,30VDC 1A, 125VAC 1A;
9 VGA resolution: 800×600@60Hz, 1024×768@60Hz, 1280×1024@60Hz, 1440×900@60Hz, 1920×1200@60Hz,
10 Power On/Off button
11 Power Input DC 12V/3A

6
2.4 Mouse Operation
On different status, the mouse operation has different definition.
Left Click
On menu locked mode, click to enter pop-up menu and then click any sub menu to pop up Log-in window. On menu unlocked
mode, click to enter pop-up menu or sub-menu directly.
After enter main menu, click left key could enter any sub-menu. On [File List] menu mode, click left key could playback one
recording file.
Change the status of check box and motion detection area.
Click combo box to display drop-down menu
Click left key in preview mode could popup color control bar and volume control bar.
Click left key could select value when appear edit box or drop-down menu and support Chinese word input, special symbol,
numeric and character input, replace [Enter-] , [Backspace ].
Right Click In preview mode, right click to pop-up right-click menu.
On main menu or sub-menu mode, clicking right key will exit current menu.
Double Click In preview mode or playback mode, double-click left key will maximize the screen. On the [File List] menu mode, double click
will playback one recording file.
Moving Mouse Moving cursor between items of menu interface.
Sliding Mouse On motion detect setup mode, sliding mouse will select motion area. On [Color set] menu mode, sliding mouse will move color
control slider and volume control slider.
3. Main Interface
3.1 Log in
To boot up DVR system, please turn on the power button in rear panel and wait moment for system initializing.
On screen, right click the mouse will pop-up a right-click menu. Select Main Menu will enter System Menu interface (DVR default setting is password disable). If you have
set password enable, the User Login dialog interface will pop up. Please input correct password to login to DVR. Default password of “Admin” and “User” is empty. It is
recommended to change the password after you finish the system configuration.
Note: Before using the DVR to record, you must format the HDD in system menu. If DVR doesn’t detect HDD, It will give sounds warning and a message of “NO Hard disk”
display on screen.

7
3.2 Camera Status Icon
The camera status includes
This icon indicates “motion detect recording” status.
This icon indicates “common recording”.
This icon indicates “sensor alarm trigger recording”.
MAIN MENU: Click to enter system menu interface
VIDEO SEARCH: Click to enter playback interface
PTZ: Click to enter PTZ control interface
START RECORD: Click to start manual record.
STOPRECORD: Stop manual record
START CRUISE: Start PTZ camera touring.
START AUTOSEQ: Click to run camera switch view
PIP MODE: Click to select picture in picture viewing mode

8
4. System Menu
System menu structure
Main Menu
Search
Search
Playback
Detail File
Log Search
File Backup
Camera
Record
HDD Management
Alarm Setting
PTZ Setting
3G Network
Motion
Color set
System
User password
System Information
Language Select
System Maintenance
Audio/Video Setting
Time Setting
Device
Network
Area setting
9
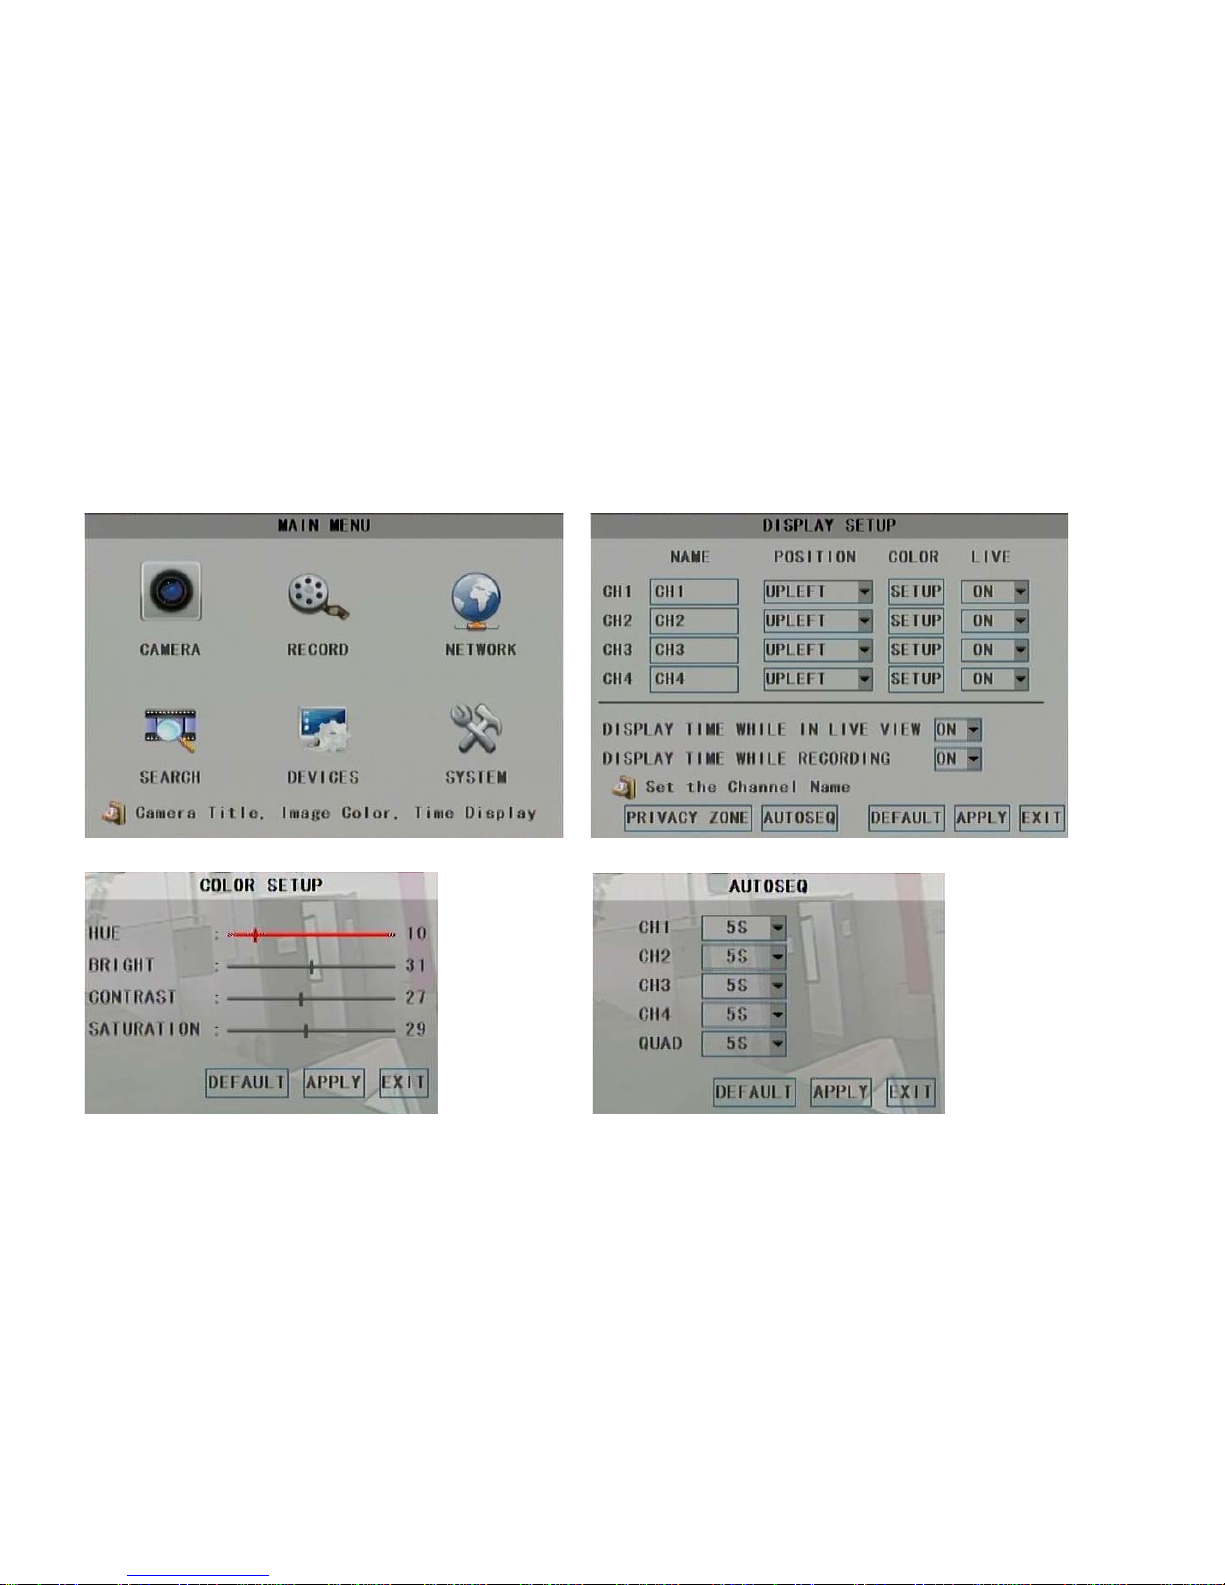
4.1 Camera
In main menu click CAMERA icon to enter Display Setup interface (below right illustration). In this page please setup camera OSD, adjust color, set privacy mask area, camera auto
switch time and even hide a camera in preview mode.
Move slider to change color settings. Click dropdown list to select auto switching time.
10
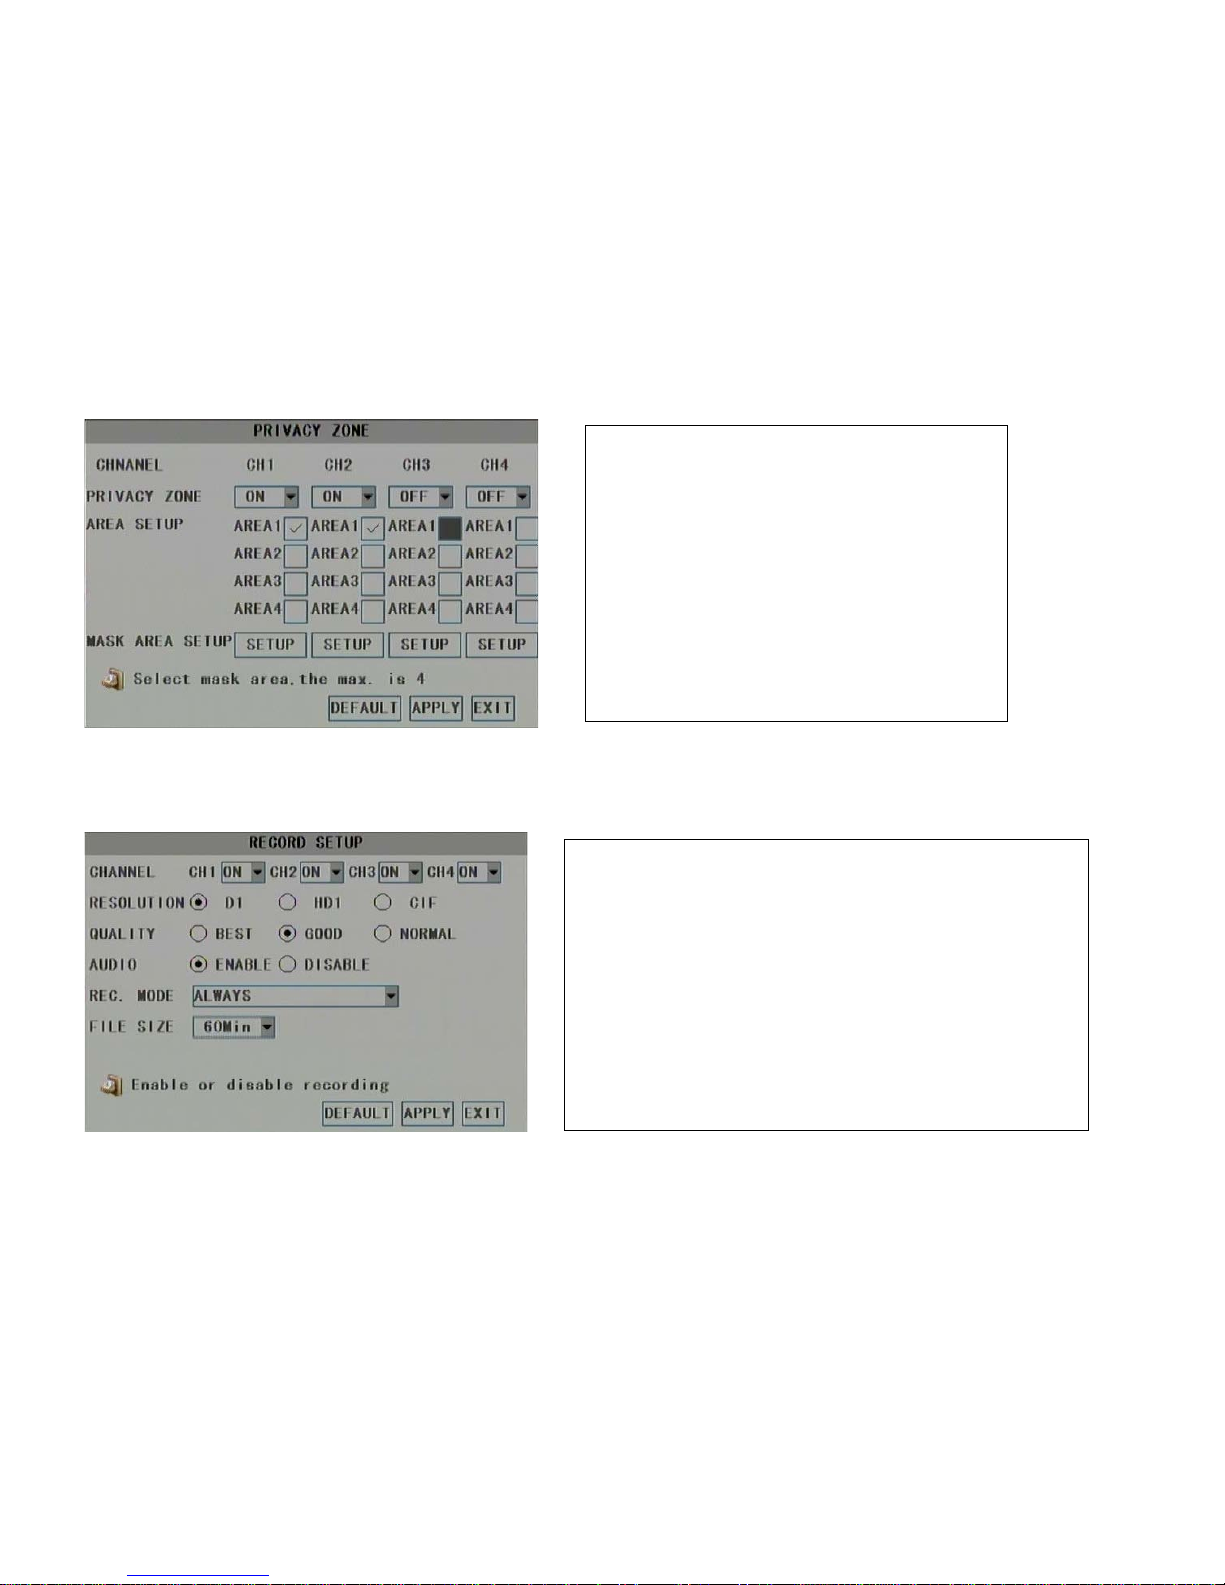
4.2 Record
In main menu interface click RECORD icon to enter Record Setup interface (below illustration).
In Display Setup interface, click Privacy Zone button to enter into
Privacy Zone interface. Every camera supports max. 4 zones of
privacy mask. Operation steps:
1. Set Privacy Zone ON
2. Select a area number to configure
3. Click SETUP button to bring up camera image. Move the
default mask area to aim position or use the mouse to
draw a new area if you need change the area size
4. Right click to exit camera image viewing interface
5. Click APPLY button to save settings
Channel: Choose channel number to configure.
Resolution: Set record video resolution D1 (4CIF), HD1 (2CIF) and CIF.
Quality:Set video quality level Best, Good and Normal.
Audio: Set audio enable will record both video and audio synchronously.
REC. Mode: Set Always or Time Schedule Record. If you set Time Schedule
Record, please go ahead to setup record time table.
File size: Set maximum continuous time length of recording file (15, 30, 45, 60
minute options).

11
4.3 Network
In main menu interface click NETWORK icon to enter Network Setup interface (below illustration). Please input correct parameters in this page otherwise network function may
work abnormally.
If you don’t have a legal IP address for the DVR but connect DVR to internet through a
public router, please configure the router to map the media port and web port to the DVR
LAN IP address.
Host Port: 9000
Web Port: 8080
LAN IP address of DVR: 192.168.1.100
Remote user visit DVR by input http://router’s IP:8080.
For your attention, if you use mobile phone for remote viewing, don’t forget to map
mobile phone port, Refer to section MOBILE.
Operation steps:
1. Choose channel number to setup
2. Choose record mode icon (Red icon means alarm record. Green
icon means continuous record. Grey icon means no record)
3. Following step 2 to click the time bar to set recording time
schedule. One block in the time bar means one hour.
4. Click Apply button to save settings.
5. Repeat above steps to configure other channel one by one.
Use COPY feature to clone one day’s setting to another day
12
4.4 Search
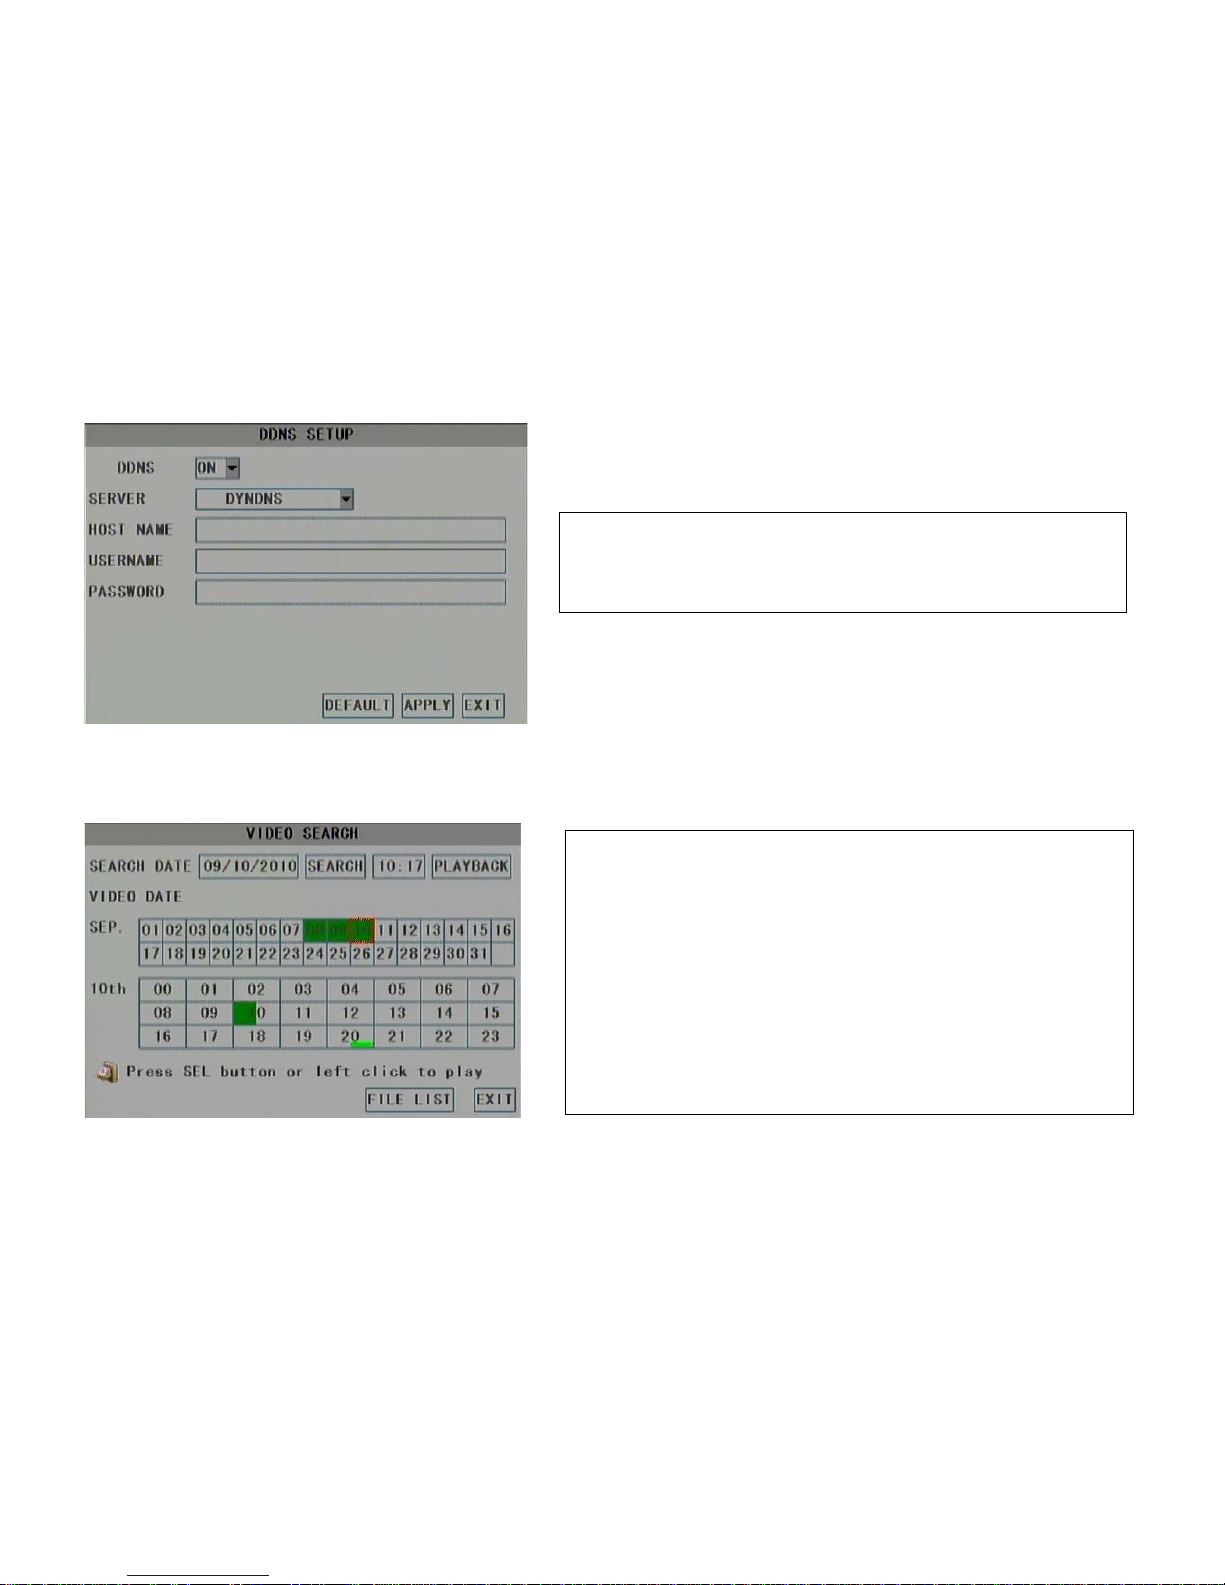
In main menu interface click SEARCH icon to enter Video Search interface (below illustration).
If you use DDNS service please input your domain name and login information here.
Remote user visit DVR by input http://your domain name:8080.
Operation steps:
1. Click date box to choose searching date
2. Click SEARCH button to begin search
3. In day and month area, the highlight green date means there is general normal
recording video in the days. The highlight dark red date means there is alarm
recording video in the days. Click it to select a day to search.
4. In the 24 hours time area, the highlight green digits means there are recording
video in that hours. Click to select it then click PLAYBACK button to play
video or double click it to play.
5. Click FILE LIST button to enter File List interface and list all files in the day.

13
4.5 Device
In main menu interface click DEVICE icon to enter Device Management interface (below illustration). For your attention, HDD only format in DVR could be used to record.
You can select a record file to play by double click it. If you
need backup record data, please plug in USB stick to the
USB port, check on the files which you want to save then
click BACKUP button. See below diagram.
14
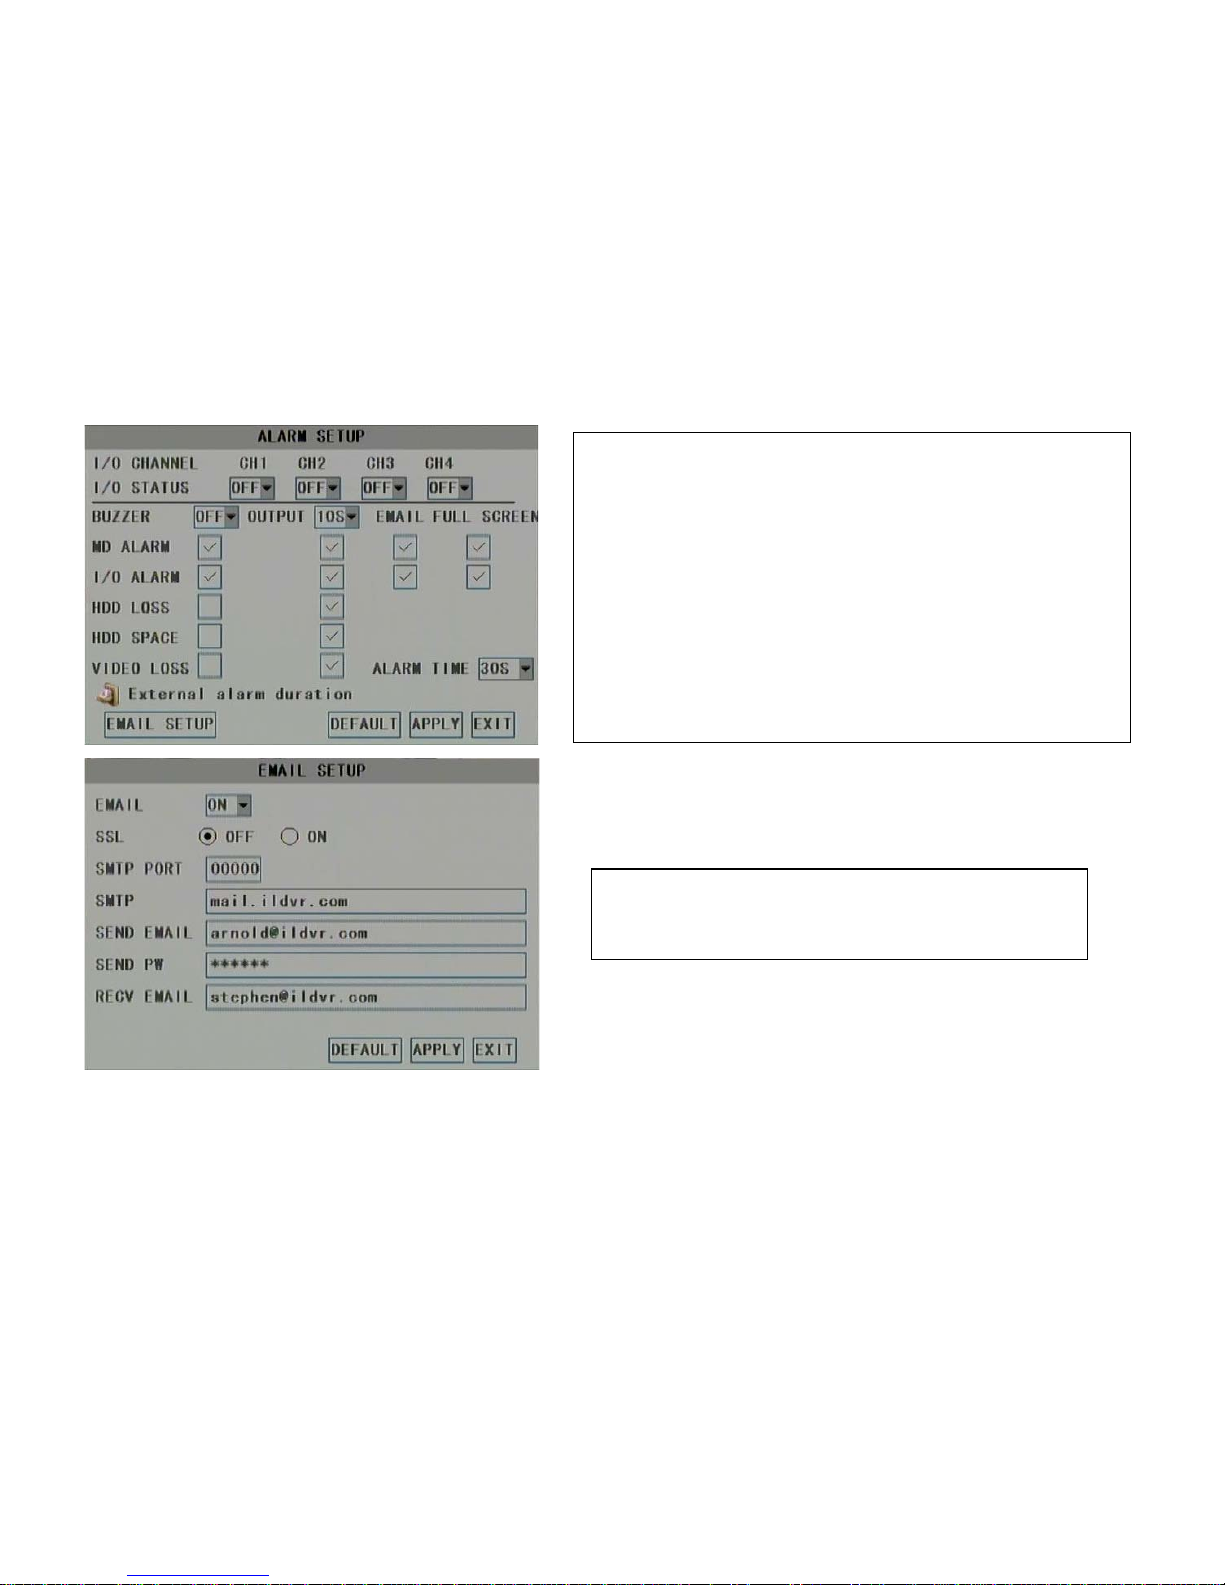
There are 5 types of alarm trigger:
Motion Detect alarm (MD): Refer to Motion Detect Setup
Sensor Input alarm (I/O): Please choose correct I/O type NC (normal close) or NO
(normal open)
HDD lost: A sign of “H” shows up on screen.
HDD full: DVR sounds alarm beep.
Video Lost: DVR sounds alarm beep.
If you install a buzzer to alarm port of rear panel, you can use it for alarm output.
Otherwise please use alarm email notification or full screen mode notification.
Please input your email parameters correctly if you use the feature of alarm
email notification
15
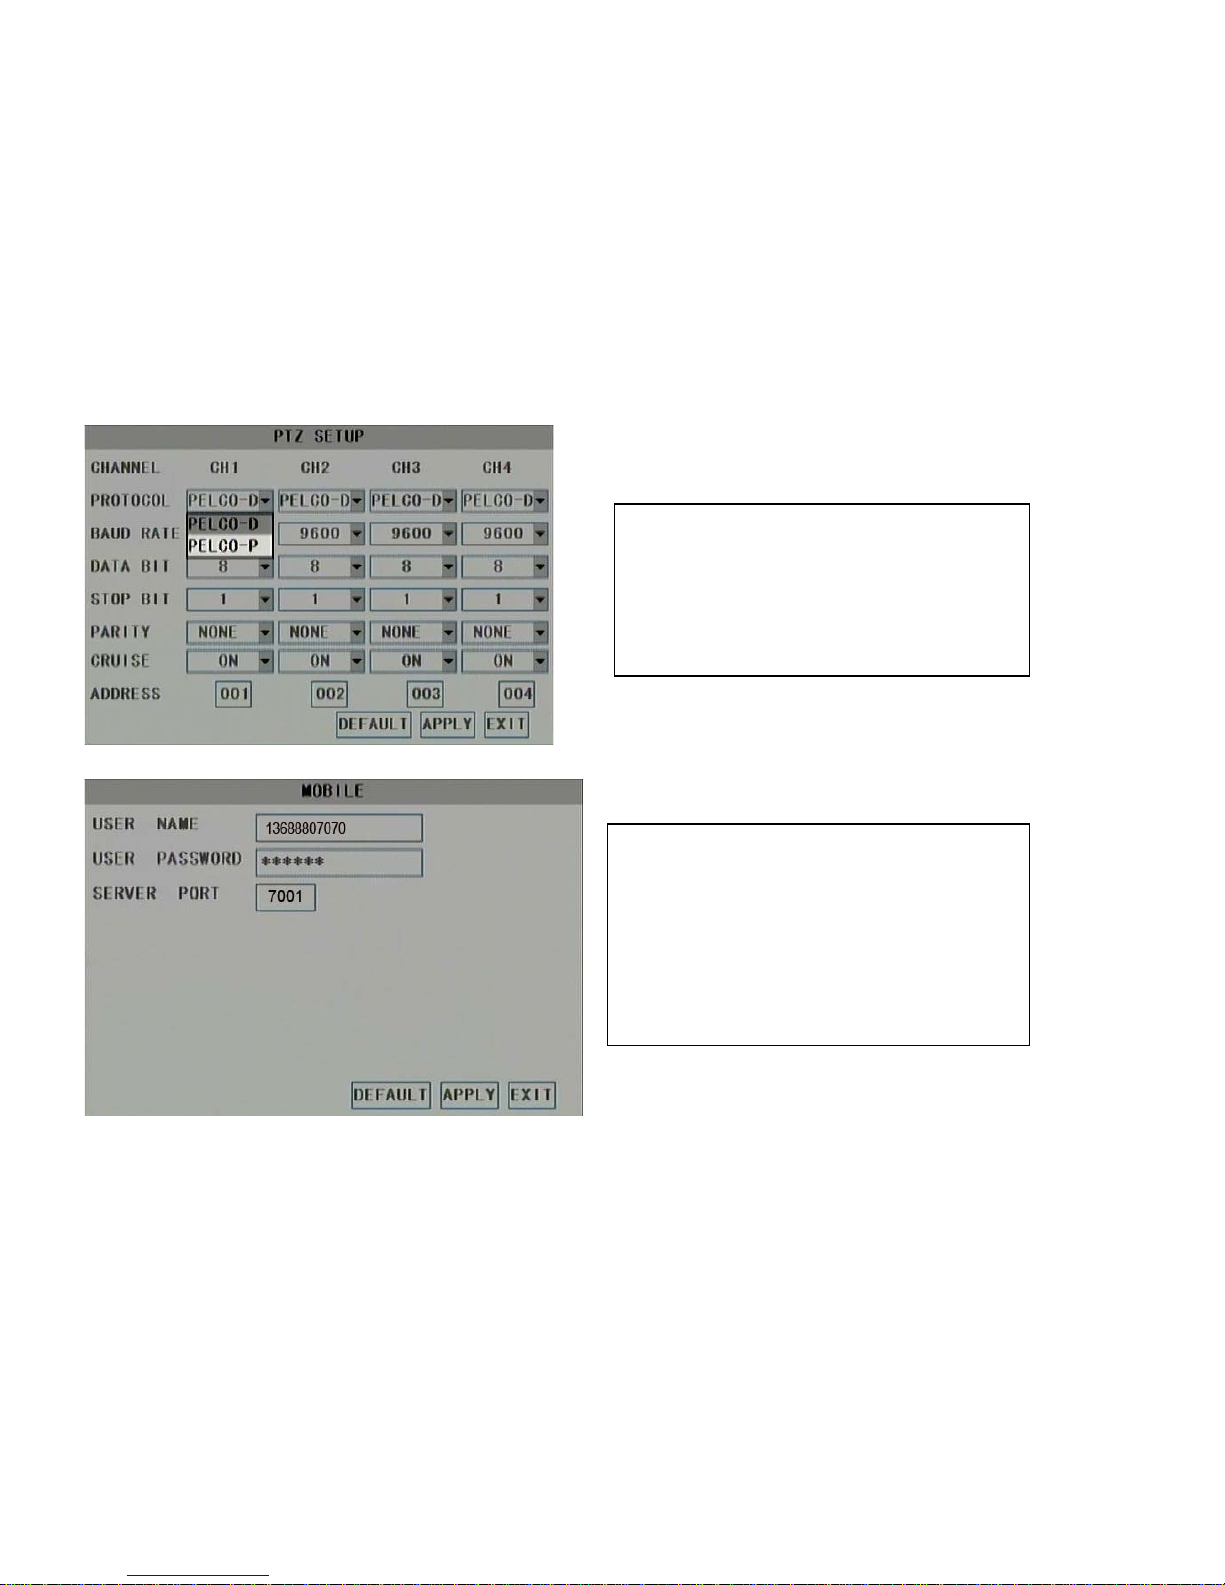
If you connect PTZ camera to DVR, please configure PTZ
protocol, Baud Rate and PTZ address (ID) correctly in this
page.
Please configure the mobile phone login ID, password and
communication port in this page. If your DVR connect to public
internet router, don’t forget to map the port number for your
DVR in the router.
DVR supports Windows Mobile, Sybian OS, iPhone, Blackberry.
16
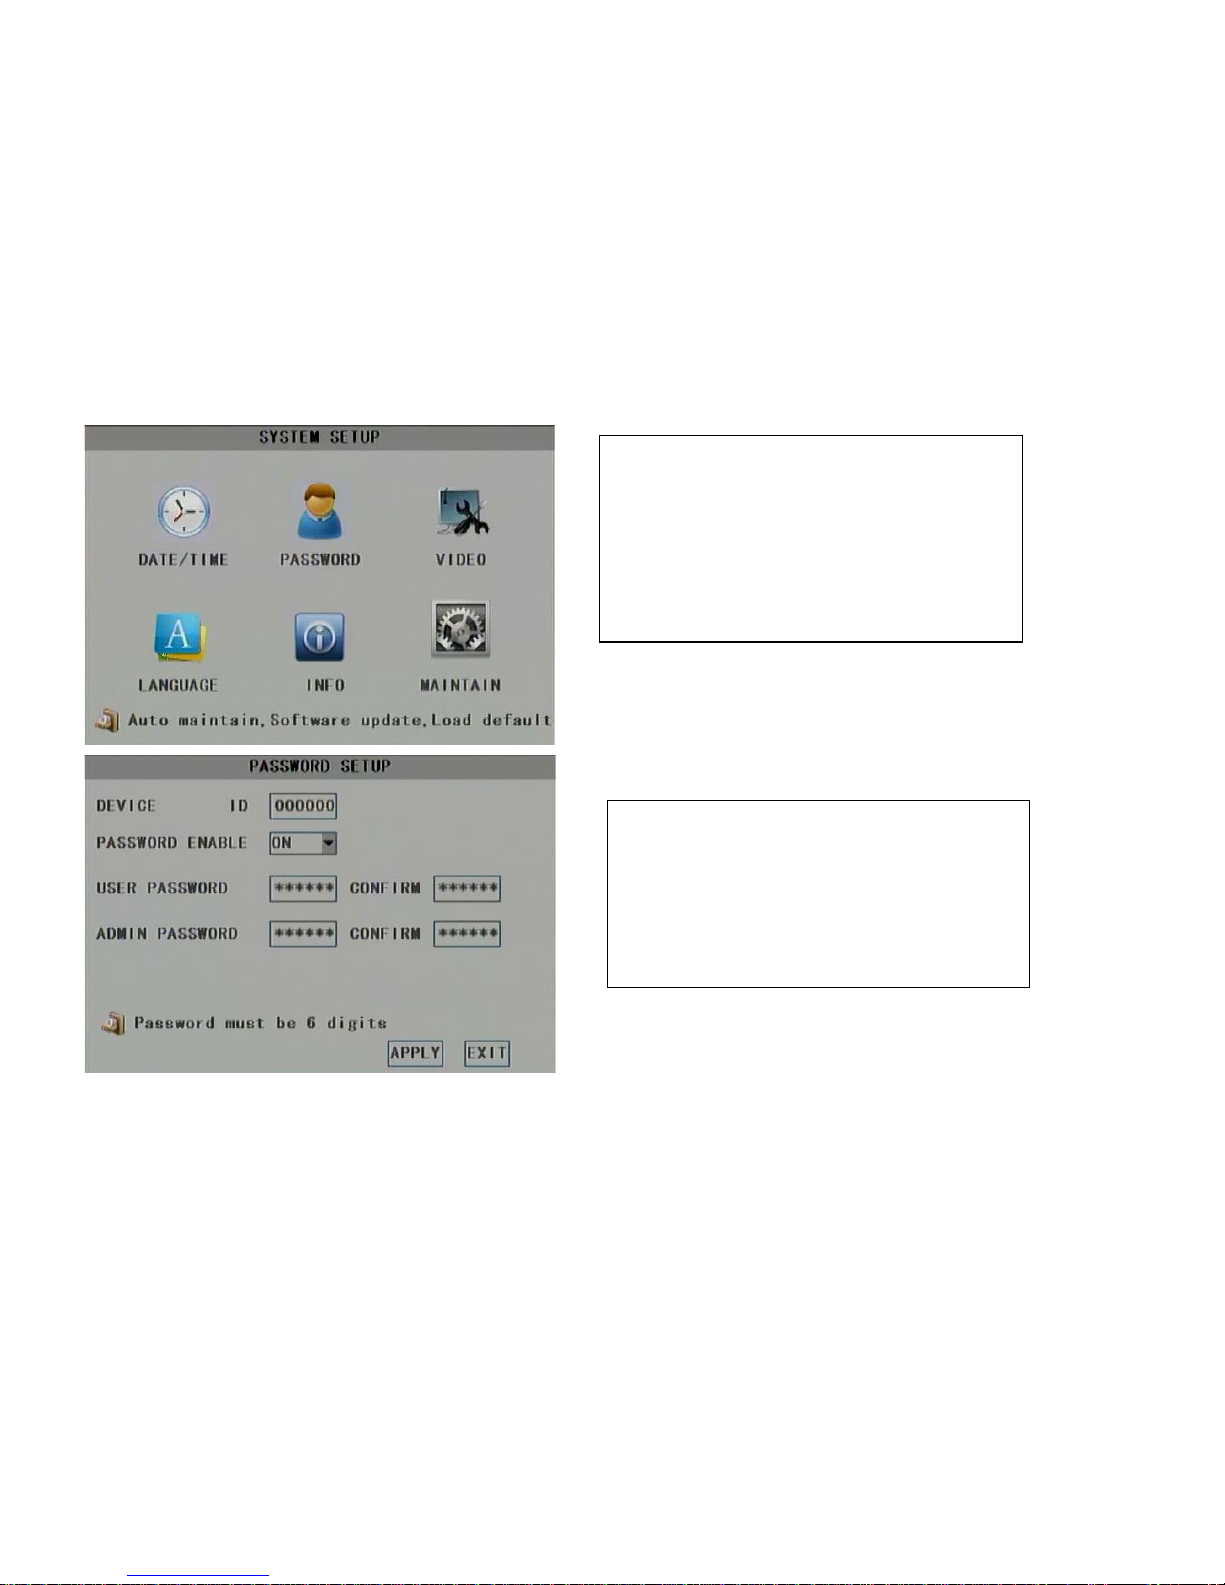
4.6 System
In main menu interface click SYSTEM icon to enter SYSTEM SETUP interface (below illustration)
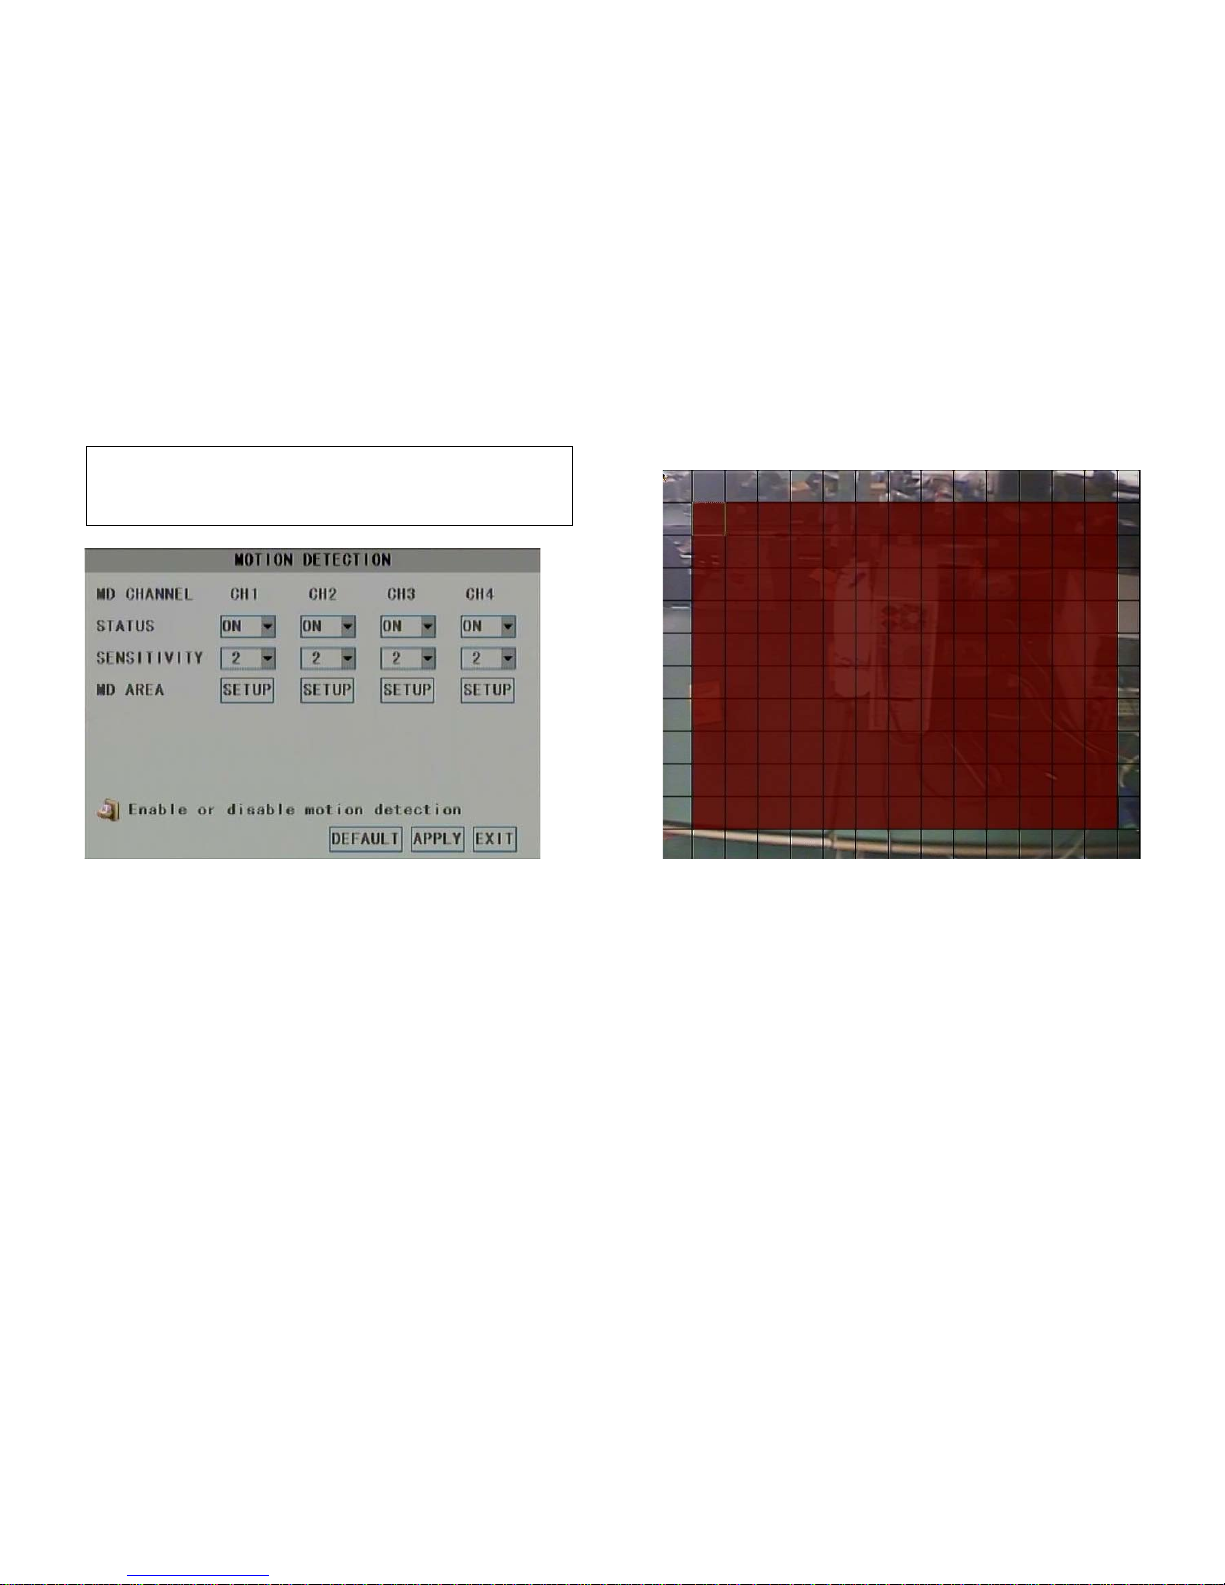
To enable motion detect function, you should configure every camera
settings in this page. Click SETUP button to bring up camera image. Click
the grid area to set motion detect zone.
17
5. PTZ Control
Date/Time: Change system time and set time format
Password: Click to bring up PASSWORD SETUP interface
Video: Set system video standard and VGAresolution
Language: Set GUI language
Info: View firmware version and hardware info
Maintain: Restore factory default settings. Upgrade system and
Set system reboot time.
Set password enable or disable. Change user password.
For your attention, system only supports 2 users ID, one is
“Admin” and the other one is normal “User”. Here the password
is local user’s password. It may be different from network user
password.
18
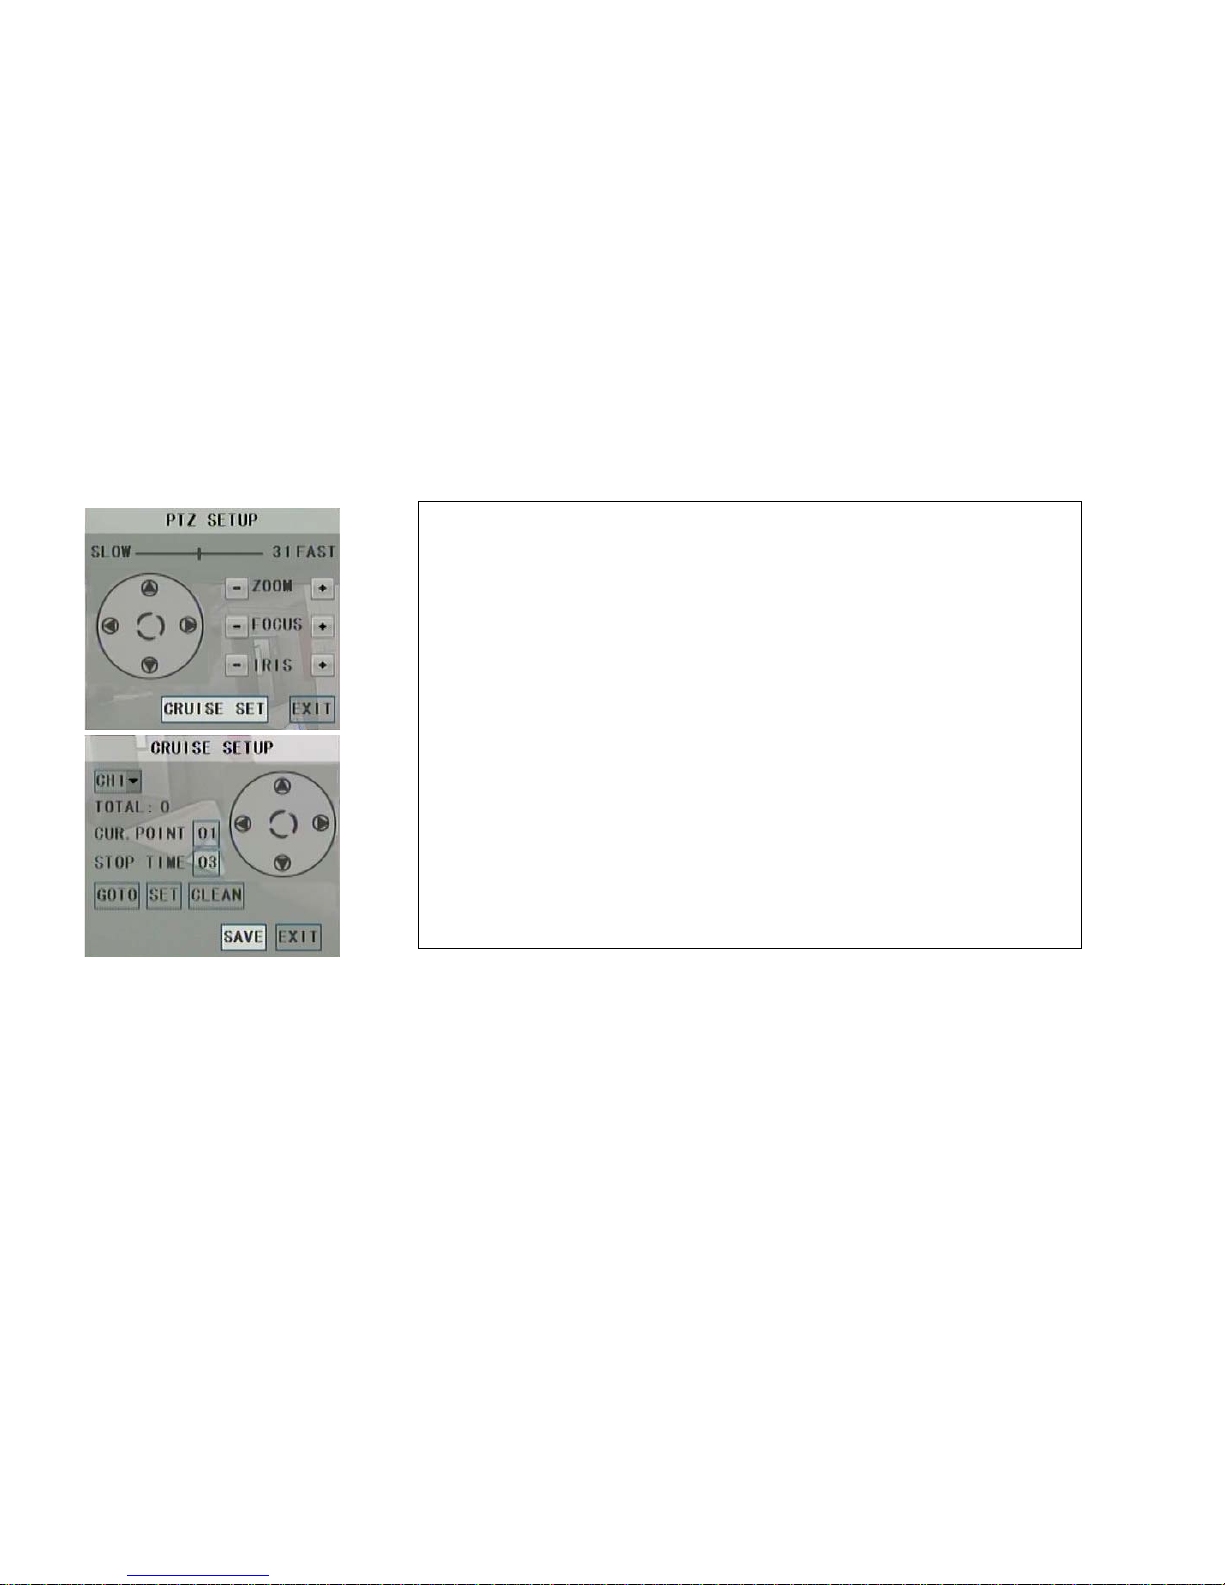
In main interface, right click camera image on screen, from right-click menu select PTZ to bring up the PTZ SETUP interface.
Click arrow button to move camera, click the ZOOM/FOCUS/IRIS to adjust lens. Click the central circle button to run auto-pan.
6. Backup Player
Before playing the backup video, please install the player program from software CD. Double click the PlaybackSetup.exe to initial installation. After finish
installation, there is a shortcut Playback Software icon on desktop. You can run it to view backup video on your PC.
If you install the program AVIGenerator.exe in your PC, you can run it to convert the backup H.264 video to AVI format. Most of popular video player support AVI
Set preset point steps:
1. Click CRUISE SET button to bring up CRUISE SETUP interface.
2. In Cruise Setup panel choose PTZ camera channel number
3. Choose CUR. POINT number (current preset)
4. Move camera to aim position by click arrow button. If you want to adjust lens, please return to
PTZ Setup panel to set zoom/focus/iris then enter this interface again.
5. Click SET button to save preset position. Repeat step 1 to 3 to set other preset points. Click
Save button to save the settings. Max presets number is 128.
Call preset: Choose CUR.POINT number then click GOTO button.
Cruise Setup Steps:
1. Choose PTZ camera channel number
2. Choose CUR. POINT number (current preset) as start point of cruise
3. Set STOP TIME for each preset point (stop point) then save it
Run Cruise: Select START CRUISE to run PTZ touring from right-click menu.
Clean: Clear the cruise setting
This manual suits for next models
1
Table of contents
Popular Network Hardware manuals by other brands


Altec Lansing
Altec Lansing 1631A SIGNAL PROCESSING Specifications

ZyXEL Communications
ZyXEL Communications Network Storage Appliance NSA-220 user guide

Paradyne
Paradyne Hotwire 5446 installation instructions

Jatontec
Jatontec JT4500H Quick user guide

NetApp
NetApp AFF C400 Install manual

Siemens
Siemens RUGGEDCOM MX5000RE Equipment manual


