iLive IVN900X Configuration guide

RangeHoods
GeneralManual

1
IMPORTANTSAFETYINFORMATION
**Readthecompletemanualcarefullybefore installation**
IntendedforDomestic KitchenUse Only
Warnings:
TOREDUCETHERISKOFFIRE,ELECTRICALSHOCKORPERSONALINJURY,
PLEASEOBSERVETHEFOL-LOWING:
1.Installationandelectricalworkmustbedonebya qualifiedpersoninaccordancewithall
ap-plicablecodesandstandards
2.If thesupplycordisdamaged,itmustbereplacedbythemanufacturer,itsserviceagent
orasimilarlyqualifiedpersontoavoidahazard.Any modificationsthatmayberequiredto
theelectricalsystemfortheinstallationoftherangehoodmustonlybemadebyqualified
electri-cians.
3.Beforeservicingorcleaningunit,switchpoweroffattheservicepanel.Lockpanelto
preventpowerfrombeingswitchedonaccidentally.
4.Usethisunitonlyinthemannerintendedbythemanufacturer.
5.Whencuttingordrillingintowallorceiling,becarefullytodonotdamageexisting
electricalwiringandotherhiddenutilities.
6.Ductedfansmustalwaysbeventedtotheoutdoors.
7.Thisunitmustbegrounded.

2
CAUTION
1.Toreduce theriskoffireand toproperlyexhaustair, besuretoductair
outside. Donotventexhaustairintospaceswithinwallsorceilingorintoattics,
crawlspacesorgarages.
2.Takecarewhenusingcleaningagentsordetergents.
3.Avoidusingfoodproductsthatproduce flamesundertherangehood.
4.Therangehoodmustonlybeusedfortheexhaustofcookingfumesinhome
kitchens.Themanufacturerdisclaimsallliabilityforanyotheruseofthe
appliance.
5.Twoinstallersarerecommendedbecauseofthelargesizeand weightofthis
hood.
6.Usewithapprovedcord-connectionkitonly.
7. Pleasereadspecificationlabelonproductforfurtherinformationand
requirements.
8. Donotflambeundertherangehood.

3
INSTALLATIONINSTRUCTIONS
BeforeYouStart...
1.Readthismanualcarefullyandcompletely.
2.Therangehoodsconformtorelatedappliancesstandards. Pleasecheckyourlocal
building codesforanyadditionalrequirements.
3. Theappliance hasbeenmanufacturedasclassI,there-foregroundconnectionis
necessary.Therangehoodmustbeinstalledsothatthattheplug iseasilyaccessible.
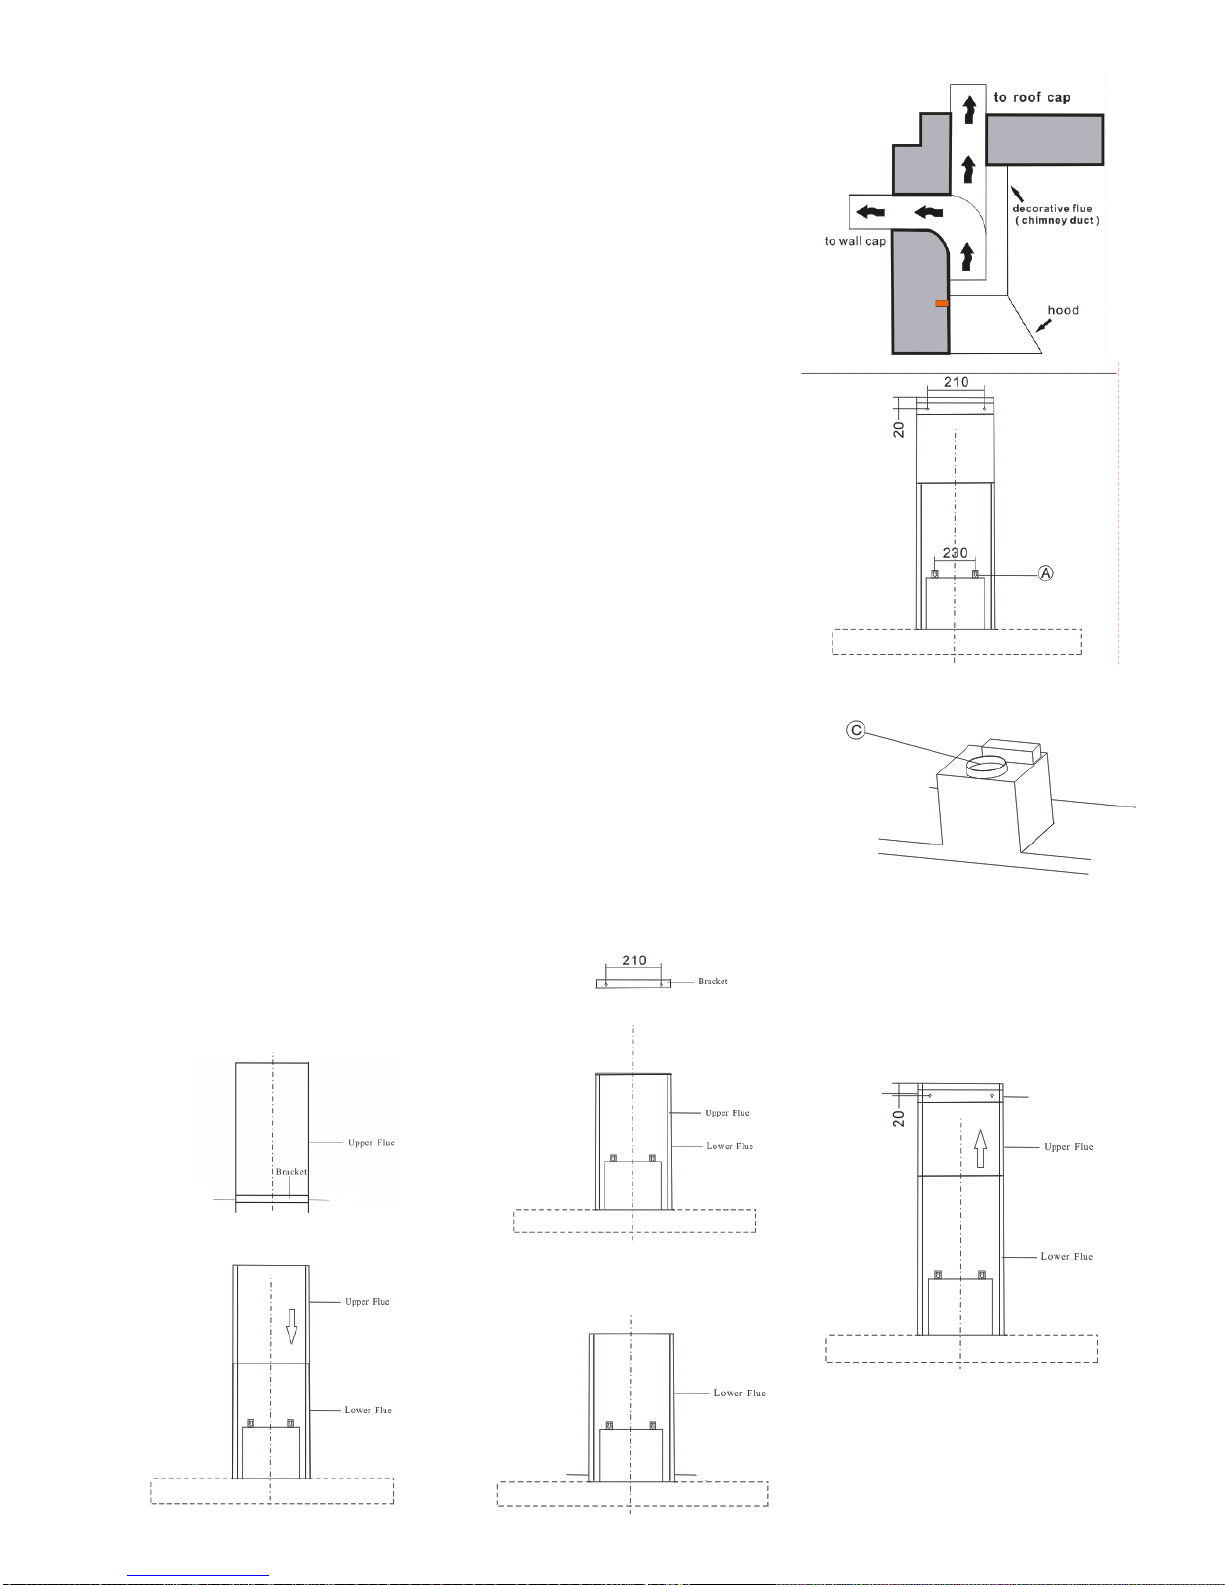
1. Measurethefloortoceilingheight.Thishood
canbeinstalledonwallsbetween8 (203mm)and
9(229mm)tall.
2.Find thecentrepointofyouropening.Marka
plumblinethroughthispointfromceilingtoyour
range/cook-top.
3.Checkyourrange/cook-topUserManualforthe
minimumdistanceaboveyourcookingsurface.
Theminimumdistancebetweenanyelementor
flameheightand thenearestcombustiblesurfaceis
610mm(24 ).
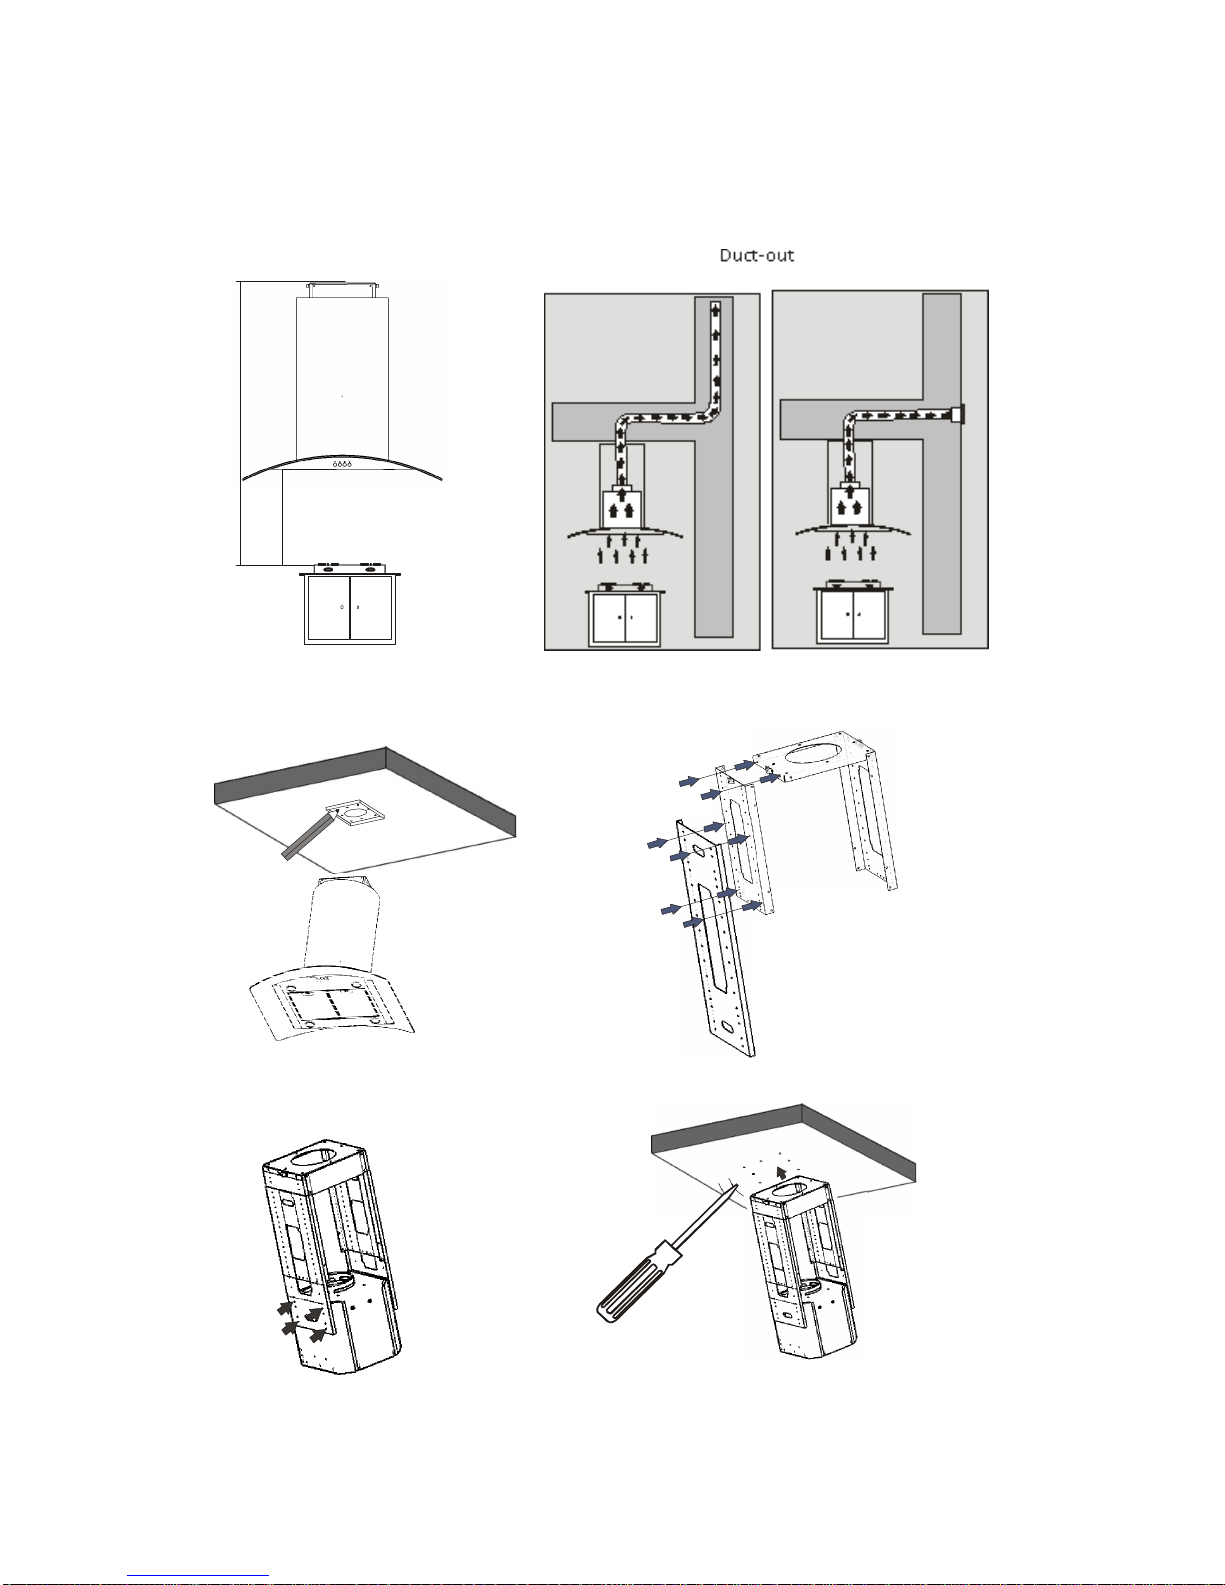
4.Decidedwheretheductworkwillrunbetween
thehoodandtheoutside.Short,straightductruns
will providethemostairflow.
5.If theunitisinstalledwithducting(i.e.notin
re-circulatingmode)plsremovethecharcoalfilter.
Unpacking
Removethepackagingwiththeproductinplace.Cutoff thepackingribbonsand carefullycut
openthepackaging (donotcuttoo deeply),removethepackaging.Checkthattheproductisfree
fromtransportdamage.Anydamageshall bereportedimme-diatelytothecarrierorseller.
Damage, faultsand missingpartsmustbereportedimmediatelytotheseller.
PlanningYourInstallation

(1)
(2)
(3)
(4)
(5)
DD
EE
FF
Installin
g
theDuctwork
1.Planwheretheductworkwillrunbetweenthehoodandtheoutside.Thehoodsexhaust
verticallybutcanbeductedtotherearbehindthechimneyductthroughanoutsidewall or
verticallyup throughtheceiling totheroof. Ashortstraightductrunwillproduce themost
airflow. Lengthand elbowswill reduce theefficiencyoftheblower.
2. Installarooforwall cap. Connecta6 round metalducttothecapandworkbackwards
towardthehood. Ensurejointsarecompletelysealedwithducttape.
Fixin
g
totheWall
1. Beforemountingthehood, pluginand testallfunctionsforproperoperation.
2.Removedthefiltersfromthebottomof thehoodtopre-ventdamageduring the
installation.
3. Withassistance,holdthehoodtemporaryinpositionensuringthebottomisabovethe
minimumclearance forthecookingsurface.Markonthewall theholesforthetwo
mountingscrews.
4.Drilltheholes(A)at thedistancesindicated.Usetheappropriatescrewsandscrew
anchorsforyourwall type(e.g.reinforcedconcrete, drywall,etc.).Ifnecessary,prepare
backwall withcross framingforsecureinstallation.
5. Mountthehoodonthewallscrews.Alignitinahori-zontalpositionrelativeto
cabinets.Whenthehoodhasbeenadjusted,secureunitbytighteningscrews(A).
6.Connecta6 metalducttube(notincluded) totheexhaustpiece usingducttapeon
allseals. (C)
Fixin
g
the Fixi
ng
theFlues
1.Fixonefluebracket tothescrewholes(D)atthelowerendof theupperflue,tomake
suretheupperfluewill notdistortduring&aftertheinstallation (Thisstepisoptional
and recommendedforheightover700mm from bottom of thehoodtotheceiling).
2. Inserttheupperflueinsidethelowerflue.
3.Measureandmarktheheightatwhichtheupperflueshallbemountedonthewall,fix
theotherfluebracketonthewallattheheightmarked.
4. Fixthelowerfluetothehoodthroughscrewholes(E).
5.Bringup theupperflueandfixitthroughscrewholes(F)tothefluebracketonthe
wall
4

5
InstallationGuideline
allMounted -
1200~1700mm
650~700mm
Island hood step 1
Island hood step 2
Island hood step 3
Island hood step 4
Note:Theaboveinstallationguidelineisforreference only,pleaseyourcontactlocal
dealerforinstallationservices.

6
LevelingDevice
Whenmountinghoodonthewall, thelevelcanbeadjustedbyturningthetwoscrewsonthe
motorhousing.
InstallationAlternatives
Thecookerhood canbeinstalledinthefollowingways:
Circulatingindoorair(A)
Outdoorventing(B)
REMEMBER!
Thedistance betweenthetop ofthehob andthelowestpartofthecookerhoodmustbeat
least65cm.
Ifatwo-partconnectiontubeisused,thelowersectionmustsitoutsidetheupper
sec-tion.
Donotconnectthecookerhood exhausttoaductusedtocirculatehotairorventsteam
fromanotherappliance.
Alwaysuseprotective gloveswheninstallingtheappliance!

7
USEAND CAREINSTRUCTIONS
Operations
1.Foroptimumperformance inremovingcookingodors,itisrecommendedthatyou
turnonyourrangehood priortocookingandyouleave it operatingfor15min-utesafter
cooking.
2.Cleanthesurfacesoftherangehoodregularlyusinganon-abrasive detergent.
3.Theanti-greasefilterscapture thegreaseparticlessus-pendedintheair. They will
accumulategreaseanddirtdependingonthefrequency oftheuseofyourrange/cook top.
4. Inordertopreventafirehazard, itisrecommendedthatyoucleanthealuminumfilter
atleastevery2months
WARNINGS:Donotattempttoremove thefil-ters whiletheRangeHoodisoperating.
Disconnecttheelectricalplugpriortoanymaintenance.
Thisappliance isnotintendedforuseby persons(includingchildren)withreduced
physical, sensoryormentalcapabilities,orlackofexperience andknowledge, unless they
have beengivensupervisionorinstructionconcerninguseoftheappliance byaperson
responsiblefortheirsafety.Childrenshouldbesupervisedtoensurethatthey do notplay
withtheappliance.
.
Thereshouldbeadequateventilation intheroomwhentheRangeHood isusedatthe
sametimeasotherfuelburningappliances.
CAUTION:Accessiblepartsmaybecomehotwhenusedwithcookingappliances.
Theairmustnotbedischargedintoafluethatisusedforexhaustingfumesfrom
appliancesburninggasorotherfuels.
Regulationsconcerningthedischargeofairhave tobefulfilled

8
DescriptionofControls
A. Slidecontrol
Motor ON/OFF
LIGHT
TIMER/TURBO SLIDE CONTROLLER DIGITDISPLAY
Motor:
Touchshorttime-blueindicatorflash:defaultsetinspeed1, byslidecontrolcanadjustto
speed2, 3
Afterstopononespeedlevel, thelightwillflash10sec.
Light:
Touchshorttime-blueindicatorflash-defaultsetin25%lux, -byslidecontrolcanadjustto,
25%, 50%, 75%&100%available.
Timer(Delay-offFunction)
Touchshorttime-blueindicatorflash-byslidecontrolcanadjustto, 5,10, 15, 20mindelay
off functionavailable.
B.TouchControl

9
C. Pushbuttoncontrol
D. ElectriccontrolwithLCD screen
LIGHTON/OFF
TIMESETTING LCD SCREEN MOTORON/OFF
TIMERDELAYOFF
SETINCREASE SETDECREASE

10
E. Rotary knobcontrol
Using thedialcontrol:
1.Pushtherotarydial, theLEDlightswill illuminate.
2.Turningtherotaryswitchclockwiseorcounter-clockwise, stoptheindicating lightattheset
tingyouwanttoselect, thehoodwillselectthatsettingaftertheindicatinglightilluminates
twice.
3.Pushtherotaryswitchagainatany settingtoswitchthehoodoff.
4. Whentheindicatinglightstopsatthe “Timer setting, thehoodwillbefunctioningat
SpeedIIIand thenautomaticallyoff after3min.

11
CAREAND CLEANING
General
Regularmaintenanceisrequiredtoensurethat
thecookerhoodfunctionsproperly.Thisis
espe-ciallytrueofthegreaseand charcoalfilters.
Cleanthefanandothersurfacesofthecooker
hoodregularlywitha clothdippedindenatured
alcoholora non-abrasiveliquidcleaner.
Thecharcoalfiltercleansthecirculatingairin
theroom. Suchfilterscannotbecleanedor
recycledandmustbereplacedatleasteveryfour
months.Thespeedatwhichthecharcoalfilter
becomessaturateddependsonhowoftenthefan
isused, thetypeoffoodthatiscookedandhow
oftenthegreasefilteriscleaned.
Topreventtheriskoffireandtoensurethatthe
cookerhoodfunctionsproperly, thegreasefilter
mustalwaysbecleanedasinstructedbelow
whenthedisplayindicatestheneedoratleast
everytwomonths.
*Thereisafireriskifcleaningisnotcarried
outinaccordance withtheinstructions.
Cleaningthegreasefilter
Removethefilterfromthecookerhoodand
cleanitina solutionofwaterand neutral
cleaningliquid. Leavethefiltertosoakinthe
solutionfora while.
-Rinsethoroughlywithhotwaterand leavethe
filtertodry.
-Thefiltercanalsobecleanedina dishwasher.
Thecolorofthegreasefiltermaychangeaftera
fewwashes.Thisisnormal.
NB:
Ifyoucleanthegreasefilterinthe
dishwasher:loadonlythegreasefilterand
nootheritemsasfood particlesfromdishes
canfasteninthefilter.
Replacingthecharcoalfilter
(standardhood)
Replacethecharcoalfilter(standard
hood)asfollows:
Removethegreasefilter.
Squeezetheclipsonthecharcoalfiltera
pull thecharcoalfilterbacktoremoveit.
Replacingthecharcoalfilter(for
hoodwithslopingsurface)
1.Press themiddleoftherightedgeof
theglass covertoopenit
2.Removethegreasefilter
3.Squeezetheclipsonthecharcoalfilterand
pull thecharcoalfilterbacktoremoveit.

12
Emptying andcleaning theoil collector(Forthosemodelsfittedwithoilcollector)
Thefanisfittedwitha oilcollectorthatcollectsoilfromthefanbladesand fanhousing.
1.Removethegreasefilterand thecharcoalfilter(iffitted).
2.Removetheoilcollectorand cleanitinwarmwaterwithwashingup liquid. Itcanalsobe
cleanedina dishwasher.
DO NOTletdirtbuild up onthehood
DO NOTusesteelwoolorsteelbrushestocleanthehood
DO NOTleavesalt solutions, disinfectants, bleachesorcleaning compoundsonthehoodfor
any lengthoftimeastheymaydamagethestainless steel. Rinseafterusewithcleanwater
and wipedrywitha cleancloth.
Replacingthebulbs
Dependingonyourmodelofhood, therearetwopossibletypesoflighting, halogenandLED.
Theilluminationisdesignedforuseduringcookingand notforprolongedgeneral
illuminationofyourkitchen. Prolongeduseofthelightsmayreducethelifetimeofthebulbs.
WARNING:Donottouchorchangelightbulbs whilethehoodisoperating. Wait
until thebulbhascooledbeforeremoving.
Useonlythesamebulbsastheoriginalspecification. Re-placementlightsareavailable
throughthedealers.
HalogenandLEDLights.
Withthegreasefilterremoved, frominsidethehood press thelightfixtureoutofitsmounting
bracket. Unplugthelightfromthewiringharness.Avoiddirectcontactbetweenthelensesand
yourhands.
Replacethedamagedlampbyreversingthesteps. Snapinplace.
Replacethebulbsasfollows:
Halogenlights:
1.Liftup and removethelightfittingwitha screwdriverorothersuitabletool.
12

13
2.Removetheblownhalogenbulb(ifthefanhas4bulbs=10W, 2bulbs=20W).
Rememberthatthebulbcanbehot!
3.Insertthenewhalogenbulb.
If youtouchthehalogenbulbwithyourbarehandsthismayreduceitsservicelife.Always
usea gloveoraclothtoavoiddirectcontact.
LEDlights:
1.Withthegreasefilterremoved, frominsidethehood press thelightfixtureoutofits
mountingbracket.
2.Unplugthelightfromthewiringharness.Avoiddirectcontactbetweenthelenseandyour
hands, thenreplacewitha newone
3. Pushthelightintoitsmountingbracket.
NB:
Thelightisonlymeantforuseduringcookingand notforilluminatingthesurroundingsfor
longerperiods. If thelightisusedforlongerperiods, thiswill considerablyshortentheburn
timeofthebulbs.
Recycling
ThisappliancecomplieswithEuropeanCommunitydirective2002/96/EC, WasteElectrical
and ElectronicEquipment(WEEE). Byensuringthatthisproductisrecycledresponsibly, the
userhelpspreventpossiblenegativeimpactontheenvironment.
NB:
Disposeofthisproductresponsibly. Irresponsibledisposalcanresultinnegative
environmentalimpactorpersonalinjury.'
Undernocircumstancesmaythisextractorfanbedisposedofashouseholdwaste. Itmustbe
takentoa recyclingcentreforelectricaland electronicequipment.
Thisproductmustbedisposedofinaccordancewithlocallegislation.
Formoreinformationondisposal, recycling andreuseofthisproduct, contactyourlocal
authority, yourhouseholdwastecollectionserviceorthestorewhereyoupurchasedthe
product

14
TroubleShootingGuide
Problem PossibleReason Solution
Noelectricalsupply. Checktheplugisconnect-ed.
Checktheplugisconnect-ed.
Hooddoesn'tturnon. Powercordisdamaged Contacttechnicianservice
Aluminumgreasefiltersclogged Cleanthefiltersand replace
whendry.
PoorAirflow Charcoalfiltersclogged.
Re-circulatingmodeonly. Replacethecharcoalfilters.
Hoodisvibrating Hoodisnotsecuredinplace Checktheinstallationofhood.
Tightenmountingscrews.
Motorrunningbutno
airflow Butterflyvalvejammed. Contacttechnicianservice
Hightemperaturesafetydevice
activated. Thekitchenisnotsufficiently
ventilated.Motorstopsaftera few
minutes Thehoodisinstalledtoonearthe
cookingsurface. Thehoodmustbeatleast
610mm(24 )fromthestove
Fanspeedtoolow Useoneofthehigherset-tings.
Strong cooking smell. Charcoalfiltersnotinstalled. Inre-circulating mode,
char-coalfiltersmustbe
installed.
Oildrippingonto
stove. Aluminumgreasefilter
satu-rated. Washthealuminumgrease
filters
Whirringsound Somethingincontactwithfan
blade. Contacttechnicianservice
Lightsareworkingbut
fanisn't Contacttechnicianservice
Fanisworkingbut
lightsarenot Contacttechnicianservice
GUARANTEE AND SERVICE!
Beforebookinga servicecall, readtheTroubleShootingGuideabove, formoreinformation
onguaranteeandserviceconditions, pleasecontactlocaldealer.
This manual suits for next models
4
Table of contents
Other iLive Ventilation Hood manuals