ILVE IVDFSP5 Manual

Dishwasher Operating
& Installation Manual
ILVE Dishwasher Installation and Operating Instructions template pages.indd 1 1/05/2015 9:16 am


1-11-1
This appliance is intended to be used in household and similar
applications such as:
-staff kitchen areas in shops, offices and other working environments;
-farm houses;
-by clients in hotels, motels and other residential type environments;
-bed and breakfast type environments.
This appliance can be used by children aged from 8 years and above and
persons with reduced physical, sensory or mental capabilities or lack of
experience and knowledge if they have been given supervision or
instruction concerning use of the appliance in a safe way and understand
the hazards involved. Children shall not play with the appliance. Cleaning
and user maintenance shall not be made by children without supervision.
For EN60335-1
This appliance is not intended for use by persons(including children )with
reduced physical, sensory or mental capabilities, or lack of experience and
knowledge ,unless they have been given supervision or instruction
concerning use of the appliance by a person responsible for their safety.
For IEC60335-1
This appliance is for indoor use only, for household use only. To protect
against the risk of electrical shock, do not immerse the unit, cord or plug in
water or other liquid.
Please unplug before cleaning and maintenance the appliance .Use a soft
cloth moisten with mild soap, and then use a dry cloth to wipe it again .
1.IMPORTANT SAFETY INFORMATION1.IMPORTANT SAFETY INFORMATION
When using your dishwasher,
follow the precautions listed below:
WARNING!WARNING!
EARTHING INSTRUCTIONS
This appliance must be earthed. In the event of a malfunction or breakdown,
earthing will r e d u c e the r i s k o f anelectric s h o c k b y p r o v i d i n g a p a t h o f l e a s t
resistance o f e l e c t r i c c u r r e n t . T h i s appliance is e q u i p p e d w i t h a c o r d h a v i n g
an equipment-earthing conductor and a earthing plug.
The plug must be plugged into an appropriate outlet that is installed and
earthed in accordance with all local codes and ordinances.
Improper connection of the equipment-earthing conductor can result
in the risk of an electric shock. Check with a qualified electrician or service
representative if you are in doubt whether the appliance is properly earthed.
Do not modify the plug provided with the appliance; If it does not fit the outlet.
Have a proper outlet installed by a qualified electrician.

1-21-2
Do not abuse, sit on, or stand on the door or dish rack of the dishwasher.
Do not operate your dishwasher unless all enclosure panels are properly in place.
Open the door very carefully if the dishwasher is operating, there is a risk of water
squirting out.
Do not place any heavy objects on or stand on the door when it is open. The
appliance could tip forward.
When loading items to be washed:
1) Locate sharp items so that they are not likely to damage the door seal;
2) Warning: Knives and other utensils with sharp points must be loaded in the
basket with their points down or placed in a horizontal position.
Check that the detergent powder is empty after completion of the wash cycle.
Do not wash plastic items unless they are markeddishwasher safe or the
equivalent. For plastic items n check the manufacturer's
ot so marked,
recommendations.
Use only detergent and rinse additives designed for a n a u t o m a t i c dishwasher.
Never use soap, laundry detergent, or hand washing detergent in your dishwasher.
Children should be supervised to ensure that they do not play with the appliance.
The door should not be left open, since this could increase the risk of tripping.
If the supply cord is damaged, it must be replaced by the manufacturer or
its service agent or a similarly qualified person in order to avoid a hazard.
During installation, the power supply must not be excessively or dangerously
bent or flattened.
Do not tamper with controls.
The appliance is to be connected to the water mains using new hose sets and
that old hose-sets should not be reused.
The maximum number of place settings to be washed is 15.
The maximum permissible inlet water pressure is 1MPa.
The minimum permissible inlet water pressure is 0.04MPa.

Dispose of the dishwasher packaging material correctly.
All packaging materials can be recycled.
Plastic parts are marked with the standard international
abbreviations:
PE for polyethylene, e.g. sheet wrapping material
PS for polystyrene, e.g. padding material
POM polyoxymethylene, e.g. plastic clips
PP polypropylene, e.g. Salt filler
ABS Acrylonitrile Butadiene Styrene, e.g. Control Panel .
Packaging material could be dangerous for children!
For disposing of package and the appliance please go to a
recycling centre. Therefore cut off the power supply cable
and make the door closing device unusable.
Cardboard packaging is manufactured from recycled paper
and should be disposed in the waste paper collection for
recycling.
By ensuring this product is disposed of correctly, you will
help prevent potential negative consequences for the
environment and human health, which could otherwise be
caused by inappropriate waste handling of this product.
For more detailed information about recycling of this
product, please contact your local city office and your
household waste disposal service.
DISPOSAL: Do not dispose this product as unsorted
municipal waste. Collection of such waste separately for
special treatment is necessary.
WARNING!WARNING!
1-31-3
DisposalDisposal

22
2.Quick operation guide2.Quick operation guide
For detailed operating method read the corresponding content on the instruction manual.
Compartment A:Compartment A:
With each wash cycle.
Compartment B:B:
For programs with pre-wash only.
(Follow the user instructions!)
Mechanical indicator C.Mechanical indicator C.
Electric indicator on control panel (if provided).
Check the rinse aid level
Load the baskets
Select a program
T urn on the water tap and press the Start/Pause button. The machine will start working .
Running the dishwasher
Switch off the appliance
Turn off the water tap,
unload the baskets
Fill the detergent dispenser
Warning: wait a few minutes (about 15 minutes) before unloading the dishwasher to avoid handling
the dishes and utensils while they are still hot and more susceptible to break.
They will also dry better.Unload the appliance, starting from the lower basket.
Changing the program
Add forgotten dishes in the
dishwasher.
Scrape off any large amount of leftover food. Soften remnants of burnt food in pans,
then load the baskets. Refer to the dishwasher loading instructions.
Close the door,press the program button until the selected program lights up.
( See the section entitled Operation instruction )
When the working cycle has finished, the buzzer of the dishwasher will sound 8 times, then stop.
Turn off the appliance using the Power button.
If the appiance was under standby mode, it will be power off automaticly after 30 minutes without
any operation.
If the appliance is switched
off during a wash cycle.
Open the doorcarefully.
Hot steam mayescape
when the dooris opened!
WARNING!
If the appliance is switched off during a wash cycle, when switched
on again, please re-select the washing cycle and operate the dishwasher
according to the original Power-on state ).
Switch on the appliance
Press the Power switch button to switch on the appliance, Open the door.
1.Press the start/pause button to stop the machine.
2.Open the door.
3.Add the forgotten dishes.
4.Close the door, then press the start/pause button, the dishwasher will
start running again.
1. A running cycle can only be modified if it has been running for a short time. Otherwise the detergent
may have already been released and the water already drained. If this is the case, the detergent
dispenser must be refilled.
2. Press the Start/Pause button ,then press the program button more than 3 seconds to cancel the
running program.
3. Select a new program.
4. Restart the dishwasher.

3.Operation Instruction3.Operation Instruction
before using it for the first time.
To get the best performance from your dishwasher, read all operating instructions
IMPORTANTIMPORTANT
Control PanelControl PanelControl PanelControl Panel
11
1.On/Off Button: To turn on/off the power supply.
2. Strong Wash function Button :improve the cleaning
efficiency(only Intensive, Heavy, ECO, Glass and
90 min have this function)
5.Display screen: to show the reminding time,program
error code , Rinse Aid indicator etc
4.Alt Button: Dualzone wash function,press the button
to select either upper basket or lower basket loaded.
3.Extra Drying function Button : improve the drying
efficiency(only Intensive, Heavy,, ECO, Glass and
90 min have this function )
7.Delay Button:Press the button to increase dealay time
Dishwasher FeaturesDishwasher Features
33
223344556677991010
88
10.Start /Pause button: To start the selected
washing program or pause the washing program
when the machine is working..
6.Program Button :To Press the button toselect
8.Child lock button: press the two buttons
simultaneously to lock the button
for 3 seconds
9.Delay Button:Press the button todecrease dealay time
Faucet is not open
Rinse detergent need to be refilled
Child lock
10 11
Back View
1
2
3
4
5
6
8
89
Front view
Lower basket
Dispenser
Cup shelf
Spray arms
Filter assembly
Inlet pipe connector
Drain pipe
Upper basket
Cutlery rack
Topspray arm
1Inner pipe
5
6
7
8
9
10
11
3
2
4
7
And the response indicator will light

Before using your dishwasher for the first time:
A. Fill the rinse aid dispenser
B. Detergent
A. Fill the Rinse Aid DispenserA. Fill the Rinse Aid Dispenser
The rinse aid is released during the final rinse to prevent water from forming droplets on your dishes, which can
leave spots and streaks. It also improves drying by allowing water to roll off the dishes. Your dishwasher is
designed to use liquid rinse aids. The rinse aid dispenser is located inside the door next to the detergent dispenser.
To fill the dispenser, open the cap and pour the rinse aid into the dispenser until the level indicator turns completely
black. The volume of the rinse aid container is about 110ml.
Rinse AidDispenser
Functionof Rinse Aid
Rinse aid is automatically added during the last rinse, ensuring thorough rinsing, and spot and streak free drying.
Attention!
Only use branded rinse aid for dishwasher. Never fill the rinse aid dispenser with any other substances
(e.g. Dishwasher cleaning agent, liquid detergent). This would damage the appliance.
As the rinse aid diminishes, the size of the black dot
on the rinse aid level indicator changes, as illustrated below.
Full
3 / 4 ful l
1 / 2 ful l
1 / 4 full - Should refill to eliminate spotting
Empty
Whento Refill theRinse AidDispenser
Unless the rinse-aidwarning light on the control panel is on, youcan always estimatethe amount from the color
of the opticallevel indicator "C "located next to the cap. When the rinse-aid containeris full, the indicator
will be fullydark. The size of the dark dot decreases as therinse-aid diminishes. You should never let
the rinse aidlevel be less than 1/4 full.
112233
C (Rinse-Aid indicator)C
To open the dispenser, turn the cap to the "open" (left) arrow and lift it out.
Carefully pour in the rinse-aid into its dispenser, whilst avoiding it to overflow.
Replace the cap by inserting it aligned with "open" arrow and turning it to the closed (right) arrow.
1
2
3
during the next wash. Don't forget to replace the cap before you close dishwasher door.
Clean up any rinse aid spilled while during filling with an absorbent cloth to avoid excessive foaming
NOTE:NOTE:
4. Prior to first time use
4

The chemical ingredients that compose the detergent are necessary to remove, crush and dispense all dirt out of the
dishwasher. Most of the commercial quality detergents are suitable for this purpose.
B. DetergentB. Detergent
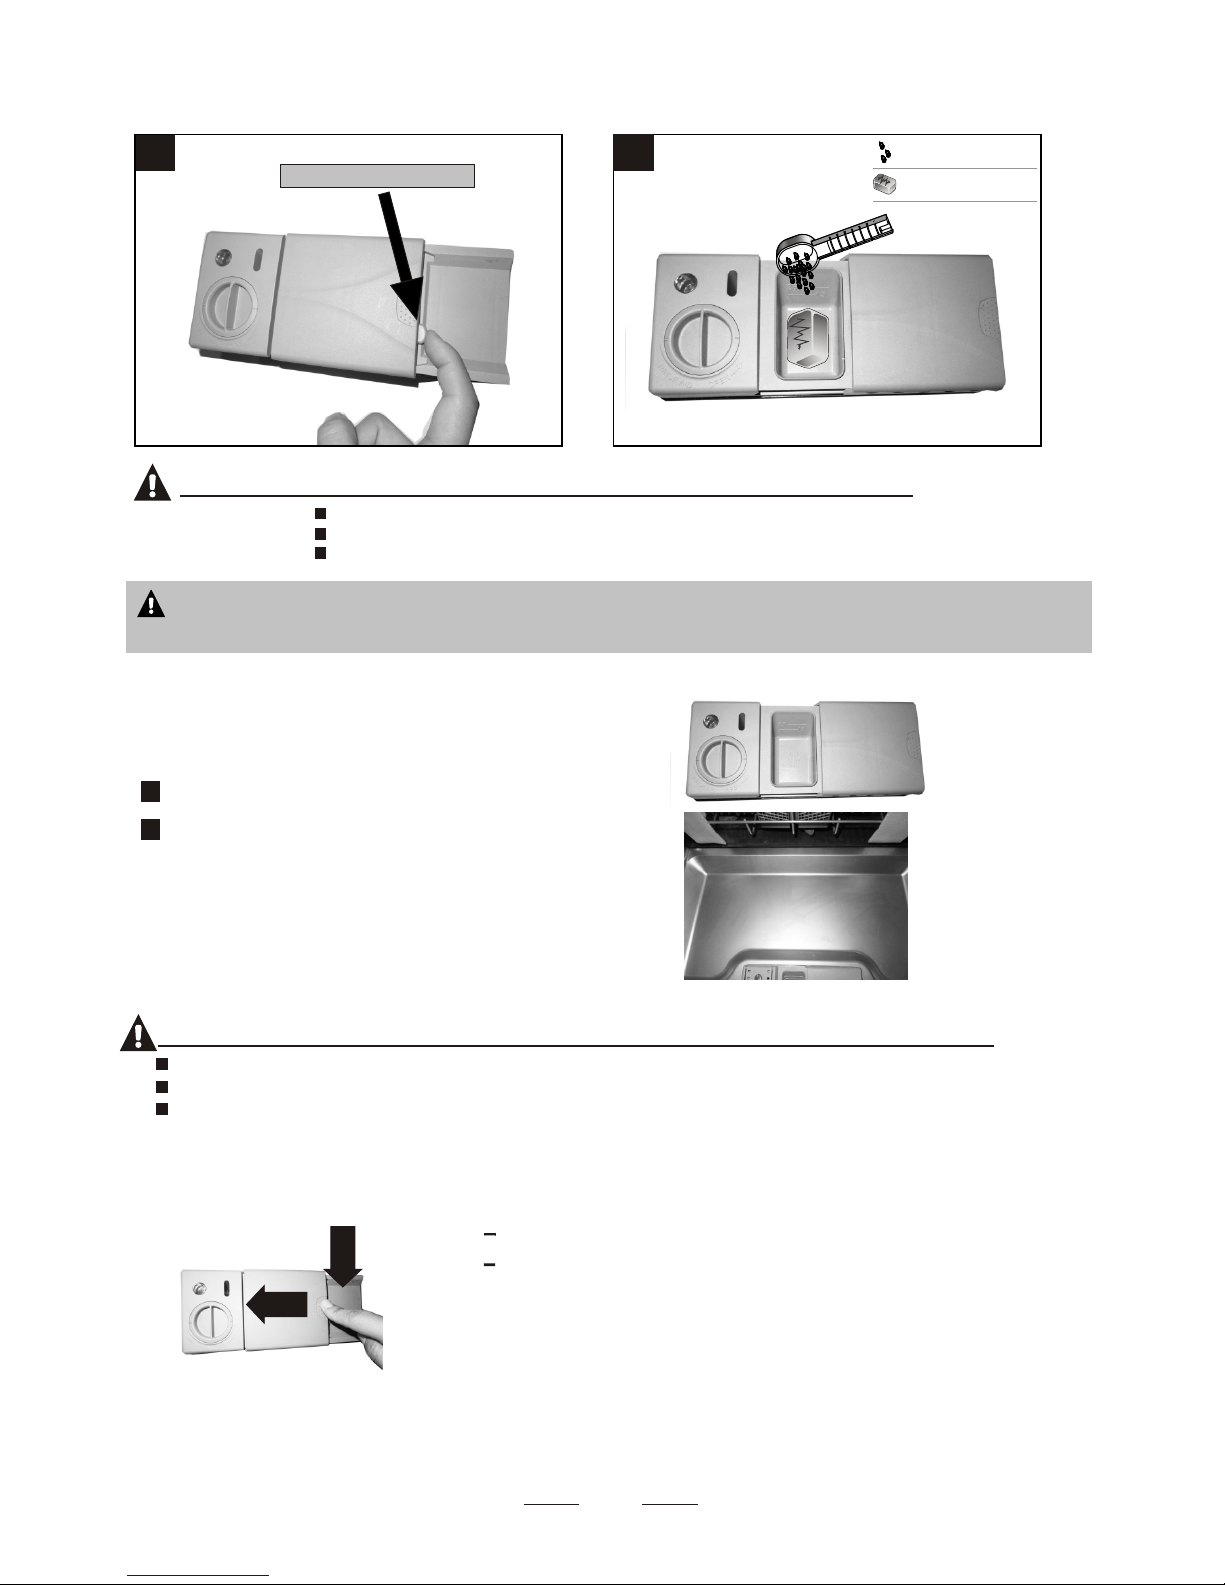
Proper Use of Detergent
Use only detergentspecifically made for the use in dishwashers. Keep your detergent fresh anddry.
Don't put powdereddetergent into the dispenser until you're ready to wash dishes.
Warning!
Based on theirchemical composition, detergentscan be split in two basic types:
Detergent tablets ofdifferent brands dissolve at different speeds. For this reasonsome
detergent tablets cannotdissolve and develop their full cleaning power during short
programs. Therefore please use longprograms when using detergent tablets, to
ensure the completeremoval of detergent residuals.
The dispenser mustbe refilled before the start of each wash cycle following the instructions
provided in the wash cycle table . Your dishwasher uses less detergent and rinse aid than
Conventional dishwasher. Generally, only one tablespoon of detergent is needed for
a normal wash load. More heavily soiled items need more detergent. Always add the
detergent just before starting the dishwasher, otherwise it could get damp and will not
dissolve properly.
Concentrated Detergent
Detergent Tablets
Detergent Dispenser
conventional, alkaline detergentswith caustic components
low alkaline concentrated detergents with natural enzymes
Normally new pulverised detergent is without phosphate. Thus the water softener function of
phosphate is notgiven. In this case we recommend to fill salt in thesalt container even when
the hardness ofwater is only 6 dH. If detergents without phosphate are used in thecase of hardwater
often white spotsappear on dishes and glasses. In this case pleaseadd more detergentto reach
better results. Detergentswithout chlorine do only bleach a little. Strong andcoloured spots will not
be removed completely. In this case please choose a program with a highertemperature.
Detergents
There are 3sorts of detergents
1.With phosphate and with chlorine
2.With phosphate andwithout chlorine
3.Without phosphate and without chlorine
5
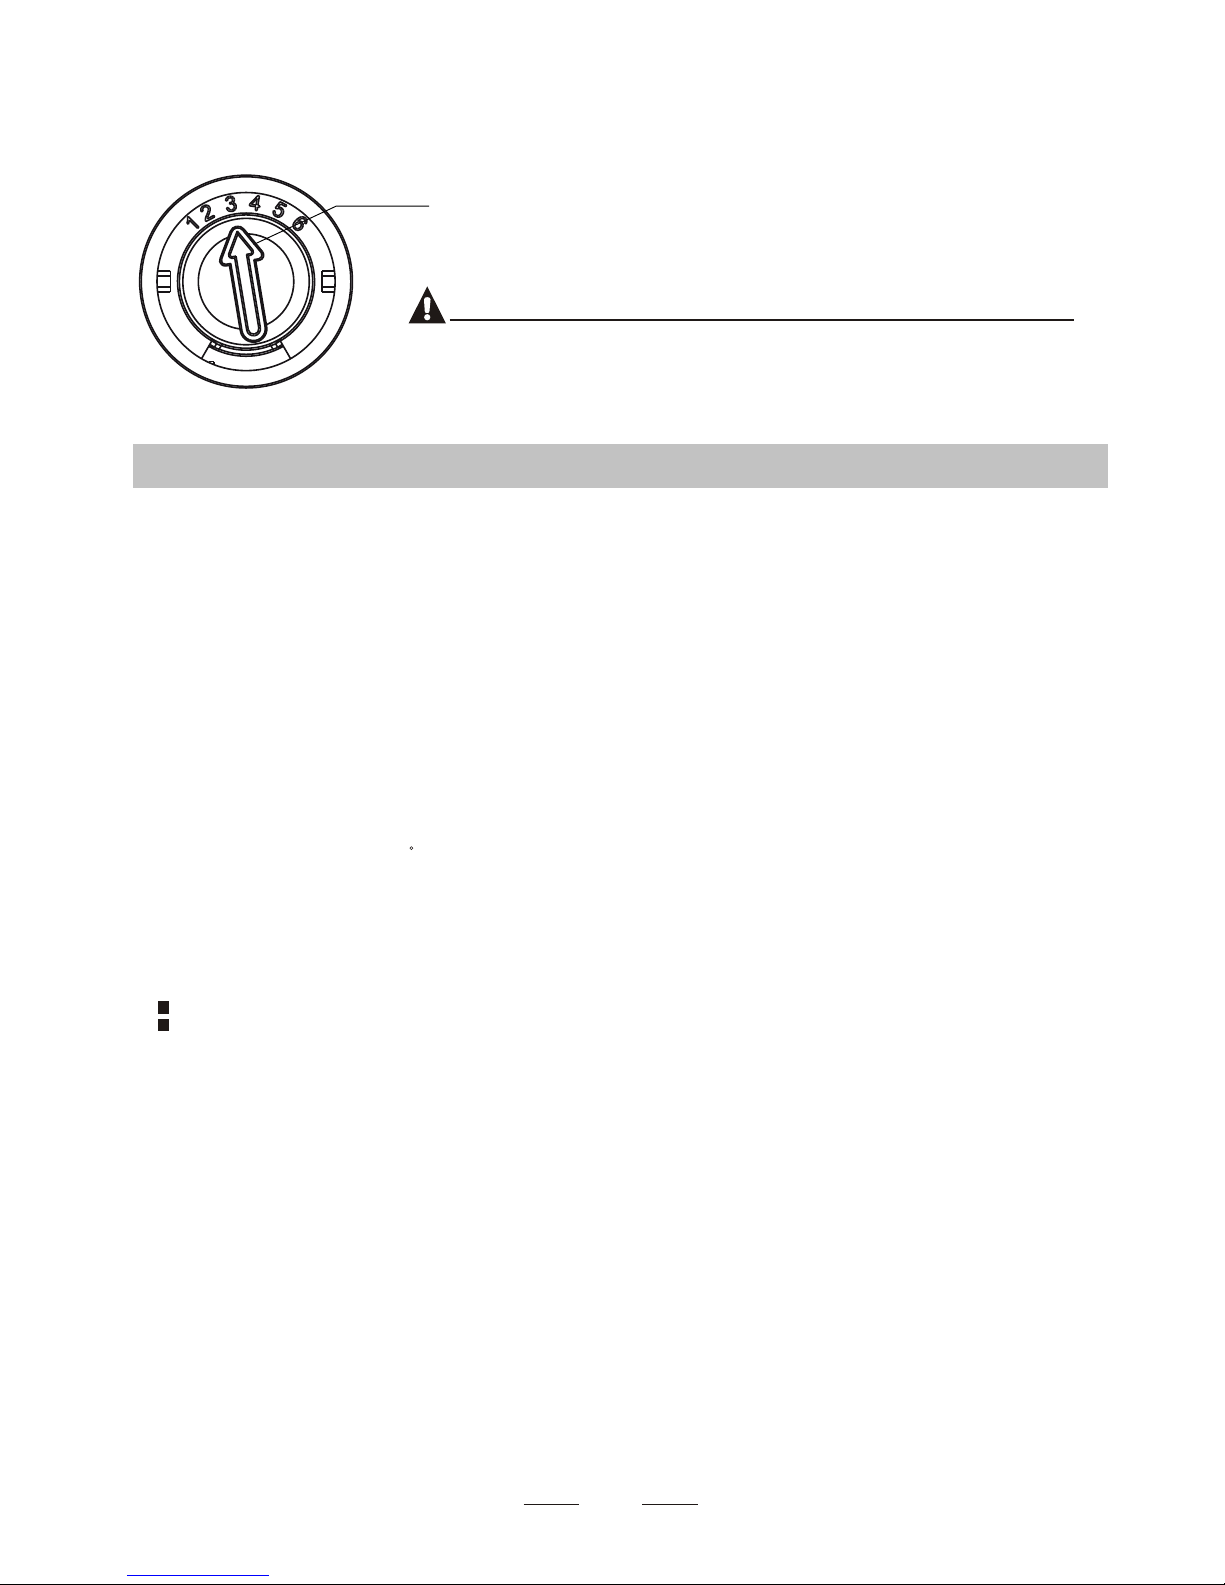
AdjustingRinse AidDispenser
The rinse aid dispenser has six settings. Always start with the dispenser
set on "3". If spots and poor drying are a problem, increase the amount of rinse
dishes still are not drying properly or are show spots, adjust the dial to the next
higher lever until your dishes are spot-free. The recommended setting is "3".
(Factory value is "3".)
Increase the dose if there are drops of water or lime spots on the dishes after washing.
Reduce it if there are sticky whitish stains on your dishes or a bluish film on glassware or
knife blades.
NOTE:NOTE:
Adjust lever
(Rinse)
Adjust lever
(Rinse)
aid dispensed by removing the dispenser lid and rotating the dial to "4". If the

Dishwasher detergent is corrosive!
Take care to keep it out of reach of children.
WARNING!WARNING!
Always add the detergent just before starting each wash cycle.
Only use branded detergent aid for dishwasher.
If the lid is closed: press release button. The lid will spring open.
NOTE:NOTE:
Amount of Detergent to Use
1122
Detergent tablet
Detergent powder
Press latch to openPress latch to open
Fill the detergentdispenser with detergent.
The marking indicates the dosing levels , as
illustrated on theright:
The place of main wash cycle detergent placed.
The place of pre-wash cycle detergent placed.
Please observe the manufacturers dosing and storage
Recommendations as stated on the detergent packaging.
Close the lid and press until it locks in place.
If the dishes are heavily soiled, place an additional
detergent dose inthe pre-wash detergent chamber. This detergent will take effect during the pre-wash phase.
A
B
Fill in Detergent
Please aware, thataccording to the level soiling and the specific hardness of water differences are possible.
Please observe themanufacturer's recommendations onthe detergent packaging.
NOTE:NOTE:
AA
Close the Detergent compartmentClose the Detergent compartment
compartment.Press down the lid (1) until it clicks shut (2).
If you are using detergent in tablet form, read the manufacturer
recommendations on the packaging in order to determine where the
If your dishes are only moderately dirt. You may be able to use less deterget
,
11
22
tablets should beplaced inside the dishwasher (e.g. In cutlery
basket, detergent compartment,etc).
Make sure that the lid on the detergent compartment is closed,
even if youare using tablets.
6
BB
You find information about the amount of detergent for the single programme
on page 9.

5.Loading the Dishwasher Baskets5.Loading the Dishwasher Baskets
For washing in the dishwasher the following cutlery/dishesFor washing in the dishwasher the following cutlery/dishes
Cutlery with wooden, horn china or
mother-of-pearl handles
Plastic items that are not heat resistant
Older cutlery with glued parts that are not
temperature resistant
Bonded cutlery items or dishes
Pewter or copperitems
Crystal glass
Steel items subject to rusting
Wooden platters
Items made from synthetic fibres
Some types ofglasses can become
dull after a large number of washes
Silver and aluminumparts have a
tendency to discolour during washing
Glazed patterns may fade if machine
washed frequently
Are not suitable Are of limited suitability
Dishes and items of cutlery must not lie inside one another, or cover each other.
To avoid damage to glasses, they must not touch.
Load large items which are most difficult to clean into the lower basket.
The upper basket is designed to hold more delicate and lighter dishware such as glasses, coffee
and tea cups
Long bladed knives stored in an upright position are a potential hazard!
Long and/or sharp items of cutlery such as carving knives must be positioned
horizontally in the upper basket.
Please do not overload your dishwasher. This is important for good results and for
reasonable consumption of energy.
Load hollow itemssuch as cups,glasses, pans etc.With the openingfacing downwards sothat
water cannot collect in the container or a deep base.
RecommendationRecommendation
Consider buying utensils which are identified as dishwasher-proof.
Use a mild detergent that is described as 'kind to dishes'. If necessary, seek further
information from the detergent manufacturers.
For particular items, select a program with as low a temperature as possible.
To prevent damage, do not take glass and cutlery out of the dishwasher immediately
after the programme has ended.
(For best performance of the dishwasher, follow these loading guidelines.
Features and appearanceof baskets and cutlery baskets may vary from your model.)
Scrape off any large amountsof leftover food. Soften remnants of burnt food in pans.
It is not necessary to rinse the dishes under running water.
Place objects inthe dishwasher in following way:
1.Items such as cups,glasses, pots/pans, etc. are faced downwards.
2.Curved items,or ones with recesses, should be loaded aslant sothat water canrun off.
3.All utensils are stacked securely and can not tip over.
4.All utensilsare placed in the way that the spray arms can rotate freely during washing.
NOTE:NOTE:
Very smallitems should not be washed in the dishwasher asthey could easilyfall out of the basket.
Attention before or after loading the Dishwasher BasketsAttention before or after loading the Dishwasher Baskets
Toprevent water dripping from the upper basket intothe lower basket, we recommend that you
empty the lowerbasket first and then the upper basket.
Removing the DishesRemoving the Dishes
77

88
The upper basketis designed to hold more delicate
and lighter dishware such as glasses, coffee and
tea cups and saucers, as well as plates, small bowls
and shallow pans(as long as they are not too dirty).
Position the dishes and cookware so that they will
not get moved by the spray of water.
Loading the Upper BasketLoading the Upper Basket
We suggest that you place large items and the most
difficult to clean items are to be placed into the lower
basket: such as pots, pans, lids, serving dishes and
bowls, as shownin the figure below. Itis preferable to
place serving dishesand lids on the side of the racks
in order toavoid blocking the rotation of the top spray
arm.
Loading the Lower BasketLoading the Lower Basket
Pots, serving bowls, etc, must always be placed top down.
Deep pots should be slanted to allow water to flow out.
Please be remindedthat:
The Bottom Basket features folding spikes so that larger or more pots and pans can be loaded.
The Method Loading Normal DishwareThe Method Loading Normal Dishware
IN IN
Folding Spikes of Lower Basket
For better stacking of potsand pans,
the spikes can be folded down as
show in thepicture right.
Folding back the cup shelves
For better stacking of potsand pans,
the spikes can be folded down as
show in thepicture right.
Cutlery should be placed in the cutlery rack separately
from each other in the appropriate positions, and do
make sure the utensils do not nest together, this may
cause bad performance.
Cutlery BasketCutlery Basket
For a top quality cleaning, place the silverware in the basket
making sure that:
For a top quality cleaning, place the silverware in the basket
making sure that:
They do not nest together.They do not nest together.
Silverware is placed with the male face up.Silverware is placed with the male face up.
Long utensils in the middle.Long utensils in the middle.
Adjusting the Upper Basket
The height of the upper basket can be adjusted in order to
create more space fo r large utensils b oth for the upper
/lower basket. The height of the upper basket can be
adjusted by lift up the basket for the upper position, and up
press the handle to lower the uppe r baske t, see the picture
below :

Intensive
Heavy
Rapid
33.75g
20g
To r i n s e d i s h e s t h a t y o u p l a n
to wash later that day
Soak
15 0.02 4.5
Means: need to fill rinse into the Rinse-Aid Dispenser.
()
For heavily soiled loads,
such as pots, plates, glasses
and lightly soiled pans.
For heaviest soiled crockery,
such as pots, pans,casserole
dishes and dishes that have
been sitting with dried food on
them for a while.
Ashorterwashforlightly
soiled loads that do not
need drying.
Prewash 50
Wash 60
Rinse
Rinse
Rinse 70
Drying
(℃)
(℃)
(℃)
Prewash(45 )
Wash (55 )
Rinse
Rinse (65 )
Drying
℃
℃
℃
Prewash
Wash (45 )
Rinse(45 )
Drying
℃
℃
Wash (45 )
Rinse
Rinse (55 )
℃
℃
(55 )℃
Wash 65
Rinse
Rinse (65 )
Drying
(℃)
℃
Prewash
(*AS/NZS 2007.1)
For normally soiled loads,
such as pots, plates, glasses
and lightly soiled pans.
standard daily cycle.
Glass
Pre-wash
wash(40 )
Rinse
Rinse(60 )
Drying
℃
℃
For lightly soiled crockery
and glass
11~ 15
0.9~1.3
150
Pre-wash (45 )
Autowash(45-55 )
Rinse
Rinse (65 )
Drying
℃
℃
℃
Auto sensing wash, lightly,
or heavily soiled crockery,
with or with out dried-on food
Auto
185
195
175
30
1.1
1.5
0.7
19
15
12.5
90 131.15
130
0.75
15
(1 piece)
5/28.75g
For lightly soiled
that need quick wash.
plates and
pans
(1 piece)
5/28.75g
5/28.75g
5/28.75g
(1 piece)
5/28.75g
(1 piece)
(1 piece)
(1 piece)
0.641 11.8

1010
When the working cycle has finished,the buzzer of the dishwasher will sound for 8seconds, then stop. Turn off
the appliance using the Power switchbutton, shut off the water supply andopen the door of the dishwasher.
Wait for a few minutes before unloading the dishwasher to avoid handling the dishes and utensils while they
are still hot and more susceptible to breakage. They will also dry better.
Switch Off the Dishwasher
The program light is on but is not blinking, only in this case the programme has ended.
1.Switch off the dishwasher by pressing the Power button.
2.Turn off the water tap!
Open the door carefully.
Hot dishes aresensitive to knocks. The dishes should therefore be allowed to cool down around 15minutes
before removing from the appliance.
Open the dishwasher'sdoor, leaveit ajar and wait a few minutes before removingthe dishes. Inthis way they
will be cooler and the drying will be improved.
Unloading the dishwasher
It is normal that the dishwasher is wet inside.
Empty the lowerbasket first and then the upper one. This will avoid water dripping from theupper Basket onto
the dishes in the lower one.
Change the ProgramChange the Program
Forgot to Add a DishForgot to Add a Dish
If you open the door during a wash cycle , the machine will pause. The LED display
will stop blinking and the buzzer will mooing every minute unless you close the door . After
you close the door ,the machine will keep on working after 10 seconds.
NOTE:NOTE:
At the end of the Wash CycleAt the end of the Wash Cycle
Premise:
Acycle that is underway can only be modified if it has only been running for a short time. Otherwise, the
detergent may have already been released, and the appliance may have already drained the wash water.
If this is the case, the detergent dispensermust be refilled (see the sectionentitled " Loading the
Detergent " ).
Press the Start/Pause button ,the machine willbe in standby state, press the program button more than
3s then you can change the program to the desired cycle setting (see the section entitled " Starting a wash
cycle " ).
1
2
A forgotten dish can be added any time before the detergent cup opens.
Add forgotten dishes.
Close the door
After the spray arms stop working,you can open the door
completely.
2
3
Open the door a little to stop the washing.
14
5
6
Press the Start/Pause button
Press the Start/Pause button, the dishwasher will run
after 10 seconds.
When you press the Start/Pause button to pause during washing, the LED display will
stop blinking and the dishwasher will mooing every minute unless you press the
Start/Pause button to start.
NOTE:NOTE:
WARNING!WARNING!
It is dangerous to open the door when washing,
because the hot water may scald you.

The filter preventslarger remnants of food or other objects from getting inside the pump.
The residues may block the filter, in this case they must be removed.
The filter system consists of a coarse filter,a flat (Main filter)
And a microfilter(Fine filter).
Food and soil particles trapped in this filter are pulverized by a
special jet on the lower spray arm and washed down to drain.
Larger items, such as pieces of bones or glass,that could block
the drain aretrapped in the coarse filter.To remove theitems
caught by the filter, gently squeeze the tap on the topof this
filter and liftout.
This filter holds soil and food residues in the sump area and
prevents it from being deposited on the dishes during wash cycle.
Main filter 1
Coarse filter2
Fine filter 3
2
3
1
Filter assembly
The filter efficiently removes food particles from the wash water, allowing it to be recycled during the cycle.
For best performanceand results, the filter must be cleaned regularly. For thisreason, it isa good ideato
remove the largerfood particles trapped in the filter after each wash cycle by rinsingthe semicircular filter and
cup under runningwater. Toremove the filter device, pull the cup handle in the upward direction.
WARNING!WARNING!
The dishwasher must never be used without the filters.
Improper replacement of the filter may reduce the performance level of the appliance
and damage dishes and utensils.
7.Maintenance and Cleaning7.Maintenance and Cleaning
Filtering SystemFiltering System
NOTE:NOTE:
When following this procedure from step1 to step 2, the filter system will be removed;
when following it from Step 2 to Step 1, the filter system will be installed.
1111
Step 1 Turn the filter in anti-clockwise direction,
Step 2 lift the filter assy up
1
2
OpenOpen

The control panel can be cleaned by using a lightly dampened cloth.
After cleaning, make sure to dry it thoroughly.
For the exterior, use a good appliance polish wax.
Never use sharp objects, scouring pads or harsh cleaners on any part of the dishwasher.
Protect AgainstFreezing
1.Cut off the electrical power to the dishwasher.
2.Turn off the water supply and disconnect the water inlet pipe from the water valve.
3.Drain thewater from the inlet pipe and water valve. (Use a pan to gather the water)
4.Reconnect the water inlet pipe to the water valve.
5.Remove thefilter at the bottom of the tub and usea sponge to soak up water in the sump.
please take frostprotection measures onthe dishwasher in winter. Every time after washing cycles,
please operate as follows
Caring for the DishwasherCaring for the Dishwasher
Cleaning the Filter
Cleaning the Door
Toclean the coarse filter and the fine filter, use a cleaning brush. Reassemble thefilter parts as shown in the figures
on the lastpage and reinsert the entire assembly in the dishwasher, positioning it in its seat and pressing downwards.
When cleaning the filters, don't knock on them. Otherwise, the filters could be
contorted and the performance of the dishwasher could be decreased.
WARNING!WARNING!
To clean the edge around the door, you should use only a soft warm, damp cloth.
To avoid penetration of water into the door lock and electrical components, do not
use a spray cleaner of any kind.
WARNING!WARNING!
Never use a spray cleaner to clean the door panel as it may damage the door lock
and electrical components.
Abrasive agents or some paper towels should not be used because of the risk of
scratching or leaving spots on the stainless steel surface.
Cleaning the Spray Arms
NOTE:NOTE:
If your dishwasher cannot work because of the ice,
please contact professional service persons.
It is necessaryto clean thespray arms regularly for hard
water chemicals willclog the spray arm jets and bearings.
- Inspect the filters for blocking after every time the dishwasher has been used.
- By unscrewing the coarse filter, you can remove thefilter system. Remove any food remnants and
clean the filters under running water.
Remarks:
The entire filter assembly should be cleaned once a week.
NOTE:NOTE:
To remove the lower spray arm, pull out the spray arm upward.
Toremove the upper spray arm, hold the nut, rotate the arm
clockwise to removeit.
Wash the arms in soapyand warm water and use a soft brush to
clean the jets. Replace them after rinsing them thoroughly.
1212
OpenOpen

1313
It is recommend that you run a wash cycle withthe
dishwasher empty andthen remove the plug fromthe
socket, turn off the water supply andleave the door of
the appliance slightlyopen. This will help the door
seals to last longer andprevent odours from forming
within the appliance.
If the appliance must be moved, try to keep it in the
vertical position. If absolutely necessary, it can be
positioned on its back.
One of thefactors that causeodours to form in the
dishwasher is foodthat remains trapped in the seals.
Periodic cleaning witha damp sponge will prevent this
from occurring.
Before cleaning orperforming maintenance, always
remove the plugfrom the socket.
To clean the exterior and rubber parts of the dishwasher,
do not use solvents or abrasive cleaning products.
Only use a cloth with warm soapy water.
Toremove spots or stains from the surface of the
interior, use a cloth dampened with water an a little
vinegar, or a cleaning product made specifically for
dishwashers.
Remove the Plug
No Solvents or Abrasive Cleaning
Moving the Appliance
Seals
How to Keep Your Dishwasher in Shape
After every wash,turn off the water supply to the
appliance and leave the door slightly open so that
moisture and odours are not trapped inside.
After Every Wash When not in Use for a LongTime
8.8.
Position the appliancein the desired location. The back should rest against the wall behind it, andthe sides,
along the adjacentcabinets or walls. The dishwasher is equippedwith water supply and drainhoses that can
be positioned eitherto the right or the left sides to facilitate proper installation.
Levelling the Appliance
Once the appliance is positioned for levelling, the height of the dishwasher
may be altered via adjustment of the screwing level of the feet.
Positioning the AppliancePositioning the Appliance
Electrical Requirements
Ensure the voltage and frequency of the power being corresponds to
those on the rating plate. Only insert the plug into an electrical socket which is earthed
properly. If the electrical socket to which the appliance must be connected is not
appropriate for the plug , replace the socket, rather than using a adaptors or the like as
they could cause overheating and burns.
Electrical Connection
Insure proper ground
exists before use
Please look at the rating label to know the rating voltage and connect the dishwasher to the appropriate power supply.
Use the required fuse 10 amp, time delay fuse or circuit breaker recommended and provide separate circuit serving
only this appliance.
About Power ConnectionAbout Power Connection
WARNING!WARNING!
For personal safety:
Do not use an extension cord or an adapter plug
with this appliance.
Do not, under any circumstances, cut or remove the
earthing
Connection from the power cord.

1414
Cold Water Connection
Connect the coldwater supply hose to a threaded 3/4(inch) connector and make sure
that it isfastened tightly in place.
If the waterpipes are new or have not been used foran extended periodof time, let the
water run tomake sure that the water is clear. This precaution is needed to avoidthe
risk of thewater inlet to be blocked and damage the appliance.
Please close the hydrant after using.
WARNING!WARNING!
Water ConnectionWater Connection
Drain hose Connection
Insert the drainhose into a drain pipe with a minimum diameterof 40mm, orlet it run into the sink, making sure to
avoid bending orcrimping it. The top of the hose must be less than1000mm.
MAX 1000mm
A
Counter
Front
Drain pipe
NOTE
The top of the hose
must be less than
1000mm.
40mm
B
PLEASE HANG UP THE DRAIN HOSE EITHER WAY OF A, BPLEASE HANG UP THE DRAIN HOSE EITHER WAY OF A, B

The following things should be checked before starting the dishwasher.
Start of DishwasherStart of Dishwasher
The content of this manual is very helpful to the users.
After installation, please make sure to keep this manual.
Attention:Attention:
1The dishwasher is level and fixed properly
2The inlet valve is open
3 Fill hose connections are fully tightened and not leaking
4The wires are tightly connected
5The power is switched on
6The inlet and drain hoses are knotted
7All packing materials and printings should be taken out from the dishwasher
Extension Hose
If you need a drain hose extension, make sure to use a similar drain hose.
It must be no longerthan 4 metres; otherwise the cleaning effect of the dishwasher couldbe reduced.
Water Outlet
Connect the waterdrain hose. The drain hose must be correctly fitted to avoid water leaks.
Ensure that the water drain hose is not kinked or squashed.
If the sinkis 1000 higher from the floor, the excess water in hoses cannot be draineddirectly
into the sink. It will be necessary to drain excess water from hoses into a bowl or suitable
container that isheld outside and lower than the sink.
How to Drain Excess Water From Hoses
Syphon Connection
The waste connectionmust be at a height less than 1000 mm(maximum) from the bottom of the dish.
The water drain hose should be fixed .

1616
9.Troubleshooting Tips9.Troubleshooting Tips
Problem Possible CausesWhat to Do
Fuse blown, or the
circuit breaker acted
Replace fuse or reset circuit breaker. Remove any other
appliances sharing the same circuit with the dishwasher
Suds in the tub
Spilled rinse-aid Always wipe up rinse-aid spills immediately.
Review the charts on the following pages may save you from calling for service.
White film on
inside surface
There are rust
stains on cutlery
Knocking noise
in the wash cabinet
Rattling noise
in the wash cabinet
Knocking noise
in the water pipes
Hard water minerals
The affected items are
not corrosion resistant.
The lid of the softer
is loose
A spray arm is
knocking against
an item in a basket
Items of crockery
are loose in the
wash cabinet
This may be caused
by on-site installation
or the cross-section of
the piping.
A programme was not
run after dishwasher
salt was added.
Traces of salt have
gotten into the wash cycle.
To clean the interior, use a damp sponge with
dishwasher detergent and wear rubber gloves.
Never use any other cleaner than dishwasher
detergent for the risk of foaming or suds.
Always run the quick wash programme .
without any crockery in the dishwasher and
without selecting the Turbo function (if present),
after adding dishwasher salt.
Check the lip .Ensure the fix is fine.
Interrupt the programme, and rearrange the items
which are obstructing the spray arm.
Interrupt the programme,
and rearrange the items of crockery.
This has no influence on the dishwasher function.
if in doubt, contact a suitably qualified plumber.
Stained tub interior
Detergent with
colourant was used
Make sure that the detergent is the one without
colourant.
Improper detergent
Dishwasher doesn't
start
Make sure the dishwasher is turned on and the door is
closed securely.
Check that the water supply is connected properly and
the water is turned on.
Make sure to close the door properly and latch it.
Make sure the power cord is properly plugged into the
wall socket.
Power supply is not
turned on
Water pressure is low
Door of dishwasher
not properly closed.
water not pumped
from dishwasher
Kink in drain hose
Filter clogged
Kitchen sink clogged
Check drain hose.
Check the coarse filter
(see section titled " Cleaning The Filter ")
Check the kitchen sink to make sure it is draining well.
If the problem is the kitchen sink not draining ,you may
need a plumber rather than a serviceman for dishwashers.
Before Calling for ServiceBefore Calling for Service
Technical
problems
General
problems
Noise
Use only the special dishwasher detergent to avoid suds.
If this occurs, open the dishwasher and let suds evaporate.
Add 1 gallon of cold water to the tub. Close and latch the
dishwasher, then select any cycle. Dishwasher will drain
out the water at the first step.Open the door after draining
is stop and check if the suds is disappeared.
Repeat if necessary.
Table of contents
Other ILVE Dishwasher manuals