Image Dynamics USA XS65 User manual

IMAGE DYNAMICS USALIMITED WARRANTY
C A UT IO N:
THESE PROD UCTS ARE CAPABLE OF V ERY HIGH S OUND
PRESSURE L EVELS. PROLONGE D EXP OSURE T O S OUND
PRESSURE L EVELS IN EXCESS OF 100DB CAN CAUSE
PE RMANENT H EARING LOSS . P LE ASE LI STEN U SING CO MMON
SE NS E AND RE STRAI NT
IMAGE DYNA MICS USA warrants th is product is fre e fro m defects in
m ate ria l an d wo r kma nsh ip fo r a pe ri o d o f 1 ( o ne) year f ro m da te of or igi n al
pu r chase w h en i nsta lle d by an a uth or ized r eta i le r o r i n a re tai ler a pp ro ved
installation, this must be in dicated in writing on the ori ginal sales receipt .
Ni net y ( 90) d ay s if no t i nsta l le d b y a n a uth or ized de al er o r in a n
au th or ize d re ta i ler appr o ved insta ll a tion.
Thi s w arr an ty is not tr an sfer ab le a nd ap pl ies on ly to the or igi na l re tail
pu r chase r of th e pro du ct fr om an aut ho ri zed IM AGE DYNA MI CS U SA
Retailer. Upon inspection by Image Dynamics USA should service be
necessary under this warranty for any reason due to manufacturing
de fe cts IM AG E DYNAM IC S will, at it s sol e di scret io n, re pa ir or r ep la ce the
defectiveprodu ctwith new or re-manufacturedproduct atnocharge.
This warrantyis limited and does not coverclaims fordamage caused by
misuse, abuse, neglect, alteration, or burnt or overheated voice coils,
normal wear and tear, a nd is limited to material failure s or defects a rising
du r in g norm al u se in a de al e r app r oved inst all ation .
All warranty returns should be sent to IMAGE DYNAMICS USA freight
pr e paid th ro ug h an a uth or ized IM AG E DY NA MI CS U S A re tailer and m ust
be acco mp an i e d by pr oo f of pu rch as e (a c op y of th e o rig in al sa le s
receipt).Direct returns from consumers or non-authorized retailerswillbe
r efu s ed un le s s spe cif ic a l ly a uth or i zed by IM AGE DY NAM IC S U SA
cust omer servi ce with a valid return authorizatio n num ber.This warranty
do es no t c o ver th e co st o f re mo ving or r ein stal lin g the s p eake r s.
No other warra ntiesare expressed or implied.
In noeventwill IMAGE DYNAMICS be liable for incidental,consequential,
or o th er da m ag es r esu lting fr om th e us e of th is pr od uct, th is incl ud es but is
not limited to, damage to hearing, property or person, damage based
upon inconvenience or on loss of use of the product, and, to the extent
pe r mitte d by l a w, dam a ges for p er so nal in j ury.
This warranty gives you specific legal rights, and yo u may have other
rights, which vary from state to state. This warranty applies to products
sold an d used i n the U nite d St ate s of Am er ic a . I n a l l oth er co unt rie s,
con tact your distr ibu tor . If you ha ve an y qu esti on s pl ea se co nta ct
customer service @951-281-2000.
All warr anty r eturns must be package d in original re tail packaging
and b e a cc o mpanied by a cop y o f the orig in al sal es re ce ipt .
Products dam aged in shi pment due to improper packaging will not
be covered under this warranty.
Image Dynamics USA Ph. 951-281-2000 Fax 951-281-2020
620-C S. Magnolia Ave. Ontario, CA 91762
www.imagedynamicsusa.com
If you are not an experienced installer it is advised that you have your authorized Image Dynamics dealer
complete the installation for you. Follow these simple guidelines for best results.
Carefully plan out your installation before beginning. Check for proper clearance and depth before cutting
or altering your vehicle in any way.
It is recommended to run new wires into the door location rather than using the factory systems wiring.
Mount speakers only to a flat and rigid baffle. A baffle that vibrates or resonates will severely degrade
sound quality.
Ensure that the speakers are protected from water damage. Most parts of the XS speakers are water
resistant but prolonged exposure to moisture can damage the spider and motor structure.
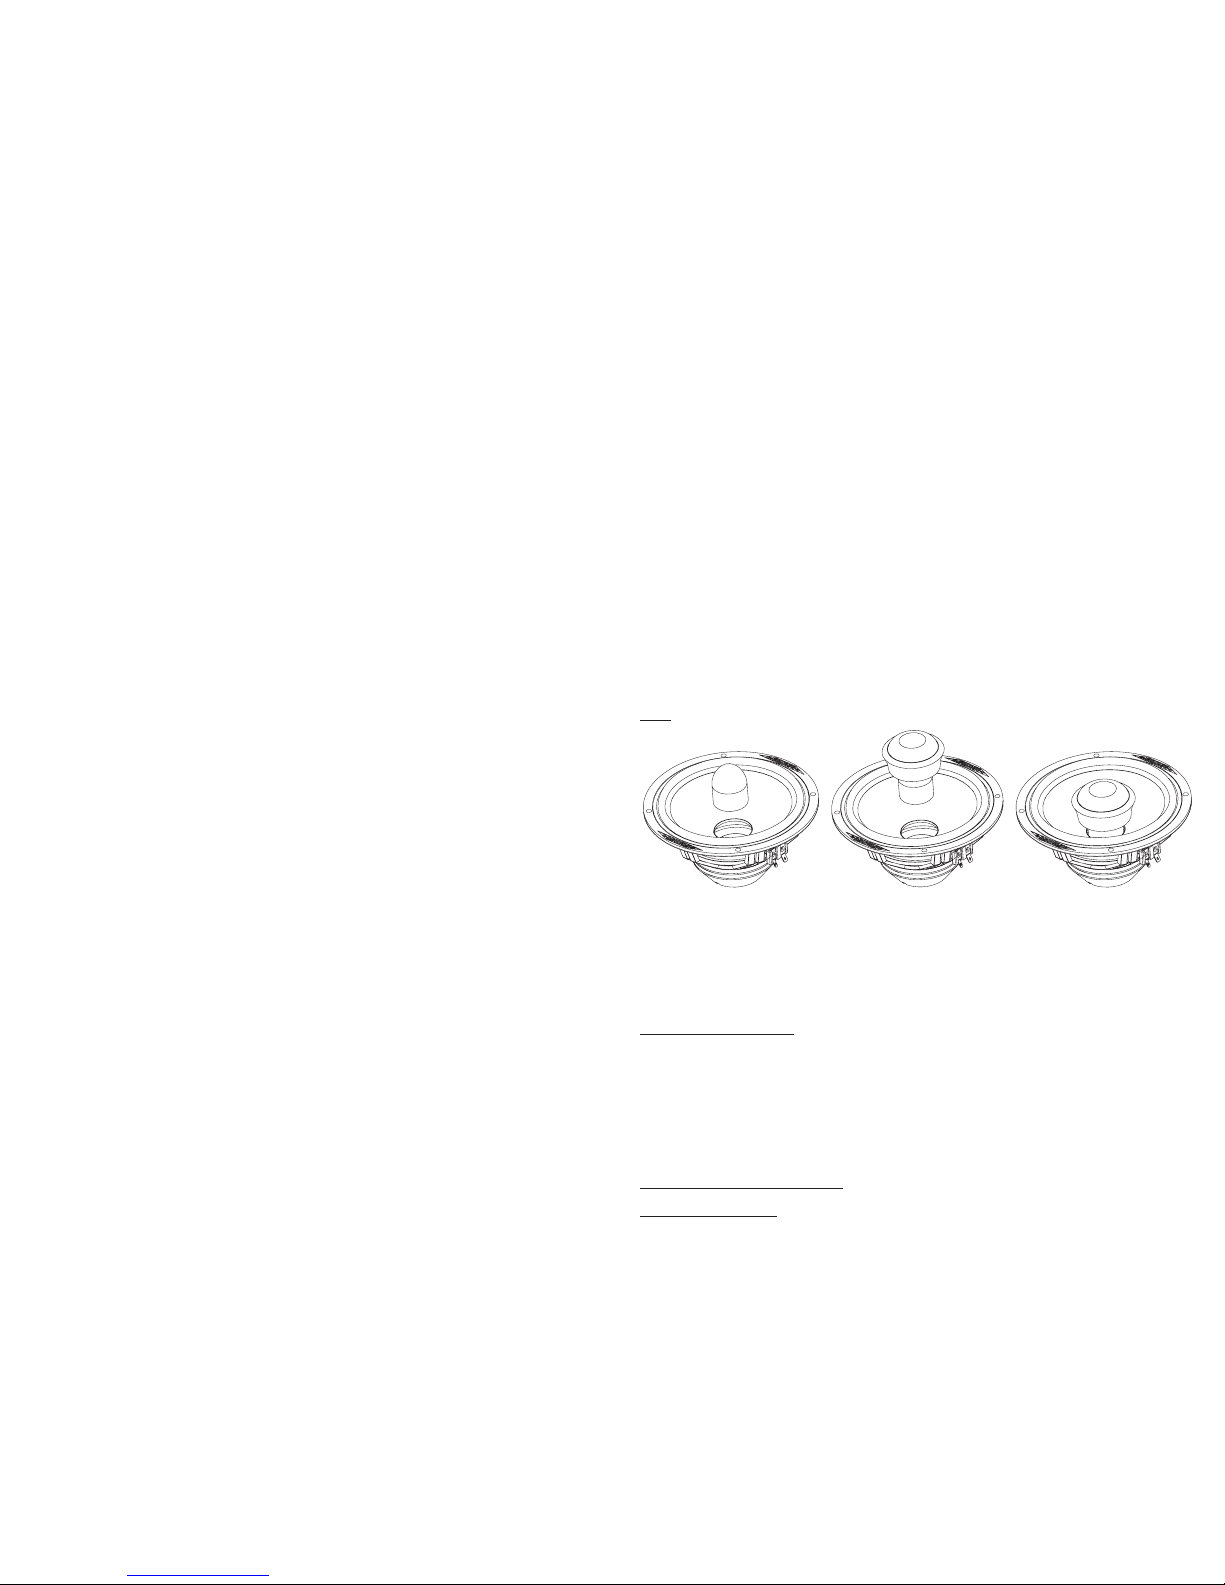
POINT SOURCE TWEETER MOUNTING INSTRUCTIONS
Step 1
Step 2
Step 3
Step 4
Step 5
Step 6
Step
- Remove phase plug by twisting ins counter clockwise direction to un-screw it from the
pole piece of the speaker.
- Remove tweeter flush mount trim ring and replace with coaxial mounted trim ring.
- Mount tweeter to tweeter stand. Slide tweeter wire through the center hole in the black
tweeter adapter stand and screw threads of the adapter into threads on the rear of the tweeter
- Remove the rear magnetic label from the mid-bass speaker and save for re-
assembly.
- Insert wire through hole in pole piece of the XS mid-bass and screw the tweeter
assembly into the threads in the top of the mid-bass driver pole piece. Make sure to tighten
snugly to prevent vibrations but do not over tighten.
- Route the tweeter wires in the groove up to the terminal on the side of the basket and
connect the copper colored wire to the positive terminal and the silver colored wire to the
negative terminal.
- Replace the rear magnetic label.
: To remove tweeter from XS mid perform above steps in reverse order
-
Note .
CROSSOVER CONNECTIONS AND OPERATION
The connections to the crossover are simple. It is suggested to use a high quality 14 gauge or larger
speaker wire for the connection to the amplifier and the mid-bass driver. For the tweeter it is
recommended that a high quality 16 gauge or larger speaker wire be used. The actual connections to the
crossover can be made two ways, 1- strip the wire back approx .25” and insert into terminal block and
tighten, 2- Crimp or solder a terminal to the end of the wire and insert into terminal block and tighten.
The XS crossovers are equipped with multiple adjustments for tailoring the sound output to compensate
for different mounting locations and acoustic environments.Adjustments are as follows:
TWEETER FILTER- This jumper allows you to adjust the filter slope between second order to first order.
TWEETER CONTOUR- These two jumpers allow you to vary the crossover frequency and output level of
the tweeter.
MID-BASS CONTROL- This jumper allows you to select a low pass filter or to bypass the low pass filter.
Tweeter Filter set to 2nd, Tweeter contour set to 6.0uF and +3 dB,
Mid-Bass control set to low-pass.
- Tweeter filter set to 1 st, Tweeter contour set to 4.7 uF and 0 dB, Mid-Bass set
to all pass.
CROSSOVER CONTROLS
Suggested settings:
Tweeter mounted near or on mid-bass
Tweeter mounted up high
GENERAL DESCRIPTION
The XS Interchangeable component speakers are a unique and innovative speaker that
allows you to optimize the mounting options to work best with your installation. They offer you
the choice of point source separates with the tweeter mounted on the midrange’s pole piece
or a pair of conventional separates with the tweeter mounted separately. The phase plug is
easily removed by un-threading it from the pole piece. The adapter and tweeter are then
screwed together and installed in place of the phase plug.
MOUNTING LOCATION
SOUND STAGING
ENCLOSURE CONSIDERATIONS
Choosing the proper mounting location can have a very dramatic effect on the overall sound
quality achieved. There are several factors that will affect your decision on where and how to mount the
XS separates, such as installation difficulty or cost, cosmetic integration, and/or effect on sound quality.
Part of this decision will be whether to mount the drivers separately or as a point source. In most instances
the best results will be attained when using the XS separates as a point source driver or with the tweeter
mounted within a few inches of the mid-bass driver. In certain instances where the tweeter will be
extremely off axis, the sound quality can be improved by mounting the tweeter separately and aiming it
towards the listeners . Always mount the tweeter as close to the midrange driver as possible.
To achieve the best sound staging and imaging it is necessary to keep the path length
difference between the left and right speakers as small as possible, this usually means mounting the
drivers as far from the listening position in the front of the vehicle as possible. The most logical is the kick
panel as this mounting location yields the least amount of path length difference. The only drawback is it
requires custom installation which results in a more expensive or time consuming installation. The
second most logical location is low and far forward in the door, this can be done behind factory grills or in a
custom fabricated speaker pod. The simplest and most cost effective mounting location is to utilize
speaker mounting locations provided by the vehicle manufacturer. The factory locations may not provide
a proper sound stage, but can yield very satisfying results in tonal quality.
The XS mid-bass drivers are high performance drivers that provide dynamic mid-bass output
and detailed midrange response. They are designed and engineered to perform excellently when used
infinite baffle or free-air in a door or other location.
Warning: Before settling on any given mounting location check for proper rear clearance and that
there are no mechanical structures that prevent proper mounting.
INSTALLATION AND MOUNTING INSTRUCTIONS
INSTALLATION INSTRUCTIONS
Tweeter level
Other Image Dynamics USA Speakers System manuals


