02
7. Getting started
8. cleaning and disinfection
9. How long can I store breast milk ?
10. How do I thaw and use stored breast milk?
11. Troubleshooting
12. Use and Storage environment
13. Specifications
14. Limited Warranty
15. EMC
03 04
1. Important Safeguards
05 06
2. Important Symbols
Warnings and Precautions
When using electrical products, especially when children are present,
basic safety precautions should always be followed.
① This device is a single-user product. To prevent cross contamination, please do not share the breast pump.
② If you are a mother who is infected with Hepatitis B, Hepatitis C or Human Immunodeficiency Virus (HIV),
pumping breast milk will not reduce or remove the risk of transmitting the virus to your baby through
your breast milk.
③ Before each use visually inspect the individual components for cracks, chips, tears, discoloration or
deterioration. In the event that damage to the device is observed, please discontinue use until the parts have
been replaced.
④ Use of this equipment adjacent to or stacked with other equipment should be avoided because it could result
in improper operation. If such use is necessary, this equipment and the other equipment should be observed
to verify that they are operating normally
⑤ Use of accessories, transducers and cables other than those specified or provided by the manufacturer of
this equipment could result in increased electromagnetic emissions or decreased electromagnetic immunity
of this equipment and result in improper operation
⑥ Portable RF communications equipment (including peripherals such as antenna cables and external antennas)
should be used no closer than 30 cm (12 inches) to any part of the imani i2 Plus breast pump, including cables
specified by the manufacturer. Otherwise, degradation of the performance of this equipment could result.
⑦ pregnant women should not use the breast pump, as pumping can induce contractions or premature labor
⑧ If the power adapter casing or wiring becomes loose, separated, or frayed, stop use of the power adapter
immediately and contact the device manufacturer. Stop using the device immediately if you note any smoke
or burning from the pump unit or power adapter.
READ ALL INSTRUCTIONS BEFORE USING.
When using electrical products, basic safety precautions should always be followed
NOTE : Before using imani i2 Plus pump for the first time, it needs to be charged Note that
the pump will not operate during charging.
If you feel pain or discomfort in your breast or nipple, turn the pump off and remove it from
your breast. (Suction can be broken by inserting finger between the breast and breast shield
or by shutting the pump off) Consult your healthcare professional or IBCLC
To reduce the risk of electrocution :
① DO NOT USE WHILE BATHING.
② DO NOT PLACE OR STORE PRODUCT WHERE IT CAN FALL OR BE PULLED.
③ DO NOT PLACE IN OR DROP INTO WATER OR OTHER LIQUOD.
④ DO NOT REACH FOR A PRODUCT THAT HAS FALLEN INTO WATER, UNPLUG THE PRODUCT
IMMEDIATELY.
⑤ DO NOT DISINFECT THE KIT IN MICROWAVE OVEN, NEVER IMMERSE MAIN BODY IN WATER
To reduce the risk of burns, electrocution, fire, or injury to persons :
①THIS PRODUCT SHOULD NEVER BE LEFT UNATTENDED WHEN PLUGED IN.
②CLOSE SUPERVISTION IN NECESSARY WHEN THIS PRODUCT IS USED NEAR INFANTS OR CHILDREN.
③USE THIS PRODUCT ONLY FOR ITS INTENDED USE AS DESCRIBED IN THIS MANUAL.
DO NOT USE ATTACHMENTS NOT RECOMMENDED BY THE imani CO.
④ONLY USE imani MANUFACTURED PARTS WITH imani PUMP, INCLUDING THE CHARGING CABLE,
DO NOT SUBSTITUTE
⑤IT IS RECOMMENDED TO USE AN ADAPTOR COMPATIBLE WITH IEC 60601-1 AND WITH YOUR REGIONAL
POWER SOURCE
⑥NEVER USE WHILE SLEEPING OR DROWSY.
⑦DO NOT USE OUTDOORS OR OPERATE WHERE AEROSOL SPRAY. PRODUCTS ARE BEING USED OR
WHERE OXYGEN IS BEING ADMINISTERED.
⑧DO NOT DROP OR INSERT ANY FOREIGN OBJECT INTO ANY OPENINGS ON THE PRODUCT AND ALWAYS
CLOSE THE CHARGING CAP AFTER CHARGING
⑨DO NOT DISASSEMBLE OR MODIFY THE PRODUCT.
⑩DO NOT INHALE OR SWALLOW SMALL PARTS
⑪ALLERGIC REACTIONS MAY OCCUR
⑫imani PUMP WILL NOT WORK WHEN CONNECTED TO THE CHARGER, ALWAYS DISCONNECT
imani PUMP FROM THE CHARGER AND CLOSE THE CHARGING CAP BEFORE USING
⑬BE CAREFUL NOT TO GET STRANGLED BY THE CHARGING CABLE. MAY CAYSE THE RISK
OF SUFFOCATION
3. Indication for use
The imani i2 Plus breast pump is a powered breast pump to be used by lactating women to
express and collect milk from their breast. The i2 Plus Breast Pump is a single user device.
4. Components and Assembly
07 08
09 10
11 12
17 18
Before using imani-series breast pump for the first time, sanitize the Hands-free Cup Set
(not the Main Body or Charging Cable) in boiling water for 3-5 minutes.
Note: Parts may bend and warp if left in boiling water for more than 5 minutes.
Included in box :
User manual x 1
Main Body / User manual / Hands-free Cup Set (With 1 charging cable)
Main Body x 1 Charging Cable x 1
Purpose of use
- To express and collect breast milk conveniently and efficiently
- For busy moms in need of a completely mobile, hands-free pumping option
- For breastfeeding moms that have to be apart from their baby for any length of time
- When a latch or nursing at the breast are difficult or uncomfortable, this versatile, mobile pump
supports a successful breastfeeding journey
Connector x 1Protector x 1Valve x 1 Collection Cup x 1
Insert
x 1 Funnel x 1
i2 Plus
Handsfree Cup Set
Warning: These pump kits are designed for a single user and should not be shared.
NOTE : Do not boil for more than 5 minutes, as parts may become warped.
Handling condition
Ambient temperature Relative humidity Atmospheric pressure (kPa)
60℃
140°F
-20℃
-4°F
90%
15% 70
106
How to deal with backflow
- imani Co. is not responsible for breast milk backflow when the subject device is not used
with the hands-free cup set.
- If you notice breast milk backflow, please stop using the breast pump immediately,
detach the hands-free cup set, and remove the breast milk backflow protector.
- Please refer to page 23, “How to clean” for the instructions to remove breast milk Protector.
※If you are unable to pump within the above mentioned appropriate conditions,
please stop use of pump immediately.
Assembly instruction
①Wash your hands with soap and water and and dry hands before assembly.
②Please ensure that the breast is clean of debris before use.
③ Please ensure all parts of the hands-free cup set are cleaned or sterilized, and dried.
④ Please assemble the hands-free cup set as instructed on pages 9-10.
⑤ Please connect the main body with the hands-free cup set as instructed on page 11.
※ How to disassemble after use
First, disconnect the Main Body from the Hands-free cup.
Remove the Breast Shield from the cup and detach the Valve Base from the shield.
Disconnect the Valve and the Backflow Protector from the Valve Base.
※ Precaution
Prior to first use, please sterilize all parts except the main body in boiling water.
Bring water to a boil, turn off the heat and then submerge accessories in boiling water.
Remove accessories after 3-5 minutes.
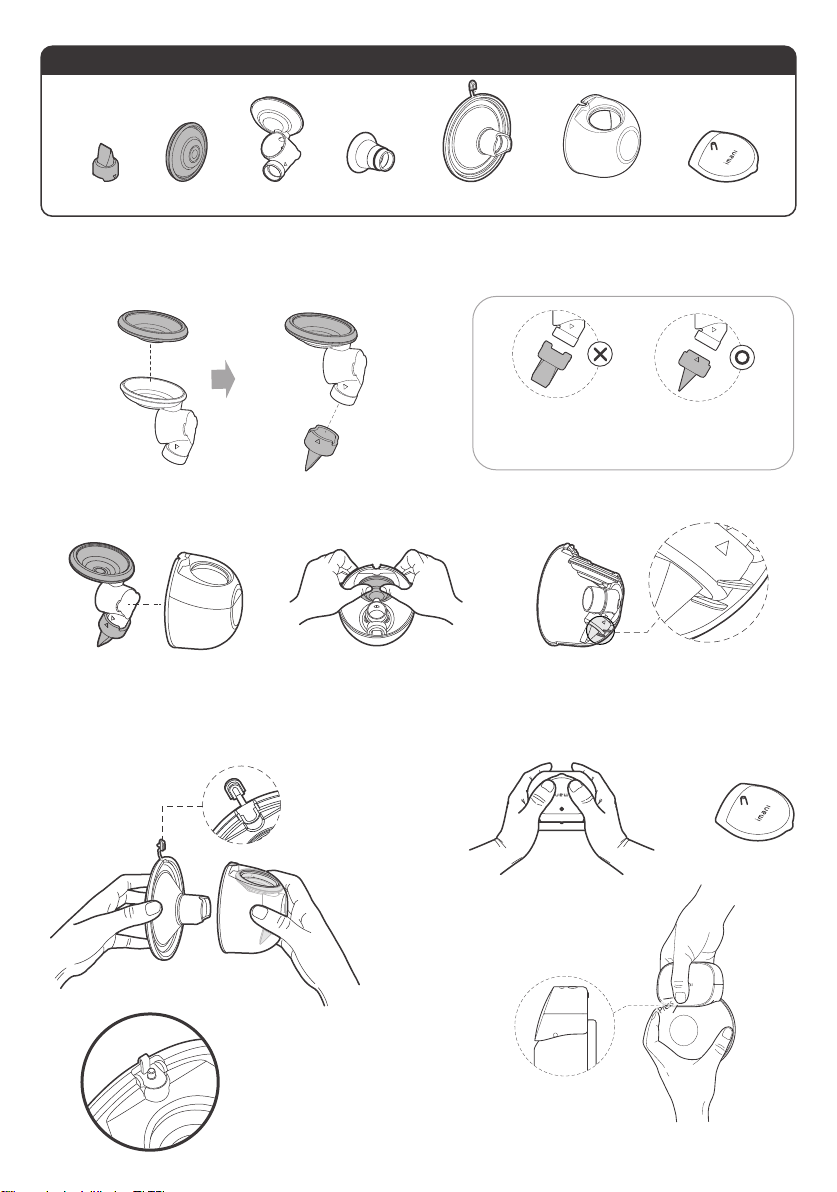
Assemble the parts
How to assemble the Hands-free Cup Set: ① Assemble the Connector
※When assembling the Connector
and Valve, please align them in the
correct position as outlined above.
How to assemble the Hands-free Cup Set: ② Assemble the Breast Shield How to assemble the Hands-free Cup Set: ③ Assemble the Collection Cup
How to assemble the Main Body + Hands-free Cup Set
Please complete assembly in the following order (①, ②)
※ Before connecting the Hands-free Cup Set, please confirm
that there is a silicone ring at the bottom of Main Body.
13 14
15 16
imani i2Plus How to wear
Step 1)
Center
the Breast Shield
around the nipple.
Step 2)
Press the Breast Shield
to the breast to create a
seal between
the shield and breast.
Step 3)
hold
the Shield in place
with your hand.
Step 4)
Power Main Body on
and begin expressing
breast milk after
the pump is sealed
on the breast.
Functions of Control Panel
2) PUMP : Breast Pump Mode
3) MASSAGE: Massage Mode
- Turn the power ON/OFF
- Standby Mode when press the powerbutton
- If you press the button during Breast PumpingMode,
it’s temporarily paused
- If you press the button during temporary pause, it goes on to
Breast Pumping Mode
- Save the past history (When re-operate, it starts from previous
settings)
- If you press the button during Massage Mode, it’s temporarily paused
- If you press the button during temporary pause, it goes on to
Massage Mode
- Save the past history(When re-operate, it starts from previous
settings)
1) POWER : ON/OFF
※This product turns off after 20 minutes automatically.
- Massage Mode Pressure : 5 Level(50~150mmHg)
- Breast Pumping Mode Pressure : 5 Level(80`~270mmHg)
4) Set the pressure for the breast pumping/massage
19 20
21 22
Battery fault:
If the LCD battery level indicator is off and the pump it not working, it is likely due to battery
failure. If the battery fails, the breast pump can no longer be charged or run.
The battery cannot be repaired by the user. Please contact the seller for battery replacement
of repair.
① After assembling the Hands-free Cup Set (Refer to p.9-10), connect with Main Body
(p.11)
② Please center Breast Shield over your nipple correctly (p.12-13) and wear device in bra.
③ After positioning the device against skin, please press the power button to turn on.
④ Adjust the suction level gradually (p. 15-16) and begin expressing milk.
(After operating Massage Mode for about 3-5 minutes, you can switch to Expression Mode
and gently express breast milk.)
⑤ When you finish expressing milk, do not immediately pull Hands-free Cup Set from your skin
since it adheres to your skin with the seal from the suction.
Turn off the power and slide your finger between your chest and Breast Shield to break the
seal. Then, slowly remove device.
How to operate
Tips
- Begin pumping from low suction and then gradually increase the suction to highest comfort
level. Adjust the suction and speed of pump as needed.
- Generally, it takes about 10-15 minutes to completely empty the breast of milk,
though it may vary from person to person.
- This product turns off automatically 20 minutes after the breast pump is turned on.
- Please be careful not to lose the silicone ring that produces suction between the Main Body
and Hands-free Cup.
Battery charging
Parts that need to be washed and disinfection
Parts that do not needs to be washed and disinfection
Body Charging Cable
Replace the valves every 1-2 months. Plastic and silicone parts should be replaced every
3 months or so to ensure optimal performance.
NOTE : This is a personal use item intended for one user.
6. Pumping Guide
7. Getting started
8. cleaning and disinfection
10. How do I thaw and use stored breast milk?
5. Button Control
23 24
9. How long can I store breast milk ?
25 26
11. Troubleshooting 12. Use and Storage environment
27 28
13. Specifications
14. Limited Warranty
29 30
15. EMC
31 32
33
Connect using the USB-C Type charging cable.
NOTE :
Please use certified adapters with a rated output of 5 Vdc and a minimum of 1A (max. 3A)
to charge the pump.
Please note that the AC charger is not provided with the pump.
When fully charged, the usage time is less than 2.5 hours.
(You can use it 6 times every 20 minutes.) Charging time is approximately 3 hours.
The imani Pump will not work when the charging cable is connected.
THAW
Always thaw the oldest milk first.
STORE
Label milk with the date it was expressed and the child’s name if delivering to childcare.
Store milk in the back of the freezer or refrigerator, not the door.
Freeze milk in small amounts of 2 to 4 ounces to avoid wasting any
Thaw milk under lukewarm running water, in a container of lukewarm water, or overnight in
the refrigerator. Never thaw or heat milk in a microwave.
Microwaving destroys nutrients and creates hot spots, which can burn a baby’s mouth.
Use milk within 24 hours of thawing in the refrigerator (from the time it is completely thawed,
not from the time when you took it out of the freezer).
Use thawed milk within 2 hours of bringing to room temperature or warming.
Never refreeze thawed milk.
When freezing leave an inch of space at the top of the container; breast milk expands as it
freezes. Milk can be stored in an insulated cooler bag with frozen ice packs for up to 24 hours
when you are traveling.
If you don’t plan to use freshly expressed milk within 4 days, freeze it right away.
imani i2Plus
Weight : 165g, Power consumption: 5W Pump dimensions: 80×65×60(mm)
Charging cable length: 1M Expected imani i2 Plus Service Life is 1 year
Battery: 3.7V , 1400mAh
1. The typical operation time or number of pumping sessions : about 2 hours or 6 sessions
2. The typical service life of the internal electrical power source : 1 year
3. Type of protection against electric shock: Internally powered equipment
4. Degree of protection against electric shock: Type BF applied parts
5. Classification according to the degree of protection against ingress of water: IP22
6. This equipment is not suitable for use in the presence of flammable anesthetics or oxygen
7. Mode of operation: continuous operation
NOTE : Battery replacement and repair are carried out by the seller.
Condition Possible Causes Checks Solutions
No Power Battery Check the battery charge
level.
Inspect battery for damage.
Charge until the green LED
turns on. If battery will not
charge contact the
manufacturer or service
center, or place of purchase.
No Suction Valve Check if they are connected
to breast shield properly.
Low Suction
Pain
Suction Level
Defective
accessories or
Check if there is a low suction
level on the control panel or if
there is an unusual noise.
Contact the location where
you purchased the product
or the manufacturer.
Check the assembly
of the Hands-free Cups
Disassemble / reassemble
them.
Breast funnel Check for damage or wear
to the Breast funnel.
Purchase and replace the
Breast funnel or accessories
Valve Check if there is
damage to the valve
Replace the valve.
Suction too high Check the suction level. Set to the lowest suction
level and consult your lactation
consultant or physician.
Disassemble and reassemble
them properly.
Appropriate Conditions
for Use
Appropriate Conditions
for storage
Temperature Humidity Pressure
106 kPa
70 kPa
90 %
15 %
Temperature Humidity Pressure
106 kPa
70 kPa
90 %
15 %
-20℃
-4°F
60℃
140°F
5℃
41°F
40℃
104°F
This equipment needs to be installed and put into service in accordance with the information
provided in the user manual [IEC/EN 60601-1-11:2010 Clause 12.3a]
Wireless communications equipment such as wireless home network devices, mobile phones,
cordless telephones and their base stations, walkie-talkies can affect this equipment and should be
kept at least a distance d away from the equipment. [IEC/EN 60601-1-11:2010 Clause 12.3b]
This equipment has been tested and found to comply with the limits for medical devices in
IEC 60601-1-2:2014 4th Edition. These limits are designed to provide reasonable protection against
harmful interference in a typical medical installation. This equipment generates, uses and can radiate
radio frequency energy and if not installed and used in accordance with the instructions,
may cause harmful interference to other devices in the vicinity. However, there is no guarantee that
interference will not occur in a particular installation. If this equipment does cause harmful
interference to other devices, which can be determined by turning the equipment off and on,
the user is encourage to try to correct the interference by one or more of the following measures.
- Reorient or relocate the receiving device.
- Increase the separation between the equipment.
- Connect the equipment into an outlet on a circuit different from that to which the other device(s) are
connected. Consult the manufacturer or field service technician for help.
Table 1: Electromagnetic Emissions (IEC 60601-1-2:2014)
The imani i2 Plus has been tested and found to comply with IEC 60601-1-2:2014 for electromagnetic
compatibility (EMC) and the Class B of CISPR11:2009. The following table lists the test levels that the
imani i2 Plus is in compliance with
Table 2: Electromagnetic Immunity (IEC 60601-1-2:2014)
The imani i2 Plus has been tested and found to comply with IEC 60601-1-2:2014 for electromagnetic
compatibility (EMC) and the Class B of CISPR11:2009. The following table lists the test levels that the
imani i2 Plus is in compliance with
- Warning : Use of this equipment adjacent to or stacked with other equipment should be avoided
because it could result in improper operation. If such use is necessary, this equipment
and the other equipment should be observed to verify that they are operating normally.
Immunity test
RF Emissions
CISPR 11
Compliance
Group 1
RF Emissions
CISPR 11
Class B
Voltage
Fluctuations
/ Flicker emissions
IEC 61000-3-3
Complies
Harmonic
emissions
IEC 61000-3-2
Class A
Electromagnetic environment - Guidance
This equipment uses RF energy only for internal function.
Its RF emissions thus are very low and are not likely to cause
interference with nearby electronic equipment
This equipment is suitable for use in all establishments,
including domestic establishments and those directly
connected to public low-voltage power supply networks that
supply buildings used for domestic purposes
Immunity Test Test level Compliance Level Electromagnetic guidance
Electrostatic
discharge
IEC 61000-4-2
Contact ± 8 kV,
Air ± 2, 4, 8, 15 kV
Contact ± 8 kV,
Air ± 15 kV
Floors should be wood, concrete or
ceramic tile. If floors are covered with
synthetic material, the relative
humidity should be at least 5%.
Electrical fast
transient/burst
IEC 61000-4-4
± 2 kV for power
supply lines
± 1 kV for
input/output lines
± 2 kV for power
supply lines
± 1 kV for
input/output lines
Mains power quality should be typical of a
commercial or hospital environment.
Surge
IEC 61000-4-5
± 0.5 kV, ± 1 kV
line(s) to line(s)
± 2 kV line(s)
to earth
± 0.5 kV, ± 1 kV line(s)
to line(s)
± 2 kV line(s) to earth
Mains power quality should be typical of a
commercial or hospital environment.
Power frequency
and magnetic field
IEC 61000-4-8
30 A/m at 50 and
60 Hz
30 A/m at 50 and 60 Hz Power frequency magnetic fields should
be at levels characteristic of a typical
location in a typical commercial or hospital
environment
Voltage dips and
interruptions
IEC 61000-4-11
0 % UT; 0.5 cycle
At 0°, 45°, 90°,
135°, 180°, 225°,
270° and 315°
0% UT; 1 cycle
and 70 %
UT; 25(50Hz)/
30(60Hz) cycles
Single phase;
at 0° 0% UT;
250(50Hz)/
300(60Hz) cycle
0 % UT; 0.5 cycle
At 0°, 45°, 90°, 135°,
180°, 225°, 270° and
315°
0% UT; 1 cycle and
70 % UT; 25/30 cycles
Single phase; at 0° 0%
UT; 250/300 cycle
Mains power quality should be typical of a
commercial or hospital environment.
During a power outage, the equipment
should be powered from battery or other
constant, appropriate power supply.
Immunity Test Test level Compliance Level Electromagnetic guidance
Conducted RF
IEC 61000-4-6
3 Vrms
150 kHz to 80 MHz
outside ISM band
6 Vrms
150 KHz to 80 MHz
in ISM and amateur
radio bands
3 Vrms
6 Vrms
Except as indicated in the table on the next
page, portable and mobile RF
communications equipment should be used
no closer to any part of the breast pump,
including cables, than the recommended
separation distance calculated from the
equation applicable to the frequency of the
transmitter.
Recommended separation distance
d = 1.2√P
d = 2.0√P
d = 0.35√P for 80 MHz to 800 MHz
d = 0.7√P for 800 MHz to 2.7 GHz
Where P is the maximum output power
rating of the transmitter in watts (W)
according to the transmitter manufacturer
and d is the recommended separation
distance in meters (m)
Field strengths from fixed RF transmitters,
as determined by an electromagnetic site
survey, should be less than the compliance
level in each frequency range. Interference
may occur in the vicinity of equipment
marked with the following symbol.
Radidated RF
IEC 61000-4-3
10 V/m
80 MHz to 2.7 GHz
10 V/m
Frequencies of portable and mobile transmitters for which the recommended separation
distance is 30 cm (12 inches).
a Field strength from fixed transmitters, such as base stations for radio (cellular/cordless)
telephones and land mobile radios, amateur radio, AM and FM radio broadcast and
TV broadcast cannot be predicted accurately. If you wish to use the equipment in the vicinity
of fixed RF transmitters and you are uncertain about the electromagnetic environment,
please consider obtain an electromagnetic site survey.
If the measured field strength in the location where the equipment is being used exceeds the
applicable RF compliance level above, it is the user’s responsibility to verify that the
equipment is operating normally. If abnormal performance is observed, additional measures,
such as re-orienting or relocating the equipment, may be necessary.
b Over the frequency range 150 kHz to 80 MHz, field strengths should be less than 10 V/m.
Bend (MHz)
380 – 390
430 – 470
704 – 787
800 – 960
1,700 – 1,990
2,400 – 2,570
5,100 – 5,800
Service
TERA 400
GMRS 460, FRS 460
LTE Band 13, 17
GSM 800/900, TETRA 800, iDEN 820, CDMA850, LTE Band 5
GSM 1800; CDMA 1900; GSM 1900; DECT; LTE Band 1, 3, 4, 25; UMTS
Bluetooth, WLAN, 802.11. b/g/n, RFID 2450, LTE Band 7
WLAN 802.11 a/n
Contraindications: No known contraindications
3) After Each Use
① Store milk safely. Seal milk collection bag, label with date and time,
and immediately place in a refrigerator, freezer, or cooler bag with ice packs.
② Clean the pump. Clean the buttons, power switch, and countertop with
disinfectant wipes.
③ Tubing and separate all parts that come in contact with breast/breast milk.
④ Rinse hands-free cup parts that come into contact with breast/breast milk
by holding under warm running water to with soap to clean. Do not leave the
parts in the sink to soak.
⑤ Clean pump parts that come into contact with breast/breast milk as soon as
possible after pumping. You can clean your hands-free cup parts by hand in a
wash basin used only for cleaning the pump kit and infant feeding items.
4) Clean Pump Kit : Clean by hand
① Place pump parts in a clean wash basin used only for infant feeding items.
Do not place pump parts directly in the sink.
② Add soap and hot water to basin.
③ Scrub items using a clean brush used only for infant feeding items.
④ Rinse by holding items under running water, or by submerging in fresh water in a
separate basin.
⑤ Air-dry thoroughly. Place pump parts, wash basin, and bottle brush on a clean,
unused dish towel or paper towel in an area protected from dirt and dust.
Do not use a dish towel to rub or pat items dry.
⑥ Clean wash basin and bottle brush. Rinse them well and allow them to air-dry
after each use. Wash them by hand at least every few days.
1) Before first use
Before using imani i2 Plus breast pump for the first time, Disassemble and sanitize
all Hands-free Cup parts that come into contact with the breast and breast milk
2) Before Each Use
① Wash hands with soap and water.
② Inspect and assemble clean pump kit. If your tubing is moldy,
discard and replace immediately.
③ Clean buttons, power switch, and countertop with disinfectant wipes.
Refer to
instruction manual
ISO 7010
M002
IEC 60417
5333
IEC 60417
5009
ISO 7000
2620
ISO 7000
2497
ISO 7010
W001
IEC 60417
5031
ISO 7000
2498
ISO 7000
0632
ISO 7000
0626
EN 50419
ISO 7000
3082
ISO 7000
2621
General warning,
caution
Symbol that indicates
electrical and electronic
components which must
be disposed of separately.
Type BF
applied part
DC
Serial
Number
Temperature
limitation
Keep dry
Atmospheric
pressure limitation
Protection against entrance
of solid foreign objects and
against harmful effects due
to the entrance of water
Manufacturer
On / Off
Humidity
limitation
Date of
Manufacture
95%
20%
106kPa
70kPa
Symbol Title Standard/
Reference No. Symbol Title Standard/
Reference No.
No
1 Vacuum
For each level, select and apply the smaller
of ±50mmHg or ±20%
1 level: 80 mmHg
2 level: 130 mmHg
3 level: 180 mmHg
Cycle±20%
1 level: 55 cycle/min
2 level: 48 cycle/min
3 level: 40 cycle/min
Vacuum
For each level, select and apply the smaller
of ±50mmHg or ±20%
1 level: 50 mmHg
2 level: 80 mmHg
3 level: 100 mmHg
Cycle±20%
1 level: 65 cycle/min
2 level: 65 cycle/min
3 level: 65 cycle/min
Backflow protection : Backflow mechanism works when the milk collection container is full.
Breast pumping mode
Massage vacuum
Accuracy of setting
The cycle is fixed at each pressure level
Performance
4 level: 220 mmHg
5 level: 270 mmHg
4 level: 34 cycle/min
5 level:24 cycle/min
4 level: 120 mmHg
5 level: 150 mmHg
4 level: 65 cycle/min
5 level: 65 cycle/min
① Insert the connector into the
Cup. ③ Push valve back with your hands.
② When attaching the protector
to the cup, please press firmly. Make sure the valve is aligned in the correct position
in the cup as shown above.
i2 Plus Main Body
Hands-free Cup Set
①
②
③
※ Please hold Hands-free Cup Set with
one hand and press down firmly on the front of
Main Body with the other hand.
Valve Protector Connector Collection CupFunnelInsert
Protector
Connector
Valve
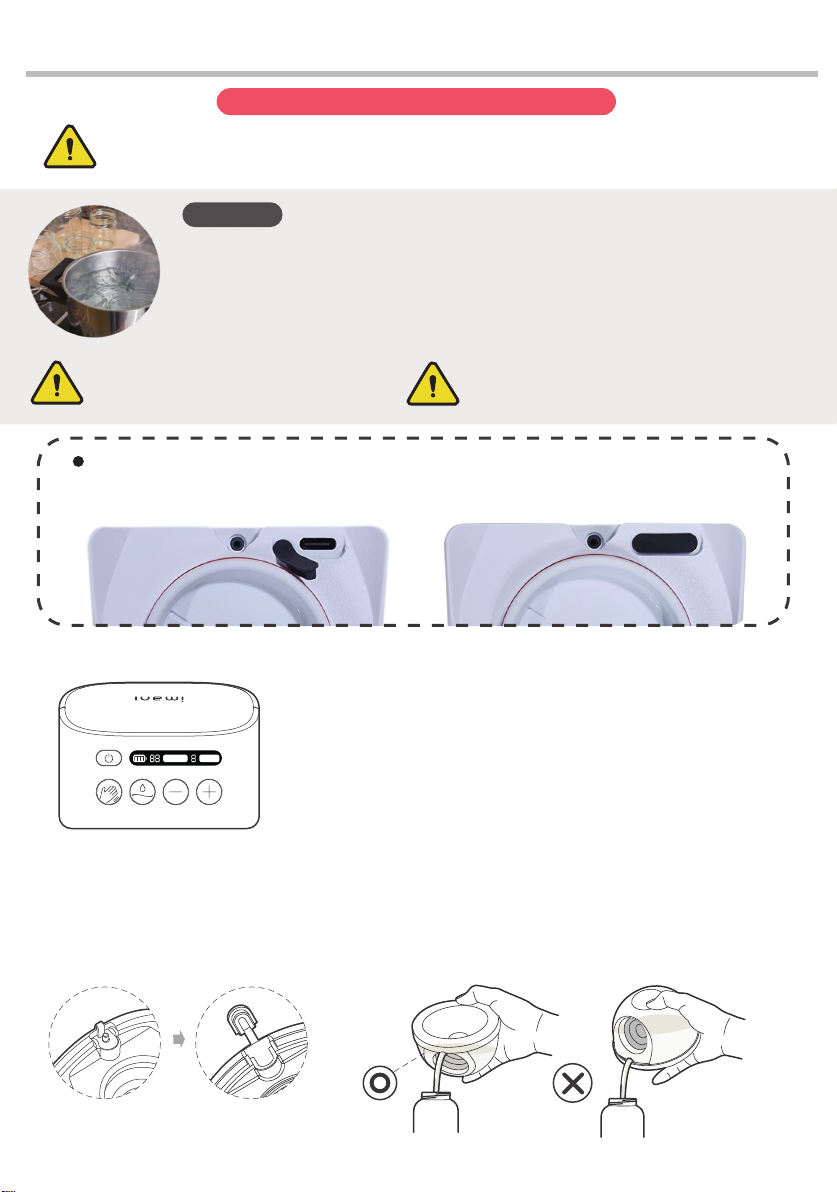
Place the Cup on a flat, firm
surface and open the cap carefully
to prevent breast milk in the cup
from spilling. Use your thumb to
squeeze the Funnel and
slowly angle the Cup to gently
pour the milk in the bottle.
※ How to pour milk into a bottle
Correct position
of cap
※ Open the cap carefully
Proper alignment of the Breast Shield on the breast
※ If you find that the funnel is too large,
add the insert to the tunnel to reduce the size.
- Please position Breast Funnel so that your nipple is centered in the tunnel correctly.
Some space between the nipple and tunnel should remain so that the
nipple can move freely with the suction of the pump.
- Optimal and comfortable expression of breast milk occur when the nipple is pulled straight
forward into the tunnel.
※ You should wear a bra to hold the pump in place.Wearing a supportive nursing bra is
recommended. If you feel discomfort from the compression between the breast and pump,
you may consider wearing a larger nursing bra.
Funnel
⑤ After assembling the hands-free cups,
please close the cap.
④ Insert the Collection Cup in the
groove of the Funnel to create
snug fit between the cup and Funnel.
IP22
Power Button
LCD Indicator
Breast, Massage Pumping step check
Check remaining battery level
Check the charging status
Check working hours
Massage Mode
Button
Breast Pumping
Mode Button
Button to increase
pressure
Button to decrease
pressure
MASSAGE B. PUMP
Battery 100%~60%
Fully battery
charged status Low battery,
needs charging
Battery 60%~30% Battery 10%~0%
Battery Indicator / Battery Charge Status Codes
Battery 30%~10%
STORAGE LOCATIONS AND TEMPERATURES
TYPE OF BREAST MILK
Countertop
77˚F (25˚C) or colder
(room temperature)
Up to 4 Hours
1–2 Hours
Refrigerator
40 ˚F (4˚C)
Freezer
0 ˚F (-18 ˚C) or colder
Up to 4 Days
Up to 1 Day
(24 hours)
Leftover from a Feeding
(baby did not finish the
bottle)
Use within 2 hours after the baby is finished feeding
Thawed,
Previously Frozen
Freshly Expressed or
Pumped
Within 6 months is best
Up to 12 months is acceptable
NEVER refreeze human milk
after it has been thawed
HUMAN MILK STORAGE GUIDELINES
imani i2 Plus Electric Breast pump
Disposal
This product contains electrical waste or electronic equipment.
It must not be disposed of as unsorted municipal waste and must be collected separately
in accordance with applicable national or institutional related policies relating to obsolete
electronic equipment.
Name
Address
This product is warrantied by imani Co., to the original retail purchaser to be free from defects
in material and workmanship for the period of 1 year.
This warranty does not cover damage caused by accident, misuse, abuse, improper
maintenance, unauthorized modification, or connection to an improper power supply.
A charge will be made for repair of such damages.
WARRANTY CARD
imani i2 Plus
Origin : Legendairy Milk, LLC
Address : 1007 S. Heatherwilde Blvd., Suite 100, Pflugerville, Texas 78660
Legendairy Milk, LLC
1007 S. Heatherwilde Blvd., Suite 100
Pflugerville, Texas 78660
※After wearing the device, please use and operate the Control Panel.