Page 3 Health and Safety
8. The accessory kit is a personal care item designed to be used by
one woman only. They are not to be shared between mothers.
9. The lter needs to be replaced if it gets wet. In the unlikely event
that milk enters the pump, discontinue use of the device and call
the company.
10. Make sure the voltage of the power supply is compatible with
the pump. If you plan to use this pump in another country where
voltage and outlet plugs may differ, a plug adapter may be
required. Please contact Limerick, Inc., for recommendations.
11. Do not use while sleeping or when overly drowsy.
12. Supervision is needed when using the pump near children.
13. On rare occasions the amount of suction may become strong
enough to cause pain. If that occurs, immediately pull the lter
(9 on page 15) off the pump’s lter connector (5) and turn the
pump off. Should the cup remain stuck with suction to your
breast after you have removed the lter and turned off the
power, insert your nger between the cup and your breast to
break the seal.
14. If the Accessory Kit is not marked sterile, see page 8-5
for sanitizing accessories before rst use and page 31 for
cleaning after each use.
15. To avoid the risk of electric shock, this equipment must only be
connected to a supply main with protective grounding.
16. In the case of an emergency, do not place the breast pump in an
area that restricts or prevents manual disconnection.
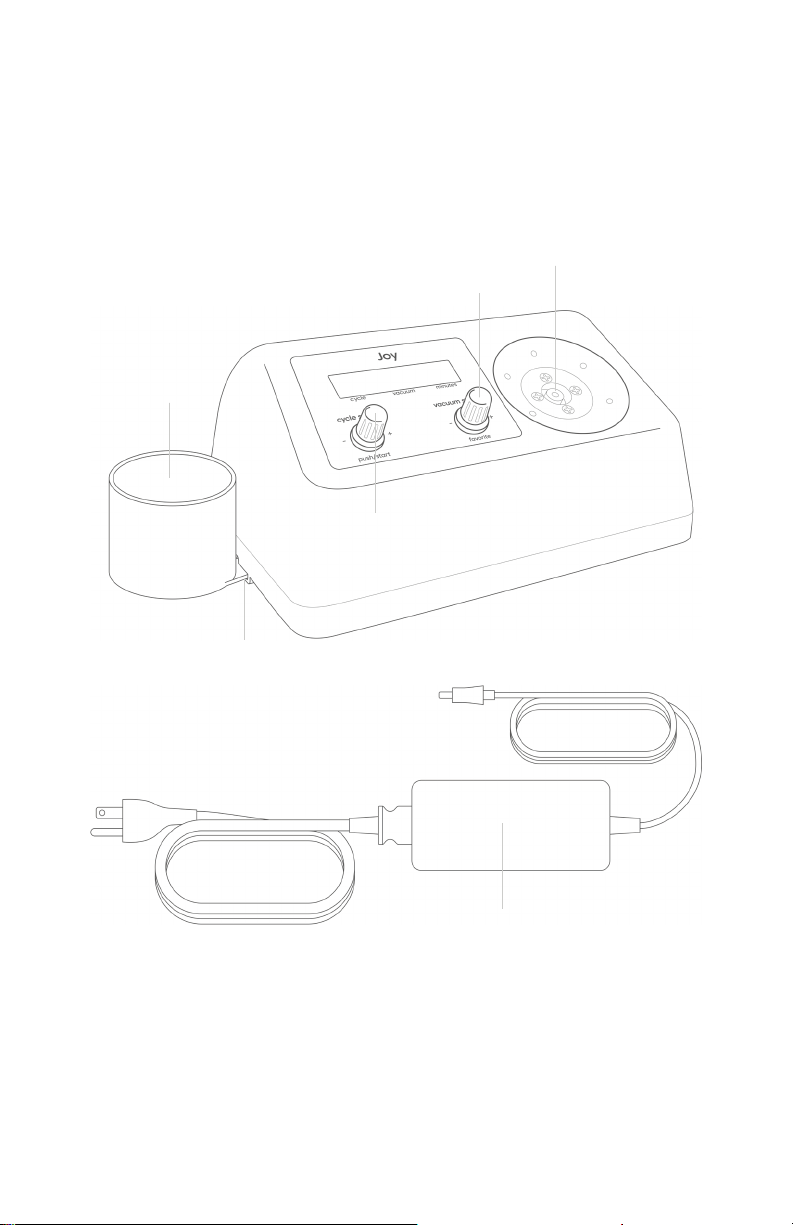
17. The electrical rating of the Joy pump is 12V 2A DC.
Caution: To reduce the likelihood of malfunction, pump
failure, damage to pump, or damage to other property, take these
precautions:
1. Your Joy hospital grade electric breast pump should never be left
unattended when plugged into an electric outlet.
2. Use the pump only for its intended use as described in this
manual.
3. Use ONLY Accessory Kits manufactured by Limerick, Inc. Your
Joy breast pump operates differently than other pumps, so other
kits will not work properly with it. Use of incorrect parts voids
warranty.
4. Use the pump only in an upright position.
5. Never operate your pump if it’s not working properly.
6. Do not use outdoors or where pump could get wet.
7. Keep the cord and all components away from heated surfaces.
8. If the lter becomes plugged, replace the lter. Do not tamper
with the lter. See Caution on page 25 to prevent clogging.
9. DO NOT ATTEMPT TO REPAIR Joy hospital grade electric breast
pump. There are no user-serviceable parts inside.
10. Your pump has a temperature sensor that shuts it off if the
temperature inside gets too high. In the unlikely event that this
sensor should fail, and the pump begins to smell hot, turn it off
immediately, and call Limerick, Inc., to return it for repair.
11. In the unlikely event that the pump motor should stop running
or cycling with the power still connected, turn it off immediately
and call Limerick, Inc., to return it for repair.