imani i1 User manual

You can download the instruction in website
(www.hello-imani.com).
i1
USER MANUAL

목차 0201
CONTENTS.
1. Description
6. Warranty Card
2. Precaution
2-1. General Tips
2-2. Safety Requirements
2-3. Handling condition
2-4. How to deal with backflow
2-5. When to stop breastfeeding
3. How to use
3-1. Direction for the use
3-2. How to assemble parts
3-3. Display panel
3-4. Functions of Display Panel
3-5. How to operate
3-6. Precaution for Breast Pumping
4. How to manage
4-1. How to clean
4-2. How to sanitize
4-3. How to keep
4-4. Maintenance
5. Warranty Period
& Customer Service
5-1. Warranty
5-2. Exchange & Refund
5-3. Customer Service
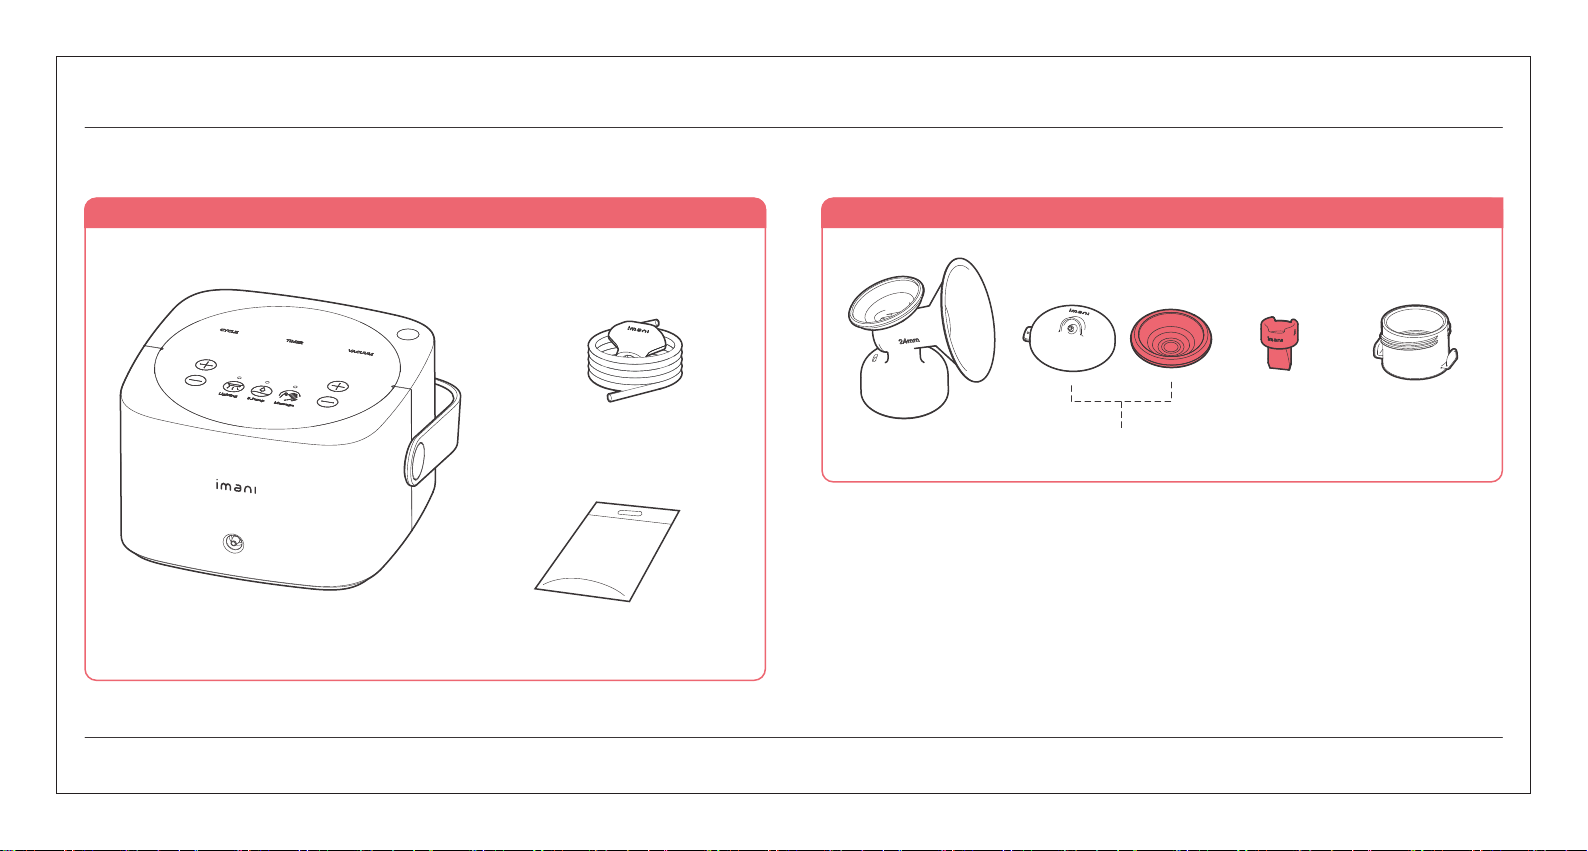
1. 제품 기본구성 0403
PRODUCT DESCRIPTION.
Main Body / Air Hose Hub / Breastmilk Storage PackSet (30pcs) / Breast Shield24mm Set (1Adaptor included)
Purpose of use
- If you have large or small volume of breast milk and need to express in advance
to keep
- Since you have blood congestion on your breast, you need to express breast
milk quick
- If you’re working mom and far away from your baby for a long time
- If you have flat nipples so that you can’t breastfeed your baby directly
Main Body x 1 Breastmilk Storage PackSet (30pcs) x 1
i1 Breast Shield 24mm Set (BPA FREE)
Breast Shield24mm x 2 Milk Connector x 2Protector x 2 Valve x 2
Air Hose Hub x 1

2. 사용 시 주의사항 0605
PRECAUTION.
2-1. General Tips
- This product is for person use that requires hygiene management and use.
- If you buy a secondhand product or rent, you’re not allowed to have warranty
service and be exposed to unexpected infection.
- This product comes with a backflow stopper which prevents from backflow of
breast milk toward the Main Body.Please frequently check out the backflow
stopper and make sure there’s no foreign substance or residual milk after
pumping.
- If you use this product with others in the public facilities, it may cause unsanitary
issue.
- This motor-operated product still works before the main power is disconnected.
So, please do not use it when you’re sleepy or while in your sleep.
- If you express breast milk full of the bottle, it may flow backward.
- You may feel uncomfortable little bit in the beginning when using this breast
pump. However, if there’s consistent pain or wound or bleeding around your
nipple, please stop using it and visit a hospital.
2-2. Safety Requirements
1) Products
- Please do not soak the Main Body in water or liquid. Always keep it dry,
- Please avoid contact with radiator or heat.
- Do not throw away or drop the product but avoid damage on it.
- Do not use the defective product and contact the shop where you purchased.
- Do not remodel or disassemble arbitrarily.
2) Electricity
- Please connect or detach Adaptor with dry hands.
- Use the only Adaptor made by IMANI.
- You shall bear whole responsibility for product defects by using Adaptor
made by other companies.
- If the product is soaked, please make inquiry to Customer Service Center
before use.
(Depending on its condition, it may need to be inspected.)
- Please do not use this product in the bath.

2. 사용 시 주의사항 0807
PRECAUTION.
2-3. Handling condition 2-4. How to deal with backflow
- If the breast milk flows backward when not using Backflow Preventor,
you will be charged for the repair since it’s regarded as consumer negligence.
- If the breast milk flows backward, please stop using it immediately.
After detaching Air Hose Hub, please remove all backflow of breast milk.
- When removing backflow of breast milk, please separate Breast Shield
first and wash with water. (Please refer to page 23.)
- If it seems that backflow of breast milk goes into the Main Body, please
stop using it.
It’s recommended to visit shop where you purchased or Customer Service
Center for inspection.
2-5. When you should stop breastfeeding
- If you suffer from life-threatening disease
- If you have chronic disease or physical limitation
- If you take medicine due to postpartum depression
※ If you are diagnosed not to breastfeed with treatment for the above-mentioned
reason,please stop breastfeeding immediately.
Ambient temperature Relative humidity Atmospheric pressure (kPa)
60℃
-20℃
90%
15% 70
106
3. 제품 사용방법 1009
HOW TO USE THE PRODUCT.
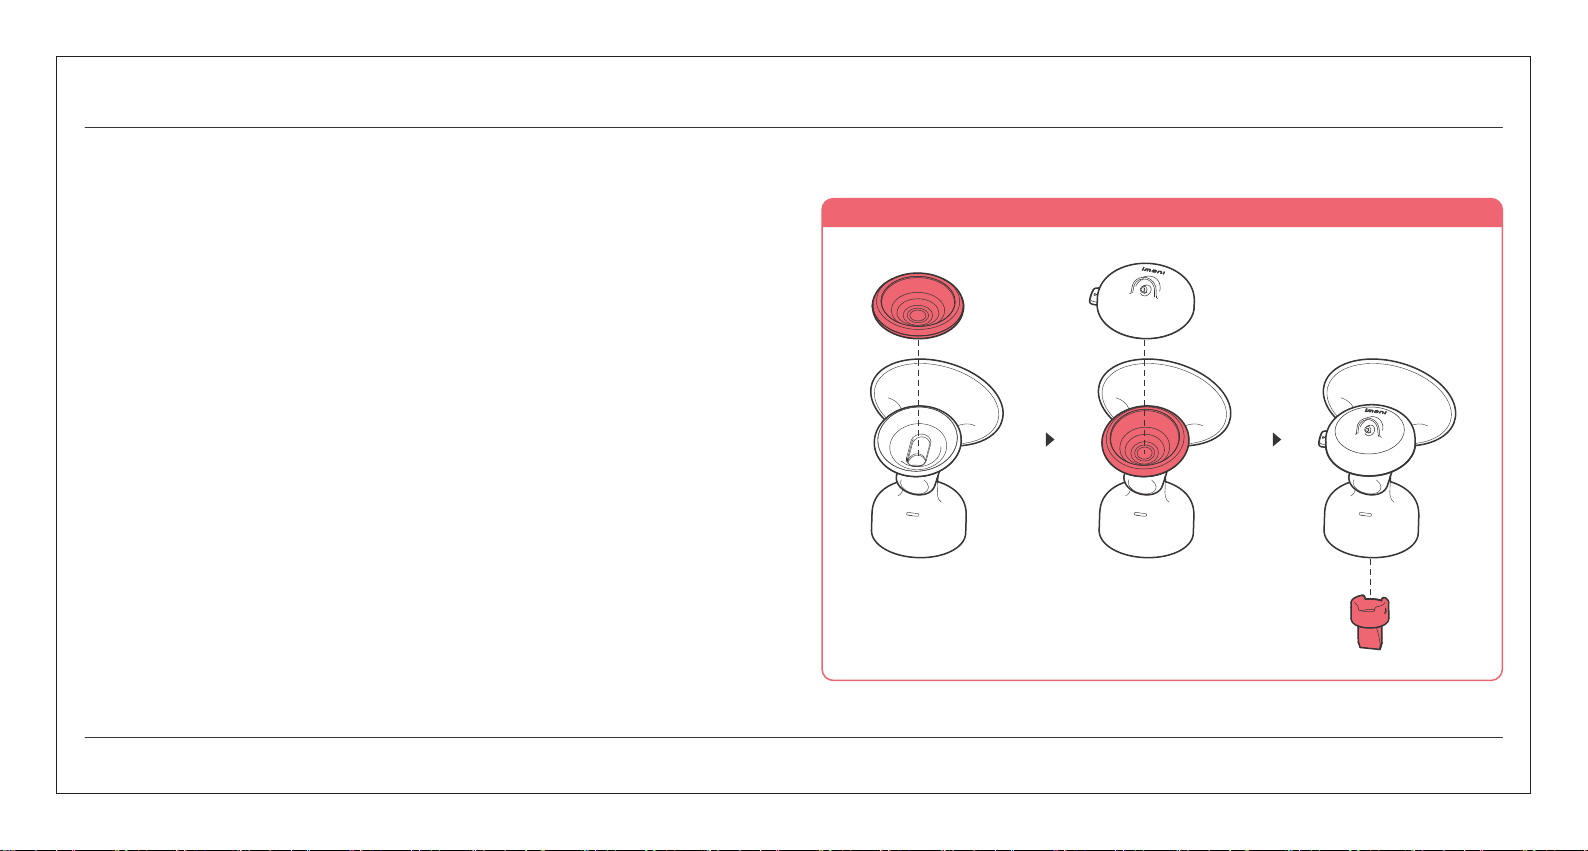
3-2. How to assemble parts3-1. Direction for the use
①Your hands should be washed and dried before you use product.
②Please make sure to check out any foreign material on your breast before pumping
③Please check out whether all parts (Breast Shield, Protector, Valve etc.) are cleaned,
sterilized and dried.
④Assemble Breast Shield, Connector and Valve etc. following the direction in the
instruction manual.
(3-2. How to assemble parts → Refer to page 10 to find out how to assemble Backflow Preventor)
⑤Please connect Milk ConnectorandBreastmilk Storage Pack or Milk Bottle.
⑥Please assemble Milk Connector which is connected to Breastmilk Storage Pack or
Milk Bottle with Breast Shield.
How to assemble Breast Shield (+Backflow Preventor)
※ How to disassemble after use
Please disassemble in reverse order of assembly.
※ Precaution
If it’s first time to use, please sterilize all parts except the Main Body in hot
water for 3-5 minutes and let them dry.
Breast Shield
Protector Protector Cap
Valve

3. 제품 사용방법 1211
HOW TO USE THE PRODUCT.
How to assemble WideMilk Bottle How to assemble normalMilk Bottle How to connect Breastmilk Storage Pack by using Milk Connector
Milk Connector
Breast Shield
①
②
③
normalMilk BottleWideMilk Bottle
Breast Shield

3. 제품 사용방법 1413
HOW TO USE THE PRODUCT.
3-3. Display Panel
TimeDisplay
CycleDisplay
IncreasingCycle (Speed) Button
Decreasing Cycle (Speed) Button
/ Breast Pump IlluminationLED
Breast Pump Illumination Button
/ Breast Pumping Mode LED
Breast Pumping Mode button
/ Massage Mode LED
Massage Mode button
Increasing PressureButton
PressureDisplay
PowerButton
Decreasing PressureButton

3. 제품 사용방법 1615
HOW TO USE THE PRODUCT.
3-4. Functions of Display Panel
- Breast pumping function
- If you touch the button during Breast PumpingMode, it’s temporarily paused
(TIMER flickering)
- If you touch the button during temporary pause, it goes on to
Breast PumpingMode
2) PUMP : Breast Pump Mode
- Massage your breast before pumping
- If you touch the button during Massage Mode, it’s temporarily paused
(TIMER flickering)
- If you touch the button during temporary pause, it goes on to
Massage Mode
3) MASSAGE : Massage Mode
- If you touch the button, you can adjust brightness of light from
Lev. 1 (50%) → Lev. 2 (100%) → Turn off the light.
- If you touch the button for 3 sec, you can turn activate or deactivate mute state.
4) LIGHTING : Breast Pump Illumination
- Turn the power ON/OFF
- Standby Mode when touching the powerbutton(TIMER 00:00)
- Save the past history (When re-operate, it starts from previous settings)
1) POWER : ON/OFF
Please press (+) and (-) buttons on the left side.
to control the massage and Breast Pumping CYCLE (Speed).
MassageModeCycle : 2 Levels available(70~80times/min)
Breast PumpingModeCycle : 6Lev. (30~55times/min)
Please press (+) and (-) buttons on the right side.
to control the massage and Breast Pumping VACUUM
(Pressure range).
Pressure in MassageMode : 6Levels available(80~200mmHg)
Pressure in Breast PumpingMode : 12Levels available
80~320mmHg)
When setting the CYCLE (Left) When setting the VACUUM (Right)
※ If this product operates more than 30 minutes, it automatically turns
off for your safe use.

3. 제품 사용방법 1817
HOW TO USE THE PRODUCT.
3-5. How to operate
Tips.
- You may feel pain when pressing milk on hard pressure from the beginning.
(It’s important to find appropriate pressure for you before use.)
-Please express breast milk from low pressure and then, gradually increase the pressure as long as it’s not painful.
Adjust the pressure and speed of expressing breast milk as you want.
- Generally, it takes about 10-15 minutes to press the breast milk completely. It may differ from person to person.
- If you use Breast Pump Illumination button, you can express milk without feeling uncomfortable in the darkness.
- When expressing milk, press the Breast Pumpingbutton to pause. When massaging, press the Massage button to pause.
- If you express milk more than 30 minutes or there’s no operation for 30 minutes during the temporary pause state,
it automatically turns off for your safe use
Location to connect the air hose : On the front side Location to connect the Adaptor:On the back side
①Please connect AdaptortoMain Bodyon the back side and electrical outlet.
②Please connect Breast Shield with Air Hose Hub and Main Body. Please refer to page 10 to check out how to
assemble Breast Shield.
③Press the Power Button and turn on the product.
④Please position Breast Shield over your nipple correctly, especially in the middle.
⑤Press Breast PumpingModebutton and adjust the pressure level to express milk. Please refer to page 16.
(After operating Massage Mode for about 3~5 minutes, you can switch to Breast Pumping Mode and gently express breast
milk.)
⑥If you finish expressing milk, do not take off Breast Shield from your skin immediately since it adheres to your skin in a
vacuum.
Turn off the power and stick your finger between your chest and Breast Shield. Then, slowly take it off.
Other imani Breast Pump manuals


