IMG Group Scandi User manual

045 INT SCANDI 120 KD STAR BASE 2018.02
STEP 12
If needed drag the cushion cover to hide the attachment parts.
TRINN 12
Hvis nødvendig dra stoff/hud over monteringsbeslagene.
CONGRATULATIONS
GRATULERER
You are now the proud owner of a Scandi by IMG.
We are confident you will enjoy the comfort
and style of this new furniture.
Du er nå den stolte eier av en Scandi stol fra IMG.
Vi er sikre på at du vil like den fortreffelige
komforten og utførelsen på det nye møbelet.
IMPORTANT / VIKTIG
Read this and other relevant instructions
before using the product. Keep this manual
for future reference.
Studer dette og andre relevante instruksjoner
før du bruker dette produktet. Ta vare på denne
veiledningen for senere referanse.
ASSEMBLY INSTRUCTIONS / MONTERINGSVEILEDNING
STEP 14
Assembly ottoman by attaching ottoman
cushion on the already assembled
ottoman base by inserting screw M6
throught hole and using hex key to
tighten all screws.
TRINN 14
Monter krakken ved å feste puten til det
tidligere monterte understellet. Bruk
skruer M6 og stram skruene med den
medfølgende umbraconøkkelen.
CONGRATULATIONS YOUR CHAIR AND
OTTOMAN IS READY TO ENJOY.
NB : Please check bolts for tightness
every six months or as needed.
GRATULERER. STOL OG TABURETT ER
KLAR TIL BRUK.
NB: Sjekk at alle bolter og skruer er
skikkeleig festet hver 6. måned
eller etter behov.
STEP 13
Tilt down the seat and fix it with the bolt and clip from step 8.
TRINN 13
Tilt ned setet og fest det med bolten og klipset fra trinn 8.
IMG recommends adding felt pads as an extra precaution beneath each
of the five legs on Star bases to prevent damage to flooring.
IMG anbefaler at der brukes gode filtknotter under hver fot for å
beskytte underlaget.
imgcomfort.com
IMG Group AS Postboks 251 N-6239 Sykkylven Norway
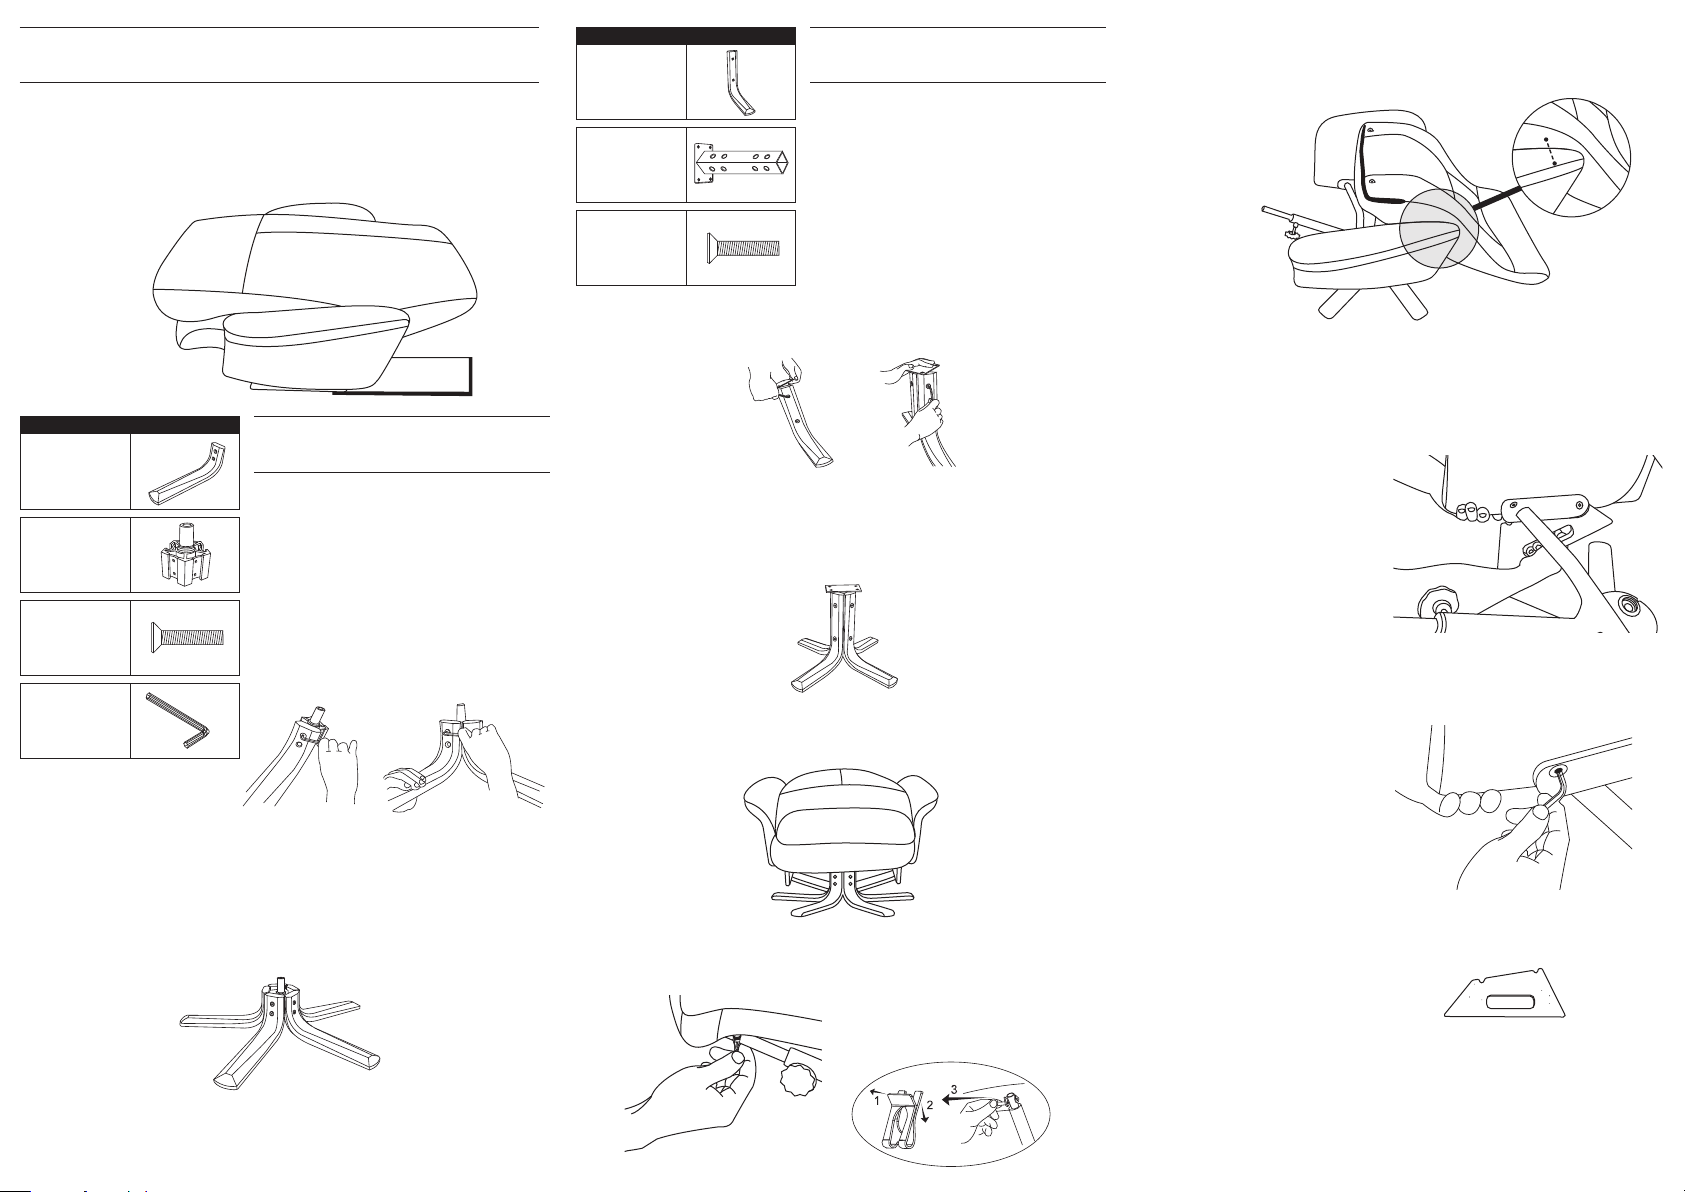
STEP 11
Place the top of the back down on the floor. Press the leather around the tabs
at the bottom of the back so that the tabs come visible. Fasten seat and back
together by sliding the holes (on the seat) into the tabs.
NOTE! One of the tabs is longer than the other to facilitate assembly.
TRINN 11
Legg toppen på ryggen ned mot gulvet. Trykk inn huden rundt tappene
nederst på ryggen slik at de kommer frem. Fest sete og rygg sammen ved å
skyve hullene på setets bakkant inn på tappene.
NB! En av tappene er lengre enn den andre for å forenkle monteringen.
Sett på klipset (IV) på den minste tappen på ryggen.
“CLICK”
(IV)
STEP BY STEP ASSEMBLY INSTRUCTIONS
MONTERINGSVEILEDNING TRINN FOR TRINN.
STEP 1
Take out the box inside the carton hidden under the ottoman cushion,
it contains the base for chair and ottoman.
TRINN 1
Ta ut esken som ligger under taburettputa. Den inneholder sokkelen
til stol og krakk.
BOX FOR BASE
ESKE MED UNDERSTELL
STEP 4
Put the chair on the side and attach the chair base.
TRINN 4
Legg stolen på siden og sett på stolunderstellet.
STEP 7
Turn the chair upright like this.
TRINN 7
Snu stolen slik som dette. Tighten the arm screws after
removing the support part.
Skru inn og dra til skruene som
holder armene.
Chair support parts have now
done it’s job.
Støtteplatene har nå gjort jobben
sin.
STEP 10
Loosen the screws holding the
arms (just one or two turns) and
remove both the two chair support
parts. Attention. Secure that the
bolts for back are in position.
TRINN 10
Løsne skruene som holder armene
(bare en eller to omdreininger) og
fjern begge støtteplatene under
stolarmene. P.S. Kontroller at
ryggboltene er på plass i plastfo-
ringene.
STEP 8
Loosen the clip and the locking bolt from under the seat.
TRINN 8
Under setet. Ta ut klipset og låsebolten som holder setet.
STEP 3
If the legs are not lined up loosen the screws M8x30 and line up the legs
before retighten again.
TRINN 3
Dersom stolbeina ikke står i riktig stilling, løs opp skruene M8x30 (C) og
sett beina rett før det strammes til igjen.
STEP 2
Put star leg (A) on to star center (B) by using
hex key (D) and screws M8x30 (C). Tightening
the screw on the top hole first (all legs)
before tighten the second lower screw.
TRINN 2
Sett beina (A) på svingsenteret (B) og dra
til skruene M8X30 (C) med umbraconøkkel
(D) i de øverste hullene (på alle beina).
Dra så til de nederste skruene.
CHAIR BASE ASSEMBLING
KRYSSFOT MONTERING
A
Star leg
Bein x 5
STAR BASE CHAIR / KRYSSFOT STOL
B
Star center
svingsenter x1
D
Hex key
Umbraconøkkel x 1
C
Screw
Skru M8x30 x10
OTTOMAN BASE ASSEMBLING
TABURETT MONTERING
E
Star leg
Kryssbein x 4
STAR BASE OTTOMAN / KRYSSFOT TABURETT
F
Star center
Senter x1
G
Screw
Skru M8x30 x8
STEP 6
If the legs are not lined up loosen the screws M8x30 (G) and line up the legs
before retightening again.
TRINN 6
Dersom beina til taburetten ikke står riktig plassert, løs opp skruene M8x30 (G)
og still beina rett før du strammer til igjen.
STEP 5
Put 4 star leg (E) on to 4 star center (F) and
use hex key (D) and screw M8x30 (G). You
can choose ottoman height by choosing the
upper or lower set of holes in the 4 star
center. Tightening the screw on the top hole
first (all legs) before tighten the second
lower screw.
TRINN 5
Monter beina (E) på senteret (F) ved hjelp
av umbraconøkkel (D) og skruer M8x30 (G). Du kan velge høyde på fotskammelen
ved å velge øverste eller nederste sett med hull i senteret. Stram først skruene
på de øverste hullene (alle bein) før du strammer skruene nede.
STEP 9
Remove the seat and put the back in this position.
TRINN 9
Ta bort setet og legg ryggen slik som skissen viser.
Other IMG Group Indoor Furnishing manuals


Popular Indoor Furnishing manuals by other brands

Regency
Regency LWMS3015 Assembly instructions

Furniture of America
Furniture of America CM7751C Assembly instructions

Safavieh Furniture
Safavieh Furniture Estella CNS5731 manual

PLACES OF STYLE
PLACES OF STYLE Ovalfuss Assembly instruction

Trasman
Trasman 1138 Bo1 Assembly manual

Costway
Costway JV10856 manual


