imilab V1 User manual
V1 Vacuuming Robot
User Manual
Manufacturer: Shanghai Imilab Technology Co., Ltd.
Address: Room 001A, Floor 11, Block 1, No. 588 Zixing Road, Minhang District,
Shanghai, China
For further information, please go to www.imilab.com.
Support: [email protected]
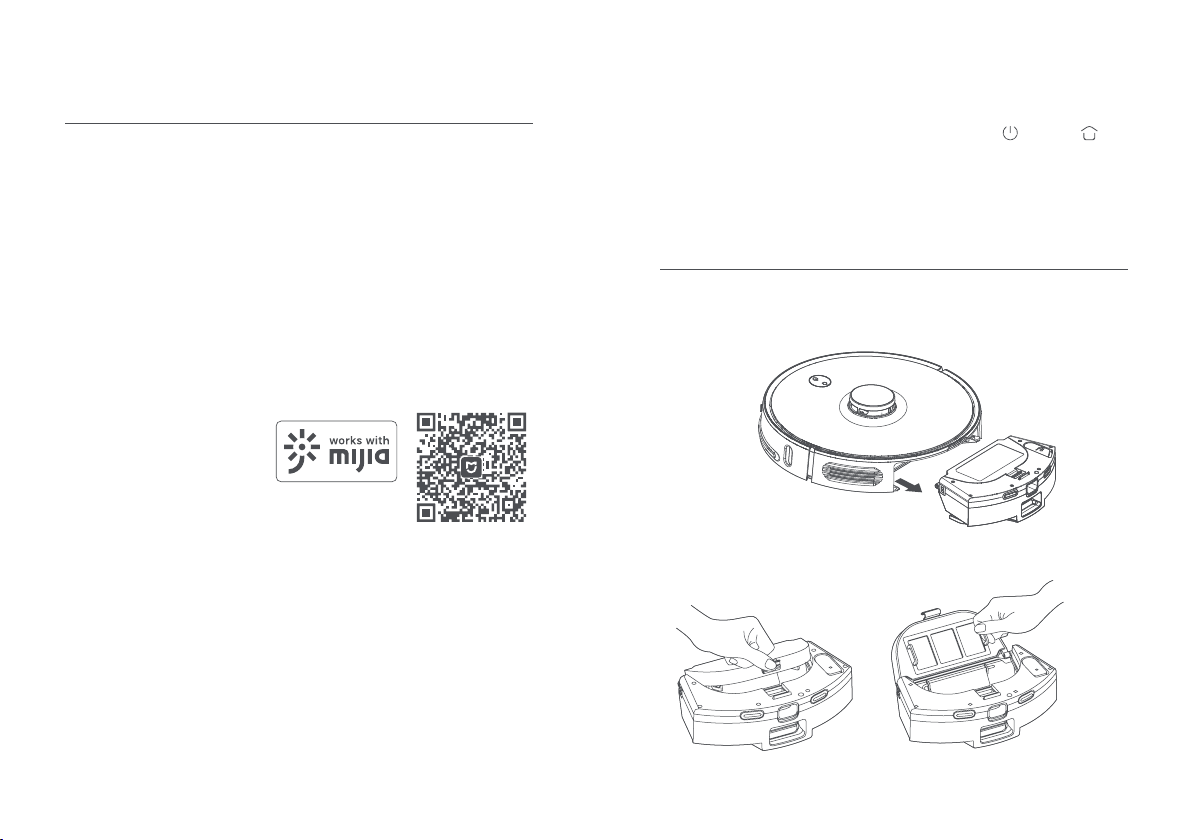
Scan the QR code with your mobile phone
to get the manual in more languages

Contents
Introduction·······························
Installation································
Operation··································
Connecting to Wi-Fi······················
Daily maintenance························
Basic parameters·························
Troubleshooting··························
Frequently asked questions············
Precautions································
1
8
9
13
14
23
24
25
27
Please read this manual carefully to ensure correct and safe
use of the product.
Maintenance notes
Repairs should only be done by professionally trained and
qualified technicians.
Do not attempt to perform any repair on your own to avoid
serious consequences.
In case of a malfunction, please refer to the “Troubleshoot-
ing” and “Frequently Asked Questions” sections before
contacting customer service.
If you are unable to troubleshoot the fault, please unplug the
power cable and contact us.
Please read this manual carefully to ensure correct and safe
use of the product.
Please read this manual carefully before using the product and
keep it in a safe place for future reference. The adapter of the
product is intended for use up to a maximum height of 2,000
meters above sea level.
Introduction
1 2
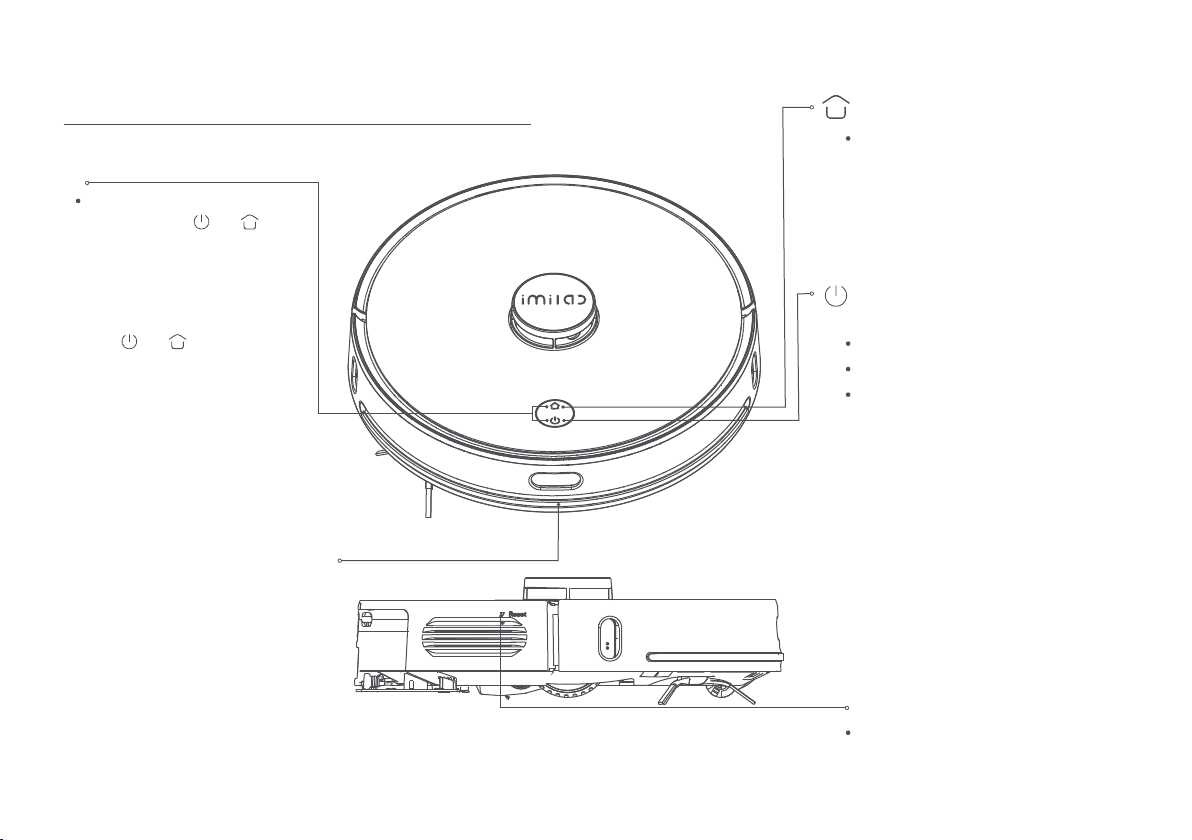
Smart recharge
Short press the button to activate smart
recharge.
Slow flashing yellow light indicates that the
product is recharging or the battery is
running low.
The blue breathing light indicates that the
product is in charging.
Reset button:
Short press (less than 3 seconds) to force
shut down the product
Power on/o
or Whole map cleaning
Infrared receiving sensor
Short press to start/pause cleaning.
Press and hold for 3 seconds to power on/o.
The solid blue light indicates that network
connection is successful/product is working
normally/in standby. The blue breathing
light indicates that the product is being
powered on.
Slow flashing blue light indicates that the
firmware is being updated/restoring to
factory settings.
Flashing blue light indicates that network
is being connected.
The red breathing light indicates that the
battery is low.
Flashing red light indicates abnormal status.
Light o indicates that the product is
powered o/in sleep mode.
Network settings
While the product is powered on,
press and hold the and buttons
together for 5 seconds. After hearing
“Entering network settings” voice,
release the buttons to enter the
Network settings.
While the product is powered on,
press and hold the buttons
together for 10 seconds. After hearing
“Factory settings will be restored”
voice, continue to hold the buttons for
another 10 seconds to restore the
product to factory settings.

3 4
Main body and sensors
Lidar
5
4
5
3
1
1Cover
2
Collision sensor
5
Button
3
Charging plates
6
Infrared receiving
sensor
4
Directional wheel
7Side brush
8
Roller brush
11
Cliff sensors
9
Left wheel
12
Middle brush cover
10
2-in-1 dust box and water tank
14
Right wheel
13
2
6
14
9
9
9
7
8
11
10
12 13
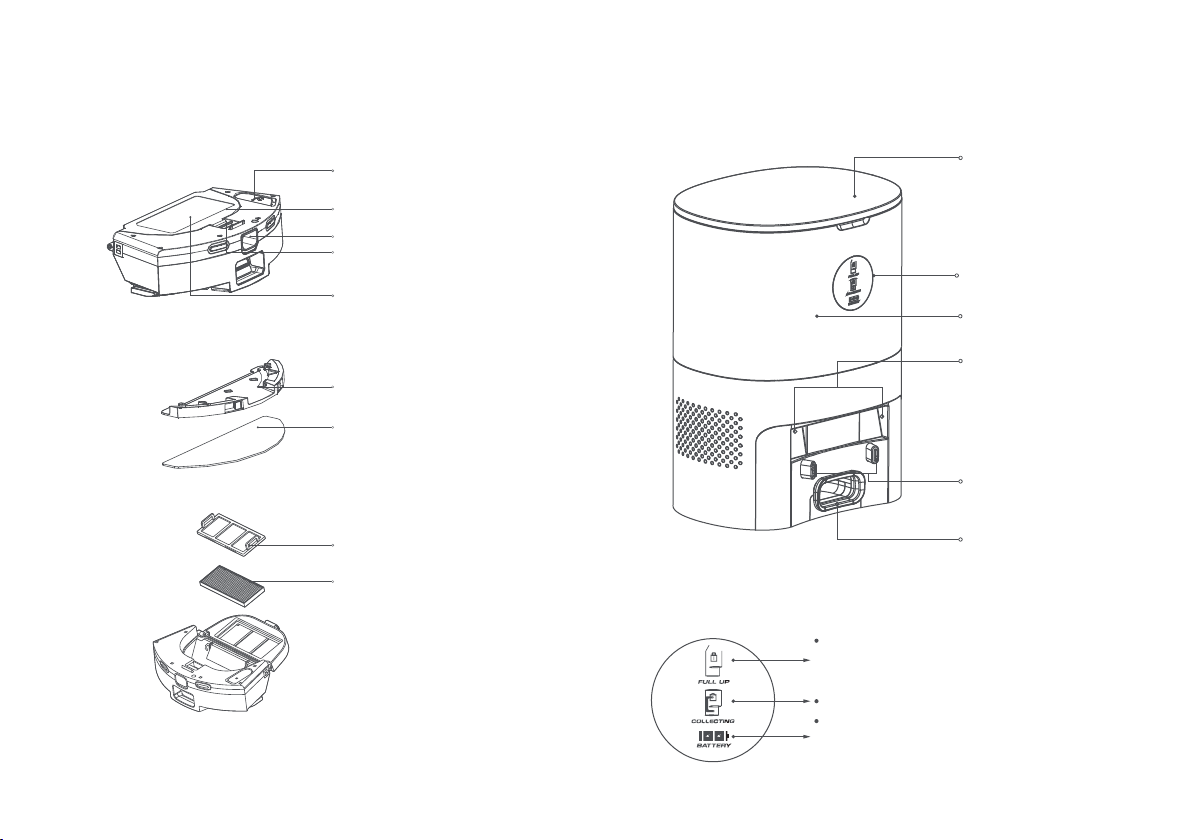
5 6
Water inlet
Water tank
Dust box
Dust box release button
Dust box catch
Mop cloth holder
Mop cloth
Filter cover
Filter
2-In-1 water tank Dust collection dock
(dust collection and charging 2-in-1)
Cover
Open the cover to put
in/take out dust bag
Indicator light
Dust bag chamber
Infrared lens
Charging and dust
collection sensor head,
dust collection sensors
The light will shine brightly when the dust bag is full.
The light will flash if the dust bag is not installed
correctly.
The light will flash brightly during dust collection.
When the battery is fully charged, two green bars will
be shown. When the battery is at 50% or lower, one
green bar will be shown.
Dust inlet
The dust in the product
will be transferred to
the dust bag via the
dust inlet

7 8
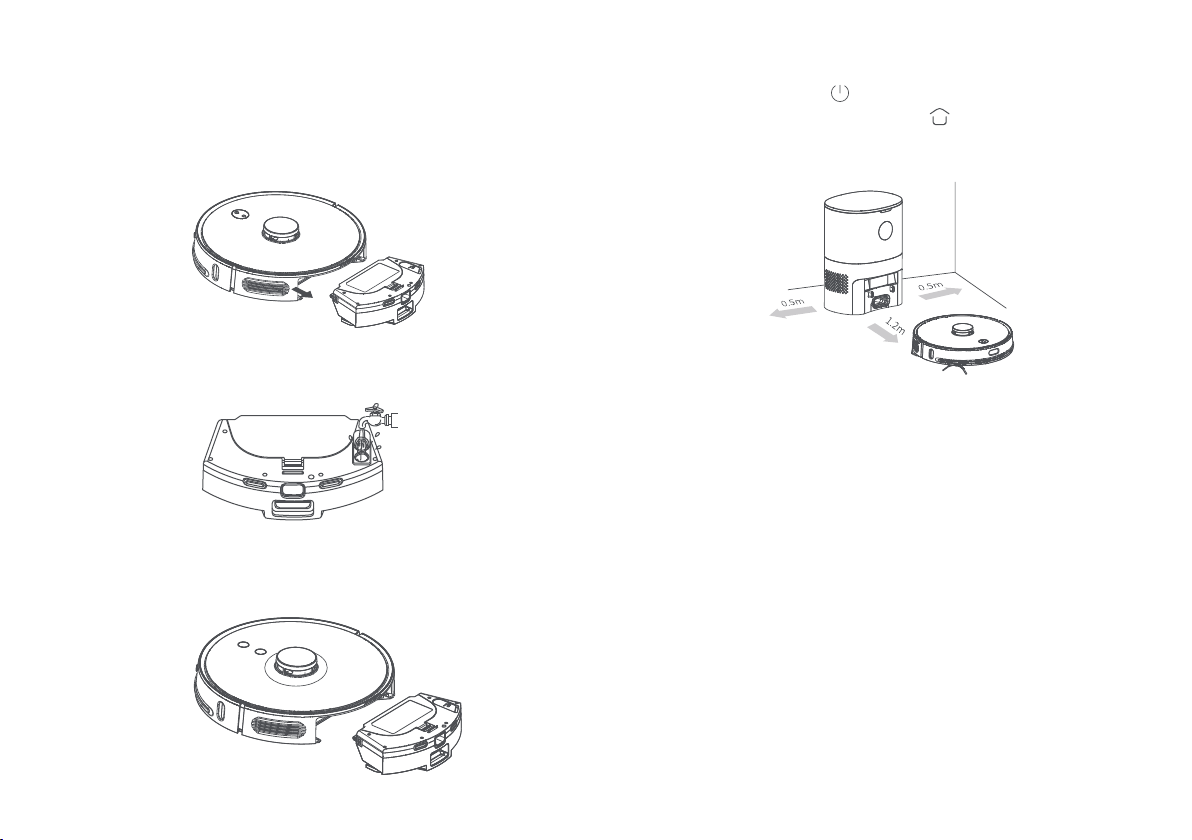
Installing the dust collection dock
1. Place the dust collection dock against a wall and on a level surface.
Plug in the power cable to a compliant socket and turn on the power.
2. Ensure that there is no object within 1.2 meters in front of the dust
collection dock and within 0.5 meters of its sides.
Installation
Fan filter Place it against a wall
Dust bag
handle
Dust bag
Dust bag (the dust collection dock is already installed with 1)
Reminder: The dust bag is a consumable material and cannot
be reused. Please replace it regularly.

1. Powering on/o
Press and hold the “ ” button for 3 seconds to power on the
product: when the blue indicator light flashes slowly for 4 seconds
and becomes solide, the robot vacuum has entered standby mode.
When the robot vacuum is still, press and hold the “ ” button
for 3 seconds to power it off. The indicator light will turn off.
The robot vacuum will enter sleep mode when it is not used for 20
minutes. Short press any button to wake the robot vacuum up from
the sleep mode.
Note: The robot vacuum cannot be powered on and will not enter
sleep mode while it is being charged.
9 10
2. Cleaning
While the robot vacuum is powered on, short press the “ ”button
and the robot vacuum will say “Start cleaning”. While the robot
vacuum is cleaning, short press the “ ” button and the robot
vacuum will stop cleaning.
Note: The robot vacuum will not start cleaning when the battery level
is too low.
3. Automatic/manual recharge
After completing a cleaning operation, the robot vacuum will
say “Cleaning completed. Returning to recharge.” The robot
vacuum will automatically return to the stand to recharge.
When the battery is running low, the robot vacuum will
automatically return to the stand to recharge.
4. Refilling the water tank or adding mop cloth
while cleaning
Short press the “ ” button to stop the robot vacuum. Remove
the mop module. Add water or mop cloth. Re-insert the mop
module and short press the button again to continue cleaning.
5. Network connection and firmware update
Scan the QR code on the robot vacuum to download the app.
Open the app and follow the on-screen instructions to connect
to a Wi-Fi network. Refer to the quick guide for more information.
Use the app to check for the latest firmware and update it. While
updating the firmware, ensure that the robot vacuum is being
charged and has at least 50% of battery left. Follow the
on-screen instructions in the app for firmware update. After
downloading the app, open it and follow the on-screen
instructions to connect to a Wi-Fi network. After the robot
vacuum is connected to a network, you can use the app to
control the robot vacuum remotely or schedule a cleaning.
6. Fault status
In case of a fault during operation, the robot vacuum will read
an error message and its indicator light will flash quickly in red.
Refer to the “Troubleshooting” for the problem solving approach.
After encountering a fault, the robot vacuum will enter sleep
mode when it is not operated for 10 minutes.
Using the robot vacuum
1. Please the robot vacuum on a level indoor surface. Remove
the safety strips on both sides of the front bumper.
Operation
Remove
11 12
3. Wet the mop cloth and attach it to the Velcro. Fill water using
the water inlet and insert the rubber cover securely.
2. Press the dust box release button to remove the 2-in-1 dust
box and water tank. When using the 2-in-1 water tank for the
first time. The water tank may contain a very small amount of
water, left behind after a production test. This is normal.
4. Insert the 2-in-1 dust box and water tank into the robot
vacuum.
Note:
1. When the robot vacuum returns to the dust collection dock
after at least 1 minute of cleaning. The dock will automatically
clear the dust box. While the dust is being collected, a green
arrow will flash brightly on the display.
2. The robot vacuum may not start when its battery is too low.
Please fully charge the robot vacuum before using it.
3. When the battery is running low during a cleaning operation,
the robot vacuum will automatically return to the dust collection
dock to recharge. After it is charged, the robot vacuum will
return to the original spot to continue cleaning.
5. Press and hold the “ ” button for 3 seconds to power on
the robot vacuum. Short press the “ ” button to return the
robot vacuum to the stand. The robot vacuum will enter
standby mode after it is fully charged.
13 14
Login to the Mijia app for more
device control and shop for more
smart products.
Mijia app
App download
Search for “Mijia” in an app
store or scan the QR code to
download the app. Open the
app.
Wi-Fi connection for Android
phones
Open the notification to connect to the product.
Tap”next” and follow the on-screen instructions.
Resetting Wi-Fi connection
When there is a need to reset the Wi-Fi connection due to a change
of router or Wi-Fi password, press and hold the “ “ and “ ”
buttons together for 10 seconds. Wait for the Wi-Fi indicator light to
flash quickly in blue. You will hear a voice prompt when the Wi-Fi
connection is reset successfully.
Wi-Fi connection for iOS phones
Enter the phone’s Wi-Fi settings page. Select the robot vacuum’s
hotspot and wait for a connection to be established. Return to the
app, tap next and follow the on-screen instructions.
Note: If you are unable to connect your phone to the robot vacuum,
please see “Resetting Wi-Fi connection” below. Connect the
produce to a Wi-Fi network for better usage experience.
Using the Mijia app
This product is part of the Mijia product family and can be controlled
using the Mijia app. It can interact with other Mijia products.
Note: Actual operation may differ due to Mijia app update. Please
follow the on-screen instructions of the Mijia app.
“Works with Mijia” only involves a verification at a software level.
Xiaomi and Mijia are not responsible for the production processes,
standards execution, quality supervision, etc. of the product and the
manufacturer.
Scan the QR code to download and install the Mijia app. Open the
app to enter the device connection page. Alternatively, search for
“Mijia” at an app store to download and install the app. At the app
homepage, tap the “+” button at the top right hand corner and
follow the on-screen instructions to add a device.
Connecting to Wi-Fi
Cleaning the 2-in-1 dust box and water tank
1. Press the dust box release button and pull out the 2-in-1 dust box
and water tank.
Daily maintenance
2. Open the dust box catch and remove the filter cover.

15 16
5. Add clean water to the dust box and close the cover. Shake the
dust try and pour out the dirty water. Repeat a few times until the
dust box is clean.
6. Flip the 2-in-1 dust box and water tank over and replace the mop
cloth or remove it for cleaning.
Note:
1. Cleaning effect will deteriorate when the mop cloth is dirty. Please
clean it regularly.
2. Please remove the mop cloth before cleaning it. Do not wash the
mop cloth while it is attached to the 2-in-1 water tank. Otherwise,
the 2-in-1 water tank may be damaged.
3. It is recommended to replace the mop cloth every 6-12 months to
ensure cleaning effect.
3. Take out the filter.
4. Use a brush to clean the filter and filter cover.
Filter cover
Filter
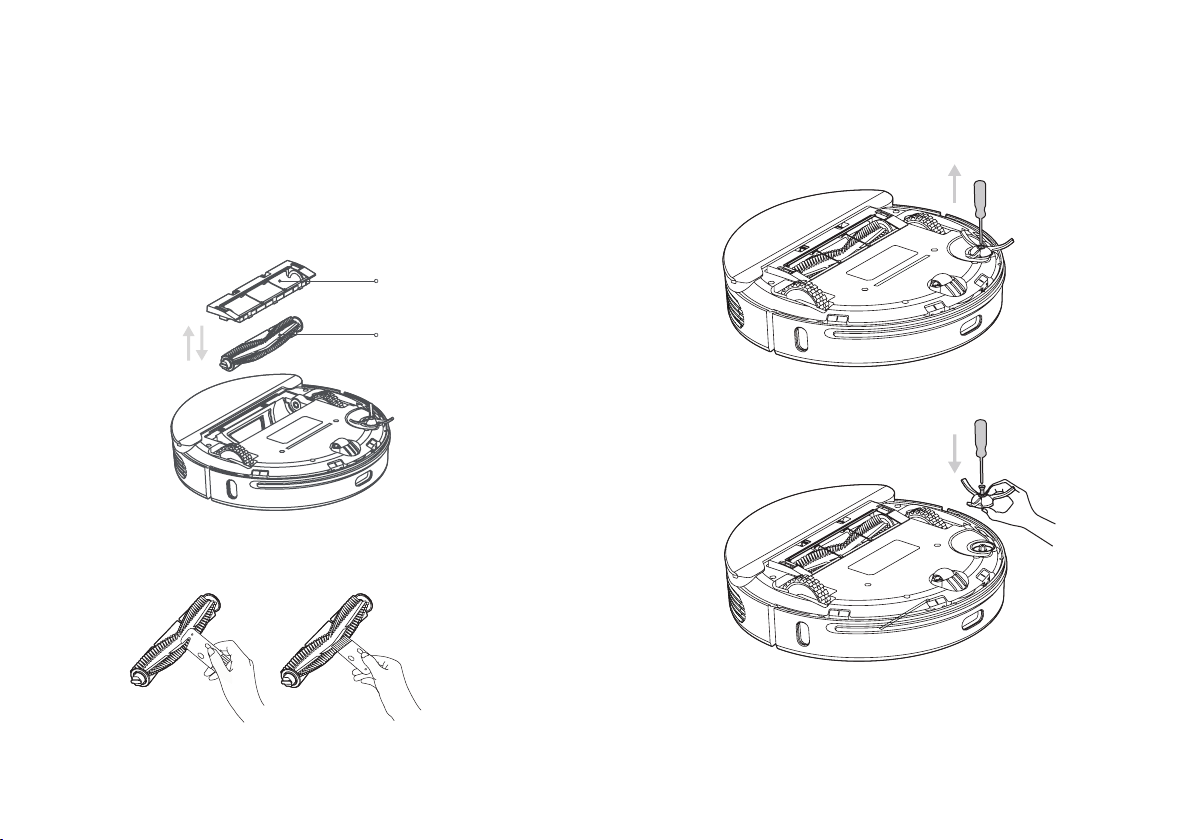
Cleaning the main brush
1. The main brush is a consumable material that should be
cleaned at least once a week. It is recommended to replace the
main brush every 6-12 months to ensure cleaning eect. Flip
the robot vacuum over and press the catch on the main brush
cover to remove the main brush cover and the main brush.
Note: Be careful when flipping the robot vacuum over to avoid
damage to the lidar.
Cleaning/replacing the side brush
1. Use a screwdriver to remove the screw on the side brush and
take the side brush out.
2. Attach the side brush after cleaning or replace it with a new
one.
Note: It is recommended to replace the side brush every 3-6
months to ensure cleaning eect.
2. Use a cleaning knife to cut away hairs that have entangled
on the main brush. Use the other end of the cleaning knife to
clean the main brush.
3. Fix back the main brush and main brush cover and secure
the catch.
Main brush cover
Remove
Install
Main brush
17 18
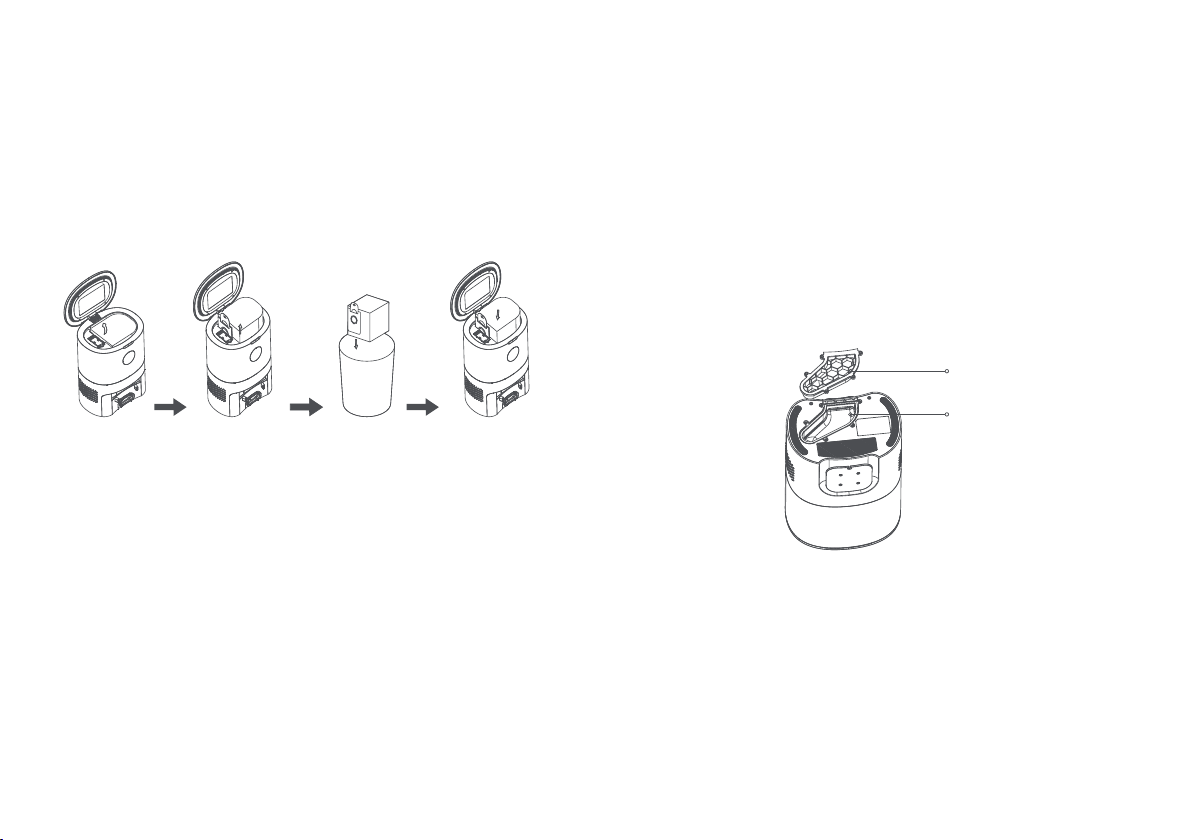
Replacing the dust bag
1. When the dust bag is full, the indicator on the dust bag’s
display will flash in orange. You may also receive an app
notification. Please replace the dust bag immediately. During
normal operation, the indicator on the dust bag's display will
flash in green or white.
Cleaning the dust vent
1. If the indicator on the dust collection station continues to
flash in orange even after the dust bag is replaced, unplugged
the power cable and flip over the dust collection dock. Check
the dust vent for any blockage. If the dust vent is blocked, use
a screwdriver to remove the transparent dust vent cover and
remove the blockage. See the diagram below.
Note: Be gentle when removing
the dust vent cover and dust vent. Put the parts in place after
cleaning them.
Transparent dust vent
cover
Dust vent
Open the cover. Pull up the
dust bag
handle to
remove the
dust bag.
Throw away
the old dust
bag.
Insert a
new dust
bag and
close the
cover.
19 20
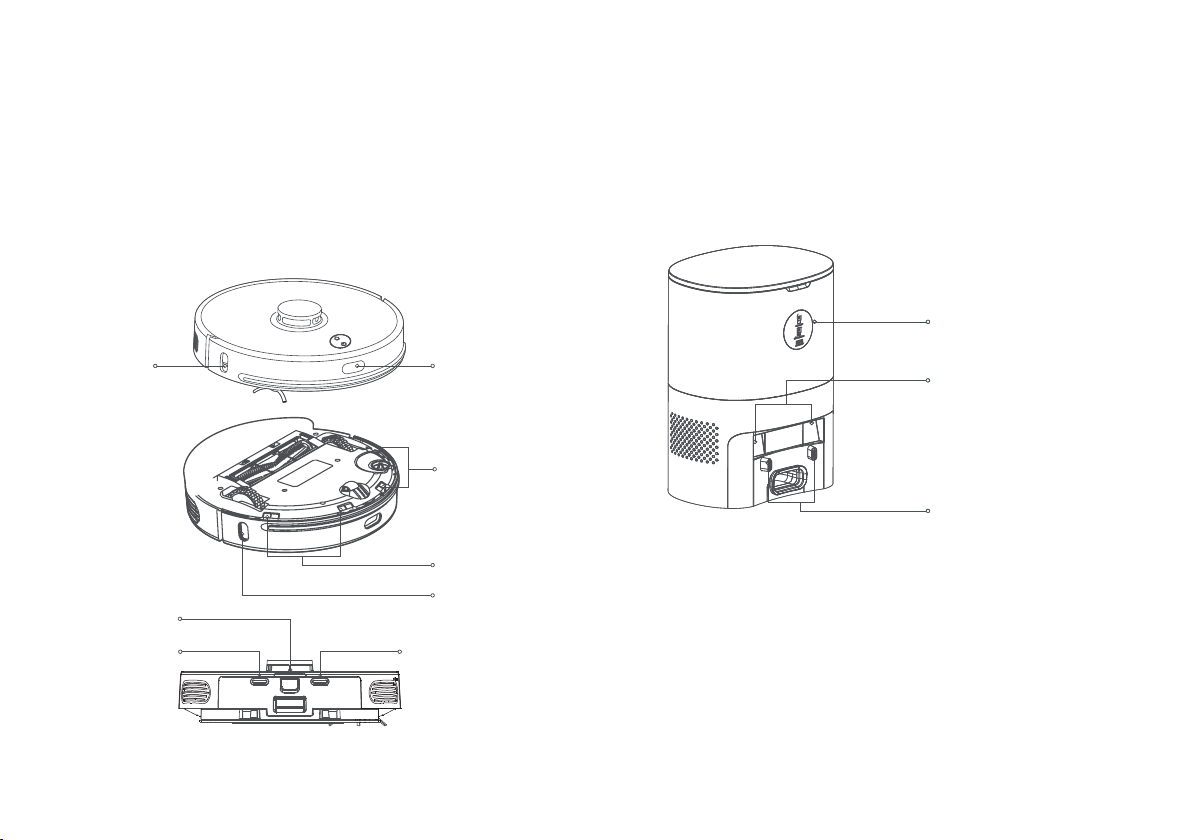
Cleaning the sensors
1. It is recommended to use a piece of dry, soft cloth to gently
wipe the dierent sensors once a week to ensure that the robot
vacuum can operate normally.
Robot vacuum:
Cli sensors x 4 Charging plates x 2
Infrared sensors x 3 Wall PSD detector x 1
Dust collection and charging stand:
Infrared lens x 2
Charging and dust collection sensor heads x 2
Wall PSD
detector
Infrared
sensor
Indicator light
Infrared lens
Charging and dust
collection sensor heads
Cli
sensors
Cli sensors
Infrared sensor
Charging plate
Infrared sensor
Charging plate Maintaining the battery
1. The robot vacuum has a built-in high-performance rechargeable
lithium-ion battery pack. To preserve battery performance, please
keep it charged daily.
2. If the robot vacuum will not be used for an extended period of time,
power it off and store it. Charge it at least once a month to prevent
battery damage.
21 22

Error message Solution
Error 2: Please clean the
cliff sensors and move
device to a new location.
Error 4: Please check and
remove any foreign
objects at the collision
sensor.
Error 3: Strong magnetic
interference detected.
Please move device to a
new location and restart.
Error 1: Please check that
the lidar is not covered.
Error 5: Abnormal
temperature. Please wait
for the device's tempera-
ture to return to normal.
Error 6: Charging error.
Please clean the charging
plates.
Please check and remove any foreign
objects near the lidar or move the
device to a new location and restart.
Please clean the cliff sensors and
restart (see the instruction manual for
the location of the sensors) or move
device to a new location and restart.
Please move the device to a new
location and restart.
Please try to press on the bumper and
remove any foreign object and restart.
The device’s temperature is too high or too
low. Please wait for its temperature to
return to normal and restart.
Please check if an original power
adapter is used and whether the
charging dock is placed on a level
surface. Please power off the device
and unplug the dock’s power cable
before wiping the metallic charging
plates.
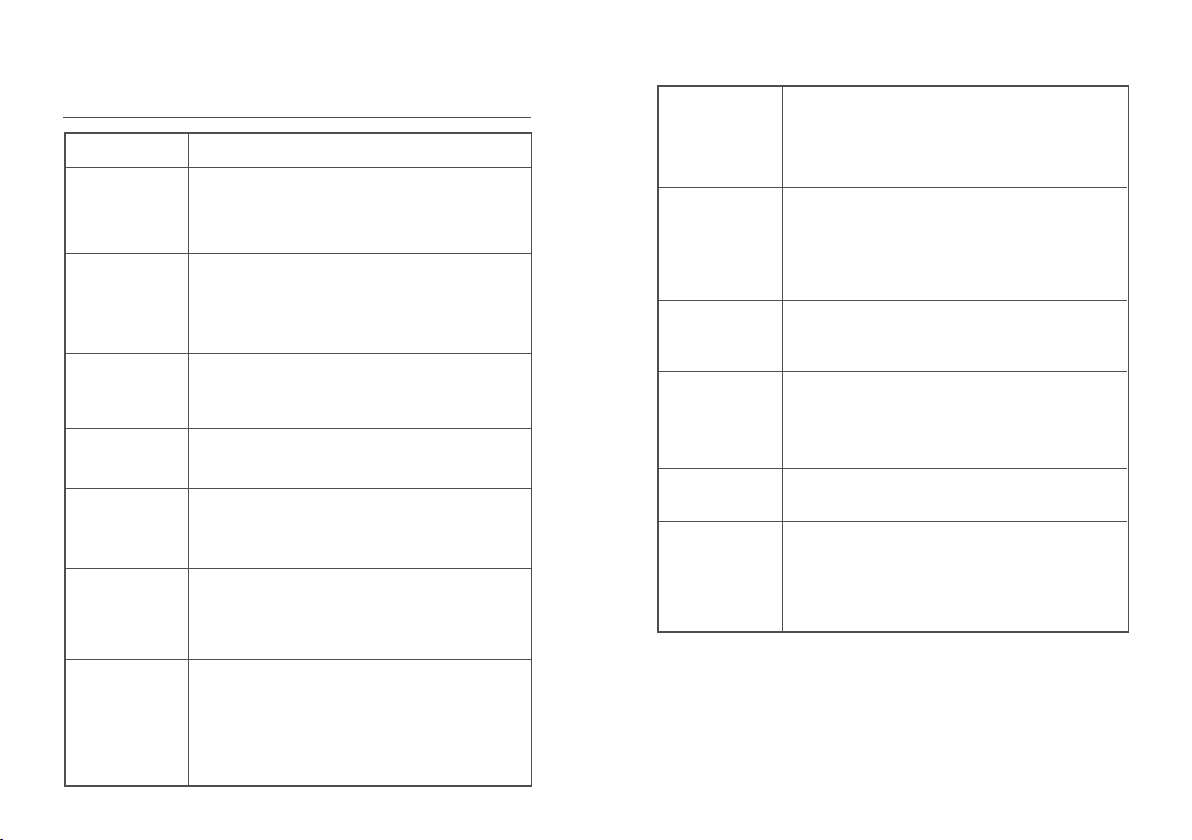
Product name
Model no.
Dimension
Rated voltage
Rated power
IMILAB V1 Vacuuming Robot
CMSDJ707A
φ350mm × 98mm
14.4V
50W
Battery capacity 5200mAh
Wi-Fi connection Wi-Fi IEEE 802.11b/g/n 2.4GHz
Main device
Model no.
Rated power
Rated input
Rated output
950W
CMJCZ01
220V-240V
24V 1.2A
Rated frequency 50/60Hz
External dimension 356 × 250 × 193mm
Dust collection station
Basic parameters Troubleshooting
23 24
When performing spot cleaning or after the
device is moved, the device will generate a new
room map. If the charging dock is too far away,
the device may not be able to automatically
return to the stand. Please place the device on
the stand manually.
There is a weird
noise while the
device is in
cleaning
Power off and restart the device
The roller brush, side brush or left/right wheel
may be entangled. Stop the device and clean it.
1) The dust box is full. Please empty the dust box.
2) The HEPA filter is blocked. Please clean it. 3) The
roller brush is entangled. Please clean the main
brush.
1) Wi-Fi signal is poor. Please ensure that the
device is within Wi-Fi coverage.
2) Wi-Fi connection error. Please reset the Wi-Fi
connection and download the latest app to try
again.
Please ensure that the device is not in do not
disturb mode. In this mode, the device will not
resume cleaning. The device will not resume
stand to recharge.
Question type Solution
The device
cannot be
powered on
The device
won’t start
cleaning
The device
cannot be
recharged
The device is
behaving
strangely
1) The battery is too low. Please charge the device
at the charging dock before use. 2) The ambient
temperature is too low (below 0℃) or too high
(above 50℃)
The device is too far away from the charging
stand. Please place the device near the charging
dock and try again.
The battery is too low. Please charge the device at
the charging dock before use.
There are too many obstacles around the charging
dock. Please place the charging dock in an open
area.
Cleaning
performance is
poor or there is
a dust trail
Unable to
connect to a
Wi-Fi network
The device
cannot return to
the charging
dock after spot
cleaning or
being moved
The device
cannot be
charged
The device did
not follow the
cleaning
schedule
The device is
always offline
The device
cannot be paired
with the phone
Please ensure that there is sufficient space
around the charging stand and that the
charging plates are clean.
Please confirm that the device is connected to a
network. The device cannot be synced and will
not perform any scheduled cleaning if it is not
connected.
Please ensure that the device is connected to a
network and is within the Wi-Fi coverage area.
Please ensure that the charging stand and the
device are within Wi-Fi coverage. Check that the
Wi-Fi signal is strong. Refer to the instruction
manual to reset the Wi-Fi connection and try
pairing again.
The device did
not resume
cleaning after
stopping for a
charge
Frequently asked questions
25 26

Precautions
Do not use any third-party battery, power adapter or charging
stand.
Do not use non-rechargeable batteries.
Do not disassemble, repair or modify the battery or charging
stand on your own.
Do not place the charging stand near a source of heat (such as
radiators, etc.)
Do not wipe any part of the product with a damp cloth or wash
it with liquid.
Please dispose of an old batteries in a proper manner. It is
recommended to hand them over to professional organizations
for disposal.
If there is a need to transport the product, please ensure that
the product is powered o. It is recommended to use the
original packaging materials to pack the product.
This product is only intended for use to clean the floor in an
indoor household environment. Do not use it outdoors (such
as an open terrace), on a non-floor surface (such as sofa), or
in a commercial or industrial environment.
Do not use the product in an elevated environment (such as
duplex floors, open terrace, roof) without any protective fences.
Do not use the product in an environment where the
temperature is above 40°C or below 0°C, or on floor surfaces
with any liquid or stick substances.
Remove any kinds of wires on the floor before using the
product.
Put away any fragile objects and miscellaneous articles (such
as vases, plastic bags, etc.) on the floor to ensure smooth
operation and prevent damage to valuable items.
Do not allow persons with physical, mental or sensory
impairments (including children) to use or operate the product.
Do not allow children to use the product as a toy. When the
product is in operation, supervise the children and pets and
try to keep them away.
Do not put anything (including children, pets) on the product
while it is stationary or in operation.
Do not use the product to clean any burning objects (such as
unextinguished cigarette butts).
Do not use the product to clean long-haired carpets (some
dark-colored carpets may not be cleaned properly).
Do not let the product vacuum hard or sharp objects (such as
renovation materials, glass, nails).
Do not use the lidar cover as a handle to carry the product.
Please clean and maintain the product and charging stand
while they are powered o.
Do not spill any liquid on the product (the dust box can be
cleaned and dried).
Do not put the product upsize down (the lidar cannot be
placed on floor surface).
Please follow the instructions in this manual or the quick
guide when using the product. Users are solely responsible f
or any losses or injuries caused by improper use.
Do not flip over the product. Do not look directly at the UV
light at the bottom of the product.
Battery and charging
27 28
If the product is not used for an extended period of time,
please fully charge the product, turn it o and store it in a cool
and dry location. Charge the product at least once a month to
avoid battery damage.
Use the correct tools to remove the battery. First, unscrew the
bottom cover. Then, unplug the battery and remove it.
Please remove the battery before discarding the product.
When removing the battery, ensure that the product is not
connected to a power source.
All products bearing this symbol are waste electrical
and electronic equipment (WEEE as in directive 2012/
19/EU) which should not be mixed with unsorted
household waste. Instead, you should protect human health
and the environment by handing over your waste equi pment
to a designated collection point for the recycling of waste
electrical and electronic equipment, appointed by the
government or local authorities. Correct disposal and recycling
will help prevent potential negative consequences to the
environment and human health. Please contact the installer
or local authorities for more information about the location
as well as terms and conditions of such collection points.
WEEE Information
Hereby, Shanghai Imilab Technology Co., Ltd. declares that the
radio equipment type IMILAB V1 Vacuuming Robot is in
compliance with Directive 2014/53/EU.
EU Declaration of Conformity
29 30
This manual suits for next models
1
Table of contents


