Immarsat Teletics WKSU-PA User manual

Using Teletics
WKSU-PA
Over BGAN
Extending BGAN
Coverage
Version 01
10 Novemeber 2009

Contents
1Overview 1
2Product Range 1
3Typical Users 1
4Key Features 1
5Benefits to BGAN users 2
6Setting up 2
6.1 Setup Diagram 2
6.2 Equipment Needed 3
6.3 Using BGAN – Step by Step Setup 3
6.4 Thrane & Thrane EXPLORER™ 300/500/700 and 527 3
6.5 Thrane & Thrane EXPLORER™ 110 5
6.6 Sabre 1 Wideye 5
6.7 HNS 9201, 9250 and 9350 7
7Teletics WKSU-PA setup and configuration 7
7.1 Obtaining / Installing Teletics TShop WKSU-PA 58 software: 8
7.2 Laptop setup 9
7.3 Downloading the software 9
7.4 Configuration topology: Working Example 9
8Using Teletics TShop software: 11
9Hints and tips 11
10 Technical Summary 11
11 Customization required 12
12 Further details and support 12

1 Overview
Many BGAN systems provide services to sites with multiple buildings or temporary structures in
close proximity, such as oil and gas camps, or emergency responder sites. Today, the “distribution”
of the BGAN communications services at this type of site is provided by running cable from the
BGAN terminal to various locations.
The Teletics Wireless Key System eliminates the need to run hard cable, by providing the essential
telephone, internet and public address links between the satellite communications equipment and
all of the buildings and structures at the site.
The Teletics WKSU-PA provides phone (RJ11), internet (RJ45), and an option for a wireless public
address connection at each location on the site. This will provide a wireless POTS Line
functionality and internet capability to up to 20 buildings or structures. Teletics also manufactures
phone line voice interfaces. These interfaces enable users to access a remote satellite link that can
support up to 20 outside lines, as well as receive direct dial calls from the rest of the world. The
Teletics WKSU-PA is an ideal compliment to satellite of cellular communications systems,
eliminating hard wire and allowing plug and play set up and tear down.
2 Product Range
The Teletics WKSU-PA System is made up of the following components:
•Up to 20 WKSU-PA radios. Each WKSU-PA radio provides telephone, network, and
(optionally) PA capability to one location/trailer/building at the site.
•Each WKSU-PA requires RF cable and a suitable antenna. If PA is used, an 8 ohm PA
speaker is also required. The customer typically furnishes their own telephone and
computer.
•If PA is a requirement, the Teletics Feature Server is needed to provide “multicast” logic.
•(optional) 2LVOICE units provide POTS interfaces to provide distribution of 2 POTS lines
to any WKSU-PA connected phone in the system. Up to 10 2LVOICE units may be daisy
chained on a system, for 20 lines total.
3 Typical Users
•Oil Well Drilling Camps
•Public Safety Responders
•Constuction Sites
•Any site which has multiple trailers/buildings which moves frequently.
4 Key Features
•Standard RJ11 Telephone connection at each location
•Standard RJ45 Internet connection at each location
•Fully encrypted radio links
•Programming software is included
Using Teletics with BGAN 1
•Each system has a unique “GroupID” to prevent unauthorized access, even from other
WKSU-PA systems
•Wireless Public Address at each location with individual or group paging.
•5.8 GHz operation provides interference free operation
•Any station can call any other station at any time without incurring satellite cost
•Outside lines may be assigned to any phone in the system
•Teletics equipment is designed to withstand harsh environments
5 Benefits to BGAN users
•Teletics WKSU-PA offers you the following main benefits:
•Faster communications setup after site moves
•Much better reliability than hard wire between trailers/buildings
•Improved access to communications services provided on the site
•Enhanced communications between workers at the site
•Public Address Capability
6 Setting up
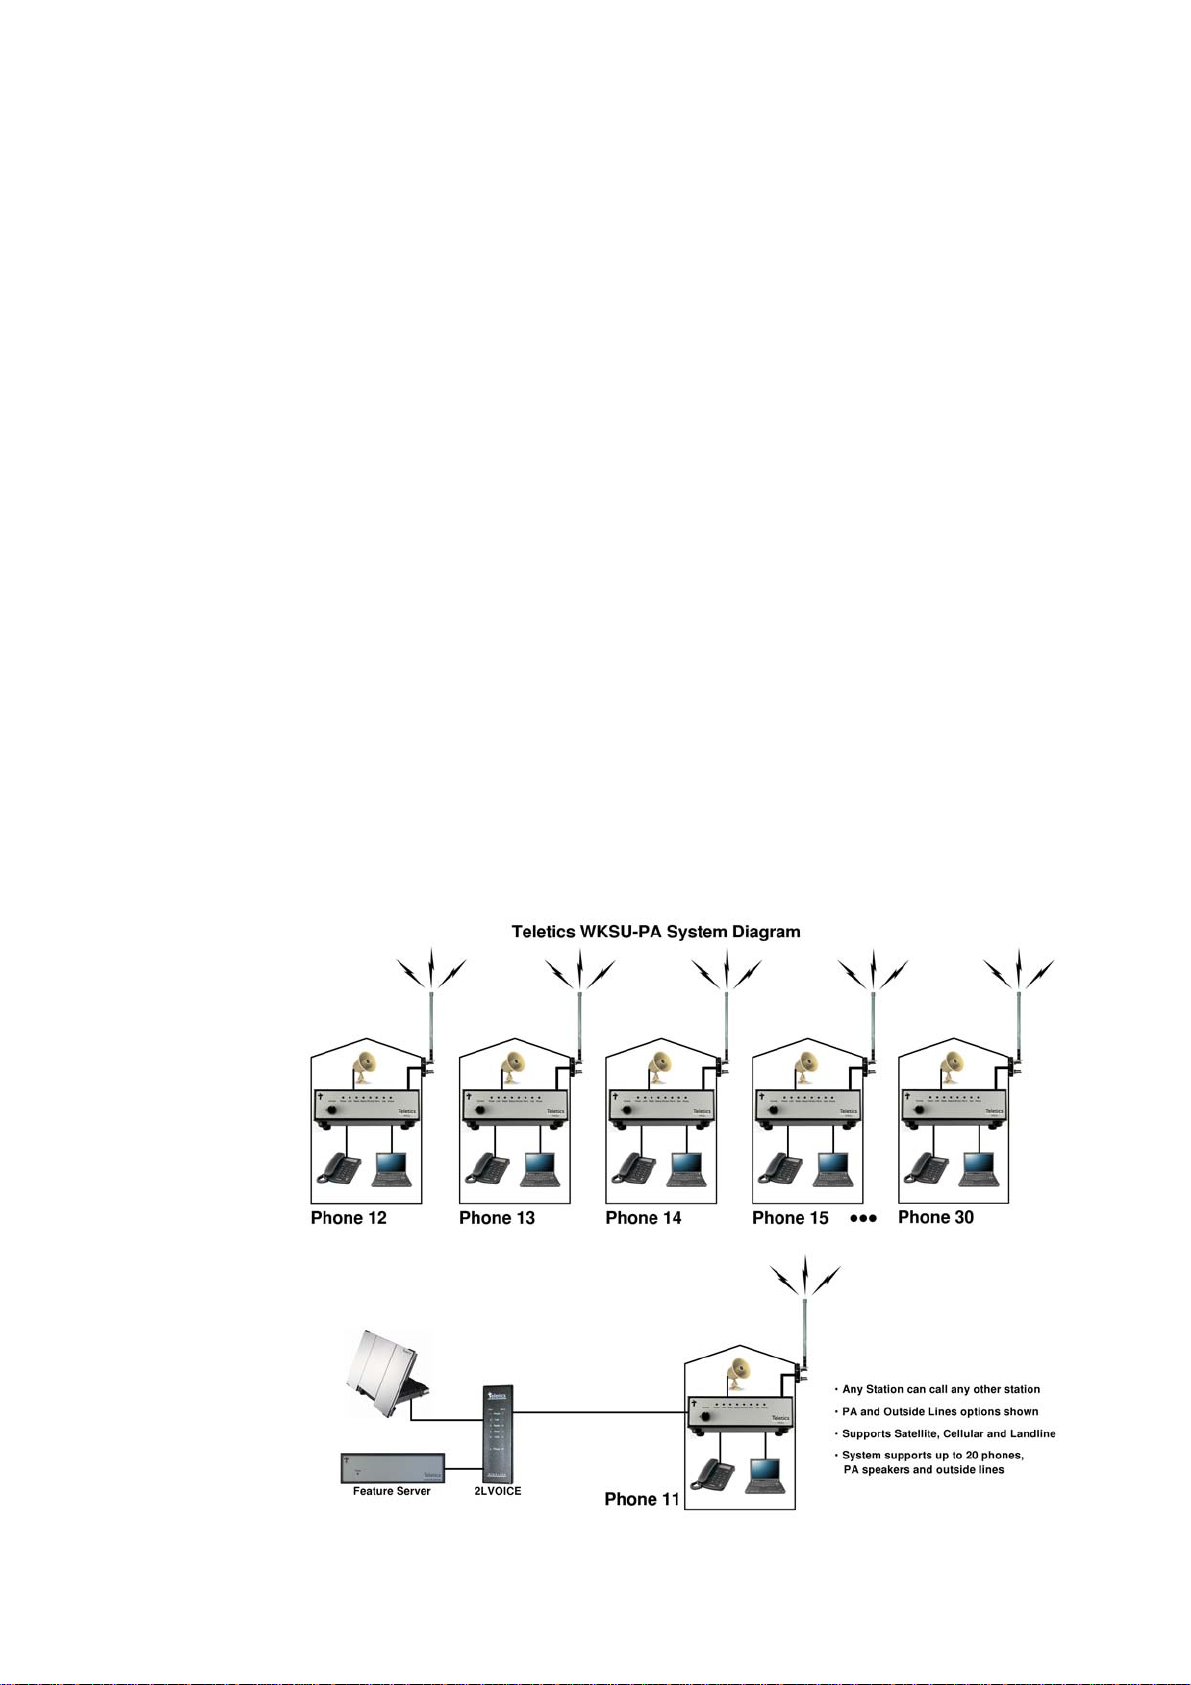
6.1 Setup Diagram
Using Teletics with BGAN 2

6.2 Equipment Needed
•Phones (if not supplied by the customer)
•Computers (if not supplied by the customer)
•8 ohm PA speakers for each location requiring Public Address
•5.8 GHz antennas (one for each WKSU-PA)
•Radio cable (one for each WKSU-PA and of sufficient length)
•Optionally, one small ethernet switch if any LAN connections are required at the master
WKSU-PA
•In cases where power on site is not stable/reliable or of questionable quality, a UPS power
supply capable of at least powering the Master WKSU-PA, the Feature Server, and
(optionally) any 2LVOICE units.
•One open Ethernet port on the BGAN
•One or more open POTS interfaces on the BGAN
•Teletics TShop programmings software, from the Teletics website
•Teletics TRadio signal strength software, from the Teletics website
•Teletics TPeek interrogation software, from the Teletics website
•Laptop or Desktop Computer to run the Teletics Software
6.3 Using BGAN – Step by Step Setup
To set up your computer and BGAN terminal for Teletics WKSU-PA:
Assemble the BGAN terminal as you usually would. There will be a regular RJ11 jack for
connecting a regular phone. This is where the beige ports for the Teletics 2LVOICE will be plugged
into. You should read the Teletics 2LVOICE manual for details on which line is used by which
phone on the system, programming, etc.
To download the Teletics TShop WKSU-PA 5.8 programming software, contact Teletics Technical
Support for a user name and password. Make certain you specify that you are using the WKSU-PA
system with a BGAN terminal, since there is a specific version of TShop for use with Inmarsat.
Program all the WKSU-PA units in the system with the Inmarsat version of TShop, as described in
the TShop manual, and assemble the WKSU-PA system on a bench for testing.
6.4 Thrane & Thrane EXPLORER™ 300/500/700 and 527
Background IP service should be initiated from the BGAN terminal and can be configured from
either the EXPLORER™’s built-in web server (via a laptop’s web browser) or using the LCD MMI.
1. Open your internet web browser and type the following IP address in the address bar:
192.168.0.1
Using Teletics with BGAN 3

2. Click on Settings and then LAN
3. Now you should see the web server interface. Use the default settings, i.e. Router mode, and
automatic activation is enabled.
4. Now your terminal is configured to start a Standard connection after you register on the network.
5. Restart your terminal and click OK after properly pointing the terminal. Once the Explorer is
register on the BGAN network you will be connected automatically with a Standard connection.
Connecting to BGAN via LCD MMI
The screenshot below shows the settings required as configured via the EXPLORER™ LCD MMI.
To initiate a connection from the LCD MMI, go to the main view of the LCD.
Press Arrow Down button until CONNECT menu is selected
Press OK
Select Standard and press OK button
Select START and press OK button
Press OK button to confirm Standard connection and wait a minute or two to allow the
EXPLORER™ to register the Packet Switched connection with the BGAN system. After registration
the LCD main screen will show DATA ACTIVE.
Using Teletics with BGAN 4

6.5 Thrane & Thrane EXPLORER™ 110
Background service should be initiated from the BGAN terminal using the EXPLORER™110’s built-
in web server (via a PC’s web browser).
1. Open your internet web browser and type the following IP address in the address bar:
192.168.0.1
2. Now you should see the web server interface
3. Next, click on Data connections on the left hand side menu.
4. Change the connection type by clicking the dropdown box and select ‘Standard
Background’.
5. Make sure your Data Connection Activation is set to ‘Automatic when any PC is
connected to the Unit.
6. Before you exit the web interface make sure you click ‘Store Settings’.
You can connect to BGAN in two different ways, from the web server interface or by using the front
panel.
Using the front panel
1. Power on the terminal by pressing and holding the ACTIVATE for 1.5 seconds.
2. Obtain a GPS fix.
3. Find the best signal.
4. Press the Activate on the front panel of the terminal and you will automatically register to
the network. Wait approx. 30 seconds and you will be on the internet. If you have a World
Set you will see displayed ‘Connected’.
Using the Web Interface (if you set up ‘Data connection Activation’ to ‘Manual’)
1. Open your internet web browser and type the following IP address in the address bar:
192.168.0.1
2. Next, click on Data connections on the left hand side menu.
3. Make sure the ‘Manual’ radio button is selected under connections
4. Finally, scroll down and click ‘Connect’ at the bottom of the page.
6.6 Sabre 1 Wideye
Using Teletics with BGAN 5

Background Standard service should be initiated from the BGAN terminal and needs to be
configured from the Wideye™ Sabre I’s built-in web server (via a PC’s web browser).
1. Open your internet web browser and type the following IP address in the address bar:
192.168.1.35
2. Then you will prompt for the User Name: sabre1 Password: wideye.
3. On the web interface, Click on the Data Icon
4. Click on Primary Profiles
5. Select the connection Type as Standard
6. Check mark ‘Set as default’
7. Click ‘Update Settings’
Your configuration should look like this
8. Click on the Settings Tab
9. Select ‘Router Mode (Multi User)’
10. Check the box for ‘Auto PDP context Activation’. This will make the terminal start the
Standard connection automatically after you register on the network.
11. Save settings
Using Teletics with BGAN 6
12. Reboot the terminal
13. Accept the signal strength by pressing Enter on the LCD screen. Now your Standard
connection should start in a minute of so.
6.7 HNS 9201, 9250 and 9350
Standard service should be initiated from the BGAN terminal and needs to be configured from the
Hughes™ HNS9201’s built-in web server (via a PC’s web browser).
1. Open your internet web browser and type the following IP address in the address bar:
192.168.128.100
2. Click on ACA on the menu on the left.
3. Select ACA settings for TEs using DHCP assigned IP address ‘ON’
4. Click Apply
5. Then Click Restart Terminal
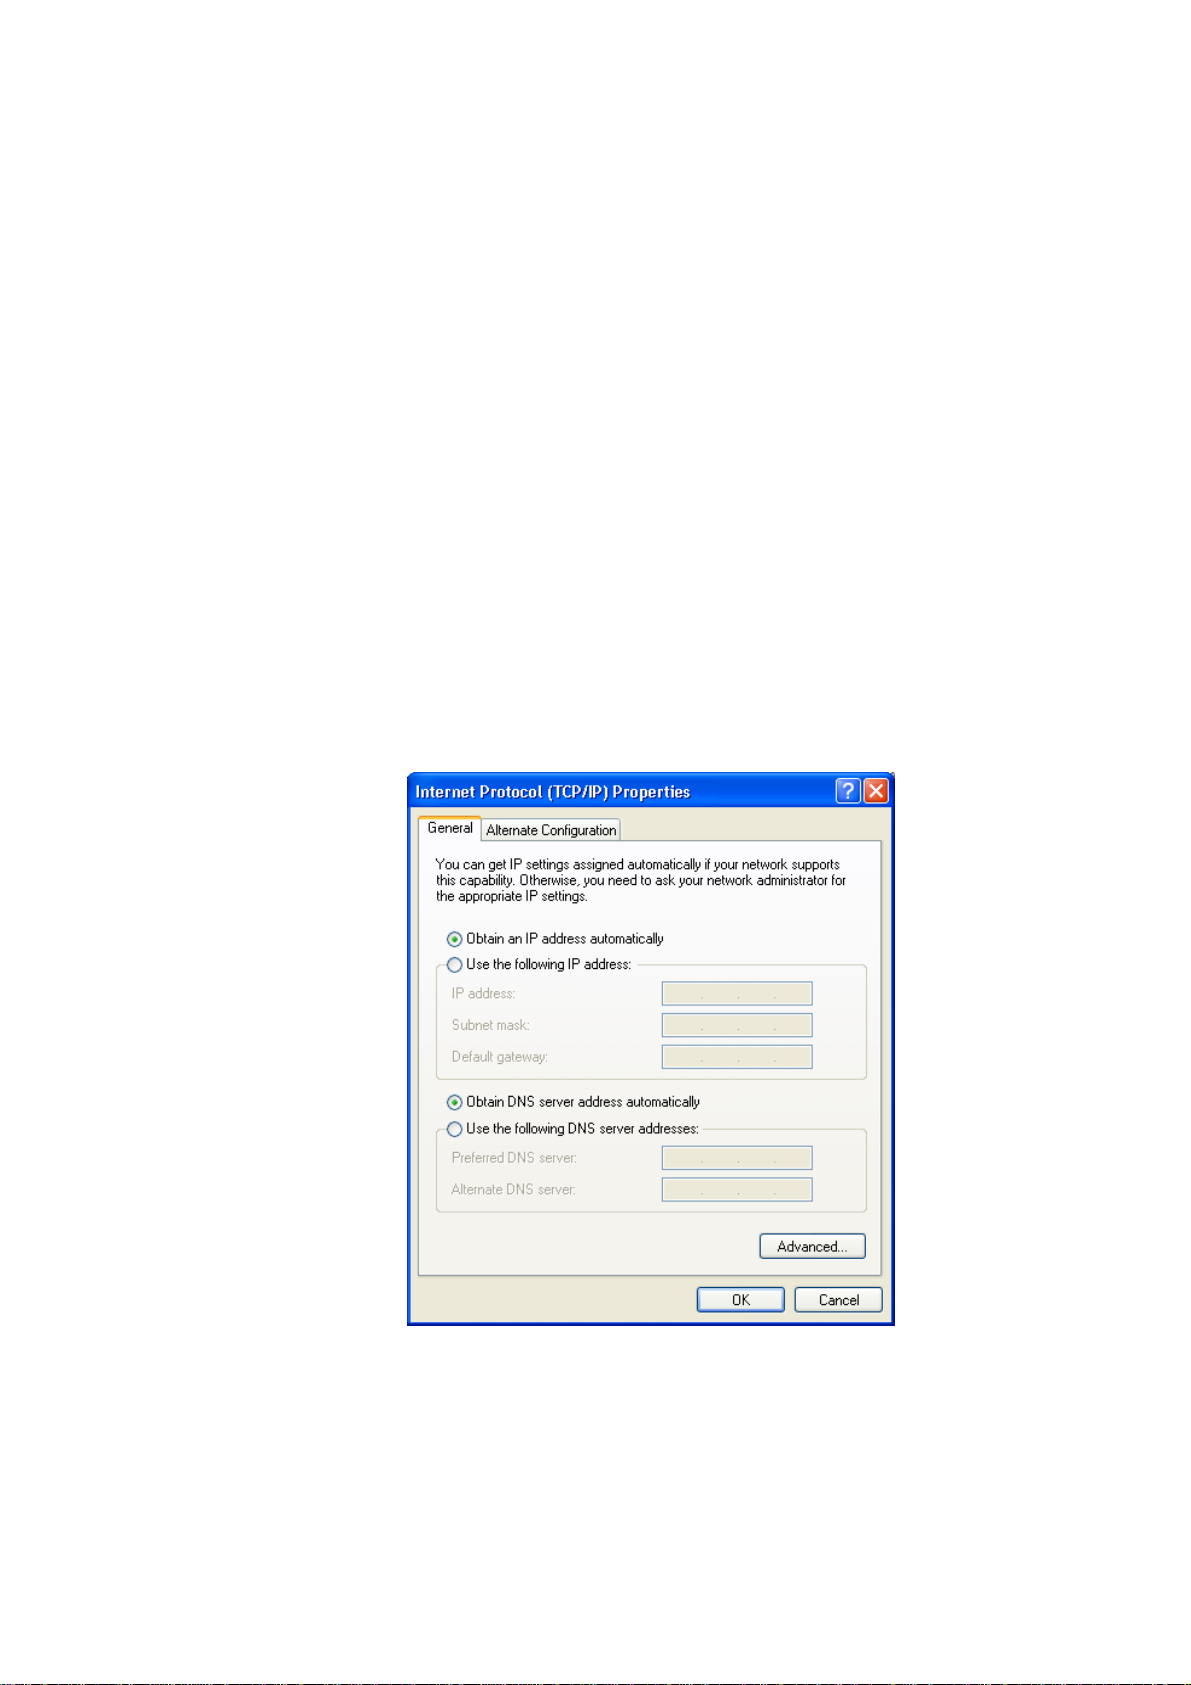
6. Next, configure the PC TCP/IP setting to Obtain an IP address Automatically (Start->Control
Panel -> Network Connections. Right click on the LAN interface and select Properties. Select
‘Internet Protocols’ from the list, and select Properties).
7. Now register the terminal by pressing the Audio button until the signal strength lights go off or by
clicking the Register with the Network button on the Properties page of the web interface.
8. The terminal will automatically recognize the DHCP Request and start the Background service
automatically.
7 Teletics WKSU-PA setup and configuration
Using Teletics with BGAN 7

(complete WKSU-PA installation instructions are available on the Teletics website
www.teletics.com/support)
The WKSU-PA system is architected to be a “star topology”. In each system, there needs to be one
master (Unit 11), and up to 19 stations numbered 12 through 30. A system may contain as few as 2
WKSU-PA units, or as many as 20.
•Each WKSU-PA station needs to have radio line of sight to the WKSU-PA master.
•WKSU-PA Stations do not have to have RF line of sight to each other, only the master.
•It does not matter which WKSU-PA station or master the Teletics Feature Server is
plugged into. It simply needs to be connected somewhere on the system.
•By the same rule, it also does not matter where the 2LVOICE units are plugged into.
Here is an example WKSU-PA installation scenario:
An oil drilling rig operation has one BGAN terminal with 2 outside lines, plus an internet connection
for the camp, located in one of the trailers. There are 5 trailers in total, plus a phone on the drilling
rig “doghouse” and one other outside phone on the mud separator platform. There is a requirement
for a PA connection at each location, plus a requirement to have phones 12, 15, 16 and 17 to be
able to dial out over the BGAN system.
This example system requires the following equipment:
•7 WKSU-PA units, one programmed as a Master, the other 6 as stations
•1 Teletics Feature Server units
•2LVOICE unit
•TShop WKSU-PA 58 Programming Software
7.1 Obtaining / Installing Teletics TShop WKSU-PA 58 software:
Using Teletics with BGAN 8

To assist you in deciding which computer you would like to load TShop WKSU-PA 58 on at your
shop, you should be aware that TShop WKSU-PA 58 performs best on a dedicated desktop
computer with one Ethernet port and Windows XP Professional, Service Pack 2. It can run on
machines as slow as 1GHz effectively. It is often better just to put an older (but reliable) computer
on the bench and dedicate it to running TShop WKSU-PA 58. However, you can still run it on a new
laptop, assuming you follow the following setup procedure:
7.2 Laptop setup
1. Ensure that the Ethernet port is the only network device that Windows XP can use. You
MUST disable any wireless networking or other network devices that are built into the
laptop.
2. Ensure that the laptop that you are using is not putting the Ethernet port to sleep as a
power saving feature. If the Ethernet port goes to sleep during programming, it will cause
TShop WKSU-PA 58 to hang.
3. In rare cases, it is necessary to turn off the automatic cable detection feature in the Laptop
chipset’s drivers. The Ethernet port on the WKSU-PA units have this feature turned on,
and occasionally the WKSU-PA and laptop will both attempt to switch back and forth and
neither will ever settle on the correct setting.
7.3 Downloading the software
Once you have a computer ready, preferably with Windows XP Service Pack 2 installed, you should
obtain the software by doing the following:
1. Open up “My Documents” in windows.
2. Enter
ftp://ftp.teletics.com in the address bar. Press the enter key, or hit the “go” button.
3. You will be asked for a User Name and Password. You will need to either get these from
your distributor, or directly from Teletics technical support. The reason that we do not give
out the User Name and password in this manual is to ensure that you download the
correct version of the TShop WKSU-PA 58 software for your equipment.
4. Once you have entered in the correct User Name and Password, you can obtain a manual
about how to download and install TShop WKSU-PA 58 under the Manuals folder, and
then the correct version of TShop WKSU-PA 58 in the Software folder.
Complete installation and use instructions for TShop WKSU-PA 58 are in the TShop WKSU-PA 58
manual.
7.4 Configuration topology: Working Example
Using Teletics with BGAN 9

For any WKSU-PA system to correctly operate, you will need to program one WKSU-PA as unit 11.
The rest can be programmed as any number from 12 through 30, however you cannot have two
WKSU-PA units with the same number in one system. A system may contain up to 20 WKSU-PA
units.
Each WKSU-PA unit has its own serial number that is assigned at the factory. This is on the label of
each unit. Additionally, the TShop WKSU-PA 58 programming software allows you to set a Group
ID as well, which is a common identity code which is used to group units into one system together.
The Group ID can be any alpha numeric sequence you would like, up to 10 characters or numbers.
When Teletics WKSU-PA systems leave the factory, they are tested and shipped as systems with
one master and 4 stations. They are numbered 11, 12, 13, 14, and 15, and the Group ID for the
system is the Teletics WKSU-PA 58 Installation and User Guide Page 10 same as the serial
number for the Unit 11 master. The factory default channel is channel A and the LAN and dial 9
features are also turned on by default during factory programming. These systems may be
deployed right out of the carton as a 5 station system.
However, for example, let’s assume that we have a brand new WKSU-PA system in its carton in
our shop, and we have two additional “loose” units that we want to make into one 7 station system.
For our example let’s assume that they have the following serial numbers:
Unit Serial Number Group ID
Complete System: Unit 11 0805-0360 0805-0360
Unit 12 0805-0361 0805-0360
Unit 13 0805-0362 0805-0360
Unit 14 0805-0363 0805-0360
Unit 15 0805-0364 0805-0360
Loose Units: Unit 12 0802-0301 unknown
Unit 14 0802-0303 unknown
Therefore, the fastest way to program our example system is to program the loose units to Unit 16
and Unit 17 using TShop WKSU-PA 58, using the Group ID of the new, complete system, which is
0805-0360. Also, keep in mind that you should use the TShop factory default channel of Channel A.
If you wish, you can disable the LAN port on the unit, so that your customer cannot connect a
computer to the unit. Setting the dial 9 option to off simply speeds up the return of a busy signal to
WKSU-PA units which do not have an outside line assigned to a 2LVOICE line.
One other way to accomplish the same thing is to reprogram all of the units using a serial number
of your choice, such as A1B2C3D4, or SITE4567.
Keep in mind that all serial numbers are case sensitive!
It is noteworthy that Teletics Feature Server units do not require any kind of programming. They will
only talk to the system that they are physically connected to. 2LVOICE units also do not need to
know the Group ID of the system. They only need to be programmed to the phone number of the
WKSU-PA units that each line is paired to.
Once you have the WKSU-PA units programmed, it is a good idea to test them as a system to
ensure that each unit can call the other units in the system. You connect one of the units to the
Teletics Feature Server unit, and once you have antennas and phones connected to each unit, you
Using Teletics with BGAN 10

should apply power to all of them. You can refer to the “Powering Up” section on what the LEDs on
the front panel mean.
Once all of the WKSU-PA units can call each other, you can attach PA speakers to their outputs
and try doing a PA message across the system. Be warned that the volume produced by multiple
WKSU-PA units on one bench can be a bit overwhelming. You should start with the Volume at
about a quarter and go from there.
Finally, once the complete system is working on a phone to phone or PA basis, you can then attach
the 2LVOICE unit and test the functionality of the outside phone lines.
8 Using Teletics TShop software
When you start up TShop, you will see the following screen:
Once TShop is initialized, you may program a WKSU or
2LVOICE simply by plugging it in to the Ethernet port of your
computer using a standard (straight through) Ethernet cable.
There are two main sections to the TShop screen:
Phone – used to program WKSUs
Gateway – used to program 2LVOICE units
The GroupID field is like a “system identifier”. All units in one
system are given this ID so that they will communicate with
each other, but not another system.
You may program any WKSU-PA with any Phone number
from 11 to 30. This is provided as a drop down choice in the
software.
Complete installation instructions on using TShop may be
obtained from the TShop Manual available at
ftp://ftp.teletics.com.
9 Hints and tips
When a phone connected to the WKSU-PA dials an outside line, the WKSU-PA system strips off
the leading “9” and presents the rest of the phone number to the BGAN.
10 Technical Summary
Using Teletics with BGAN 11

The Teletics WKSU-PA technical feature sets are summarized below: see example below.
WKSU-PA Feature Server 2LVOICE
Interfaces RJ11 (1), RJ45 (1)
2W /8 Ohm PA (1)
600 Ohm PA (1)
RF “N” connector
RJ45 (1)
RJ45 (2)
RJ11 (2)
Power 12VDC / 2.5A
(Universal Wall Cube
included)
12VDC / 1A
(Universal Wall Cube
included)
12VDC / 2.0A
(Universal Wall Cube
included)
Operating Temperature
Range -40C to +55C
-40F to +130F -20C to +50C
-5F to +125F -0C to +40C
32F to +104F
Software Included TShop
TPeek
TRadio
TShop
TPeek
TRadio
TShop
TPeek
TRadio
Weight 3.8 kgs / 8.4 lbs 3.4 kgs / 8.1 lbs 3.3 kgs / 8.0 lbs
Dimensions 7.6” x 6.1” x 2.25” 7.6” x 6.1” x 2.25” 8” x 10” x 3”
11 Customization required
A regular phone cable will need to be installed between the 2LVOICE unit and the POTS interface
on the BGAN terminal – This is the port on the BGAN terminal where you can plug in a regular
phone.
You also need to ensure the BGAN terminal will accept phone calls on this port. The best way to
check if the BGAN terminal is properly programmed is to plug a regular phone into this port and
make a phone call to check its operation.
12 Further details and support
Inmarsat Contact:
Teletics Products:
Mike Fraser – VP of Sales (USA) 800 511 7813 or 916 267 3320
www.inmarsat.com/bgan
Whilst the above information has been prepared by Inmarsat in good faith, and all reasonable efforts have been made to ensure its accuracy, Inmarsat makes no warranty or representation as to
the accuracy, completeness or fitness for purpose or use of the information. Inmarsat shall not be liable for any loss or damage of any kind, including indirect or consequential loss, arising from
use of the information and all warranties and conditions, whether express or implied by statute, common law or otherwise, are hereby excluded to the extent permitted by English law.
INMARSAT is a trademark of the International Mobile Satellite Organisation, Inmarsat LOGO is a trademark of Inmarsat (IP) Company Limited. Both trademarks are licensed to Inmarsat Global
Limited. © Inmarsat Global Limited 2006. All rights reserved
Using Teletics with BGAN 12
Table of contents
Popular Network Hardware manuals by other brands


Apposite
Apposite Netropy 10G1 quick start guide

Monacor
Monacor DN-10 instructions

Linksys
Linksys NMH305 - Media Hub Home Entertainment Storage NAS... user guide

Alstom
Alstom MiCOM H35x Technical manual

Fortinet
Fortinet FortiController FortiController-5208 System guide

Direct IP
Direct IP IDIS DR-1304P Operation manual


