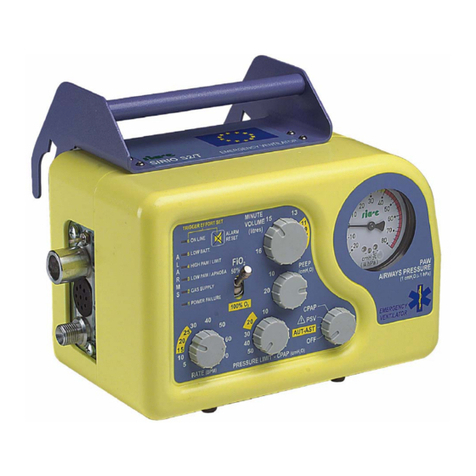
Impact Instrumentation UNI-VENT Eagle 700 Series Operation manual

EXTERNAL
AIR
SIGH PEEP
(cmH O)
PLATEAU
(cmH O) (cmH O) (cmH O)
222 2
by
tm
PRESSURE ALARMS
HIGH LOW
Series Portable Ventilator - Model 754
15 100 050
MODE
SYSTEM
FAILURE
ALARM
MANUAL
BREATH/
TRIGGER
MUTE/
CANCEL
ALARM
VENTILATION
RATE
INSPIRATION
TIME I:E RATIO
TIDAL
VOLUME
AIR/OXYGEN
MIXER
2345
SIMV
A/C CPAP
OFF CAL
1 150 0.1 3.0 MIN MAX 21 100
(BPM)
ASSIST/SIMV
(SEC) (ml) (%O )
2
1
1:2 I:E
SET
IMPACT
Uni-Vent
CHARGE
OFF OFF 0 OFF 100 0
ALARM MESSAGE CENTER
MODE=A/C
V = 12.0L
INSPIRATION
min
12 BPM 1.0 SEC 1:4.0 1000ml del 21% O
.2
EXT PWR ON
OK
- +
P (T=12 SEC) (cmH O)
aw
2
0
50
100
PEAK= 27
MEAN= 8
EXTERNAL AIR OFF/ON
Pushbutton Switch: Use with
nominal 50-PSI compressed gas
source. Default value is "OFF".
Status displayed in LCD (beneath
Pushbutton Switch).
SIGH OFF/ON Pushbutton Switch: Default value is "OFF". When
set to "ON", first breath delivered is a SIGH, then once every 100-
breaths or 7-minutes thereafter (whichever occurs first). Each
SIGH equals 150% of Inspiration Time setting, delivered volume is
increased by 50%. Status displayed in LCD (beaneath Pushbutton
Switch).
PEEP OFF/ON-SET Pushbutton Switch:
Sets internally-generated PEEP setpoint.
Default value is "OFF". Range is from 0 to
20 cmH O. Value increases by 1, each
2
time pushbutton is pressed. Value displayed
in LCD (beneath Pushbutton Switch).
PRESSURE PLATEAU OFF/ON Pushbutton Switch:
Default value is "OFF". When switch is pressed,
PLATEAU value is automatically referenced 10
cmH O less than HIGH PRESSURE ALARM/PEAK
2
INSPIRATORY PRESSURE RELIEF Control setpoint.
Plateau range is 5 to 90 cmH O. Value displayed in
2
LCD (beneath Pushbutton Switch).
HIGH PRESSURE ALARM/PEAK INSPIRATORY PRESSURE RELIEF Control:
Sets threshold value for High Pressure Alarm/Peak Inspiratory Pressure Relief.
Range is 15 to 100 cmH O. Default is current postion of Control. Activates
2
when inspiratory pressure exceeds setpoint any time during 4-consecutive
ventilations. Value displayed in LCD (beneath Control).
LOW PRESSURE ALARM Control: Sets threshold
value for Low Pressure Alarm. Range is 0 to 50
cmH O. Default is current postion of Control.
2
Activates when inspiratory pressure does not exceed
setpoint at any time during 2-consecutive ventilations.
Value displayed in LCD (beneath Control).
PEAK and MEAN AIRWAY PRESSURE Indicators: Display
the Peak and MEAN Airway Pressure of the previous breath.
HIGH AIRWAY PRESSURE ALARM Setpoint Indicator: Indicates current
setting of HIGH PRESSURE ALARM Control adjacent to Digital Bar Graph.
DIGITAL BAR GRAPH Indicator: Provides continuous display of airway
pressure. Range is from -10 to +100 cmH O, vertical resolution 2 cmH O/bar.
22
LOW AIRWAY PRESSURE ALARM Setpoint Indicator: Indicates current
setting of LOW PRESSURE ALARM Control adjacent to Digital Bar Graph.
P Indicator: Displays the most recent 12-seconds of airway pressure
aw
information. Vertical axis is calibrated to coincide with adjacent DIGITAL
BAR GRAPH. Horizontal axis is calibrated in 1-second intervals.
AIR/OXYGEN MIXER Control: Sets FIO when ventilator is connected to
2
external 50-PSI oxygen source. Range is 21 to 100%. Default is current
position of Control. FIO value displayed in LCD (above Control).
2
TIDAL VOLUME Control: Sets Tidal Volume. Range is based on gas flow not
exceeding 60 LPM (1000 ml/sec). Default value is current position of Control.
Set and delivered Tidal Volume alternately displayed in LCD (above Control).
MODE Selector Switch: Applies operating power to ventilator for Assist-Control
(A/C), Synchronized Intermittent Mandatory Ventilation (SIMV), Continuous
Positive Airway Pressure (CPAP), or Transducer Calibration (CAL) modes.
CHARGE Indicator: Green LED, illuminates when battery recharging current
is flowing. LED does not remain illuminated when battery is fully charged.
ALARM Indicator: Activates for all alarm conditions except a System Failure Alarm. Red
LED flashes on/off when alarm is not muted; stays on continuously when alarm is muted.
The LED Indicator is accompanied by a pulsing tone that remains on until the alarm is muted.
SYSTEM FAILURE Indicator: Activates when CPU is forced to stop operation or a CPU failure
has occurred. Red LED illuminates continuously and is accompanied by a continuous audible
tone that cannot be muted. A System Failure will cause the LCD to blank.
MANUAL BREATH/TRIGGER: Delivers a Manual Breath equal to one complete ventilatory cycle in A/C and
SIMV. In CPAP, the Manual Breath delivers gas at a 30 LPM flow rate, for 1.67-seconds, pressure limited to
40 cmH O. The Manual Trigger is operational when a System Failure has occured. Gas will flow at a rate of
2
30 LPM, pressure limited to 40 cmH O, for as long as the Pushbutton Switch is pressed.
2
ALARM MUTE/CANCEL Pushbutton
Switch: The alarm catagory
determines what effect pressing this
switch will have. It will mute an
audible operating alarm signal,
cancel an advisory alarm signal, or
cancel specific alarms such as
APNEA or EXTERNAL POWER FAIL.
A typical mute is 30-seconds, special
alarms have longer mutes.
MODE Indicator: Displays current
setting the MODE Selector Switch
V Indicator: Displays Minute Volume
min
(in liters), in the A/C mode.
INSPIRATION/EXHALATION Indicator:
Alternately displays the inspiration and
exhalation phase of mechanical and/or
spontaneous breaths.
POWER INFORMATION CENTER: A 2-line
area that displays current status of external
power, internal power, and fuses. The EXT
PWR line blanks when the ventilator is not
connected to an external power source.
ALARM MESSAGE CENTER (AMC): A
centralized location for displaying up to 4-lines
of alarm message information. Up to 2-alarms
with, short messages, may be displayed
simultaneously. If more than 2-alarms occur
simultaneously, only the name of each alarm is
displayed (as shown below in boldface).
BATTERY LOW/FAIL-RECHARGE/
REPLACE BATTERY PACK
EXTERNAL POWER LOW-CHECK
POWER SOURCE/CONNECTIONS
O2 LOW/FAIL-CHECK OXYGEN
SOURCE/CONNECTIONS
EXT AIR LOW/FAIL-CHECK AIR
SOURCE/CONNECTIONS
LOW PRESSURE-PEAK INSPIRATORY
PRESSURE TOO LOW
DISCONNECT-CHECK CIRCUIT
CONNECTIONS
HIGH PRESSURE-PEAK INSPIRATORY
PRESSURE TOO HIGH
APNEA-CHECK PATIENT FOR
SPONTANEOUS BREATHING
APNEA-CPAP AVERAGE RATE LESS
THAN 6-BPM
HIGH PEEP-INSPIRATION BEGAN
BEFORE END PRESSURE PLATEAU
FIO2-GAS MIX ERROR. CHECK
SOURCE/SETTINGS/CONNECTIONS
PRESSURE ALARM SETTINGS-ALARM
SETTINGS REVERSED
VT-DELIVERED TIDAL VOLUME DOES
NOT EQUAL SET TIDAL VOLUME
COMP-COMPRESSOR OUTPUT
LOW/FAIL
INSPIRATION TIME TRUNCATED
TO 3-SEC - NOTE I-TIME & I:E
PLATEAU VOLUME-DELIVERED
VOLUME LESS THAN SET VOLUME
VT SETTINGS - I-TIME X FLOW
UNABLE TO DELIVER SET VOLUME
EXT PWR FAIL/DISCONNECT - CHECK
POWER SOURCE/CONNECTIONS
TOTAL FLOW BACKUP -
CONTACT CUSTOMER SERVICE
INVERSE I:E-INSPIRATORY TIME
LONGER THAN EXHALATION TIME
TRANSDUCER CALIBRATION ABORT
RECALIBRATE TRANSDUCER
The following alarm overrides any of the above
messages when activated:
VENTILATOR FAILURE DETECTED
* this alarm is followed by one of the following *
FAILURE CODE 1
SELF-CHECK FAILURE!
FAILURE CODE 2
NO GAS AND COMPRESSOR FAILURE!
FAILURE CODE 3
EXCESSIVE AIRWAY PRESSURE!
FAILURE CODE 4
MEMORY CHECK FAILURE!
FAILURE CODE 5
EXHALATION VALVE FAILURE!
FAILURE CODE 6
EXCESSIVE NEGATIVE PRESSURE!
FAILURE CODE 7
RUN-TIME CALIBRATION FAILURE!
VENTILATION RATE Control:
Sets mechanical ventilation rate
for A/C and SIMV modes. Range
is 1 to 150 BPM. Default is
current position of Control. Value
displayed in LCD (above Control).
INSPIRATION TIME I:E RATIO Control:
Sets inspiratory duration for all ventilator-
generated breaths. Range 0.1 to 3.0-
seconds maximum. Usable range is
limited by VENTILATION RATE Control
setting (Inverse I:E is not permitted). Fully
counterclockwise position enables fixed
1:2 I:E Ratio. Default is current position of
Control. Combination of inspiration time and
I:E Ratio is displayed in LCD (above Control).
Uni-Vent Eagle Model 754/754M Portable Ventilator: Description of Controls and Indicators.
TM
TM Rev C
(02/98)

MANUAL, OPERATION & SERVICE
PORTABLE, SELF-CONTAINED VENTILATION SYSTEM
(VENTILATOR, COMPRESSOR, AIR/OXYGEN MIXER)
UNI-VENTEagle
700 SERIES
MODEL 754/754M
Impact Instrumentation, Inc.
27 Fairfield Place
West Caldwell, New Jersey 07006
1997 Impact Instrumentation, Inc. REV. 1.85N (04/05)
P/N 906-0754-02

T A B L E O F C O N T E N T S
_____________________________________________________________________________________________
______________SUBJECT PAGE________
LIST OF ILLUSTRATIONS iv
CONVENTIONS, TERMINOLOGY, DEFINITIONS AND
ABBREVIATIONS AS USED IN THIS MANUAL vi
A WORD ABOUT EAGLES vii
SHIPPING CONTENTS vii
ACCESSORIES LIST vii
LIMITED COPYRIGHT RELEASE (MODEL 754M only) viii
CALIBRATION/PREVENTATIVE MAINTENANCE NOTICE viii
UNPACKING viii
LOCATION OF USE viii
WARNINGS AND CAUTIONS REGARDING USE viii
ASSEMBLY, INTERCONNECTIONS AND INITIAL ADJUSTMENTS ix
SECTION I. OPERATION 1-1
INTRODUCTION 1-1
FEATURES 1-1
DESCRIPTION OF CONTROLS, VISUAL INDICATORS AND CONNECTIONS 1-2
CONTROLS 1-2
EXTERNAL AIR OFF/ON Switch -SIGH OFF/ON Switch -PEEP
OFF/ON-set Switch -PRESSURE PLATEAU OFF/ON Switch -HIGH
PRESSURE ALARM/PEAK INSPIRATORY PRESSURE RELIEF Control -
LOW PRESSURE ALARM Control -VENTILATION RATE Control -
INSPIRATION TIME/I:E RATIO Control -TIDAL VOLUME Control -
AIR/OXYGEN MIXER Control -ALARM MUTE/CANCEL Switch-
MANUAL BREATH/TRIGGER Switch-MODE SELECTOR Switch -
LCD VISUAL INDICATORS
STATUS 1-6
MODE -Vmin -INSPIRATION/EXHALATION -POWER INFORMATION
CENTER -PEAK AIRWAY PRESSURE -MEAN AIRWAY PRESSURE -
DIGITAL BAR GRAPH -HIGH and LOW AIRWAY PRESSURE ALARM
SETPOINTS-Paw -EXTERNAL AIR -SIGH -PEEP -PRESSURE
PLATEAU -HIGH AIRWAY PRESSURE ALARM (setpoint) -LOW
AIRWAY PRESSURE ALARM (setpoint) -RATE -INSPIRATION
TIME/I:E RATIO -TIDAL VOLUME -FIO2
-i -

T A B L E O F C O N T E N T S, (cont'd)
_____________________________________________________________________________________________
______________SUBJECT PAGE________
LED VISUAL INDICATORS
STATUS 1-7
CHARGE 1-8
ALARM
ALARM 1-8
SYSTEM FAILURE 1-8, 1-9
LCD VISUAL INDICATORS
ALARMS -OPERATING 1-8
BATTERY LOW -EXTERNAL POWER LOW -LOW PRESSURE -
DISCONNECT -HIGH PRESSURE -APNEA -HIGH PEEP -O2
LOW/FAIL -EXT AIR LOW/FAIL -FIO2-PRESSURE ALARM
SETTINGS -VT-COMPRESSOR
ALARMS -NON-OPERATING 1-9
INVERSE I:E -TRANSDUCER CALIBRATION ABORT -
SYSTEM FAILURE -VENTILATOR FAILURE
ALARMS -ADVISORY 1-10
INSPIRATION TIME TRUNCATED TO 3-SEC -PLATEAU VOLUME -
VTSETTINGS -PREVENTATIVE MAINTENANCE -
EXTENDED NON-USE/STORAGE -EXTERNAL POWER FAILURE -
TOTAL FLOW BACKUP
CONNECTIONS 1-10
OXYGEN INLET -AIR INLET-GAS OUTLET -TRANSDUCER -
EXHALATION VALVE -EXTERNAL POWER JACK -
COMMUNICATIONS PORT
OPERATING POWER SELECTION & STOPPING 2-1
INITIAL SET-UP, SELF-CHECK AND TRANSDUCER CALIBRATION 3-1
INITIAL SET-UP 3-1
SELF-CHECK 3-3
TRANSDUCER CALIBRATION 3-3
AUTOMATIC CALIBRATION (AUTO CAL)
MANUAL CALIBRATION
USER PROGRAMS 3-4
-ii -

T A B L E O F C O N T E N T S, (cont'd)
_____________________________________________________________________________________________
______________SUBJECT PAGE________
MODES OF OPERATION 4-1
ASSIST-CONTROL VENTILATION (ACV) 4-2
SYNCHRONIZED INTERMITTENT MANDATORY VENTILATION (SIMV) 4-3
CONTINUOUS POSITIVE PRESSURE VENTILATION (CPAP) 4-5
CONTROL VENTILATION DURING APNEA 4-5
USING POSITIVE END EXPIRATORY PRESSURE (PEEP) 4-6
USING PRESSURE PLATEAU 4-6
BACKUP VENTILATOR 4-7
HUMIDIFIERS AND HEAT MOISTURE EXCHANGERS (HME'S) 4-7
OPERATOR PERFORMANCE CHECKS 4-7
ALARM FUNCTIONS 5-1
OPERATING ALARMS 5-1
BATTERY LOW -EXTERNAL POWER LOW -
LOW PRESSURE -DISCONNECT -HIGH PRESSURE -APNEA -HIGH
PEEP -O2LOW/FAIL -EXT AIR LOW/FAIL -FIO2-PRESSURE
ALARM SETTINGS -VT-COMPRESSOR
NON-OPERATING ALARMS 5-4
INVERSE I:E -TRANSDUCER CALIBRATION ABORT -
SYSTEM FAILURE -VENTILATOR FAIL
ADVISORY ALARMS 5-6
INSPIRATION TIME TRUNCATED TO 3-SEC -PLATEAU VOLUME -
VT SETTINGS -PREVENTATIVE MAINTENANCE -
EXTENDED NON-USE/STORAGE -EXTERNAL POWER FAILURE -
TOTAL FLOW BACK UP
ALARM MUTING AND CANCELLING 5-7
-iii -

T A B L E O F C O N T E N T S, (cont'd)
_____________________________________________________________________________________________
______________SUBJECT PAGE________
ROUTINE CARE: CALIBRATION, CLEANING AND
PREVENTATIVE MAINTENANCE 6-1
CALIBRATION 6-1
CLEANING 6-1
PRESSURE HOSE 6-1
COMPRESSOR INLET FILTER 6-1
PREVENTATIVE MAINTENANCE 6-1
BATTERY CARE AND RECHARGING 7-1
IN CASE OF DIFFICULTY 8-1
OPERATOR CORRECTABLE PROBLEMS 8-1
OPERATOR PROBLEMS REQUIRING SERVICE 8-1
STORAGE INFORMATION 9-1
SPECIFICATIONS 10-1
LIMITED WARRANTY 11-1
LIST OF ILLUSTRATIONS
_____________________________________________________________________________________________
________FIGURE DESCRIPTION PAGE________
1Model 754/754M Main Features v
2Interconnection Diagram x
3Control Panel 1 -2
4Disposable Ventilator Circuit 1-11
5a Initial Setup 3 -1
5b Initial Setup 3 -2
-iv -

Figure 1. Model 754/754M Main Features
- v -
12 VDC
POWER
CABLE
BATTERY
COMPARTMENT
DOOR
LCD
DISPLAY
DISPOSABLE
VENTILATOR
CIRCUIT
CLEAR
PROTECTIVE
DOOR
CARRY
HANDLE
UNIVERSAL AC
POWER SUPPLY
INSTRUCTION
MANUAL
OPERATION
& SERVICE
FUNCTIONAL,
EASY-TO-USE
CONTROL PANEL
AIR HOSE
D.I.S.S. X D.I.S.S. OXYGEN HOSE
D.I.S.S. X D.I.S.S.

CONVENTIONS, TERMINOLOGY, DEFINITIONS AND
ABBREVIATIONS AS USED IN THIS MANUAL
CONVENTIONS
WARNING
A WARNING message identifies conditions that could have an adverse effect upon the patient or operator.
CAUTION
A CAUTION statement identifies conditions that could damage this device.
NOTE
Information immediately following is of sufficient importance that emphasis is made.
TERMINOLOGY
Air/Oxygen Mixer -Blender, Gas Blender
Model 754/754M -Uni-Vent
Pressure Plateau -Plateau
Uni-Vent-Model 754/754M, Ventilator, Eagle
Ventilator-Compressor-Air/Oxygen Mixer -Ventilator
DEFINITIONS
Gas -Air or oxygen or the resultant mixture of these two gases
Ventilator -Any reference to the Model 754/754M, Uni-Vent, Ventilator-Compressor-Air/Oxygen Mixer
# -Denotes that display will indicate some number between 0 an 9 for each appearance of "#"
ABBREVIATIONS
Airway Pressure -Paw
Alarm Message Center -AMC
Assist-Control -A/C
Assist-Control Ventilation(s) -ACV
Breaths Per Minute -BPM
Centimeters of Water -cmH2O
Continuous Positive Airway Pressure -CPAP
delivered -del
End Tidal Carbon Dioxide -ETCO2
Fraction of Inspired Oxygen -FIO2
Light Emitting Diode -LED
Liquid Crystal Display -LCD
liters -L
Liters Per Minute -LPM
milliliters -ml
Oxygen -O2
Peak Inspiratory Pressure -PIP
Positive End Expiratory Pressure -PEEP
Pounds Per Square Inch -PSI
Power Information Center -PIC
Synchronized Intermittent Mandatory Ventilation(s) -SIMV
Tidal Volume -VT
Work-of-Breathing -WOB
-vi -

A WORD ABOUT EAGLES
This very special Uni-Ventwas named Eagle, to represent its leadership role in the world of portable
ventilators. Where the eagle has come to symbolize power -this Eaglerepresents the most powerful, self-
contained portable ventilator available today. Where the eagle is known for its skills -this Eaglepossesses skills
never before found in a portable ventilator this small. And where the eagle is known for its keen sight -this Eagle
sees a future that no other portable ventilator has ever seen. The Uni-VentEagle-its not just another bird!
SHIPPING CONTENTS
Each Uni-VentEagleModel 754 is shipped with the following components:
1 ea. Ventilator, Compressor, Air/Oxygen Mixer
1 ea. Ventilator Circuit, Disposable, Single Patient Use
1 ea. High Pressure Hose, D.I.S.S. Oxygen X D.I.S.S. Oxygen, 6' Long
1 ea. High Pressure Hose, D.I.S.S. Air X D.I.S.S. Air, 6' Long
1 ea. Universal AC Power Supply (standard)
1 ea. Universal AC Power Supply with 16-30V DC-DC Converter (optional)
1 ea. 12 VDC Power Cable
1 ea. Operator's Manual, Model 754/754M
1 ea. CD, Manual
Each Uni-VentEagleModel 754M is shipped with the following components:
1 ea. Ventilator, Compressor, Air/Oxygen Mixer
1 ea. Ventilator Circuit, Disposable, Single Patient Use
1 ea. Oxygen Reservoir
1 ea. High Pressure Hose, D.I.S.S. Oxygen X D.I.S.S. Oxygen, 6' Long
1 ea. High Pressure Hose, D.I.S.S. Air X D.I.S.S. Air, 6' Long
1 ea. Universal AC Power Supply with 16-30V DC-DC Converter
1 ea. 12 VDC Power Cable
1 ea. Case, Padded, Ventilator & Accessories
2 ea. Strap, Velcro, 24" Long
1 ea. Instruction Manual, Operation & Service (Model 754M)
1 ea. Reusable Transit Case (DEPMEDS only)
2ea. CD, Manual, Model 754M
ACCESSORIES LIST
The Accessories List contains common items, required from time to time. Each item is preceded by its part number.
Accessories may be ordered direct from Impact. When ordering, please include the part number, description and
quantity required.
Send written purchase orders to: Impact Instrumentation, Inc. Telephonic orders: 973/882-1212
P.O. Box 508 Fax orders: 973/882-4993
West Caldwell, New Jersey 07007-0508
PART NUMBER DESCRIPTION
334-0020-00 Strap, Velcro, 24" Long
402-0014-00 Case, Padded, Ventilator & Accessories
402-0016-00 Case, Padded, Ventilator
820-0053-00 Heat/Moisture Exchanger, Single Patient Use
820-0067-15 Ventilator Circuit, Disposable, Single Patient Use (Case/15)
820-0096-15 1-Way Valve (Antiasphyxia) (Case/15)
820-0097-15 Oxygen Reservoir (Case/15)
825-0002-00 High Pressure Hose, D.I.S.S. Oxygen X D.I.S.S. Oxygen, 6' Long
825-0004-00 High Pressure Hose, D.I.S.S. Air X D.I.S.S. Air, 6' Long
703-0754-09 Universal AC Power Supply with 16-30V DC-DC Converter
703-0754-08 Universal AC Power Supply
703-0754-03 12 VDC Power Cable
906-0754-01 Operator's Manual (Model 754/754M)
906-0754-02 Instruction Manual, Operation & Service (754M)
906-0754-01 Operator's Manual (Model 754/754M)
909-0754-03 Manual CD
909-0754-04 Manual CD (754M) -vii -

LIMITED COPYRIGHT RELEASE (Model 754M only)
Permission is hereby granted to the Department of Defense to reproduce all material furnished under this contract
for use in a military service training program and other technical training programs.
CALIBRATION/PREVENTATIVE MAINTENANCE NOTICE
This device should be incorporated into a regular preventative maintenance program to insure compliance with
operating specifications (see LIMITED WARRANTY statement). Calibration measurements should be made each
year unless significant usage warrants a shorter period between preventative maintenance inspections. A complete
calibration check should be made following each 2000 hours of cumulative use or 12-month period. A pressure-
sensitive Calibration label is attached to the outer case, indicating when the last calibration was performed and the
next calibration is due. DO NOT remove this label. Following 6-months of continuous storage/non-use, this device
should be examined, operationally tested, and its batteries rechargedbefore patient-use is attempted. Recommended
maintenance checks can be found in the SERVICE section of the Model 754M Instruction Manual. The Model
754/754M contains internal clocks that monitor cumulative use and storage/non-use periods. Appropriate Advisory
Alarm messages will appear in the Alarm Message Center when calibration/preventative maintenance is required.
UNPACKING
Compare shipping case contents against SHIPPING CONTENTS list. Examine instrument for any obvious signs of
shipping damage. If there is no apparent sign of mechanical damage, read instructions contained within this Manual
before attempting operation.
LOCATION OF USE
The Uni-VentEagle, Model 754/754M, is a transportable device, therefore, its location of use will vary. When
operated in a wet environment, users should take precautions and protect this device by covering it with a protective
barrier (small tarp, plastic sheet, etc.).
WARNINGS AND CAUTIONS REGARDING USE
WARNING: Electric shock hazard, do not remove equipment covers.
WARNING: Do not operate this instrument prior to reading instructions contained within this Manual.
WARNING/CAUTION: Possible explosion hazard if used in the presence of flammable anesthetics.
WARNING/CAUTION: DO NOT block or connect the ventilator circuit hose to the Internal Compressor Air Filter
port (see Figure 2).
CAUTION: Federal law restricts this device to sale by or on the order of a physician.
WARNINGS AND CAUTIONS REGARDING USE, (cont'd)
CAUTION: Service is to be performed by qualified biomedical equipment technicians only (for Model 754M, see
SECTION entitled SERVICE).
CAUTION: Do not allow oil and grease to enter system. See ROUTINE CARE AND MAINTENANCE section
entitled CLEANING for additional instructions.
CAUTION: Internal components are susceptible to damage from static discharge.
-viii -

ASSEMBLY, INTERCONNECTIONS AND INITIAL ADJUSTMENTS
ASSEMBLY:
Model 754 -No assembly is required before placing this device into operation.
Model 754M -Depending upon contract requirements, battery pack installation may be necessary. Please check
your contract accordingly. If battery pack installation is required, see BATTERY CARE AND RECHARGING
section for instructions.
INTERCONNECTIONS:
CAUTION: Follow interconnection instructions prior to placing this device into service (see Figure 2).
1. For use with external oxygen: connect high pressure oxygen hose between OXYGEN inlet port and a 50-PSI
external oxygen source. Use only medical-grade oxygen (see Figures 5a and 5b).
2. For use with external air: connect high pressure air hose between AIR inlet port and a 50-PSI external air source.
Use only medical-grade compressed air (see Figures 5a and 5b).
3. Connect disposable ventilator circuit to its respective gas outlet, transducer, and exhalation valve connectors on
Model 754/754M Connector Panel. Observe directions included with disposable ventilator circuit (see Figure 4).
The gas outlet contains a leaf valve mounted flush to its inside –it has two purposes. First, should a spontaneously
breathing patient require supplemental flow or the ventilator is not triggering in response to the patient’s breathing
effort, the leaf valve opens allowing entrainment of ambient air (acting as an antiasphyxia valve). Second, should
the gas outlet port or the ventilator circuit become blocked, the leaf valve wedges itself into the large holes it
normally blocks (acting as a protective blow-out valve) to protect the patient and ventilator from excessively high
pressures. Never block (or occlude) the gas outlet port or connected ventilator circuit when the ventilator is
operating. Prior to operation, verify that the leaf valve is properly seated otherwise re-seat before patient use.
Location of Leaf Valve inside AdapterLeaf Valve in position
-ix –
Should valve
dislodge
, use blunt end of a small diameter object to gently push wedged section(s) of leaf valve inward so it
dislodges from peripheral hole(s) and re-seats itself against inner wall of gas outlet connector. Visually verify leaf valve lays
flush against inner wall curvature of gas outlet connector.
Should valvedetach from gas outlet connector, gently grab leaf valve “tail” with tweezers. Insert “tail” from inside of gas
outlet connector through its small hole. Grab“tail” as it passes through small hole. Pull gently on “tail” until you feel it lock
into position. Leaf valve and mating hole have interlocking shoulders causing valve to become locked in place when initially
pulled. Visually verify leaf valve lays flu
sh against inner wall curvature of gas outlet connector.

INTERCONNECTIONS, (cont’d)
4. Connect Universal AC Power Supply, or 12 VDC Power Cable, between EXTERNAL POWER JACK and
external power source (see Figure 5b).
INITIAL ADJUSTMENTS:
Before placing this device into operation, read section entitled OPERATION: DESCRIPTION OF CONTROLS,
VISUAL INDICATORS AND CONNECTIONS. Make control settings and verify device performance prior to
patient use.
Figure 2. Interconnection Diagram
-X -
NOTE: The standard Universal AC Power Supply is operable from AC voltages between 90 and 265 volts, 47 to 440 Hz.
Voltage and line frequency sensing is automatic. An optional Universal AC Power Supply (standard with Model 754M), is
operable from 115/230 VAC, 50 to 400 Hz (voltage and line frequency sensing is automatic), and includes a 16-30V DC-DC
Converter. It accepts external DC voltages ranging from 16 to 30 volts which connect to the secondary input leads provided.
Attachment to a mating connector is required and polarity must be observed. The black input lead is positive, white is
negative. Do not attach the braided shield.
NOTE: For 11
-
15 V
DC operation, connect appropriate power cord between EXTERNAL POWER JACK and 11
-
15 VDC
power source. A 12 VDC Power Cable is provided for attachment to automotive power source, negative ground.

SECTION I. OPERATION
INTRODUCTION
User's will find this instrument quite easy-to-learn and operate. The following text presents a brief overview of
device features. A complete understanding of its capabilities and limitations will allow you to take advantage of its
many features.
Your Model 754/754M is a portable, electronically controlled ventilator, compressor, air/oxygen mixer. It is
controlled by an internal microprocessor (CPU) which continuously monitors and displays airway pressure, control
settings, alarm parameters, gas source(s), gas flows, gas blends, and power signals. ACV, SIMV and CPAP modes
are operable with or without PEEP, with or without SIGH. ACV and SIMV are operable with or without Pressure
Plateau. All modes are PEEP and altitude compensable to minimize your patient's work-of- breathing and automatic
ventilatory backup assures continued mechanical support if the patient becomes apneic. An adjustable pressure limit
control limits peak inspiratory pressures and high pressure alarm setpoint.
The Model 754/754M can provide gas mixtures with oxygen content ranging from 21 to 100%. Gases may be
blended from external oxygen (compressed gas cylinder or PTLOX) and internal compressor, or external oxygen
and external compressed air. External compressed air, delivered from an electric compressor, must be oil-less and
filtered. Acceptable input gas pressures may range up to 80-PSI without effecting measurement accuracy or danger
to internal componentry. It is operable in any position; upright, on its side, or lying flat.
Uni-Ventis operable from internal, rechargeable batteries; 11-15 volts DC (negative ground). Its battery pack
may be recharged within the range of either of the aforementioned DC voltages. A Universal AC Power Supply and
12 VDC Power Cable is provided. The Universal AC Power Supply connects directly to AC mains providing 90 to
265 volts, 47 to 440 Hz. An optional Universal AC Power Supply (standard with the Model 754M) connects
directly to AC mains providing 115/230 volts, 50 to 400 Hz (voltage and line frequency sensing is automatic), and
permits use from external DC voltages, ranging from 16 to 30 volts which connect to the secondary input leads
provided. Attachment to a mating connector is required and polarity must be observed. The black input lead is
positive, the white is negative. Do not attach the braided shield. The Model 754/754M does not consume gas for
operating power -all gas is dedicated for patient care.
Your ventilatory system employs a comprehensive alarm system. Alarms are categorized as Operating, Non-
operating, or Advisory (see section entitled ALARM FUNCTIONS for complete descriptions of each alarm).
The Model 754/754M is extremely durable and designed for all environments. Its case is injection molded from
polycarbonate material. It is appropriate for use with adults, children and infants-in clinical, field hospital,
aeromedical, homecare, and prehospital (ALS, ATLS, ACLS) settings. Its small size and weight facilitates
transport, deployment and storage.
FEATURES
•Microprocessor control of all functions including automatic monitoring of internal battery and external
power sources, internal compressor and external gases.
•Extensive alarm monitoring of operating, non-operating and advisory conditions.
•Contemporary design to facilitate transport and placement.
•Gas-efficient electronic control circuitry eliminates all pneumatic-logic circuits, and any dependency
on gas for operating power.
•Rechargeable batteries, fully compatible with vehicular electrical systems and airborne environments.
•Self-contained system, may be operated without attachment of external gas(es).
1 -1

EXTERNAL
AIR
SIGH PEEP
(cmH O)
PLATEAU
(cmH O) (cmH O) (cmH O)
222 2
by
tm
PRESSURE ALARMS
HIGH LOW
Series Portable Ventilator - Model 754
15 100 050
MODE
SYSTEM
FAILURE
ALARM
MANUAL
BREATH/
TRIGGER
MUTE/
CANCEL
ALARM
VENTILATION
RATE
INSPIRATION
TIME I:E RATIO
TIDAL
VOLUME
AIR/OXYGEN
MIXER
2345
SIMV
A/C CPAP
OFF CAL
1150 0.1 3.0 MIN MAX 21 100
(BPM)
ASSIST/SIMV
(SEC) (ml) (%O )
2
1
1:2 I:E
SET
IMPACT
Uni-Vent
CHARGE
FEATURES, (cont’d)
Numerical panel markings that indicate sequence-of-operation steps to simplify and speed start-up.
Graphics display includes 12-second pressure waveform, its amplitude is calibrated to the adjacent
digital bar graph.
Automatically compensates pressure transducer to altitude-related barometric pressure changes up to
25,000 ft.
DESCRIPTION OF CONTROLS, VISUAL INDICATORS AND
CONNECTIONS
Uni-VentTM contains various controls, indicators and connectors. Their placement has been carefully chosen to
facilitate ease of use, visibility, and interconnection. A large, liquid crystal display (LCD) provides continuous
display of graphics, control settings, operating conditions, and alarm status information. A clear door protects
control panel components from weather, fluids and inadvertent contact.
CONTROLS
Control descriptions are listed based upon their control panel location, reading from left to right, top to bottom.
Where applicable, corresponding LCD information is provided. Each is described in the following text (see Figure
3).
Figure 3. Control Panel
1 - 2

CONTROLS, (cont'd)
EXTERNAL AIR OFF/ON Pushbutton Switch: The EXTERNAL AIR Pushbutton Switch permits you to
manually select external compressed air as your primary air source. When the ventilator is turned ON, its CPU
"samples" the respective gas fitting and looks for an air pressure, greater than 40-PSI. If a lower pressure, or no
pressure is sensed, the LCD will display "OFF" (default value), and the CPU allows operation from the internal
compressor. If a pressure exceeding 40-PSI (+/-2-PSI) is sensed, the LCD will display "ON", and allow operation
from the external air supply. Manually pressing this pushbutton will toggle the display from "OFF" to "ON", or
from "ON" to "OFF". Attempting to select "ON" with less than 35-PSI (+/-2-PSI) present will cause an alarm to
sound. The LCD display area for EXTERNAL AIR is on the top line, immediately below its respective pushbutton
switch. The EXTERNAL AIR OFF/ON display will blank when a SYSTEM FAILURE Alarm occurs.
SIGH OFF/ON Pushbutton Switch: The SIGH OFF/ON Pushbutton Switch permits Uni-Ventto operate with
or without SIGH. When activated, the first ventilator generated breath will be a SIGH. Additional SIGH
ventilations are delivered once every 100 ventilations or 7-minutes, whichever occurs first. Each SIGH ventilation
equals 150% ofthe INSPIRATION TIME setting (and exhalation period), which increases delivered volume by
50%. Proportionately increasing both the inspiration and exhalation time allows Uni-Ventto maintain I:E during
SIGH. As a safety precaution, Uni-Ventdoes not allow the inspiratory portion of a SIGH breath to exceed 3-
seconds. Manually pressing this pushbutton will toggle the display from "OFF" to "ON", or from "ON" to "OFF".
"OFF" is its default value. SIGH becomes disabled ("OFF") in the CPAP mode, or when PRESSURE PLATEAU is
selected ("ON"). The LCD display area for SIGH is on the top line, immediately below its respective pushbutton
switch. The SIGH OFF/ON display will blank when a SYSTEM FAILURE Alarm occurs.
PEEP OFF/ON-SET Pushbutton Switch: The PEEP OFF/ON-SET Pushbutton Switch activates Uni-Vent's
internal PEEP control. When the ventilator is turned ON, PEEP has a default value of 0 cmH2O (no PEEP).
Pressing the pushbutton allows a PEEP value to be manually entered (see section entitled USING POSITIVE END
EXPIRATORY PRESSURE). The LCD display area for PEEP is on the top line, immediately below its respective
pushbutton switch. The PEEP OFF/ON-SET display will blank when a SYSTEM FAILURE Alarm occurs.
PRESSURE PLATEAU OFF/ON Pushbutton Switch: The PRESSURE PLATEAU OFF/ON Pushbutton Switch
permits ACV or SIMV operation with a pressure plateau. When the ventilator is turned ON, PLATEAU is OFF
(default value). Pressing this pushbutton activates a PLATEAU value that is referenced 10 cmH2O below the HIGH
PRESSURE ALARM/PEAK INSPIRATORY PRESSURE RELIEF Control setpoint. Its absolute range is 5 to 90
cmH2O. When this pushbutton is pressed, it will toggle the display from "OFF" to its PLATEAU value, or from its
PLATEAU value to "OFF". PRESSURE PLATEAU becomes disabled ("OFF") in the CPAP mode. The LCD
display area for PRESSURE PLATEAU is on the top line, immediately below its respective pushbutton switch (see
section entitled USING PRESSURE PLATEAU). The PRESSURE PLATEAU OFF/ON display will blank when a
SYSTEM FAILURE Alarm occurs.
HIGH PRESSURE ALARM/PEAK INSPIRATORY PRESSURE RELIEF Control: This control is used to
select the HIGH PRESSURE ALARM and PEAK INSPIRATORY PRESSURE RELIEF setpoint. It has an
absolute range from 15 to 100 cmH2O. When the ventilator is turned ON, the HIGH PRESSURE ALARM/PEAK
INSPIRATORY PRESSURE RELIEF Control setpoint value equals its current position. The LCD display area for
HIGH PRESSURE ALARM/PEAK INSPIRATORY PRESSURE RELIEF Control setpoint is on the top line,
immediately below its respective control. The HIGH PRESSURE ALARM Control setting display will blank when
a SYSTEM FAILURE Alarm occurs.
LOW PRESSURE ALARM Control: This control is used to select the LOW PRESSURE ALARM setpoint. It
has an absolute range from 0 to 50 cmH2O. When the ventilator is turned ON, the LOW PRESSURE ALARM
Control setpoint value equals its current position. The LCD display area for the LOW PRESSURE ALARM
Control setpoint is on the top line, immediately below its respective control. The LOW PRESSURE ALARM
Control setting display will blank when a SYSTEM FAILURE Alarm occurs.
1 -3

CONTROLS, (cont'd)
VENTILATION RATE Control: The VENTILATION RATE control setting determines the mechanical
ventilation rate for ACV and SIMV operation. It is not operable in CPAP (RATE = 0). Its range is from 1 to 150
breaths per minute (BPM). When the ventilator is turned ON, the VENTILATION RATE Control setpoint value
equals its current position. The LCD display area for VENTILATION RATE Control setpoint is on the bottom line,
immediately above its respective control. During APNEA, the RATE Control setting and its LCD display will
change to 12 BPM. The VENTILATION RATE Control setting display will blank when a SYSTEM FAILURE
Alarm occurs, or the CPAP mode is selected.
INSPIRATION TIME/I:E RATIO Control: The INSPIRATION TIME/I;E RATIO Control sets the inspiratory
duration of all ventilator-delivered breaths. It is adjustable in 0.1 second increments from 0.1 to 3.0 seconds
maximum. Its usable range is limited by the VENTILATION RATE Control setting. Inverse I:E Ratio's
(inspiratory time is greater than expiratory time) are not permitted. (See section entitled ALARM FUNCTIONS). A
default I:E ratio of 1:2 is activated when this controlis turned to its fully counterclockwise position. When the
ventilator is turned ON, the INSPIRATION TIME/I:E RATIO Control setpoint value equals its current position.
Setting INSPIRATION TIME causes the resulting I:E RATIO to be calculated. Setting the default I:E RATIO (1:2)
causes the INSPIRATION TIME to be calculated when VENTILATION RATE settings are changed. Inspiration
time and I:E ratio are simultaneously displayed in the LCD. The LCD display area for INSPIRATION TIME/I:E
RATIO Control setpoint is on the bottom line, immediately above its respective control. The INSPIRATION
TIME/I:E RATIO Control setting display will blank when a SYSTEM FAILURE Alarm occurs or CPAP is
selected. It will blink during INVERSE I:E conditions.
TIDAL VOLUME Control:The TIDAL VOLUME Control allows gas to be delivered over a wide range. Its
maximum flow is equivalent to approximately 1000ml/sec (60 LPM). TIDAL VOLUME may be obtained from any
of the following gas or gas combinations:
External Air (Cylinder)
External Compressed Air (Compressor)
Internal Air Compressor
External Oxygen and External Air Cylinder or Compressor, or Internal Air Compressor
External Oxygen
Tidal volume is calculated and displayed in milliliters (ml). When the ventilator is turned ON, the TIDAL
VOLUME Control setpoint value equals its current position. Uni-Vent's CPU monitors and adjusts gas flow. Its
LCD initially displays "#### set" TIDAL VOLUME for the first one or two delivered breaths, while the CPU makes
whatever flow corrections are required, then the LCD alternately displays "#### set" TIDAL VOLUME and "####
del" TIDAL VOLUME. The LCD display area for TIDAL VOLUME Control setpoint is on the bottom line,
immediately above its respective control. The TIDAL VOLUME Control setting display will blank when a
SYSTEM FAILURE Alarm occurs or CPAP is selected.
AIR/OXYGEN MIXER Control: The AIR/OXYGEN MIXER Control allows air, oxygen, or mixtures of air and
oxygen to be delivered. It has a range of 21% (all air) to 100% (all oxygen) and may be obtained from the following
gas or gas combinations:
21% FIO2from External Air (Cylinder)
21% FIO2from External Compressed Air (Compressor)
21% FIO2from Internal Air Compressor
21 to 100% FIO2from External Oxygen and External Air Cylinder or Compressor
21 to 100% FIO2from External Oxygen and Internal Air Compressor
100% FIO2from External Oxygen
1 -4

CONTROLS, (cont'd)
When the ventilator is turned ON, the AIR/OXYGEN MIXER Control setpoint value equals its current position.
Uni-Vent's CPU monitors and adjusts gas flow according to the FIO2and TIDAL VOLUME setpoints. In CPAP
mode, FIO2proportions are based on gas flowing at 1000ml/sec. The CPU makes any necessary flow corrections
during the first one or two delivered breaths. Delivered FIO2is displayed in the LCD. The LCD display area for
AIR/OXYGEN MIXER Control setpoint is on the bottom line, immediately above its respective control. The
AIR/OXYGEN MIXER Control setting display will blank when a SYSTEM FAILURE Alarm occurs. It will blink
when an EXT AIR LOW/FAIL, O2LOW/FAIL, or FIO2Alarm occurs.
ALARM MUTE/CANCEL Pushbutton Switch: Depending upon alarm category, the ALARM MUTE/CANCEL
Pushbutton Switch can either mute an audible alarm signal, or cancel a particular alarm function.
Muting: Depressing this switch mutes the audible component of an Operating Alarm condition for a predetermined
period (see ALARM FUNCTIONS). Alarm muting is reset when the current alarm condition no longer applies or
the predetermined mute-period is reached (audible alarm will resound). A new alarm condition overrides a "muted"
pre-existing alarm.
When an alarm causing condition occurs, the LCD ALARM MESSAGE CENTER will display the pertinent alarm
message. The ALARM LED alternately flashes, at the same frequency as the accompanying audible alarm.
Pressing the ALARM MUTE/CANCEL Pushbutton Switch causes the ALARM LED to stay on continuously. It
will resume flashing when the mute period ends.
If a new alarm condition occurs during the mute period of a previous alarm, the new alarm will have no effect upon
the display of that alarm. The new alarm will cause the ALARM LED to alternately flash and respond as previously
described when the ALARM MUTE/CANCEL Pushbutton Switch is pressed.
Canceling: When depressed, the ALARM MUTE/CANCEL Pushbutton Switch cancels the audible component of
an Advisory Alarm condition (see ALARM FUNCTIONS). During an APNEA alarm condition, it will cancel both
the audible and visual APNEA alarms and the controlled ventilations that are automatically invoked at the onset of
apnea. Cancellation of an APNEA alarm allows Uni-Ventto resume operation at the preset ACV, SIMV or CPAP
settings.
MANUAL BREATH/TRIGGER Pushbutton Switch: The MANUAL BREATH/TRIGGER Pushbutton is
operable two ways.
Pressing this control during normal CPU operation, delivers one MANUAL BREATH. Each MANUAL BREATH
is equal to one complete ventilatory cycle consisting of the current INSPIRATORY TIME/TIDAL VOLUME
settings and expiratory period. In the CPAP mode, a manual breath is delivered at a flow rate of 30 LPM, an
inspiratory time of 1.67-seconds, and pressure limited at 40 cmH2O. A MANUAL BREATH cannot be delivered
until airway pressure has reached baseline (zero or PEEP). Each time a MANUAL BREATH is triggered, an
audible beep is heard.
This control functions as a MANUAL TRIGGER backup, if a CPU failure occurs in the primary system. The
MANUAL TRIGGER contains dedicated circuitry capable of providing manually triggered breaths. For as long as
this pushbutton is depressed, the MANUAL TRIGGER delivers a continuous gas flow at 30 liters per minute
(LPM). A pressure relieving mechanism, contained within this circuit, limits peak inspiratory pressure from
exceeding 40 cmH2O.
The MANUAL BREATH/TRIGGER Pushbutton is protected against accidental contact by a circular guard.
MODE Selector Switch (OFF-A/C-SIMV-CPAP-CAL): The MODE SELECTOR Switch provides operating
power in the ACV, SIMV, CPAP, and CAL positions.
Turning the MODE SELECTOR Switch from OFF to A/C, SIMV, or CPAP causes the microprocessor to perform
a "SELF-CHECK" (see section entitled SELF-CHECK) before initiating operating in the selected mode. Ventilator
operation will not begin until "SELF-CHECK" is successfully completed. Calibration of the airway pressure
transducer is permitted in the CAL position only (see section entitled TRANSDUCER CALIBRATION).
1 -5

VISUAL INDICATORS
When activated, STATUS, and ALARM INDICATORS are continuously displayed. All indicators are displayed
within the LCD except for the ALARM, SYSTEM FAILURE, and CHARGE LED's which appear elsewhere on the
control panel. When activated, the ALARM and SYSTEM FAILURE LED's illuminate red, the CHARGE LED
illuminates green.
STATUS
MODE Indicator: Based upon the MODE Selector Switch setting, this indicator displays, respectively, ASSIST,
SIMV, CPAP, or CAL. The MODE Indicator display will blank when a SYSTEM FAILURE Alarm occurs.
Vmin Indicator: Displays Minute Volume (in liters) in the ACV mode, blanks during SIMV, CPAP and CAL or
when a PLATEAU VOLUME or SYSTEM FAILURE Alarm occurs.
INSPIRATION/EXHALATION Indicator: Alternately displays the "INSPIRATION" or "EXHALATION"
phase of mechanical and/or spontaneous breaths in each operating mode, blanks during CAL. The
INSPIRATION/EXPIRATION Indicator display will blank when a SYSTEM FAILURE Alarm occurs.
POWER INFORMATION CENTER: The POWER INFORMATION CENTER (PIC) occupies a 2-line area in
the LCD's lower left section. It illuminates when the MODE SELECTOR SWITCH is in any position except OFF
and the CPU validates a usable source of power (see OPERATING POWER SELECTION & STOPPING) during
the power check portion of SELF-CHECK (see SELF-CHECK). The POWER INFORMATION CENTER display
will blank when a SYSTEM FAILURE Alarm occurs.
The POWER INFORMATION CENTER can display the following messages:
Line 1: "EXT PWR ON" or,
Line 1: "EXT PWR LOW" or,
Line 1: "EXT PWR FAIL" or,
Line 1: "EXT CHK FUSE" (flashing, see description below) or,
Line 1: Blank
"EXT PWR ON" denotes operation from an external power source. "EXT PWR LOW"
denotes a low external power source voltage and works in conjunction with the EXTERNAL
POWER LOW/FAIL Alarm (see section entitled ALARMS). This line is blank when no
external power is connected.
Line 2: Battery icon "OK or,
Line 2: Battery icon "LOW" or,
Line 2: Battery icon "ON CHG" or,
Line 2: Battery icon "CHK FUSE" (flashing, see description below) or,
Line 2: Blank
Battery icon "OK" denotes (1) operation from internal batteries that have more than
30-minutes of remaining charge or, (2) in conjunction with external power operation,
internal batteries can provide at least 30-minutes of operation. Battery icon "LOW"
denotes (1) operation from internal batteries having less than 30-minutes of remaining
charge (see section entitled ALARMS) or, (2) in conjunction with external power
operation, internal batteries are being charged and currently have less than 30-minutes
1 -6

VISUAL INDICATORS, (cont'd)
of operating time capability. Battery icon "ON CHG" is displayed , and the CHARGE
LED illuminates, when charging current is flowing into the battery pack. This line will
blank if no battery is sensed.
OPEN or MISSING FUSES: The POWER INFORMATION CENTER is able to identify open
or missing fuses under the following circumstances:
1. During normal operation from external power, the External Power Operation
& Charge Fuse opens (or is removed):
a. EXT PWR FAIL/DISCONNECT Alarm activates, operation
continues from internal battery.
b. PIC Line 1 displays "EXT PWR FAIL".
c. When Alarm Mute/Cancel pushbutton is pressed, the
EXT PWR FAIL/DISCONNECT Alarm is reset.
d. PIC Line 1 flashes "EXT CHK FUSE".
2. Prior to beginning operation from external power, the External Power Operation
& Charge Fuse opens (or is removed):
a. Operation begins from internal battery.
b. PIC Line 1 flashes "CHK EXT FUSE".
3. During normal operation from external power, the Battery Operation &
Charge Fuse opens (or is removed):
a. Operation continues from external power.
b. PIC Line 2 flashes battery icon "CHK FUSE".
4. Prior to beginning operation from internal battery (external power is not
connected), and the Battery Operation & Charge Fuse opens (or is removed):
a. The ventilator will not operate, its LCD will not illuminate.
b. The SYSTEM FAILURE LED illuminates and a continuous
tone sounds (non-mutable).
PEAK AIRWAY PRESSURE Indicator: Displays the PEAK AIRWAY PRESSURE of the previous breath. The
PEAK AIRWAY PRESSURE Indicator display will blank when a SYSTEM FAILURE Alarm occurs.
MEAN AIRWAY PRESSURE Indicator: Displays the MEAN AIRWAY PRESSURE. Uni-Ventcalculates
MEAN AIRWAY PRESSURE to the following algorithm:
I
(PIP-PEEP) X + PEEP
TOTAL CYCLE TIME
The MEAN AIRWAY PRESSURE Indicator display will blank when a SYSTEM FAILURE Alarmoccurs.
DIGITAL BAR GRAPH Indicator: The DIGITAL BAR GRAPH indicator provides continuous display of airway
pressure. Its absolute range is from -10 to +100 cmH2O. Increment markings appear every 10 cmH2O, numerical
markers appear at 0, 50 and 100 cmH2O. Vertical resolution is 2 cmH2O/bar. The DIGITAL BAR GRAPH
Indicator display will blank when a SYSTEM FAILURE Alarm occurs.
HIGH and LOW AIRWAY PRESSURE ALARM Setpoint Indicators: The HIGH and LOW AIRWAY
PRESSURE ALARM Setpoint Indicators appear as small horizontal lines to the right of the DIGITAL BAR
GRAPH. Setpoint indicators are positioned according to their respective alarm control settings and reposition
1 -7

VISUAL INDICATORS, (cont'd)
whenever an alarm control is adjusted. Setpoint indicator vertical resolution is 2 cmH2O. The respective HIGH or
LOW AIRWAY PRESSURE ALARM Setpoint Indicator blinks when a HIGH PRESSURE or LOW PRESSURE
Alarm is triggered and blanks when a SYSTEM FAILURE Alarm occurs.
Paw Indicator: The Paw indicator represents a continuous and updating display of airway pressure. It display's the
most recent 12-second period. Airway pressure amplitude along the vertical axis is calibrated to coincide with the
adjacent digital bar graph. Markings along the horizontal axis represent 1-second intervals. The Paw Indicator
display will blank when a SYSTEM FAILURE Alarm occurs.
CHARGE Indicator: The green CHARGE Indicator LED illuminates whenever sufficient battery recharging
current is flowing.
Control Setting Indicators: All control settings, except MODE SELECTOR Switch, appear on the LCD's upper
and lower lines.
ALARM INDICATORS
The LCD display allocates up to 4-lines of alarm message information in a dedicated area. This dedicated area is
called the ALARM MESSAGE CENTER (AMC). Each alarm is displayed in the LCD except for the ALARM
Indicator and SYSTEM FAILURE LED's. The ALARM Indicator LED illuminates, and alternately flashes ON and
OFF, whenever an alarm causing condition other than SYSTEM FAILURE occurs. An audible signal accompanies
each alarm. Alarms are categorized as OPERATING, NON-OPERATING, or ADVISORY (for detailed
information on alarms, see section entitled ALARM FUNCTIONS). When the audible signal is muted during an
OPERATING ALARM, the ALARM Indicator LED remains illuminated, but stops flashing, during the mute
period. During an ADVISORY ALARM pressing MUTE/CANCEL turns the ALARM Indicator LED OFF.
OPERATING ALARMS
BATTERY LOW/FAIL Alarm: Initiates when a low battery condition is sensed. When activated the AMC
displays: BATTERY LOW/FAIL -RECHARGE/REPLACE BATTERY PACK, BATTERY LOW/FAIL or
BATTERY. The AMC will blank if a non-operating alarm occurs.
EXTERNAL POWER LOW Alarm: Initiates when external power (as sensed at the External PowerJack), is less
than 10.9 VDC. When activated the AMC displays: EXTERNAL POWER LOW-CHECK POWER
SOURCE/CONNECTIONS or EXT PWR. The AMC will blank if a non-operating alarm occurs.
LOW PRESSURE Alarm: Initiates when PIP fails to exceed the LOW PRESSURE ALARM setpoint for two
consecutive breaths and causes its LCD setpoint indicator to blink. When activated the AMC displays: LOW
PRESSURE -PEAK INSPIRATORY PRESSURE TOO LOW or LOW PRESSURE. The AMC will blank if a
non-operating alarm occurs. The setpoint indicator will alternately blink, with the HIGH PRESSURE Alarm LCD
setpoint indicator, during a PRESSURE ALARM SETTINGS Alarm.
DISCONNECT Alarm: Initiates when a disconnect is sensed in the patient circuit. When activated the AMC
displays: DISCONNECT -CHECK CIRCUIT CONNECTIONS or DISCONNECT. The AMC will blank if a non-
operating alarm occurs.
HIGH PRESSURE Alarm: Initiates when PIP exceeds the HIGH PRESSURE Alarm setpoint for four consecutive
breaths, or 2-seconds continuously, and causes its LCD setpoint indicator to blink. When activated the AMC
displays: HIGH PRESSURE -PEAK INSPIRATORY PRESSURE TOO HIGH or HIGH PRESSURE. The AMC
will blank if a non-operating alarm occurs. The setpoint indicator will alternately blink, with the LOW PRESSURE
Alarm LCD setpoint indicator, during a PRESSURE ALARM SETTINGS Alarm.
APNEA Alarm: ACV and SIMV: initiates when approximately 19-seconds have elapsed and no pressure
deflections have been sensed. When activated the AMC displays: APNEA -CHECK PATIENT FOR
SPONTANEOUS BREATHING or APNEA. CPAP: initiates when no spontaneous breathing is detected for 10-
seconds (based on a 30-second moving average). When activated the AMC displays: APNEA -CPAP AVERAGE
RATE LESS THAN 6-BPM or APNEA. The AMC will blank if a non-operating alarm occurs.
1 -8
This manual suits for next models
2
Table of contents
