IMPATIA LUNGOLINEA User manual

LUNGOLINEA
ASSEMBLY INSTRUCTION
R
32
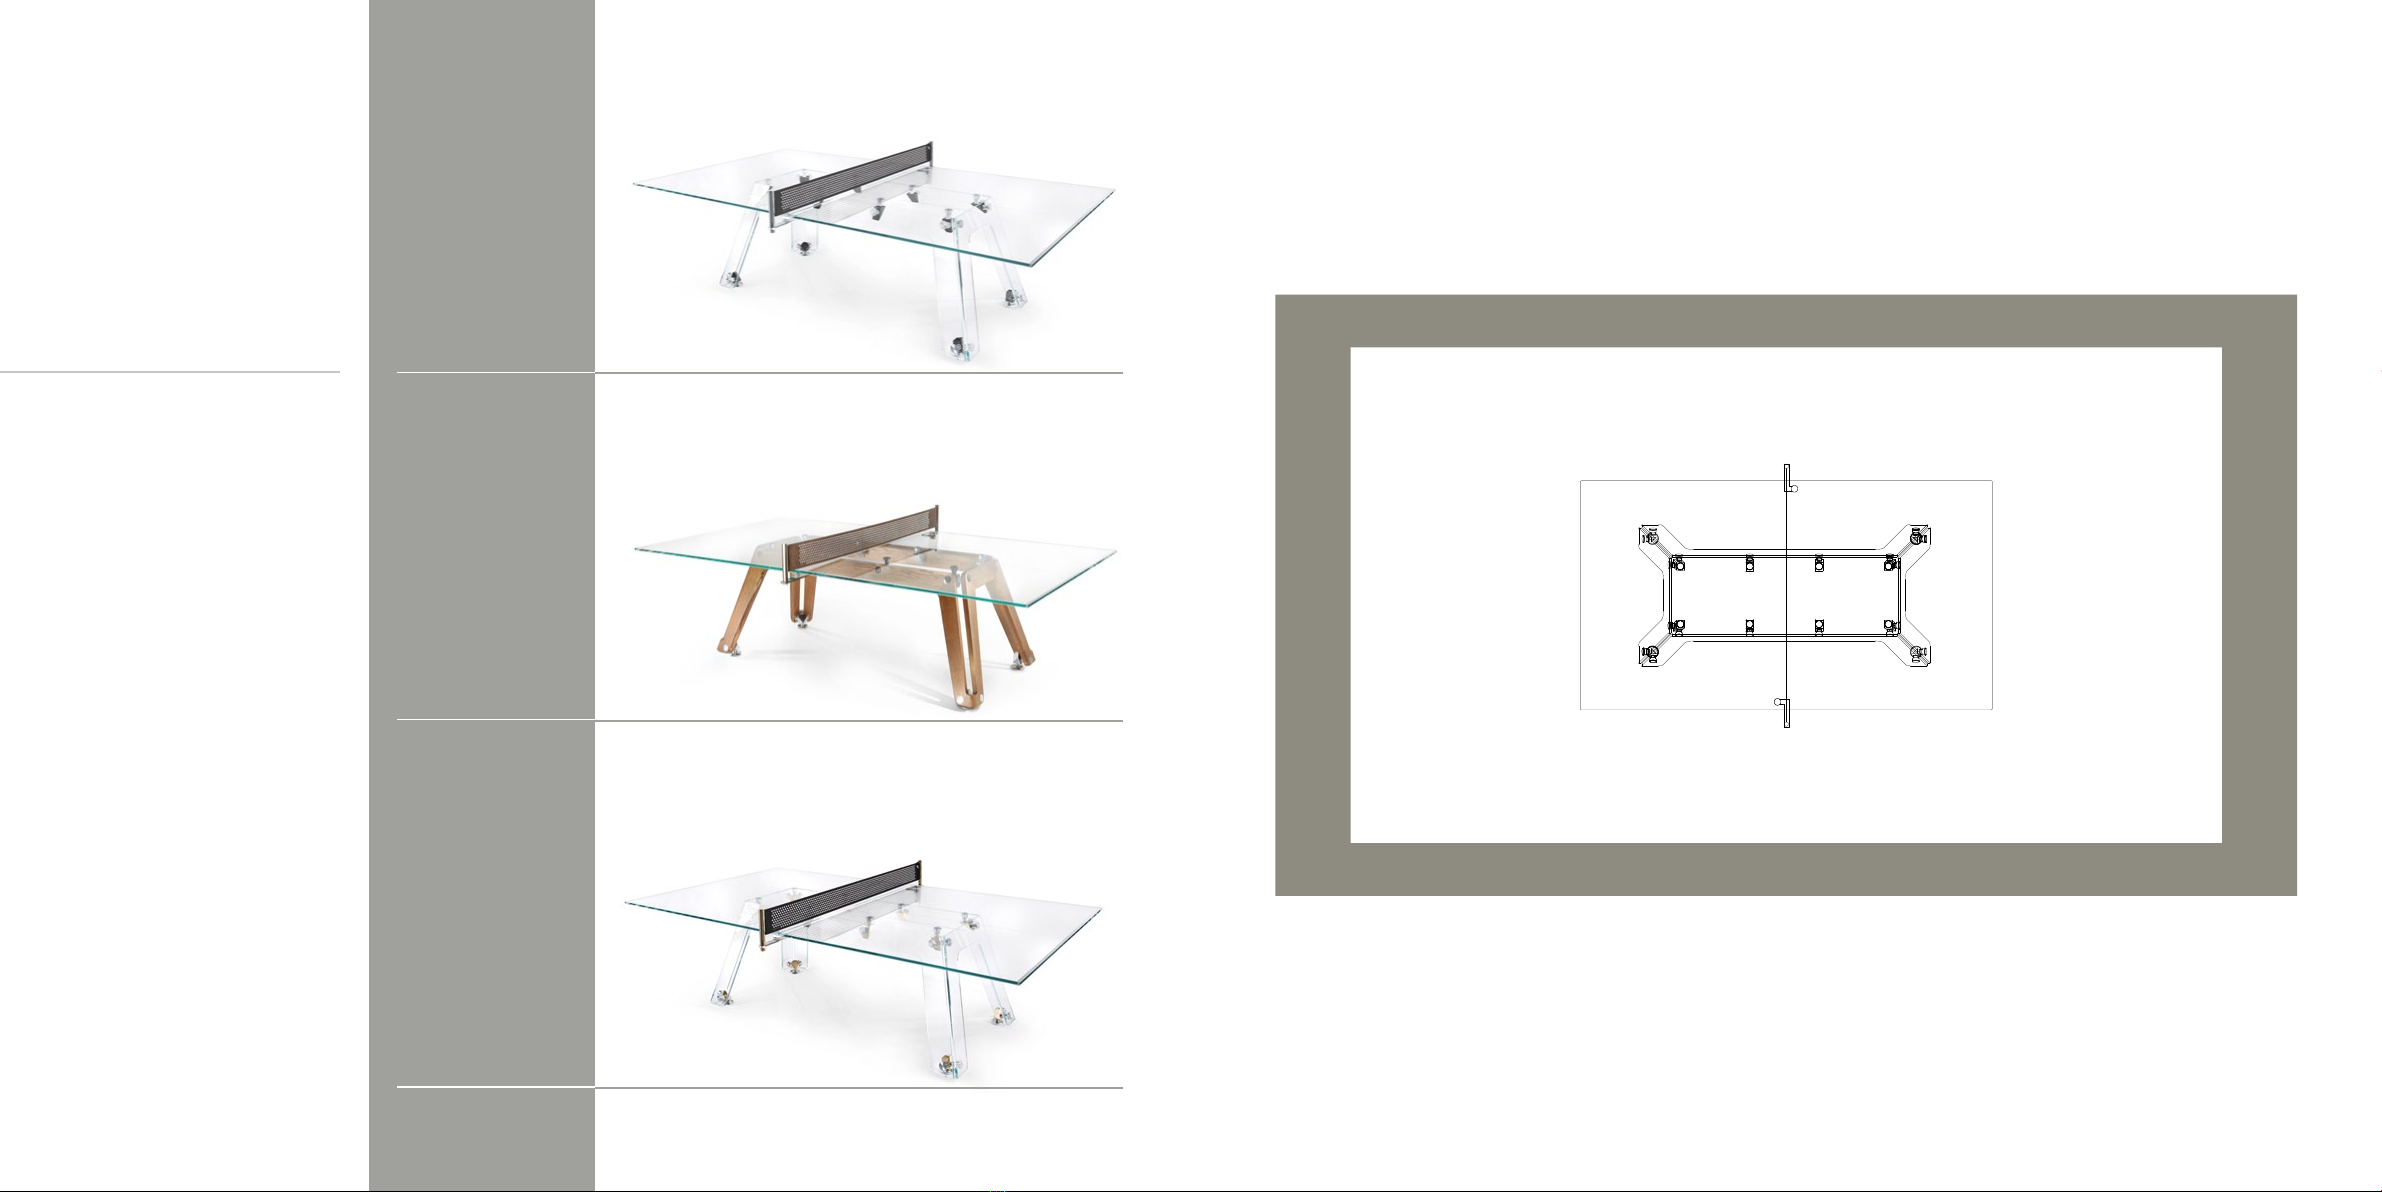
MODELS
PRELIMINARY OPERATIONS
Check the dimensions of the room and prepare for the assembly by selecting the final positioning for the ping
pong table. Once assembly has started, it is not recommended to move the table.
Lungolinea
CHROME/
BLACK CHROME
Lungolinea
WOOD EDITION
Lungolinea
PREMIUM GOLD
EDITION
OPERAZIONI PRELIMINARI
Verificare le dimensioni della stanza e predisporre il montaggio del ping pong nel luogo finale di posizionamento,
una volta iniziato il montaggio non è facile spostare il tavolo a grandi distanze.
minimum room dimensions: 580x330 cm / 228”x130”
suggested room dimensions: 680x400 cm / 266”x157”

54
002
001 Insert the metal joints in the 4 corners of the
long leg and the upper and lower corners in the
short leg, as shown in the figure. To connect the
joints, simply push the pin into the cone. When
you hear the “click” the joint is connected,
attaching the first two legs together.
Inserire i giunti metallici nei 4 angoli di una
gamba lunga e un giunto superiore ed uno
inferiore in una gamba corta, come indicato
in figura. Per agganciare i giunti e sufficiente
inserire il perno all’interno del cono, quando si
avverte il “click” il giunto è agganciato.
Agganciare le due gambe tra loro.
Next attach the second long leg and place the
last two corner joints into position; complete the
assembly of the base structure by connecting the
short leg for last.
Agganciare anche la seconda gamba lunga e
posizionare gli ultimi due nodi angolari su di essa;
completare l’assemblaggio della struttura di base
agganciando la gamba corta.
upper corner joint with 3 pins
bottom joint with 2 pins

76
Place the 4 central joints into position on the long
legs.
Posizionare i 4 giunti centrali sulle gambe lunghe.
Place the top two glass plates in place.
Be very careful not to hit the edges when
positioning the second top plate.
Posizionare i due semi-piani.
Fare molta attenzione a non urtare gli spigoli,
soprattutto durante il posizionamento del
secondo piano.
upper central joint with 2 pins
004
003

98
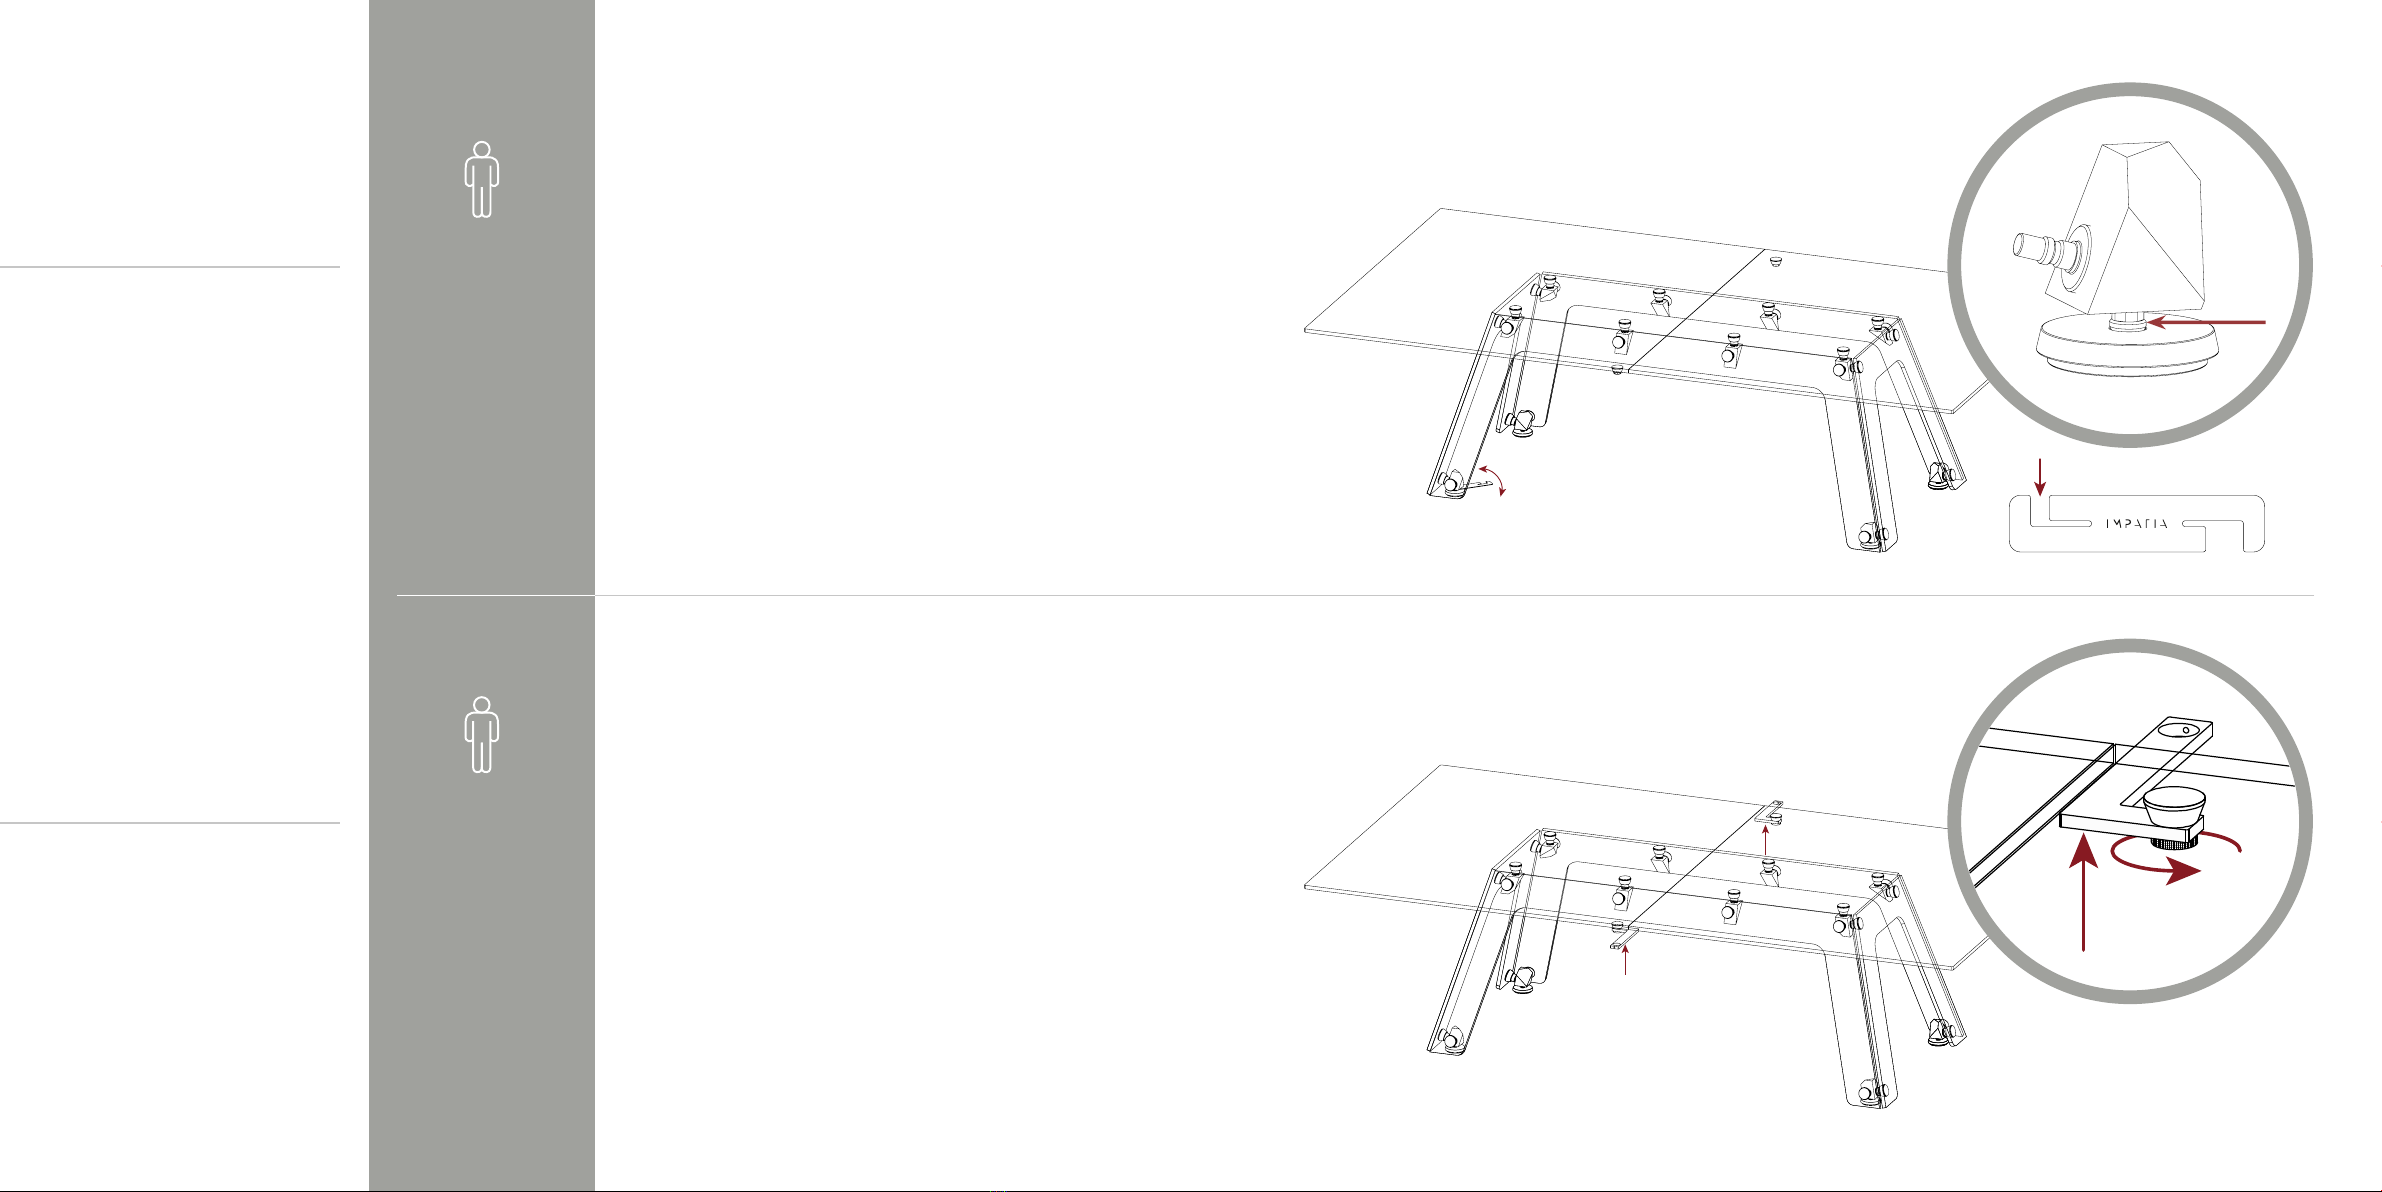
Move the table tops as close together as possible
and check the lateral alignment.
Once aligned, lock them in place by tightening
the 8 metal rings at the base of each pin with the
provided special key.
Avvicinare il più possibile i piani tra loro e
verificare l’allineamento laterale.
Una volta allineati bloccarli in posizione
stringendo, su ciascuno degli 8 giunti metallici, la
ghiera alla base del perno con la parte più larga
della chiave speciale in dotazione.
Level the table tops by raising or lowering the
vertical pins of the joints with the provided special
key.
Livellare i due piani alzando o abbassando i perni
verticali dei giunti con la parte più stretta della
chiave speciale.
006
005
1110
If necessary proceed with leveling the table by
adjusting the feet with the provided special key.
Procedere con la messa in bolla del tavolo agendo
sui perni dei piedini con la parte più stretta della
chiave speciale.
Position the L-shaped net support base as
shown in the figure and secure them with the
appropriate knob.
Posizionare i supporti della rete a forma di L
come indicato in figura e fissarli con l’apposito
pomello.
008
007

1312
Position the cylinder net support with the
adjustment ring at the bottom and tighten the
the screw in the L-shaped support with the
provided hex key.
Posizionare i supporti cilindrici della rete con la
ghiera di regolazione in basso e stringere il grano
preinserito nel supporto a forma di L con la
chiave a brugola fornita (verificare che il grano
sia allineato con l’asola ribassata del cilindro).
Remove the cylindrical support cover. Unscrew
the nut on the upper part of the support and
remove the metal disc. Insert the side of the net
onto the internal rod, then reassemble the metal
disc.
Sfilare il carter cromato del support cilindrico.
Svitare il dado nella parte superiore del supporto
e rimuovere il disco di metallo.
Infilare il lato della rete sulla bacchetta interna,
dopodichè riassemblare il disco metallico.
010
009

1514
Pass the string of the net inside the holes of
the two metal disks and immediately after the
second, make a knot.
Reposition the cylindrical support cover.
Far passare il filo della rete all’interno dei fori
dei due dischi metallici e subito dopo il secondo
realizzare un nodo.
Riposizionare il carter.
It is possible to adjust the height of the net by
loosening the screws inside the L-shaped support
and sliding the cylinder to the desired
height.
To adjust the tension of the net, turn the knob
located at the base of the cylindrical supports
counterclockwise.
E’ possibile regolare l’altezza della rete allentando
il grano all’interno del supporto a L e facendo
scorrere il cilindro fino all’altezza desiderata.
Per aumentare la tensione della rete girare in
senso antiorario le ghiere di regolazione poste
alla base dei supporti cilindrici.
15 cm
012
011

1716
To release a metal joint, simply push and hold the
conical part of the joint outwards and remove the
pin.
Per sganciare un giunto metallico è sufficiente
spingere e tenere premuta la parte conica verso
l’esterno. In questo modo il perno risulta libero e
può semplicemente essere sfilato.
D I S A S S E M B LY
GUIDELINES
d01

1918
Before removing the top pieces, protect the top
edges of the glass as seen in the diagram (for
glass versions only);
Release the conical joint (d01) of the upper part
of the central joints (1).
Rotate the joint slightly until it clears the pins
completely (2).
Remove the central joints.
Note: do not force the rotation of the plane!
Prima di rimuovere i piani proteggere i bordi
superiori delle gambe (per le versioni in vetro);
Sganciare l’attacco rapido della parte alta dei
giunti centrali (1).
Ruotare leggermente il piano fino a liberare
completamente i perni (2).
Rimuovere i giunti centrali.
NB: non forzare la rotazione del piano!
Return the glass plate to the horizontal position
and release the upper corner joints.
Remove the first top glass plate.
Repreat the same proceedure with the second
tabletop.
To disassemble the legs, follow the assembly
instructions in reverse.
Riportare il piano in posizione orizzontale e
sganciare la parte alta dei giunti angolari.
Rimuovere il piano.
Procedere in maniera analoga con il secondo
piano.
Per smontare le gambe procedere a ritroso
rispetto al montaggio.
1
2
d03
d02

IMPATIA srl - Via Mentana, 7 - 21052 Busto Arsizio (VA) - Italy - tel. +39 0331 322 581 - info@impatia.com - www.impatia.com
Game Time!
Table of contents
Popular Indoor Furnishing manuals by other brands

LOUNGELOVERS
LOUNGELOVERS ARCHER quick start guide

El Corte Inglés
El Corte Inglés NAVY 004-05389 Assembly instructions

LUXE BIDET
LUXE BIDET Callista installation manual

Amart Furniture
Amart Furniture SASKIA OTTOMAN 72545 Assembly instruction

Pollard
Pollard 311 Assembly instructions

Dimensions Furniture
Dimensions Furniture 130 Assembly instructions


SPARKLE
SPARKLE 406/9803 Assembly instructions

Hillsdale Furniture
Hillsdale Furniture Cottage 103647-110601 manual

modway
modway EEI-4679 manual

Habitat
Habitat Montino 813052 manual

Unfinished Furniture of Wilmington
Unfinished Furniture of Wilmington T-17XB Assembly instructions

GALA MEBLE
GALA MEBLE FRIDA RTV2D1S Assembly manual