in digital DVB-C8080AL User manual

DEAR CONSUMER
GREAT APPRECIATION FOR PURCHASING OUR PRODUCT
TO ENSURE THE BEST PERFORMANCE AND THE HIGHEST SAFETY, PLEASE
READ THE FOLLOWING EXPLANATION CAREFULLY
PLEASE READ THIS MANUAL WITH SUFFICIENT CAREFULNESS AND
PATIENCE PRECEDE THE CONNECTION AND INSTALLATION
DIGITAL CABLE TV RECEIVER OPERATION MANUAL
DVB-C8080AL
DIGITAL CABLE RECEIVER

Dear Subscriber,
Congratulations for choosing the digital service from IN
Digital. Now, you can take total control of your entertainment
and avail of the best that digital television has to offer.
In our continuing commitment to you, our valuable subscriber,
we present the digital Set Top Box (STB) - your gateway to
a whole new world of high quality pictures and sounds on
your television. The STB also comes with an in-built electronic
program guide and an all-new remote control to make for the
best possible viewing experience.
The IN Digital service brings to you everything from program
schedules /synopsis to 24/7 customer support at your
ngertips.
Welcome to the digital experience
Welcome to IN Digital

CONTENT
SAFETY INSTRUCTION------------------------------------------------------------- 4
FRONT PANEL------------------------------------------------------------------------- 5
REAR PANEL--------------------------------------------------------------------------- 5
REMOTE--------------------------------------------------------------------------------- 6
PRECAUTIONS ABOUT BATTERIES-------------------------------------------- 7
PREPARATION OF REMOTE------------------------------------------------------ 8
OPERATION SCOPE OF THE REMOTE --------------------------------------- 8
USEFUL PROMPTION--------------------------------------------------------------- 8
CONNECTION ------------------------------------------------------------------------- 9
STARTING UP-------------------------------------------------------------------------- 10
THE FIRST TIME USING THIS RECEIVER ------------------------------------ 10
CHANNEL MANAGER --------------------------------------------------------------- 11
SPECIFICATION----------------------------------------------------------------------- 13
CERTIFICATE OF WARRANTY -------------------------------------------------- 14
WARRANTY CARD ------------------------------------------------------------------- 14
PACKING LIST
ITEM QUANTITY
DIGITAL RECEIVER -------------------1
BATTERY ---------------------------------2
MANUAL ----------------------------------1
REMOTE----------------------------------1
RCA CORD-------------------------------1

SAFETY INSTRUCTION
IMPORTANT SAFETY INSTRUCTIONS
1. Read these instructions.
2. Keep these instructions.
3. Heed all warnings.
4. Follow all instructions.
5. Do not use this apparatus near water.
6. Clean only with dry cloth.
7. Do not block any ventilation openings. Install in accordance with the manufacturer’s instructions.
8. Do not install near any heat sources such as radiators, heat registers, stoves, or other apparatus (including
amplifiers) that produce heat.
9. The parameter of the using power source should be accordance with which indicating on the rear panel,
otherwise the machine will work improperly and even be ruined.
10. Protect the power cord from being walked on or pinched particularly at plugs, convenience receptacles,
and the point where they exit from the apparatus.
11. Only use attachments/accessories specified by the manufacturer.
12. To prolong the useful life of this machine, the interval of the continuous switch action must be above one
minute.
13. Use only the cart, stand, tripod, bracket, or table specified by the manufacturer, or sold with the
apparatus. When a cart is used, use caution when moving the cart/apparatus combination to avoid injury
from tip-over.
14. Unplug this apparatus during lightning storms or when unused for long periods of time.
15. Refer all servicing to qualified service personnel. Servicing is required when the apparatus has been
damaged in any way, such as power-supply cord or plug is damaged, liquid has been spilled or objects have
fallen into the apparatus, the apparatus has been exposed to rain or moisture, does not operate normally, or
has been dropped.
16. Warning: This unit should only be serviced by an authorized and properly trained technician. Opening the
cover or other attempts by the user to service this unit may result in serious injury or death from electrical
shock, and may increase the risk of fire.
17. The MAINS plug or an appliance coupler of the apparatus is used as the disconnect device, the
disconnect device shall remain readily operable.
18. The signal cable must be earthed to the system.
19. No naked flame sources, such as lighted candles, should be placed on the apparatus.
Note: All the OSD and illustrations in this manual may be somewhat different from the actual situation.
Please take the actual RECEIVER as the standard.
WARNING: To reduce the risk of fire or electric shock, do not expose this product to rain or moisture.
Apparatus shall not be exposed to dripping or splashing and no objects filled with liquids, such as vases, shall
be placed on the apparatus.
Refer to the identification/rating label located on the back panel of your product for its proper operating
voltage.
1
SAFETY INSTRUCTION
IMPORTANT SAFETY INSTRUCTIONS
1. Read these instructions.
2. Keep these instructions.
3. Heed all warnings.
4. Follow all instructions.
5. Do not use this apparatus near water.
6. Clean only with dry cloth.
7. Do not block any ventilation openings. Install in accordance with the manufacturer’s instructions.
8. Do not install near any heat sources such as radiators, heat registers, stoves, or other apparatus (including ampliers)
that produce heat.
9. The parameter of the using power source should be accordance with which indicating on the rear panel, otherwise the
machine will work improperly and even be ruined.
10. Protect the power cord from being walked on or pinched particularly at plugs, convenience receptacles, and the point
where they exit from the apparatus.
11. Only use attachments/accessories specied by the manufacturer.
12. To prolong the useful life of this machine, the interval of the continuous switch action must be above one minute.
13. Use only the cart, stand, tripod, bracket, or table specied by the manufacturer, or sold with the apparatus. When a
cart is used, use caution when moving the cart/apparatus combination to avoid injury from tip-over.
14. Unplug this apparatus during lightning storms or when unused for long periods of time.
15. Refer all servicing to qualied service personnel. Servicing is required when the apparatus has been damaged in any
way, such as power-supply cord or plug is damaged, liquid has been spilled or objects have fallen into the apparatus, the
apparatus has been exposed to rain or moisture, does not operate normally, or has been dropped.
16. Warning: This unit should only be serviced by an authorized and properly trained technician. Opening the cover
or other attempts by the user to service this unit may result in serious injury or death from electrical shock, and may
increase the risk of re.
17. The MAINS plug or an appliance coupler of the apparatus is used as the disconnect device, the disconnect device
shall remain readily operable.
18. The signal cable must be earthed to the system.
19. No naked ame sources, such as lighted candles, should be placed on the apparatus.
Note: All the OSD and illustrations in this manual may be somewhat different from the actual situation. Please take the
actual RECEIVER as the standard.
WARNING: To reduce the risk of re or electric shock, do not expose this product to rain or moisture.
Apparatus shall not be exposed to dripping or splashing and no objects lled with liquids, such as vases, shall be placed
on the apparatus.
Refer to the identication/rating label located on the back panel of your product for its proper operating voltage.
4
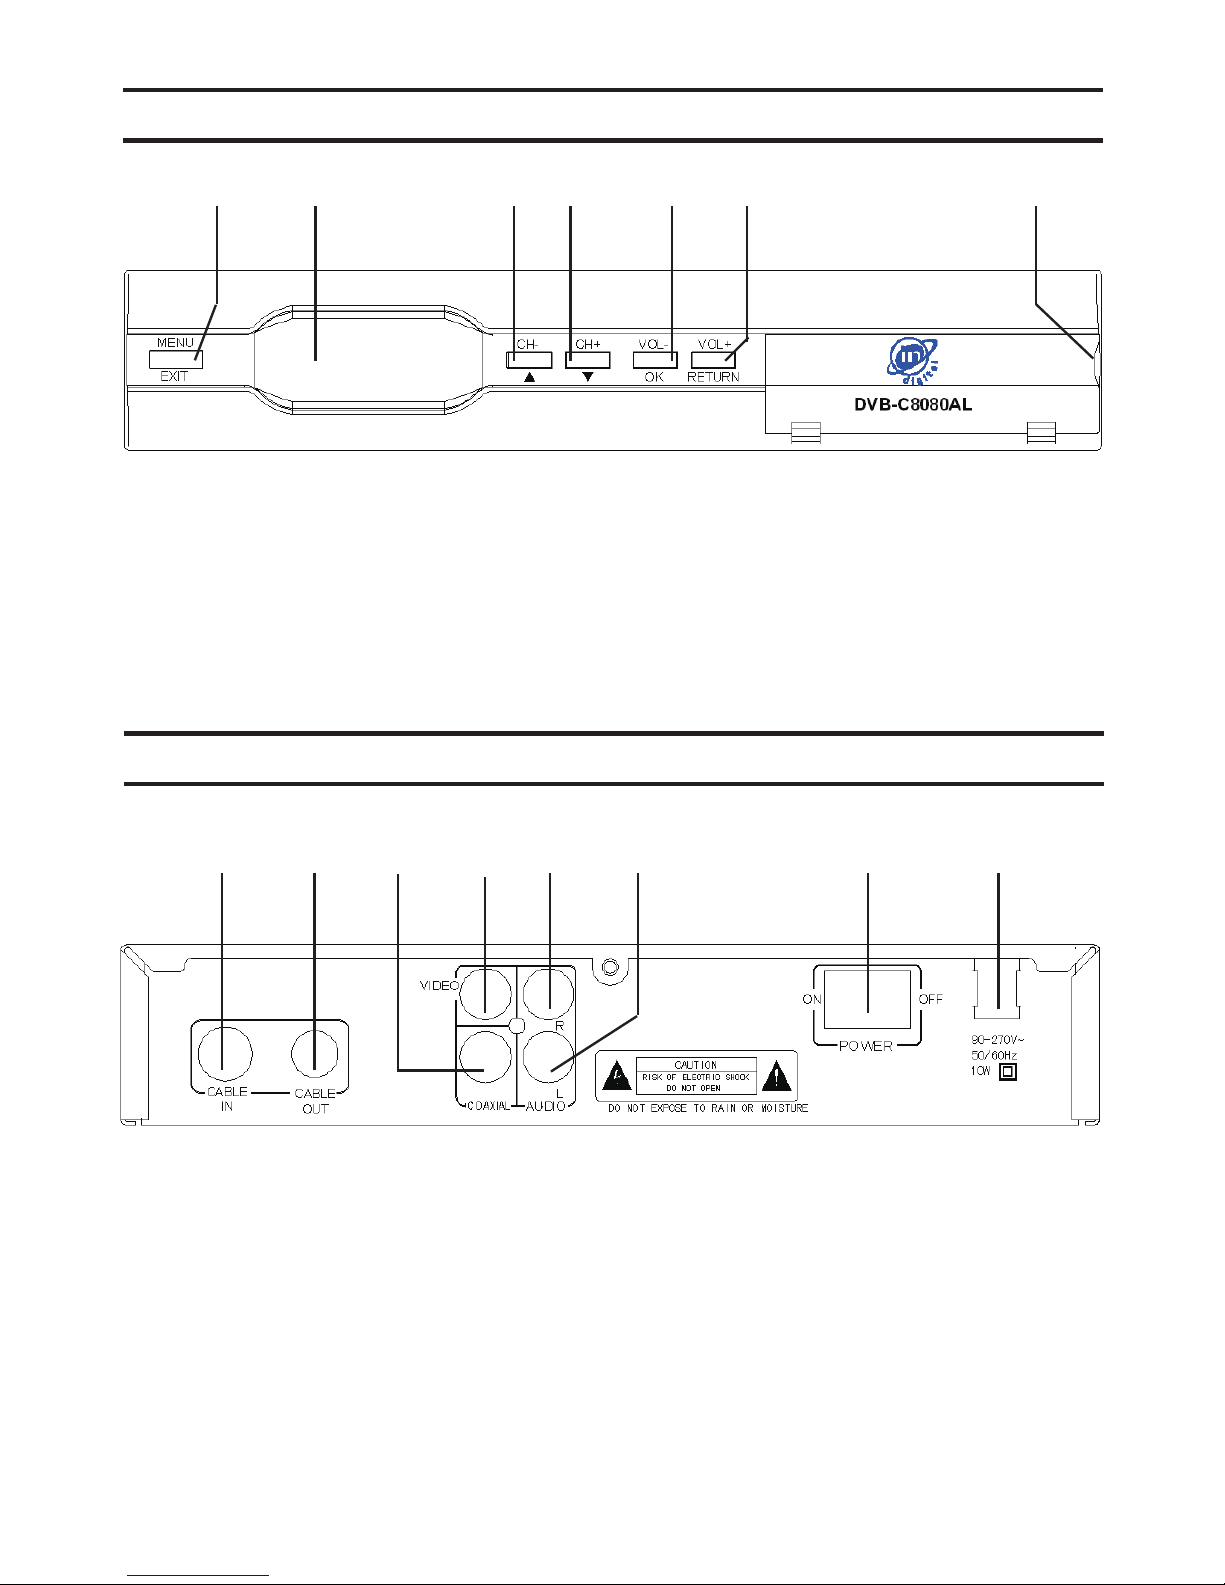
FRONT PANEL
REAR PANEL
1 2 3 4 5 6 7
1. MENU. menu entry/ menu goes back
2. Status indicator/ remote sensor/ displaying panel
3. 4. Channel XSRUGRZQ/ cursor movement
5. volume decrement/ operation conrmation
6. volume increment/ menu goes back
7. The spot where opens the lid to insert a smart card
1 2 3 4 5 6 7 8
1. terminal, antenna signal insert
2. terminal, antenna signal loop out
3. terminal, coaxial digital audio signal output
4. terminal, video signal output
5. terminal, audio signal output, R
6. terminal, audio signal output, L
7. power switch
8. plughole, power cord
5

REMOTE
It’s recommended to operate each function of the keys on the Receiver by
using the key on the remote controller. Please read this section to lend itself
to advance your understanding of the function of the Receiver
STANDBY
FAV
Instruct the receiver into standby mode or
normal watching mode
Non-menu, display FAVORITE LIST interface
Mute the receiver or open its sound
MUTE
0-9
MENU
EPG
LIST
EXIT
Menu, input value
Non-menu, channel selection
Menu entry
Non-menu, enter EPG interface, press the OK key to switch
cursor from columns of channel and program
Non-menu, enter TV LIST interface
MENU, return to the last grade interface
U P /
DOWN
MENU, cursor movement
Non-menu, channel turning
LEFT/
RIGHT
MENU, state alteration
Non-menu, volume adjustment
OK MENU, operation conrmation
Non-menu, TV LIST
V+/- Non-menu, volume adjustment

P+/- Non-menu, channel turning; channel infor, page turning
TV/
RAD Non-menu, switch channel mode between TV and radio
BACK MENU, go back
INFO Non-menu, display an information tape of the present channel,
press the key once more to deploy its brief depiction
AUDIO Non-menu, display audio options, press the directional key to
opt for an option, press the OK key to conrm, press the EXIT
key to exit
GAME Non-menu, deploy game options
HELP Non-menu, deploy STB information
F1-4 Special functional keys in certain situation
PRECAUTIONS ABOUT BATTERIES
Improper use of batteries may cause corrosion or fluid leakage. Please
observe the following instructions for the safe use of batteries
1. Do not mistake the polarities of batteries
2. Never leave dead batteries in the remote control
3. Remove batteries from the remote controller it is not going to be used
for a certain time
4. Do not attempt to disassemble, short-circuit, heat, recharge or throw the
batteries into the re source
5. Do not use new batteries and old one together, or which is different type
6. Wipe away any electrolyte uid inside the remote controller, and insert
new batteries
7

PREPARATION OF REMOTE CONTROL
OPERATION SCOPE OF THE REMOTE CONTROLLER
USEFUL PROMPTING
To prolong the useful life of this machine, the interval of the continuous switch action must be above one
minute
The parameter of the using power source should be accordance with which indicating on the rear panel,
otherwise the machine will work improperly and even be ruined
When the picture that the unexpected non-respondency happening, please turn on the machine again
To maintain the suitable antenna installation position, the proper antenna installation angle, the adequate
antenna earthing, the normal antenna anti-interference measure. Keep the earthing of the outdoor
antenna separating with the indoor equipment’s
Load the batteries to the groove of the remote control and then enable you to operate the native
1. Open the lid
2. Load the batteries (AAA type) and attend whether the anode and cathode of battery are corresponding
to the polarity indicated on the remote controller
3. Close the lid
Make the controller toward the inductive window of native
and then press the keys
Distance: about seven meters in front of the
inductive window
Angle: about 30 degree right or left refer to the
frontispiece of the native’s front panel
INDUCTIVE WINDOW OF FRONT PANEL
5
8
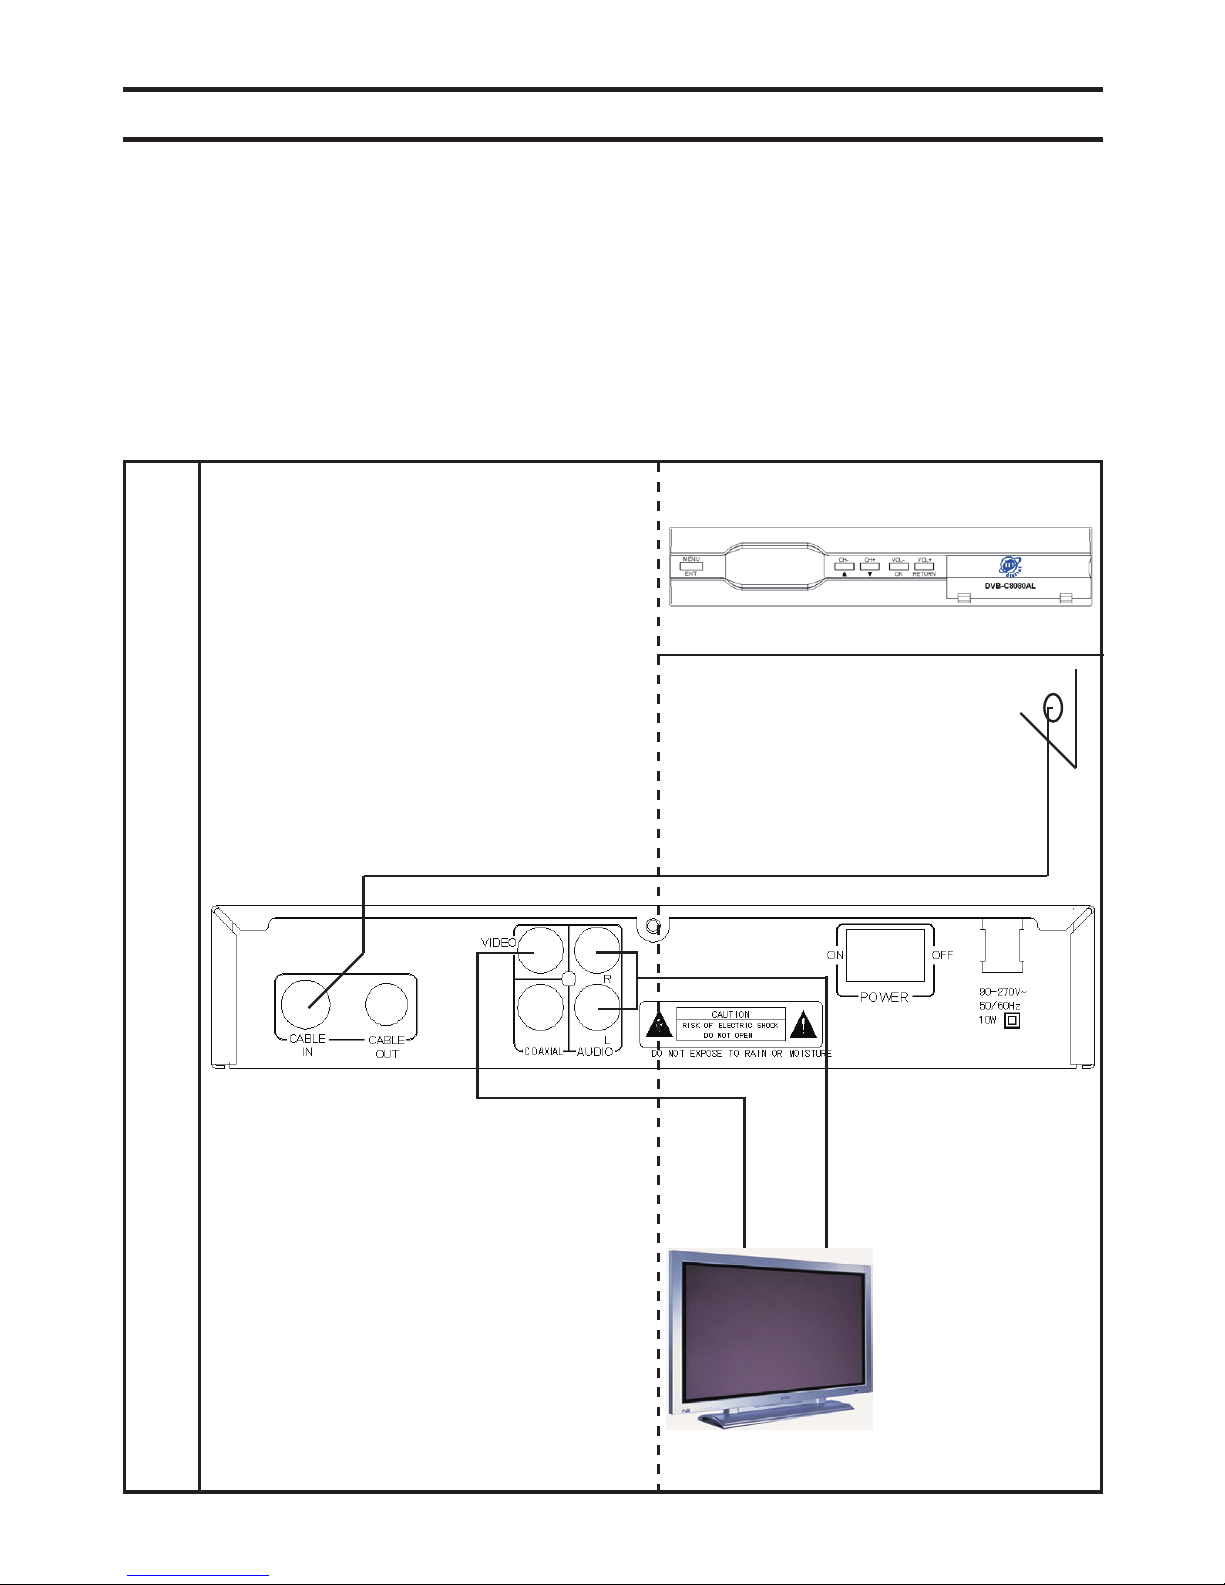
CONNECTION
»connect the audio and video output terminals with the corresponding input
terminal on a TV set
»Insert the digital antenna cable into the [CABLE IN] terminal on the rear panel,
please notice that the connection effect should effectual
»The [CABLE OUT] loop out terminal can form the loop connection with another
receiver, can also be linked with the RF IN input on a TV set to provide RF signal.
»Don't bundle the antenna cable with a power cord in case cause interference
»The terminal [COAXIAL] can connect with a coaxial input on an amplier
TYPICAL CONNECTION
VIDEO
AUDIO
SIGNAL
1.Insert the digital antenna cable
into the [CABLE IN] terminal on the
rear panel of the receiver
2. Connect one end of yellow
terminal on a RCA cable to the
VIDEO output on this receiver and
the other end to the VIDEO input
on a TV set
3. Connect one end of red terminal
on a RCA cable to the AUDIO R
output on this receiver and the
other end to the AUDIO R input on
a TV set; Connect one end of white
terminal on a RCA cable to the
AUDIO L output on this receiver
and the other end to the AUDIO L
input on a TV set
3. Plug the connector of power
cord into a socket and turn on the
receiver and TV set.
9
STARTING UP
1.
Plug the connector of power cord into a socket, turn on the power switches
of this receiver and a TV set, the receiver enters into its normal mode.
2. Render the remote towards the inductive panel of the receiver to instruct
the machine into its standby mode, re-press the key, restore it to its normal
watching state.
3. Once the signal has been locked, the signal indicator lights up.
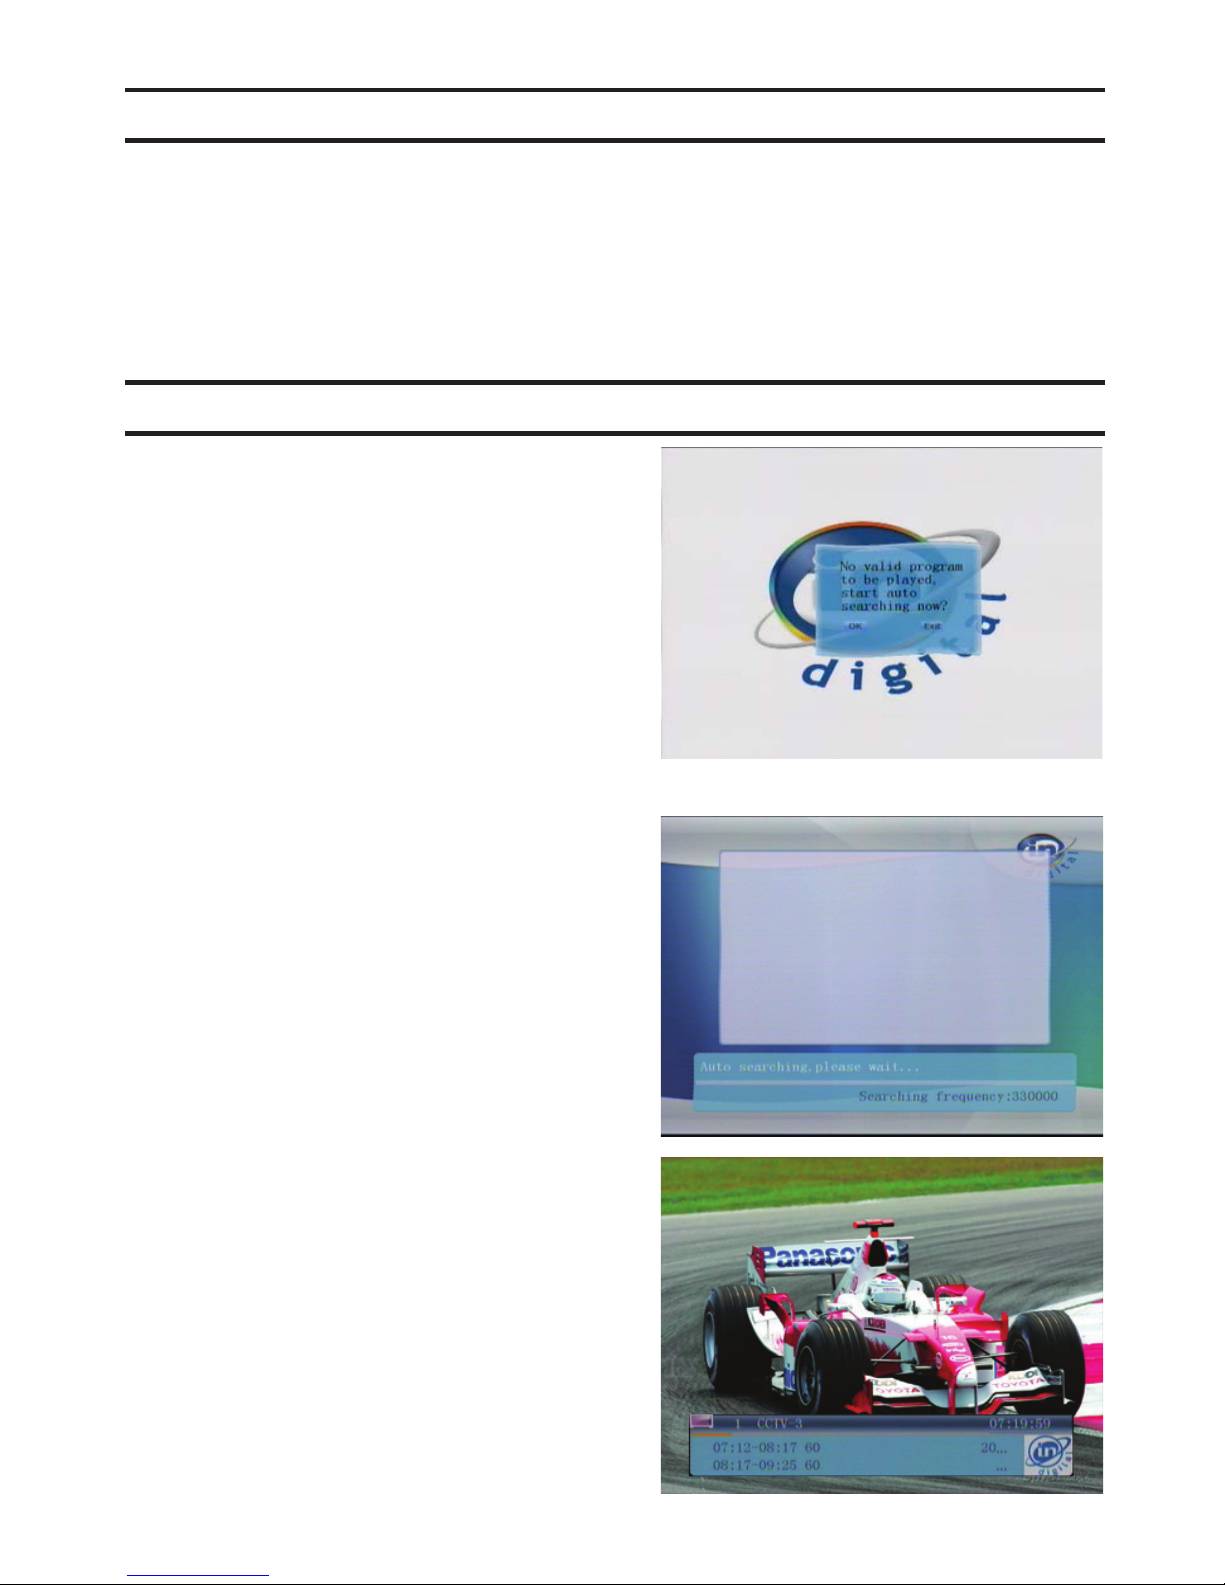
THE FIRST TIME USING THIS RECEIVER
The first time using the receiver, the
screen appears a dialog box, [No
valid program to be played, start auto
searching now?].
Use the OK instruction to start automatic
searching.
After searching, the receiver returns to its
program-watching state.
Press the UP/DOWN key to turn channel
and the LEFT/RIGHT key to adjust
volume.
10

CHANNEL MANAGER
Manager, press the OK key to enter
On Main Menu, highlight the Channel
Manager.
Press the OK key to enter.
>Auto Search. Highlight [Auto Search],
press the OK key to get into its next
menu. Press the BACK key to go back.
Press the OK key to start searching
automatically.
After searching, the screen goes back to
its program-watching status. Press the
UP/DOWN key to turn channel and the
LEFT/RIGHT key to adjust volume.
11

>Manual Search. Highlight [Manual
Search], press the OK key to get into its
next menu.
>>Frequency, Symbol Rate. Press the
digit-key to input concrete value.
>>Modulation. Press the LEFT/RIGHT
key to alternate an option.
As for the accurate value, please refer to
the local program provider.
Press the red key to start single Frequency
search, press green key to start auto search
After searching, the screen goes back to
its program-watching status. Press the
UP/DOWN key to turn channel and the
LEFT/RIGHT key to adjust volume.

SPECIFICA TION
Tuner:
Input Frequency
Input level
Frequency band
Symbol rate
Demodulation type
Input impedance
Video:
Decode format
Output system
Output terminal
Picture definition
Video output range
Audio:
Decode format
Frequency respondence
Sampling frequency
Output terminal
Output level adjustable
Power:
Voltage
Consumption
Environment:
Temperature
Mass
51-862MHz
45dBuV-90dBuV(75Ω)
8 MHz
6.900MBaud
16, 32, 64, 128, 256 QAM adjustable
75Ω
MPEG2.MP@ML
PAL, NTSC
RCA
720×576(PAL)
700±70mVpp
MPEG2(Layer 1、2)
20Hz-20KHz
32/44.1/48KHz
RCA, COAXIAL
(600Ωunbalance)
90-270V~50/60 Hz
10W or so
5℃-40℃
2.0kg or so
16
SPECIFICATION
13

CERTIFICATE OF WARRANTY
This certificate of warranty should produced for servicing under the terms of the warranty.
CONDITIONS OF WARRANTY
1)Within one year from the date of purchase, if any component(s) is found to be defective due to
faulty workmanship or defective material will be made and repairs executed free of charge and
defective part replaced.
Parts repaired or replaced are under warranty throughout the remainder of the original warranty
period only. Repairs under warranty may also be carried only by authorized service centres or the
authorized local cable operator.
2)This warranty does not cover any from of damage resulting from accident, misuse, application
of incorrect voltage or any use contrary to the operating instruction supplied along with the
equipment.
3)NO responsibility will be accepted for damage arising out of unauthorized modification or
alterations of any nature made to the Digital Set Top Box.
4)NO responsibility will be accepted for damage or less incurred during transit of Digital Set Top
Box.
5)This warranty is not valid if the serial number of the Digital Set Top Box has been deleted,
defaced or altered.
6)This certificate of warranty should accompany the Digital Set Top Box if service under warranty
period is required to be carried out at the authorized service centres .
7)The STB conforms functionally to the appropriate BIS standards.
14

WARRANTY CARD
Customer Details
Name:
Invoice Number& Date: □□/□□/□□□□
Purchase Date: Installation Date:
□□/□□/□□□□ □□/□□/□□□□
Digital Set Top Box Model&Type:
Precautionarty measure:
Please ensure that the following bar coded sticker is common between Set-Top-Box,
Retail Box,and this user manual.
IncableNet in Digital Franchisee /independent cable operator’s Details
Signature:- Date:
Franchisee/cable operator
15

Table of contents
Other in digital TV Receiver manuals


