Inalsa CafeAroma User manual

Coffee Maker
Instruction Manual

1
Dear Customer,
Congratulations on the purchase of your INALSA Coffee Maker! This has been designed to
include many superior features.
At INALSA, we have a reputation of selling innovative, high quality appliances such as Food
Processors, Mixer Grinders, Juicer Mixer Grinders, Cooking Ranges, Juice Extractors,
Cooktops, Microwave Ovens, Oven Toaster Grillers, Hand Blenders, Electric Kettles, Rice
Cookers, and Electric Chimneys. Your newly acquired INALSA Coffee Maker bears the same
distinctive hallmark of excellence.
It is all the result of vigorous quality consciousness in INALSA's design and development
where uncompromising standards are maintained and rigid quality control measures are
exercised on raw materials, components and finally, the finished product.
Your INALSA Coffee Maker has a lot of thoughtful features built in to make your life
convenient. Please read these instructions carefully, so that you may get the best out of the
power packed features in your INALSA Coffee Maker.
Welcome to the INALSA world of cooking pleasure!
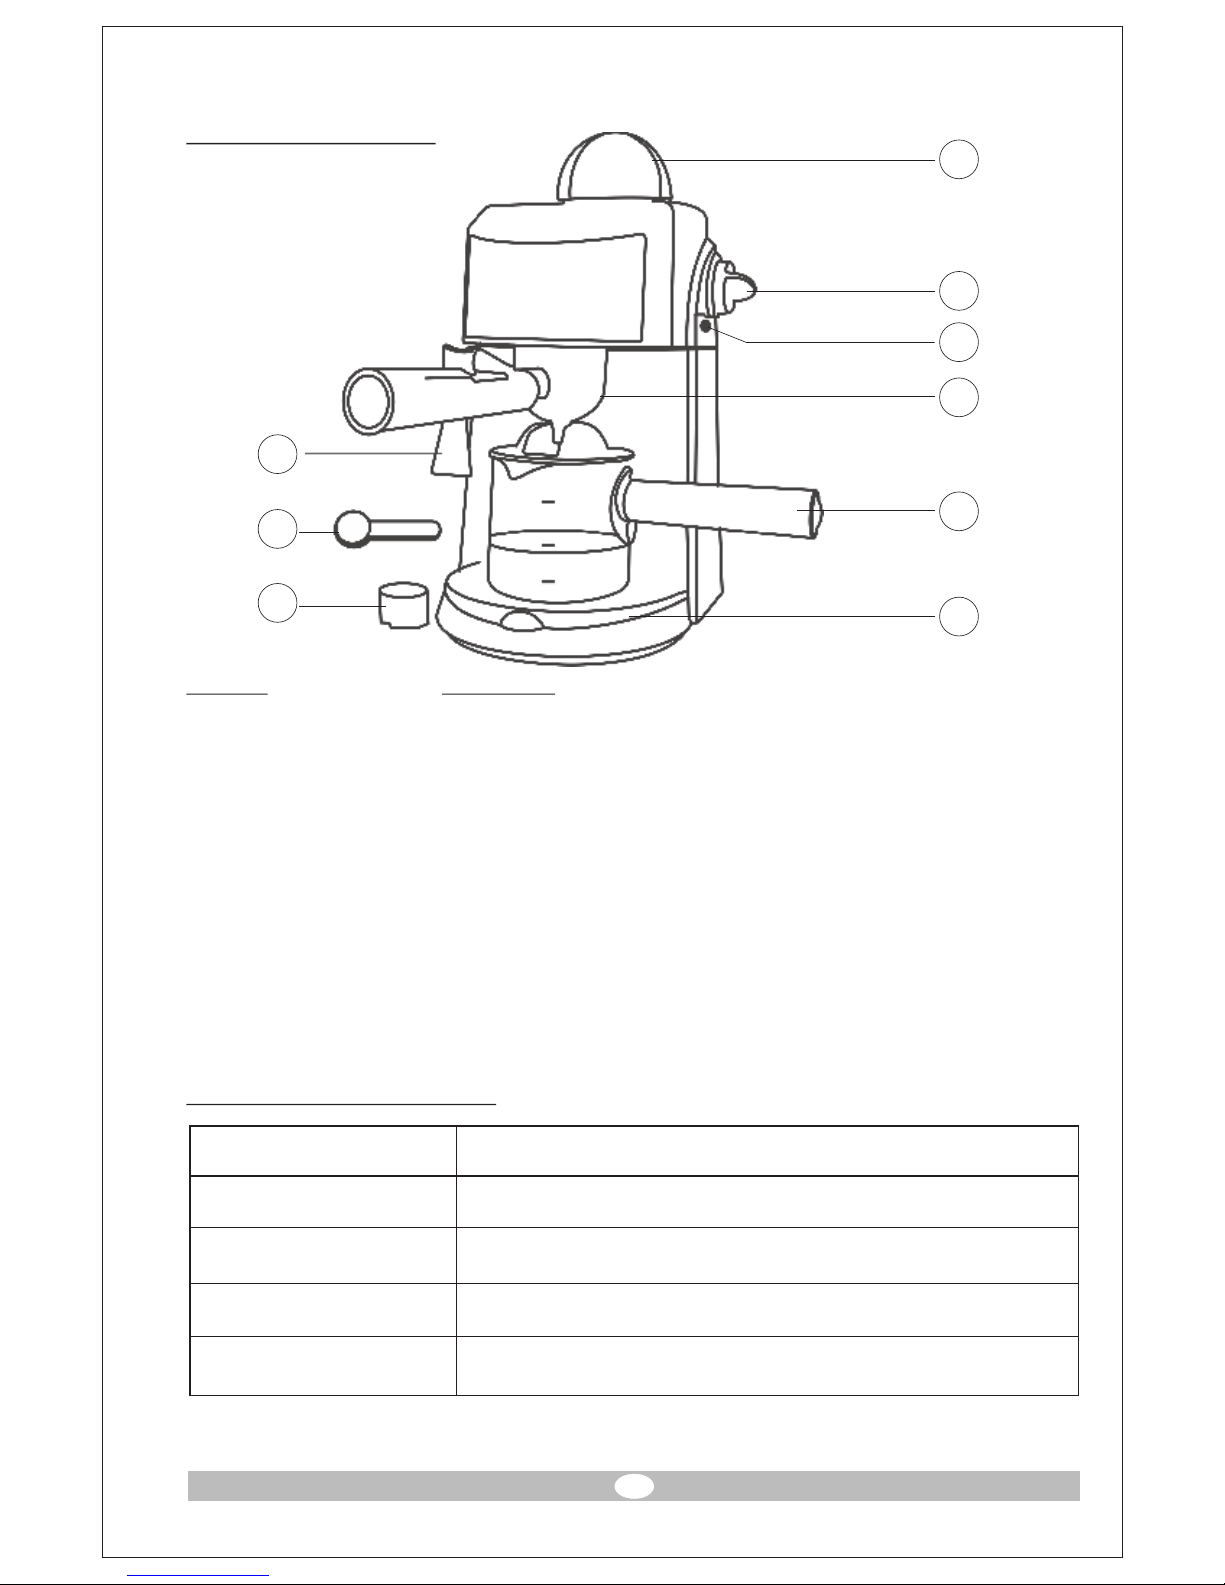
Parts Identification
Technical Specification*
Part No. Parts Name
1. Boiler cap
2. Control knob
3. Power indicator
4. Filter holder with protective thumb guard
5. Glass carafe with lid
6. Removable overflow plate
7. Steam nozzle
8. Filter basket
9. Spoon
Model Cafe Aroma
Voltage 230V, 50Hz
Wattage 800 Watts
Cord plug PVC cord with 3 pin moulded plug
Features Espresso / Cappuccino coffee
* Due to continuous improvements in product, specifications are subject to change without
prior notice.
2
8
7
6
5
4
2
1
3
9

3
Important Instructions
Please read operating instructions before using the appliance.
Do's
1. Before plugging the socket ensure that the supply voltage is in accordance with the rated
one.
2. Place the appliance on a stable, and heat resistant surface. Keep away from hot surfaces
and naked flame.
3. Some parts of the appliance become hot when operated. So hold it by the handle only.
4. Ensure that the main cable does not hang over the sharp edges and keep it away from hot
objects and open flames.
5. If the appliance is damaged, it must be repaired by authorised service technician.
6. Minimum level of water should not exceed 300ml.
7. While using the coffee maker, first the boiler should be locked properly and the control
knobs turned towards cappuccino (steam) position.
8. Wait until steam starts flowing out from the nozzle, then choose cappuccino or espresso as
per your choice.
9. Remove plug from wall outlet before cleaning.
10. Keep the appliance away from the children.
Don'ts
1. Do not place on or near a hot gas or electric burner or in a heated oven.
2. Do not use any other accessory not evaluated for use with this appliance as it may cause
injuries.
3. Do not use appliance for other than intended use.
4. Do not clean carafe with cleansers, steel wool pads, or other abrasive material.
5. Never use warm or hot water to fill the water container. Use normal water only.
6. Never refill the water chamber while this Maxi cream is in operation. Turn the Maxi cream
off and let it cool down for 10 minutes before refilling with water.
7. Before turning your Maxi cream on , please make sure that carafe sits flat in position.
8. Never remove carafe before brewing is completely finished (this is the case when dripping
from the filter holder into the carafe has stopped completely.
9. Never clean with scouring powders or hard implements.
10. Never leave the coffee maker unattended during operation.
11. Do not operate the coffee maker if the main cable shows the signs of damage.
12. Do not immerse the coffee maker in water.
13. To reduce the risk of fire or electric shock, do not remove the base. Repair should be done
by authorized service personnel only.
4
Before First Use
1. After unpacking the unit and before any use, make sure the mechanical parts of the Coffee
Maker and all its attachments are not damaged.
2. We recommend that you should get yourself familiar with all the parts of espresso machine
before using it for the first time. Insert the filter basket into the filter holder. Fit the filter
holder into the filter rings. Remove and replace the boiler cap. Check the different
positions of the switch.
3. To remove any residuals of production which may rest in the appliance, operate espresso
maker with water only, without ground espresso coffee. Wash all loose parts in warm soap
water, rinse thoroughly and make then dry.
How to Use
Making Espresso
1. Place your coffee maker near an electrical outlet and release enough cord so that you can
plug in the machine.
2. Place the filter basket into the filter holder.
3. Fill it with ground coffee. The filter basket is marked on the inside for 2 or 4 cups. Pack the
coffee lightly and clear any excess coffee from the rim of the filter holder.
6. To insert the filter holder, line up the arrow located on the handle of the filter holder with
the arrow on the left side of the machine.
7. Fit the filter holder into the filter rings and rotate right until it is locked and moves no
further.
8. Make sure that the filter holder is fitted properly into the machine, only then you should
operate the machine.
9. Unscrew the boiler cap by turning it anti-clockwise.
Caution
1. Close the boiler cap securely by turning it clockwise.
2. Place carafe under the filter holder. Make sure the overflow plate is in place.
3. Turn the control knob to cappuccino/espresso. It will take approximately 3 minutes for the
water to be heated. The water will then be forced through the ground coffee into the glass
carafe or cups.
4. Wait until all the water in the boiler has been used. Turn off the machine.
5. Do not screw the boiler cap while the machine is in operation. Wait until the brewing cycle
is completed and all water and steam has been used.
6. To remove the filter holder, turn the filter to the left, until the holder dislodges from the
machine.

Making Cappuccino
1. Take a small pitcher.
2. Pour 100ml to 150ml of fresh milk into a small pitcher. The pitcher should fit underneath
the steam nozzle.
3. Follow the directions as discussed in the caution of espresso.
4. As soon as the espresso reaches the steaming symbol on the glass carafe, turn the control
knob to cappuccino position. At this time the unit has created enough pressure and steam to
start frothing the milk. Place the tip of the steam nozzle half way into the pitcher of milk.
5. Turn the control knob anti-clockwise to release steam
6. Keep the pitcher slightly tilted so that you can always see the position of the nozzle as you
froth the milk. As the froth rises keep lowering the pitcher so that the tip of the steam nozzle
is always just slightly beneath the surface of the rising froth.
7. When you have finished frothing milk, close the control knob by turning it clockwise
while the nozzle is still immersed in the milk. This will avoid splattering of the hot milk
and froth.
Note: Milk residuals will build up in the tip of the steam nozzle. Clear with a damp cloth
after each use. This will help prevent the steam nozzle from clogging and will ensu re
perfect frothing results.
Caution
1. Please follow the instructions listed below if the machine is still under pressure. Follow
these safety precautions while your machine is in use and ten to fifteen minutes after use.
2. Turn the control knob to off position and unplug the appliance.
3. Carefully open the control knob by slowly turning it clockwise. If steam comes out of the
nozzle, then the boiler chamber is still under pressure. Close steam knob and proceed with
instructions listed below.
4. Take a pitcher filled with cold water and hold it underneath the steam nozzle and nozzle
inserted into the pitcher. Then open the control knob by turning it anti-clockwise. Leave
control knob open until no more steam comes out of the nozzle. When finished, turn
control knob clockwise to off position.
5. Now you can remove the boiler cap and the filter holder.
Practical Advice
1. Always use fresh cold water (warm water might be stale and have mineral deposits which
would impair the flavour of the coffee).
2. Freshly ground beans deliver more aroma and flavour.
3. Serve coffee immediately after brewing.
4. Never reheat coffee.
5
Cleaning and Maintenance
1. Before cleaning turn off the machine. The filter holder, filter and overflow plate can be put
in the dishwasher's upper rack, away from the drying element.
2. The machine can be wiped off with the help of a damp cloth. If there is water left in the
boiler chamber, let the machine cool down, remove all loose parts and empty through the
top opening by turning upside down.
3. For cleaning the steam nozzle remove all milk particles using a sewing needle and rinse
under the faucet.
4. Wipe off the outside of the nozzle with a wet cloth. Hold the wet cloth very close to the tip
of the nozzle and open the steam valve. Let the steam escapes into the wet cloth for one or
two seconds, then close the valve.
5. The overflow plate can be cleaned by removing the plate.
Decalcifying of the Espresso
1. The espresso machine must be decalcified regularly. The frequency depends upon the
hardness of water and how often you use the machine.
2. Before descaling, remove the filter and filter holder and clean them separately.
3. Remove all lime and coffee residue from the filter and the filter holder.
4. Dissolve two tablespoons of citric acid in the lukewarm water and pour it into the boiler
container, put one container under the espresso outlet and another under the steam nozzle.
5. Open the steam valve and turn on the appliance. Allow the descaling solution to run out of
the espresso outlet and the steam nozzle.
6. After each brewing turn off the appliance and allow it to cool down.
7. Repeat this operation once again with Citric acid solution. Then use clean water instead of
citric acid to run through the system. Turn off the appliance. Allow the appliance to cool
down. Insert the filter and other accessories and the coffee maker is ready to use.
Warning
1. This coffee maker is NOT meant for boiling.
2. This coffee maker NOT meant for commercial use.
Trouble shooting
Problem
Espresso leaking from filter holder-
Cause
1. Filter holder not properly inserted.
2. Filter holder not pushed in far enough.
3. Internal gasket is dirty and needs to be cleaned.
4. Gasket without elasticity.
5. Coffee powder not cleaned off the edge of the filter holder.
6

Problem
Espresso does not come out
Cause
1. No water in the boiler container.
2. No coffee in the filter holder.
3. Filter clogged because coffee is ground too fine and or pressed down too hard.
Problem
Steam does not come out of steam nozzle
Cause
1. No water or not enough water in the boiler chamber.
2. Steam nozzle is clogged.
3. Not enough froth when frothing the milk
4. Steam nozzle is clogged.
Problem
Not enough froth when frothing the milk.
Cause
Steam Nozzle is clogged.
7
This manual suits for next models
3
Table of contents
Other Inalsa Coffee Maker manuals


