Inalto IF9EG User manual

MODEL CODE/S
IF9EG
PRODUCT
DUAL
FUEL
COOKER
DOCUMENT
USER
MANUAL

USER MANUAL
PAGE 02
Dear Customer, Congratulations on purchasing your new cooker. The
Inalto brand is proudly distributed within Australia by
Residentia Group Pty Ltd.
Please refer to the warranty card at the rear of this
manual for information regarding your product’s
parts and labour warranty, or visit us online at
www.residentiagroup.com.au.
At Residentia Group, we are customer obsessed and
our Support Team are there to ensure you get the most
out of your appliance. Should you want to learn more
about recommended cooking temperatures, the various
cooking functions available, how to set and program
your LED clock, and importantly taking care of your
appliance when cleaning, our Support Team are here to
help. You can use our online Support Centre at anytime
by visiting http://support.residentiagroup.com.au, or you
can contact us via phone by dialling 1300 11 HELP (4357).
It is important that you read through the following use
and care manual thoroughly to familiarise yourself with
the installation and operation requirements of your
appliance to ensure optimum performance.
Again, thank you for choosing an Inalto appliance and
we look forward to being of service to you.
Kind Regards,
The Residentia Team
T1300 11 4357
E info@residentiagroup.com.au
W residentiagroup.com.au
ACN 600 546 656
Residentia Group
PO Box 581
Stanhope Gardens
NSW Australia 2768

PAGE 03
PAGE CONTENT
04 SAFETY
INSTRUCTIONS
06 YOUR INALTO
COOKER
08 CONNECTIONS
11 INSTALLATION
OF COOKER
13 OPERATING
YOUR COOKER
15 MAINTENANCE
& CLEANING
23 TROUBLESHOOTING
& TECHNICAL DATA
26 WARRANTY
INFORMATION
27 PURCHASE
DETAILS

USER MANUAL
PAGE 04
This electrical oven is manufactured for using
preparation of normal home meals. Please do not use
for other purposes.
Installation
► This appliance must be installed by qualified personnel,
according to the manufacturer’s instructions and to the
relevant Safety Standards.
► This appliance is heavy. Take care when moving it.
► Remove all packaging, protective films and oils From
the appliance before using for the first time.
► Ensure that the electrical supply complies with The
type stated on the rating plate.
► Do not attempt to modify the appliance in any way.
► Usage voltage of your oven is 230 Volt, 50 - 60 Hz.
► Fuel Type for your oven is Gas and electricity.
WARNING: This appliance must be earthed.
► When you have finished cooking check that all controls
are in the OFF position.
► If your electrical installation fuse range is not 20 A,
please have a licenced electrical technician connect
20 A fuse.
► Please be sure that plug of your oven cooker is
accidentally if the pulled beyond the extent of the
power cord, the Earth wire will pull out last. İf your
residence did not contain earth system the producer
company dose not responsible about the damaged
event.
► Your oven must be used with an earthed outlet, since
the inlet of your oven is an earthed inlet. Our firm will
not take any responsibility in case that it is used without
grounding.
► Keep electric cable of your cooker away from hot areas
and don’t let these to be in touch with the device. Keep
away from sharp edges and hot surfaces.
► When supply cable is damaged, call on your nearest
service and get it replaced with a new one.
► Connection can only be done by an expert authorised
by customer relations.
► Before connecting your appliance, please check local
connection conditions (electricity) suitability to type of
appliance.
► Appliance can not be connected to a hood. Connection
must be done according to valid assembly and
connection instructions. Please pay a special attention
to ventilation requirement. The distance between
appliance and hood must be at least as the distance
described in hoods User’s Manual.
► Oven can be installed between two furniture elements
such as kitchen cabinetry. (Class 2/1). It can be placed
near a furniture element which has a taller side than
oven. Horizontal distance to a high cupboard or wall
must be at least 650 mm. The shortest vertical distance
to appliance must be at least 950 mm.
► Operations which can only be made with a tool on
appliance must be done by an authorised service
technician.
► Appliance can only be connected by a technician
who authorised by technical service. By this way, it
provides to obey legal instructions and local technical
connection conditions. You can find important
statements about this subject at ‘Installation of Oven’
section.
► During boiling and frying, very hot solid or liquid oil
drops leaped on oven can easily catch fire and cause
fire danger. Please take frying process in your control.
► Connection cables of appliances near oven can be
damaged and shortcutted if they contacted with hot
parts of oven. Thats why, cables of other appliances
must be in enough safety distance to oven.
► Please do not use this appliance for heating inside.
Please do not use the appliance with any empty pots
or pans.
► Humidity and heat shall come out of your device
while using it, so be sure that your kitchen is well
ventilated. Keep natural ventilation holes active,
or get a mechanical ventilation assembly installed.
(Exhaust Fan)
► Utilise oven gloves to take out hot pots or pans/trays.
► Do not use harsh abrasive cleaners or sharp metal
scapers to clean the oven door glass since they can
scratch the surface, which may result in shattering
of the glass
► External surfaces of oven can be hot while utilising
oven section.
Children Safety
► This appliance is designed to be operated by adults. Do
not allow children to play near or with the appliance.
► The appliance gets hot when it is in use. Children
should be kept away until it has cooled down.
► Children can also injure themselves by pulling pans
or pots off the appliance.
► Before using your product please take out packing
materials on oven. Do not forget to take out cartoons
on sides of trays and wire grate and strafor that stick
on front panel. Packing material can cause danger for
children.
► Small children must be kept away. Don’t touch heating
elements inside oven. Don’t definitely touch oven glass
when oven is hot.
► Keep children and pets away from cooker while oven
is operating.
► Children shall not play with the appliance.
SAFETY INSTRUCTIONS

PAGE 05
► Cleaning and user maintenance shall not be made by
children without supervision.
The appliance and its accessible parts become hot during use.
WARNING: Care should be taken to avoid touching
heating elements. Children less than 8
years of age shall be kept away unless
continuously supervised.
WARNING: Burning risk is high especially for small
children who are not aware of danger.
Burners surfaces, cover of oven, inner
parts and steam exit are hot during
usage. They can exposed to burning
or boiling. So it required to keep small
children from oven in appropriate
distance. Bigger children can use oven
under watch.
WARNING: Burning Danger. Heating elements,
oven and accesories are very hot
during usage. So please always use
kitchen cloths or heat resist gloves
during holding pots and be careful on
usage of pots for remove burn risk.
Pressing on open cover of oven with
heavy matters can cause damage on
cover hinges. So please do not sit or
load heavy matters on open cover of
oven.
► This appliance can be used by children aged from 8
years old above and persons with reduced physical,
sensory or mental cap-abilites or lack of experience
supervision or instruction cancerning use of the
appliance in a safe way and understand the hazard
involved
During Use
► Ensure the control knobs are in the ‘OFF’ position when
not in use.
► When cooking heavy items, eg; turkeys, do not pull the
oven shelf out with the item is still on the shelf. There
might be a risk of tipping.
► Never use the appliance for heating a room.
► Reachable parts of oven can be very hot when grate
uses. Please keep small children away. Please do not
touch heating ele-ments inside oven.
► Outer surfaces of oven can be hot during ordinary
working of appli-ance
► Use oven gloves when removing hot food utensils from
the oven. The oven and utensils will be very hot when
in use.
► Do not put any hot items into the drawer. Utensils used
during cooking should only be put into the drawer
when cold.
► During boiling and frying, very hot solid or liquid oil
drops leaped on oven can easily catch fire and cause
fire danger. Please take frying process in your control.
► The oven door must always close properly. Keep the
door seal areas clean.
► Pressing on open cover of oven with heavy matters can
cause damage on cover hinges. So please do not sit or
load heavy mat-ters on open cover of oven.
► Do not use the oven with the door inner glass panel
removed.
► Do not use the drop down door as a step to reach above
cabinets
► After using oven side, please wipe vapour drops with
a cloth that can be formed on oven cover by high
temperature
► When opening the appliance door, take care to avoid
skin con-tact with any steam that may escape from the
oven.
► Perishable food, plastic items and aerosols may be
affected by heat and should not be stored above or
around the appliance.
► The appliance and its accessible parts become hot
during use. Care should be taken avoid touching
heating elements.
Children less than 8 years old age shall be kept away
unless con-tinuously supervised
Service
► Connection cables of appliances near oven can be
damaged and shortcutted if they contacted with hot
parts of oven. Thats why, cables of other appliances
must be in enough safety distance to oven. When power
cord damaged plese contact with closest author-ised
service to fix new one.
► Operations and repairs on appliance that done un-
methodically causes possibility of electric shock
and shortcuts. Please keep away from this kind of
operations which can destroy your appliance and cause
danger of getting injured.
► This appliance should only be repaired or serviced
by an authorised Service Engineer and only genuine
approved spare parts should be used.
DISPOSAL OF THE APPLIANCE
Old appliances should not simply be disposed of with
normal household waste, but should be delivered to a
collection and recycling centre for electric and electronic
equipment. A symbol shown on the product, the instruction
manual or the packaging shows that it is suitable for
recycling.
Materials used inside the appliance are recyclable and are
labelled with information concerning this. By recycling
materials or other parts from used devices you are
making a significant contribution to the protection of our
environment. Information on appropriate disposal centres
for used devices can be provided by your local authority.

USER MANUAL
PAGE 06
CONTROLS
KEY
—
1 Small burner 2 Medium burners 3 Large burner
4 Trible burner 5 Minute minder 6 Control buttons
7 Tray 8 Oven door 9 Flap drawer
10 Splash panel
SAFETY INSTRUCTIONS
► Always turn off all controls after use.
► Always stand back when opening the oven door to allow heat to disperse.
YOUR INALTO COOKER

PAGE 07
TECHNICAL SPECIFICATION
Model Type IF9EG
Voltage (V) 230V
Frequency (Hz) 50-60Hz
Wok Gas Burner Power (W) 14.4 MJ/h (4.0kW)
Rapid Gas Burner Power (W) 10.8 MJ/h (3.0kW)
S-Rapid Gas Burner Power (W) 2 x 6.3 = 12.6 MJ/h (3.75kW)
Aux. Gas Burner Power (W) 3.6 MJ/h (1.0kW)
Total Hob Gas Power (W) 41.4 MJ/h 11.75kW
Top Resistance Power (W) 1300W
Bottom Resistance Power (W) 1500W
Grill Resistance Power (W) 2800W
Turbo Resistances Power (W) 2 � 1500 = 3000W
Fan Powers (W) 2 � 35 = 70W
Lamps Power (W) 2 � 15 = 30W
Maximum Elc.Power Oven (W) 4600W (Turbo + Bottom + Fan + Lamp)
Total Power Oven (W) 8700W
Functions
Fan Bottom Heater Turbo Heater + Bottom
Heater Grill Bottom + Top Heater Turbo Heater
Grill + Fan

USER MANUAL
PAGE 08
CONNECTIONS
ELECTRICAL CONNECTION
► Have the electrical connection performed by authorised technical personnel.
► Use personal protective equipment.
► The appliance must be connected to earth in compliance with electrical system safety standards.
► Disconnect the main power supply.
► Do not pull the cable to remove the plug.
► Use cables withstanding a temperature of at least 90°C.
► The tightening torque of the screws of the terminal supply wires must be 1.5 – 2 Nm.
General Information
► Check the grid characteristics against the data indicated on the plate.
► The identification plate bearing the technical data, serial number and brand name is visibly positioned on the appliance.
► A copy of the identification plate is included in the booklet. It should be applied to an adjacent surface or this
instruction manual. Do not remove this plate for any reason.
► Perform the ground connection using a wire that is 20 mm longer than the other wires.
The appliance can work in the following modes:
► 230 Volt, 50 – 60 Hz.
! Power Voltage Danger of Electrocution
► The values indicated above refer to the cross-section of the internal conductor.
► The aforementioned power cables are sized taking into account the coincid-ence factor (in compliance with standard
EN 60335-2-6).
Fixed connection
► Fit the power line with an omnipolar circuit breaker in compliance with installation regulations. The circuit breaker
should be located near the appliance and in an easily reachable position.

PAGE 09
GAS CONNECTION
!Power Voltage Danger of Electrocution
► After carrying out any operation, check that the tightening torque of gas connections is between 10 Nm and 15 Nm.
► If required, use a pressure regulator that complies with cur-rent regulations.
► At the end of the installation, check for any leaks with a soapy solution, never with a flame.
► Installation with flexible hose must be carried out so that the length of the piping does not exceed 1,2 metres when fully
extended; make sure that the hoses do not come into con-tact with moving parts and that they are not crushed in any
way.
► The hoses should not come into contact with moving parts and should not be crushed in any way.
General informations
This appliance is suitable for installation with Natural Gas or ULPG (propane/butane). Refer to “Burner and nozzle
characteristics table” paragraph for the relevant burner pressure and appropriate injector sizes. When the appliance is to
be connected to Natural Gas then the pressure regulator supplied must be fitted to the gas inlet. A test point (for checking
the gas pressure) is supplied either with the regulator or as a separate fitting in the case of ULPG (propane) appliances.
Connection of the appliance to the gas supply must be in accordanc with the
requirements of AS5601. A ½” BSP connector at the inlet is recommended and
the gas supply line to the appliance must be of adequate length to allow sufficient
withdrawal of appliance for service or disconnection and be:
1. annealed copper pipe or;
2. flexible hose according to AS/NZ1869 & be at least Class “B”, 10 mm diameter.
The appliance must be installed with provision to allow the gas to be turned off
and disconnected for servicing and removal of the appliance as required from
the gas supply. Before the appliance is operated make certain all relevant parts
are placed in the correct position.
On completion of the installation, the installer MUST check for gas leaks and test
each burner individually for the correct flame. Once all burners have been tested
individually, turn all burners on together. Warranty service calls do not cover
these adjustments!
To check the operating pressure of the appliance it is recommended at least 2
large size burners are used. Ensure appliance is secured to wall when installation
is completed.
► N.G. The regulator supplied must be fitted to the ½ BSP thread at the rear of
the appliance. An approved manual shut-off valve must be installed. The N.G.
regulator must be checked and adjusted to 1.0kPa after installation.
► U.L.P.G. Can be connected to the inlet fitting directly. The pres-sure must
be checked to ensure it is operating at 2.75kPa. A separate test point fitting
must be installed between the piping & the appliance for the pressure to be
checked to ensure it is operating at 2.75kPa.
USER MANUAL
PAGE 10
CONNECTIONS
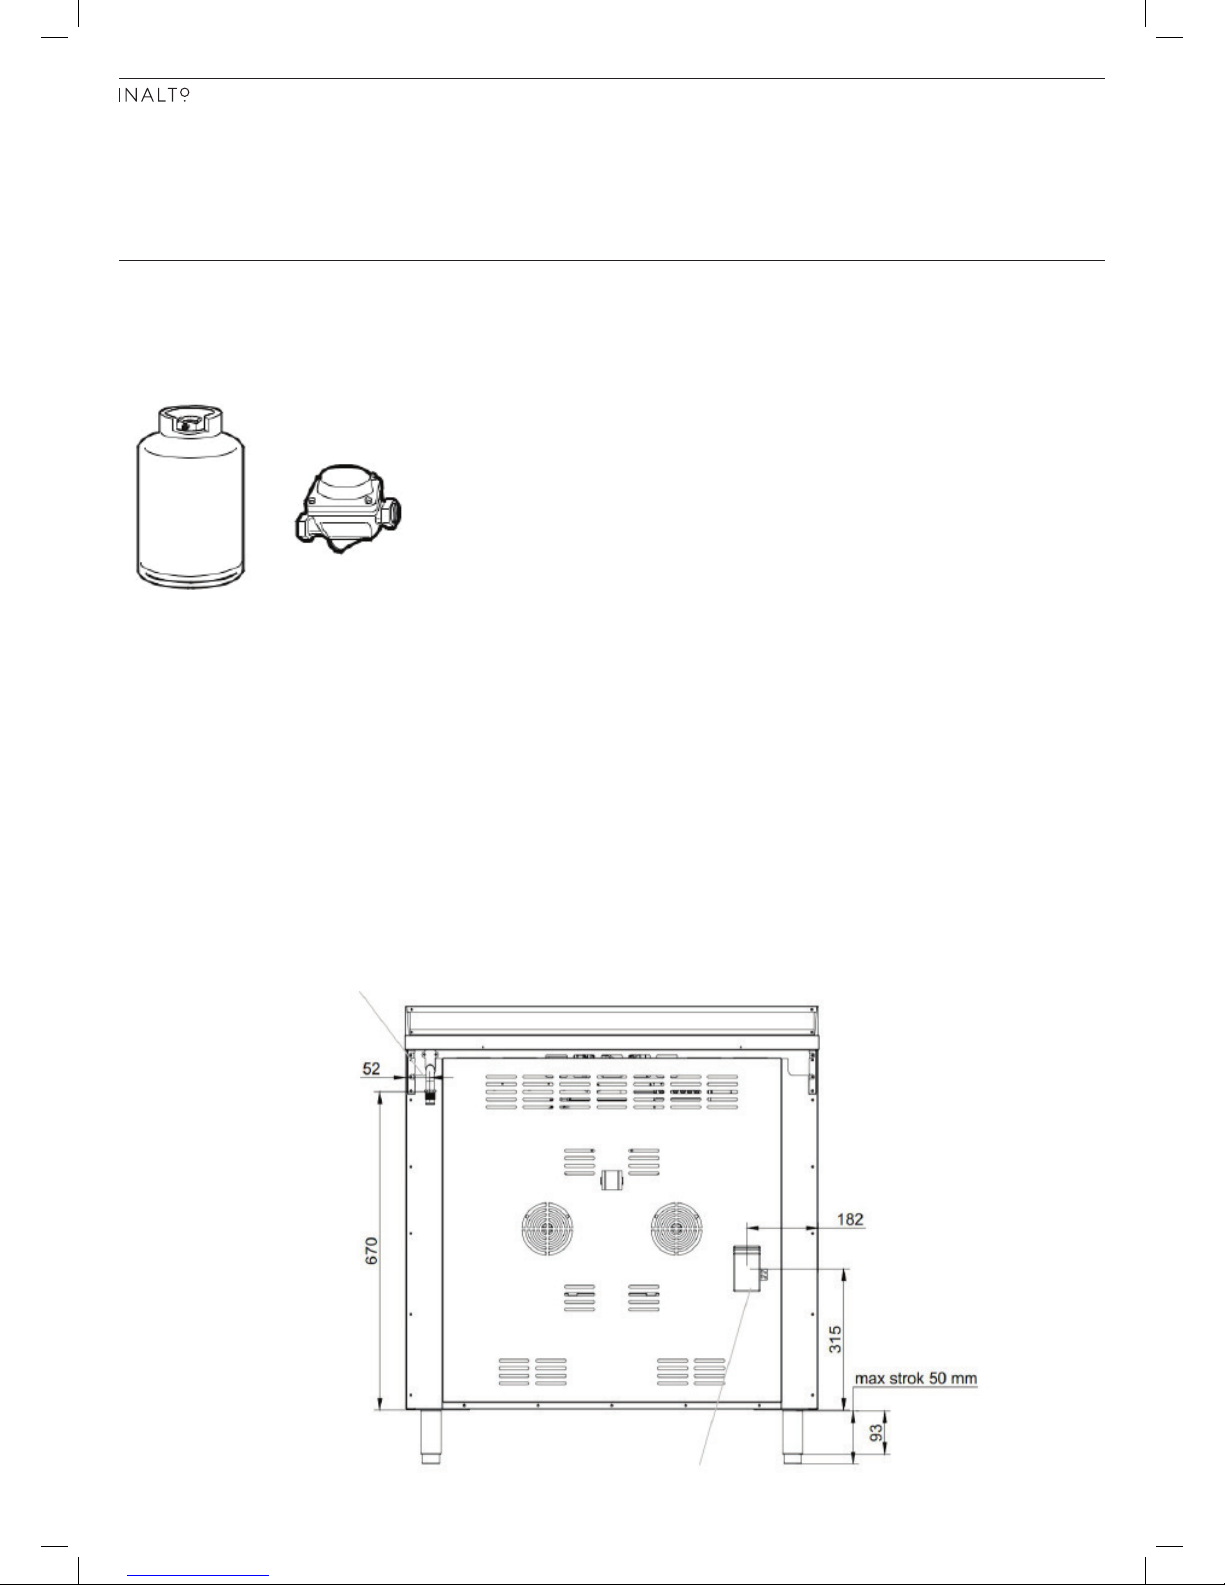
Connection to liquid gas
► Use a pressure regulator and make the connection on the gas cylinder following the guidelines set out in the regulations
in force.
► Make sure that the supply pressure complies with the values indicated in the paragraph “ Burner and nozzle
characteristics table”.
Room ventilation
► The room containing the appliance should have a permanent air supply in accordance with the standards in force.
The room where the appliance is installed must have enough air flow needed for the regular combustion of gas and
the necessary air change in the room itself. The hob shall be installed in rooms with natural ventilation, as required by
Standards regulations AS/NZS5601.
Combustion gas discharge
► Combustion gases may be discharged by means of hoods connected to a flue with reliable natural draught, or a fan
extraction system. An effective extraction system requires careful design by an authorised specialist, and must comply
with the regulation distances and positions. After installation, the engineer must issue a certificate of compliance.
ELECTRICAL & GAS CONNECTION LOCATIONS
Gas connection point
Electrical cable
entry point

PAGE 11
INSTALLATION OF COOKER
► The kitchen where the cooker is to be installed should be dry and have an efficient ventilation system.
► There should be an open space above the appliance to allow kitchen odours to disperse. A cooker hood may be installed
to either absorb or extract the odours. The distance between the gas hob and the hood should not be less than 950mm.
(Fig. 2).
► Do not install the cooker on a window-door axis.
► The position of the cooker should ensure free access to all controls.
The cooker is equipped with adjustable feet designed for levelling the cooker and for adjusting the upper edge of the
cooker to furniture level.
In order to eliminate the risk of the cooker falling forward a chain has been installed at the rear side of the cooker. This
should be fastened securely to the wall behind the appliance with the bracket supplied
Levelling the Cooker
The cooker needs to be level. To achieve this use the adjustable feet until it is at the correct level (Fig. 3).
FIG. 2
FIG. 3

USER MANUAL
PAGE 12
INSTALLATION OF OVEN
SAFETY CHAIN ANCHORS
In order to eliminate the risk of the oven falling forward, two chains have been supplied with the appliance. Before use,
these will need to be fastened securely to the wall behind the appliance with the anchor brackets supplied.
► Decide on a suitable wall location for fitting the anchor brackets directly behind each cooker safety chain.
► Hold the chain anchor up to the wall where it will be required and mark the fixing holes.
► Drill the fixing holes and fix the chain anchors to the wall using the screws provided and suitable wall plugs for the type
of wall being fixed to.
► Before securing the safety chains, check that you have completed the installation process and that all connections have
been made successfully and that the cooker is in its final operating position.
Connect safety chain as per below diagrams.
Thermostat

PAGE 13
You can find control buttons in the diagram below. With these control buttons power of each heating element can
be adjustable. Buttons can turn clockwise or opposite to clockwise directions. Please bring the control button to
required cooking position. For first cooking, it recommended to use highest cooking position.
User Instructions :
Before start cleaning cooker be sure that electrical connection is and gas connection are cut off.
Please do not use rough pots can scratch the surface of cooker. Before using cooking pots, pay attention that their base is
dry and clean. Base diameter of cooking pots must be same as cooking surface of cooker. Base of cooking pot must be a
little concave in cold condition. When this concave base heated, its contact with cooker surface increases by expansion;
so maximum heat transfer from cooker to pot provided. Best base thickness for enamelled pots is 2-3 mm. For sandwich
type stainless steel pots 4-6 mm base thickness is recommended. To test whether pot base has right shape or not, you can
do this easy test when it is cold as follows : Let pot base stay contacted to smooth side of desk in right, pass it on between
some paper tape. (For enamelled pot 5-10 pieces of paper tape, for stainless steel pot 2-5 pieces of tape are recommended).
USING THE HOB
Before using the cooker for the first time you should:
► Read the operating and safety instructions thoroughly.
► If applicable, remove the remnants of stickers and glue from the surface of the hob, pan supports and oven door.
► Ensure that all elements of the burners are positioned correctly.
► Press and turn the control knob to the large flame position.
Press and hold the ignition button downwards until ignition
has started (Fig. 5).
► The large flame mark is for maximum heat output.
► For simmering, lower the heat output by turning the control
knob towards the smaller flame position.
► Turn the knob to OFF ( ) when cooking has finished.
► The flame should not lick around from the bottom of a pan
but cover only two-thirds of its surface. This will reduce the
gas consumption and prevent the flame from soiling the
utensils.
► The size of the flame depends on the position of the knob.
The full flame should be used until the dish begins to boil,
then it is better to use the simmering flame.
► Burners and ignitor tips should be kept clean, as dirt
adversely affects the performance.
► Before removing an item off a burner, reduce the flame or
turn the burner off completely.
► Before switching on a burner, make sure that the knob you
are going to use corresponds to the burner you wish to
switch on. The relationship between knobs and burners is
shown in Fig. 5.
75
50
100
125
150
200
250
180
Max
00000
STOP
Thermostat Timer Hob Knobs
Cooking Functions
OPERATING YOUR COOKER
0
OFF POSITION
LARGE FLAME
SMALL FLAME
FIG. 5
FRONT
LEFT
BACK
LEFT
CENTRE BACK
RIGHT
FRONT
RIGHT

USER MANUAL
PAGE 14
OPERATING YOUR COOKER
OPERATING BURNERS SUPPLIED FROM AN LPG CYLINDER
Before lighting the first burner, open the valve on the LPG cylinder. Then light the burner using one of the methods
described above.
When closing the flow of gas before turning off the last burner:
► Close the valve on the LPG cylinder.
► When the flame has gone out, close the tap of that burner. When the cooker is not used, the valve of the LPG cylinder
should be closed.
Adaptation to different types of gas
► The appliance is pre-set for natural gas at a pressure of 1.0 kPa.
► In case of operation with other types of gas, the burner nozzles must be changed and the minimum flame adjusted on
the gas taps.
► Replacing nozzles
1. Remove the pan stands, burner caps and flame-spreader crowns to access the burner casings.
2. Replace the nozzles using a 7 mm socket wrench according to the gas to use (see “Burner and nozzle characteristics
table”).
Loose the injector take the injector out place the proper one (as seen below).
3. Replace the burners in the correct position. Adjusting the
minimum setting for natural or city gas
4. Light the burner and turn it to the minimum position.
Extract the gas tap knob and turn the adjustment screw
next to the tap rod (depending on the model) until the
correct minimum flame is achieved.
5. Refit the knob and verify that the burner flame is stable.
6. Turn the knob rapidly from the maximum to the
minimum setting: the flame should not go out. Repeat the
operation on all gas taps.

PAGE 15
Adjusting the minimum setting for LPG
► Tighten the screw located at the side of the tap rod clockwise all the way.
► Following adjustment to a gas other than the one originally set in the factory, replace the gas setting label fixed to the
appliance with the one corresponding to the new gas. The label is inserted inside the nozzle pack (where present).
Lubrication of gas taps
► Over time the gas taps may become difficult to turn and get blocked. Clean them internally and replace the lubrication
grease.
► The greasing of the gas taps should be performed by a specialised technician.
Burner and nozzle characteristics table
LPG 2.75 kPa AUX SR RUR
Nominal gas consumption (MJ/h) 3.6 6.3 10.8 15.0
Injector (1/100 mm) 47 65 88 100
NG 1.0 kPA AUX SR RUR
Nominal gas consumption (MJ/h) 3.6 6.3 10.8 15.0
Injector (1/100 mm) 85 115 165 185
ENVIRONMENTAL TIPS
CHOICE OF UTENSILS
► Pots should not be too tall, ideally their height should equal two-thirds of the diameter of their bottom. Utensils should
always be clean and dry as they will then conduct and retain the heat better.
► During cooking you should use the pan lids. This will prevent an excess of odours from accumulating in the kitchen.
▲
The pan is too small for the burner
and the lid is not being used
▲
Correctly selected pan

USER MANUAL
PAGE 16
FAN BAKE
Heat comes from the elements surrounding the fans. The
fans circulate the hot air around the oven cavity so that you
can put your food in different places in the oven and still
cook them at the same time. You can use the “Fan Bake”
function for multi-shelf cooking, reheating cooked foods,
pastries and complete oven meals. It will cook at a lower
temperature and be faster than baking. Please note that
some variation in browning is normal.
BAKE/PIZZA
Heat comes from two elements, one above and one below
the food. The bottom element is a clean heat element and
is below the floor of the oven. Both elements are controlled
by the thermostat and will turn on and off to maintain the
set temperature. You can use the “Bake” function for single
trays of biscuits, scones, muffins, cakes, slices, casseroles,
baked puddings, roasts and delicate egg dishes.
BASE HEAT
Heat comes from the element below the floor of the oven.
The Element is controlled by the thermostat and will turn
on and off to maintain the set temperature. The “Base Heat”
function can be used to add extra browning to the bases of
pizzas, pies and pastries. Cook in the lower half of the oven
when you are using only one shelf. For best results, use
silver or shiny trays.
GRILL
The “Grill” directs radiant heat from the powerful upper
element onto the food. You can use the “Grill” function for
tender cuts of meat, steak, chops, sausages, fish, cheese
toasties and other quick cooking foods. Grill with the oven
door closed. Preheat your grill for 3 minutes to get the best
results. This will help seal in the natural juices of steak,
chops etc. for a better flavour. You can slide your grill dish
into either of the 2 spaces within the upper pairs of support
rails.
OPERATING YOUR COOKER: USING YOUR OVEN

PAGE 17
DEFROST
The “Defrost” function uses low temperature air that is
circulated by the fans. You can defrost (thaw) your food
before you cook it. You can also use “Defrost” to raise your
yeast dough and to d r y fruit, vegetables and herbs.
PIZZA
“Pizza” is a combination of “Base Heat” and “Fan Bake” and
offers you the combined benefits of both functions. Heat
comes from the elements surrounding the fans as well as
the clean heat element below the oven floor.
The “Pizza” function is ideal for foods that require cooking
and browning on the base. It is great for foods such as
pizzas, quiches, meat pies and fruit pies. Simply place
the food in the middle of the oven and set the desired
temperature.
FAN GRILL

USER MANUAL
PAGE 18
SETTING THE TIMER
This adjustment can only made when no cooking program is in progress.
1. Press the button.
2. Within 5 seconds, using and adjust the clock. Long presses of those
buttons will result in fast changes.
Setting The Alarm
With this feature, you can get your alarm clock beep after a period of time set
by you
1. Press to Switch into alarm mode
2. Select the duration you want for the countdown (eg:30 minutes)
3. After you set the duration in a few seconds, screen will return to clock mode
Note: Once programmed, the remaining time can be seen by pressing
the button once.
Cancelling The Alarm Sound
1. Alarm will sound after the programmed period of time is over
2. Press the button to cancel the sound.
Adjusting The Alarm Tone
You may adjust the alarm tone of the timer in the following way:
1. Pressing and holding the button, you can hear the current alarm tone.
Releasing and pressing again will switch to the next tone (3 different tones
available).
Note: As factory setting, the alarm volume is set to the high tone. In case of a
long power loss, the set alarm tone will be this one.
Automatic Cooking Program (in models where available)
Setting cooking time for immediate start of cooking
If you want to start cooking immediately, you just have to give in the cooking
time.
Example: at 12:00, starting cooking for 2 hours and 15 minutes
1. Place your food into the oven to the necessary level
2. Press to switch into cooking time
3. Adjust the cooking time using mode the and buttons (in this example for 2
hours 15 minutes)
4. After a few seconds, the screen will indicate that cooking has started and
show the current day time
5. By pressing the button, you can see the day time when the food will be
ready to serve (in this example 14:15)
Now, you have programmed your oven to cook the food for 2 hours and
15 minutes. Please do not forget to adjust the function and/or temperature
knobs of your oven to appropriate position
Note: You may cancel the automatic cooking mode any time by pressing
the button.
OPERATING YOUR COOKER: USING YOUR OVEN

PAGE 19
Setting cooking time for delayed start of cooking
To set the cooking to start later, you have to decide your cooking period and the
hour you want the cooking to be finished. Example: at 12:00, setting the oven
finish a cooking of 2 hours and 15 minutes at 15:00
1. Place your food into the oven to the necessary level
2. Press to switch into cooking time
3. Adjust the cooking time using mode the and buttons (in this example
for 2 hours 15 minutes)
4. By pressing the button, you can see the day time when the food will be
ready to serve (in this example 14:15)
5. Set it to the desired time which is 15:00 by using thee and buttons.
6. After a few seconds, the screen will indicate that cooking has started and
show the current day time
Now the oven is programmed to finish cooking at 15:00. Since the cooking
time was preprogrammed as 2 hours 15 minutes, your oven will start cooking
at 12:45, so that the food is ready exactly at 15:00
When automatic cooking is completed, an alarm is heard and will sound, if
not stopped, for 7 minutes.
Switch your oven OFF by the necessary knob and reset the timer by pressing
the button
Note: Your oven will be inoperative until you reset the timer.
Child-Lock
When activated after a cooking program is entered, the but-tons get locked, so
pressing the buttons will have no effect. This is to prevent your child interrupting
or disturbing a cooking program which is in progress.
When activated when no cooking program is in progress, the buttons are locked
but in addition, also the oven gets in-operative. This is to prevent your child to
activate the oven accidentally.
1. Press and hold the +buttons for 3 seconds
2. KEY symbol will appear on the screen showing that the child-lock is active !
Note: When the child lock is active if there is any alarm sound, it may be
stopped by pressing the button simultaneously. The child lock will
continue to be active.
Note: To cancel the child-lock press and hold the button until the key
symbol disappears.

USER MANUAL
PAGE 20
COOKING TABLE
Thermostat Cooking Extension Shelf
Food Kinds Position (min.) Position
Cream-Cake 150-175 25-35 2-3
Grape-Cake 150-175 20-30 2-3
Apple-Cake 150-175 25-35 2-3
Fruitful-Cake 150-175 20-30 2-3
Light Cake 150-175 20-30 2-3
Cookie 150-175 30-35 2-3
Bun 190-200 30-40 3-4
Pastry 170-190 30-40 3-4
Cake 150-175 15-25 3
Biscuit 150-175 25 3-4
Lamb Meat 225 50-60 3-4
Beef 250 30-40 3-4
Mutton 240 40-50 3-4
Veal 250 30-40 3-4
Chicken 200 20-35 3-4
Fish 200 30-40 3-4
NOTE:
The values given in the table are the
values obtained in our laboratories.
You can obtain various tastes satisfying
your tastes depending on your cooking
and use habits. Cooking times depend
on quantity of ingredients. Using cake
forms gives better results for making
cakes.
ATTENTION!
For preventing command buttons on
control panel from heating, please set
its sheet centered between front cover
and oven body without have blank.
Our company is not responsible for
damage made by not using this sheet.
Grill Shelf Time (min.)
Lamb Meat 4 20
Lamp Chops 4 20
Calf Chops 4 20-25
Sheep Chops 4 20-25
OPERATING YOUR COOKER: USING YOUR OVEN
Table of contents
Other Inalto Oven manuals

Inalto
Inalto IO605MB User manual

Inalto
Inalto IO605MB User manual

Inalto
Inalto IO605MB User manual

Inalto
Inalto IOSO605M User manual

Inalto
Inalto IDO6013T User manual

Inalto
Inalto IO60XL5T User manual

Inalto
Inalto IO90XL9T User manual

Inalto
Inalto IOSO605T-L User manual

Inalto
Inalto IDO68S User manual

Inalto
Inalto IO60XL5M User manual


Popular Oven manuals by other brands


Frigidaire
Frigidaire FEB500CEBI parts catalog

Garland
Garland RTCS GME36-I14C Installation, operation and maintenance manual

Siemens
Siemens HB 58 6B Series instruction manual

Waldorf
Waldorf RN8410G Installation and operation manual

Furrion
Furrion IM-FHA00082 instruction manual

shelolab
shelolab SG02 Installation & operation manual