Inalto IO605MB User manual

60cm Buil-in
5 Funcion Oven
V1.3 0623
USER MANUAL INALTO.HOUSE
FOR ALL AUSTRALIAN HOMES
MODEL CODE/S
IO605MB
IO605TB

Residenia Goup Py Ld
ACN. 600 546 656
165 Barkly Avenue
Burnley, Victoria 3121
Australia
—
Applico Ld
635 Great South Road
Penrose, Auckland 1061
New Zealand
—
InAlo
www.inalto.house
/ inalto.house
/ inalto.house
Congaulaions on puchasing
you new 60cm Buil-in Oven!
The InAlo band is poudly disibued wihin
Ausalia by Residenia Goup Py Ld and wihin
New Zealand by Applico Ld.
Please ee o he waany cad a he ea o his
manual o inomaion egading you poduc’s pas
and labou waany, o visi online a:
→ www.esidenia.goup
→ www.applico.co.nz
→ www.inalo.house
Boh Residenia Goup & Applico ae cusome obsessed
and ou Suppo Teams ae hee o ensue you ge he
mos ou o you appliance. Should you wan o lean
moe abou ecommended usage, he vaious eaues o
you appliance, and impoanly aking cae o he uni
when cleaning, ou Suppo Teams ae hee o help.
Telephone Conacs:
→AU: 1300 11 4357
→ NZ: 0800 763 448
I is impoan ha you ead hough he ollowing use
and cae manual hooughly o amiliaise yousel wih
he insallaion and opeaion equiemens o you
appliance o ensue opimum peomance.
Again, hank you o choosing an InAlo appliance and
we look owad o being o sevice o you.
Welcome
Scan o Regise you InAlo Appliance or go to:
→ AU: www.inalto.house/registration
→ NZ: www.inalto.house/nz/registration
By egiseing you poduc, you will eceive advanced
suppo, say updaed wih he laes om InAlo and
ind ou abou new poducs and pomoions.

InAlo ecommends he use o oiginal spae pas. When conacing ou cusome
sevice eam on 1300 11 4357, please ensue ha you have he ollowing inomaion
a hand (which can be ound on you appliances’ aing plae).
• Model Numbe
• Seial Numbe
Customer Care
2 Welcome
4 Saey Insucions
7 Insallaion Insucions
8 You Buil-in Oven
9 Opeaion Insucions
13 Mainenance & Cleaning
14 Toubleshooing
17 Technical Specicaions
19 Puchase Deails
20 Waany Inomaion
Contents

4
IMPORTANT SAFETY INSTRUCTIONS
READ CAREFULLY AND KEEP
FOR FUTURE REFERENCE
Read his manual hooughly beoe s use,
even i you ae amilia wih his ype o poduc.
The saey pecauions enclosed heein educe
he isk o e, elecic shock and inuy when
coecly adheed o. Make sue you undesand
all insucions and wanings.
Keep he manual in a sae place o uue
eeence, along wih he compleed waany
cad and puchase eceip. I you sell o anse
owneship o his poduc, pass on hese
insucions o he new owne.
Always ollow basic saey pecauions and
acciden pevenion measues when using an
elecical appliance. The ollowing saemens
you will see in his bookle have hese meanings:
WARNING: Indicaing inomaion concening
you pesonal saey.
CAUTION: Indicaing inomaion on how o
avoid damaging he appliance o cabiney.
IMPORTANT: Indicaing ips and inomaion
abou use o he appliance.
USAGE CONDITIONS AND RESTRICTIONS
• Domesic use only: This appliance is inended
o indoo household use only. I is no inended
o commecial, indusial o oudoo use. I is
no inended o use in a eceaional vehicle.
• Pupose: Do no use his appliance o
anyhing ohe han is inended pupose.
Ohe uses ae no ecommended and may
cause e, elecic shock o pesonal inuy.
• Aachmens: The use o aachmens is no
ecommended by he appliance manuacue
and disibuo as hey may be hazadous.
• Impope use: Damage due o impope use,
o epais made by unqualied pesonnel will
void you waany. We assume no liabiliy
o any evenual damages caused by misuse
o he poduc o noncompliance wih
hese insucions.
BEFORE USING YOUR APPLIANCE
This manual explains he pope use o you new
InAlo oven. Please ead his manual caeully
beoe using he poduc. This manual should be
kep in a sae place o handy eeence.
This oven is a domesic appliance which has
been manuacued and esed o comply wih
Ausalian and New Zealand Sandads.
This oven mus only be insalled in accodance
wih he insucions povided. Incoec
insallaion may cause ham o pesons, damage
popey and void he poduc’s waany.
Read he ollowing caeully o avoid damage
o inuy.
IMPORTANT: Check o any damage o maks.
I you nd he appliance is damaged o maked,
you mus epo i wihin 7 days i you wish
o claim o damage/ maks unde he
manuacue’s waany. This does no aec
you sauoy ighs.
SAFETY INSTRUCTIONS
• Beoe he insallaion and use o he
appliance, caeully ead he supplied
insucions.
• The manuacue is no esponsible i an
incoec insallaion and use causes inuies
and damages.
• Always keep he insucions wih you
appliance o uue eeence.
• Do no use he oven unless you ae weaing
somehing on you ee. Do no ouch he oven
wih we o damp hands o ee.
• Some pas o appliance may keep is hea o
a long ime; i is equied o wai o i o cool
down beoe ouching ono he poins ha ae
exposed o he hea diecly.
• I you will no use he appliance o a long
ime, i is advised o un he plug o.
WARNING: To peven any damages o you
and ohes’ lie o popey, you have o ollow
he saey noes.
WARNING: Cauion, isk o e!
Safety Instructions

5
CHILDREN &VULNERABLE PEOPLE SAFETY
WARNING: Risk of suocation, injury or
permanent disability.
• This appliance can be used by childen
aged om 8 yeas and above and pesons
wih educed physical, sensoy o menal
capabiliies o lack o expeience and
knowledge i hey have been given supevision
o insucion o he opeaion o he
appliance by a peson who is esponsible o
hei saey.
• Do no le childen play wih he appliance.
• Keep all packaging away om childen.
• Keep all deegens away om childen.
• Keep childen and pes away om he
appliance doo when i is open.
• Do no allow childen o go nea he oven
when i is opeaing, especially when he gill
is on.
• Cleaning and use mainenance shall no be
made by childen wihou supevision.
BEFORE INSTALLATION
• Remove all he packaging.
• Do no insall o use a damaged appliance.
• Always move he appliance cauiously. Do no
use he machine doo o he handle o oven, o
li he appliance.
• When he oven is s swiched on, i may
give o an unpleasan smell. This is due o he
bonding agen used o he insulaing panels
wihin he oven. Please un he new empy
oven wih he convenional cooking uncion,
250 °C o 90 minues o clean oil impuiies
inside he caviy.
• Duing he s ime use, i is compleely
nomal ha he oven will show sligh signs o
smoke and unpleasan odous. Please wai o
he smell o clea beoe puing ood ino he
oven.
• Please use his poduc unde he open
envionmen.
• The appliance and is accessible pas become
ho duing use. Cae should be aken o avoid
ouching heaing elemens.
• I he suace is cacked, swich o he
appliance o avoid he possibiliy o
elecic shock.
• Duing use, he appliance becomes vey
ho. Cae should be aken o avoid ouching
heaing elemens inside he oven.
• Ensue ha he appliance is swiched o
beoe eplacing he oven lamp o avoid he
possibiliy o elecic shock.
• The means o disconnecion mus be
incopoaed in he xed wiing in accodance
wih he wiing specicaions.
• Accessible pas may become ho duing use.
• An all-pole disconnecion means mus be
incopoaed in he xed wiing in accodance
wih he wiing ules.
• The appliance mus be insalled by an
auhoised echnician and pu ino use. The
manuacue
is no esponsible o any damage ha migh
be caused by deecive placemen, and
insallaion by unauhoised pesonnel.
Please conac 1300 11 HELP (4357) o aange
an auhoised echnician.
ELECTRICAL CONNECTION
CAUTION: Risk of fire and electrical shock!
• The appliance mus be eahed.
• Make sue ha he elecical inomaion on
he aing plae agees wih he powe supply.
I no, conac an elecician.
• Always use a coecly insalled shockpoo
socke.
• Do no use any muli-plug adapes o
exension cables.
• Connec he mains plug o he mains socke
only a he end o he insallaion. Make sue
ha hee is access o he mains plug ae
he insallaion. Do no connec he appliance
plug wih a powe connecion boad.
• Do no pull he mains cable o disconnec he
appliance. Always pull he mains plug.
• Do no ouch he mains cable o he mains
plug wih we hands.
WARNING: I he supply cod is damaged, i
mus be eplaced by he manuacue o is
sevice agen o similaly qualied peson in ode
o avoid a hazad.
WARNING: All elecical wok mus be done in
accodance wih local and naional elecical
codes as applicable and should be undeaken
by licenced and qualied pesons only. Failue o
ollow hese insucions can esul in deah, e
o elecical shock.
Safety Instructions (Continued)

6
APPLIANCE USE
WARNING: Risk o e, explosion, elecic shock
o damage o he appliance.
• Use his appliance in a household only.
• Do no change he specicaion o his oven.
• Do no si o sand on he open doo.
• Please do no close he machine doo wih
excessive oce
• When he doo o dawe o oven is open do
no leave anyhing on i, you may unbalance
you appliance o beak he doo.
• The appliances ae no inended o be
opeaed by means o an exenal ime o
sepaae emoe conol sysem.
• The insucions o ovens ha have shelves
shall include deails indicaing he coec
insallaions o he shelves.
CARE &CLEANING
CAUTION: Risk of injury or damage to the oven.
• Beoe mainenance, deacivae he appliance
and disconnec he mains plug.
• Do no use a seam cleane on he appliance.
• Clean he appliance wih a mois so cloh.
Only use neual deegens. Do no use
abasive poducs, abasive cleaning pads,
solvens o meal obecs.
• Do no use hash abasive cleanes o shap
meal scapes o clean he oven doo glass
since hey can scach he suace, which may
esul in shaeing o he glass.
UNPACKING
Duing anspoaion, poecive packaging
was used o poec he appliance agains any
damage. Ae unpacking, please dispose o all
elemens o packaging in a way ha will no
cause damage o he envionmen.
All maeials used o packaging he appliance
ae envionmenally iendly; hey ae
100% ecyclable and ae maked wih he
appopiae symbol.
CAUTION: Duing unpacking, he packaging
maeials (polyhene bags, polysyene pieces,
ec.) should be kep ou o each o childen.
DISPOSAL OF THE APPLIANCE
• Disconnec he appliance
om he mains supply.
• Cu o he mains cable
and discad i.
• Remove he doo cach o peven childen
and pes o ge closed in he appliance.
Old appliances should no simply be disposed
o wih nomal household wase and should be
deliveed o a collecion and ecycling cene
o elecic and eleconic equipmen. A symbol
shown on he poduc, he insucion manual
o he packaging shows ha i is suiable o
ecycling.
Maeials used inside he appliance ae
ecyclable and ae labelled wih inomaion
concening his. By ecycling maeials o ohe
pas om used devices you ae making a
signican conibuion o he poecion o ou
envionmen.
Inomaion on appopiae disposal cenes
o used devices can be povided by you local
auhoiy.
DECLARATION OF COMPLIANCE
When you have unpacked the oven, make sure
that it has not been damaged in any way. If you
have any doubts at all, do not use it: contact a
professionally qualified person. Keep packing
materials such as plastic bags, polystyrene, or
nails out of the reach of children because these
are dangerous to children.
Safety Instructions (Continued)
7
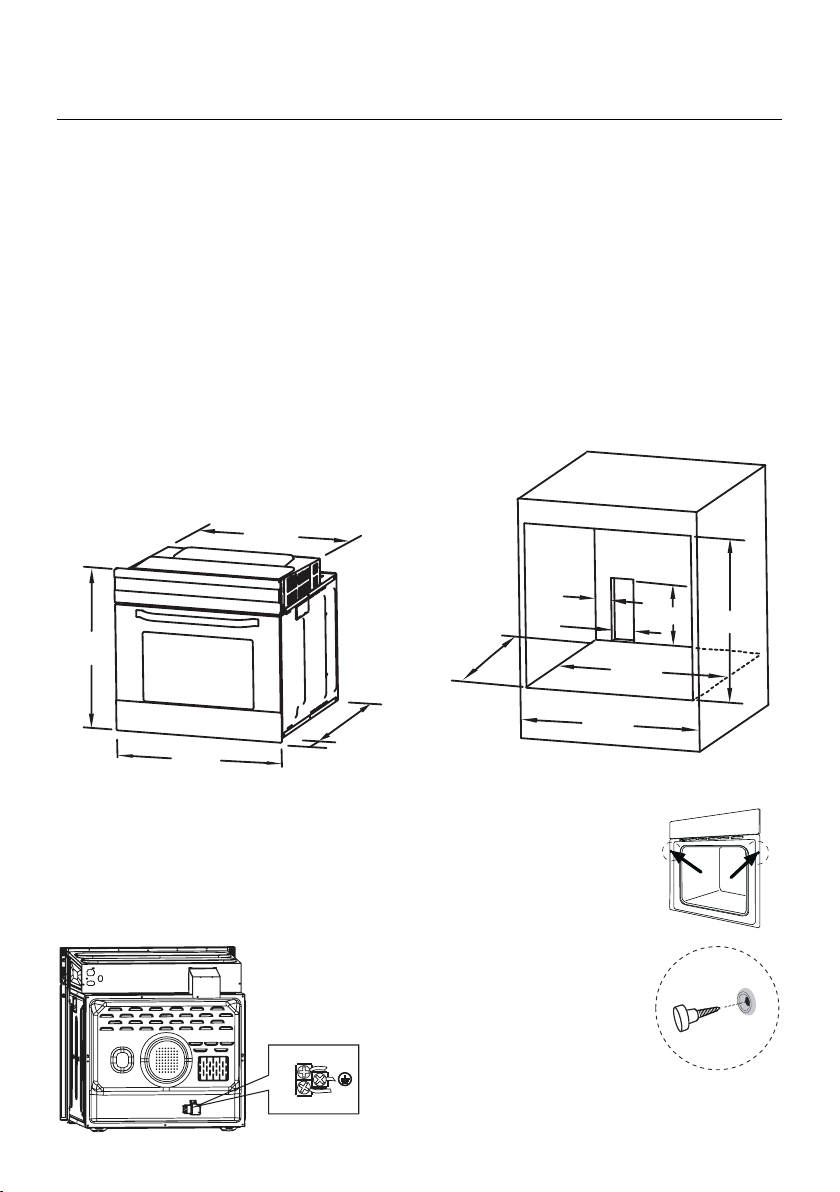
FITTING THE OVEN INTO THE KITCHEN UNIT
Fit the oven into the space provided in the kitchen unit; it may be fitted underneath a work
top or into an upright cupboard. Fix the oven in position by screwing into place, using the two
fixing holes in the frame. To locate the fixing holes, open the oven door and look inside. To allow
adequate ventilation, the measurements and distances adhered to when fixing the oven.
IMPORTANT: I he oven is o wok popely, he kichen housing mus be suiable. The panels o
he kichen uni ha ae nex o he oven mus be made o a hea esisan maeial. Ensue ha
he glues o unis ha ae made o veneeed wood can wihsand empeaues o a leas 120º C.
Plasics o glues ha canno wihsand such empeaues will mel and deom he uni, once he
oven has been lodged inside he unis, elecical pas mus be compleely insulaed. This is a legal
saey equiemen. All guads mus be mly xed ino place so ha i is impossible o emove hem
wihou using special ools. Remove he back o he kichen uni o ensue an adequae cuen o ai
ciculaes aound he oven. The hob mus have a ea gap o a leas 45mm.
Noe:
• The caviy is no o include he powe swich o socke.
• The oven & cabine dimensions ae in millimees (mm)
SECURING THE OVEN TO THE CABINET
1. Fi oven ino he cabine ecess.
2. Open he oven doo and deemine he locaion
o he mouning scew holes.
3. Fix he oven o he cabine wih wo scews..
CONNECTION OF THE OVEN
NOTE: The number of accessories included depends on the particular appliance purchased.
INSTALLATION
570
min. 560
606
600
80
250
100
Remark:
1.Only plus deviations are admissible for all dimension.
2.The cabinet is not include the power switch or socket.
VENTILATING OPENINGS
CONNECTION OF THE OVEN
Ventilating openings
L
N
When cooking is finished, if the temperature of ventilating openings is over 70 degree, the cooling
fan will continue working. The cooling fan will not stop working until the temperature becomes
lower than 60 degree.
555
20
595
595
560
9
11
BULB REPLACEMENT
For replacement, process as follows:
1> Disconnect power from the mains outlet or switch off the circuit breaker of the unit's mains outlet.
2> Unscrew the glass lamp cover by turning it counter-clockwise (note, it may be stiff) and replace
the bulb with a new one of the same type.
3> Screw the glass lamp cover back in place.
NOTE: Only use 25-40W/220V-240V , T300°C halogen lamps.
SHELF PLACEMENT WARNING:
OR
To ensure the oven shelves operate safely, correct placement of the shelves between the side
rail is imperative. Shelves and the pan only can be used between the first and fifth layers.
The shelves should use with the right direction, it will ensure that during careful removal of the
shelf or tray, hot food items should not slide out.
SECURING THE OVEN TO THE CABINET
1. Fit oven into the cabinet recess.
2. Open the oven door and determine the location of the mounting
screw holes.
3. Fix the oven to the cabinet with two screws.
Installation Instructions
12
NOTE: The number of accessories included depends on the particular appliance purchased.
INSTALLATION
Remark:
1.Only plus deviations are admissible for all dimension.
2.The cabinet is not include the power switch or socket.
CONNECTION OF THE OVEN
L
N
VENTILATING OPENINGS
When cooking is finished or in pause state or in waiting state, if the oven's center temperature is
over 75 degree, the cooling fan will continue working for 15 minutes. Or when the oven's center
temperature becomes lower than 75 degree, the cooling fan will stop in advance.
Ventilating openings
555
20
595
595
560
570
min.560
606
600
80
250
100
560 min.
8
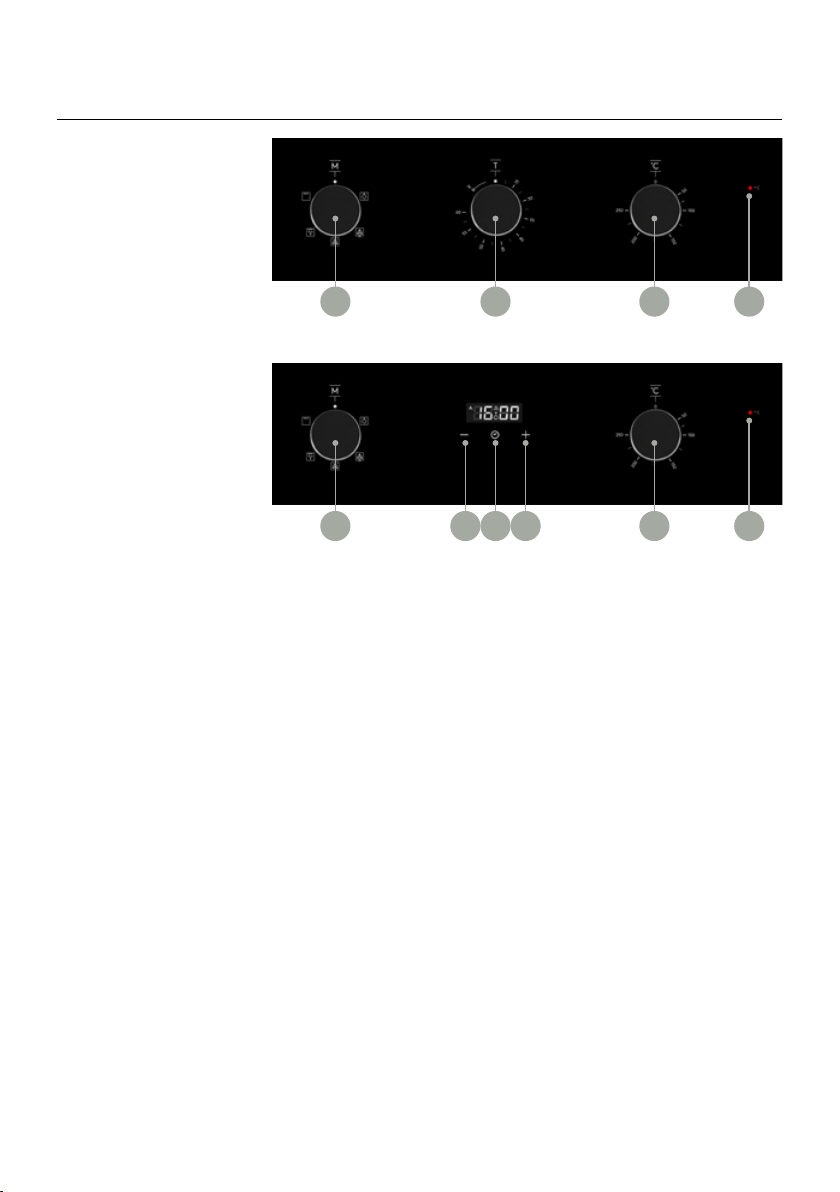
CONTROL PANEL
IO605MB
1. Funcion Mode Knob
2. Minue Time Knob
3. Tempeaue Knob (°C)
4. Pehea Indicao
CONTROL PANEL
IO605TB
1. Funcion Mode Knob
2. Decease Time Conol
3. Time Funcion
4. Incease Time Conol
5. Tempeaue Knob (°C)
6. Pehea Indicao
ACCESSORIES
You InAlo Buil-in Oven is supplied wih:
• 2 × Wie Shelves
Fo gill, dishes, cake pan wih iems o oasing and gilling
• 2 × Slide backes
These shel suppo ails on he igh and le sides o he oven can be emoved.
Dishes and ay can be placed on he oven base, using he Gill & Max Gill
and Fan uncions.
• 1 × Baking Tay
Fo cooking lage quaniies o ood such as cakes, pasies, ozen ood ec,
o o collecing a/spillage and mea uices.
Note: The images in this user manual are for reference only. Your appliance may appear dierently.
1
1
3
5
4
6
2
32 4
Your Built-in Oven
9
BULB REPLACEMENT
For replacement, process as follows:
1> Disconnect power from the mains outlet or switch off the circuit breaker of the unit's mains outlet.
2> Unscrew the glass lamp cover by turning it counter-clockwise (note, it may be stiff) and replace
the bulb with a new one of the same type.
3> Screw the glass lamp cover back in place.
NOTE: Only use 25-40W/220V-240V, T300°C halogen lamps.
SHELF PLACEMENT WARNING:
SECURING THE OVEN TO THE CABINET
1. Fit oven into the cabinet recess.
2. Open the oven door.
3. Secure the oven to the kitchen cabinet with two
distance holders " A " which fit the holes in the
oven frame and fit the two screws " B ".
To ensure the oven shelves operate safely, correct placement of the shelves between the side rail
is imperative. Shelves and the pan only can be used between the first and fifth layers.
The shelves should be used with the right direction, it will ensure that during careful removal of the
shelf or tray, hot food items should not slide out.
OR
8
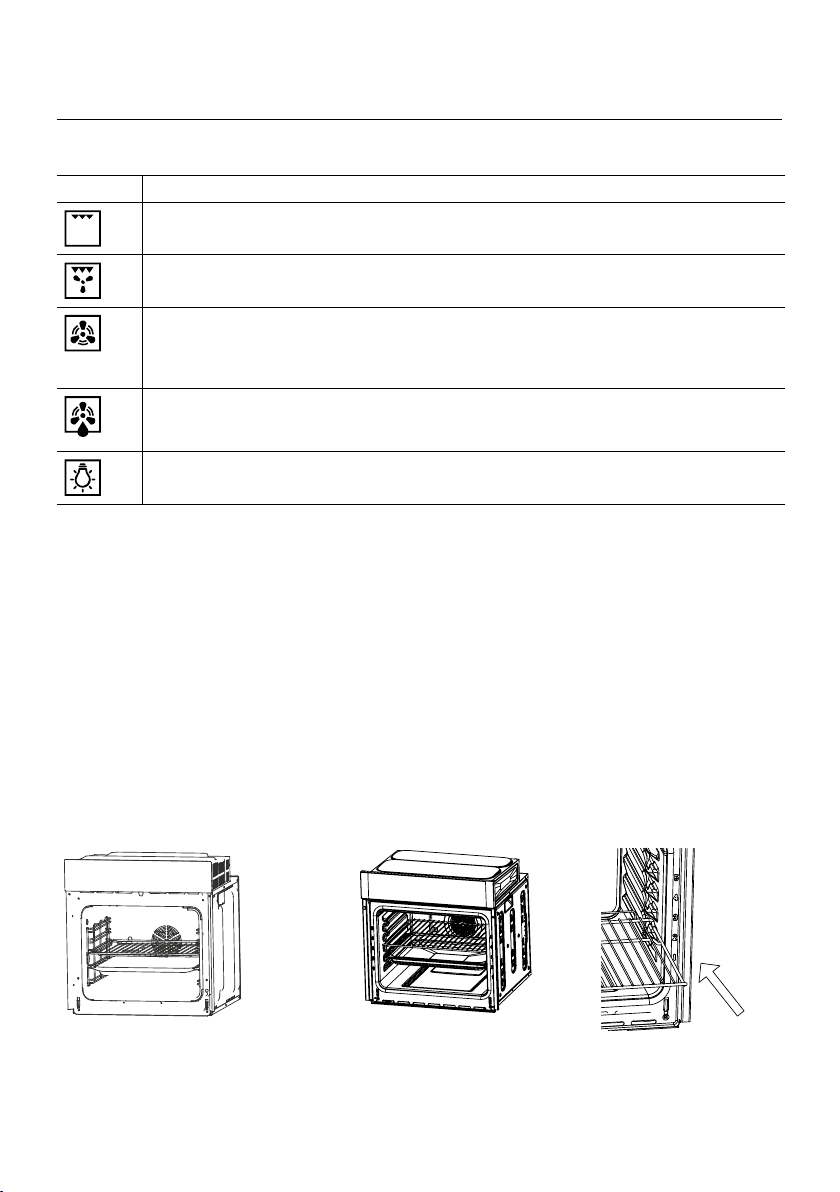
OVEN FUNCTIONS
SYMBOL FUNCTION DESCRIPTION
Gill: This cooking mehod is o eveyday gilling, uilising only he inne gill elemen
only, which diecs hea downwads ono he ood.
Gill & Fan: Uilising he inne gill elemen along wih he an, is suiable o gilling a
lage amoun o cooking.
Convecion: Hea om he ea heaing elemen ciculaed aound he caviy by he
an. I is ase and economical han he convenional mode. This uncion also helps
ood cook ase whils also educing ho and cool spos and helping dishes on evey
shel cook moe evenly.
Deos: The ciculaion o ai a oom empeaue enables quicke hawing o ozen
ood (wihou he use o any heaing elemens). I is a genle bu quick way o speed up
he deosing ime and hawing o eady-made dishes, ceam-lled poduce, ec.
Oven Ligh: This uncion enables he use o obseve he pogess o cooking wihou
opening he doo. The oven lamp will ligh o all cooking uncions.
BEFORE FIRST USE
• Beoe using he oven o he s ime, ead his manual hooughly, even i you ae amilia wih
his ype o appliance. Pay paicula aenion o he saey insucions, insallaion insucions
and opeaing insucions.
• Ae he appliance has been popely insalled, and beoe s use, you should bun o any dus,
oil o ohe emnans ha may have been le inside he caviy om he manuacuing pocess o
anspoaion. Please un he new empy oven wih he convenional cooking uncion a 250º C
o a leas 90 minues.
SHELF PLACEMENT
To ensue he oven shelves opeae saely, coec placemen o he shelves beween he side ail is
impeaive. Shelves and he pan only can be used beween he s and h layes. The shelves should
use wih he igh diecion, i will ensue ha duing caeul emoval o he shel o ay, ho ood
iems should no slide ou.
Operating Instructions

10
MANUAL COOKING MODE IO605MB
In manual cooking mode, he cooking duaion is conolled by he use wihou a ime.
1. Roae he Time Knob coune clockwise o he “ M ” posiion o engage Manual Cooking mode.
This will sop he oven om auomaically poweing o while in he “ M ” posiion.
2. Then un he Tempeaue Knob and he Funcion Knob o you equied seings.
3. Once you have nished cooking, un all knobs back o hei oiginal “ ” o posiions.
MINUTE MINDER MODE IO605MB
Use he ime conol knob o se he oven o powe o ae you se numbe o minues.
Follow hese seps o opeae he oven in ime mode:
1. Roae he Time Knob clockwise o se you desied numbe o minues
(beween 15 and 120 minues).
2. Then un he Tempeaue Knob and he Funcion Knob o you desied seings.
3. A he compleion o he se duaion, an alam will sound o indicae ha cooking is complee
and he oven will auomaically powe o.
USING YOUR BUILTIN OVEN IO605TB
• Waning: You oven is a e isk i he cooking ime is no se o i he ime is se o oo long.
I is impoan o keep close supevision when he oven is in opeaion.
• Se uncions by uning he uncion knob o desied opion.
• The oven will auomaically sa cooking ae uncion, ime and empeaue
ae se.
• To se he ime o he cooking, pess he Time Funcion buon and use he Incease and Decease
Time Conol buons o se you desied seing. Ae he cooking ime is up, he uni will make
an audible sound as he oven sops.
• Se he empeaue by uning he empeaue knob.
I he uni is no in use, always se he knobs o “0”.
INITIAL POWER CONNECTION IO605TB
When he oven is s conneced o he elecical supply, wai o he display o auomaically show
“12.30”, a beep sound once and he “12” “.” ash. Ensue he coec ime o he day is se beoe
using he oven.
NOTE: The clock is in 24 hou oma. Time will be displayed o example, 2PM shown as 14.00.
OVEN ON AND OFF IO605TB
I he ime is in sandby mode pess “ ” o moe han 3 seconds, he ime will ene manual mode
and he symbol “ ” emain li up.
Se he desied cooking uncion and he empeaue degee.
Se he ime uncion, hen he oven will un on.
I you se Du o End , ae cooking, he oven will auomaically un o.
I you se manual o minue minde, ae cooking, bing he cooking uncion and oven empeaue
knob o “0” posiion. Pess “ ” and “+” buons o moe han 3 seconds o eun o sandby mode.
Operating Instructions (Continued)

11
TIME FUNCTION SETTING IO605TB
In manual mode, pessing “ ” can ene he ime uncion seing, he sequence o he uncion
seing is Manual mode - Minue minde-Du-End-Manual mode. Then seleced cooking uncion
and adus he cook empeaue i equied.
Manual mode:
In manual mode, only he day’s ime and he symbol “
OPERATION INSTRUCTIONS
When the oven is first connected to the electrical supply, wait for the display automatically show " 12.30 ",
a beep sound once and the " 12 " " . " flash. Ensure the correct time of the day is set before using the
oven. please note: that is 24 hour clock, for example 2PM shown as 14.00.
To set the correct time of day
1> Press " + " " - " button to adjust the hour setting.
2> Press " " to confirm the hour setting.
3> Press " + " " - " button to adjust the minute setting.
4> Press " " to confirm the minute setting and the timer will be in standby mode.
If the display does not flash, adjust the time of day by pressing the " + " and " - " buttons at
the same time for more than 3 seconds.
Oven On and Off
If the timer is in standby mode,press " " for more than 3 seconds, the timer will enter manual
mode and the symbol
Manual mode
:
In manual mode, only the day's time and the symbol " " lights up. The cooking duration has to
be controlled by the user.
Notes: In manual mode, to ensure the oven is not left on accidentally, after 5 hours no any button
pressed, the timer will flash once a second to warn you the oven will enter standby mode. After a
total of 10 hours, the timer will enter standby mode.
When the timer is flashing in manual mode, press any button to reset the timer if you intend to
" and " + " together for more than 3 seconds to enter standby
continue using the oven. Or press "
mode if oven will not be used.
" " will light up continuously .
Note:
Time function setting
1> Set the desired cooking function and the temperature degree.
2> Set the time function, then the oven will on.
If you set Dur or End , after cooking, the oven will automatically turn off.
If you set manual or minute minder, after cooking, bring the cooking function and oven temperature
knob to " 0 " position. Press "
" and " + " buttons for more than 3 seconds to return to standby mode.
In manual mode, pressing " " can enter the time function setting, the sequence of the function
setting is Mamual mode - Minute minder-Dur-End-Manual mode. Then selected cooking function
and adjust the cook temperature if required.
7
” lighs up. The cooking duaion has o be
conolled by he use.
NOTE:
In manual mode, o ensue he oven is no le on accidenally, ae 5 hous and no buons have been
pessed, he ime will ash once a second o wan you he oven will ene sandby mode.
Ae a oal o 10 hous, he ime will ene sandby mode.
When he ime is ashing in manual mode, pess any buon o ese he ime i you inend o
coninue using he oven. O pess “ ” and “ + ” ogehe o moe han 3 seconds o ene sandby
mode i oven will no be used.
AUDIBLE WARNING TIME ADJUSTMENT IO605TB
This uncion can be used o eceive audible waning a he compleion o he adused ime peiod.
Pess “ ” buon o selec he minue minde uncion. The elevan “
Audible warning time adjustment:
3> , .,At the completion of the set duration the timer will stop the oven and give an audible warning Also the
symbol A will begin to flash on the screen After bringing the cooking function and oven temperature"" .
" 0 ".,
Semi automatic programming accroding to finishing time-:
Semi automatic programming according to cooking period-:
This function is used to cook in the desired time range The food to be cooked are put into the oven,.
The oven is adjustment to the desired cooking function and temperature degree.
1> " " "" .( .)Press button until you see Dur on the timer screen Before setting cooking period
2> " + " " - " .(Use button to adjust cooking period for the food you wish to cook Refer to the instructions for
settingthecorrecttimeofday. ),' appear on the
screen and the symbols A will light on the screen While doing this the oven will
. , also start
to operate.
This function can be used to receive audible warning at the completion of the ajusted time period.
1> " " . " "" " .Press button to select the minute minder function The relevant symbol will flash
.
2> .(Use button to adjust minute minder Refer to the instructions for setting the correct time
the "" symbol begins to light continuously, the audible warning time adjustment is done.
3> When the time is up, the timer gives an audible warning and the " " symbol begins to flash on the
i
t will stop the audible warning and the symbol
.""
disappears on the screen Audible warning time adjustment is for warning purposes only..
Press "
of day.)
screen
button less than 3 seconds,
Press ""
and "+"together for more than 3 seconds to enter standby mode if oven will not be used
.
The maximum setting of cooking period is 10 hours.
Press ""
button to confirm the day s time will
to position it will stop the audible warning.
knob button less than 3 seconds
Pressing any
Pressing
for more than 3 seconds set the oven to Manual mode again to use the oven.
""
Press any
" " " "
" button to confirm, the " " symbol will begin to light continuously. When
"+""-"
This function is used to cook according to the desired finishing time The food to be cooked is put into.
the oven The oven is adjusted to the desired cooking function and temperature degree. .
1> " " "" .( ).Press button until you see End on the timer screen Before setting finished time
2> .( .)Use button to adjust finishing time Refer to the instructions for setting the correct time of day
3> the symbols A
will light on the screen While doing this the oven will also start to operate
" "" "
. , .
Press ""
button to confirm,
the day 's time will appear on the screen and
,.,At the completion of the set duration the timer will stop the oven and give an audible warning Also
symbol A will begin to flash on the screen After bringing the cooking function and oven temperature"" .
4>
button less than 3 seconds, Pressing any it will stop the audible warning.
Pressing
""
for more than 3 seconds set the oven to Manual mode again to use the oven.
knobto position
" 0 "
" + " " - "
the
8
” “ . “ symbol will ash.
Use he “+” and “-” buons o adus minue minde (Ree o he insucions o seing he
coec ime o day). Pess “ ” buon o conm, he “
Audible warning time adjustment:
3> , .,At the completion of the set duration the timer will stop the oven and give an audible warning Also the
symbol A will begin to flash on the screen After bringing the cooking function and oven temperature"" .
" 0 ".,
Semi automatic programming accroding to finishing time-:
Semi automatic programming according to cooking period-:
This function is used to cook in the desired time range The food to be cooked are put into the oven,.
The oven is adjustment to the desired cooking function and temperature degree.
1> " " "" .( .)Press button until you see Dur on the timer screen Before setting cooking period
2> " + " " - " .(Use button to adjust cooking period for the food you wish to cook Refer to the instructions for
settingthecorrecttimeofday. ),' appear on the
screen and the symbols A will light on the screen While doing this the oven will
. , also start
to operate.
This function can be used to receive audible warning at the completion of the ajusted time period.
1> " " . " "" " .Press button to select the minute minder function The relevant symbol will flash
.
2> .(Use button to adjust minute minder Refer to the instructions for setting the correct time
the "" symbol begins to light continuously, the audible warning time adjustment is done.
3> When the time is up, the timer gives an audible warning and the " " symbol begins to flash on the
i
t will stop the audible warning and the symbol
.""
disappears on the screen Audible warning time adjustment is for warning purposes only..
Press "
of day.)
screen
button less than 3 seconds,
Press ""
and "+"together for more than 3 seconds to enter standby mode if oven will not be used
.
The maximum setting of cooking period is 10 hours.
Press ""
button to confirm the day s time will
to position it will stop the audible warning.
knob button less than 3 seconds
Pressing any
Pressing
for more than 3 seconds set the oven to Manual mode again to use the oven.
""
Press any
" " " "
" button to confirm, the " " symbol will begin to light continuously. When
"+""-"
This function is used to cook according to the desired finishing time The food to be cooked is put into.
the oven The oven is adjusted to the desired cooking function and temperature degree. .
1> " " "" .( ).Press button until you see End on the timer screen Before setting finished time
2> .( .)Use button to adjust finishing time Refer to the instructions for setting the correct time of day
3> the symbols A
will light on the screen While doing this the oven will also start to operate
" "" "
. , .
Press ""
button to confirm,
the day 's time will appear on the screen and
,.,At the completion of the set duration the timer will stop the oven and give an audible warning Also
symbol A will begin to flash on the screen After bringing the cooking function and oven temperature"" .
4>
button less than 3 seconds, Pressing any it will stop the audible warning.
Pressing
""
for more than 3 seconds set the oven to Manual mode again to use the oven.
knobto position
" 0 "
" + " " - "
the
8
” symbol will begin o ligh coninuously.
When he “
Audible warning time adjustment:
3> , .,At the completion of the set duration the timer will stop the oven and give an audible warning Also the
symbol A will begin to flash on the screen After bringing the cooking function and oven temperature"" .
" 0 ".,
Semi automatic programming accroding to finishing time-:
Semi automatic programming according to cooking period-:
This function is used to cook in the desired time range The food to be cooked are put into the oven,.
The oven is adjustment to the desired cooking function and temperature degree.
1> " " "" .( .)Press button until you see Dur on the timer screen Before setting cooking period
2> " + " " - " .(Use button to adjust cooking period for the food you wish to cook Refer to the instructions for
settingthecorrecttimeofday. ),' appear on the
screen and the symbols A will light on the screen While doing this the oven will
. , also start
to operate.
This function can be used to receive audible warning at the completion of the ajusted time period.
1> " " . " "" " .Press button to select the minute minder function The relevant symbol will flash
.
2> .(Use button to adjust minute minder Refer to the instructions for setting the correct time
the "" symbol begins to light continuously, the audible warning time adjustment is done.
3> When the time is up, the timer gives an audible warning and the " " symbol begins to flash on the
i
t will stop the audible warning and the symbol
.""
disappears on the screen Audible warning time adjustment is for warning purposes only..
Press "
of day.)
screen
button less than 3 seconds,
Press ""
and "+"together for more than 3 seconds to enter standby mode if oven will not be used
.
The maximum setting of cooking period is 10 hours.
Press ""
button to confirm the day s time will
to position it will stop the audible warning.
knob button less than 3 seconds
Pressing any
Pressing
for more than 3 seconds set the oven to Manual mode again to use the oven.
""
Press any
" " " "
" button to confirm, the " " symbol will begin to light continuously. When
"+""-"
This function is used to cook according to the desired finishing time The food to be cooked is put into.
the oven The oven is adjusted to the desired cooking function and temperature degree. .
1> " " "" .( ).Press button until you see End on the timer screen Before setting finished time
2> .( .)Use button to adjust finishing time Refer to the instructions for setting the correct time of day
3> the symbols A
will light on the screen While doing this the oven will also start to operate
" "" "
. , .
Press ""
button to confirm,
the day 's time will appear on the screen and
,.,At the completion of the set duration the timer will stop the oven and give an audible warning Also
symbol A will begin to flash on the screen After bringing the cooking function and oven temperature"" .
4>
button less than 3 seconds, Pressing any it will stop the audible warning.
Pressing
""
for more than 3 seconds set the oven to Manual mode again to use the oven.
knobto position
" 0 "
" + " " - "
the
8
” symbol begins o ligh coninuously, he audible waning ime adusmen is done.
When he ime is up, he ime gives an audible waning and he “
Audible warning time adjustment:
3> , .,At the completion of the set duration the timer will stop the oven and give an audible warning Also the
symbol A will begin to flash on the screen After bringing the cooking function and oven temperature"" .
" 0 ".,
Semi automatic programming accroding to finishing time-:
Semi automatic programming according to cooking period-:
This function is used to cook in the desired time range The food to be cooked are put into the oven,.
The oven is adjustment to the desired cooking function and temperature degree.
1> " " "" .( .)Press button until you see Dur on the timer screen Before setting cooking period
2> " + " " - " .(Use button to adjust cooking period for the food you wish to cook Refer to the instructions for
settingthecorrecttimeofday. ),' appear on the
screen and the symbols A will light on the screen While doing this the oven will
. , also start
to operate.
This function can be used to receive audible warning at the completion of the ajusted time period.
1> " " . " "" " .Press button to select the minute minder function The relevant symbol will flash
.
2> .(Use button to adjust minute minder Refer to the instructions for setting the correct time
the "" symbol begins to light continuously, the audible warning time adjustment is done.
3> When the time is up, the timer gives an audible warning and the " " symbol begins to flash on the
i
t will stop the audible warning and the symbol
.""
disappears on the screen Audible warning time adjustment is for warning purposes only..
Press "
of day.)
screen
button less than 3 seconds,
Press ""
and "+"together for more than 3 seconds to enter standby mode if oven will not be used
.
The maximum setting of cooking period is 10 hours.
Press ""
button to confirm the day s time will
to position it will stop the audible warning.
knob button less than 3 seconds
Pressing any
Pressing
for more than 3 seconds set the oven to Manual mode again to use the oven.
""
Press any
" " " "
" button to confirm, the " " symbol will begin to light continuously. When
"+""-"
This function is used to cook according to the desired finishing time The food to be cooked is put into.
the oven The oven is adjusted to the desired cooking function and temperature degree. .
1> " " "" .( ).Press button until you see End on the timer screen Before setting finished time
2> .( .)Use button to adjust finishing time Refer to the instructions for setting the correct time of day
3> the symbols A
will light on the screen While doing this the oven will also start to operate
" "" "
. , .
Press ""
button to confirm,
the day 's time will appear on the screen and
,.,At the completion of the set duration the timer will stop the oven and give an audible warning Also
symbol A will begin to flash on the screen After bringing the cooking function and oven temperature"" .
4>
button less than 3 seconds, Pressing any it will stop the audible warning.
Pressing
""
for more than 3 seconds set the oven to Manual mode again to use the oven.
knobto position
" 0 "
" + " " - "
the
8
” symbol begins o ash on he
sceen. Pess any buon less han 3 seconds, i will sop he audible waning and he “
Audible warning time adjustment:
3> , .,At the completion of the set duration the timer will stop the oven and give an audible warning Also the
symbol A will begin to flash on the screen After bringing the cooking function and oven temperature"" .
" 0 ".,
Semi automatic programming accroding to finishing time-:
Semi automatic programming according to cooking period-:
This function is used to cook in the desired time range The food to be cooked are put into the oven,.
The oven is adjustment to the desired cooking function and temperature degree.
1> " " "" .( .)Press button until you see Dur on the timer screen Before setting cooking period
2> " + " " - " .(Use button to adjust cooking period for the food you wish to cook Refer to the instructions for
settingthecorrecttimeofday. ),' appear on the
screen and the symbols A will light on the screen While doing this the oven will
. , also start
to operate.
This function can be used to receive audible warning at the completion of the ajusted time period.
1> " " . " "" " .Press button to select the minute minder function The relevant symbol will flash
.
2> .(Use button to adjust minute minder Refer to the instructions for setting the correct time
the "" symbol begins to light continuously, the audible warning time adjustment is done.
3> When the time is up, the timer gives an audible warning and the " " symbol begins to flash on the
i
t will stop the audible warning and the symbol
.""
disappears on the screen Audible warning time adjustment is for warning purposes only..
Press "
of day.)
screen
button less than 3 seconds,
Press ""
and "+"together for more than 3 seconds to enter standby mode if oven will not be used
.
The maximum setting of cooking period is 10 hours.
Press ""
button to confirm the day s time will
to position it will stop the audible warning.
knob button less than 3 seconds
Pressing any
Pressing
for more than 3 seconds set the oven to Manual mode again to use the oven.
""
Press any
" " " "
" button to confirm, the " " symbol will begin to light continuously. When
"+""-"
This function is used to cook according to the desired finishing time The food to be cooked is put into.
the oven The oven is adjusted to the desired cooking function and temperature degree. .
1> " " "" .( ).Press button until you see End on the timer screen Before setting finished time
2> .( .)Use button to adjust finishing time Refer to the instructions for setting the correct time of day
3> the symbols A
will light on the screen While doing this the oven will also start to operate
" "" "
. , .
Press ""
button to confirm,
the day 's time will appear on the screen and
,.,At the completion of the set duration the timer will stop the oven and give an audible warning Also
symbol A will begin to flash on the screen After bringing the cooking function and oven temperature"" .
4>
button less than 3 seconds, Pressing any it will stop the audible warning.
Pressing
""
for more than 3 seconds set the oven to Manual mode again to use the oven.
knobto position
" 0 "
" + " " - "
the
8
” symbol
disappeas on he sceen. Audible waning ime adusmen is o waning puposes only.
Pess “ ” and “+” ogehe o moe han 3 seconds o ene sandby mode i oven will no
be used.
COOKING DURATION MODE IO605TB
SEMIAUTOMATIC PROGRAMMING ACCORDING TO COOKING PERIOD
This uncion is used o cook in he desied ime ange, The ood o be cooked ae pu ino he oven.
The oven is adusmen o he desied cooking uncion and empeaue degee.
The maximum seing o cooking peiod is 10 hous.
Pess “ ” buon unil you see “Du” on he ime sceen (Beoe seing he cooking peiod).
Use he “+” and “-” buons o adus he cooking peiod o he ood you wish o cook
(Ree o he insucions o seing he coec ime o day). Pess “ ” buon o conm, he
day’s ime will appea on he sceen and he symbols “A” “
OPERATION INSTRUCTIONS
When the oven is first connected to the electrical supply, wait for the display automatically show " 12.30 ",
a beep sound once and the " 12 " " . " flash. Ensure the correct time of the day is set before using the
oven. please note: that is 24 hour clock, for example 2PM shown as 14.00.
To set the correct time of day
1> Press " + " " - " button to adjust the hour setting.
2> Press " " to confirm the hour setting.
3> Press " + " " - " button to adjust the minute setting.
4> Press " " to confirm the minute setting and the timer will be in standby mode.
If the display does not flash, adjust the time of day by pressing the " + " and " - " buttons at
the same time for more than 3 seconds.
Oven On and Off
If the timer is in standby mode,press " " for more than 3 seconds, the timer will enter manual
mode and the symbol
Manual mode
:
In manual mode, only the day's time and the symbol " " lights up. The cooking duration has to
be controlled by the user.
Notes: In manual mode, to ensure the oven is not left on accidentally, after 5 hours no any button
pressed, the timer will flash once a second to warn you the oven will enter standby mode. After a
total of 10 hours, the timer will enter standby mode.
When the timer is flashing in manual mode, press any button to reset the timer if you intend to
" and " + " together for more than 3 seconds to enter standby
continue using the oven. Or press "
mode if oven will not be used.
" " will light up continuously .
Note:
Time function setting
1> Set the desired cooking function and the temperature degree.
2> Set the time function, then the oven will on.
If you set Dur or End , after cooking, the oven will automatically turn off.
If you set manual or minute minder, after cooking, bring the cooking function and oven temperature
knob to " 0 " position. Press "
" and " + " buttons for more than 3 seconds to return to standby mode.
In manual mode, pressing " " can enter the time function setting, the sequence of the function
setting is Mamual mode - Minute minder-Dur-End-Manual mode. Then selected cooking function
and adjust the cook temperature if required.
7
” will ligh on he sceen. While doing
his he oven will also sa o opeae.
A he compleion o he se duaion, he ime will sop he oven and give an audible waning.
Also, he symbol “A” will begin o ash on he sceen. Ae binging he cooking uncion and oven
empeaue knob o posiion. Pessing any buon less han 3 sec, i will sop he audible waning.
Pessing “ ” o moe han 3 seconds se he oven o Manual mode again o use
he oven.
Operating Instructions (Continued)

12
NOTE: The number of accessories included depends on the particular appliance purchased.
INSTALLATION
570
min. 560
606
600
80
250
100
Remark:
1.Only plus deviations are admissible for all dimension.
2.The cabinet is not include the power switch or socket.
VENTILATING OPENINGS
CONNECTION OF THE OVEN
Ventilating openings
L
N
When cooking is finished, if the temperature of ventilating openings is over 70 degree, the cooling
fan will continue working. The cooling fan will not stop working until the temperature becomes
lower than 60 degree.
555
20
595
595
560
9
VENTILATION OPENINGS
COOKING END MODE IO605TB
SEMIAUTOMATIC PROGRAMMING ACCORDING TO FINISHING TIME
This uncion is used o cook accoding o he desied nishing ime.The ood o be cooked is pu ino
he oven. The oven is adused o he desied cooking uncion and empeaue degee.
Pess “ ” buon unil you see “End” on he ime sceen (Beoe seing he nished ime).
Use he “+” and “-” buons o adus he nishing ime. (Ree o he insucions o seing he
coec ime o day).
Pess “ ” buon o conm, he day’s ime will appea on he sceen and he symbols “A” “
OPERATION INSTRUCTIONS
When the oven is first connected to the electrical supply, wait for the display automatically show " 12.30 ",
a beep sound once and the " 12 " " . " flash. Ensure the correct time of the day is set before using the
oven. please note: that is 24 hour clock, for example 2PM shown as 14.00.
To set the correct time of day
1> Press " + " " - " button to adjust the hour setting.
2> Press " " to confirm the hour setting.
3> Press " + " " - " button to adjust the minute setting.
4> Press " " to confirm the minute setting and the timer will be in standby mode.
If the display does not flash, adjust the time of day by pressing the " + " and " - " buttons at
the same time for more than 3 seconds.
Oven On and Off
If the timer is in standby mode,press " " for more than 3 seconds, the timer will enter manual
mode and the symbol
Manual mode
:
In manual mode, only the day's time and the symbol " " lights up. The cooking duration has to
be controlled by the user.
Notes: In manual mode, to ensure the oven is not left on accidentally, after 5 hours no any button
pressed, the timer will flash once a second to warn you the oven will enter standby mode. After a
total of 10 hours, the timer will enter standby mode.
When the timer is flashing in manual mode, press any button to reset the timer if you intend to
" and " + " together for more than 3 seconds to enter standby
continue using the oven. Or press "
mode if oven will not be used.
" " will light up continuously .
Note:
Time function setting
1> Set the desired cooking function and the temperature degree.
2> Set the time function, then the oven will on.
If you set Dur or End , after cooking, the oven will automatically turn off.
If you set manual or minute minder, after cooking, bring the cooking function and oven temperature
knob to " 0 " position. Press "
" and " + " buttons for more than 3 seconds to return to standby mode.
In manual mode, pressing " " can enter the time function setting, the sequence of the function
setting is Mamual mode - Minute minder-Dur-End-Manual mode. Then selected cooking function
and adjust the cook temperature if required.
7
”
will ligh on he sceen. While doing his he oven will also sa o opeae.
A he compleion o he se duaion, he ime will sop he oven and give an audible waning.
Also, he symbol “A” will begin o ash on he sceen. Ae binging he cooking uncion and oven
empeaue knob o “0” posiion. Pessing any buon less han 3 seconds, i will sop he audible
waning. Pessing “ ” o moe han 3 seconds se he oven o Manual mode again o use he oven.
COOKING FUNCTION NOTES IO605TB
• When seing he dae o each uncion, long pess on “ + ”o “ - ” o moe han 3 seconds, he
dae will pogessively and apidly incease o decease.
• When seing each o he ime uncion, i hee is no opeaion o 5 minues hen i will eun o
manual mode.
• When seing each o he ime uncions, pessing “ ” and “ + ” o moe han 3 seconds, a beep
sounds. I will cancel he cuen ime uncion seing and ene sandby mode.
• We sugges ha you un he oven elemens o 15 minues a 200 degees o bun o any esidue
om he suaces.
VENTILATION
When cooking is nished, o in a paused o sandby sae, and i he oven caviy empeaue is ove
75 degees, he cooling an will opeae o 15 minues o unil he oven caviy empeaue become
lowe han 75 degees.
Operating Instructions (Continued)
13
PRIOR TO CLEANING YOUR OVEN
WARNING:
• Beoe any mainenance and cleaning, un
o he appliance and disconnec he powe.
• Se all conols in he OFF posiion.
• Wai unil he inside o he uni is no ho bu
only slighly wam—cleaning is easie han
when wam.
• Clean he suace o he uni wih a damp
cloh, so bush o ne sponge and hen
wipe dy.
• In case o heavy soiling, use ho wae wih
non-abasive cleaning poduc.
• Fo cleaning he oven doo glass, do no use
abasive cleanes o shap meal scapes,
as hese can scach he suace o lead o
he glass being damaged.
• Neve leave acidic subsances (lemon uice,
vinega) on sainless seel pas.
• Do no use a high pessue cleane o cleaning
he uni.
• The baking ay and wie shelving may be
washed in mild deegen.
BULB REPLACEMENT
Fo eplacemen, ollow he below pocess:
1. Disconnec powe om he mains oule o
swich o he cicui beake o he uni’s
mains oule.
2. Unscew he glass lamp cove by uning
i coune-clockwise (noe, i may be si)
and eplace he bulb wih a new one o he
same ype.
3. Scew he glass lamp cove back in place.
NOTE:
Only use 25W/230V , T300°C halogen lamps.
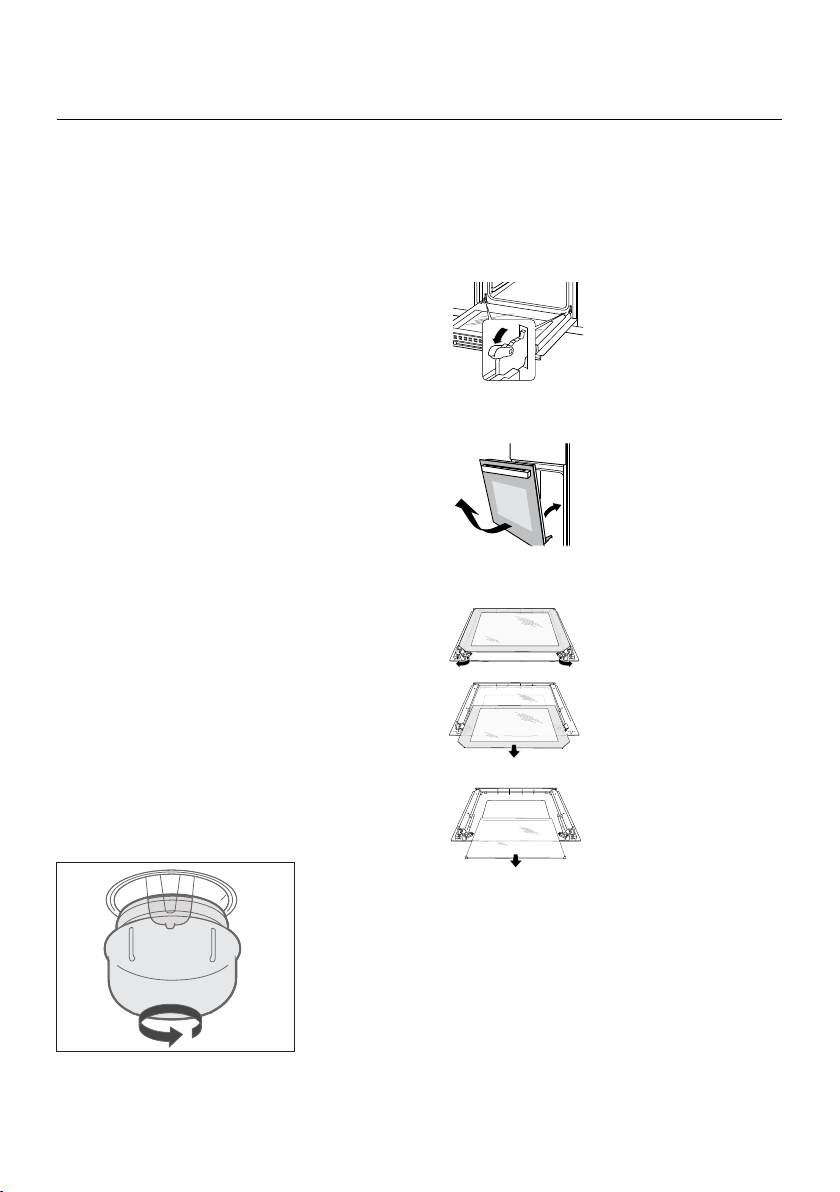
REMOVING THE OVEN DOOR &INNER GLASS
The emovable doo allows o ull access o he
enie ineio o he oven o easie and quicke
mainenance. Follow hese insucions caeully
i you wish o emove he ove doo.
1. To emove he doo, open he doo o he
maximum angle. Then pull he buckle a
he doo hinges backwad.
2. Close he doo o an angle appoximaely 30°.
Hold he doo wih one hand on each side. Li
up and slowly pull he doo ou om he oven.
3. Open he doo oaion backe assembly,
ee o image on he igh.
4. Li up he doo oue glass and pull i ou.
5. Then ake he doo middle glass ou using he
same mehod as sep 4.
6. When cleaning is compleed, evese he
above pocedues o eun he doo o is
oiginal posiion.
WARNING:
• Do no oceully pull ou he doo o glass o
peven beaking he glass duing dismanling.
• The hinge spings could become loose
and cause pesonal inuy.
• Do no li o cay he oven doo
by he doo handle.
BULB REPLACEMENT
For replacement, process as follows:
1> Disconnect power from the mains outlet or switch off the circuit breaker of the unit's mains outlet.
2> Unscrew the glass lamp cover by turning it counter-clockwise (note, it may be stiff) and replace
the bulb with a new one of the same type.
3> Screw the glass lamp cover back in place.
NOTE: Only use 25-40W/220V-240V, T300°C halogen lamps.
SHELF PLACEMENT WARNING:
SECURING THE OVEN TO THE CABINET
1. Fit oven into the cabinet recess.
2. Open the oven door.
3. Secure the oven to the kitchen cabinet with two
distance holders " A " which fit the holes in the
oven frame and fit the two screws " B ".
To ensure the oven shelves operate safely, correct placement of the shelves between the side rail
is imperative. Shelves and the pan only can be used between the first and fifth layers.
The shelves should be used with the right direction, it will ensure that during careful removal of the
shelf or tray, hot food items should not slide out.
OR
8
esatto.house13
PRIOR TO CLEANING YOUR OVEN
WARNING:
• Before ny mintennce nd clening, turn o
the pplince nd disconnect the power.
• Set ll controls in the OFF position.
• Wit until the inside of the unit is not hot but only
slightly wrm—clening is esier thn
when wrm.
• Clen the surfce of the unit with dmp cloth,
soft brush or ne sponge nd then
wipe dry.
• In cse of hevy soiling, use hot wter with non-
brsive clening product.
• For clening the oven door glss, do not use
brsive cleners or shrp metl scrpers,
s these cn scrtch the surfce or led to the
glss being dmged.
• Never leve cidic substnces (lemon juice,
vinegr) on stinless steel prts.
• Do not use high pressure clener for clening
the unit.
• The bking try nd wire shelving my be
wshed in mild detergent.
BULB REPLACEMENT
For replacement, follow the below process:
1. Disconnect power from the mins outlet or
switch o the circuit breker of the unit’s mins
outlet.
2. Unscrew the glss lmp cover by turning it
counter-clockwise (note, it my be sti) nd
replce the bulb with new one of the sme
type.
3. Screw the glss lmp cover bck in plce.
NOTE: Only use 25W/230V , T300°C
halogen lamps.
REMOVING THE OVEN DOOR & INNER GLASS
The removable door allows for full access to the
entire interior of the oven for easier and quicker
maintenance. Follow these instructions carefully if
you wish to remove the over door.
WARNING:
•
•
•
Maintenance & Cleaning
OVEN (OPTIONAL)
1.
2.
3.
4.
5.
6.
7.
(Figure 3)
(Figure 4)
in
OVEN (OPTIONAL)
1.
2.
3.
4.
5.
6.
7.
(Figure 2)
(Figure 3)
(Figure 4)
in
OVEN (OPTIONAL)
Removable door allows full access to entire interior
1.
2.
3.
4.
5.
6.
7.
(Figure 2)
(Figure 3)
(Figure 4)
in
OVEN (OPTIONAL)
1.
2.
3.
4.
5.
6.
7.
(Figure 2)
(Figure 3)
(Figure 4)
in
10
OVEN (OPTIONAL)
1.
2.
3.
4.
5.
6.
7.
(Figure 2)
(Figure 3)
(Figure 4)
in
10
OVEN (OPTIONAL)
1.
2.
3.
4.
5.
6.
7.
(Figure 1)
(Figure 3)
(Figure 4)
in
BULB REPLACEMENT
For replacement, process as follows:
1> Disconnect power from the mains outlet or switch off the circuit breaker of the unit's mains outlet.
2> Unscrew the glass lamp cover by turning it counter-clockwise (note, it may be stiff) and replace
the bulb with a new one of the same type.
3> Screw the glass lamp cover back in place.
NOTE: Only use 25-40W/220V-240V, T300°C halogen lamps.
SHELF PLACEMENT WARNING:
SECURING THE OVEN TO THE CABINET
1. Fit oven into the cabinet recess.
2. Open the oven door.
3. Secure the oven to the kitchen cabinet with two
distance holders " A " which fit the holes in the
oven frame and fit the two screws " B ".
is imperative. Shelves and the pan only can be used between the first and fifth layers.
The shelves should be used with the right direction,
shelf or tray, hot food items should not slide out.
OR
8
30˚
1. To remove the door, open the
door to the maximum angle.
Then pull the buckle at the
2. Close the door to an angle
approximately 30°. Hold the
3. Open the door rotation
bracket assembly, refer the
action in the following picture.
4. Lift up the door outer glass
and pull it out, then take the
door middle glass out in the
same way.
Don't forcibly pulled out the door and
prevent the glass breakage during the
dismantling process.
The hinge springs could loose, causing
personal injury.
Do not lift or carry the oven door by
the door handle.
door hinge backward.
door with one hand on each side.
Lift up and slowly pull the door
out from the oven.
Maintenance & Cleaning

14
OPERATION IN CASE OF EMERGENCY
In he even o an emegency you should:
• Se all conols in he OFF posiion and disconnec he powe.
• Call Ae Sales Suppo on 1300 11 4357 o email suppo@esideniagoup.com.au
Some mino auls can be xed by eeing o he insucions given in he able below.
IMPORTANT: I you appliance appeas o be opeaing incoecly, hen you should disconnec i
om you elecical supply and hen conac Ae Sales Suppo.
WARNING: Do no aemp o epai he oven yousel.
Please noe ha i an sevice agen is asked o aend whils he poduc is unde waany and nds
ha he poblem is no he esul o an appliance aul, hen you may be liable o he cos o he call
ou chage.
The appliance mus be accessible o he sevice agen o peom any necessay epai.
I you appliance is insalled in such a way ha a sevice agen is concened ha damage will be
caused o he appliance o you kichen, hen hey will no complee a epai.
Please ee o he condiions o ha appea on he waany secion a he ea o his use manual.
Troubleshooting
15
ISSUE POSSIBLE CAUSE COMMON RESOLUTIONS
The oven is not
turning on.
Break in power
supply.
Check the household fuse box for any blown fuses
and replace as necessary. Also ensure that a safety
switch hasn’t tripped.
The oven light
is not working.
The light globe is
loose or has blown.
When the oven has cooled and is switched o,
remove the globe cover and ensure that the globe
is tightly secured.
If blown, refer to the Cleaning and Maintenance
section under Bulb Replacement.
The oven is burning the
top of my dish whilst
the underside is under-
done.
Not enough heat
from the bottom
of the oven.
Try using the Conventional cooking functions.
Try lowering the temperature.
Try using a lower shelf position.
The oven is burning the
underside of my dish
whilst the top is under
cooked.
Excessive heat
from the bottom
of the oven.
Try using the Conventional cooking functions.
Try lowering the temperature.
Try using a higher shelf position.
The oven is burning
the outside of my dish
whilst the inside is
under-done.
Temperature is set
too high.
Lower the oven temperature and increase the
cooking duration.
The outside of my dish
is too dry even though it
looks cooked.
Temperature is set
too low.
Increase the oven temperature and decrease the
cooking duration.
If you need assistance, please contact our After Sales support centre on 1300 11 43 57 o email
suppo@esideniagoup.com.au
Troubleshooting (Continued)

This page is intentionally
left blank

17
Model IO605MB IO605TB
Gross Volume: 80L 80L
Product Dimensions (W × D × H): 595 × 575 × 595mm 595 × 575 × 595mm
Weight (Net/Gross): 32kg/ 36kg 31kg/34kg
Rated Voltage 220-240V~ 220-240V~
Rated Frequency 50Hz-60Hz 50Hz-60Hz
Rated Power 2.1kW 2.1kW
No. of Functions 5 5
Technical Specications

Attach your receipt
to this page

19
Purchase Details
For your records, please record details of your purchase below and staple your receipt on the opposite
page. Your serial number can be found on the aing plae of your Built-in Oven.
STORE DETAILS
STORE NAME
ADDRESS
TELEPHONE
PURCHASE DATE
PRODUCT DETAILS
MODEL NO.
SERIAL NO.*

20
AUSTRALIAN WARRANTY TERMS & CONDITIONS
COOKING APPLIANCES
This documen ses ou he ems and condiions
o he poduc waanies o Residenia Goup
Appliances. I is an impoan documen. Please keep
i wih you poo o puchase documens in a sae
place o uue eeence should you equie sevice
o you Appliance.
1. IN THIS WARRANTY
(a) ‘accepable qualiy’ as eeed o in clause 10 o
his waany has he same meaning eeed o
in he ACL;
(b) ‘ACL’ means Tade Pacices Amendmen
(Ausalian Consume Law) Ac (No.2) 2010;
(c) ‘Appliance’ means any Residenia Goup
poduc puchased by you accompanied by his
documen;
(d) ‘ASR’ means Residenia Goup auhoised sevice
epesenaive;
(e) ‘Residenia Goup’ means Residenia Goup Py
Ld o 165 Bakly Avenue Bunley VIC, ACN 600
546 656 in espec o Appliances puchased in
Ausalia;
( ) ‘mao ailue’ as eeed o in clause 10 o his
waany has he same meaning eeed o
in he ACL and includes a siuaion when an
Appliance canno be epaied o i is uneconomic
o Residenia Goup, a is disceion, o epai
an Appliance duing he Waany Peiod;
(g) ‘Waany Peiod’ means:
(i) whee he Appliance is used o pesonal,
domesic o household use (i.e. nomal
single amily use) as se ou in he
insucion manual, he Appliance is
waaned agains manuacuing deecs
o 24 monhs (o 36 monhs whee a
valid exended waany egisaion has
occued), ollowing he dae o oiginal
puchase o he Appliance;
(h) ‘you’ means he puchase o he Appliance no
having puchased he Appliance o e-sale, and
‘you’ has a coesponding meaning.
2. This waany only applies o Appliances
puchased and used in Ausalia and is in
addiion o (and does no exclude, esic, o
modiy in any way) any non-excludable sauoy
waanies in Ausalia.
3. Duing he Waany Peiod Residenia Goup o
is ASR will, a no exa chage i you Appliance
is eadily accessible o sevice, wihou special
equipmen and subec o hese ems and
condiions, epai o eplace any pas which i
consides o be deecive. Residenia Goup o
is ASR may use emanuacued pas o epai
you Appliance. You agee ha any eplaced
Appliances o pas become he popey o
Residenia Goup. This waany does no apply
o ligh globes, baeies, seals, les o simila
peishable pas.
4. Pas and Appliances no supplied by Residenia
Goup ae no coveed by his waany.
5. You will bea he cos o anspoaion, avel
and delivey o he Appliance o and om
Residenia Goup o is ASR. I you eside ouside
o he sevice aea, you will bea he cos o:
(a) avel o an auhoised epesenaive;
(b) anspoaion and delivey o he Appliance
o and om Residenia Goup o is ASR, in all
insances, unless he Appliance is anspoed
by Residenia Goup o is ASR, he Appliance is
anspoed a he owne’s cos and isk while in
ansi o and om Residenia Goup o is ASR.
6. Poo o puchase is equied beoe you can
make a claim unde his waany.
7. You may no make a claim unde his waany
unless he deec claimed is due o auly o
deecive pas o wokmanship. Residenia
Goup is no liable in he ollowing siuaions
(which ae no exhausive):
Scan o Regise you InAlo Appliance or go to:
www.inalto.house/registration
By egiseing you poduc, you will eceive advanced suppo, say updaed
wih he laes om InAlo and ind ou abou new poducs and pomoions.
Warranty Information: AU
Other manuals for IO605MB
2
This manual suits for next models
1
Other Inalto Oven manuals

Inalto
Inalto IO65 User manual

Inalto
Inalto IO605MB User manual

Inalto
Inalto IO605TB User manual

Inalto
Inalto IDO6013T User manual

Inalto
Inalto IOSO605M User manual

Inalto
Inalto IOSO605M User manual

Inalto
Inalto IOSO605M-L User manual

Inalto
Inalto IO90XL9T User manual

Inalto
Inalto IO60XL5T User manual

Inalto
Inalto IO90XL10T User manual


Popular Oven manuals by other brands
 Wall Oven installation instructions")
Kenmore
Kenmore 27" (68.6 cm) Wall Oven installation instructions

GE
GE JGRP20 owner's manual

Siemens
Siemens HB331.0Q instruction manual

Avanti
Avanti POA8K3S instruction manual

Hotpoint Ariston
Hotpoint Ariston CISFB 51.2/HA operating instructions

Parmco
Parmco OX-1-6S-5 Installation and operating instructions


