Inalto ITLWG6 User manual

USER MANUAL
V 1.0
MODELS
ITLWG6/8
6/8KG TOP LOAD
WASHING MACHINE
ITLWG6-8_Manual_V1.0.indd 1 8/5/19 1:27 pm

User Manual
02
Congratulations on purchasing your washing machine. The InAlto brand is
proudly distributed within Australia by esidentia Group Pty Ltd.
Please refer to the warranty card at the rear of this manual for information
regarding your product’s parts and labour warranty, or visit us online at
www.residentia.group
At esidentia Group, we are customer obsessed and our Support Team are
there to ensure you get the most out of your appliance. Should you want
to learn more about the various features of your new appliance, and
importantly taking care of your appliance when cleaning, our Support Team
are here to help. You can use our online Support Centre at any time by
visiting http://support.residentiagroup.com.au, or you can contact us
via calling us on 1300 11 HELP (4357).
It is important that you read through the following use and care manual
thoroughly to familiarise yourself with the installation and operation
requirements of your appliance to ensure optimum performance.
Again, thank you for choosing an InAlto appliance and we look forward to
being of service to you.
Kind Regards,
The esidentia Team
Residentia Group
—
Head Office.
165 Barkly Avenue
Burnley, Victoria
Australia 3121
—
ACN.
600 546 656
—
Online.
residentia.group
Welcome
ITLWG6-8_Manual_V1.0.indd 2 8/5/19 1:27 pm

inalto.com.au
03
02
Welcome
04
Safety
Instructions
Contents
04
Quick
Start Guide
05
Your Washing
Machine
06
Installation
Instructions
08
Operating
Your Washing
Machine
12
Cleaning &
Maintenance
13
Troubleshooting
15
Technical
Specications
16
Receipt
17
Purchase Details
18
Warranty
Information
ITLWG6-8_Manual_V1.0.indd 3 8/5/19 1:27 pm

User Manual
04
This appliance is only intended for use within the
interior of a domestic environment.
• This appliance is not intended for use by persons
(including children) with reduced physical, sensory
or mental capabilities, or lack of experience and
knowledge, unless they have been given supervision or
instruction concerning use of the appliance by a person
responsible for their safety.
• Children should be supervised to ensure that they do
not play with the appliance.
• Never insert your hands, or try to remove clothes
from inside the washing machine, until the drum has
completely stopped spinning.
UNPACKING
• During transportation, protective packaging was
used to protect the appliance against any damage.
After unpacking, please dispose of all elements of
packaging in a way that will not cause damage to the
environment. All materials used for packaging the
appliance are environmentally friendly; they are 100%
recyclable and are marked with the appropriate symbol.
CAUTION!
During unpacking, the packaging materials (polythene
bags, polystyrene pieces, etc.) should be kept out of reach
of children.
DISPOSAL OF THE APPLIANCE
• Old appliances should not simply be disposed of with
normal household waste, but should be delivered
to a collection and recycling centre for electric and
electronic equipment. A symbol shown on the product,
the instruction manual or the packaging shows that it is
suitable for recycling.
• Materials used inside the appliance are recyclable
and are labelled with information concerning this. By
recycling materials or other parts from used devices you
are making a signicant contribution to the protection
of our environment.
• Information on appropriate disposal centres for used
devices can be provided by your local authority.
Safety Instructions
Quick Start Guide
QUICK START:
1. Install your washing machine.
2. Load the laundry
3. Measure the detergent and pour in the appropriate amount.
4. Close the machine door.
5. Put down (or hang up) the drain pipe
6. Turn on the water supply.
7. Plug in the power supply.
8. Select the desired program.
9. Press the Start/Pause button to begin
10. Completion of the washing cycle
• When the washing cycle is complete, a buzzer will sound six
times and then the power will switch o.
11. Turn o the water supply
• Although the washing machine would be switched o, the
power outlet should be switched o and the plug should be
pulled out for safety reasons.
ITLWG6-8_Manual_V1.0.indd 4 8/5/19 1:27 pm
inalto.com.au
05
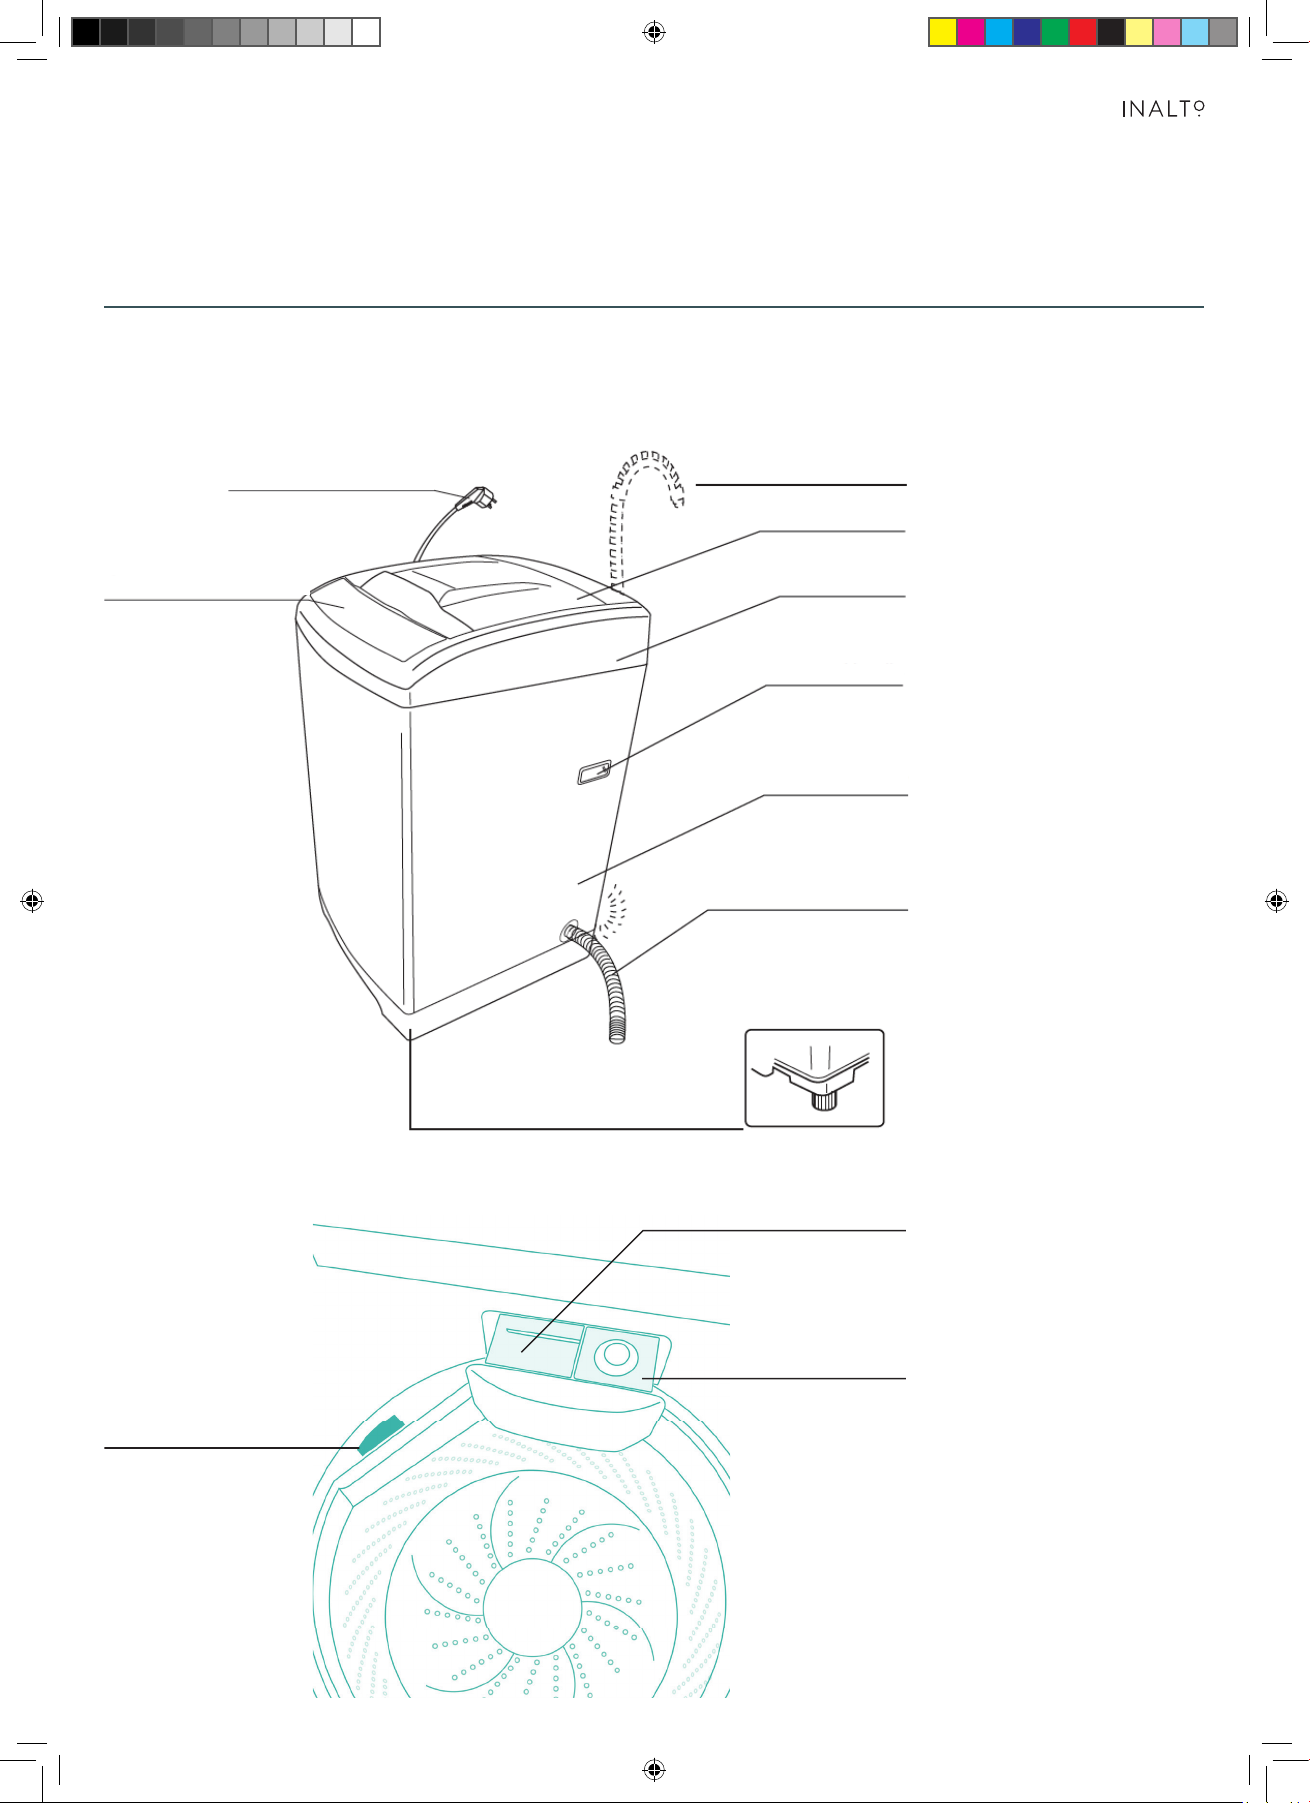
EXTERIOR
INTERIOR
Your Washing Machine
Adjustable Feet
Power cord/plug
Control Panel
Power cord/Plug
Top lid
Frame
Handle
Adjustable feet
Drain hose
(for lower drain only)
Upper drain hose
(for upper drain only)
Fabric Softner
Washing powder
Liquid detergent
Cabinet
ITLWG6-8_Manual_V1.0.indd 5 8/5/19 1:27 pm

User Manual
06
Installation Instructions
POWER SOURCE AND GROUNDING
• It’s recommended to use the washing machine on its own dedicated power outlet for both convenience and safety.
The power outlet must be grounded.
IMPORTANT!
If the power cord is damaged, it must be replaced by Residentia Group or one of it’s authorised
service representatives. Please contact 1300 11 HELP (4357) and ensure the appliance is completely
disconnected from the power supply.
INSTALLATION OF DRAIN HOSE
ITLWG6-8_Manual_V1.0.indd 6 8/5/19 1:27 pm
inalto.com.au
07
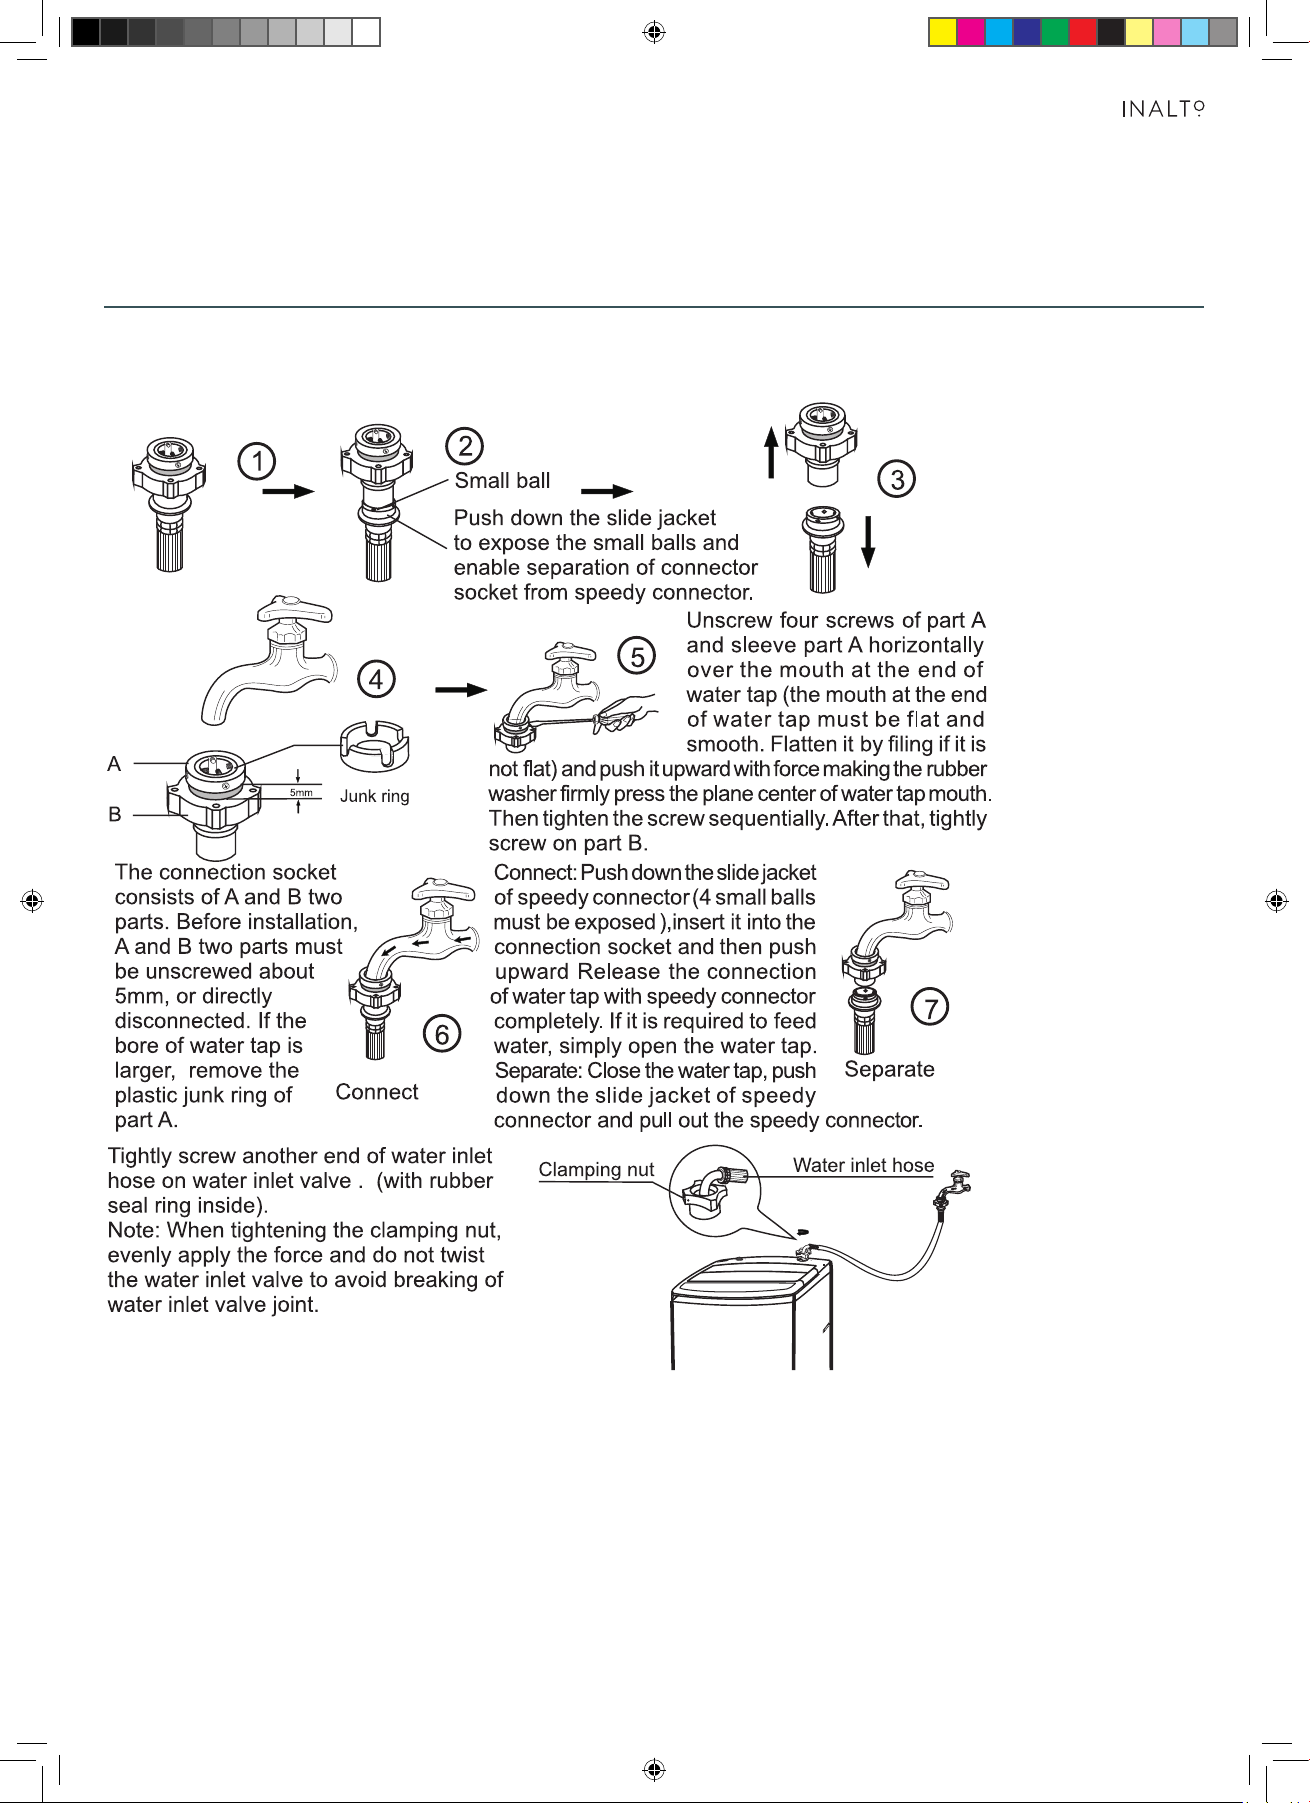
INSTALLATION OF THE WATER INLET PIPE:
PREPARATION BEFORE WASHING:
1. Adjust the feet on your washing machine to ensure it is stable and level. The feet extend when
rotated clockwise and shorten when rotated anti-clockwise.
2. Connect the water inlet hose(s) to your taps.
3. Connect the plug to a power point.
4. Turn on the water supply at the taps.
5. Put the drainage hose down the drain.
Note: The water will overow when the height of the drain hose is under 860mm.
CAUTION!
Always ensure coins, keys and other hard goods are removed from items of clothing before washing,
as they can cause damage to the barrel. It is recommended to zip up clothes for the same reason.
ITLWG6-8_Manual_V1.0.indd 7 8/5/19 1:27 pm

User Manual
08
Operating Your Washing Machine
Press this button to set your Water Level,
where 1 is low and 6 is high.
A solid indicator light indicates the water levels
to the left (1, 3, 5) and a flashing indicator light
indicates the water levels to the right (2, 4, 6).
Press this button to select your
wash function. I.e. Wash, Rinse or
Spin, or a combination of these.
Simultaneously press the
Water Level and Function
buttons to activate the child
lock. Repeat this process to
deactivate the child lock. Press this button to set a delayed start time. With each
press, your machine will delay by 1 hour, up to 24 hours,
there after delaying by 6 hours with each press up to 48
hours. To switch the delayed start off, simply press the
button until it returns to 1.
FUNCTION WATER LEVEL DELAY
PROGRAM TEMPERATURE START⁄PAUSE
POWER
SMART WASH SOLID ⁄ FLASH
WASH
RINSE
JEANS ⁄ ANTI-CREASE
SPIN
5 ⁄ 6
3 ⁄ 4
1 ⁄ 2
STANDARD ⁄ AIR DRY
HOT
WARM
COLD
DELAY (HRS)
MINUTES REMANING
SOLID ⁄ FLASH
HEAVY ⁄ QUICK
ITLWG6
6KG TOP LOAD
WASHING MACHINE
PMS 656 C
PMS BLACK C
PMS 1788 C
WATER LEVEL:
CHILD LOCK:
DELAY:
WASH FUNCTION:
ITLWG6-8_Manual_V1.0.indd 8 8/5/19 1:27 pm

inalto.com.au
09
Press this button to
turn your washing
machine On or Off.
Press this button to select your
water temperature. When both the
Hot and Cold indicators are lit, your
washing machine will be set to use
Warm water.
Press this button to select your wash
program type. A solid indicator indicates
the programs to the left, whereas a
flashing indicator indicates the programs
to the right.
After selecting your desired wash settings,
press this button to start your wash cycle.
You can also use this button to pause the
washing machine during operation.
FUNCTION WATER LEVEL DELAY
PROGRAM TEMPERATURE START⁄PAUSE
POWER
SMART WASH SOLID ⁄ FLASH
WASH
RINSE
JEANS ⁄ ANTI-CREASE
SPIN
5 ⁄ 6
3 ⁄ 4
1 ⁄ 2
STANDARD ⁄ AIR DRY
HOT
WARM
COLD
DELAY (HRS)
MINUTES REMANING
SOLID ⁄ FLASH
HEAVY ⁄ QUICK
ITLWG6
6KG TOP LOAD
WASHING MACHINE
PMS 656 C
PMS BLACK C
PMS 1788 C
POWER:
PROGRAM:
START/PAUSE:
WATER TEMPERATURE:
ITLWG6-8_Manual_V1.0.indd 9 8/5/19 1:27 pm

User Manual
10
WASH PROGRAMS
Program Wash Time: Rinse Time: Spin Time: Total Time:
Quick 2 minutes one time 1 minute 10 minutes
Heavy 12 minutes two times 7 minutes 44 minutes
Standard 48 minutes one time 15 minutes 87 minutes
Jeans
Soak 13 minutes
+
Wash 3 minutes
two times 2 minutes 42 minutes
Easy Iron 12 minutes two times only drain 34 minutes
Air Dry - - 60 minutes 60 minutes
• QUICK
Suitable to wash lightly soiled clothes.
• HEAVY
Delicate wash, designed especially for heavy fabrics.
This is normally the most commonly used wash
program.
• JEANS
Suitable program to wash heavily soiled, durable
clothes.
• AIR DRY
Designed to dry clothes without heat, with a similar
result of being dried in a room.
• EASY IRON
Thorough wash program that leaves the clothes more
moist than the other programs, helping to ensure
clothes are less wrinkled.
NOTE:
This product is subject to continuous improvement, specication are subject to change without prior notice.
This product was tested in accordance with AS/NZS 2040.2 and AS/NZS6400 using program: Standard, which is the
program recommended for a normally soiled cotton load at rated capacity.
ITLWG6-8_Manual_V1.0.indd 10 8/5/19 1:27 pm

inalto.com.au
11
PROCEDURE FOR SETTING A SINGLE WASH:
1. Load your washing into the machine.
2. Switch on the washing machine with the
POWER button.
3. Use the PROGRAM button to select the desired wash
program, which will be indicated by a
solid light.
Note: The Heavy wash program is the most common
wash program used and is a good all purpose washing
program.
4. Press the WATER LEVEL button to select your desired
water level, where 1 is a small load and
6 is a full load.
5. Press the FUNCTION button to select your desired
procedure (Wash, Rinse, Spin), where you may select a
single procedure alone, or any two combined.
6. Press the TEMPERATURE button to select your desired
water temperature (Cold, Warm, Hot).
7. Press the START/PAUSE button to start the wash
program. The LED panel will indicate the remaining
time for your wash program and begin to count down.
Note:
The washing machine lid must be closed for it to
operate.
SPECIAL FEATURES
• DELAY START TIME
The DELAY button allows you to preset the start time
of your washing machine. After selecting your desired
wash program and functions (as described on page 10),
press the DELAY button to select the number of hours
time you’d like to start your wash program in (I.e. 1 to
48 hours). With each press of the button the display will
increase by 1 hour, from 24 it will increase by 6 hours
with each press. After you reach 48 hours, it will reset
to display the remaining wash time for the program you
have selected.
Once you’ve set your desired delay time, press the
START/PAUSE button. The Delay indicator light will
begin to ash in isolation and will countdown to your
desired start time.
• CANCELING OR ALTERING A DELAY TIME
To cancel a set delayed start time, simply press the
POWER button to reset the machine.
• CHILD LOCK
To activate the child lock feature, simply press the
FUNCTION and WATER LEVEL buttons at the same
time. Repeat this process to deactivate the child lock.
• AUTOMATIC POWER SHUT-OFF
If the machine isn’t used within the rst 10 minutes
after being powered on it will automatically power o.
This also occurs after completing a wash cycle, where
the machine will sound a buzzer 6 times and then
automatically power o.
• AUTOMATIC ADJUSTMENT FOR IMBALANCE
If the laundry is placed unevenly within the drum, it is
likely to cause vibration during spinning. Your InAlto
washing machine has a built in function of adjusting for
the imbalance. When the machine is adjusting for any
imbalance, the rinse light will ash and normally takes
around 1 minute. In the event that the washing machine
cannot adjust for the imbalance, an alarm will sound.
• POWER FAILURE MEMORY FUNCTION
If the power supply is cut o suddenly during operation,
the machine remembers the current operation state.
When the power supply is restored, the machine returns
to former operation state automatically.
ITLWG6-8_Manual_V1.0.indd 11 8/5/19 1:27 pm
User Manual
12
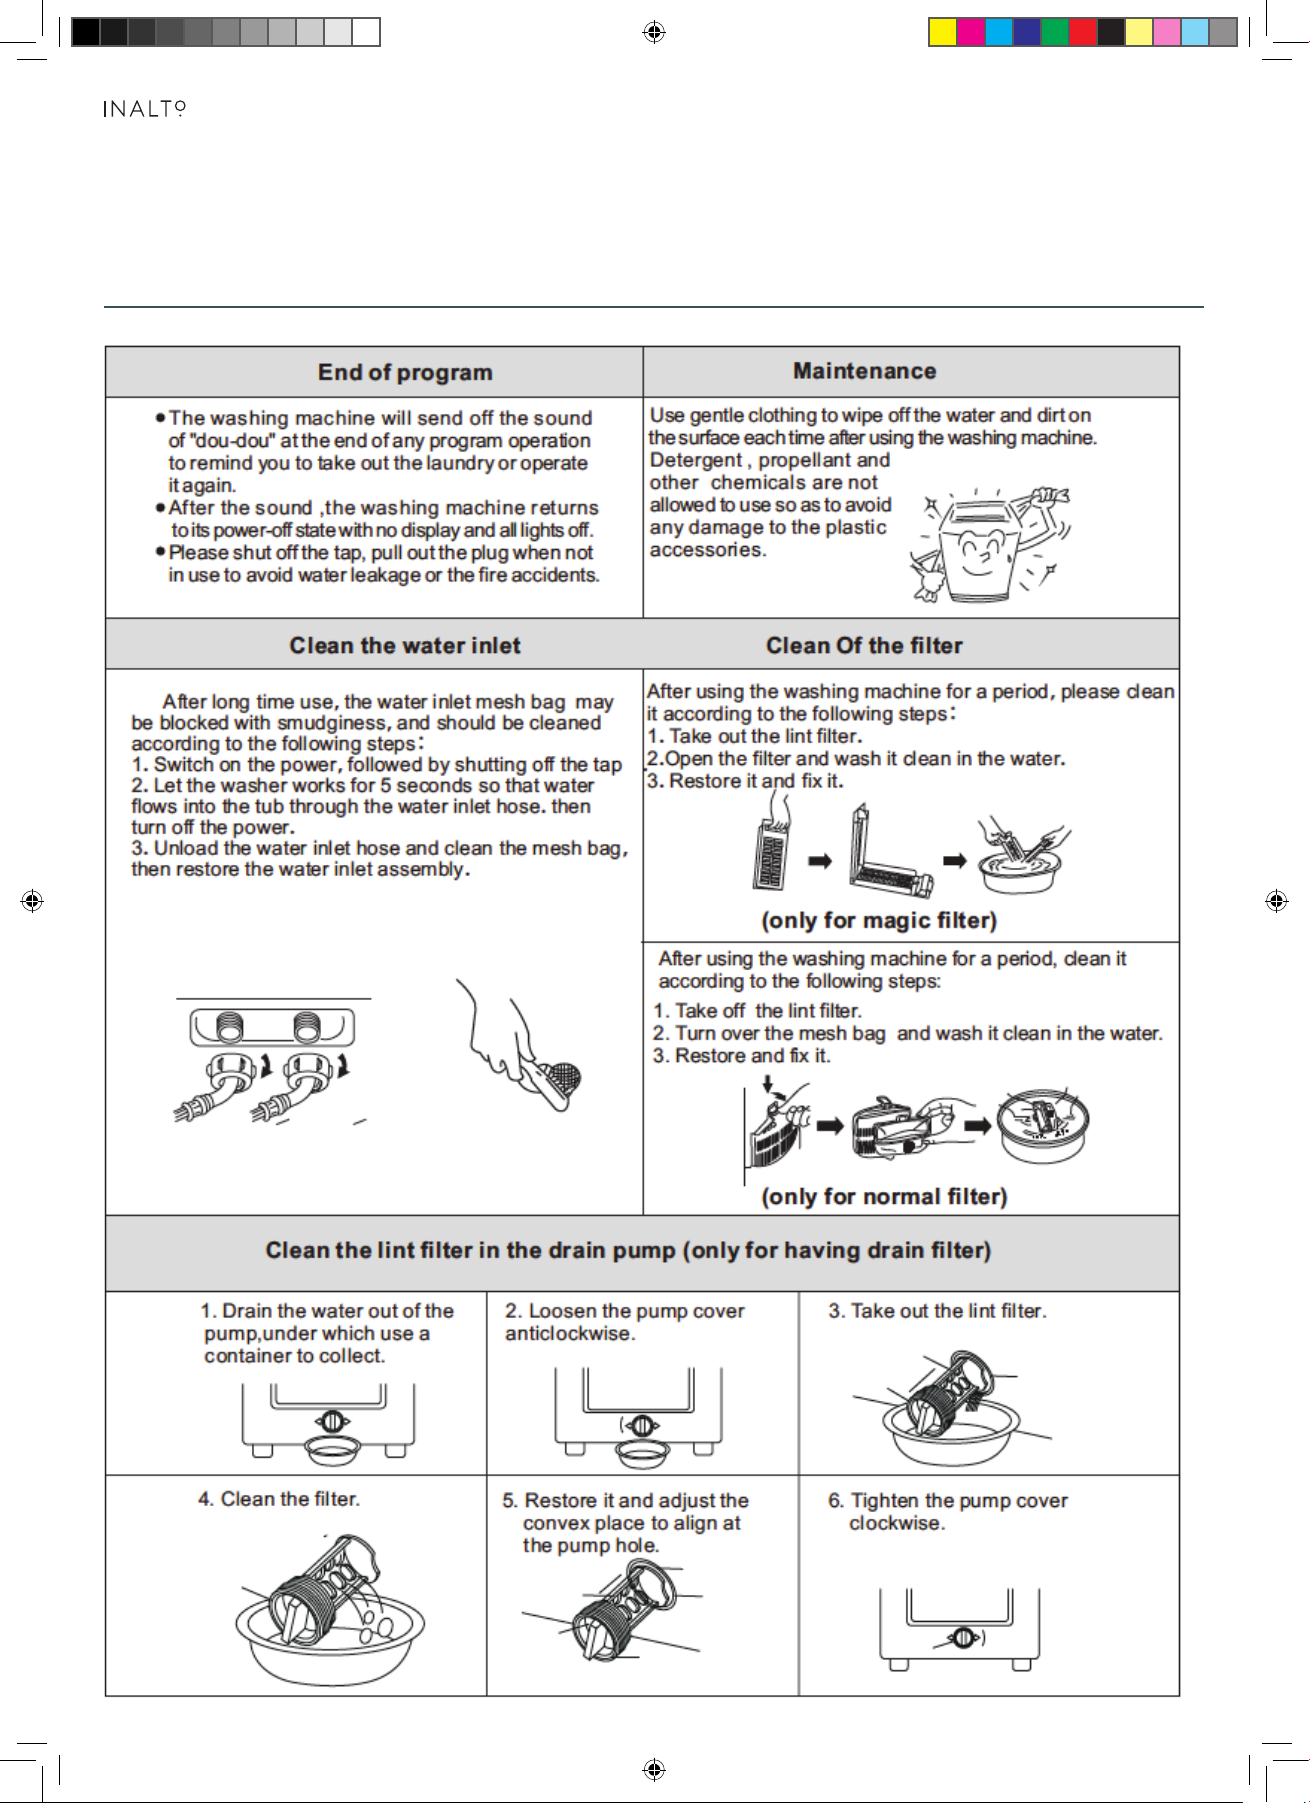
Cleaning & Maintenance
ITLWG6-8_Manual_V1.0.indd 12 8/5/19 1:27 pm

inalto.com.au
13
Troubleshooting
OPERATION IN CASE OF EMERGENCY
In the event of an emergency you should:
• Switch o all controls.
• Switch the washing machine o at the power point or at the fuse box.
• Call the Residentia Support Team on 1300 11 HELP (4357).
Some minor faults can be xed by referring to the instructions given in the Troubleshooting section
below. There is also a self-help section online at http://www.residentiagroup.com.au.
FAULT INSPECTION ITEMS
No water flows in
• If the power is o or the fuse is burned out.
• If the water supply is cut o or the water pressure too low.
• If the inlet hose is properly connected and the water tap is opened.
• If the filtering screen of inlet valve is blocked by dirt.
• If the coil of inlet valve is damaged. (The slight electromagnetic sound is normal
phenomenon when the inlet valve is switched on)
• If the "Start / Pause" button is pressed after the power switch is pressed.
No washing
• If the power is o or the fuse is burned out.
• If the power supply voltage is too low.
• If the water amount reaches to the required water level.
(The washer will not work if the water amount does not reach the required
water level)
• If it is set to "Delay" washing mode. (It will only start to work until the
reservation time reached)
Abnormal draining
• If the water drain hose is placed very high.
• If the end of water drain hose is sealed in pond.
• If the internal rubber ring of drain valve is blocked by dirt.
Abnormal spin
• If the door lid is closed.
• If all clothing piled largely at one side of barrel or the clothing is excessively
placed.
• If the washer is not placed in stable condition or it is placed in inclination state.
(The ground is not flat).
• If the motor belt is loosened.
ITLWG6-8_Manual_V1.0.indd 13 8/5/19 1:27 pm

User Manual
14
Troubleshooting (Continued)
When the washing machine experiences a fault, please contact the Residentia Group support team on:
Telephone: 1300 11 HELP (4357).
WARNING! Never dismantle the washing machine.
ERROR MESSAGES AND SOLUTIONS
FAULT CAUSE OF FAULT INDICATION BUZZING
ALARM SOUND
STOPPING
ALARM
Alarm for
water inlet
Water injection for
about 16 minutes, but
do not reach preset
water level
"E1" flares The buzzer goes
on buzzing for
10 seconds. If
the fault is not
solved, buzzes
again for
10 seconds in
every 16 minutes.
Open the lid
to deal with
faults, then close
the lid to stop
the alarm.
Alarm for
opening lid
Open the lid after
starting the delay time.
Open the lid when the
washer is spinning.
Open the lid when
entering into the child
lock state.
"E2" flares
Imbalance
alarm
Checked imbalance for
the third time.
"E3" flares
Drain alarm Alarm for water drain
time out.
"E4" flares
ITLWG6-8_Manual_V1.0.indd 14 8/5/19 1:27 pm

inalto.com.au
15
Technical Specications
Below outlines the technical specications for your InAlto Washing Machine.
ITLWG6 ITLWG8
SIZE 550w � 565d � 950h (mm) 601w � 625d � 1000h (mm)
WEIGHT OF THE PRODUCT 36kg 45kg
RATED INPUT POWER 560W 560W
RATED CAPACITY OF
WASH AND SPIN
6.0kg
(dry clothes)
8.0kg
(dry clothes)
RATED VOLTAGE 240V~ 240V~
RATED FREQUENCY 50Hz 50Hz
MAXIMUM WATER PRESSURE
PERMITTED IN THE WATER INLET
0.03MPa 0.1MPa
MINIMUM WATER PRESSURE
PERMITTED IN THE WATER INLET
0.8MPa 0.6MPa
NOTE:
This product is subject to continuous improvement, specication are subject to change without prior notice.
This product was tested in accordance with AS/NZS 2040.2 and AS/NZS6400 using program: Standard, which is the
program recommended for a normally soiled cotton load at rated capacity.
ITLWG6-8_Manual_V1.0.indd 15 8/5/19 1:27 pm
User Manual
16
Attach your receipt
to this page
ITLWG6-8_Manual_V1.0.indd 16 8/5/19 1:27 pm
inalto.com.au
17
Purchase Details
For future reference, please record the following information
which can be found on the rating plate and the date of
purchase which can be found on your sales invoice.
The rating plate of your hob is located on the underneath
of the appliance. Therefore please t the duplicate data
plates or label on the outside of the cupboard to sure that
the label can be easily seen during operation.
STORE DETAILS
STORE NAME
|
ADDRESS
|
TELEPHONE
|
PURCHASE DATE
|
PRODUCT DETAILS
MODEL NO.
|
SERIAL NO.*
|
ITLWG6-8_Manual_V1.0.indd 17 8/5/19 1:27 pm

User Manual
18
WARRANTY TERMS & CONDITIONS
LAUNDRY APPLIANCES
This document sets out the terms and conditions of the
product warranties for Residentia Group Appliances. It is
an important document. Please keep it with your proof of
purchase documents in a safe place for future reference
should you require service for your Appliance.
1. IN THIS WARRANTY
(a) ‘acceptable quality’ as referred to in clause 10 of this
warranty has the same meaning referred to in the ACL;
(b) ‘ACL’ means Trade Practices Amendment (Australian
Consumer Law) Act (No.2) 2010;
(c) ‘Appliance’ means any Residentia Group product
purchased by you accompanied by this document;
(d) ‘ASR’ means Residentia Group authorised service
representative;
(e) ‘Residentia Group’ means Residentia Group Pty Ltd
of 165 Barkly Ave, Burnley VIC 3121, ACN 600 546 656
in respect of Appliances purchased in Australia;
(f ) ‘major failure’ as referred to in clause 10 of this
warranty has the same meaning referred to in the ACL
and includes a situation when an Appliance cannot
be repaired or it is uneconomic for Residentia Group,
at its discretion, to repair an Appliance during the
Warranty Period;
(g) ‘Warranty Period’ means:
(i) where the Appliance is used for personal,
domestic or household use (i.e. normal
single family use) as set out in the instruction
manual, the Appliance is warranted against
manufacturing defects for 24 months, following
the date of original purchase of the Appliance;
(h) ‘you’ means the purchaser of the Appliance not having
purchased the Appliance for re-sale, and ‘your’ has a
corresponding meaning.
2. This warranty only applies to Appliances purchased
and used in Australia and is in addition to (and does
not exclude, restrict, or modify in any way) any
non-excludable statutory warranties in Australia.
3. During the Warranty Period Residentia Group or its
ASR will, at no extra charge if your Appliance is readily
accessible for service, without special equipment and
subject to these terms and conditions, repair or replace
any parts which it considers to be defective. Residentia
Group or its ASR may use remanufactured parts to
repair your Appliance. You agree that any replaced
Appliances or parts become the property of Residentia
Group. This warranty does not apply to light globes,
batteries, lters or similar perishable parts.
4. Parts and Appliances not supplied by Residentia Group
are not covered by this warranty.
Warranty Information
ITLWG6-8_Manual_V1.0.indd 18 8/5/19 1:27 pm

inalto.com.au
19
5. You will bear the cost of transportation, travel and
delivery of the Appliance to and from Residentia Group
or its ASR. If you reside outside of the service area,
you will bear the cost of:
(a) travel of an authorised representative;
(b) transportation and delivery of the Appliance to and
from Residentia Group or its ASR, in all instances,
unless the Appliance is transported by Residentia
Group or its ASR, the Appliance is transported at
the owner’s cost and risk while in transit to and from
Residentia Group or its ASR.
6. Proof of purchase is required before you can make
a claim under this warranty.
7. You may not make a claim under this warranty unless
the defect claimed is due to faulty or defective parts
or workmanship. Residentia Group is not liable in the
following situations (which are not exhaustive):
(a) the Appliance is damaged by:
(i) accident
(ii) misuse or abuse, including failure to properly
maintain or service
(iii) normal wear and tear
(iv) power surges, electrical storm damage or
incorrect power supply
(v) incomplete or improper installation
(vi) incorrect, improper or inappropriate operation
(vii) insect or vermin infestation
(viii) failure to comply with any additional instructions
supplied with the Appliance;
(b) the Appliance is modied without authority from
Residentia Group in writing;
(c) the Appliance’s serial number or warranty seal has
been removed or defaced;
(d) the Appliance was serviced or repaired by anyone
other than Residentia Group, an authorised repairer
or ASR.
8. This warranty, the contract to which it relates and the
relationship between you and Residentia Group are
governed by the law applicable where the Appliance
was purchased.
9. To the extent permitted by law, Residentia Group
excludes all warranties and liabilities (other than as
contained in this document) including liability for any
loss or damage whether direct or indirect arising from
your purchase, use or non use of the Appliance.
10. For Appliances and services provided by Residentia
Group in Australia, the Appliances come with a
guarantee by Residentia Group that cannot be
excluded under the Australian Consumer Law. You
are entitled to a replacement or refund for a major
failure and for compensation for any other reasonably
foreseeable loss or damage. You are also entitled
to have the Appliance repaired or replaced if the
Appliance fails to be of acceptable quality and the
failure does not amount to a major failure. The benets
to you given by this warranty are in addition to your
other rights and remedies under a law in relation to the
Appliances or services to which the warranty relates.
11. At all times during the Warranty Period, Residentia
Group shall, at its discretion, determine whether repair,
replacement or refund will apply if an Appliance has a
valid warranty claim applicable to it.
12. To enquire about claiming under this warranty, please
follow these steps:
(a) carefully check the operating instructions, user manual
and the terms of this warranty;
(b) have the model and serial number of the Appliance
available;
(c) have the proof of purchase (e.g. an invoice) available;
(d) telephone the numbers shown below.
13. You accept that if you make a warranty claim,
Residentia Group and its ASR may exchange
information in relation to you to enable Residentia
Group to meet its obligations under this warranty.
IMPORTANT
Before calling for service, please ensure that the steps
in point 12 have been followed.
→ Service: Please call 1300 11 HELP (4357)
The Australian Consumer Law requires the inclusion of the following statement with this warranty: Our goods come with guarantees that cannot
be excluded under the Australian Consumer Law. You are entitled to a replacement or refund for a major failure and for compensation for any other
reasonably foreseeable loss or damage. You are also entitled to have the goods repaired or replaced if the goods fail to be of acceptable quality and the
failure does not amount to a major failure.
ITLWG6-8_Manual_V1.0.indd 19 8/5/19 1:27 pm

TEL. 1300 11 4357
SUPPORT@RESIDENTIAGROUP.COM.AU
WWW.RESIDENTIA.GROUP
AN INITIATIVE BY RESIDENTIA GROUP
ITLWG6-8_Manual_V1.0.indd 20 8/5/19 1:27 pm
This manual suits for next models
1
Table of contents
Other Inalto Washer manuals


