Inalto CLASSIQUE IFLW50 User manual

USER MANUAL
V 1.0
MODEL
IFLW50
5KG FRONT LOAD
WASHING MACHINE

User Manual
02
Congratulations on purchasing your new appliance!
The InAlto brand is proudly distributed within Australia by esidentia
Group Pty Ltd and within New Zealand by Applico Ltd.
Please refer to the warranty card at the rear of this manual for
information regarding your product’s parts and labour warranty, or visit
online at:
– www.residentia.group
– www.applico.co.nz
– www.inalto.house
Both esidentia Group & Applico are customer obsessed and our
Support Teams are there to ensure you get the most out of your
appliance. Should you want to learn more about recommended usage,
the various features of your appliance, and importantly taking care of
the unit when cleaning, our Support Teams are here to help.
Telephone Contacts:
– AU: 1300 11 4357
– NZ: 0800 763 448
It is important that you read through the following use and care manual
thoroughly to familiarise yourself with the installation and operation
requirements of your appliance to ensure optimum performance.
Again, thank you for choosing an InAlto appliance and we look forward
to being of service to you.
Residentia Group Pty Ltd
ACN. 600 546 656
165 Barkly Avenue
Burnley, Victoria
Australia 3121
—
Applico Ltd
635 Great South Road
Penrose, Auckland 1061
New Zealand
Welcome

inalto.house
03
02
Welcome
04
Safety
Instructions
Contents
06
Installation
Instructions
08
Your InAlto
Washing
Machine
11
Quick
Start Guide
12
Operation
Instructions
14
Cleaning &
Maintenance
16
Troubleshooting
17
Technical
Specications
18
Receipt
19
Purchase Details
20
Warranty
Information

User Manual
04
Safety Instructions
CONDITIONS OF USE
• This appliance is intended to be used in household and
similar applications such as farm houses or by clients
in serviced apartments, holiday apartments and other
residential type environments.
SAFETY INSTRUCTIONS
• Before the installation and use of the appliance,
carefully read the supplied instructions.
• The manufacturer is not responsible if an incorrect
installation and use causes injuries and damages.
• Always keep the instructions with your appliance for
future reference.
• For your safety,the information in this manual must be
followed to minimise the risk of re or explosion, electric
shock, or to prevent property damage, personal injury
or loss of life.
• You will see the following in your manual:
WARNING: This indicates a potentially dangerous
situation which may result in death or serious injuries.
CAUTION: This indicates a potentially dangerous
situation which may result in slight or minor injuries
or damage to property and the environment.
NOTE: This indicates a potentially dangerous situation
which may result in damaging the appliance or minor
injuries.
ELECTRICAL CONNECTION
WARNING: Risk of re or electrical shock!
• If the supply cord is damaged, it must be replaced by
the manufacturer, its service agent or similarly qualied
persons in order to avoid a hazard.
• The new hose-sets supplied with the appliance are to be
used and that old hose-sets should not be reused.
• Before any maintenance the device, unplug the
appliance from the mains.
• Always unplug the machine and turn o the water
supply after use. The max. inlet water pressure, in
pascals. The min. inlet water pressure, in pascals.
• To ensure your safety, power plug must be inserted into
an earthed three-pole socket. Check carefully and make
sure that your socket is properly and reliably earthed.
• Make sure that the water and electrical devices must
be connected by a qualied technician in accordance
with the manufacturer's instructions and local safety
regulations.
CHILDREN & VULNERABLE PEOPLE SAFETY
WARNING: Risk of suocation, injury or permanent
disability.
• This appliance can be used by children aged from
8 years and above and persons with reduced physical,
sensory or mental capabilities or lack of experience
and knowledge if they have been given supervision
or instruction for the operation of the appliance by a
person who is responsible for their safety.
• Do not let children play with the appliance.
• Keep all packaging away from children.
• Keep all detergents away from children.
• Keep children and pets away from the appliance door
when it is open.
• Cleaning and user maintenance shall not be made by
children without supervision.
• Glass door may be very hot during the operation. Keep
kids and pets far away from the machine during the
operation very wet rooms as well as in the rooms with
explosive or caustic gas.
WARNING: Risk of explosion!
Do not wash or dry articles that have been cleaned in,
washed in, soaked in, or dabbed with combustible or
explosive substances (such as wax, oil, paint, gasoline,
degreasers, dry-cleaning solvents, kerosene, etc.) This
may result in re or explosion
• Thoroughly rinse items of washing by hand beforehand.
INSTALLATION
• Remove all the packaging.
NOTE: Remove all packages and transport bolts before
using the appliance. Otherwise, serious damage may result.
• Do not install or use a damaged appliance.
• Plug must be accessible after installation.
• Make sure that the oor where you install the appliance
is at, stable, heat resistant and clean.
• Plug must be accessible after installation
• This washing machine is for indoor use only
• It is not intended to be installed built-in.
• When the appliance is put in its permanent position,
check if it is fully level with the aid of a spirit level. If it is
not, adjust the feet until it is.
• Washing machine should not be installed in bathrooms
or very wet rooms as well as in the rooms with explosive
or caustic gases.
• The washing machine with single inlet valve only can be
connected to the cold water supply. The product with
double inlet valves should be correctly connected to the
hot water and cold water supply.

inalto.house
05
APPLIANCE USE
WARNING: Risk of re, explosion, electric shock or
damage to the appliance.
•
• Use this appliance in a household only.
• Before operating this appliance, ensure that all
packaging and transport bolts have been removed.
Otherwise, serious damage can occur to the appliance.
• Before washing any clothes for the rst time, the
washing machine should be operated for one whole
cycle without any clothes inside.
• Do not climb up or sit on top of the appliance.
• Do not change the specication of this appliance.
• If you use fabric softener or similar products, obey the
instructions on the packaging.
• Do not sit or stand on the open door.
• Obey the maximum load volume of 5.0 kg
(refer to the “Programme chart” chapter).
• Ensure all objects are removed from clothing pockets
such as lighters and matches.
• Please only use front load washing machine detergents.
Flammable and explosive or toxic solvents are forbidden
for use with this appliance. Gasoline and alcohol should
not be used as a detergent.
• Please check whether the water inside the drum has
been drained before opening its door. Please do not
open the door if there is any water visible.
• Be careful to avoid burns when the machine drains hot
washing water.
• Never rell the water by hand during washing.
• After a wash program completes, please wait two
minutes before opening the door.
• If a tumble dryer is installed on top of the washing
machine, use the suitable stacking kit. The stacking kit,
available from your authorized vendor, can be used only
with the appliance specied in the instructions, supplied
with the accessory. Read it carefully before installation
(Refer to the Installation leaet).
• Please do not close the machine door with excessive
force and if you nd it dicult to close the door, ensure
that the clothing load isn’t excessive.
TRANSPORT
• Always move the appliance cautiously. Do not use the
machine door or the handle of the detergent dispenser,
to lift the appliance.
• Transportation bolts should be reinstalled within the
machine by a specialised person, prior to transporting
the appliance.
• Ensure that all accumulated water is drained from the
appliance before moving.
CARE & CLEANING
WARNING: Risk of injury or damage to the appliance.
• Before maintenance, deactivate the appliance and
disconnect the mains plug.
• Do not use water spray and steam to clean the
appliance.
• Clean the appliance with a moist soft cloth. Only use
neutral detergents. Do not use abrasive products,
abrasive cleaning pads, solvents or metal objects.
PRODUCT DISPOSAL
• Disconnect the appliance from the mains supply.
• Cut o the mains cable and discard it.
• Remove the door catch to prevent children and pets to
get closed in the appliance.
User Manual
06
Installation Instructions
INSTALLATION POSITIONING
WARNING:
• Stability is important to prevent the product from
wandering!
• Make sure that the appliance is not installed on top of
the power cord.
• Ensure that your appliance is installed on solid and
at ground, in a level position.
• Please do not place the appliance on a slope, soft carpet
or wooden oor.
• Your appliance should only be installed within an
internal environment.
• Do not install the appliance outdoors, in direct sunlight
or near heat resources such as coal or gas.
• Ensure there is sucient amount of ventilation and the
room temperature is about 0 °C.
UNPACKING THE WASHING MACHINE
WARNING:
• Packaging material (e.g. Films, Styrofoam) can be
dangerous for children.
• There is a risk of suocation! Keep all packaging well
away from children.
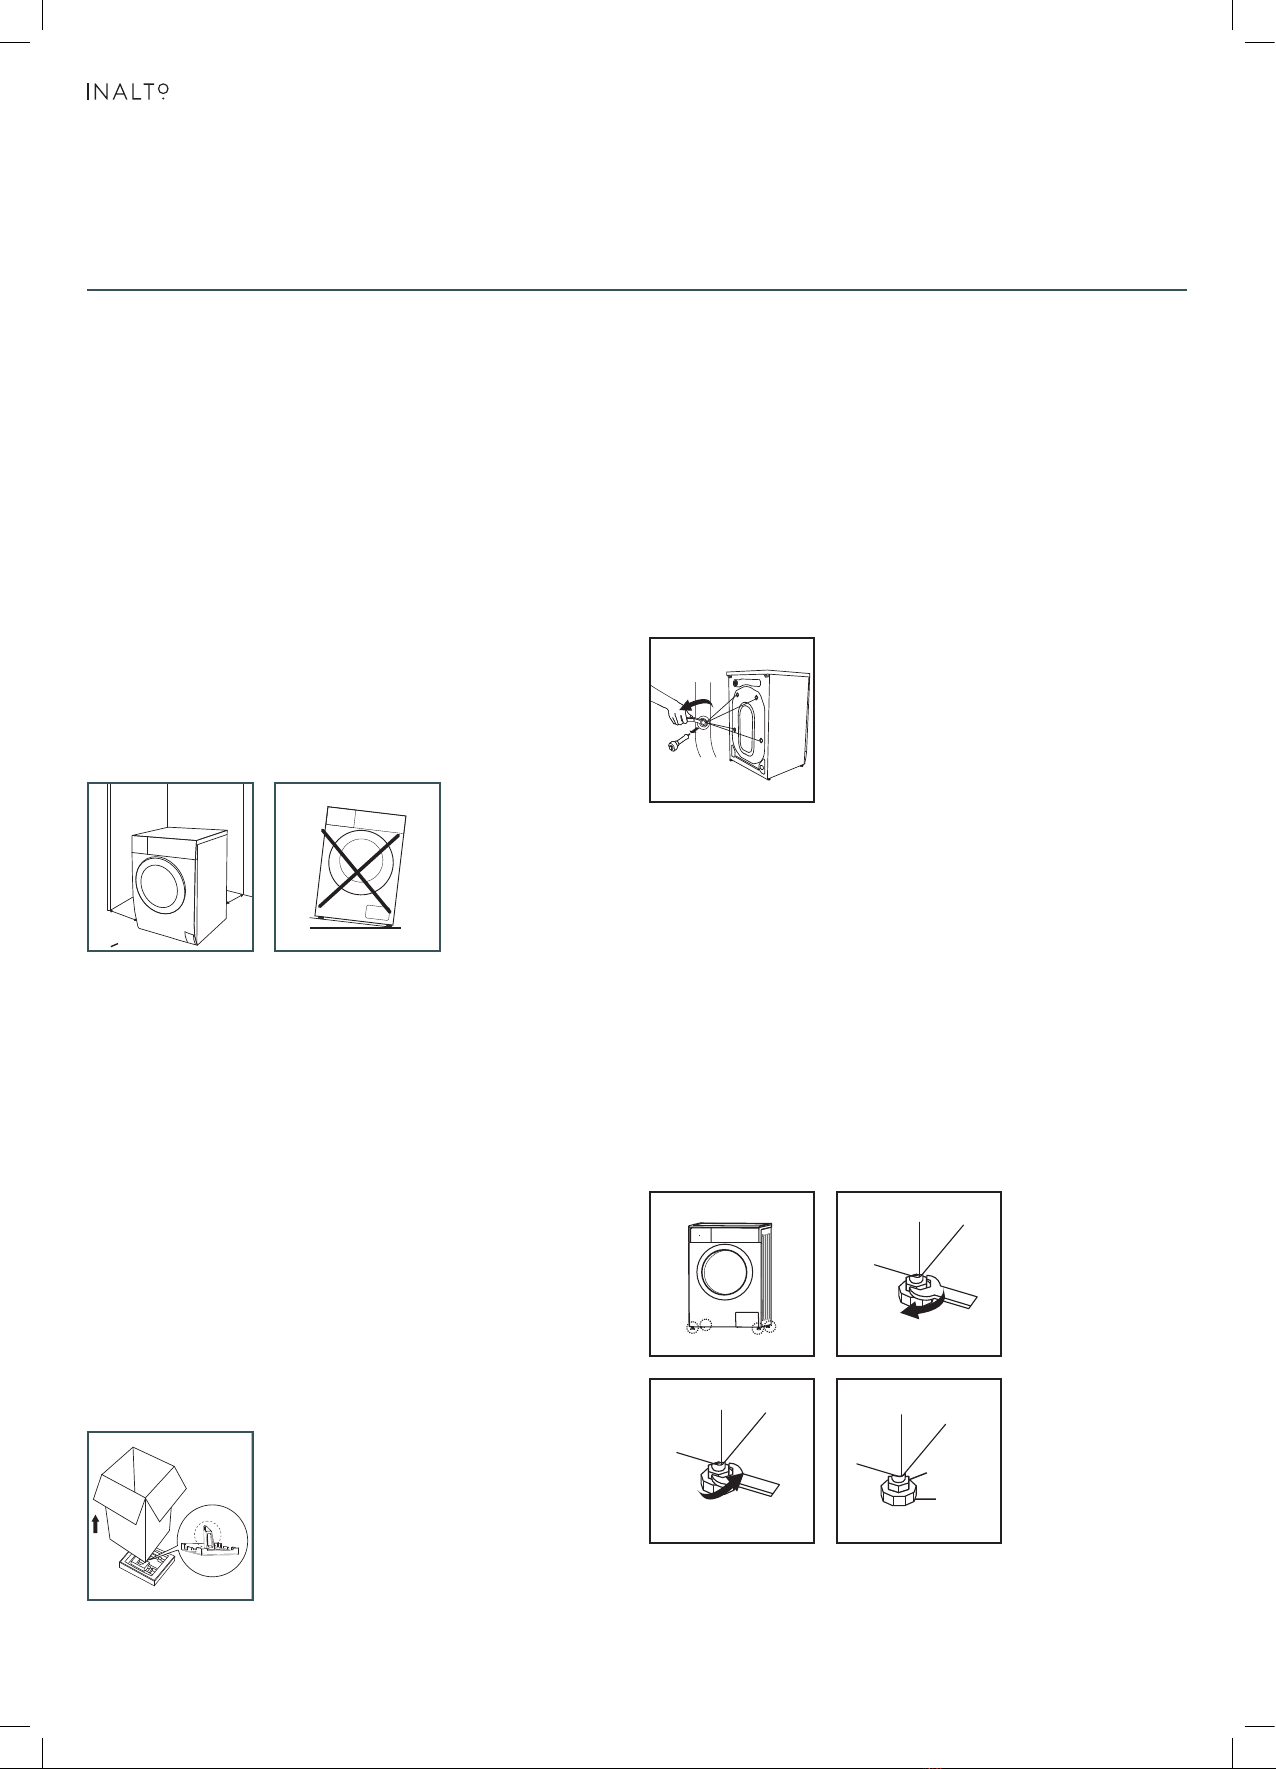
1. Remove the cardboard box and Styrofoam packing.
2. Lift the washing machine and remove the base packing.
Make sure the small triangle foam is removed with the
bottom one together. If not, lay the unit down with
side surface, then remove the small foam from the unit
bottom manually.
3. Remove the tape securing the power supply cord and
drain hose.
4. Remove the inlet hose from the drum.
REMOVING THE TRANSPORTATION BOLTS
WARNING:
• You must remove the transport bolts from the rear of the
appliance before using the product.
• You’ll need the transport bolts again if you move the
appliance, so make sure you keep them in a safe place.
Please take the following steps to remove the bolts:
• Loosen all bolts with a spanner and then remove them.
• Use the plugs (supplied) to plug the holes.
• Keep the transport bolts for future use.
LEVELLING THE WASHING MACHINE
WARNING:
• The lock nuts on all four feet must be screwed tightly
against the housing.
• Check if the legs are closely attached to the cabinet.
If not, please turn them to their original positions tighten
the nuts.
• Loosen the lock nut turn the feet until it closely contacts
with the oor.
• Adjust the legs and lock them with a spanner, make sure
the machine is steady.
Installation
Before installing the machine, the location characterized
follows shall be selected:
1.Rigid, dry, and level surface
2.Avoid direct sunlight
3.Sufficient ventilation
4.Room temperature is above 0℃
5.Keep far away from the heat resources such as coal or gas.
as
Unpacking the washing machine
1. Remove the cardboard box and styrofoam packing.
2. Lift the washing machine and remove the base packing.
3. Remove the tape securing the power supply cord and drain hose.
4. Remove the inlet hose from the drum.
Make sure the small triangle
foam is removed with the bottom one together. If not, lay the unit down with side
surface, then remove the small foam from the unit bottom manually.
Please take the following steps to remove the bolts:
1.Loosen 4 bolts with spanner and then remove them.
2.Stop the holes with transport hole plugs.
3.Keep the transport bolts properly for future use.
Remove transport bolts
•
•
Stability is important to prevent the product from
wandering!
Make sure that the product should not stand on
the power cord.
Warning!
!!
•
•
Packaging material (e.g. Films, Styrofoam) can be
dangerous for children.
There is a risk of suffocation ! Keep all packaging
well away from children.
Warning!
!!
•
• product
you
You must remove the transport bolts from the backside before using the product.
You’ll need the transport bolts again if you move the , so make sure
keep them in a safe place.
Warning!
!!
8
INSTALLATION
w
w
W> 20mm
Installation area
1.Check if the legs are closely attached to the cabinet. If not, please turn them to
their original positions tighten the nuts.
2.Loosen the lock nut turn the feet until it closely contacts with the floor.
3.Adjust the legs and lock them with a spanner, make sure the machine is steady.
Levelling the washing machine
• The lock nuts on all four feet must be screwed tightly against the housing.
Connect Water Supply Hose
Connect the inlet pipe as indicated, There are two ways to connect the inlet pipe.
1.Connection between ordinary tap and inlet hose.
• To prevent leakage or water damage, follow the instructions in this chapter
Do not kink, crush, modify or sever .
!
• water inlet hose
• For the model equips hot valve,connect it to hot water tap with hot water supply
hose. Energy consumption will decrease automatically for some program.
234
1
Raise Lower
Lock nut
foot
Warning!
!!
Warning!
!!
9
9
INSTALLATION
Loosen clamp nut and
four bolts
Tighten clamp nut Press slide bushing,
insert inlet hose into
connecting base
slide bushing
2341
Connection finished
clamp nut
Tap with threads and inlet hose Special tap for washing machine
2.Connection between screw tap and inlet hose.
slide bushing
1.Check if the legs are closely attached to the cabinet. If not, please turn them to
their original positions tighten the nuts.
2.Loosen the lock nut turn the feet until it closely contacts with the floor.
3.Adjust the legs and lock them with a spanner, make sure the machine is steady.
Levelling the washing machine
• The lock nuts on all four feet must be screwed tightly against the housing.
Connect Water Supply Hose
Connect the inlet pipe as indicated, There are two ways to connect the inlet pipe.
1.Connection between ordinary tap and inlet hose.
• To prevent leakage or water damage, follow the instructions in this chapter
Do not kink, crush, modify or sever .
!
• water inlet hose
• For the model equips hot valve,connect it to hot water tap with hot water supply
hose. Energy consumption will decrease automatically for some program.
234
1
Raise Lower
Lock nu
t
foot
Warning!
!!
Warning!
!!
9
9
INSTALLATION
Loosen clamp nut and
four bolts
Tighten clamp nut Press slide bushing,
insert inlet hose into
connecting base
slide bushing
2341
Connection finished
clamp nut
Tap with threads and inlet hose Special tap for washing machine
2.Connection between screw tap and inlet hose.
slide bushing
1
3
2
4

inalto.house
07
CONNECTING THE WATER SUPPLY HOSE
WARNING:
• To prevent leakage or water damage, follow the
instructions in this chapter!
• Do not kink, crush, modify or sever water inlet hose.
• For models which equips hot valve, connect it to
hot water tap with hot water supply hose. Energy
consumption will decrease automatically for some
programs.
Connect the inlet pipe as indicated.
There are two ways to connect the inlet pipe:
1. Connection between ordinary tap and inlet hose.
2. Connection between screw tap and inlet hose.
THE DRAIN HOSE
WARNING:
• Do not kink or protract the drain hose
• Position drain hose properly, otherwise damage might
result of water leakage.
There are two ways to place the end of drain hose:
NOTE:
• If the machine has drain hose support, please install it
like the following:
WARNING:
• When installing drain hose, x it properly with a rope.
• If drain hose is too long, do not force it into washing
machine as it will cause abnormal noises.
1.Check if the legs are closely attached to the cabinet. If not, please turn them to
their original positions tighten the nuts.
2.Loosen the lock nut turn the feet until it closely contacts with the floor.
3.Adjust the legs and lock them with a spanner, make sure the machine is steady.
Levelling the washing machine
• The lock nuts on all four feet must be screwed tightly against the housing.
Connect Water Supply Hose
Connect the inlet pipe as indicated, There are two ways to connect the inlet pipe.
1.Connection between ordinary tap and inlet hose.
• To prevent leakage or water damage, follow the instructions in this chapter
Do not kink, crush, modify or sever .
!
• water inlet hose
• For the model equips hot valve,connect it to hot water tap with hot water supply
hose. Energy consumption will decrease automatically for some program.
234
1
Raise Lower
Lock nut
foot
Warning!
!!
Warning!
!!
9
9
INSTALLATION
Loosen clamp nut and
four bolts
Tighten clamp nut Press slide bushing,
insert inlet hose into
connecting base
slide bushing
2341
Connection finished
clamp nut
Tap with threads and inlet hose Special tap for washing machine
2.Connection between screw tap and inlet hose.
slide bushing
1.Check if the legs are closely attached to the cabinet. If not, please turn them to
their original positions tighten the nuts.
2.Loosen the lock nut turn the feet until it closely contacts with the floor.
3.Adjust the legs and lock them with a spanner, make sure the machine is steady.
Levelling the washing machine
• The lock nuts on all four feet must be screwed tightly against the housing.
Connect Water Supply Hose
Connect the inlet pipe as indicated, There are two ways to connect the inlet pipe.
1.Connection between ordinary tap and inlet hose.
• To prevent leakage or water damage, follow the instructions in this chapter
Do not kink, crush, modify or sever .
!
• water inlet hose
• For the model equips hot valve,connect it to hot water tap with hot water supply
hose. Energy consumption will decrease automatically for some program.
234
1
Raise Lower
Lock nut
foot
Warning!
!!
Warning!
!!
9
9
INSTALLATION
Loosen clamp nut and
four bolts
Tighten clamp nut Press slide bushing,
insert inlet hose into
connecting base
slide bushing
2341
Connection finished
clamp nut
Tap with threads and inlet hose Special tap for washing machine
2.Connection between screw tap and inlet hose.
slide bushing
1
Loosen clamp nut
and four bolts
Press slide bushing,
insert inlet hose
into connecting
base
Tap with threads and inlet hose
Special tap for washing machine
Tighten clamp nut
Connect the other end of inlet pipe to the inlet valve at the
backside of product and fasten the pipe tightly clockwise.
Connection nished
3
2
4
Warning!
!!
10
Drain Hose
There are two ways to place the end of drain hose:
1.Put it into the water trough. 2.Connect it to the branch drain pipe of
the trough.
•
• If drain hose is too long, do not force it into washing machine as it will cause
abnormal noises.
When installing drain hose, fix it properly with a rope.
•
• Position drain hose properly ,otherwise damage might result of water leakage.
Do not kink or protract the drain hose.
Water
trough
Min.60cm
100cm
Max.
Trough
Hose Retainer
Bind
Max.100cm
Min.60cm
Min.60cm
Max.100cm
If the machine has • drain hose support, please install it like the following .
Warning!
!!Warning!
!!
Note!
10
INSTALLATION
water supply hose
water Inlet valve
Connect the other end of inlet pipe to the inlet valve at the backside of product
and fasten the pipe tightly clockwise.
Warning!
!!
10
Drain Hose
There are two ways to place the end of drain hose:
1.Put it into the water trough. 2.Connect it to the branch drain pipe of
the trough.
•
• If drain hose is too long, do not force it into washing machine as it will cause
abnormal noises.
When installing drain hose, fix it properly with a rope.
•
• Position drain hose properly ,otherwise damage might result of water leakage.
Do not kink or protract the drain hose.
Water
trough
Min.60cm
100cm
Max.
Trough
Hose Retainer
Bind
Max.100cm
Min.60cm
Min.60cm
Max.100cm
If the machine has • drain hose support, please install it like the following .
Warning!
!!Warning!
!!
Note!
10
INSTALLATION
water supply hose
water Inlet valve
Connect the other end of inlet pipe to the inlet valve at the backside of product
and fasten the pipe tightly clockwise.

User Manual
08
Means must ○ Means optional
Detergent Dispenser
Pre wash detergent
Main wash detergent
Softener
II
I
Pull out the dispenser
Liquid detergent Powder detergent
Caution!
• Detergent only need to be added in "case I “after selecting pre-washing
for machines with this function.
10
13
OPERATIONS
Dam-board Dam-board
Programme
Cotton Eco 40 °C
Cotton Eco 60 °C
Cotton
Cotton 20 °C
Cotton 30 °C
Cotton 40 °C
Cotton 60 °C
Cotton 90 °C
Synthetic
Synthetic 40 °C
Synthetic 60 °C
Drum Clean
Programme
Spin Only
Drain Only
Rinse&Spin
Delicate 30 °C
Delicate
Ends in 9H
Ends in 6H
Ends in 3H
Daily Wash 45'
Daily Wash 30'
Daily Wash 15'
Model:MFE50-S1202/A07-AU(2) MFE60-S1202/A07-AU(25) MFE75-S1202/A07-AU(25)
DETERGENT DISPENSER
I Pre-wash detergent.
II Main detergent compartment.
Fabric softener compartment.
PRODUCT DESCRIPTION
Your InAlto Washing Machine
Detergent Dispenser
Transport Hole
Plugs
Liquid detergent Powder detergent Pull out the dispenser
Cold Water
Supply Hose
Drain Hose
Support
User Manual
Control Panel
Power Supply Plug
Drain Hose
Service Filter
Drum
Door
NOTE: This diagram is indicative
for your reference only
NOTE:
Please see table on page 11 for detergent use recommendations
Water Supply Hose
ACCESSORIES
7
Accessories
Product Description
Transport
plughole
Supply hose hot
water (optional)
Supply hose
cold water
Drain hose
(optional
support
)
• The product line chart is for reference only, please refer to real product as
standard.
Note!
Drum
Power supply cord
Control panel
Detergent dispenser
Service filter
Door
Water supply hose
Top cover
Drain hose
Owner’s manual
INSTALLATION
Means must ○ Means optional
Detergent Dispenser
Pre wash detergent
Main wash detergent
Softener
II
I
Pull out the dispenser
Liquid detergent Powder detergent
Caution!
• Detergent only need to be added in "case I “after selecting pre-washing
for machines with this function.
10
13
OPERATIONS
Dam-board
Dam-board
Programme
Cotton Eco 40 °C
Cotton Eco 60 °C
Cotton
Cotton 20 °C
Cotton 30 °C
Cotton 40 °C
Cotton 60 °C
Cotton 90 °C
Synthetic
Synthetic 40 °C
Synthetic 60 °C
Drum Clean
Programme
Spin Only
Drain Only
Rinse&Spin
Delicate 30 °C
Delicate
Ends in 9H
Ends in 6H
Ends in 3H
Daily Wash 45'
Daily Wash 30'
Daily Wash 15'
Model:MFE50-S1202/A07-AU(2) MFE60-S1202/A07-AU(25) MFE75-S1202/A07-AU(25)
Means must ○ Means optional
Detergent Dispenser
Pre wash detergent
Main wash detergent
Softener
II
I
Pull out the dispenser
Liquid detergent Powder detergent
Caution!
• Detergent only need to be added in "case I “after selecting pre-washing
for machines with this function.
10
13
OPERATIONS
Dam-board Dam-board
Programme
Cotton Eco 40 °C
Cotton Eco 60 °C
Cotton
Cotton 20 °C
Cotton 30 °C
Cotton 40 °C
Cotton 60 °C
Cotton 90 °C
Synthetic
Synthetic 40 °C
Synthetic 60 °C
Drum Clean
Programme
Spin Only
Drain Only
Rinse&Spin
Delicate 30 °C
Delicate
Ends in 9H
Ends in 6H
Ends in 3H
Daily Wash 45'
Daily Wash 30'
Daily Wash 15'
Model:MFE50-S1202/A07-AU(2) MFE60-S1202/A07-AU(25) MFE75-S1202/A07-AU(25)
7
Accessories
Product Description
Transport
plughole
Supply hose hot
water (optional)
Supply hose
cold water
Drain hose
(optional
support
)
• The product line chart is for reference only, please refer to real product as
standard.
Note!
Drum
Power supply cord
Control panel
Detergent dispenser
Service filter
Door
Water supply hose
Top cover
Drain hose
Owner’s manual
INSTALLATION
inalto.house
09
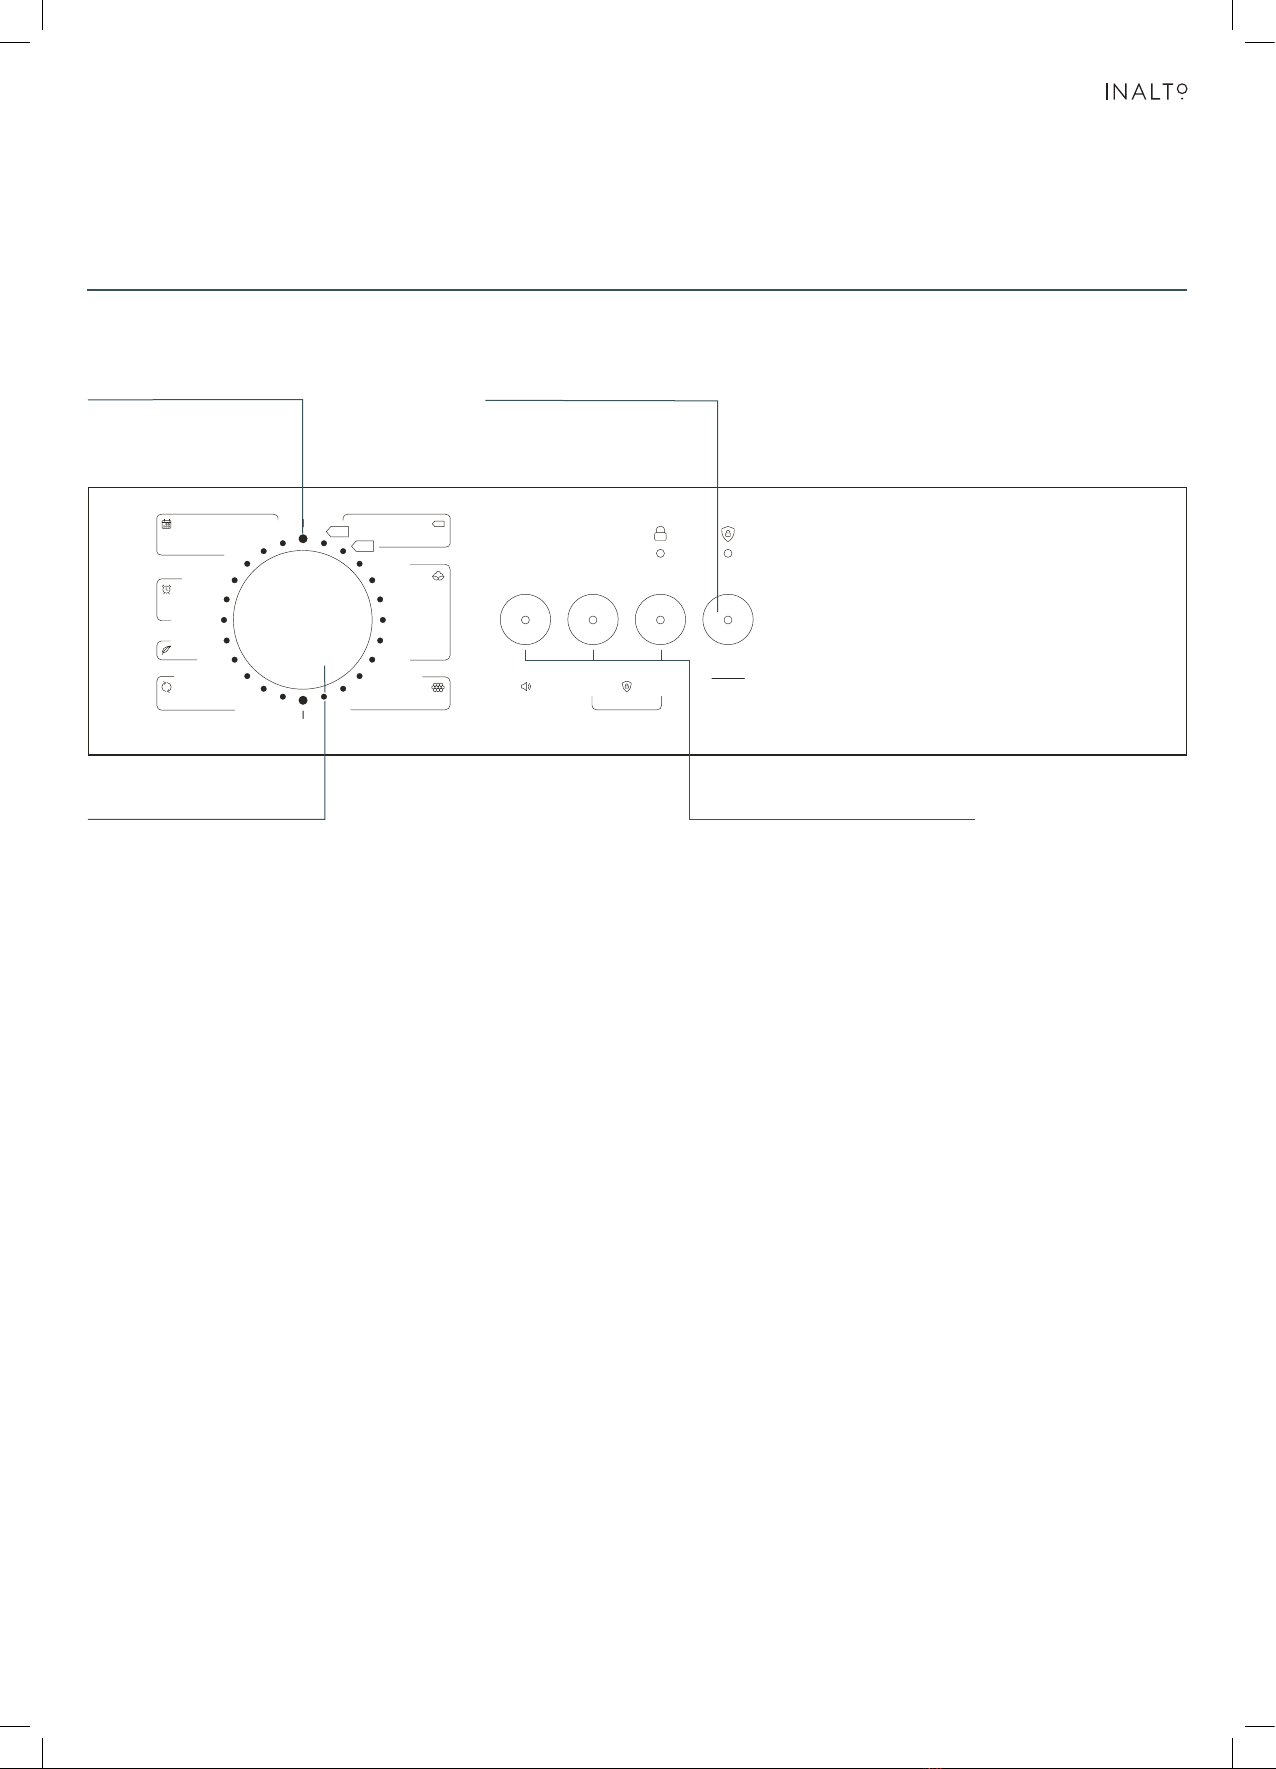
O Start / Pause
Program Selector Additional Options
CONTROL PANEL
Product is switched o Press the button to start
or pause the wash cycle
Turn the dial to select your
desired wash cycle program
These buttons will allow you to
select additional wash functions
and will light up when selected
40˚C
60˚C
90˚C30˚C
60˚C
Delicate
Daily Wash Cotton Eco
40˚C
30˚C
20˚C
9 Hours
6 Hours
3 Hours
Cotton
40˚C
60˚C
Child Lock
40˚C
Synthetic
Spin Only
Press 3 sec.
Prewash Extra
Rinse
No
Spin Pause
Start
OFF
Drum Clean
Drain Only
Rinse & Spin
15’
45’
30’
ADDITIONAL OPTIONS
Prewash:
The Prewash function can get an extra wash before main wash,it is suitable for
washing the dust rises to surface of the clothes. You need to put detergent into
the Case (I) when select it.
Extra Rinse:
The laundry will undergo one extra rinse when choosing this option.
No Spin:
The machine will not spin if you choose this function.
Mute:
Hold the Prewash button down for 3 seconds to mute the machine's alert.
Perform the same action again to unmute. The machine will keep this setting until
the next reset.
Child Lock:
After selecting your desired wash programs and start the cycle, hold the
Extra Rinse and No Spin buttons at the same time for 3 seconds to activate
Child Lock. Perform the same action again to disable Child Lock.

User Manual
010
THIS PAGE IS INTENTIONALLY LEFT BLANK
inalto.house
11
Quick Start Guide
CAUTION:
• Before washing, please ensure all installation instructions are followed correctly!
• Please operate the washing machine with one full cycle without any clothes before washing
for the rst time.
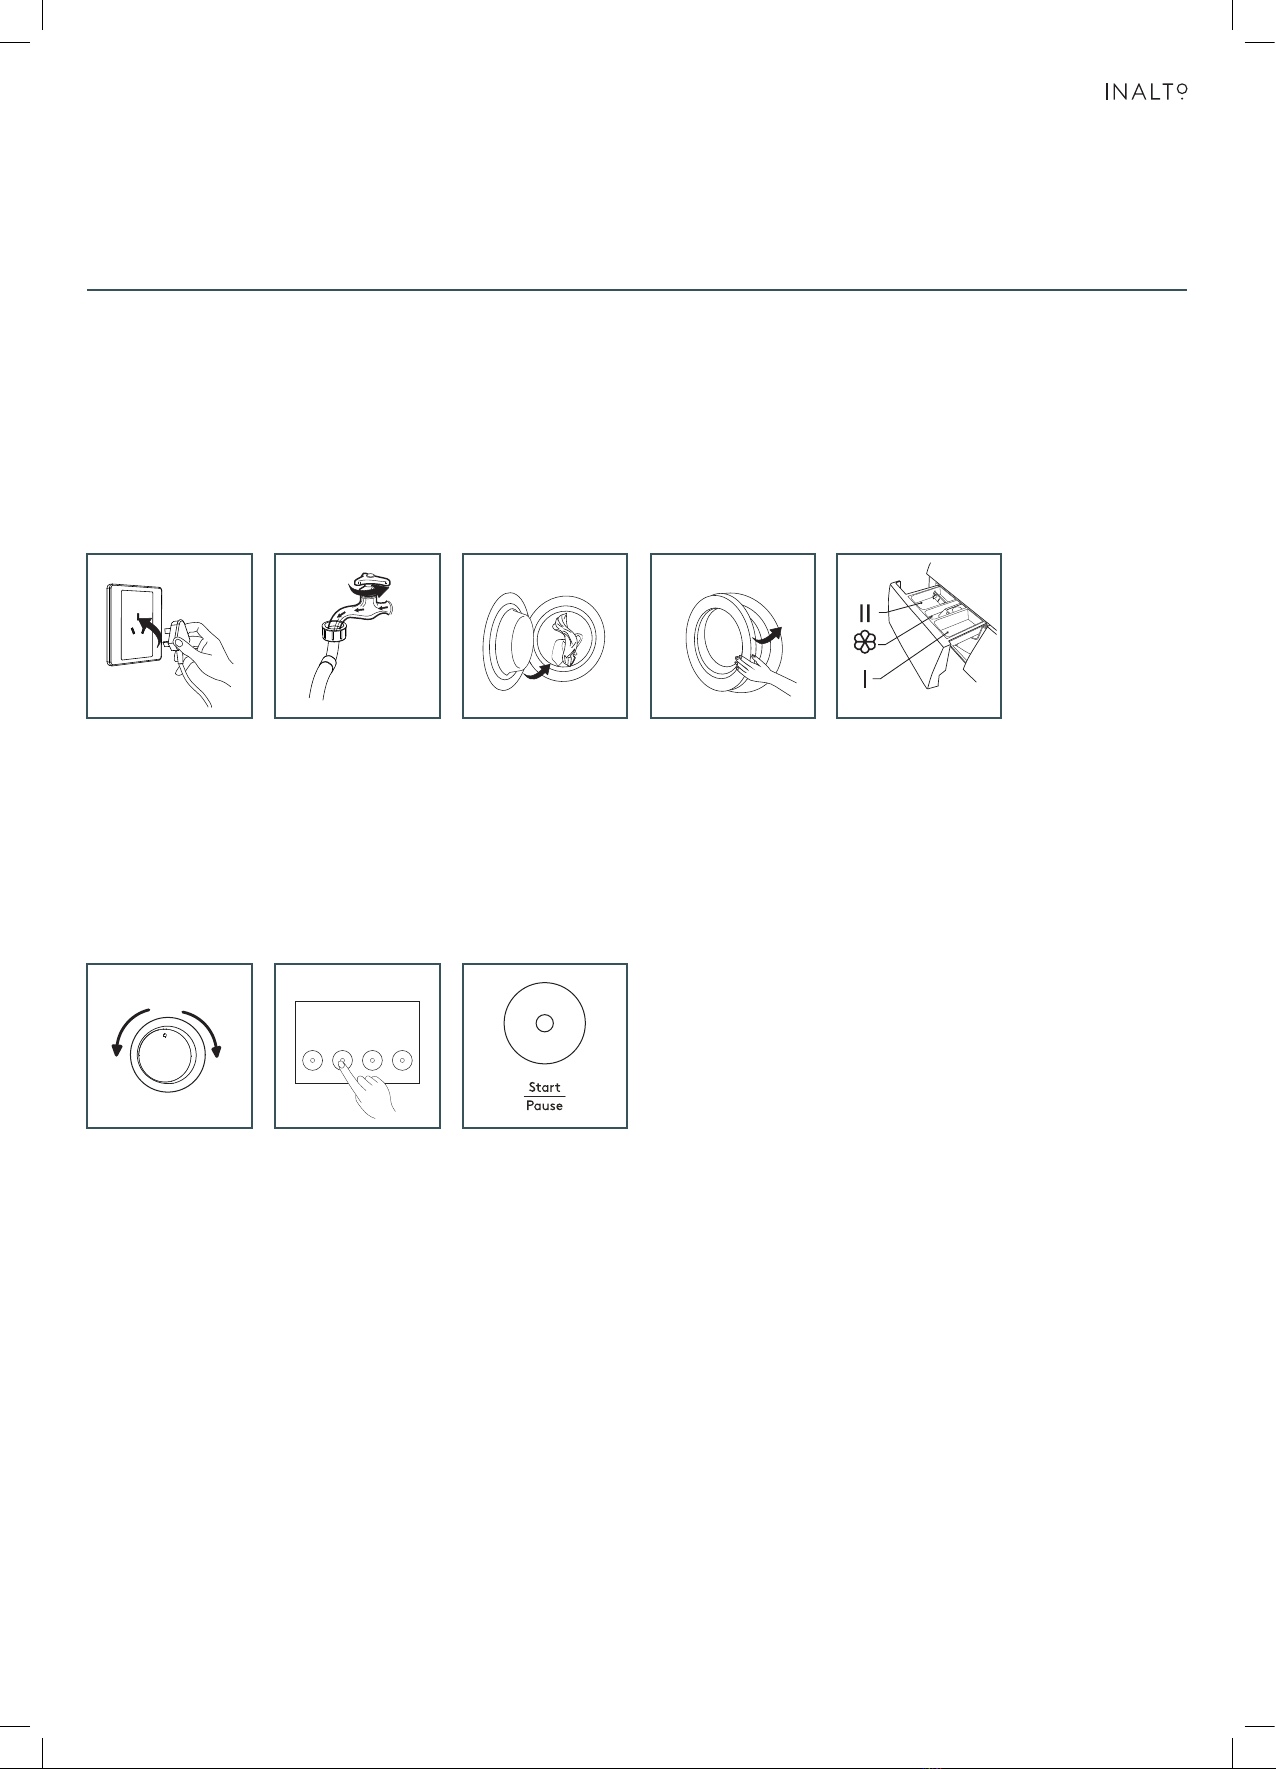
QUICK START:
Follow the procedure below to operate your washing machine.
1. Before washing:
NOTE:
Detergent only need to be added in "case I" after selecting pre-washing
for machines with this function.
2. Washing:
NOTE:
Step 2 can be skipped if you would like to run the default wash cycle.
3. After washing:
Depending on the washing machine model, it will alert or the buttons will ash
to indicate that the wash cycle has ended.
Plug it in Add detergentLoad
your washing
Open the tap Close the door
Before washing, please make sure it’s installed properly.
Before washing at first time, the washing machine shall be operated in one
of the whole procedures without clothes in as follows.
•
•
round
1. Before Washing
Buzzer beep or “End” or on display.two small points flash
Open tap
Load
Close door
Plug in
Add detergent
Quick Start
3. After Washing
• Detergent only need to be added in "case I “after selecting pre-washing for
machines with this function.
1122334455
2. Washing
Power On
Select Programme
Select function or
default
Start up
1 2 3 4
•
• 2.The function button line chart is for reference only, please refer to real product
as standard.
If default is selected, step 3 can be skipped.
Note!
Note!
Caution!
10
11
OPERATIONS
Main
wash
Prewash
Softener
1 532 4
Turn the dial
to your desired
wash cycle
program
Start the
wash cycle
Select any
extra additional
functions for your
wash cycle
Before washing, please make sure it’s installed properly.
Before washing at first time, the washing machine shall be operated in one
of the whole procedures without clothes in as follows.
•
•
round
1. Before Washing
Buzzer beep or “End” or on display.two small points flash
Open tap
Load
Close door
Plug in
Add detergent
Quick Start
3. After Washing
• Detergent only need to be added in "case I “after selecting pre-washing for
machines with this function.
1122334455
2. Washing
Power On
Select Programme
Select function or
default
Start up
1 2 3 4
•
• 2.The function button line chart is for reference only, please refer to real product
as standard.
If default is selected, step 3 can be skipped.
Note!
Note!
Caution!
10
11
OPERATIONS
Main
wash
Prewash
Softener
1 32

User Manual
12
Operation Instructions
PREPARATION BEFORE WASHING CLOTHES
Please follow these steps carefully to avoid trouble with your washing machine and damaging your clothing.
Washing Considerations
• The working condition of the washer should be between
0-40°C. If operated under 0°C,the inlet valve and
draining system may be damaged. If the machine is
placed under condition of 0°C or less, then it should be
transferred to normal ambient temperature to ensure
the water supply hose and drain hose are not frozen
before use.
• Please check the labels and the explanation of using
detergent before wash. Use non-foaming or
low-foaming detergent suitable for machine washing
properly.
• Always check the labels for laundry washing
recommendations
• Ensure all pockets are empty and there are no items in
them.
• Tie a knot in long strings, zip up zippers and do up
buttons.
• Place smaller items into a laundry bag.
• Turn easy-pilling and long-pile fabric inside out.
• Separate clothes of dierent textures.
WARNING:
• When washing a single clothes, it may easily cause great
eccentricity and give alarm due to great unbalance.
Therefore it is suggested to add one or two more
clothes to be washed together so that draining can be
done smoothly.
• Don’t washing the clothes in contact with kerosene,
gasoline, alcohol and other ammable materials.
Detergents
• Only use suitable front load washing machine
detergents with this appliance. Powders and liquid
detergents only.
• Only ever use the recommended quantity of detergent,
as per the manufacturer’s guidelines, as an excessive
quantity can cause excessive bubbles and overow to
occur.
• It can also result in detergent residue remaining on the
clothing after completion of the wash cycle.
• WARNING: Always keep detergents and additives out
of reach from children.
• CAUTION: Detergent only needs to be added in case "I"
after selecting the Prewash function.
• For the agglomerated or ropy detergent or additive,
before they are poured the detergent box, it is
suggested to use some water for dilution to prevent inlet
of detergent box from being blocked and overowing
while lling water.
• Please choose suitable type of detergent for the
various washing temperature to get the best washing
performance with less water and energy consumption.
Program III
Cotton Eco 40 °C —Required Optional
Cotton Eco 60 °C —Required Optional
Cotton Optional Required Optional
Cotton 20 °C Optional Required Optional
Cotton 30 °C Optional Required Optional
Cotton 40 °C Optional Required Optional
Cotton 60 °C Optional Required Optional
Cotton 90 °C Optional Required Optional
Synthetic Optional Required Optional
Synthetic 40 °C Optional Required Optional
Synthetic 60 °C Optional Required Optional
Drum Clean ———
Spin Only ———
Drain Only ———
Rinse & Spin — — Optional
Delicate 30 °C —Required Optional
Delicate —Required Optional
End in 9hrs —Required Optional
End in 6hrs —Required Optional
End in 3hrs —Required Optional
Daily Wash 45' —Required Optional
Daily Wash 30' —Required Optional
Daily Wash 15' —Required Optional
Means must ○ Means optional
Detergent Dispenser
Pre wash detergent
Main wash detergent
Softener
II
I
Pull out the dispenser
Liquid detergent Powder detergent
Caution!
• Detergent only need to be added in "case I “after selecting pre-washing
for machines with this function.
10
13
OPERATIONS
Dam-board Dam-board
Programme
Cotton Eco 40 °C
Cotton Eco 60 °C
Cotton
Cotton 20 °C
Cotton 30 °C
Cotton 40 °C
Cotton 60 °C
Cotton 90 °C
Synthetic
Synthetic 40 °C
Synthetic 60 °C
Drum Clean
Programme
Spin Only
Drain Only
Rinse&Spin
Delicate 30 °C
Delicate
Ends in 9H
Ends in 6H
Ends in 3H
Daily Wash 45'
Daily Wash 30'
Daily Wash 15'
Model:MFE50-S1202/A07-AU(2) MFE60-S1202/A07-AU(25) MFE75-S1202/A07-AU(25)

inalto.house
13
WASHING PROGRAMS
Selecting the main washing program depend on the types of
clothing to be washed, as follows:
Cotton
Hard-wearing textiles, heat-resistant textiles made of cotton
or linen.
Synthetic
Wash synthetic articles, for example: shirts, coats, blending.
While washing the knitting textiles, detergent quantity shall
be reduced due to its loose string construction and easily
forming bubbles.
Daily Wash
It is suitable for washing few and not very dirty clothes
quickly.
Cotton Eco
This procedure saves energy and limits the washing
temperature to 40°C or 60°C. To increase the washing
eects, washing time is increased.
Ends in
The function can be set with this program, the total time
including washing time and delaying time is 3h,6h or 9h.
Delicate
For delicate, washable textiles, e.g. made of silk, satin,
synthetic bers or blended fabrics.
Drum Clean
It applies 90 °C high temperature sterilisation to improve
the washing results. When this procedure is performed, the
clothes or other washing cannot be added. When proper
amount of chlorine bleaching agent is put in,the barrel
cleaning eect will be better. You can use this program
regularly according to your needs.
Spin Only
This procedure provides a spin only option. Residual soapy
water shall be drained out before spinning.
Rinse & Spin
This procedure provides a short rinse cycle followed by a
spin cycle.
Drain Only
This procedure provides a drain only option.
Mix
You can select this procedure wash the tough clothes, that
need much more time and strength. It is used for the daily
clothes for cotton, such as sheets, pillowcases bathrobe
andunderwear. Washing Programs Table
Program 5kg Load Temp. (ºC) Default Time
(6/7.5)
Cotton Eco 40ºC 5.0 40 1:39
Cotton Eco 60ºC 5.0 60 4:54
Cotton 5.0 Cold 1:35
Cotton 20ºC 5.0 20 1:19
Cotton 30ºC 5.0 30 1:20
Cotton 40ºC 5.0 40 1:40
Cotton 60ºC 5.0 60 1:45
Cotton 90ºC 5.0 90 2:40
Synthetic 2.5 Cold 1:18
Synthetic 40ºC 2.5 40 1:33
Synthetic 60ºC 2.5 60 1:43
Drum Clean —90 1:21
Spin Only 5.0 —0:12
Drain Only — — 0:01
Rinse & Spin 5.0 —0:31
Delicate 30ºC 2.5 30 1:00
Delicate 2.5 Cold 0:55
9 Hours 5.0 40 1:13
6 Hours 5.0 40 1:13
3 Hours 5.0 40 1:13
Daily Wash 45' 2.0 30 0:45
Daily Wash 30' 2.0 20 0:30
Daily Wash 15' 2.0 Cold 0:15
Note:
1. Energy test program: Cotton ECO 60°C, Speed: the
highest speed; Other as the default, Half load 2.5kg.
2. “Cotton ECO 60°C ” is the standard washing programs
to which the information in the label and the che
relates, and they are suitable to clean normally soiled
cotton laundry and that they are the most ecient
programs in terms of combined energy and water
consumptions for washing that type of cotton laundry,
that the actual water temperature may dier from the
declared cycle temperature.
3. The parameters in this table are only for user's
reference. The actual parameters maybe vary with the
parameters in above mentioned table.

User Manual
14
Cleaning & Maintenance
CLEANING PROCEDURES
WARNING: Before beginning any cleaning or maintenance,
always ensure the appliance is switched o, the power plug
is removed from the power outlet and the water supply has
been closed.
CLEANING THE CABINET
Proper maintenance of your washing machine will keep it
looking as new and extend its working life.
• The exterior surface can be cleaned with household
cleaners and a soft damp cleaning cloth.
• If there is any residual water at the completion of a
washing program, please use a cloth to wipe it o
immediately.
Note: Never use solvents or harsh cleaning chemicals on
your washing machine’s exterior. Formic acid and its diluted
solvents or equivalent are forbidden, such as alcohol,
solvents or chemical products,etc.
CLEANING THE DRUM
Should any rust form on the inside drum (i.e. water was
left to sit for an extended period of time), please remove
immediately using a chlorine free detergent. Never use
steel wool or a harsh abrasive.
NOTE: Don’t put laundry in the washing machine
during the drum cleaning.
CLEANING THE DOOR SEAL AND GLASS
Wipe the glass and seal after each wash to remove lint and
stains. If lint builds up it can cause leaks.
Remove any coins, buttons and other objects from the seal
after each wash.
CLEANING THE INLET FILTER
NOTE: Inlet lter must be cleaned if there is less water.
Washing the lter in the tap:
1. Close the tap.
2. Remove the water supply hose from the tap.
3. Clean the lter.
4. Reconnect the water supply hose.
Washing the lter in the washing machine:
1. Screw o the inlet pipe from the rear of the machine.
2. Pull out the lter
3. Use a brush to clean the lter.
4. Reinstall the lter after being washed
NOTE: If the brush is not clean, you can pull out the lter
washed separately; Reconnect, turn on the tap.
CLEANING THE DETERGENT DISPENSER
You should periodically follow these steps to ensure the
detergent drawer remains clean.
1. Press down the arrow location on softener cover inside
the dispenser drawer.
2. Lift the clip up and take out softener cover and wash
all grooves with water.
3. Restore the softener cover and push the drawer into
position.
NOTE: Do not use alcohol, solvents or chemical products
to clean the machine.
Washing the filter in the tap
1.Close the tap.
2.Remove the water supply hose from the tap.
3.clean the filter.
4.Reconnect the .water supply hose
Cleaning The Inlet Filter
• Inlet filter must be cleaned if there is less water.
• If the brush is not clean, you can pull out the filter washed separately;
• Reconnect, turn on the tap.
Washing the filter in washing machine:
1.Screw off the inlet pipe from the backside
of the machine.
2.Pull out the filter with long nose pliers
and reinstall it back after being washed.
3.Use to clean the filter.
4.Reconnect the inlet pipe.
the brush
Clean The Detergent Dispenser
Do not use alcohol,solvents or chemical products to clean the machine.•
A
Pull out the dispenser
drawer with press the A
Clean the dispenser
drawer under water
Clean inside the recess
with an old toothbrush
Insert the dispenser
drawer
1234
Note!
Note!
Note!
23
1.Press down the arrow location on softener cover inside the dispenser drawer.
2.Lift the clip up and take out softener cover and wash all grooves with water.
3.Restore the softener cover and push the drawer into position.
MAINTENANCES
21
Washing the filter in the tap
1.Close the tap.
2.Remove the water supply hose from the tap.
3.clean the filter.
4.Reconnect the .water supply hose
Cleaning The Inlet Filter
• Inlet filter must be cleaned if there is less water.
• If the brush is not clean, you can pull out the filter washed separately;
• Reconnect, turn on the tap.
Washing the filter in washing machine:
1.Screw off the inlet pipe from the backside
of the machine.
2.Pull out the filter with long nose pliers
and reinstall it back after being washed.
3.Use to clean the filter.
4.Reconnect the inlet pipe.
the brush
Clean The Detergent Dispenser
Do not use alcohol,solvents or chemical products to clean the machine.•
A
Pull out the dispenser
drawer with press the A
Clean the dispenser
drawer under water
Clean inside the recess
with an old toothbrush
Insert the dispenser
drawer
1234
Note!
Note!
Note!
23
1.Press down the arrow location on softener cover inside the dispenser drawer.
2.Lift the clip up and take out softener cover and wash all grooves with water.
3.Restore the softener cover and push the drawer into position.
MAINTENANCES
43
Pull out the dispenser
drawer with press the A
Clean inside the recess
with an old toothbrush
Clean the dispenser
drawer under water
Insert the dispenser drawer
inalto.house
15
• Make sure that valve cap and emergency drain hose are reinstalled properly, cap
plates should be inserted aligning to hole plates otherwise water may leak;
• Some machines don’t have emergency drain hose, Rotate lower cover cap directly
to make water run into basin.
• When the appliance is in use and depending on the programme selected there can
be hot water in the pump. Never remove the pump cover during a wash cycle, always
wait until the appliance has finished the cycle, and is empty. When replacing the
cover, ensure it is securely re-tightened.
Cleaning The Drain Pump Filter
Be careful of the hot water!
Allow detergent solution to cool down.
•
•
• Unplug the machine to avoid electrical shock before washing.
• Drain pump filter can filter the yarns and small foreign matters from the
washing.
• Clean the filter periodically to ensure the normal operation of washing
machine.
Warning!
!!
10
24
Caution!
MAINTENANCES
Open the Service filter Open the filter by turning
to the counter clockwise
Remove extraneous
matter
1
Close the lower cover cap
3
。
24
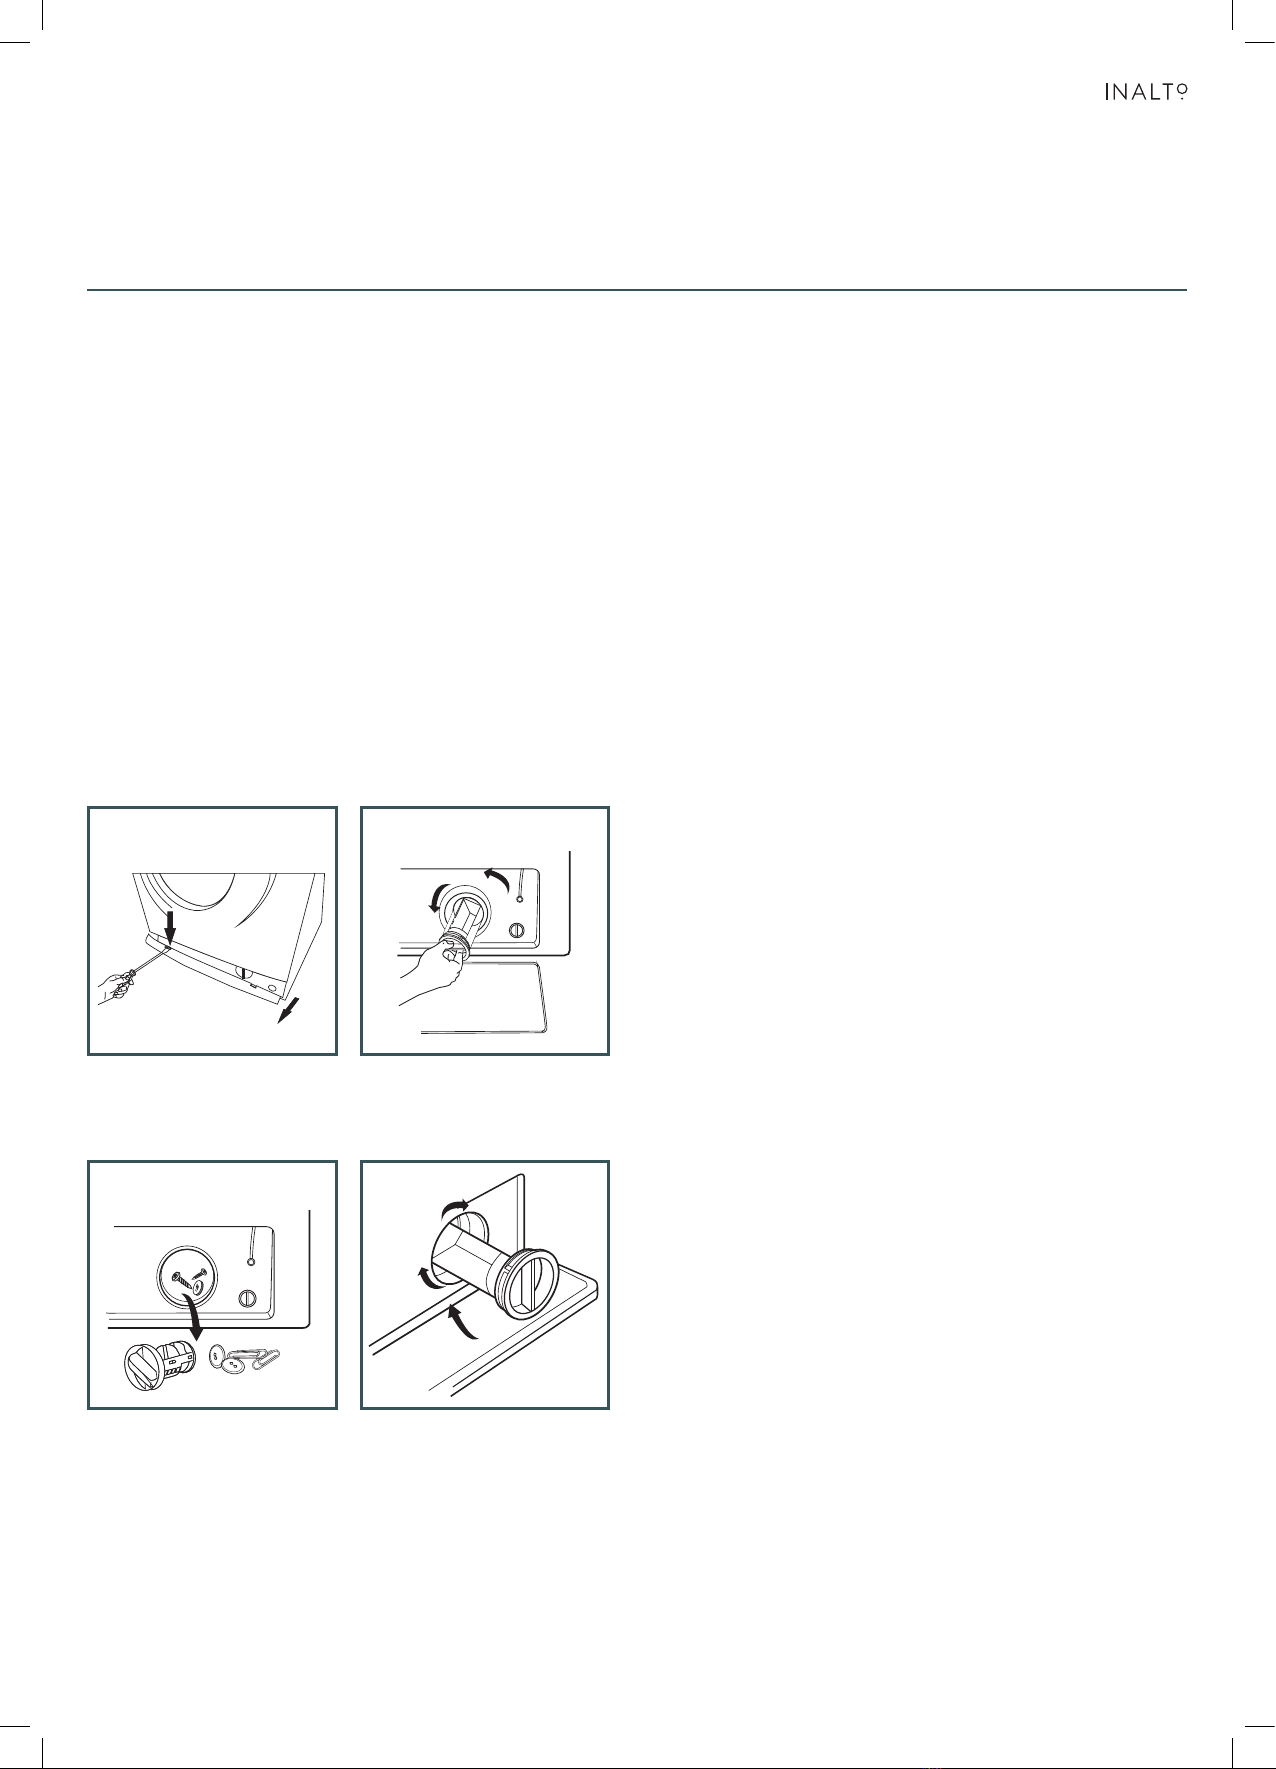
CLEANING THE DRAIN PUMP FILTER
REMOVING FOREIGN OBJECTS
WARNING:
• Be careful of the hot water!
• Allow detergent solution to cool down.
• Unplug the machine to avoid electrical shock
before washing.
Periodically you should clean the drain pump lter to ensure
normal operation of your washing machine. The type of
washing, frequency and soil level of your washing cycles
will alter how often this procedure needs to be undertaken,
however you should inspect the lter regularly.
Should your washing machine not empty and/or spin, or
your machine makes unusual noises during operation, your
Drain Pump lter could be blocked. Follow this procedure to
check or remove any foreign objects.
CAUTION:
• Never remove the pump cover when the washing
machine is in operation, always wait until the appliance
has nished and the is empty. There can be hot water
within the pump, so be careful to avoid burns, should it
have operated recently. When replacing the cover, be
careful to ensure it is securely retightened.
• Make sure that valve cap and emergency drain hose
are reinstalled properly, cap plates should be inserted
aligning to hole plates otherwise water may leak.
• Some machines don’t have emergency drain hose,
Rotate lower cover cap directly to make water run into
the basin.
21
43
Open the service door
Remove any foreign
objects or matter
Open the lter by turning
the lter counter clockwise
Close the lower cover cap
• Make sure that valve cap and emergency drain hose are reinstalled properly, cap
plates should be inserted aligning to hole plates otherwise water may leak;
• Some machines don’t have emergency drain hose, Rotate lower cover cap directly
to make water run into basin.
• When the appliance is in use and depending on the programme selected there can
be hot water in the pump. Never remove the pump cover during a wash cycle, always
wait until the appliance has finished the cycle, and is empty. When replacing the
cover, ensure it is securely re-tightened.
Cleaning The Drain Pump Filter
Be careful of the hot water!
Allow detergent solution to cool down.
•
•
• Unplug the machine to avoid electrical shock before washing.
• Drain pump filter can filter the yarns and small foreign matters from the
washing.
• Clean the filter periodically to ensure the normal operation of washing
machine.
Warning!
!!
10
24
Caution!
MAINTENANCES
Open the Service filter Open the filter by turning
to the counter clockwise
Remove extraneous
matter
1
Close the lower cover cap
3
。
24

User Manual
16
Troubleshooting
WARNING
Only authorised technicians can carry out repairs.
Before contacting our customer service team, please refer to the table below to see if your fault can be xed by
yourself. Should a service technician visit be arranged and its found there are no faults with the appliance, a call out
charge will apply.
PROBLEM SOLUTION
Washing Machine
won’t start-up
• Check that the mains plug is inserted and switched on at the power point.
• Check that the door is closed securely or if clothes are stuck.
• Check that the relevant fuse hasn’t blown.
• Check that the water supply tap has been opened.
Door won’t open • The machine’s safety protection is working. Disconnect the power and reconnect the power.
Water is leaking
• The inlet pipe or outlet hose may not be tight enough or has cross threaded.
• Check and fasten all water connection pipes.
• Check that the inlet or outlet hose is not damaged.
• Outlet hose could be blocked. Clean out outlet hose.
Indicator or display lights
do not light up
• Check that the power isn’t disconnected and the power plug is connected correctly.
• PC board may have issues. Please contact our customer service team.
Detergent residues remain in
the detergent drawer
• Ensure you are using a correct amount of detergent.
• Follow the cleaning steps on page 13 to remove any damp residual detergent from the drawer.
Washing results aren’t
to expectations
• Ensure you are using a sucient amount of detergent.
• Ensure the correct quantity of clothes are being used depending on the wash program selected.
• Ensure you are using the correct wash program to suit the clothing and level of dirtiness.
• Try using an alternative detergent.
Washing machine is making an
abnormal noise or vibrating
• Ensure the washing machine is level.
• Ensure that all transportation bolts have been removed.
• Ensure the appliance has been installed on a solid and level floor.
• Ensure that all legs are making contact with the floor and adjust as required.
• Follow the Cleaning the Drain Pump Filter procedure on page 14 to ensure there are no foreign
objects.
INDICATION LIGHTS PROBLEM SOLUTION
Flashing Pause/Start light
and Lock light ( ) Door is not closed properly • Restart after the door is closed
• Check if there are clothes or washing articles stuck in the door
Flashing No Spin light Water injecting problem
while washing
• Check if the water pressure is too low
• Straighten the water pipe
• Check if the inlet valve lter is blocked
Flashing No Spin and
Pause/Start light Overtime water draining • Check if the drain hose is blocked
Flashing Extra Rinse light Water overow • Restart the washer
Note: If the above steps don’t resolve your issue or you cannot resolve the fault by yourself:
• Turn the program selector dial to the O position.
• Switch o the appliance at the power outlet and remove the plug.
• Call our Support Team to arrange an authorised technician on 1300 11 HELP (4357).

inalto.house
17
Technical Specications
Below outlines the technical specications for your InAlto 5kg Front Load Washing Machine.
Washing Capacity 5.0kg
Dimensions (W � D � H mm) 595 � 470 � 850 mm
Net Weight 54kg
Rated Power 1950W
Power Supply 220-240V, ~50Hz
MAX. Current 10A
Standard Water Pressure 0.05MPa~1.0MPa
NOTE:
This product is subject to continuous improvement, specication are subject to change without prior notice.
This product was tested in accordance with AS/NZS 2040.1:2005+Amdt1-2007+Amdt2-2009 using program:
"Cotton Eco 60", which is the program recommended for a normally soiled cotton load at rated capacity.
RATING LABEL

User Manual
18
Attach your receipt
to this page
inalto.house
19
Purchase Details
For future reference, please record the following information which can be found on the rating plate and the date of
purchase which can be found on your sales invoice.
STORE DETAILS
STORE NAME
|
ADDRESS
|
TELEPHONE
|
PURCHASE DATE
|
PRODUCT DETAILS
MODEL NO.
|
SERIAL NO.*
|

User Manual
20
WARRANTY TERMS & CONDITIONS
LAUNDRY APPLIANCES
This document sets out the terms and conditions of the
product warranties for Residentia Group Appliances. It is
an important document. Please keep it with your proof of
purchase documents in a safe place for future reference
should you require service for your Appliance.
1. IN THIS WARRANTY
(a) ‘acceptable quality’ as referred to in clause 10 of this
warranty has the same meaning referred to in the ACL;
(b) ‘ACL’ means Trade Practices Amendment (Australian
Consumer Law) Act (No.2) 2010;
(c) ‘Appliance’ means any Residentia Group product
purchased by you accompanied by this document;
(d) ‘ASR’ means Residentia Group authorised service
representative;
(e) ‘Residentia Group’ means Residentia Group Pty Ltd
of 165 Barkly Ave, Burnley VIC 3121, ACN 600 546 656
in respect of Appliances purchased in Australia;
(f ) ‘major failure’ as referred to in clause 10 of this
warranty has the same meaning referred to in the ACL
and includes a situation when an Appliance cannot
be repaired or it is uneconomic for Residentia Group,
at its discretion, to repair an Appliance during the
Warranty Period;
(g) ‘Warranty Period’ means:
(i) where the Appliance is used for personal,
domestic or household use (i.e. normal
single family use) as set out in the instruction
manual, the Appliance is warranted against
manufacturing defects for 24 months, following
the date of original purchase of the Appliance;
(h) ‘you’ means the purchaser of the Appliance not having
purchased the Appliance for re-sale, and ‘your’ has a
corresponding meaning.
2. This warranty only applies to Appliances purchased
and used in Australia and is in addition to (and does
not exclude, restrict, or modify in any way) any
non-excludable statutory warranties in Australia.
3. During the Warranty Period Residentia Group or its
ASR will, at no extra charge if your Appliance is readily
accessible for service, without special equipment and
subject to these terms and conditions, repair or replace
any parts which it considers to be defective. Residentia
Group or its ASR may use remanufactured parts to
repair your Appliance. You agree that any replaced
Appliances or parts become the property of Residentia
Group. This warranty does not apply to light globes,
batteries, lters or similar perishable parts.
4. Parts and Appliances not supplied by Residentia Group
are not covered by this warranty.
Warranty Information
Table of contents
Other Inalto Washer manuals


Popular Washer manuals by other brands

Daewoo
Daewoo DWF-5510 instruction manual

Unique Klasse
Unique Klasse KUD-WC1113KUD-WD1117 Service manual

Frigidaire
Frigidaire ATFB7000E Factory parts catalog

Hotpoint Ariston
Hotpoint Ariston ARXXL 88 Instructions for use

Samsung
Samsung WD12J8 Series user manual

Panasonic
Panasonic NA-F80VS8HU Operating & installation instructions


 owner's manual")


