Inalto IWCD46.1 User manual

MODEL CODE/S
IWCD46.1
USER MANUAL INALTO.HOUSE
A HIGHER LEVEL OF REFRIGERATION
46 Bottle
Dual Zone
Wine Cellar
—

Welcome!
Congratulations on purchasing your new appliance.
The InAlto brand is proudly distributed within Australia
by Residentia Group Pty Ltd.
Please refer to the warranty card at the rear of this manual for
information regarding your product’s parts and labour warranty,
or visit us online at www.residentia.group
At Residentia Group, we are customer obsessed and our
Support Team are there to ensure you get the most out of your
appliance. Should you want to learn more about the various
features of your appliance, and importantly taking care of it
when cleaning, our Support Team are here to help. You can
use our online Support Centre at anytime by visiting:
http://support.residentiagroup.com.au
You can contact us via calling us on 1300 11 HELP (4357)
Or email us at: support@residentiagroup.com.au
It is important that you read through the following use and care
manual thoroughly to familiarise yourself with the installation
and operation requirements of your appliance to ensure
optimum performance.
Again, thank you for choosing an InAlto appliance and we look
forward to being of service to you.
Kind Regards,
The Residentia Team
Residentia Group Pty Ltd
—
Head Office
165 Barkly Avenue, Burnley
Victoria Australia 3066
—
Postage
PO Box 5177, Burnley
Victoria Australia 3121
—
ACN.
600 546 656
—
Online
residentia.group
A RESIDENTIA
GROUP INITIATIVE

Customer Care
Contents
Safety Information 4
Product Overview 7
Using your Wine Cellar 8
Installation 10
Troubleshooting 12
Care and Maintenance 13
Technical Specifications 14
Warranty Information 16
Your Receipt 18
Purchase Details 19
InAlto recommends the use of original spare parts. When contacting our customer service
team, please ensure that you have the following information at hand (which can be found on your
appliances’ rating plate).
— Model Number
— Serial Number
T . 1300 11 4357 | E. support@residentiagroup.com.au

USER MANUAL
PAGE 4
Safety Information
Do not splash water on the appliance. It may cause electrical
parts to fail and result in an electric shock.
Do not sit stand or place any other heavy objects on top of the
appliance. This could result in injury or damage to the appliance.
To prevent possible harm to the environment or human health from
uncontrolled waste disposal, recycle it responsibly to promote the sustainable
reuse of material resources (further detail on page 26 of this instruction
manual).
Young children should be supervised to ensure that they do
not play with the appliance.
In case there is a flammable gas leak, open the window for air
circulation and disconnect from the mains. Do not turn the temperature knob.
Otherwise sparks may happen.
Do not use the appliance for
industrial and commercial use, or any other purpose.
The appliance is design for indoor use only and must be
protected from rain, moisture and extreme temperature variations.
This appliance is not intended for outdoor use.
This appliance can be used by children aged from 8 years and above
and persons with reduced physical, sensory or mental capabilities or lack
of experience and knowledge if they have been given supervision or
instruction concerning use of the appliance in a safe way and understand
the hazards involved. Children shall not play with the appliance. Cleaning
and user maintenance shall not be made by children without supervision.
Children aged from 3 to 8 years are allowed to load and unload refrigerating
appliances.
If the socket and refrigerator plug are not compatible please contact
after sales service provider.
3
Light bulb replacement
The internal light is a LED type. To replace the lamp, please speak to after sales service provider.
Power Failure
If the power failure lasts for up to 24 hours, keep the door closed. This will allow the stored bottles to stay cold as
long as possible. If it lasts longer than 24 hours, it is advised to empty the wine cooler compartment
and temporarily store the bottles in a portable wine chiller.
Short vacation
There is no need to disconnect the appliance from the mains if you will be away for two to three weeks.
Long vacation
Remove all the wine if you are away for three weeks or more. Unplug the appliance and leave the
doors open to provide air circulation to prevent odour and mould.
If the refrigerating appliance is left empty for long periods, switch off, defrost, clean, dry, and leave the
door open to prevent mould developing within the appliance.
Do not use hard brushes, steel wool, wire brushes, abrasives, or solvents like, alcohol or acetone,
boiling water, acids or alkaline to clean this appliance, as it may damage or deform the surface or
interior.
10

INALTO.HOUSE
PAGE 5
24
It is recommended that you remove all the internal and external
packaging and clean the interior of the appliance prior to first use. We
recommend you wipe all parts with warm water then rise and dry.
Place all parts back into the appliance after cleaning.
Cleaning and user maintenance shall not be made by children
without supervision.
- Only store wine in sealed containers.
- Do not overload the cabinet.
- Only open the door when necessary.
- This is a self-defrosting appliance. The compressor will not run during
the twenty minutes defrost cycle.
- Do not pull the shelves beyond the anti-stop position when fully loaded.
- This appliance is intended to be used exclusively for the storage of wine.
- In the event of a power failure leave the door closed as much as possible
to maintain the internal working temperature. Should the power failure
continue for a prolonged period you should take steps to protect the
contents of the wine cooler against a rise in temperature. The wine
cooler will remember the selected temperature setting and revert to
these setting once the power is restored.
Opening the door for long periods of time can cause a significant increase
in the temperature in the compartments of the appliance.
4
The wine cooler is designed to defrost automatically every 4 hours. The defrost process will last for 20 minutes.
During defrost, the compressor stops working and fan keeps on running for 20 minutes.
The wine cooler is equipped with an alarm that will sound if the door is left open for more than 60 seconds. Close door
or press any key once to switch off the alarm.
o o
It is recommended that you install appliance in a place where the ambient temperature is between 16 C - 32 C. If the
ambient temperature is above or below recommended temperature, the performance of the unit may be affected. For
example, placing your unit in extremely cold or hot conditions may cause interior temperatures to fluctuate. The
operation temperature range may not be reached.
To switch the power on/off
Press and hold the power button for 6 seconds to switch the wine cooler on.
Press and hold the power button for 6 seconds again to switch the wine cooler off.
To change the temperature
Continue to press the “+” or “-” buttons for the appropriate zone until the required temperature is shown on the display.
o o
The preset temperature is 8C/46F for the upper zone and 12 C/54 F for lower zone.
To change the temperature display from Fahrenheit to Celsius, or Celsius to Fahrenheit, press lower zone “+” and “-”
button at the same time for 2 seconds. Tips, please see the “ ” symbol on control panel.
The display shows the current internal temperature when the wine cooler is on.
Optimal temperature selection
o
Whilst wine is best stored at temperatures between 13 and 15 C , your wine can also be stored at drinking temperature.
o o
As a guide for red wine this is between 15 and 17 C, and for white wine between 12 and 13 C.
To use the internal light
Press the light button to switch the light on or off.
To turn the light ON when door opens, press the light button for 6 seconds, the display with show ‘OP_’ which means
door controls function is ON
To turn the light function OFF, press the light button for 6 seconds, the display will show ‘CL’, which means the door
control function is OFF.
To lock the whole panel
Press power button and “+” button at the same time for one second, all the buttons on panel will be locked.
Press power button and “+” button once again, all the buttons will be unlocked.
Tips, please see the “ ” symbol on control panel.
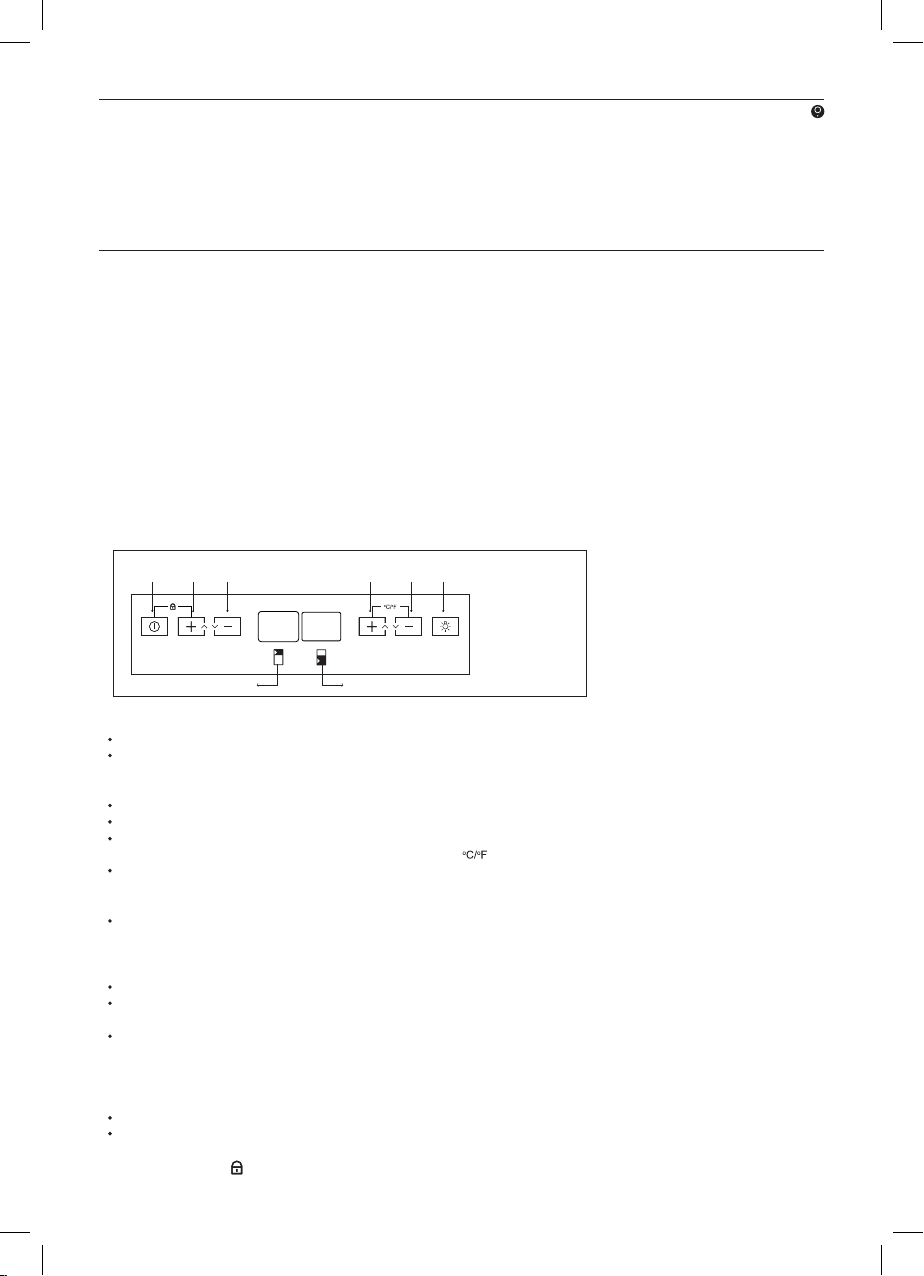
812
1 2 3 4 5 6 Key:
1 - Power button
2 - Upper zone
“+” button
3 - Upper zone
“-” button
4 - Lower zone
“+” button
5 - Lower zone
“-” button
6 - Light button
Defrosting
Door alarm
Controls
Upper zone display Lower zone display
9
USER MANUAL
PAGE 6
This page
is intentionally
left blank
INALTO.HOUSE
PAGE 7
Full instructions on how to x the handle can be found on Page 10 of this manual
Product Overview
1
2
3
4
6
5
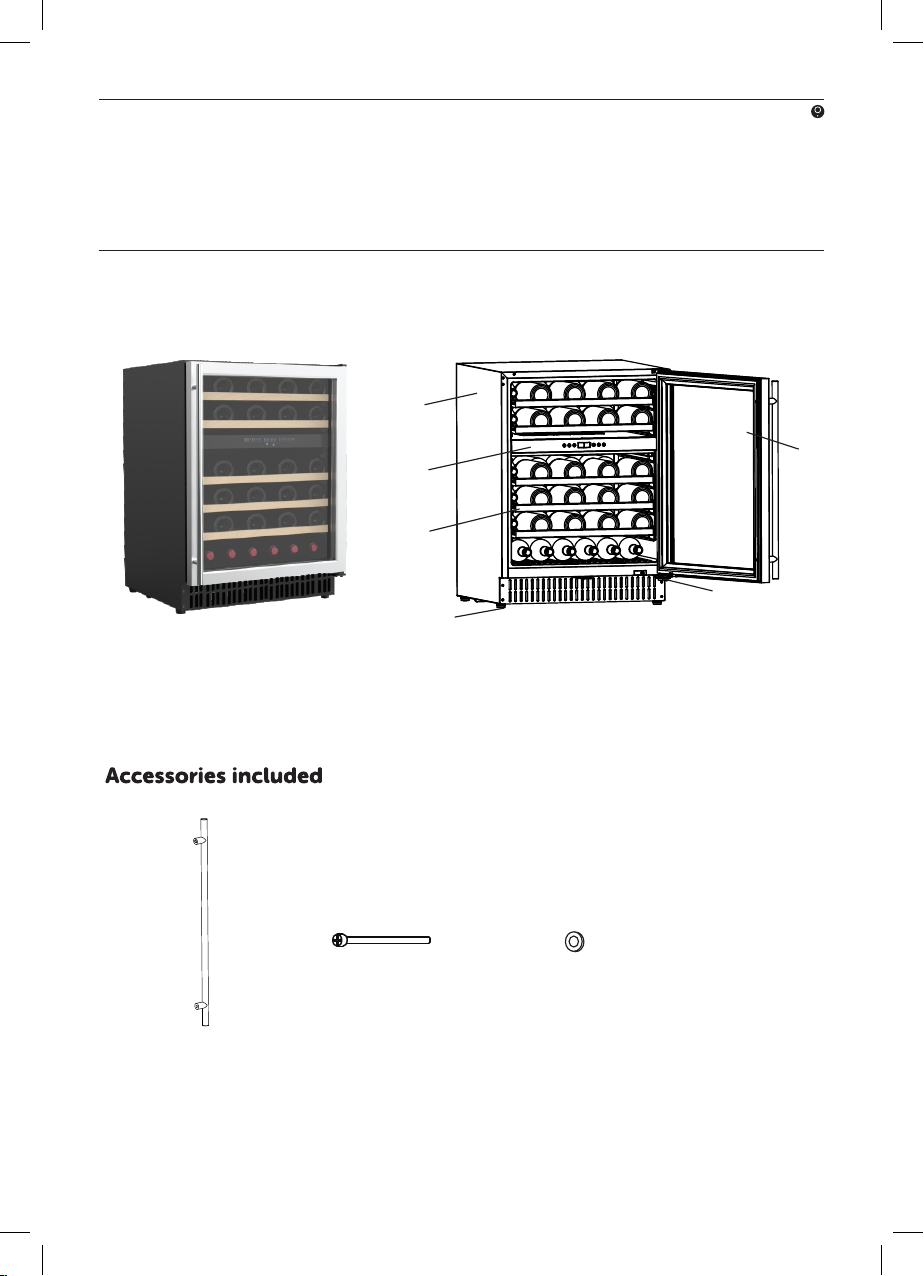
1.Cabinet
2.Touch control panel
3.Wine shelves
5.Glass door
6.Lower door hinge
4.Levelling feet
5
Handle x 1 Screws x 2 Spacers x 2
Please be aware that this wine cooler is designed to fit 0.75 litre Bordeaux style wine bottles (see bottle dimension).
Using different size bottles in the wine cooler may prevent the door from closing, and limit the space between shelves
and between bottles. When using a different size wine bottle we recommend to take out a shelf or rearrange the bottles
to suit the wine bottle size.
Do not exceed the capacity that the appliance is able to handle. Follow below bottle loading diagram.
Shelf 1-5 : Loading diagram for 8 bottles on each shelf , max loading 8 bottles only.
Bottom : 6 bottles place at bottom directly, no shelf, max loading 6 bottles only.
Caution:
Condensation may be found on the glass door during summer time or humid temperatures. This is normal. Wipe it with
a damp cloth.
Remove the shelves
To remove a shelf from the wine cooler, first remove all bottles from the shelf, then pull out the shelf until it stops. Lift up the
inner end of the shelf up, then the whole shelf can be pulled out from the cooler.
Diagram for shelf 1-5 loading Diagram for bottom loading
shelf 1
shelf 2
shelf 3
shelf 4
shelf 5
bottom
Before use
Final checks before operating the appliance
1. Make sure there is sufficient space for air circulation around the appliance.(Please see page 13 of Instruction
Manual titled ‘Installation requirements’ for this information).
2. The feet have been adjusted for perfect leveling.
3. Clean the compartment per recommendation in section “Care and Maintenance”.
4. Plug in the appliance and it will start operation to the default temperature setting.
5. The LED display may not show the selected temperature whilst the appliance first gets to the correct temperature.
This is normal, and the display will be corrected automatically once the appliance has run for a few hours.
6. If the appliance is switched off, you should allow five minutes before switching it on again to prevent the risk of
unnecessary damage to the compressor.
Please note :
The appliance will work continuously until it gets to correct temperature. Continuous noise from the compressor and
refrigeration system is normal, this is not a defect.
Arranging wine in your wine cooler.
Before putting the wine into the wine cooler, please ensure the shelves are correctly in place.
Adjust the temperature of the wine cooler.
Allow several hours to let bottles reach the desired temperature.
Fill the wine cooler with your choice of wine bottle. Lay the wine bottles in a horizontal position and ensure they sit on
the shelf securely (see diagram).
8

USER MANUAL
PAGE 8
1
2
3
4
6
5
1.Cabinet
2.Touch control panel
3.Wine shelves
5.Glass door
6.Lower door hinge
4.Levelling feet
5
Handle x 1 Screws x 2 Spacers x 2
Please be aware that this wine cooler is designed to fit 0.75 litre Bordeaux style wine bottles (see bottle dimension).
Using different size bottles in the wine cooler may prevent the door from closing, and limit the space between shelves
and between bottles. When using a different size wine bottle we recommend to take out a shelf or rearrange the bottles
to suit the wine bottle size.
Do not exceed the capacity that the appliance is able to handle. Follow below bottle loading diagram.
Shelf 1-5 : Loading diagram for 8 bottles on each shelf , max loading 8 bottles only.
Bottom : 6 bottles place at bottom directly, no shelf, max loading 6 bottles only.
Caution:
Condensation may be found on the glass door during summer time or humid temperatures. This is normal. Wipe it with
a damp cloth.
Remove the shelves
To remove a shelf from the wine cooler, first remove all bottles from the shelf, then pull out the shelf until it stops. Lift up the
inner end of the shelf up, then the whole shelf can be pulled out from the cooler.
Diagram for shelf 1-5 loading Diagram for bottom loading
shelf 1
shelf 2
shelf 3
shelf 4
shelf 5
bottom
Before use
Final checks before operating the appliance
1. Make sure there is sufficient space for air circulation around the appliance.(Please see page 13 of Instruction
Manual titled ‘Installation requirements’ for this information).
2. The feet have been adjusted for perfect leveling.
3. Clean the compartment per recommendation in section “Care and Maintenance”.
4. Plug in the appliance and it will start operation to the default temperature setting.
5. The LED display may not show the selected temperature whilst the appliance first gets to the correct temperature.
This is normal, and the display will be corrected automatically once the appliance has run for a few hours.
6. If the appliance is switched off, you should allow five minutes before switching it on again to prevent the risk of
unnecessary damage to the compressor.
Please note :
The appliance will work continuously until it gets to correct temperature. Continuous noise from the compressor and
refrigeration system is normal, this is not a defect.
Arranging wine in your wine cooler.
Before putting the wine into the wine cooler, please ensure the shelves are correctly in place.
Adjust the temperature of the wine cooler.
Allow several hours to let bottles reach the desired temperature.
Fill the wine cooler with your choice of wine bottle. Lay the wine bottles in a horizontal position and ensure they sit on
the shelf securely (see diagram).
8
Using your Wine Cellar
10
INALTO.HOUSE
PAGE 9
24
It is recommended that you remove all the internal and external
packaging and clean the interior of the appliance prior to first use. We
recommend you wipe all parts with warm water then rise and dry.
Place all parts back into the appliance after cleaning.
Cleaning and user maintenance shall not be made by children
without supervision.
- Only store wine in sealed containers.
- Do not overload the cabinet.
- Only open the door when necessary.
- This is a self-defrosting appliance. The compressor will not run during
the twenty minutes defrost cycle.
- Do not pull the shelves beyond the anti-stop position when fully loaded.
- This appliance is intended to be used exclusively for the storage of wine.
- In the event of a power failure leave the door closed as much as possible
to maintain the internal working temperature. Should the power failure
continue for a prolonged period you should take steps to protect the
contents of the wine cooler against a rise in temperature. The wine
cooler will remember the selected temperature setting and revert to
these setting once the power is restored.
Opening the door for long periods of time can cause a significant increase
in the temperature in the compartments of the appliance.
4
The wine cooler is designed to defrost automatically every 4 hours. The defrost process will last for 20 minutes.
During defrost, the compressor stops working and fan keeps on running for 20 minutes.
The wine cooler is equipped with an alarm that will sound if the door is left open for more than 60 seconds. Close door
or press any key once to switch off the alarm.
o o
It is recommended that you install appliance in a place where the ambient temperature is between 16 C - 32 C. If the
ambient temperature is above or below recommended temperature, the performance of the unit may be affected. For
example, placing your unit in extremely cold or hot conditions may cause interior temperatures to fluctuate. The
operation temperature range may not be reached.
To switch the power on/off
Press and hold the power button for 6 seconds to switch the wine cooler on.
Press and hold the power button for 6 seconds again to switch the wine cooler off.
To change the temperature
Continue to press the “+” or “-” buttons for the appropriate zone until the required temperature is shown on the display.
o o
The preset temperature is 8C/46F for the upper zone and 12 C/54 F for lower zone.
To change the temperature display from Fahrenheit to Celsius, or Celsius to Fahrenheit, press lower zone “+” and “-”
button at the same time for 2 seconds. Tips, please see the “ ” symbol on control panel.
The display shows the current internal temperature when the wine cooler is on.
Optimal temperature selection
o
Whilst wine is best stored at temperatures between 13 and 15 C , your wine can also be stored at drinking temperature.
o o
As a guide for red wine this is between 15 and 17 C, and for white wine between 12 and 13 C.
To use the internal light
Press the light button to switch the light on or off.
To turn the light ON when door opens, press the light button for 6 seconds, the display with show ‘OP_’ which means
door controls function is ON
To turn the light function OFF, press the light button for 6 seconds, the display will show ‘CL’, which means the door
control function is OFF.
To lock the whole panel
Press power button and “+” button at the same time for one second, all the buttons on panel will be locked.
Press power button and “+” button once again, all the buttons will be unlocked.
Tips, please see the “ ” symbol on control panel.
812
1 2 3 4 5 6 Key:
1 - Power button
2 - Upper zone
“+” button
3 - Upper zone
“-” button
4 - Lower zone
“+” button
5 - Lower zone
“-” button
6 - Light button
Defrosting
Door alarm
Controls
Upper zone display Lower zone display
9
USER MANUAL
PAGE 10
Installation
Installation of your appliance
The appliance is designed for built-in, recessed or free standing
installation. The minimum space required is :
615mm W x 605mm D X 830mm H ( refer to right photo)
IMPORTANT: Failure to follow the instructions regarding installation
and ventilation may void the warranty supplied with your
appliance.
615
610
830-890
595
575
820~880
90
30
10mm
30mm
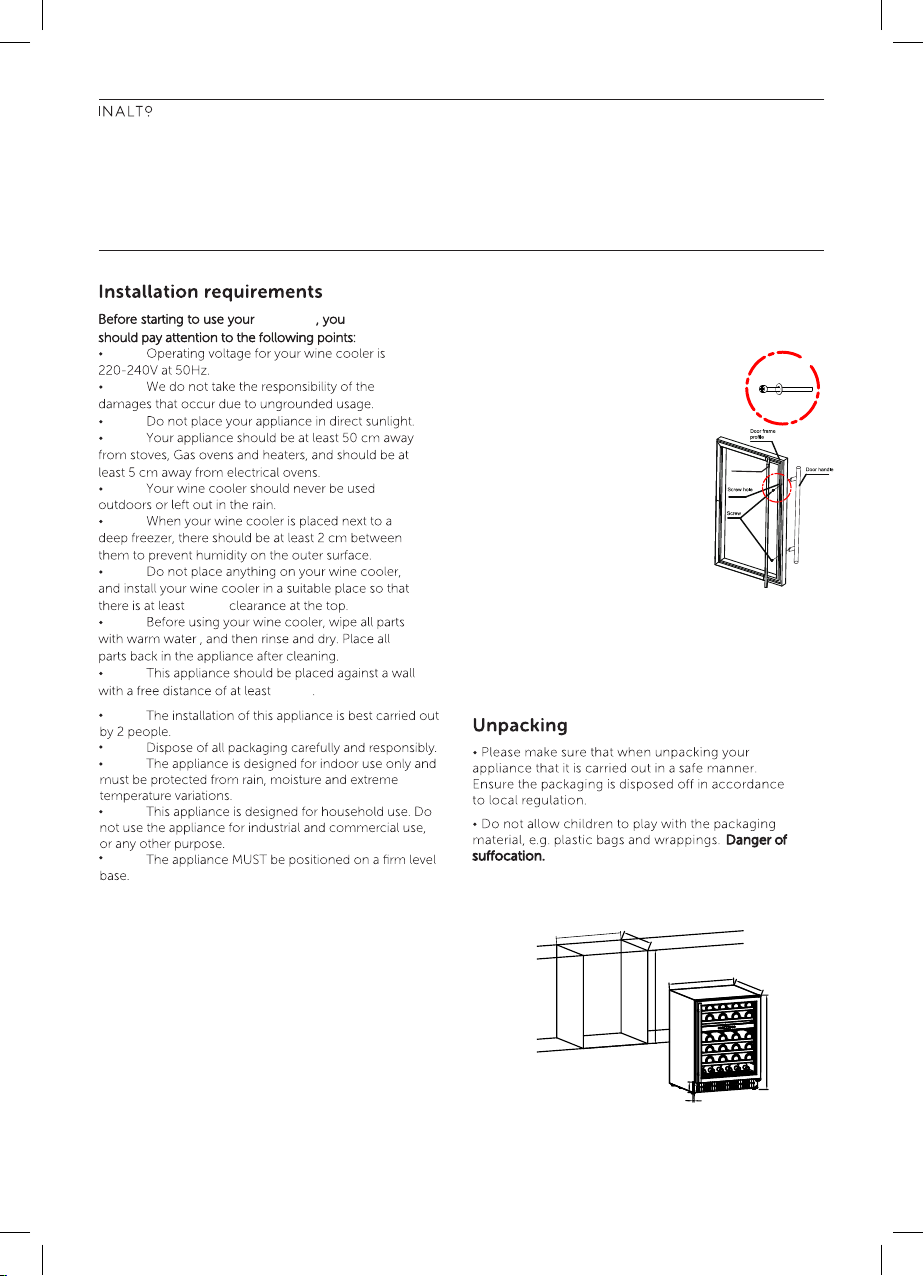
Installing the stainless steel handle
Door se al
Installing your Wine Cellar
wine cellar
To install the handle, follow the instructions below:
1. Peel back door seal along the right hand side
of door. You will find a screw hole at the top
and lower of the door where you have
peeled the seal back. (please refer to
the diagram)
2. Take out the screws and spacers from
bag at back of cabinet. Place the
spacers onto screws and then put
the screws in the hole where the
handle is to be installed. Please make
sure the spacer is correctly in place
before you put the screws in the hole.
3. Align the handle with screws,
tighten the screws using a screw
driver until the handle is both flush
and secured tightly against the
door side. (DO NOT over-tighten as
this may cause damage to the door
surface)
4. After handle fixed well, put the door
seal back to the door to cover the
hole.
6
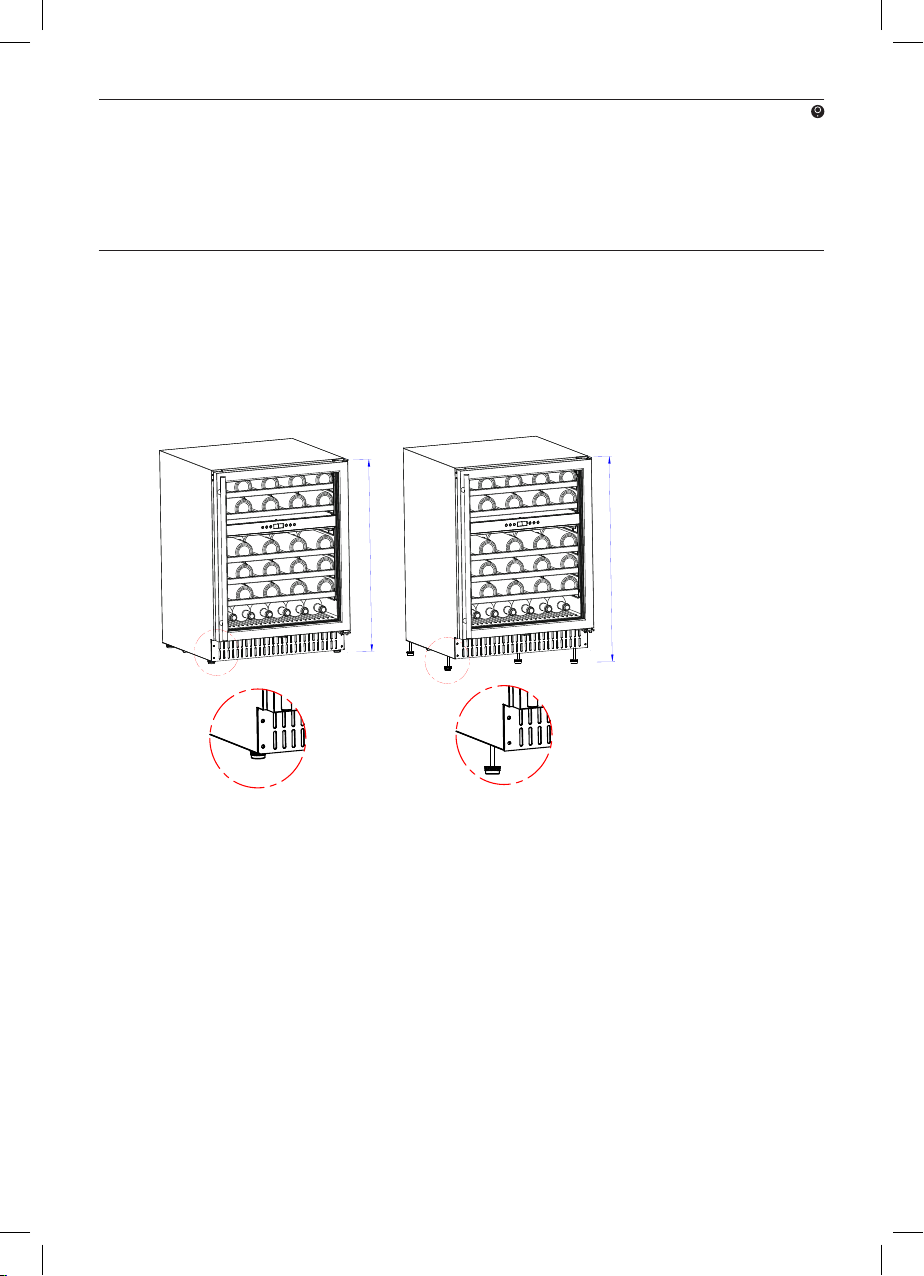
Normal Height After Adjust
This appliance comes with height adjustable feet which allows the appliance to be installed under bench and ensures
the appliance is stable and level. Just screw the bottom feet anticlockwise to raise the height up to 880mm or clockwise
to lower the height to 820mm. See below photos.
Adjustable feet
Levelling feet
The appliance must be installed level in order to work properly. If the unit is not level, the doors and magnetic seal
alignments will not be covered properly.
To level the unit, adjust one or both levelling feet at the base of the unit.
820
880
7
INALTO.HOUSE
PAGE 11
Installation of your appliance
The appliance is designed for built-in, recessed or free standing
installation. The minimum space required is :
615mm W x 605mm D X 830mm H ( refer to right photo)
IMPORTANT: Failure to follow the instructions regarding installation
and ventilation may void the warranty supplied with your
appliance.
615
610
830-890
595
575
820~880
90
30
10mm
30mm
Installing the stainless steel handle
Door se al
Installing your Wine Cellar
wine cellar
To install the handle, follow the instructions below:
1. Peel back door seal along the right hand side
of door. You will find a screw hole at the top
and lower of the door where you have
peeled the seal back. (please refer to
the diagram)
2. Take out the screws and spacers from
bag at back of cabinet. Place the
spacers onto screws and then put
the screws in the hole where the
handle is to be installed. Please make
sure the spacer is correctly in place
before you put the screws in the hole.
3. Align the handle with screws,
tighten the screws using a screw
driver until the handle is both flush
and secured tightly against the
door side. (DO NOT over-tighten as
this may cause damage to the door
surface)
4. After handle fixed well, put the door
seal back to the door to cover the
hole.
6
Normal Height After Adjust
This appliance comes with height adjustable feet which allows the appliance to be installed under bench and ensures
the appliance is stable and level. Just screw the bottom feet anticlockwise to raise the height up to 880mm or clockwise
to lower the height to 820mm. See below photos.
Adjustable feet
Levelling feet
The appliance must be installed level in order to work properly. If the unit is not level, the doors and magnetic seal
alignments will not be covered properly.
To level the unit, adjust one or both levelling feet at the base of the unit.
820
880
7

USER MANUAL
PAGE 12
Troubleshooting
PROBLEM SOLUTION
THE DOORS DO NOT
CLOSE PROPERLY
-Ensure there are no obstructions preventing
door closure.
-Check the door compartments and shelves
are correctly in place.
-Check the door seal is not warped or torn.
-Check the appliance is level.
UNUSUAL NOISES
THE COMPRESSOR
RUNS CONSTANTLY
THE EXTERNAL
FRIDGE SURFACE
IS WARM
-Check that the appliance is on a flat, level surface
and is stable.
-Check the spacing's around the appliance and
ensure it is not touching other items.
-Bubbling and gurgling sound:
This noise is emitted as the coolant fluid flow through
the pipes within the system. This is normal.
-Contraction and expansion of the inside walls may
cause popping and cracking noises.
-The temperature is set too cold: select a lower
(warmer) setting.
-The door is open, or something is obstructing proper
door closure.
-The room temperature is hotter than usual.
-The exterior walls can be warmer than room
temperature. This is normal while the compressor
works to transfer heat from inside the bottle cabinet.
-If the door has just been opened, leave it for a few
minutes to allow the air pressure to equalise
before trying again.
-Check all the drinks that are in the cooler are in date
and correctly packaged. Please remove anything
that may be spoiled and repack if necessary.
-Check for spillages throughout the cooler. Spillages
may cause odours if left unwashed. Wash accordingly
to the manufacturers advise.
THE COOLER DOOR
WILL NOT OPEN
SMELLS/ODOURS
12
INALTO.HOUSE
PAGE 13
Care and Maintenance
Do not splash water on the appliance. It may cause electrical
parts to fail and result in an electric shock.
Do not sit stand or place any other heavy objects on top of the
appliance. This could result in injury or damage to the appliance.
To prevent possible harm to the environment or human health from
uncontrolled waste disposal, recycle it responsibly to promote the sustainable
reuse of material resources (further detail on page 26 of this instruction
manual).
Young children should be supervised to ensure that they do
not play with the appliance.
In case there is a flammable gas leak, open the window for air
circulation and disconnect from the mains. Do not turn the temperature knob.
Otherwise sparks may happen.
Do not use the appliance for
industrial and commercial use, or any other purpose.
The appliance is design for indoor use only and must be
protected from rain, moisture and extreme temperature variations.
This appliance is not intended for outdoor use.
This appliance can be used by children aged from 8 years and above
and persons with reduced physical, sensory or mental capabilities or lack
of experience and knowledge if they have been given supervision or
instruction concerning use of the appliance in a safe way and understand
the hazards involved. Children shall not play with the appliance. Cleaning
and user maintenance shall not be made by children without supervision.
Children aged from 3 to 8 years are allowed to load and unload refrigerating
appliances.
If the socket and refrigerator plug are not compatible please contact
after sales service provider.
3
Light bulb replacement
The internal light is a LED type. To replace the lamp, please speak to after sales service provider.
Power Failure
If the power failure lasts for up to 24 hours, keep the door closed. This will allow the stored bottles to stay cold as
long as possible. If it lasts longer than 24 hours, it is advised to empty the wine cooler compartment
and temporarily store the bottles in a portable wine chiller.
Short vacation
There is no need to disconnect the appliance from the mains if you will be away for two to three weeks.
Long vacation
Remove all the wine if you are away for three weeks or more. Unplug the appliance and leave the
doors open to provide air circulation to prevent odour and mould.
If the refrigerating appliance is left empty for long periods, switch off, defrost, clean, dry, and leave the
door open to prevent mould developing within the appliance.
Do not use hard brushes, steel wool, wire brushes, abrasives, or solvents like, alcohol or acetone,
boiling water, acids or alkaline to clean this appliance, as it may damage or deform the surface or
interior.
10
Looking after your appliance

USER MANUAL
PAGE 14
Product Dimensions (H, W, D): 820mm, 595mm, 575mm
Weight (Net / Gross): 42kg / 46.5kg
Temperature Range: Upper Zone: 4–12ºC
Lower Zone: 12–22ºC
Other Features: 128L Capacity
Touch key control panel
White LED interior light
Triple glazed tinted glass door
Stainless Steel and Glass Finish
Technical Specifications
INALTO.HOUSE
PAGE 15
20190813
A190813
20190813
145x90mm
,彩色印刷
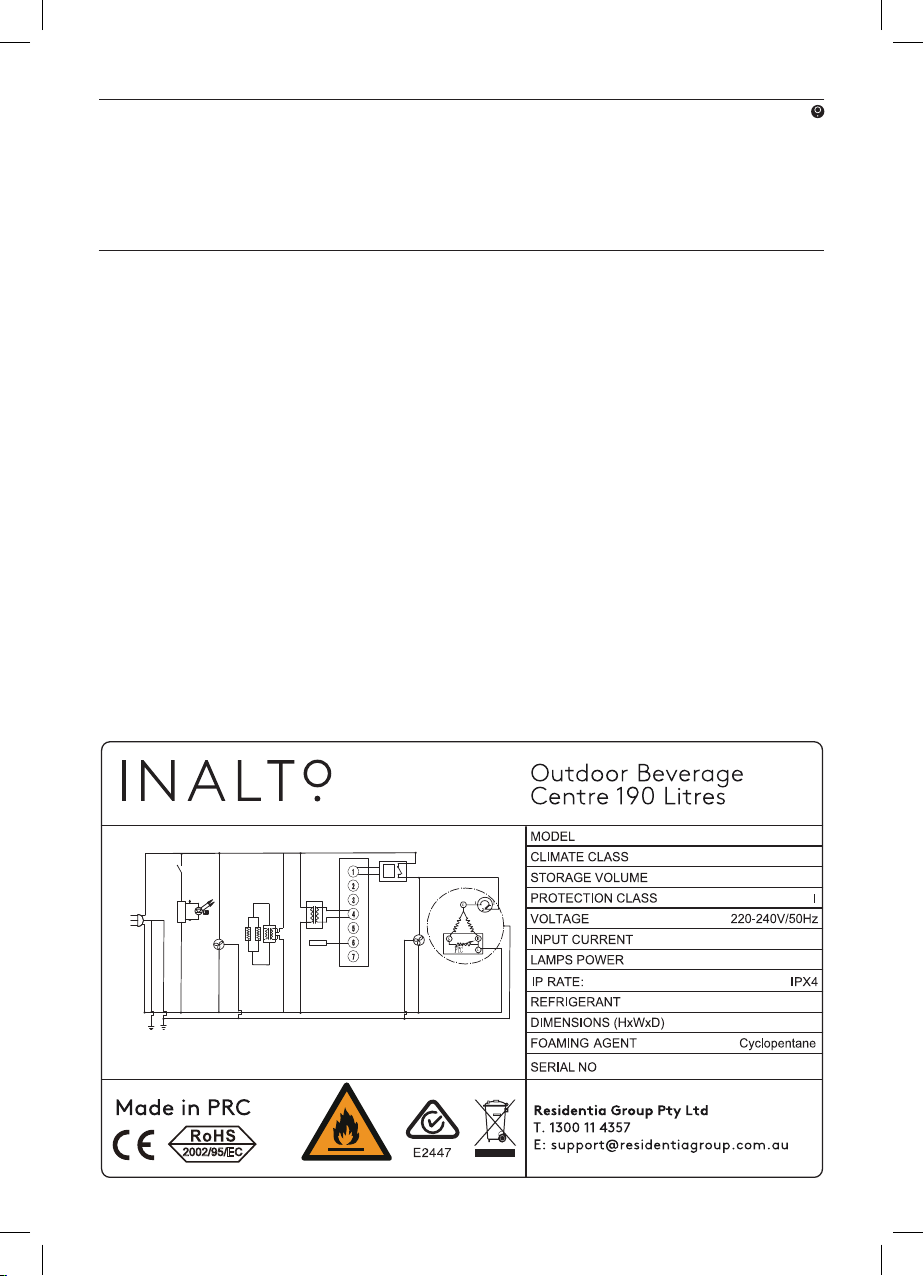
C284AFRA0AU02A
IBF190
R600a/68g
3.5W
1.5A
850x870x541mm
190L
T
C2H-840-ALF
145mm
90mm
8mm
6mm
17mm
7mm
15.5mm
5.8mm
8mm
2002/95/EC
2002/95/EC
Caution:risk of fire
客户名称:澳大利亚RA
L
E
N
Evaporator Fan
YL/GN
Switch
Condenser Fan
Relay
Over load
Protecter
Compressor
Temperature
Controller
Transformer
Sensor
Power Plug
Transformer
Inner Lamp
Heater
Specication and Technical Parameters
This product complies with AS/NZS 60335.1
and AS/NZS 60335.2.24 electrical safety, and
with EN 55014-1:2006+A1:2009 A2:2011 for
electromagnetic compatibility.
Rating Label
See below. This will also be axed to the unit.
Responsible Disposal
• At the end of its working life, do not throw this
appliance out with your household rubbish.
Electrical and electronic products contain
substances that can have a detrimental eect on
the environment and human health if disposed of
inappropriately.
• This refrigeration appliance contains ammable
refrigerants and insulation blowing gases, which
must be removed before disposal. Observe
any local regulations regarding the disposal of
electrical consumer goods and dispose of it
appropriately for recycling and recovery of the
refrigerant. Contact your local authorities for
advice on recycling facilities in your area.
• Danger: Risk of child entrapment! To avoid the
possibility of child entrapment, take o the door
and leave the shelves in place before discarding
your Beverage Centre so that children cannot
easily climb inside.

USER MANUAL
PAGE 16
Warranty Information
WARRANTY TERMS & CONDITIONS
REFRIGERATION
This document sets out the terms and conditions
of the product warranties for Residentia Group
Appliances. It is an important document. Please
keep it with your proof of purchase documents
in a safe place for future reference should you
require service for your Appliance.
1. IN THIS WARRANTY
(a) ‘acceptable quality’ as referred to in clause
10 of this warranty has the same meaning
referred to in the ACL;
(b) ‘ACL’ means Trade Practices Amendment
(Australian Consumer Law) Act (No.2) 2010;
(c) ‘Appliance’ means any Residentia Group
product purchased by you accompanied by
this document;
(d) ‘ASR’ means Residentia Group authorised
service representative;
(e) ‘Residentia Group’ means Residentia Group
Pty Ltd of 165 Barkly Avenue Burnley VIC,
ACN 600 546 656 in respect of Appliances
purchased in Australia;
(f ) ‘major failure’ as referred to in clause 10 of
this warranty has the same meaning referred
to in the ACL and includes a situation when
an Appliance cannot be repaired or it is
uneconomic for Residentia Group, at its
discretion, to repair an Appliance during the
Warranty Period;
(g) ‘Warranty Period’ means:
(i) where the Appliance is used for
personal, domestic or household
use (i.e. normal single family use)
as set out in the instruction manual,
the Appliance is warranted against
manufacturing defects for 36 months,
following the date of original purchase
of the Appliance;
(h) ‘you’ means the purchaser of the Appliance
not having purchased the Appliance for
re-sale, and ‘your’ has a corresponding
meaning.
2. This warranty only applies to Appliances
purchased and used in Australia and is in
addition to (and does not exclude, restrict,
or modify in any way) any non-excludable
statutory warranties in Australia.
3. During the Warranty Period Residentia
Group or its ASR will, at no extra charge
if your Appliance is readily accessible for
service, without special equipment and
subject to these terms and conditions, repair
or replace any parts which it considers to
be defective. Residentia Group or its ASR
may use remanufactured parts to repair
your Appliance. You agree that any replaced
Appliances or parts become the property
of Residentia Group. This warranty does
not apply to light globes, batteries, filters or
similar perishable parts.
4. Parts and Appliances not supplied by
Residentia Group are not covered by this
warranty.
5. You will bear the cost of transportation, travel
and delivery of the Appliance to and from
Residentia Group or its ASR. If you reside
outside of the service area, you will bear the
cost of:
(a) travel of an authorised representative;
(b) transportation and delivery of the Appliance
to and from Residentia Group or its ASR,
in all instances, unless the Appliance is
transported by Residentia Group or its ASR,
the Appliance is transported at the owner’s
cost and risk while in transit to and from
Residentia Group or its ASR.
6. Proof of purchase is required before you can
make a claim under this warranty.

INALTO.HOUSE
PAGE 17
The Australian Consumer Law requires the inclusion of the following statement with this warranty:
Our goods come with guarantees that cannot be excluded under the Australian Consumer Law. You are entitled to a
replacement or refund for a major failure and for compensation for any other reasonably foreseeable loss or damage.
You are also entitled to have the goods repaired or replaced if the goods fail to be of acceptable quality and the failure
does not amount to a major failure.
7. You may not make a claim under this
warranty unless the defect claimed is due
to faulty or defective parts or workmanship.
Residentia Group is not liable in the following
situations (which are not exhaustive):
(a) the Appliance is damaged by:
(i) accident
(ii) misuse or abuse, including failure to
properly maintain or service
(iii) normal wear and tear
(iv) power surges, electrical storm damage
or incorrect power supply
(v) incomplete or improper installation
(vi) incorrect, improper or inappropriate
operation
(vii) insect or vermin infestation
(viii) failure to comply with any additional
instructions supplied with the
Appliance;
(b) the Appliance is modified without authority
from Residentia Group in writing;
(c) the Appliance’s serial number or warranty
seal has been removed or defaced;
(d) the Appliance was serviced or repaired by
anyone other than Residentia Group, an
authorised repairer or ASR.
8. This warranty, the contract to which it
relates and the relationship between you
and Residentia Group are governed by the
law applicable where the Appliance was
purchased.
9. To the extent permitted by law, Residentia
Group excludes all warranties and liabilities
(other than as contained in this document)
including liability for any loss or damage
whether direct or indirect arising from your
purchase, use or non use of the Appliance.
10. For Appliances and services provided by
Residentia Group in Australia, the Appliances
come with a guarantee by Residentia
Group that cannot be excluded under the
Australian Consumer Law. You are entitled
to a replacement or refund for a major
failure and for compensation for any other
reasonably foreseeable loss or damage.
You are also entitled to have the Appliance
repaired or replaced if the Appliance fails to
be of acceptable quality and the failure does
not amount to a major failure. The benefits to
you given by this warranty are in addition to
your other rights and remedies under a law
in relation to the Appliances or services to
which the warranty relates.
11. At all times during the Warranty Period,
Residentia Group shall, at its discretion,
determine whether repair, replacement or
refund will apply if an Appliance has a valid
warranty claim applicable to it.
12. To enquire about claiming under this
warranty, please follow these steps:
(a) carefully check the operating instructions,
user manual and the terms of this warranty;
(b) have the model and serial number of the
Appliance available;
(c) have the proof of purchase (e.g. an invoice)
available;
(d) telephone the numbers shown below.
13. You accept that if you make a warranty claim,
Residentia Group and its ASR may exchange
information in relation to you to enable
Residentia Group to meet its obligations
under this warranty.
IMPORTANT
Before calling for service, please ensure that the
steps in point 12 have been followed.
Telephone contact
► Service: Please call 1300 11 HELP (4357)
Attach your receipt to this page

INALTO.HOUSE
PAGE 19
For future reference, please record the following information
which can be found on the rating plate and the date of
purchase which can be found on your sales invoice.
STORE DETAILS
STORE NAME
|
ADDRESS
|
TELEPHONE
|
PURCHASE DATE
|
PRODUCT DETAILS
MODEL NO.
|
SERIAL NO.*
|
Purchase Details
A HIGHER LEVEL OF REFRIGERATION
—
WWW.INALTO.HOUSE
—
Other manuals for IWCD46.1
1
Table of contents
Other Inalto Wine Cooler manuals


