Stirling JC-145B1EQ User manual

After Sales Support
Telephone: 1300 886 649
Email: [email protected]
Model Number JC-145B1EQ
50 Bottle Wine Fridge
INSTRUCTION MANUAL

2
Contents
03 Warranty Details
04 Welcome
05 General Safety Instructions
07 Product Overview
08 Getting Started
13 Instructions
16 Other Useful Information

3
50 Bottle Wine Fridge
Warranty Details
The product is guaranteed to be free from defects in workmanship and parts for
a period of 36 months from the date of purchase. Defects that occur within this
warranty period, under normal use and care, will be repaired, replaced or refunded
at our discretion, solely at our option with no charge for parts and labour. The
benefits conferred by this warranty are in addition to all rights and remedies
in respect of the product that the consumer has under the Competition and
Consumer Act 2010 and similar state and territory laws.
Our goods come with guarantees that cannot be excluded under the Australian
Consumer Law. You are entitled to a replacement or refund for a major failure
and to compensation for any other reasonably foreseeable loss or damage. You
are also entitled to have the goods repaired or replaced if the goods fail to be of
acceptable quality and the failure does not amount to a major failure.

4
Welcome
Congratulations on choosing to buy a STIRLING®product.
All products brought to you by STIRLING®are manufactured to the highest standards
of performance and safety and, as part of our philosophy of customer service and
satisfaction, are backed by our comprehensive 3Year Warranty. We hope you will
enjoy using your purchase for many years to come.

5
General Safety Instructions
Read this manual thoroughly before first use, even if you are familiar with this type
of product. We have provided many important safety statements in this manual
concerning the use of this appliance. Always read all safety statements. They reduce
the risk of fire, electric shock and injury when correctly adhered to.
Keep the manual in a safe place for future reference, along with the completed
warranty card, purchase receipt and carton. If applicable, pass these instructions on
to the next owner of the appliance.
This is a wine fridge, this is NOT a fridge.
A wine fridge is designed for the storage of bottles at a certain temperature that
is particularly suitable for wine. The temperature maintained in this wine fridge is
too high for safe storage of perishable foods.
Electrical safety
• Voltage: Before connecting and turning on the fridge, ensure the electrical voltage
and circuit frequency correspond to those indicated on the appliance rating label.
• Connection: Plug the appliance into a properly earthed, 3-prong, 220~240V AC
50Hz wall outlet with an electrical fuse protection of at least 10A at the mains. Use
an electrical outlet that cannot easily be turned off accidentally. It is recommended
that a separate circuit, serving only your appliance be provided.
• Power plug: Do not modify the cord and plug provided with the appliance. Improper
use of the grounded plug can result in the risk of electric shock. If the plug does not
fit your power outlet, have a proper outlet installed by a qualified electrician.
• Power cord: Do not kink or damage the power cord; do not leave it exposed or
dangling. Secure it at the back so no one steps on or places anything on the cord or
against it. Keep the cord out of reach of children. When moving the appliance, make
sure not to damage the power cord.
• No adaptor, no extension cord: Do not use an adaptor or an extension cord. Do
not overload the electrical circuit.
• Protect from moisture: To protect against the risk of electric shock, do not
immerse the unit, cord, or plug in water or spray any other liquid. Do not connect or
disconnect the electric plug when your hands are wet.
• WARNING: To reduce the risk of fire, electric shock or personal injury, always
unplug the appliance from the socket when not in use, when moving and before
cleaning or servicing.
• Disconnect: Never unplug the unit by pulling the power cord. Always grip the plug
firmly and pull straight out from the power point.
• Electrical work: Any electrical work required for the installation of this appliance
should be carried out by a qualified electrician.
6
Usage conditions and restrictions
• Domestic use only: This appliance is intended for indoor household use only. It is
not suitable for commercial or industrial use. Do not use it outdoors.
• Purpose: Do not use this appliance for anything other than its intended purpose.
Other uses not recommended may cause fire, electric shock or personal injury.
• Attachments: The use of attachments not recommended by the appliance
manufacturer/distributor may be hazardous.
• Improper use: Damage due to improper use, or repairs made by unqualified
personnel will void your warranty. We assume no liability for any eventual damages
caused by misuse of the product or noncompliance with these instructions.
• Usage restriction: This appliance is not intended for use by persons (including
children) with reduced physical, sensory or mental capabilities, or lack of experience
and knowledge, unless they have been given supervision or instructions concerning
use of the appliance by a person responsible for their safety.
• Children: Supervise young children to ensure they do not play with the appliance.
Never allow children to operate, play with or crawl inside the wine fridge.
• WARNING: Do not operate any electrical appliance inside the wine fridge.
• Cleaning: Never clean any appliance parts with flammable fluids. These fumes can
create a fire hazard or explosion.
• Damage: Do not use the appliance if the power cord, plug or the appliance itself is
damaged. If the cord is damaged, contact the after sales support line and have the
cord replaced by qualified personnel in order to avoid a hazard.
• Do not modify: Do not attempt to alter or modify this appliance in any way.
• Repair: Do not attempt to repair or replace any part of your wine fridge unless it is
specifically recommended in this manual. All other servicing should be referred to a
qualified technician. Contact the after sales support line for advice.
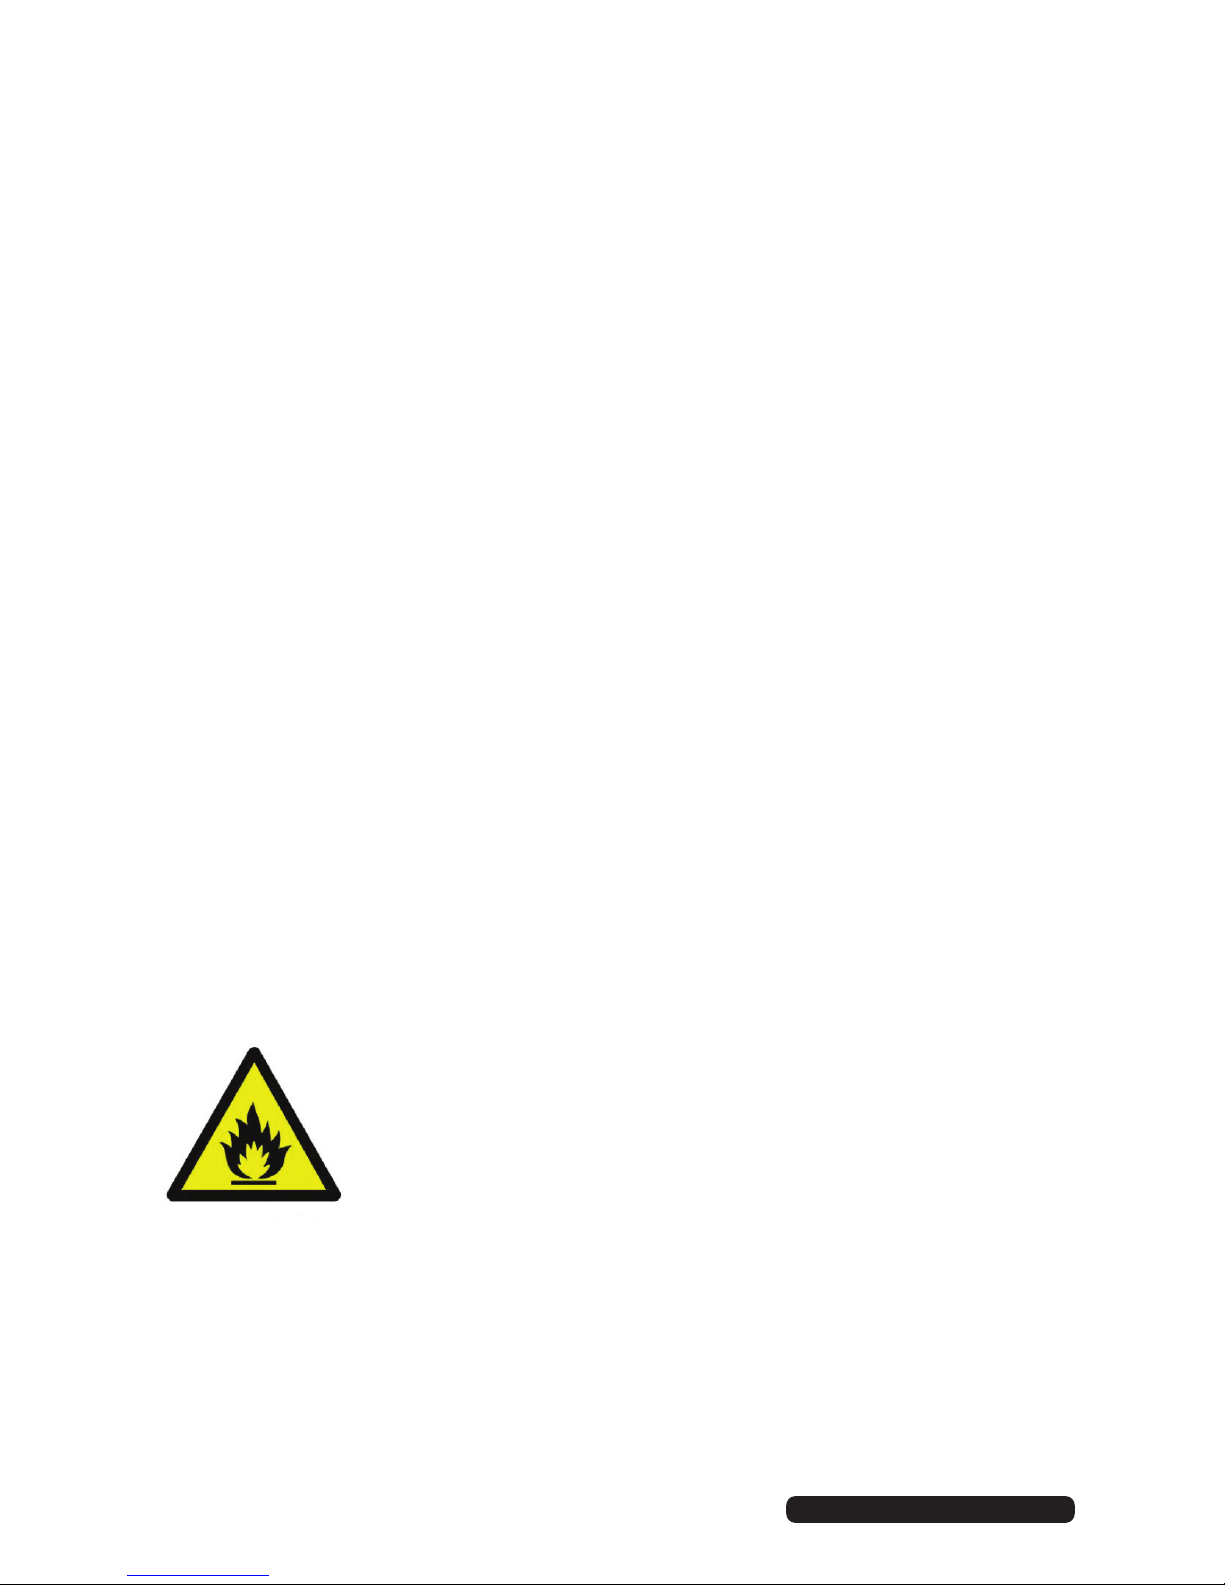
Flammable refrigerant: This appliance is CFC- and HFC-
free and contains small quantities of isobutane (R600a), a
flammable refrigerant. You must ensure that the refrigerant circuit
is undamaged when installing the appliance. Never use an
appliance with a damaged refrigerant circuit! If the coolant
circuit becomes damaged, avoid proximity to open fires and all
types of heat sources. The room in which the appliance is located
should be ventilated for a few minutes.
General Safety Instructions (Cont.)
CAUTION:
Flammable Gas
7
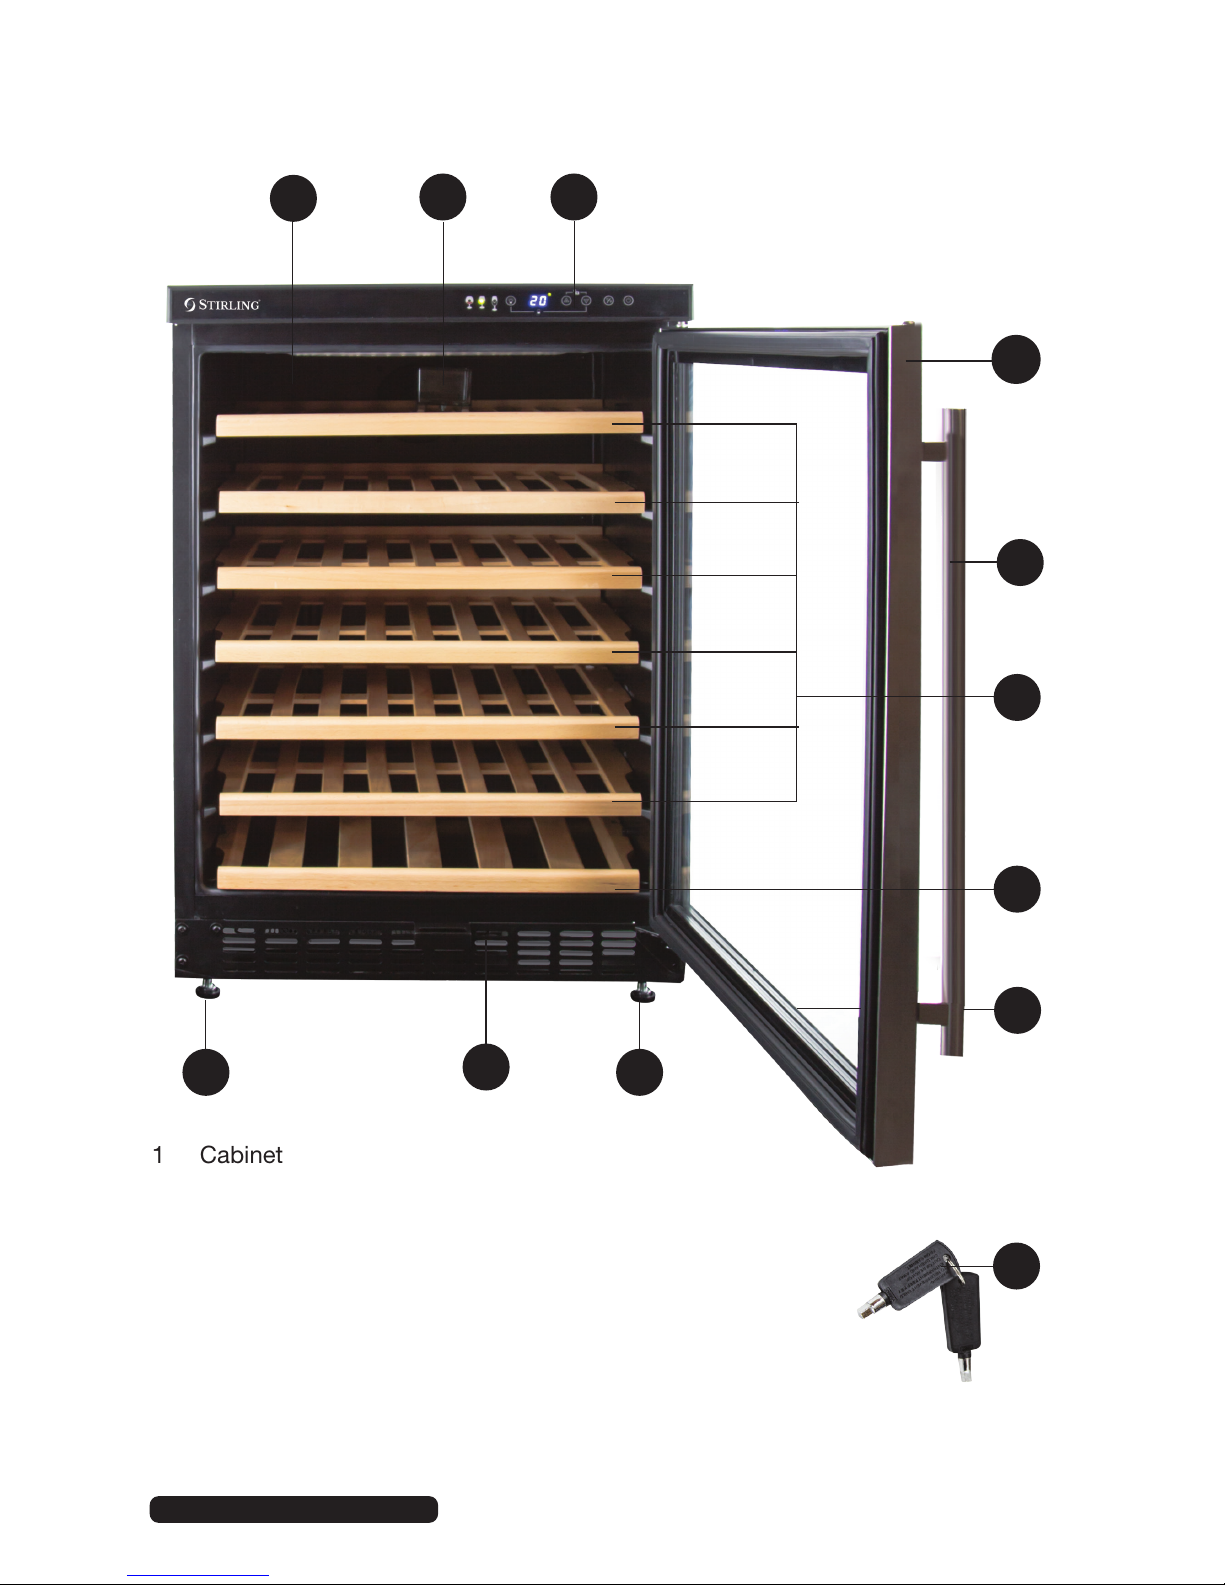
Product Overview
1 Cabinet
2 Water Container (for optional use in low humidity conditions)
3 Digital Control Panel
4 Stainless Steel Glass Door Frame
5 Stainless Steel Handle
6 Full Shelves (x6)
7 Half Shelf (x1)
8 Security Lock (at the front bottom of the door frame)
9 Levelling Legs
10 Base Grille
11 Keys (for the security lock)
10
4
9
8
7
6
32
1
5
11
9

8
Getting Started
Before first use
Before installing your wine fridge, read all safety instructions in this manual, especially
the sections on electrical safety and installation.
• Packaging materials: Remove all packaging materials from around and inside
the appliance and keep it until you have made sure your wine fridge is in good
condition. If in doubt, do not use the appliance and contact the after sales support
line for advice.
Plastic wrapping can be a suffocation hazard for babies and young children, so
keep all packaging materials out of their reach.
• Installation hardware: The supplied plastic bag with the instruction manual also
contains the screws necessary for installing the handle and two keys for the cabinet
door lock. Keep it in a safe place.
• Power cord: Inspect the cord for damage. Do not use the wine fridge if the cord is
damaged. In case of damage, contact the after sales support line for advice.
• Clean: To remove any dust from transit and storage, clean the inside of the wine
fridge with lukewarm water and a soft cloth. Dry thoroughly.
• Before installing the wine fridge, let it stand upright for approximately 2 hours.
This will reduce the possibility of a malfunction in the cooling system from handling
during transport.
• Door swing: The door on this appliance can be opened from either the left or the
right side. The unit is delivered with the door opening on the left side. Should you
wish to open it from the right, follow the instructions on pages 10-11.
9
Getting Started (Cont.)
Installation
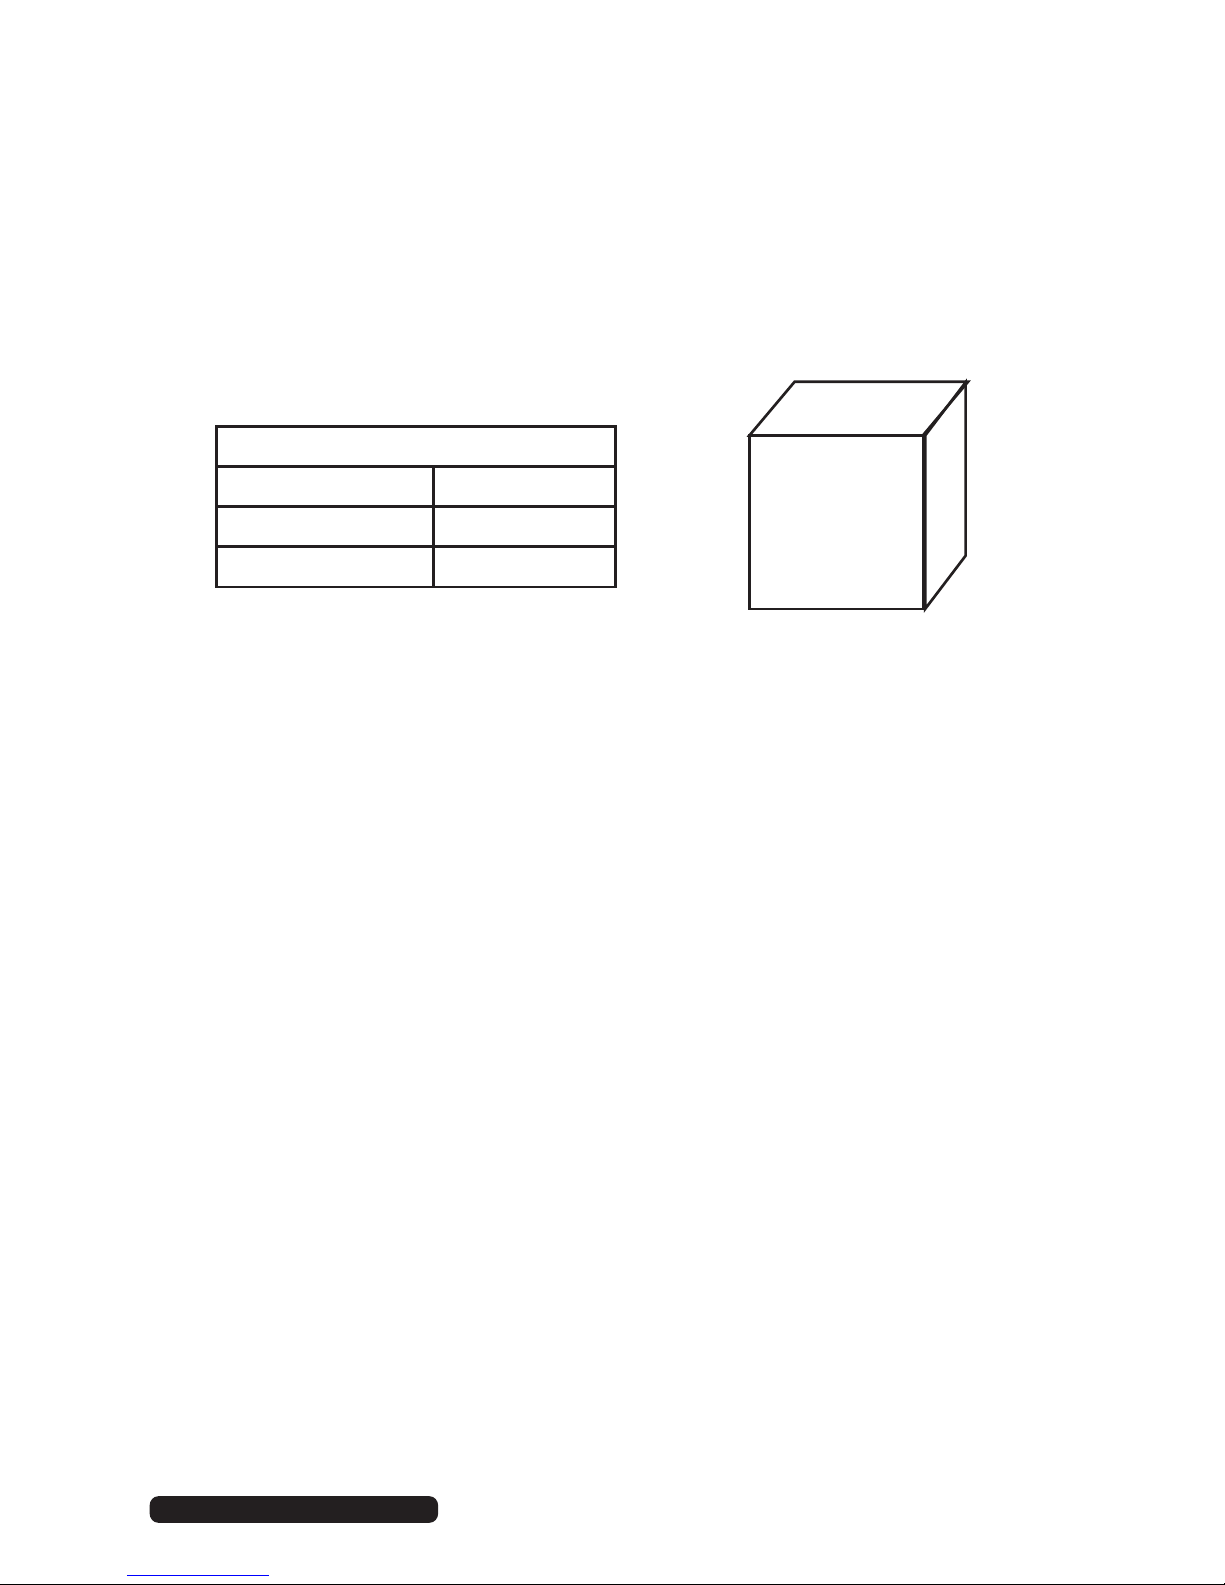
The appliance must be installed to all electrical, plumbing, water and drain
connections in accordance with state and local codes. It is designed for built-in,
recessed or free-standing installation.
• Built-in installation: If installing the wine fridge in a built-in environment, you will
need the following minimum space requirements:
60cm
87cm
59cm
Cabinet Opening Dimensions (min)
Width (Length) 60cm
Depth 59cm
Height 87cm
• Two person installation: Use two or more people to move and install the appliance.
Failure to do so can result in back or other injury.
• Door and handle: See pages 10-12 for door reversal and handle installation
instructions.
• Floor surface: This wine fridge must be properly positioned on a dry, sturdy, level
surface that is strong enough to support it when it is fully loaded.
• Levelling: It is important for the wine fridge to be level in order to work properly. To
level the unit, adjust the front levelling leg at the bottom of the wine fridge.
• DO NOT install the wine fridge:
• In direct sunlight, near heat sources, next to an open flame, cooking or heating
appliance, or near any other source of high heat.
• In an area with extreme cold ambient temperatures.
• In an area with excessive moisture and high humidity. Make sure it is protected
from elements such as wind, rain, water spray or drips.
• In an area where petrol or other explosive and/or flammable liquids or fumes are
used or stored. The fumes can create a fire hazard or explosion.
• Ventilation: Ensure that the ventilation openings to and from a built-in appliance are
never blocked or covered. To ensure proper ventilation for your wine fridge, the front
of the unit must be completely unobstructed.
• Ambient temperatures: Choose a well ventilated area for the wine fridge with
temperatures above 16°C and below 35°C. Ambient temperatures above or below
this range may affect the performance of the unit. For example, placing your wine
fridge in extremely cold or hot conditions may cause the interior temperatures in
the unit to fluctuate, and the normal operating range of 5-18°C may not always be
maintained.

10
Getting Started (Cont.)
Door reversal steps
1. First you need to take the hinge off the
right bottom corner of the door (Fig. 1).
To do so, open the glass door and remove
the two lock screws (A) under the right
bottom corner of the door that hold the
lower hinge (B) to the door shaft assembly
(C). Be careful to hold the glass door firmly
after removing the screws to prevent
it from dropping. Keep the screws for
installation on the left side.
2. Pull down to remove the glass door and
place it aside on a padded surface to
prevent scratching it.
3. Remove the three screws (D), the lower
hinge (B) and door shaft assembly (C).
Keep the parts for installation on the left
side.
4. Then you need to install the parts on the
left side of the lower frame (Fig. 2).
Remove the three screws on the bottom
left side (E) and install them on the right
side to cover the holes from the screws
you previously removed.
5. Remove the two screws (F) from the
bottom of the left door frame and install
them on the right side to cover the holes
from the screws you previously removed.
Reversing the door swing
The wine fridge has the capability of the door opening from either the left side or the
right side to suit your individual installation requirements. If you want to reverse the
opening direction, follow the instructions on this page spread.
WARNING: * Make sure the wine fridge is disconnected from the power supply when
changing the side at which the door opens.
* Keep all parts you remove for installation on the other side.
Fig. 1
A
C
D
Fig. 2
E
B
F

11
6. Turn the lower hinge (B) around and
install it with the three screws (D) at the
designated position on the left side of the
lower frame.
7. Now you will need to reverse the door
axle (Fig. 3). Remove the door axle from
the right upper hinge (G), then install and
tighten it in the left upper hinge (H).
8. Now you can reverse the glass door.
Set the door to the designated position.
Connect the door shaft assembly (C) with
the two lock screws (A) you previously
removed to the glass door and tighten
them before levelling the door.
9. Now you need to remove the door
handle. Open the door and gently lift the
door gasket to access the screws that
hold the handle (Fig. 4). Unscrew the two
screws from the inner side of the door
(Fig. 5).
10. Remove the two screws on the opposite
side of the door with a screwdriver and
install them at the opposite side to cover
the screw holes. CAUTION: Do not try to
remove these screws from the outside as
you might damage the stainless steel door
frame!
11. Mount the handle on the required |side as
described in ‘Handle installation’, page 12.
Fig. 3
Getting Started (Cont.)
G
H
Fig. 4
Fig. 5

12
Getting Started (Cont.)
Electrical connection
• The wine fridge should be plugged into an exclusive, properly installed, earthed and
easily accessible wall outlet.
• If the socket is no longer accessible once the appliance has been built-in, suitable
measures must be taken during the installation to ensure that the appliance can
be disconnected from the mains. Direct any questions concerning power and/or
earthing to a qualified electrician.
• After connecting the appliance to the mains power supply, allow it to run for at
least 30 minutes before making any adjustments or placing bottles in the cabinet.
Fig. 6
Handle installation
The handle comes supplied with the necessary installation hardware in the plastic bag
with the instruction manual.
• Open the fridge door and gently lift the door gasket at the area of the two screw
holes designated for handle installation.
• Align the screw holes in the handle with those in the door frame, then insert the
screws and washers from the inside and turn clockwise to tighten (Fig. 6).
• Replace the door gasket (Fig. 7).
Fig. 7

13
Instructions
Powering on
• Upon first connection, or when restarting the wine fridge after a long disconnection,
the selected temperature may vary slightly from the one shown on the LED display,
but this will be corrected once the wine fridge has been running for a few hours.
• If the unit is unplugged, turned off or power has been lost, you must wait 3 to 5
minutes before restarting the unit. If you attempt to restart before this time delay,
the wine fridge will not start.
The control panel
Touch the UP and DOWN marks at the same time for at least 3 seconds
to unlock the control panel, if unresponsive.
1 2 3 4 5 6 7 8
Number Function Description
1 Wine Indicator
Lights
Red LED indicator for red wine.
Green LED indicator for white wine.
Amber LED indicator for sparkling wine.
2 Light Touch to turn the interior light on or off.
3 LED Display Displays the current temperature inside the cabinet.
4 Up Touch to raise (warm) the set temperature by 1 degree.
5 Key Lock The controls will be locked automatically when no key
is touched for 2 minutes. To unlock, touch the UP and
DOWN pads at the same time for at least 3 seconds.
6 Down Touch to lower (cool) the set temperature by 1 degree.
7 ºF / ºC
Selector
Touch to select the temperature display in degrees
Fahrenheit or Celsius.
8Power Touch briefly to turn the wine fridge on.
Touch for 5 seconds to turn the wine fridge off.

14
Instructions (Cont.)
Temperature control
• Temperature display: The temperature inside the cabinet can be displayed in either
degrees Celsius (°C) or degrees Fahrenheit (°F). To change the display, simply touch
the ºF/ºC Selector mark. The selected temperature indicator will illuminate (ºF or ºC).
• Selecting the right temperature: In this single temperature zone wine fridge you
can store your wine at the most appropriate serving temperature (see the table
below). Set the temperature according to the type of wine that is mostly stored in
the wine fridge.
Type of Wine Recommended Storage
Temperature Wine Indicator Light
Red wine 15º – 18ºC (58º – 65ºF) Red
White wine 9º – 14ºC (48º – 57ºF) Green
Sparkling wine 5º – 8ºC (40º – 47ºF) Amber
• Adjusting the temperature: You can adjust the temperature in the cabinet to
anywhere within the cooling range (5ºC – 18ºC). To set the temperature, touch
the UP and DOWN marks repeatedly. When you touch the two marks for the first
time, the LED display will show the original temperature set by the factory: 12ºC /
54ºF. With every touch of the UP or DOWN mark, the temperature will increase or
decrease by 1 degree.
• Viewing the temperature: How fast the temperature drops inside the cabinet
depends on the room temperature. The current temperature inside the cabinet is
shown on the LED display.
To view the set temperature at any time, touch the UP or DOWN mark, the set
temperature will temporarily flash in the LED display for 5 seconds.
Interior light
Your wine fridge has a light for your viewing convenience. To activate the light, touch
the light mark on the control panel and check the contents, then touch the mark again
to switch off the light. For best wine storage conditions, always leave the light off
during normal operation.
Touch the UP and DOWN marks at the same time for at least 3 seconds
to unlock the control panel, if unresponsive.
After using the light, remember to touch the light mark again to switch off the
light; it will not extinguish automatically when the door is closed.

15
Instructions (Cont.)
Wine storage
• Capacity: Your new wine fridge will hold approximately 50 bottles of wine,
depending on their size and shape, up to a maximum of 54 standard 750ml bottles
in the following configuration: 8 bottles on each full-size shelf and 6 bottles on the
bottom half-size shelf (Fig. 8).
Do not overload the cabinet, and only store wine in sealed bottles.
• Access: To prevent damaging the door gasket, make sure the door is fully open
when pulling shelves out of the cabinet. For easy access to the bottles stored, pull
the shelves out approximately 1/3. The shelves are designed with an emergency
stop to prevent them being removed too far when loaded.
• Heat and direct sunlight: Install the wine fridge in the coolest area of the room,
away from heat producing appliances and out of direct sunlight.
• Ventilation: Always ensure proper ventilation. Never cover the air vents. Never cover
shelves with aluminum foil or any other material, which may prevent air circulation.
• For efficient operation: Do not open the door unnecessarily. Only keep it open for
as long as necessary when selecting or adding a bottle.
• Humidity control: The ideal ambient humidity level for storing wine is 50-80%. If
your ambient humidity is lower than 50%, we recommend adding some water to
the supplied plastic water container (Fig. 9) and placing it on the top shelf. If your
ambient humidity surpasses 80%, please minimise the door openings.
Door lock
• Your wine fridge is equipped with a lock and key for safe storage of wine.
• The keys are located inside the plastic bag that contains the instruction manual.
Insert the key into the lock and turn it counterclockwise to unlock the door. Turn
the lock clockwise to lock the door, making sure metal pin is engaged completely.
Remove the key and place it in a secure place for safekeeping.
8 Bottles Arrangement
6 Bottles Arrangement
Fig. 8 Fig. 9

16
Other Useful Information
Troubleshooting guide
If you encounter any problems with your wine fridge, try the suggestions below to see
if you can solve the problem before calling the after sales support line. You can solve
many common problems easily, saving you the time of a possible service call.
PROBLEM CAUSE
The wine fridge does not
operate.
• Not plugged in.
• The appliance is turned off.
• The circuit breaker tripped or a blown fuse.
The wine fridge is not cold
enough.
• Check the temperature control setting. Your external
environment may require a higher setting.
• The door is opened too often, or is kept open for too
long.
• The door is not closed completely.
• The door gasket does not seal properly.
The wine fridge turns on
and off frequently.
• The room temperature is hotter than normal.
• A large amount of contents has been added to the
wine fridge.
• The door is open too often.
• The door is not closed completely.
• The temperature control is not set correctly.
• The door gasket does not seal properly.
The light does not work. • The wine fridge is not plugged in.
• The circuit breaker tripped or a blown fuse.
• The light is not switched on.
Vibrations • Check to ensure that the wine fridge is level.
The wine fridge seems to
make too much noise.
• A rattling noise may come from the flow of the
refrigerant, which is normal.
• As each cycle ends, you may hear gurgling sounds,
which are caused by the flow of refrigerant in the
wine fridge.
• Contraction and expansion of the inside walls may
cause popping and crackling noises.
• The wine fridge is not level.
The door will not close
properly.
• The wine fridge is not level.
• The door was reversed and is not properly installed.
• The gasket is dirty.
• The shelves are out of position.
“EL” or “EH” is displayed. • The air temperature sensor has failed. Call our after
sales support line to arrange for a service.
17
Other Useful Information (Cont.)
Cleaning and maintenance
• Take out any bottles as well as the shelves before cleaning.
WARNING!
Before cleaning the appliance, make sure it is switched off and disconnected from
the power supply. Failure to do so can result in electrical shock or injury.
• To remove a shelf, move the shelf so
the notch in the shelf is positioned exactly
under the plastic protrusion, then lift up
the shelf and remove. When reinserting the
shelf, place it with the notch exactly above
the plastic post and then lower the shelf
onto the rails. (Fig. 10).
• Wash the inside surfaces with a solution
of warm water and baking soda (about 2
tablespoons of baking soda dissolved in
600ml of water). Use a soft, clean cloth to wipe down the surfaces, then rinse with
clean water and dry with a dry cloth.
NOTE: Make sure to wring excess water out of the sponge or cloth when cleaning
around the area of the controls or any electrical parts.
• Do not use soap or detergent for the cabinet.
• Wash the shelves and the outside of the cabinet with a mild detergent solution.
Wipe dry with a clean soft cloth.
• Never clean the unit with an abrasive, acid, oil or solvent based cleaning agent.
Never use flammable fluids or sprays for cleaning as the fumes from these
substances can create a fire hazard or explosion.
Defrosting
The evaporator behind the rear wall of the unit defrosts automatically. The condensate
collects in the drainage channel behind the rear wall of the unit and flows through the
drainage hole into the drip tray by the compressor, where it evaporates.
Going away?
• Leave the wine fridge operating during vacations of less than three weeks. If you
are not going to use the appliance for longer periods, remove all items and unplug
the power cord. Clean and dry the interior thoroughly. To prevent odours and mould
growth, leave the door open slightly, blocking it open if necessary.
• To move the wine fridge, take all items out of the appliance, securely tape down the
shelves and tape the door shut. Turn the levelling leg up to the base to avoid damage.
• Protect the outside of the wine fridge with a blanket or similar soft material and
make sure the wine fridge stays secure in the upright position during transportation.
Fig. 10

18
Power failure
Most power failures are corrected within a few hours and should not affect the
temperature of your appliance if you minimise the number of times the door is opened.
If the power is going to be off for a longer period of time, take proper steps to protect
the contents.
Responsible disposal
• At the end of its working life, do not throw this appliance out with your household
rubbish. Electrical and electronic products contain substances that can have
a detrimental effect on the environment and human health if disposed of
inappropriately. Observe any local regulations regarding the disposal of electrical
consumer goods and dispose of it appropriately for recycling and recovery of the
refrigerant. Contact your local authorities for advice on recycling facilities in your
area.
• Before discarding your wine fridge, disconnect it from the power supply and cut off
the plug to render it useless.
• Danger: risk of child entrapment! Take off the door and leave the shelves in place
so that children cannot easily climb inside.
Other Useful Information (Cont.)


Repair and Refurbished
Goods or Parts Notice
Unfortunately, from time to time, faulty products are manufactured which need to
be returned to the supplier for repair.
Please be aware that if your product is capable of retaining user-generated data
(such as files stored on a computer hard drive, telephone numbers stored on
a mobile telephone, songs stored on a portable media player, games saved on
a games console or files stored on a USB memory stick) during the process of
repair, some or all of your stored data may be lost. We recommend you save this
data elsewhere prior to sending the product for repair.
You should also be aware that rather than repairing goods, we may replace them with
refurbished goods of the same type or use refurbished parts in the repair process.
Please be assured though, refurbished parts or replacements are only used
where they meet ALDI’s stringent quality specifications.
If at any time you feel your repair is being handled unsatisfactorily, you may
escalate your complaint. Please telephone us on 1300 886 649 or write to us at:
Tempo (Aust) Pty Ltd ABN 70 106 100 252
PO BOX 6056 Frenchs Forest, Sydney, Australia NSW 2086
Telephone: 1300 886 649 (Aust) - Fax: (02) 9975 2688
Tempo Help Desk: 1300 886 649 (Aust)
(Operating Hours: Mon-Fri 08:30am to 06:00pm EST)
Email: [email protected]
After Sales Support
Telephone: 1300 886 649
Email: [email protected]
50 Bottle Wine Fridge
Other manuals for JC-145B1EQ
1
Table of contents
Other Stirling Wine Cooler manuals


