inbody 230 User manual
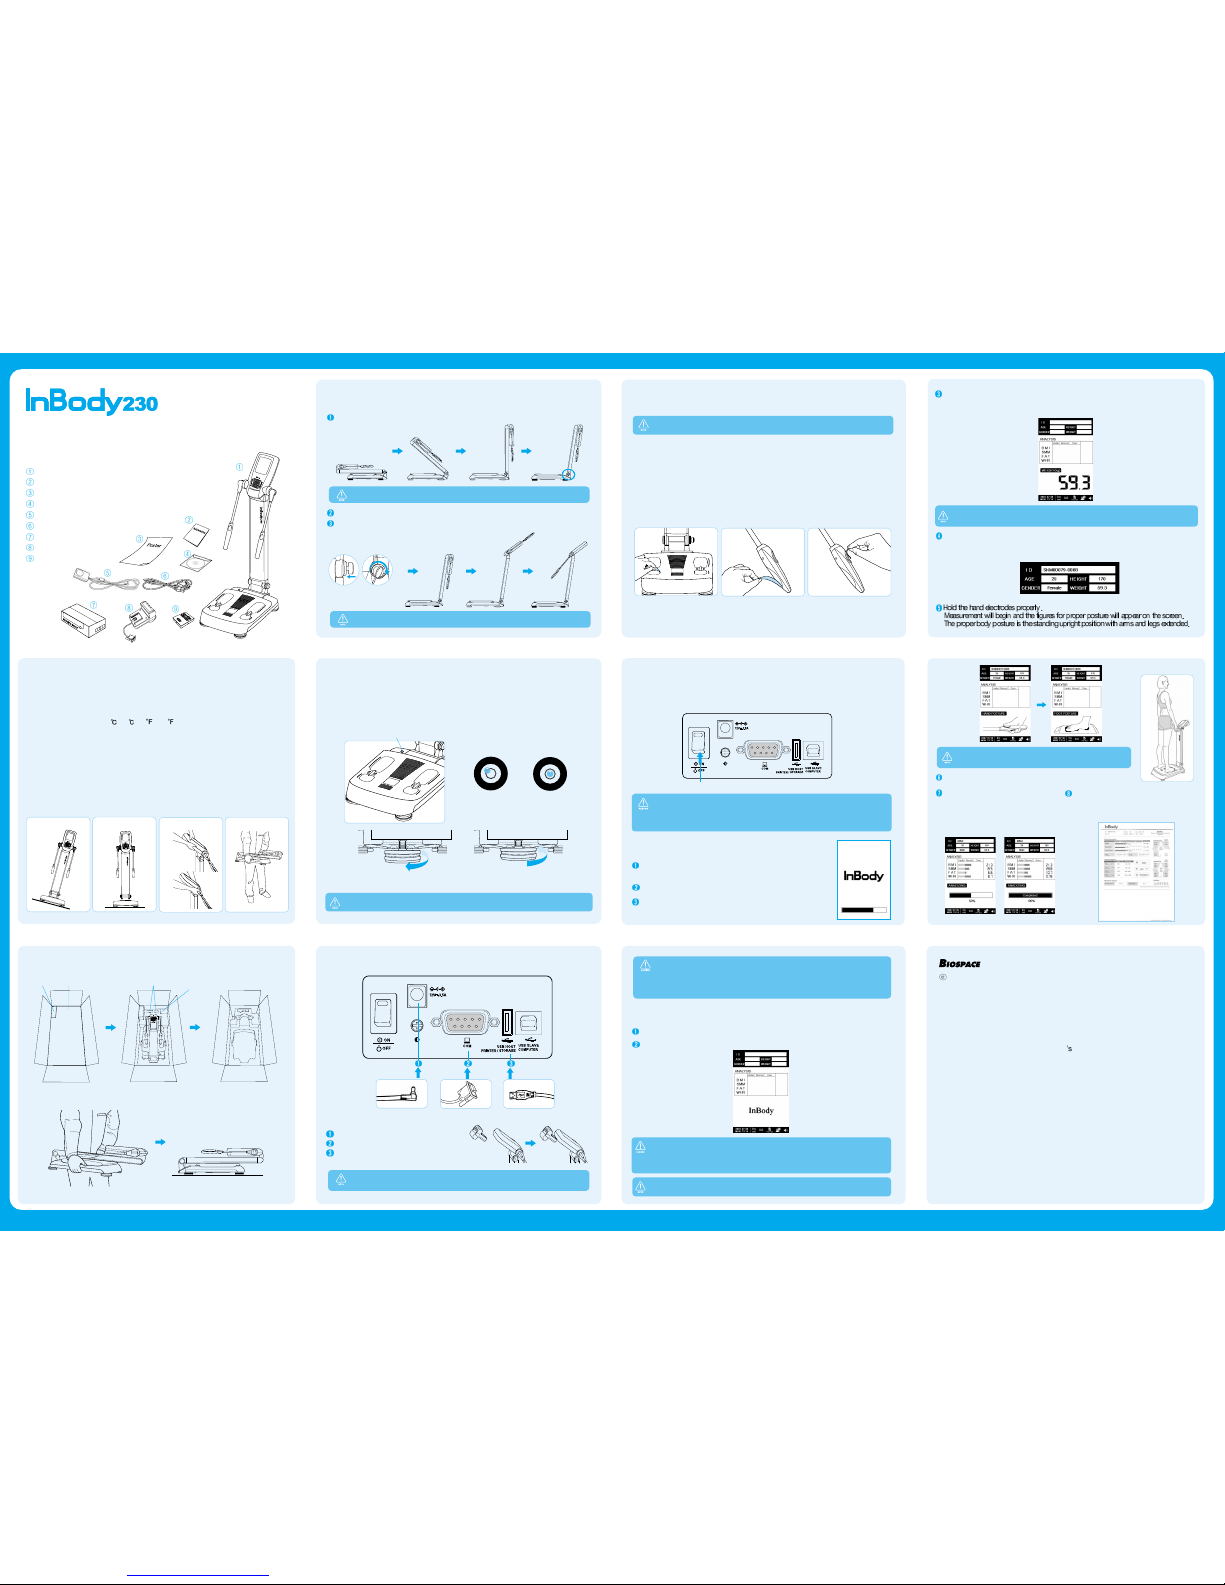
Contents of the Box
When opening the box, make sure all the following items are inside.
A. Product Units
InBody230 unit
Qui k installation guide
InBody230 Poster (1EA)
User’s manual CD
Power Adapter (12V, 3.5A) (1EA)
Power ord (AC 250V 10A, 1.8m) (1EA)
Result Sheet (Optional)
Thermal Printer (Optional)
SD400 (Optional)
6. Put the result sheets in the printer
1. Open the box and remove the top pad
Quick Installation Guide
5. Set up connections
nstallation nstructions
A. Workplace Requirements
(1) Indoor installation is highly re ommended.
Any outdoor installation pla es should meet all the onditions below.
(2) Operation onditions : 10 ~40 (50 ~104 ), 30%~80% RH, 500~1060hPa
(3) Adapter : Power Input AC 100~240V, 50/60 Hz, 1.2A
Power Output DC 12V, 3.5A
B. Attention
Please READ the following CAREFULLY before installing the InBody230.
(1) The InBody230 should be pla ed horizontal to the ground.
(2)
DO NOT hold the head part with LCD or joints of hand ele trodes when moving
the InBody230.
2. Place the nBody230 horizontal to the ground
Adapter able
9 pin serial port: Thermal printer ( optional )
USB HOST port: Printer
ONLY use the adapter provided by Biospa e to onne t with the powerport. Insert the
adapter able tightly into the power input port.
For insertion dire tion of result sheets, please refer to your printer manual as they may vary.
7.Remove the PVC cover from the hand and
foot electrodes
8.Turn on the power switch
The power swit h is lo ated at the rear of the equipment.
Please turn on the equipment.
When onne ting peripherals(printers and other optional devi es) to InBody230, turn
on the power of peripherals before turning on the InBody230. When turning the power
off, turn off the InBody230 before turning off the peripherals. This pro ess will minimize
the harm to the equipment aused by ele tri sho k.
DO NOT tou h the base frame after turning it on and during warming up. During
warming-up, the InBody230 pro esses the self-testing, zero point setup for the
s ale, and adjustment of the internal ir uit. Applying pressure or weight to the
base frame during self- alibration will result in an ina urate alibration and the
measurement may be ina urate.
Workplace Requirements Right posture for moving
XXOOXXOO
<In lined pla e> <Flat level> <Wrong posture> <Corre t posture>
Power Swit h
The printer onne ted to the InBody230
automati ally prints out the results.
Then, the InBody230 goes ba k to the
initial s reen.
9.Self-calibration
When the power is turned on, there is a signal sound and as the
logo omes up on the s reen, self- alibration starts automati ally.
Self- alibration will last about 15 se onds.
After self- alibration, there is another signal sound and the
InBody230 is ready for the measurement.
During the measurement, maintain the same posture and
do not move or talk.
The measurement takes approximately 30 se onds.
When the measurement is ompleted, the
‘Completion’ message appears on the
s reen with a signal sound. Return ea h
hand ele trode ba k to its original position,
and step down from the base frame.
10.Measurement
Step on the base frame and measure weight. Make sure to pla e your heels on the ir ular
ele trodes and the front soles on the fore-foot ele trodes.
When you steps onto the ma hine, the s reen will display your weight.
Bare feet must be in onta t with the foot ele trodes. Fingers and thumbs must be tou hing
hand ele trodes.
Top Pad
Result Sheet Adapter & Power Cable Thermal Printer
NEVER use this equipment if you have
- Medi al ele troni implants, su h as pa emakers
- Ele troni life support systems, su h as an artifi ial heart/lung
- Portable ele troni medi al devi es, su h as an ele tro ardiograph
This equipment may ause malfun tions of the above mentioned medi al ele troni devi es.
Confirm the InBody230 is ready for measurement. If it is ready, the following s reen is displayed.
For a urate results, please take off heavy lothes and a essories.
Enter personal information and press ENTER.When the ursor is at the I.D., use the
keypad beneath the s reen; type the I.D., AGE, HEIGHT, and GENDER. (WEIGHT will be
automati ally appeared on the s reen) Please press ENTER to start the measurement.
1996-2007 Biospa e Co., Ltd. All rights reserved.
Notice
The information ontained herein is subje t to hange without noti e. No part of this
manual shall be reprodu ed, stored in any retrieval system, or transmitted by any
means (ele troni , me hani al, photo opying, re ording, or otherwise) without written
permission from Biospa e. No patent liability is assumed with respe t to the use of
the information ontained herein. Biospa e is not liable for any damage aused by a
failure to meet the requirements in this user manual.
Biospa e Co., Ltd.
518-10 Dogok 2-dong, Gangnam-gu, Seoul 135-854 KOREA
Tel : 82-2-501-3939 Fax:82-2-501-3978
Homepage : http://www.biospa e. o.kr E-mail : biospa e@biospa e. o.kr
Biospa e, InBody and Lookin’Body are the registered trademarks of Biospa e
Co., Ltd. The names of the ompanies and produ ts in this manual other than those
of Biospa e Co., Ltd. are the trademarks of the ompanies. Stating the produ ts of
other ompanies is stri tly for the purpose of providing information, and not to
guarantee or re ommend the produ ts. Biospa e is not responsible for the
performan e or the use of these produ ts.
Biospa e reserves the right to modify the dimensions or exterior of InBody230 to
improve the quality of the produ ts, without onsent of the ustomer.
While pulling it up, press the base frame down to hold the ma hine on the ground.
From the front view, it should be slightly tilted ba kward.
3. Unfold the nBody230
Pull the stand of the equipment upward arefully until it stands upright.
Tighten the joint s rew to the right pushing it as below.
Push the head part upward arefully.
4. Balance the nBody230
Level the InBody230 using the indi ator and the four supporters.
The level indi ator is lo ated at the upper-left orner of the base frame.
Four supporters on the bottom of the base frame also work as leveling s rews.
Be areful with handling those s rews. Your fingers may get hurt on the edge of the base frame.
Level Indi ator
<Un-leveled state> <Leveled state>
<Raising> <Lowering>

www.biospaceamerica.com
Repacking
Be sure to turn off the power swit h and unplug the power able before repa king. Avoid
any severe physi al sho k, jarring or other damages to the devi e while repa king,
espe ially the arms and foot ele trodes.
(1) Turn off the power swit h.
(2) Remove all ables onne ted to the InBody230. If a thermal printer is atta hed to the
unit, remove the thermal printer first.
(3) Raise the hand ele trodes and make parallel with the equipment s head.
(4) Step onto the foot board and slowly fold the head part with hand ele trodes till it
rea hes to the ba k of the equipment.
(5) Loosen the joint s rew to the left.
(6) Fold the head and stand towards the foot board.
For the nBody box users
(7) Put the equipment in the box. Pla e the pads in position as illustrated below.
(8) Seal the box with a tape.
For the nBody bag users
(7) Put the equipment in the bag as illustrated below.
nBody230 SETUP MENU
The setup allows you to ustomize several fun tions through modifi ation.
The below setup s reen appears as pressing the SETUP button on the keypad at the initial s reen.
The setup of the InBody230 onsists of 5 items; Region, Printer, Result, Others and Interfa e.
1. How to Modify Settings
(1) Use the left and right buttons ( , ) or number buttons to sele t a ategory among
Region, Printer, Result, Others and Interfa e. Then sele ted item’s sub ategories are
displayed on the s reen.
(2) Use the upper and lower buttons ( , ) to move to the sub ategories.
(3) Use the right button ( ) to sele t the ategory and press the ENTER button to move into
the options. Press the upper and lower buttons ( , ) to modify the option you sele t.
(4) Use the left button ( ) or the EXIT button to move out from that ategory.
(5) Use the upper button ( ) or number buttons to go into other ategories: Region, Printer,
Result, Others or Interfa e
(6) Use the EXIT button to finish the setup menu.
(7) It will be automati ally saved as you move out from the setup menu.
2. Setup Menu
A. Region
Set the Date, Time, Display, Unit, Language and Ethni Ba kground.
(1) Set Date
Set the date using the upper and lower buttons ( , ) to modify the date. Use the left and
right buttons ( , ) or the ENTER button to move to Year, Month and Date.
(2) Set Time
Set the urrent time using the upper and lower buttons ( , ) to modify the time. Use the
left and right buttons ( , ) or the ENTER button to move to hour, minute and se ond.
(3) Display Mode
Sele t a time display mode. (yy/mm/dd, mm/dd/yy, dd/mm/yy)
(4) Unit
Sele t the unit to be used for height and weight. (kg/ m, kg/in., lb./ m, lb./in)
(5) Language
Sele t the language to be used.
(6) Ethni ba kground
Sele t the ethni ba kground of the examinee. (Asian, Cau asian, Afri an, Hispani , Others)
B. Printer
(1) Printer
Printers that support PCL3 or above and GDI / SPL are ompatible with InBody230.
(2) Alignment
Use the dire tion buttons ( , ,, ) to adjust the printing position. After adjusting, you
an he k whether the alignment has been set properly or not by ‘Test Print’. (Alignment
range: X ( left, right ), Y ( up, down ), + 50 ~ - 50 )
(3) Test Print
Che k the printing position by printing out a sample result sheet.
(4) Thermal Printer
Enable : Enable is he ked if the thermal printer is sele ted from ‘E. Interfa e’. For a test
print, move the ursor to ‘Enable’ and press ‘Print’ button.
Disable : Disable is he ked when the thermal printer is not in use.
C. Result
(1) Mode
Printed : To use printed result sheet provided by BIOSPACE.
Built-in : To use plain A4 paper. All formats of the result sheet will be printed out.
(2) Number of Result Sheets Printing
You an de ide the number of sheets to be printed. (0,1, or 2)
If ‘None’ is sele ted, it will not print the result sheet.
(3) BMI Standard
Sele t the standard range for BMI
Asian : The standard range is 18.5~23.0kg/m2
WHO : The standard range is 18.5~25.0 kg/m2
(4) Logo Type
Sele t a logo to be printed on the result sheet.
Pi ture : To be sele ted when a omputer is used to upgrade a logo. In this ase, as it annot be
uploaded by a user, you must onta t a lo al distributor of Biospa e.
Text : To be sele ted when a keypad is used to dire tly type in a logo. When you press the
ENTER button, a s reen for the logo upload will appear. A text of logo must be reated with
alphabets and numbers only.
(5) I.D.
Manual : You an enter the ID. If you put in an ID, the data is automati ally saved in the
InBody230.
Auto : ‘GUEST’ automati ally appears on the ID se tion. The InBody230 will not save any data
under this ondition.
D. Others
(1) Measure Weight
Enable : The InBody230 measures weight when an examinee stands on the foot frame.
Disable : The InBody230 does not measure weight and weight needs to be entered
manually like other personal information.
(2) Adjust Weight
It is possible to adjust weight offset value. If weight adjustment is needed due to lothes
or a essories, use the upper and lower buttons ( , ) to sele t the desired offset value.
( Calibration range : + 10 lbs ~ -10 lbs, step: 0.1 lbs or range: + 5 kg ~ -5 kg, step: 0.1 kg )
(3) Volume
Adjust the volume of the sound. (0 ~8)
(4) Sound
BEEP : Use Beep sound to inform measurement status.
OFF : Do not use any sound during the measurement.
(5) Initialize History
Use to erase the entire saved data. Press the ENTER button to delete all data.
(6) Version
The urrent program version is displayed.
E. nterface
Setup the external devi es to onne t with the InBody230 through a network.
(1) Lookin’Body (PC Software)
Sele t when you use LookinBody. (Enable/Disable)
(2) COM1 (Serial)
Sele t the external devi e to be onne ted to the 9-pin serial port.
Disable : Do not use the 9 - pin serial port.
SD400 : Sele t when you use SD400. 4 devi es at the most an be used with port 1~port 4.
Lookin’Body : Sele t when you use Lookin’Body with 9-pin serial port.
Thermal Printer : Sele t when you use a Thermal Printer.
Please reboot InBody230 when you connect a new external device.
3. Quick Setup
Users an easily modify frequently used fun tions in the initial s reen.
A. How to modify using Quick Setup
(1) Press the MODE button at the initial s reen and the qui k setup s reen will appear as
above.
(2) Choose an item you want to modify.
Use the left and right buttons ( , ) to move into the ategory that you want to hange.
Use the upper and lower buttons ( , ) to modify setup values.
(3) Press the ENTER button to save the hanges and press the EXIT button to go ba k to
the initial s reen.
B. Quick Setup Menu
(1) Unit
Sele t the unit to be used in measurement. (kg/ m, kg/in., lb./ m, lb./in.)
(2) Adjust Weight
If weight adjustment is needed due to lothes or a essories, sele t desired offset
values. Use the upper and lower buttons ( , ) to adjust the weight.
(Calibration range : +10 lbs ~ -10 lbs, step : 0.1 lbs or range : +5 kg ~ -5 kg, step : 0.1 kg)
(3) Result Sheet Mode
Printed : Sele t when using the printed result sheet provided by Biospa e.
Built - in : Sele t when using general A4 paper.
(4) Number of result sheets
Sele t the number of result sheet to be printed. (0,1 or 2)
(5) Volume
Adjust the volume of the sound. (0~8)
4. Data Transfer
If you input an ID of personal information, the data is automati ally saved. You an easily
transfer all data stored in the InBody230 into a USB storage devi e.
(1) Turn off the InBody230.
(2) Conne t a USB storage devi e to the USB host port.
Please use the only USB storage device provided by Biospace only. Contact
Biospace or an authori ed distributor, if you need further information of USB
storage devices compatible with the InBody230.
(3) Turn on the InBody 230.
(4) Press the ENTER button after finishing the warming-up pro ess.
(5) “Saving” message appears.
“Not found USB storage” message appears when the USB storage device is not connected.
“Lack of memory space” message appears when there is not enough space to store in the
USB storage device.
(6) “Complete” message appears when it is finished transferring all the data.
nBody230 Maintenance
(1) After usage, wipe ele trodes with a wet tissue (also known as ‘wet naps, surfa e
wipes, anti-ba terial tissues, et .). Wet tissues an be pur hased at any lo al stores.
(2) Handle the arms with are. Never apply ex essive stress near the hand ele trode
joint. The damage aused by misuse may affe t the fun tion of the internal able and
ele tri board.
(3) Do not pla e anything on the base frame nor apply any pressure onto it when the
InBody230 is not in use.
(4) When the InBody230 is not in use for a period longer than a day, unplug the adapter.
(5) Do not move or relo ate the InBody230 while the power is on.
(6) Do not drop food or drinks on the equipment. They may affe t the ele tri al parts in the
equipment or ause damage.
(7) On e a week, wipe the exterior sides of InBody230 with a dry towel. In parti ular,
lean the LCD monitor, softly with are not to s rat h the surfa e.
(8) Follow lo al governing ordinan es and re y ling plans regarding disposal or re y ling of
devi e omponents.
Error Messages
The InBody230 displays an error message to alert the operator of problems and to
re ommend the orre t a tion.
A. “Remove any objects on the footboard”
When pressure or weight is applied to the base frame during self- alibration, this message
appears. Turn the InBody230 off and on again after removing the obeje ts from the base
frame. Please do not apply pressure or weight to the base frame during self- alibration.
B. “ Enter the personal data again”
If entered subje t data are beyond a eptable ranges, this error message appears.
When inputting subje t data, do not ex eed the a eptable ranges of Age and Height,
please refer to Chapter2, se tion 3: “Personal Profile” of the manual CD.
C. “Try again after wiping hands and feet”
If this message still display on the LCD after he king the subje t’s posture on the se ond
trial, a subje t’s soles and palms are too dry to be measured pre isely. In this ase, a
subje t should wipe his/her soles and palms with wet tissue and try again.
Manufacturer’s Warranty
(1) BIOSPACE guarantees that the produ t has been approved through qualified test
pro edures under severe onditions.
(2) The two years of manufa ture’s warranty begins on the date of pur hase.
(3) During two years of warranty period, BIOSPACE remedies any original defe t in material
or workmanship.
(4) The following defe ts or malfun tions will not be overed under the two years of warranty:
a. Any defe t aused by user’s fault.
b. Any defe t or damage aused by not following the instru tions des ribed in the user’s manual.
. Any defe t or damage aused by natural disasters (storm, flood, earthquake, et .).
d. Any defe t or damage aused by disassembly of the InBody230 or by modifying internal
parts or program by unauthorized personnel.
(5) An extended warranty may be pur hased by exe uting an extended warranty ontra t
after the initial warranty period.
(6) No return is allowed after a produ t is opened. The proof of pur hase must be
a ompanied before requesting servi e.
(7) Please onta t authorized personnel for any servi e alls.
The client’s copy of the manufacture’s warranty is located at the last page of user’s
manual CD.
1996-2007 Biospa e Co., Ltd. All rights reserved. BM-ENG2-40-C-070910
Other manuals for 230
1


