INFIMED ONYX TL-01 User manual

User's Manual
TREATMENT LAMP
ONYX TL-01
Serial number ……………………………..
Release 3.0
June 2022

2
Producent:
INFIMED Ltd.
Kabaty 1 Street
34-300 Żywiec
Poland
WWW.INFIMED.PL
Tel/fax +48 33 861 40 96
SRN: PL-MF-000015633
NIP 553 251 29 67
REGON 243274947
According to the classification of medical devices according to Regulation of the European
Parliament and of the Council (EU) 2017/745, the table is classified as Class I.
The manufacturer declares that the product complies with the essential requirements of
the Regulation of the European Parliament and of the Council (EU) 2017/745 and the Law
on Medical Devices.
The compliance procedure was conducted in accordance with Annex VIII of the Ordinance.
1. Safety........................................................................................... Błąd! Nie zdefiniowano zakładki.

3
1.1. General safety notes ................................................................ Błąd! Nie zdefiniowano zakładki.
1.2. General notes on safe use of the product.................................................................................... 4
1.3. Technical parameters .............................................................. Błąd! Nie zdefiniowano zakładki.
1.4. General requirements .................................................................................................................. 6
1.5. Product description .................................................................. Błąd! Nie zdefiniowano zakładki.
1.6. Description of the components of the ONYX TL-01 lamp construction...Błąd! Nie zdefiniowano
zakładki.
TL-01 treatment lamp......................................................................................................................... 9
2. Transport and commissioning ........................................................................................................... 11
2.1. Transport .................................................................................................................................... 11
2.2. Unpacking and initial startup ..................................................................................................... 11
3. Operation and performance.............................................................................................................. 11
3.1. Control panel.................................................................................................................................. 12
3.2. Adjustment with an adjustment handle (optional extra)........................................................... 13
3.3. Positioning.................................................................................................................................. 13
4. Battery charging ........................................................................................................................ 15
5. Risk of collisions......................................................................................................................... 16
6. Performance evaluation............................................................................................................ 16
7. Damage and defects.................................................................................................................. 17
8. Cleaning and disinfection .......................................................................................................... 17
9. Maintenance, inspection and repair ......................................................................................... 18
10. Condition checks and inspections ........................................... Błąd! Nie zdefiniowano zakładki.
11. Removal of potential defects Usuwanie potencjalnych usterek.............Błąd! Nie zdefiniowano
zakładki.
12. Liquidation of the product........................................................................................................ 19
13. Lamp labels.................................................................................................................................. 19

4
1. Safety
The product has been designed and manufactured to ensure its safe use and operation. The
prerequisite for the safe use of the lamp is to read, understand and follow the rules contained in this
manual.
1.1 General safety considerations
- Do not use, operate or service the lamp in a manner inconsistent with these operating
instructions. This may lead to damage, which is the responsibility of the user and for which
the manufacturer is not responsible.
- The user is not allowed to make independent modifications or repairs to the product. The
occurrence of such will void the product warranty. Repairs can be carried out by service personnel or
manufacturer's representative.
1.2. General notes on the safe use of the product
- The lamp must not be used when the obscuring glass or lens system indicates damage (unstable
attachment, cracking, etc.). Temperature disturbance or change in light parameters may affect the
course of treatments.
- When moving the lamp arms, avoid collisions between the lamp bowls and other equipment in
the room.
- To achieve a full range of lighting control, the distance between the illuminated field and the
lamp should be between 0.6 and 1.5 m.
- Do not look into the light of an operating lamp due to the possibility of temporary glare.
- The lamp must be connected to a power source according to the nameplate.
- The lamp is not intended for use in potentially hazardous areas, e.g., where there is an
explosion hazard.
- Do not place foreign objects on the components of the lamp, as this may lead to loss of hanging
stability or danger during treatment.
- It is forbidden to store the lamp with discharged batteries.
- Do not use bleaching agents - containing active chorine or oxygen - for washing and
disinfection.

5
- For washing elements made of plastic, do not use any agents whose components destroy their
structure.
- If the product will not be used for a long period of time, it should be stored in the following
environmental conditions:
- temperature: 25⁰C (77⁰F) ± 10⁰C (18⁰F)
- humidity: 50% ± 25%
During storage, the product must be turned off. The switch must be in the "0" position. In case of
prolonged storage, it should be connected to the power supply for 24 hours every 6 months to
recharge the batteries. The product must not be stored when the batteries are discharged (the red
light on the panel is lit).
- The product is designed to be installed and operated only indoors with the following environmental
conditions:
- temperature: 25⁰C (77⁰F) ± 10⁰C (18⁰F)
- humidity: 50% ± 25%
- atmospheric pressure 700 do 1060 hPa
Failure to comply with the above requirements for cleaning and disinfection in the first place will
void the product warranty

6
1.3. Technical parameters
Parameters of Infimed ONYX treatment lamps:
TL-01 60/100klx
TL-01 30klx
Ec illumination intensity
60 klx (100klx-120klx)*
30 klx
Light intensity control
10 – 100%
10 – 100%
Color temperature Tc
4300K (4800K)*
4300K (4800K)*
Light field diameter d10 at Ec
260mm (240-340mm )*
240mm
Depth of illumination
800mm
800mm
Color rendering index [Ra(1-8)].
> 92 (> 95)*
>92 (> 95)*
Red color rendering index [R9].
> 90 (> 92)*
(> 90)*
Canopy housing temperature
< 40,00oC
< 40,00oC
Temperature rise in the area of the operator's head
< 1,00oC
< 1,00oC
Supply voltage of the primary side
90-250V AC
90-250V AC
Power consumption
50W
20W
Supply voltage of the luminaire heads
24-28V DC
24-28V DC
Lamp life
> 50 000godz.
> 50 000godz.
Degree of protection of the luminaire head
IP54
IPX2
At the special request of the customer, it is possible to manufacture a product with changed
technical parameters, without reducing its safety.
1.4. General requirements
The product should be used, operated and serviced in accordance with the rules of this manual.
The lamp is designed for installation and operation only indoors.
Use, operation and servicing of the lamp contrary to the guidelines of the manual is absolutely
prohibited and may lead to danger and irreparable damage through the fault of the user, for which
the manufacturer is not responsible. Any interference with the components of the lamp contrary
to the instructions, the use of equipment other than that offered by the manufacturer may be
permitted only with written permission from the manufacturer. The user must ensure that all
persons operating, handling the product have read, understood and followed this manual.
In addition, he is obliged to ensure that the lamp is used only for its intended purpose and under
conditions suitable for this purpose. The user is obliged to ensure all necessary measures to ensure
the safe and appropriate operation of the product, to prevent any risk to the safety of his life and

7
health, as well as that of patients and third parties. Storage - if the product will not be used for a long
period of time, it should be stored under the following environmental conditions:
- temperature: 25⁰C (77⁰F) ± 10⁰C (18⁰F)
- humidity: 50% ± 25%
During storage, the product must be turned off. The switch must be in the "0" position. In case of
prolonged storage, it should be connected to the power supply for 24 hours every 6 months to
recharge the batteries. The product must not be stored when the batteries are discharged (the red
light on the panel is lit).
The product is designed to be installed and operated only indoors with the following environmental
conditions:
- temperature 25⁰C (77⁰F) ± 10⁰C (18⁰F)
- humidity: 50% ± 25%
- atmospheric pressure 700 do 1060 hPa
Permissible temperature change in 12 hours not more than 20°C.
During transportation, storage and unpacking of the product, the temperature change must not be
greater than 10°C per hour. Do not unpack the product before it reaches the temperature in the
room intended for installation. In case of significant temperature differences between the transport
temperature and the temperature of the room where the product is to be operated, the product
should be left for a minimum of 12 hours to equalize the temperature level. After this period, you
can proceed to commissioning. If the product is transported in specific conditions (low ambient
temperature), the methods of transportation, protection should be agreed with the manufacturer.
1.5 Description of the product
Infimed Onyx treatment lamps are modern lamps made with LED technology, designed to illuminate
the treatment field during diagnostic, therapeutic and cosmetic procedures. LED technology ensures
low energy consumption, absence of harmful UW radiation and several times longer life of a
treatment lamp made this way in comparison with traditional light sources - both halogen and
discharge. LED light sources do not contain lead, mercury and other hazardous substances, which
facilitates their future disposal. Infimed Onyx LED treatment lamps are characterized by very good
technical parameters, low thermal radiation, and easy positioning of lightweight, ergonomic bowls.
Tight and damage-resistant aluminum construction guarantees easy disinfection and maintenance, as
well as resistance to environmental factors. The control panel allows you to adjust selected
parameters of the lamp - illumination intensity, and optionally adjust the light field. The sterile
adjustment handle allows precise adjustment of the lamp and can be sterilized in an autoclave. As an
additional option, it also allows adjustment of the size of the light field. The Infimed Onyx treatment
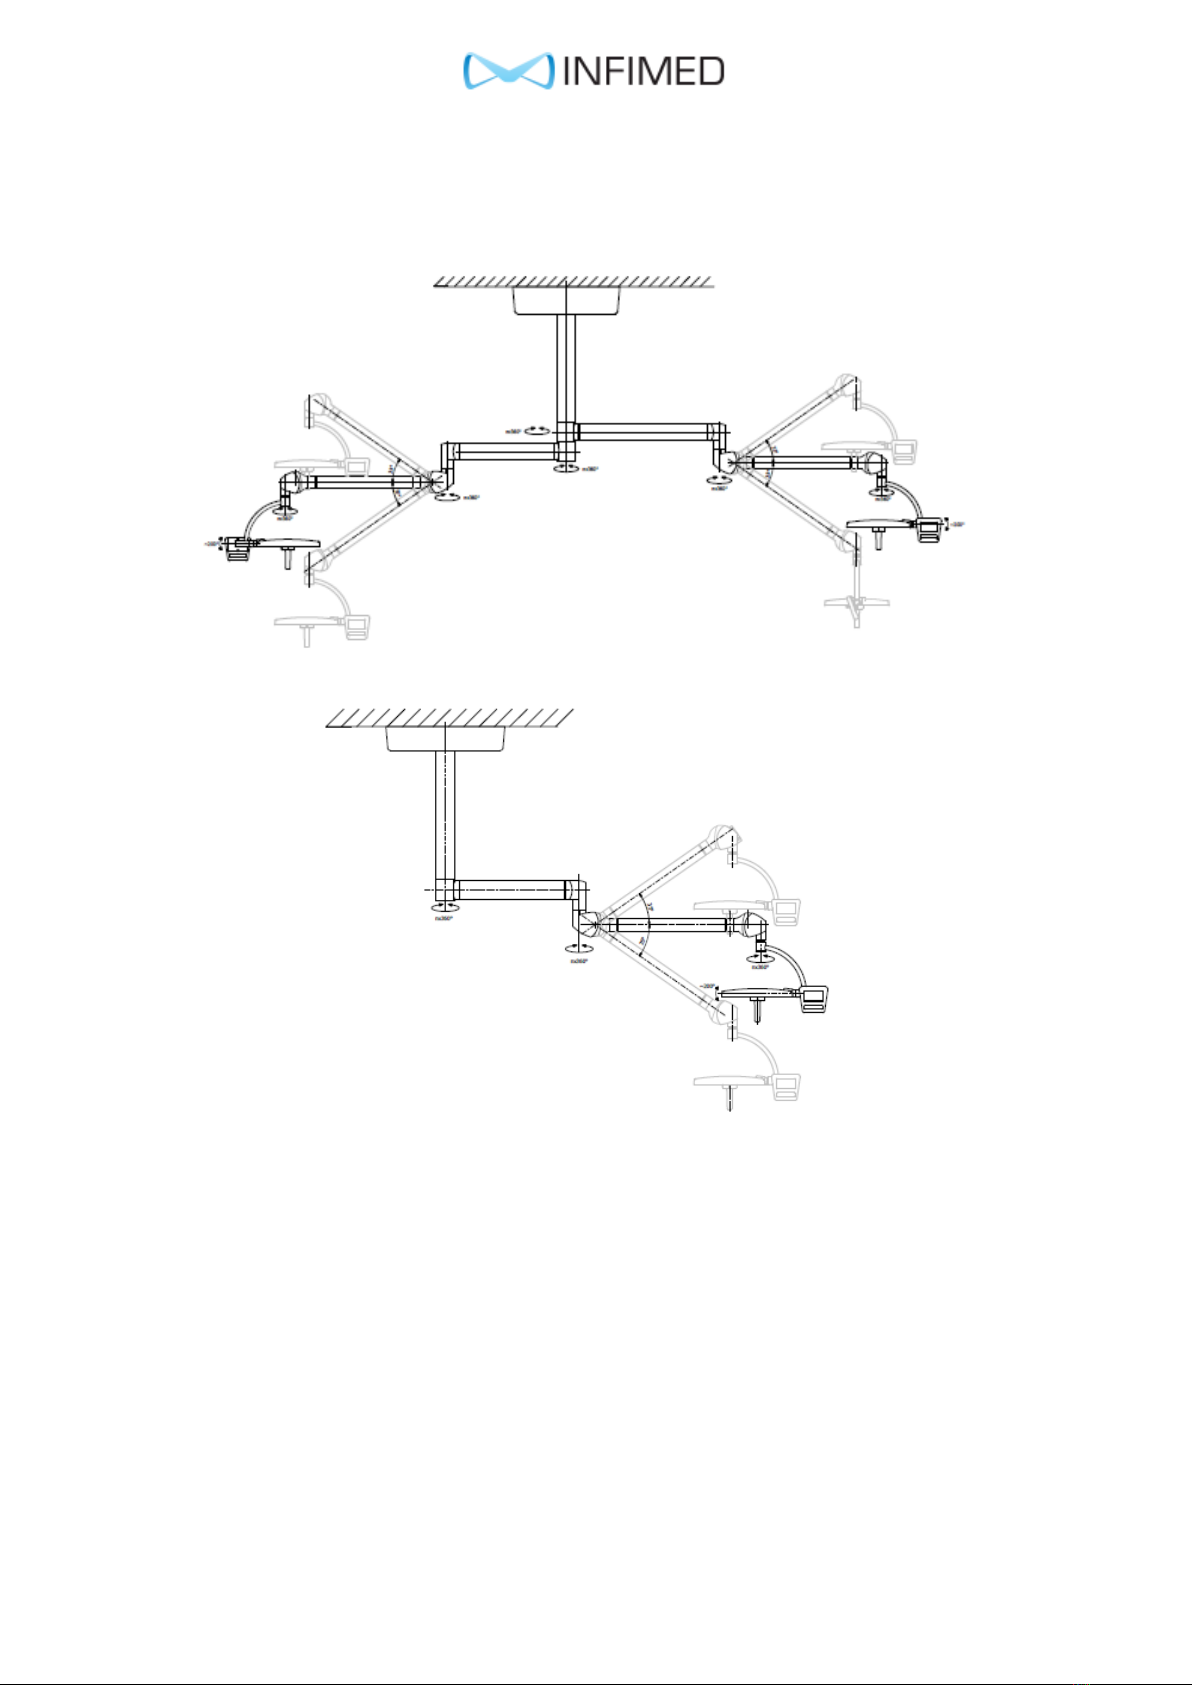
lamp is available in a single or double ceiling-mounted sling, wall-mounted, and a mobile version
equipped with an optional battery system.
8
Ceiling sling versions (double and single):

9
A wall-mounted and mobile version of the treatment lamp:

10
1.5. Description of the components of the ONYX TL-01 lamp construction
TL-01 treatment lamp
1 - control panel
2 - canopy arm system
3 - canopy
4 - sterile holder
Treatment lampTL-01 30klx
1
2
3
4

11
2. Transport and commissioning
2.1. Transport
The product can be transported by all generally available covered means of transport. During
transport, the product must be protected from moisture and dust and immobilized. During transport
and storage, the temperature should be in the range from -10 to +60 degrees C, and humidity 20-
60%. When unpacking the product, the temperature change should not be more than 8-10 degrees C
per hour. Do not unpack the product before it reaches the temperature of the room intended for
installation. In the case of significant temperature differences between the transport temperature
and the temperature of the room where the product is to be operated, the product should be left for
a minimum of 12 hours to equalize the temperature level. If there is no clear marking on the
transport packaging, do not stack the products in layers. In the case of transporting the lamp in
specific conditions (low ambient temperature), the methods of transportation, protection should be
agreed with the manufacturer.
2.2. Unpacking and initial startup
The lamp is supplied by the manufacturer in a box. Do not unpack the lamp outside the building.
Preparing the lamp for operation should be done according to the following order:
a) Make sure that the transport package stood long enough in the room where the lamp is to be used
b) Open the transport package and remove the materials protecting the lamp
4
1
3

12
c) Attach the ceiling plate system to the existing ceiling in accordance with the Building Preparation
Manual for Infimed lamps
d) Attach the lamp mounting arm system, depending on the version of the lamp design (installation
according to the Installation Manual on the bracket provided by the manufacturer)
e) Fix the lamp in the arm holder
f) Connect the lamp with the power supply system, then connect the system to the mains supply
g) Carefully read the instruction manual
h) Check the operation of the mechanical suspension systems of the lamp
If the product is not fully operational, i.e. the obtained parameter values differ from those
provided in the instructions, it must not be used. This fact should be reported to the manufacturer
or its representative. The use of an inoperative lamp may lead to damage, which is the
responsibility of the user and for which the manufacturer is not responsible.
If the product will not be used for a long period of time, it should be stored under the following
environmental conditions: temperature: 25⁰C (77⁰F) ± 10⁰C (18⁰F), humidity: 50% ± 25%. The
product must be turned off during storage. The switch must be in the "0" position. For prolonged
storage, it should be plugged in every 6 months for 24 hours to recharge the batteries. The product
must not be stored when the batteries are discharged (the red LED on the panel is lit).
The product is designed to be installed and operated only indoors with the following environmental
conditions: temperature: 25⁰C (77⁰F) ± 10⁰C (18⁰F), humidity: 50% ± 25%, atmospheric pressure 700
to 1060 hPa.
3. Operation and performance
3.1. Control panel
The lamp is switched on and off by pressing button 1.
Buttons 2 adjust the parameters of the lamp canopy.
1
2
3

13
LED indications 3 signal failure and battery or power status.
3.2. Adjustment with an adjustment handle (optional extra)
The size of the light field is adjusted by turning clockwise or counterclockwise with the
sterilizable adjustment handle.
1
2
2
3
1
14
- To remove the sterilizable handle, press the latch button (2)
and, keeping it in the pressed position, pull the handle downward.
- To install the holder, slide the holder (1) onto the guide until the latch (2) catches.
3.3. Positioning
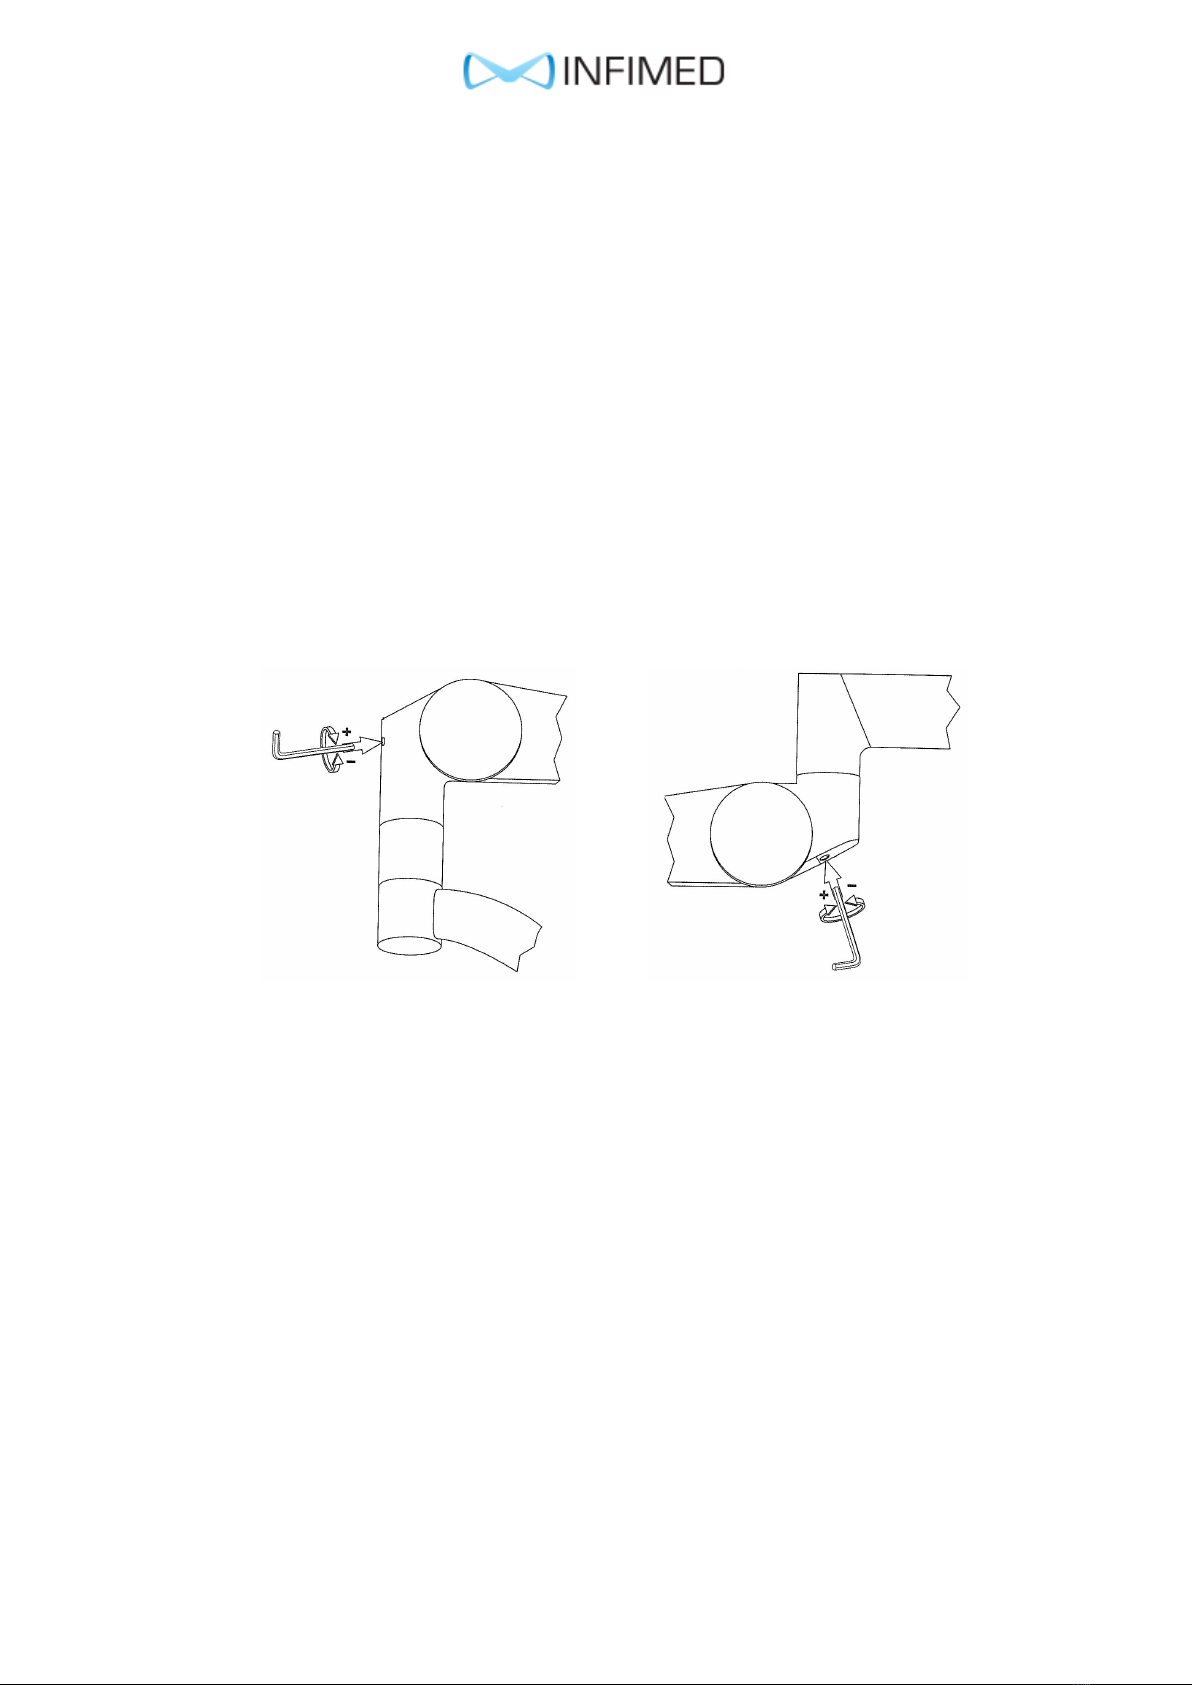
ONDAL production arms
The following are used for positioning the lamp canopy: a sterilizable adjustment handle and lamp
positioning handles on the edges of the lamp canopy. The height of the lamp is determined using the
movement capabilities of the lamp suspension arms. It is possible to adjust the tension force of the
arm. To reduce the tension force (the arm rises on its own), place the adjustment rod (included in the
original package of the arm) in the hole and turn it clockwise (+). When the force is too low (the arm
automatically descends), turn the adjustment rod counterclockwise (-).
Method of adjusting the tension force and swing range of the Ondal spring arm
Liberec production arms
The following are used for positioning the lamp canopy: a sterilizable adjustment handle and lamp
positioning handles on the edges of the lamp canopy. The height of the lamp is determined using the
movement capabilities of the lamp suspension arms. It is possible to adjust the tension force of the
arm. To reduce the tension force, place the Allen key in the hole (from the bottom of the arm) and
turn it in the direction of movement indicated below. When the force is too low, turn the Allen key
in the opposite

15
direction.
Do not adjust the function screw. It must be screwed in, it is not for adjustment.
Adjustment of the spring arm
Direction of reduction of spring
force of spring for smaller
loads/times
Direction to increase arm spring
force for higher loads/times
Swivel arm
Imbus key
Spring arm
SPR arm joint components
Spring arm
Spring arm
Hinge cover
Hinge
Inner ring
Place for ring

16
4. Battery charging
If the lamp is equipped with a charger for charging the batteries contained in the lamp, it should be
connected to a power supply network with power parameters identical to those specified on the
nameplate. The charging system is switched on by inserting the appropriate end of the power cord
into the socket located in the lamp housing, inserting the plug of the cord into the power socket and
pressing the switch located in the lamp housing from the 0 to 1 position.
Do not perform operations while the batteries are charging.
On the control panel or power panel, there is a built-in LED indication of the state of charge of the
batteries. When the green LED is lit, there is no need to charge. As the energy level in the batteries
decreases, more LEDs will additionally light up and go out. The following indications may occur:
Green diode - batteries charged
Orange diode - battery capacity at 60% - charging can be connected
Red diode - capacity below 30% - absolutely connect the power supply to the batteries
The charging process can be started already at the level of the orange diode light.
After connecting the power supply, the green LED will light up. You should charge the batteries for
about 6 hours. If the batteries charge in less time, the process will end automatically. In the event
that the user completes the charging process earlier after disconnecting the power supply, those
LEDs corresponding to the degree of charge of the batteries will light up. The nominal operating time
of the batteries is about 3 hours. However, this period may be reduced depending on the intensity of
use of the lamp.
Do not store the lamp with discharged batteries.
When replacing batteries, always replace a set.
Excessive charging of the batteries may eventually lead to a shortened battery life.
Place of the function screw
Spring arm
Function screw

17
Do not store the table with discharged batteries - if the product is not used for more than a week,
turn off the mains switch, and after a longer period of non-use of the product, recharge the
batteries - at least once every six months.
5. Risk of collisions
When moving lamp arms, avoid collisions between lamp arms or lamp bowls, as well as with
other equipment in the operating room.
Operate the lamp deliberately with care and full responsibility.
6. Performance evaluation
Before each first start-up and use of the lamp on a given day, it is necessary to evaluate the
correctness of its operation.
How to evaluate the state of correct operation:
- check the smoothness of movement by trying to move the lamp manually
- check for mechanical clearances, by moving the lamps and arm system manually
- check the functioning of the electronic system by performing all movements controlled from the
control panel and the sterilized handle
- check that the arms do not drop or rise spontaneously
When no inaccuracies or damages are detected during such a test, and no disturbing sounds were
heard by the user during the tests, the lamp can be used. Otherwise, refer to the troubleshooting
section.
If the lamp is not completely case, that is, the obtained parameter values differ from those in the
instructions, it must not be used. This fact should be reported to the manufacturer or its
representative. The use of an inoperative lamp may lead to damage, which is the responsibility of
the user and for which the manufacturer is not responsible.
7. Damage and defects
Defects and defects detected in the product by operating personnel must be reported
immediately to the person in charge of technical maintenance at the facility. This person, having
carefully recognised the possible defect and its cause, is obliged to contact the service department or
the manufacturer for consultation and possible instructions for further action. A product which
cannot be used safely (mechanical, electrical faults) must not be used until it has been repaired.

18
8. Cleaning and disinfection
For cleaning and disinfection, use cleaning agents that do not contain active oxygen or chlorine. After
disinfection, rinse with distilled water to eliminate streaks. Use a dry soft sterile cloth for thorough
drying.
Before disinfection, it is essential to disconnect the power cord.
Do not use a water jet to wash the product.
Do not use any agents whose ingredients damage the structure of plastic parts to wash them.
The removable sterilisable adjustment handle is made of material resistant to high-temperature
sterilisation conditions. The handle must be cleaned, disinfected and sterilised, both before first use
and before each subsequent use. The holder must be sterilised upright in the autoclave at up to 134
degrees C for up to 5 minutes. The handles can be sterilised a maximum of 100 times, after this
period the handles must be replaced with new ones.
The apertures of the lamp diodes are made of polycarbonate, which can be cleaned using standard
cleaning agents in the form of a solution at the concentrations specified by the manufacturer.
Polycarbonate should not be dry wiped, scouring agents should not be used or agents with an alcohol
content above 20% should not be used. After cleaning, the curtains should be wiped down with an
anti-static agent.
A list of disinfectants can be found in Annex 1 of the instructions.
Failure to comply with the above requirements will void the product warranty.
9. Maintenance, inspection and repair
Any repairs to the product shall be carried out by the relevant service centre or the manufacturer's
direct representative. The user is not entitled to make any modifications or repairs to the product
himself without special training and authorisation. Once the customer has obtained the
manufacturer's written consent for a possible repair to be carried out by the customer's technical
personnel, the manufacturer will make available all the necessary information needed to carry out
the repair.
To ensure long and trouble-free operation of the lamps, only original parts supplied by the
manufacturer should be used.
As the product contains components which may pose a risk to the environment, the handling of
used parts must comply with environmental regulations.
When replacing batteries, the manufacturer is obliged to take them back.

19
All repairs, inspections and maintenance work should be recorded in the Repair and Maintenance
Service Card included in the product instructions (Annex 2).
10. Condition checks and inspections
In order to ensure that the product remains in good technical condition during its period of use, the
user is obliged to submit it to periodic technical inspections. Inspections are carried out by an
authorised service centre or by the manufacturer's direct representative. The inspection is carried
out at the user's expense.
Only a positive inspection result can form the basis for further use of the lamp.
Every 12 months the following should be carried out:
- check of general technical condition
- functional check
- check of electrical installation
In order to ensure the correct safe functioning of the lamps, the user should check the technical
condition of the device at least once every 6 months. In this case, the following sequence should be
followed:
a) a) carry out all functional movements of the lifting arms by checking the effectiveness of the
brakes, the tensile forces of the swing arms, the safety devices on the swivel joints
b) check the condition of the sterilised holder and the functioning of its fixing mechanism
c) check the condition of the lamp holder - condition of shades, functioning of controls, etc.
d) check the condition of the protective earthing conductor
11. Removal of potential faults
a) lamp does not light
- check the charge level of the batteries
- check the status of the mains supply to the lamp
b) niepewne mocowanie uchwytów sterylizowalnych
- replace the handle with a new one
If in doubt, contact the manufacturer for the necessary assistance and clarification.

20
12. Liquidation of the product
The user is obliged to disinfect the product when deciding to stop using it (a product that is not
disinfected in accordance with current environmental legislation is hazardous waste).
13. Lamp labels
TL-01 treatment lamp labeling:
Safety Manual
Equipotential
bonding
Nameplate
Table of contents
Other INFIMED Medical Equipment manuals

Popular Medical Equipment manuals by other brands


BIOTRONIK
BIOTRONIK CardioMessenger Smart Technical manual

Siemens
Siemens POLYMOBIL Plus Start-up instructions

Mindray
Mindray Resona 7 Operator's manual

Doherty
Doherty Salisbury Couch COU32 user guide

Chattanooga Group
Chattanooga Group Intelect IFC instruction manual

medi
medi SAS light Instructions for use