InFocus INA-LC100 User manual

009-1689-02
INA-LC100
User Guide

Contents
Introduction 3
System Setup 4
Mounting 4
Connectivity 4
Remote Control 5
Registration 6
Basic Navigation 9
Using the remote and keyboard 9
Using the on screen keyboard 9
Using a mouse and keyboard 9
Document Viewer 10
Supported document types 10
Open document les 11
Document Viewer tools 12
Annotate the le 13
Annotation tools 15
Save the le 17
Share the le 17
Create a new folder 19
Delete les and folders 20
Cast (Wireless display) 21
LightCast 21
AirPlay 22
Miracast 23
Whiteboard 24
Navigation 24
Create a drawing object 24
Add text 25
Whiteboard tools 25
Save the whiteboard canvas 28
Save the whiteboard canvas to a USB thumb drive 29
Share the le 30
Open a new whiteboard canvas 30
Open a whiteboard le 30
Open a whiteboard le from a USB thumb drive 30
Browser 31
Navigation controls 31
Tools submenu 32

Save the le 34
Share the le 35
Settings 36
Network Settings 36
Device 37
System and Security 38
Accounts 39
Browser Preferences 40
Troubleshooting 41
Declaration of Conformity 43
Limited Warranty 44
Specications 47
Appendix 48
Access Point Setup 48
Port Requirements for AirPlay, Miracast, and LightCast Sender App 49

Page 3INA-LC100 User Guide
Introduction
LightCast is an easy to use set of applications designed to maximize the connectivity and interactivity
of your InFocus display.
Available features
Document reader
• Documents (doc, docx, ppt, pptx, pdf, txt, xls, xlsx)
• Pictures (bmp, jpg, jpeg, png)
• Videos (avi, v, mkv, mov, mpg, mp4, ts, wmv, 3gp)
Wireless display (AirPlay, LightCast, Miracast)
Whiteboard
Internet browser
Network control (if display is equipped with a wired network connector)
USB-A connectors which can be used for:
• USB storage device (such as a thumb drive, camera, or external hard drive)
• Touch device (such as a touchpad)
• Wireless USB keyboard/mouse
Current limit on both connectors is 1A.
Accessories
• International power cord with country-specic adapters
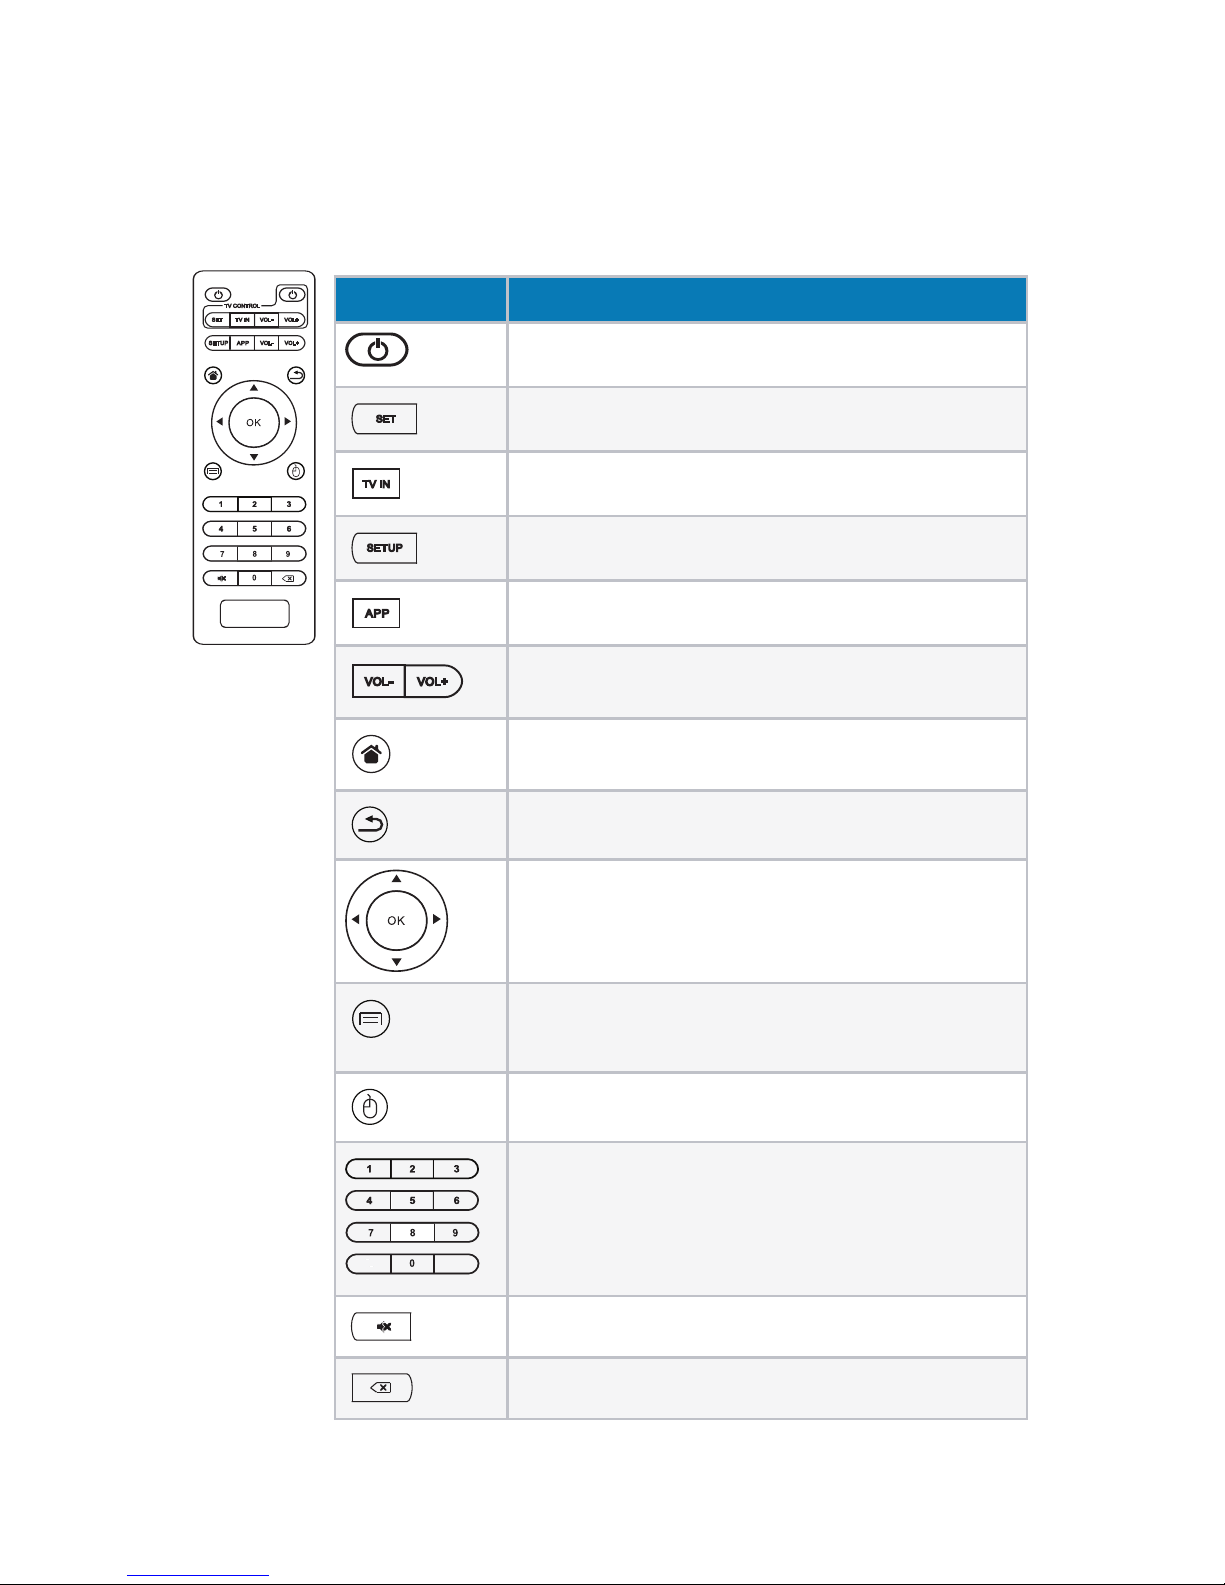
• Remote control (no batteries are included)
• HDMI cable
• Velcro strips (3)
• User manual

Page 4
System Setup
Mounting
If desired, the InFocus hub can be mounted to the back of the
display. To do so, attach the velcro strips onto back of hub per the
illustration. Then attach it to the back of display being careful
not to block display vents.
Note: When mounted to the back of the display, we recommend
using the display to control the InFocus hub instead of the remote.
Connectivity
1) Connect the LightCast hub to the desired devices per below. Note: To use all the LightCast fea-
tures, you must connect a mouse and keyboard to the LightCast hub, or connect the LightCast
hub to an InFocus touch display.
2) Turn on the InFocus hub when the indicator light is blue. The main menu appears in about 30
seconds.
Optional:
Connect USB cable
to InFocus touch
display
Router Power adapter
Ethernet cable
Connect to InFocus touch display
HDMI cable

Page 5INA-LC100 User Guide
Remote Control
Use the remote to control the LightCast hub. Note: To use all the LightCast features, you must con-
nect a mouse and keyboard to the LightCast hub, or connect the LightCast hub to an InFocus touch
display.
SE TU P
AP P
Remote key Description
Power: Click to turn on/o.
SET: Not functional on this model.
TV IN: Not functional on this model.
SETUP
SETUP: Click to access the
Settings options.
APP
APP: Not functional on this model.
VOL: Click to decrease/increase the volume.
Home: Click to get back the main menu.
Return: Click to return back to previous menu.
Navigation: Click to navigate
left/right/up/down, and click OK to conrm your selection.
Menu: Click to choose function menu of corresponding ap-
plication in video, music, photo and website.
Mouse: Click to use the navigation button as a mouse.
Number: Click to select a number.
Mute: Click to turn down the volume.
Backspace: Click to backspace the input.

Page 6
Registration
1) Turn on the LightCast hub.
2) Press the Source button on the remote or keypboard.
3) Navigate to LightCast.
4) Press the Enter/Select button on the remote or keyboard. The LightCast registration welcome
page displays.
5) Click the arrow.

Page 7INA-LC100 User Guide
6) Enter the information for registration using either a wireless keyboard/mouse (not included) or
the on screen keyboard and remote. Click the right facing arrow.
7) Use a keyboard/mouse or on screen keyboard and remote to rename the device. This is useful to
dierentiate between dierent displays that have LightCast enabled.
8) If equipped, the Wired LAN IP address is displayed.
9) After the local SSIDs are displayed, log onto a wireless network:
10) Highlight an SSID.
11) Press Select/Enter.
12) If the SSID is encrypted, enter the password.

Page 8
13) The word “Connected” displays below the SSID when the connection is made. A green check-
mark displays next to saved SSIDs.
14) If a software update is available, an update window displays. Click Update and follow the
prompts to complete the update process.
15) When registration is complete, the LightCast home page displays.

Page 9INA-LC100 User Guide
Basic Navigation
Using the remote and keyboard
1) Use the arrow keys to highlight items in LightCast.
2) Press the Select button on the remote or the Enter button on the display to select the high-
lighted item.
3) Press the Esc button on the remote to back out of the currently running item.
4) Press the Auto Image button on the remote or Auto button on the display to return to the
LightCast home screen.
Using the on screen keyboard
1) In the desired eld, highlight and click Select using the keyboard or remote.
2) The on screen keyboard is displayed.
3) Use the arrow keys to highlight characters.
4) Click Select when the correct character is highlighted.
5) After each eld is completed, highlight and click Done to go to the next eld.
Using a mouse and keyboard
1) Plug a mouse and keyboard into an available USB-A connectors on the display.
2) Use the mouse and keyboard as you normally would.

Page 10
Document Viewer
The Document Viewer allows you to display images, les, and videos from your display's internal
memory or from a USB thumb drive.
Supported document types
Supported File Types File Extensions
Images .jpg, .jpeg, .bmp, .png
PowerPoint .ppt, .pptx
Excel .xls, .xlsx
Word .doc, .docx
Adobe PDF .pdf
Video les .avi, .v, .mkv, .mov, .mpg, .mp4, .ts, .wmv, .3gp
Other les .txt
To access the Document Viewer follow the instructions below:
1) Turn on the display.
2) Press the Source button on the remote or keyboard.
3) Navigate to LightCast.
4) Press the Enter/Select button on the remote or keyboard. The LightCast home page displays.
5) Navigate to Documents.

Page 11INA-LC100 User Guide
6) Press the Enter/Select button on the remote or keyboard. The Document Viewer displays.
Open document les
1) Navigate to the desired le and either click the le with an attached mouse, or press the Se-
lect/Enter button on the remote or keyboard. Note: Files can be opened from the local folder
or a USB thumb drive.
2) Use the menu options to navigate through the le. Note: File-level tools vary depending on the
le type.
3) To move the tool bar position, use a mouse to click the vertical dots and drag the tool bar to
one of four positions. Or use the remote or keyboard to highlight the vertical dots and press the
Select/Enter button. Then use the up or down arrow buttons to move the tool bar and press
the Select/Enter button when done.
4) When nished with the document le, click the Return button to return to the document
folder.
5) To return to the LightCast home page, click the Home button.

Page 12
Document Viewer tools
Note: Document tools vary based on le type.
Button Description
Return Exits the document view and returns to the folder view.
Up When displaying an Excel, Word, or PDF document, selecting up scans
up the open document. When displaying a PowerPoint document,
selecting up goes to the previous slide in the slideshow.When an image
is shown in full screen, selecting Up displays the previous image in the
same folder. When the document is zoomed in, selecting Up scans up
the open document.
Down When displaying an Excel, Word, or PDF document, selecting down
scans down the open document. When displaying a PowerPoint docu-
ment, selecting down goes to the next slide in the slideshow. When an
image is shown in full screen, selecting Down displays the next image
in the same folder. When the document is zoomed in, selecting Down
scans down the open document.
Left When the document is zoomed in, selecting Left scans the open docu-
ment to the left.
Right When the document is zoomed in, selecting Right scans the open docu-
ment to the right.
Previous For Excel documents only: Selects the previous tab in the le.
Next For Excel documents only: Selects the next tab in the le.

Page 13INA-LC100 User Guide
Rotate Rotates the document ninety degrees clockwise
Zoom In Magnies the document view
Zoom Out Reduces the document view
Reset
Zoom
Returns the document back to its original document width
Annotation When selected, allows the user to annotate the document. See "An-
notate the le" on page <OV> for more information. Note: Annotation
is only available when a mouse (or touch device) is connected to one of
the USB-A connectors.
Video
menu
For video les only: Click to open the video controls.
Return For video les only: Click to close the video le and return to the folder
view.
Play For video les only: Click to play the video le.
Pause For video les only: Click to pause the video le.
Annotate the le
Document les can be annotated and saved us using the Annotation submenu.
Note: You must attach a mouse (or touch device) to use the annotation feature. If a mouse (or touch
device) is not detected, a warning displays.
Create a drawing
1) Open a le from the document viewer.
2) Click Annotation.
3) Click Tools and select a drawing tool.
4) Click Color Wheel to adjust the color, size, and opacity of the selected drawing tool.
5) Draw on the page using the mouse (or touch device).
6) Use Eraser,Select, Undo, Re-do, and Clear to modify the drawing. See "" on page 14 for
more information.

Page 14
Add text
Note: Text boxes overlay the open document and do not aect the text within the displayed docu-
ment.
1) Open a le from the document viewer.
2) Click Annotation.
3) Click Tools.
4) Click Text.
5) Click the screen where you want the text box to be. A text box opens.
6) Adjust the font family, size, color, and text attributes, as desired.
7) Using either a keyboard or the on-screen keyboard, type your text.
8) Click OK when nished.

Page 15INA-LC100 User Guide
Annotation tools
Button Description
Current tool Click to use the current tool.
Eraser Click Eraser, and then click and drag across the drawing object
to erase the portion you touched. Only drawing objects are
aected.
Color Wheel
submenu
Click to access the color submenu.
Color wheel Click to choose a color using a color ramp. The current selected
color displays in the middle of the color wheel.
Segmented
color wheel
Click to choose a color from the segmented color wheel. The cur-
rent selected color displays in the middle of the color wheel.
Size Click and drag the thumbnail button along the slider path to
adjust the size of the pen/line width.
Opacity Click and drag the thumbnail button along the slider path to
adjust the size of the highlighter/shape opacity.
Tools sub-
menu
Click to select an annotation tool. Note: Each object has its own
color, pen width, and pen transparency setting.
Pen Click to use a pen. Note: Opacity control is not available for the
pen object.
Highlighter Click to use a highlighter.
Rectangle Click to draw a rectangle.
Circle Click to draw a circle.

Page 16
Line Click to draw a line.
Text Click to add a text box. Adjust the font size, color, and type at-
tributes as desired. Type your text and click OK.
Laser Click to highlight something temporarily. The mark disappears
when a new mark is made. Laser marks cannot be saved.
Select Click Select. Click and drag the selection box around the draw-
ing objects which you want to move, cut, copy, paste, or delete.
Once selected:
• Click and drag to move the selection.
• Click Copy to copy the selection, and then click Paste to
create a duplicate object set.
• Click Delete to delete the selection.
Undo Click to delete the last annotation.
Redo Click to display the last deleted annotation.
Clear Click to delete all annotations from the le.
More sub-
menu
Click to access additional menu features.
Save Click to save the le as a JPG image or PDF le.
Paste Click to paste the clipboard onto the image.
Share Only available when the display is connected to a network. Click
to send the annotated image as a JPG image by email.
USB Click to save the annotated picture to a USB device as a JPG
image or PDF le.
Exit Click to exit the annotation submenu.

Page 17INA-LC100 User Guide
Save the le
1) From the annotation submenu, click More.
2) Click Save.
3) Type the le name in the Name eld.
4) Select the desired File Type ( JPG or PDF).
5) Select Current View to save the displayed page or Whole View to save the entire le.
6) Browse to the Location you would like to save the le to or accept the default location.
7) Click Save.
Share the le
1) From the annotation submenu, click More.
2) Click Share.
3) Type the recipient email address in the To: eld.
4) Type information about the le in the Description eld, if desired.
5) Click Send (envelope icon).

Page 18
Copy a le or folder
1) Navigate to the desired le or folder location.
2) Navigate to More.
3) Click Select/Enter on the remote or keyboard.
4) Navigate to Copy.
5) Click Select/Enter on the remote or keyboard.
6) Navigate to the desired le or folder.
7) Click Select/Enter on the remote or keyboard. A green checkmark displays.
8) Repeat until all desired les or folders are selected.
9) Navigate to the location where you would like to paste the copied les.
10) Navigate to Paste.
11) Click Select/Enter on the remote or keyboard.
12) Click Done.

Page 19INA-LC100 User Guide
Create a new folder
1) Browse to the desired folder location.
2) Navigate to More.
3) Click Select/Enter on the remote or keyboard.
4) Click New Folder.
5) Using an attached keyboard or the virtual keyboard, enter the desired folder name. Note: If
using the virtual keyboard, use the arrows and Select/Enter button on the remote or keypad to
select the letters. Select Done when the folder name is complete.
6) Click OK.
Table of contents
Popular Cables And Connectors manuals by other brands

FONESTAR
FONESTAR WP-49RJ quick start guide

SIIG
SIIG AV-GM06H3-S1 user manual

Watts
Watts FEBCO LF860 Small Series installation instructions

Sygonix
Sygonix 2758025 operating instructions

NEUTRIK
NEUTRIK NAC3MX-W powerCON TRUE1 Operating & assembly instruction

Xantrex
Xantrex power Inverter Stacking installation guide

Eaton
Eaton 600 A 35 kV Class Insulated Standoff Bushing installation instructions

Agro
Agro EVolution EMC E-Mobility Important installation instructions

SCHURTER
SCHURTER 4790 Series manual

Steren
Steren 251-137BL instruction manual

Philips
Philips SWV3434W Specifications

Innotech
Innotech VERT-SET-50 Safety instructions and instruction manual