InFocus VHD-V61U User manual

2
Preface
Thanks for using this USB3.0 HD Video Conferencing Camera.
This manual introduces the function, installation and operation of the HD camera. Prior to
installation and usage, please read the manual thoroughly.
Precautions
This product can only be used in the specified conditions in order to avoid any damage to the
camera:
Don’t subject the camera to rain or moisture.
Don’t remove the cover. Otherwise, you may get an electric shock. In case of abnormal
operation, contact the authorized engineer.
Never operating under unspecified temperature , humidity and power supply.
Please use the soft dry cloth to clean the camera. If the camera is very dirty, clean it with
diluted neuter detergent; do not use any type of solvents, which may damages the surface.
Note
This is class A production. Electromagnetic radiation at the specific frequency may affect the
image quality of TV in home environment
Copyright Notice
All contents of this manual, whose copyright belongs to Infocus Corporation. Cannot be cloned,
copied or translated without the permission of the company. Product specifications and information
which were referred to in this document are for reference only, and the content will be updated at any
time without prior notice
InFocus Corporation

3
Contents
Note.........................................................................................................................................................4
Supplied Accessories...............................................................................................................................4
Quick Start............................................................................................................................................... 5
Features ...................................................................................................................................................7
Product Specification............................................................................................................................... 8
Main Unit ..............................................................................................................................................10
Size........................................................................................................................................................ 11
IR Remote Controller Explanation.........................................................................................................12
RS-232 Interface....................................................................................................................................14
VISCANetwork Configuration .............................................................................................................15
Serial Communication Control ..............................................................................................................16
VISCACommand List...........................................................................................................................16
Menu Setting .........................................................................................................................................17
Network Function..................................................................................................................................22
USB3.0.................................................................................................................................................. 30
Maintenance and Troubleshooting......................................................................................................... 31

4
Note
Electric Safety
Installation and operation must accord with electric safety standard.
Caution to transport
Avoid stress, vibration and soakage in transport, storage and installation.
Polarity of power supply
The power supply of the product is +12V, the max electrical current is 2A .Polarity of the power
supply plug drawing as follows.
Careful of installation
Do not grasp the camera head when carrying the camera. Don’t turn camera head by hand. Doing so
may result in mechanical damage.
Don’t apply in corrosive liquid, gas or solid environment to avoid damaging the cover which is made
up of plastic material.
To make sure no obstacle in rotation range.
Never power on before installation is not completed.
Don’t dismantle the camera
We are not responsible for any unauthorized modification or dismantling.
CAUTION!
The specific frequency of electromagnetic field may affect the image of the camera!
SuppliedAccessories
When you unpack, check that all the supplied accessories are included:
Camera ......................................................... 1PCS
AC power adaptor ........................................ 1PCS
Power cord..................................................... 1PCS
RS232 cable................................................... 1PCS
Remote controller .......................................... 1PCS

5
User manual ................................................. 1PCS
USB3.0 .......................................................... 1PCS
Quick Start
Step1. Please check connections are correct before starting
Step2. Setting of the system select switch
The option of video format:
VIDEO SYSTEM
0
1080p60
8
720p30
1
1080p50
9
720p25
2
1080i60
A
-
3
1080i50
B
-
4
720p60
C
-

6
5
720p50
D
576i
6
1080p30
E
480i
7
1080p25
F
-
CAUTION:
a. After changing the switch, you need to restart the camera to take effect.
b. 720 p30 and 720 p25 only under the HDMI output.
Step3. Press the Switch ON/OFF button on the rear of the camera, the power lamp light.
Step4. Pan-Tilt will rotate to the maximum position of top right after the camera started, then it return to
the center, the process of initialization is finished. (Note: If the position preset 0 has been stored, the
position preset 0 will be called up after initialization)

7
Features
72.5°Wide-angle Lens + 32x Digital Zoom
Use 72.5° wide-angle high quality lens, support 12x optical zoom, and 32x digital zoom (optional)
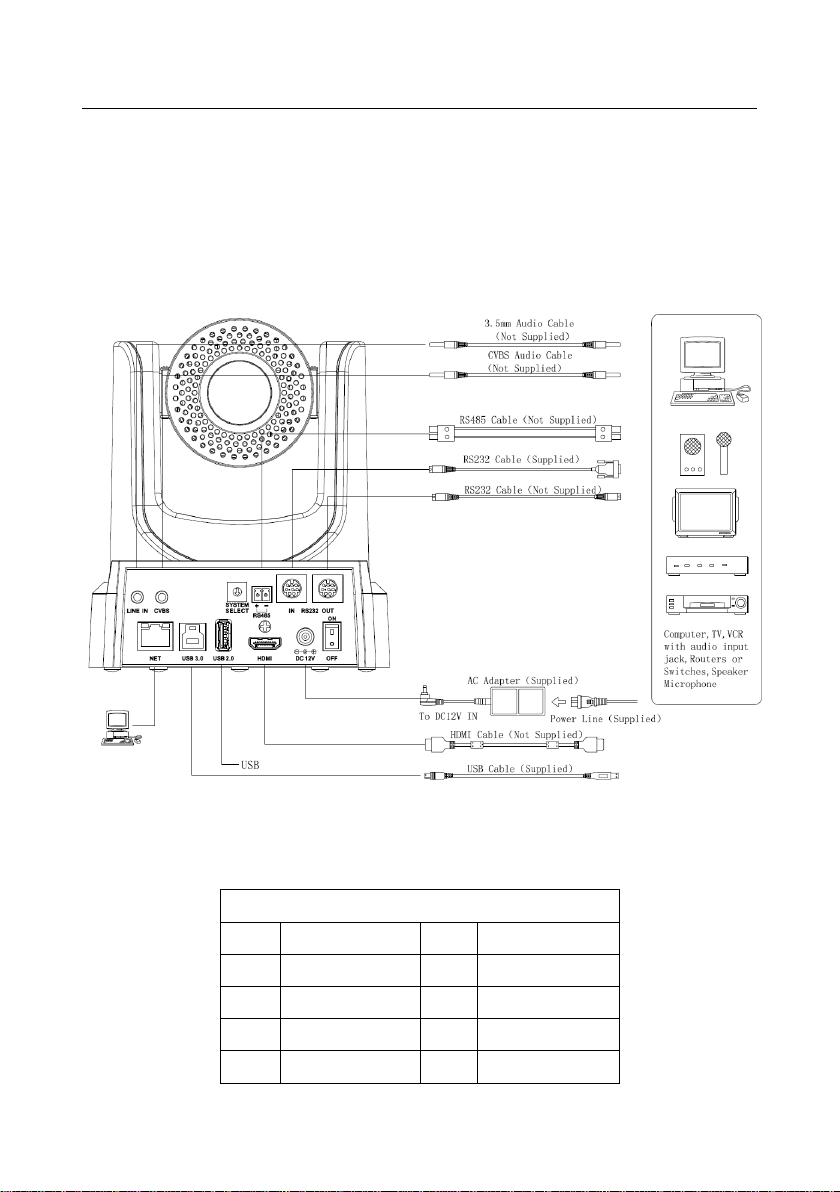
USB3.0
Support USB3.0 ultra-high speed interface, can transfer uncompressed original video, and
downward compatible with USB2.0. USB3.0, HDMI, Network can output at the same time. It also
support CVBS interface
AACAudio Encoding
Support AAC audio encoding, better sound quality and smaller bandwidth
H.265 Support
The first H.265 encoding support conference video camera in the world, enabling full HD
1080p/60fps video stream by ultra-low bandwith.
1080P Full HD
Apply Panasonic's 1/2.7 inch, 2.07 million effective pixels high quality HD CMOS sensor, can
reach maximum 1920 x 1080 high resolution and achieve quality image.
Ultra-high Frame Rate
The output frame rate up to 60fps in 1080P.
Low-light
High SNR of CMOS sensor combined with 2D and 3D noise reduction algorithm, effectively
reduce the noise, even under low illumination conditions, picture can still keep clean and clear.
Remote Control
Using RS232/485 interface, all the parameters of the camera can be remote controlled by the
high-speed communications.
Freeze During Preset
Support "Freeze During Preset" function, can masked image when calling the preset.

8
Product Specification
Model
VHD-V61U
Name
USB3.0 Type HD Color Video Camera
Camera
Video System
HD: 1080p/60, 1080p/50, 1080i/60, 1080i/50, 1080p/30,
1080p/25, 720p/60, 720p/50, 720p/30, 720p/25
SD: 480i, 576i
Sensor
1/2.7", CMOS, Effective Pixel: 2.07M
Scanning Mode
Progressive
Lens
12x, f3.5mm ~ 42.3mm, F1.8 ~ F2.8
Digital Zoom
32x (optional)
Minimal Illumination
0.05 Lux @ (F1.8, AGC ON)
Shutter
1/30s ~ 1/10000s
White Balance
Auto, Indoor, Outdoor,One Push, Manual
Backlight Compensation
Support
Digital Noise Reduction
2D&3D Digital Noise Reduction
Video S/N
≥55dB
Horizontal Angle of View
72.5° ~ 6.9°
Vertical Angle of View
44.8° ~ 3.9°
Horizontal Rotation Range
±170°
Vertical Rotation Range
-30° ~ +90°
Pan Speed Range
1.7° ~ 100°/s
Tilt Speed Range
1.7° ~ 69.9°/s
H & V Flip
Support
Image Freeze
Support
Number of Preset
255
Preset Accuracy
0.1°
USB 3.0 Featured
Oprate System
Windows XP, Windows Vista, Windows 7,Windows 8,Mac
OS X, Linux

9
Color System
YUV 4:2:2
Video format
USB3.0 : 1080p/60, 1080p/50, 1080p/30, 1080p/25,
720p/60, 720p/50, 720p/30, 720p/25
USB2.0 : 960x540p/30, 960x540p/25, 640x360p/60,
640x360p/50,1280x720p/25
USB video communication protocol
UVC1.0
UVC PTZ
Support
IPC Features
Video Compression
H.265/H.264/MJEPG
Video Stream
Main Stream, Sub Stream
Main Stream Resolution
1920x1080, 1280x720, 1024x576
Sub Stream Resolution
720x576, 720x480, 320x240
Video Bit Rate
128Kbps ~ 8192Kbps
Bit Rate Type
Variable Rate, Fixed Rate
Frame Rate
50Hz: 1fps ~ 50fps, 60Hz: 1fps ~ 60fps, 720p: 120fps,
640x480p: 240fps
Audio Compression
AAC
Audio Bit Rate
96Kbps, 128Kbps, 256Kbps
Support protocols
TCP/IP, HTTP, RTSP, RTMP, Onvif, DHCP, Multicast,
etc.
Input/Output Interface
HD Output
1xHDMI: Version 1.3
SD Output
1xCVBS: RCA jack, 1Vp-p, 75Ω
Network interface
1xRJ45: 10/100/1000M Adaptive Ethernet ports
Audio Input
1-ch: 3.5mm Audio Interface, Line In
USB
1xUSB3.0: Type B female jack
1xUSB2.0: Type A female jack
Control Input/Output
1xRS-232: 8pin Min DIN, Max Distance: 30m, Protocol:
VISCA/Pelco-D/Pelco-P
1xRS-232 OUT: 8pin Min DIN, Max Distance: 30m,
Protocol: VISCA network use only

10
1xRS-485: 2pin phoenix port, Max Distance: 1200m,
Protocol: VISCA/Pelco-D/Pelco-P
Power Connector
JEITA type (DC IN 12V)
Generic Specification
Input Voltage
DC 12V
Current Consumption
1.0A (Max)
Operating Temperature
-5°C ~ 40°C
Storage Temperature
-20°C ~ 60°C
Power Consumption
12W (Max)
Size
169mm x 142mm x 164mm
Net Weight
1.35Kg
Main Unit
1. Line in Interface 7. POWER switch
2. CVBS Interface 8. DC IN 12V jack
3. System select switch 9. HDMI interface
4. RS485 Interface 10. USB2.0
5. RS232 IN Interface 11. USB3.0
6. RS232 out Interface 12. Rj45 interface

11
Size

12
IR Remote Controller Explanation
1. Standby Button
Press this button to enter standby mode.
Press it again to enter normal mode. (Note:
Power consumption in standby mode is
approximately half of the normal mode)
2. Position Buttons
To set preset or call preset
3. *Button
Used with other buttons
4. Set/Preset Buttons
Set preset: Store a preset position
[SET PRESET] + Numeric button (0-9):
Setting a corresponding numeric key preset
position
5. Pan-Tilt control Buttons
Pressing the Pan-Tilt back to the middle
position
6. MENU
MENU: enter or exit OSD MENU
7. Zoom Buttons
Slow Zoom: Zoom In [+] or Zoom Out [-]
slowly
Fast Zoom: Zoom In [+] or Zoom Out [-]
fast
8. Pan-Tilt L/R set
Press with 1 buttons and 2 buttons setting the
direction of the Pan-Tilt
L/R Set +1[STD]: set the Pan-Tilt turn the
same direction as the L/R Set
L/R Set +2[REV]: set the Pan-Tilt turn the
opposite direction as the L/R Set

13
9. Focus Buttons
Used for focus adjustment.
Press [AUTO] adjust the focuses on the center of
the object automatically. To adjust the focus
manually. Press [MANUAL] adjust the focus on
the center of the object manual
MANUAL button, and adjust it with [Far] (Focus
on far object) and [NEAR] (Focus on near object)
10. Camera Select Buttons
Press the button corresponding to the camera you
want to operate with the remote controller.
11. # Button
Used with other buttons
12. Set Camera IR Address Buttons
[*]+[#]+[F1]: Address1
[*]+[#]+[F2]: Address2
[*]+[#]+[F3]: Address3
[*]+[#]+[F4]: Address4
13. Clear Preset Buttons
Clear preset: Erase a preset position
[CLEAR PRESET] + Numeric button (0-9)
Or: [*]+[#]+[CLEAR PRESET]: Erase all the
preset individually
14. Pan/Tilt Control Buttons
Press arrow buttons to perform panning and tilting.
Press [HOME] button to face the camera back to
front
15. Back buttons
Press the OSD menu return to the superior.
16. BLC (Backlight Compensation) Button
BLC ON/OFF: Press this button to enable the
backlight compensation. Press it again to disable
the backlight compensation.(NOTE: Effective
only in auto exposure mode)
Note: If a light behind the subject, the subject will
become dark. In this case, press the backlight ON /
OFF button. To cancel this function, press the
backlight ON / OFF button.
17. Pan/Tilt reset
Presset Pan/Tilt self-test.
18. Image freezing function
Manually freeze: Open the freezing function after
press the remote control [F4], display "Freeze" on
the left upper corner character, after 5 seconds
display disappear automatically. If you want to
cancel the freeze, press [F4] key and then can
return to normal, display "Unfreeze" on the left
upper corner, after 5 seconds display disappear
automatically.
Recalling the Preset image Freeze:By the OSD
Menu Setting "Recalling the Preset image Freeze"
function. After the function is opened, the screen
will stay in before Recalling the Preset when
Recalling the Preset, the screen can be switched to
the preset position screen until the camera points
to the preset position.
19. Shortcut Set
[*]+[#]+[1]: OSD menu default English
[*]+[#]+[3]: OSD menu default Chinese
[*]+[#]+[4]: Default IP address
[*]+[#]+[5]: Save OSD
[*]+[#]+[6]: Quickly recover the default
[*]+[#]+[8]: Look the camera version
[*]+[#]+[9]: Quickly set up inversion

INFOCUS
14
RS-232 Interface
Camera Windows DB-9
1.DTR 1.CD
2.DSR 2.RXD
3.TXD 3.TXD
4.GND 4.DTR
5.RXD 5.GND
6.GND 6.DSR
7.IR OUT 7.RTS
8.NC 8.CTS
9.RI
Camera Mini DIN
1.DTR 1.DTR
2.DSR 2.DSR
3.TXD 3.TXD
4.GND 4.GND
5.RXD 5.RXD
6.GND 6.GND
7.IR OUT 7.NC
8.NC 8.NC
No.
Function
1
DTR
2
DSR
3
TXD
4
GND
5
RXD
6
GND
7
IR OUT
8
NC

INFOCUS
15
VISCANetwork Configuration

INFOCUS
16
Serial Communication Control
In default working mode, the camera is able to connect to a VISCA controller with RS232C
serial interface.
RS232 Communication Control
The camera can be controlled via RS232 ,the parameters of RS232C are as follows:
Baud rate: 2400/4800/9600 bit/s.
Start bit: 1 bit.
Data bit: 8 bits.
Stop bit: 1bit.
Parity bit: none.
RS485 Communication Control
The camera can be controlled via RS485, Half-duplex mode:
Baud rate: 2400/4800/9600 bit/s.
Start bit: 1 bit.
Data bit: 8 bits.
Stop bit: 1bit.
Parity bit: none.
Pan-Tilt will rotate to the maximum position of top right after the camera started, then it return to the
center, the process of initialization is finished. (Note: If the position preset 0 has been stored, the
position preset 0 will be called up after initialization) Then the users can control the camera with
commands in the command list.
VISCACommand List
(Ignore)
Note:
The camera serial standard VISCA/Pelco-D/Pelco-P, if the need for the secondary development,
According to standard protocol to control the camera. If you need VISCA/Pelco - D/Pelco - P protocol
command list in detail, please contact the manufacturer.

INFOCUS
17
Menu Setting
1. MENU
Press [MENU] button to display the main menu
on the normal screen, using arrow button to move
the cursor to the item to be set. Press the [HOME]
button to enter the corresponding sub-menu.
2. EXPOSURE
Move the cursor to the Exposure item in the
main menu and press [home] button, EXPOSURE
menu appears, as shown in the following figure.
Mode: Exposure mode. Optional items: Auto,
Manual, SAE, AAE, Bright
ExpCompMode: Exposure compensation mode,
Optional items: On, Off (Effective only in Auto
mode)
ExpComp: Exposure compensation value,
Optional items:-7 ~ 7(Effective only in ExpComp
Mode item to On)
Gain Limit: Maximum gain limit. Optional
items: 0 ~ 15 (Effective only in Auto,
AAE ,Bright
mode)
Backlight: Set the backlight compensation,
Optional items: On, Off (Effective only in Auto
mode )
DRC: DRC strength, Optional items: 0 ~ 8.
Bright: Intensity control, Optional items: 00~17.
EXPOSURE
Mode Auto
ExpCompMode Off
Backlight Off
Gain Limit 3
Anti-Flicker 50Hz
DRC 6
Select Item
Change Value
[Menu] Back
MENU
Exposure
Color
Image
P/T/Z
Noise Reduction
Setup
Restore Default
[Home] Enter
[Menu] Exit

INFOCUS
18
(Effective only in Bright mode)
Anti-Flicker Flicker: Anti-flicker. Optional
items: Off, 50Hz, 60Hz (Effective only in Auto,
Bright mode)
Iris: Aperture value. Optional items: F1.8,
F2.0,F2.4,F2.8,F3.4,F4.0,F4.8,F5.6,F6.8,F8.0,F9.6
,F11.0,Close(Effective only in Manual, AAE
mode)
Shutt: Shutter value. Optional items:
1/30,1/60,1/90,1/100,1/125,1/180,1/250,1/350,1/5
00,1/725,1/1000,1/1500,1/2000,1/3000,1/4000,1/6
000,1/10000 (Effective only in Manual, SAE
mode)
3. COLOR
Move the cursor to the Color item in the main
menu and press [home] button, COLOR menu
appears, as shown in the following figure.
WB-Mode: White balance mode. Optional
items:Auto,3000K/Indoor,4000K,5000K/Outdoor,
6500K-1,6500K-2,6500K-3,One Push, Manual
RG: Red gain. Optional items: 0~255(Effective
only in Manual mode)
BG: Blue gain. Optional items: 0~255
(Effective only in Manual mode)
Sat.: Saturation. Optional items: 60% ~ 200%.
Hue: Chroma adjustment, Optional items:0 ~ 14
AWB sens: The white balance sensitivity,
Optional items: Normal, High, Low.
4. IMAGE
Move the cursor to the Image item in the main
menu and press [home] button, IMAGE menu
appears, as shown in the following figure.
Luminance: Brightness adjustment. Optional
IMAGE
Luminance 6
Contrast 6
Sharpness 1
Flip-H Off
Flip-V Off
B&W-Mode Off
Gamma Default
Styel Norm
Select Item
Change Value
[Menu] Back
COLOR
WB Mode Auto
Saturation 90%
Hue 7
AWB sens Low
Select Item
Change Value
[Menu] Back

INFOCUS
19
items: 0 ~ 14
Contrast: Contrast adjustment. Optional items:
0 ~ 14
Sharpness: Sharpness adjustment. Optional
items: Auto, 0 ~ 15
Flip-H: Image flipped horizontally. Optional
items: On, Off.
Flip-V: Image Flip Vertical. Optional items:
On, Off
B&W-Mode: Image color. Optional items: On,
Off
Gamma: Optional items: Default, 0.45, 0.5,
0.56, 0.63
Style: Optional items: Norm, Clarity, Bright,
Soft, CStyle.
5. P/T/Z
SpeedByZoom: The depth of field scale switch,
Optional items: On, Off
AF-Zone: Interested in focusing area, Optional
items: Top, Center, Bottom
AF-Sense: Automatic focusing sensitivity
options, Optional items: Low, Normal, High
L/R Set: Optional items: STD, REV
Image Freeze: Optional items: On, Off
6. NOISE REDUCTION
Move the cursor to the Noise Reduction item in
the main menu and press [home] button, NOISE
REDUCTION menu appears, as shown in the
following figure.
NR2D-Level: 2D noise reduction. Optional
items: Off, Auto, 1 ~ 5
NR3D-Level: 3D noise reduction. Optional
NOISE REDUCTION
NR2D-Level 3
NR3D-Level 4
D-HotPixel Off
Select Item
Change Value
[Menu] Back
P/T/Z
SpeedByZoom On
AF-Zone Center
AF-Sense Low
L/R Set STD
Image Freeze OFF
Select Item
Change Value
[Menu] Back

INFOCUS
20
items: Off, 1 ~ 8
D-HotPixel: Dynamic bad points, Optional
items: Off, 1 ~ 5
7. SETUP
Move the cursor to the Setup item in the main
menu and press [home] button, SETUP menu
appears, as shown in the following figure.
Language: menu language, Optional items: EN,
Chinese, Rssian
DVI Mode, Optional items: DVI, HDMI
Protocol: Control protocol type. Optional items:
AUTO, VISCA, PELCO-D, PELCO-P
V_Address: Protocol address, To be decided
according to the agreement, AUTO, VISCA
protocol Optional items: 1 ~ 7
P_D_Address: PELCO-D protocol Optional
items: 0 ~ 254
P_P_Address: PELCO-P protocol Optional
items: 0 ~ 31
V_AddrFix: If I can change through the serial
port of infrared switch, Optional items: On, Off
(When set to On, useless in 88 30 01 FF
Command)
Net Mode: Set the serial port control
networking, Optional items: Serial, Paral
Baudrate: Serial port baud rate. Optional items:
2400, 4800, 9600
8. RESTORE DEFAULT
Move the cursor to the Restore Default item in
the main menu and press [home] button,
RESTORE DEFAULT menu appears, as shown in
the following figure.
Restore: Confirm restore factory settings.
RESTORE DEFAULT
Restore? No
Change Value
[Home] OK
[Menu] Back
SETUP
Language EN
DVI Mode DVI
Protocol VISCA
V_Address 1
V_AddrFix Off
Net Mode Serial
Baudrate 9600
Select Item
Change Value
[Menu] Back
Table of contents
Other InFocus IP Camera manuals
Popular IP Camera manuals by other brands

TP-Link
TP-Link NC250 Quick installation guide

RADEMACHER
RADEMACHER HomePilot 9487 Instruction manual for installation and commissioning

Avigilon
Avigilon 5.0MP-HD-DN installation guide

Arec
Arec CI-21S Quick installation guide

Dalian
Dalian DS-2BB6E10-AP installation instructions

Microseven Systems
Microseven Systems MSH-RD080PTW Operation manual