INGENIOUS DESIGNS Lorena Garcia Lorena Bella User manual
TM
SLOW COOKER
INSTRUCTION MANUAL

When using electrical appliances, basic safety precautions should always be
followed, including the following:
1. READ ALL INSTRUCTIONS.
2. Do not touch hot surfaces. Use handles or knobs.
3. To protect against electrical shock,do not immerse cord, plugs or appliance
in water or other liquid.
4. Close supervision is necessary when any appliance is used by or near
children.
5. Unplug from outlet when not in use and before cleaning.Allow to cool before
putting on or taking off parts.
6. Do not operate any appliance with a damaged cord or plug or after
the appliance malfunctions or has been damaged in any manner. Bring
it to a qualied technician for examination,repair or electrical or mechanical
adjustment.
7. The use of accessory attachments not recommended by the appliance
manufacturer may cause injuries.
8. Do not use outdoors.
9. Do not let cord hang over edge of table or counter, or touch hot surfaces.
10. Do not place on or near a hot gas or electric burner, or in a heated oven.
11. Extreme caution must be used when moving an appliance containing hot
oil or other hot liquids.
CAUTION: To protect against damage or electric shock, do not cook in the
slow cooker body. Cook only in the aluminum pot provided.
12. To disconnect, press the POWER button, then remove plug from wall outlet.
13. Do not use appliance for other than intended use.
IMPORTANT SAFEGUARDS
SAVE THESE INSTRUCTIONS
HOUSEHOLD USE ONLY
1

IMPORTANT SAFEGUARDS
ADDITIONAL IMPORTANT SAFEGUARDS
CAUTION, HOT SURFACES: This appliance generates heat and escaping steam during
use. Proper precautions must be taken to prevent the risk of burns, res or other injury to
persons or damage to property.
1. A person who has not read and understood all operating and safety instructions
is not qualied to operate this appliance.All users of this appliance must read and
understand this instruction manual before operating or cleaning this appliance.
2. If this appliance falls or accidentally becomes immersed in water, unplug it from
the wall outlet immediately. Do not reach into the water!
3. When using this appliance, provide adequate air space above and on all sides
for air circulation.Do not operate this appliance while it is touching or near curtains,
wall coverings, clothing, dishtowels or other ammable materials.
4. Do not leave this appliance unattended during use.
5. If this appliance begins to malfunction during use, immediately unplug the cord.
Do not use or attempt to repair a malfunctioning appliance!
6. The cord to this appliance should be plugged into a 120V AC electrical wall outlet.
7. Do not use this appliance in an unstable position.
8. Never use the aluminum pot on an open ame.
9. Lift lid carefully to avoid scalding, and allow water to drip into aluminum pot.
10. Use care when removing the lid. Make sure it is fully cooled before touching.
11. Never leave the aluminum pot unattended when searing foods on the stovetop.
Take care to watch foods so that they brown, not burn.
12. Use protective oven mitts when handling aluminum pot and aluminum pot side
handles, as they will get very hot and may cause injuries such as burns.
NOTES ON THE PLUG
This appliance has a polarized plug (one blade is wider than the other). To reduce
the risk of electric shock, this plug will t in a polarized outlet only one way. If the plug
does not t fully into the outlet, reverse the plug. If it still does not t, contact a qualied
electrician. Do not modify the plug in any way.
NOTES ON THE CORD
The provided short power-supply cord (or detachable power-supply cord) should be
used to reduce the risk resulting from becoming entangled in or tripping over a longer
cord. Do not use an extension cord with this product.
ELECTRIC POWER
If the electrical circuit is overloaded with other appliances, your appliance may not
operate properly. It should be operated on a separate electrical circuit from
other appliances.
2

GETTING TO KNOW YOUR SLOW COOKER
Product may vary slightly from illustration.
PLASTICIZER WARNING
CAUTION: To prevent Plasticizers from migrating from the nish of the counter top or
table top or other furniture, place NON-PLASTIC coasters or place mats between the
appliance and the nish of the counter top or table top. Failure to do so may cause
the nish to darken; permanent blemishes may occur or stains can appear.
Lid Knob
Front lid lock release
button
Tempered glass lid
Lid handle
Aluminum pot
handles with silicone
Ceramic coated
aluminum pot
Slow cooker side
handles with plastic
Control panel with
blue backlit screen
Slow cooker body
Polarized plug
Hinge
Black lid lock tabs
Rear housing
Figure 1A
Rear View
Figure 1
3

CONTROL PANEL
1. Digital count down timer. Easy-to-read, blue backlit
screen displays remaining LOW, HIGH or WARM time.
2. PRESET button. Press to choose BEEF, PORK, CHICKEN,
or STEW.The auto-programmed TIME and LOW or HIGH
cooking temperatures will be displayed.
3. MODE button. Press to change to HIGH, LOW, or WARM
cooking temperatures.
4. TIME button. Press to adjust the time during slow
cooking or warming.
5. UP/DOWN (TIME) Arrows. Use the UP/DOWN time
arrows to adjust time in 30 minute intervals from 00:30
minutes to 20:00 hours.
6. CLOCK Icon. Illuminates when the auto-program is in use.
7. COOK icon. Illuminates any time the Slow Cooker is ON.
8. BEEF, PORK, CHICKEN, or STEW. Illuminates when the auto-program is in use.
9. LOW, HIGH or WARM.Temperatures are displayed whenever the Slow Cooker is in
use.
10.POWER button. Press to begin or to cancel cooking.
A one pot solution to slow cooking
• Brown, sear, slow cook, serve and travel in one easy-to-clean, dishwasher safe
aluminum pot.
• Remove the aluminum pot from the slow cooker body and sear meats on the
stovetop.
• The 6.5 quart aluminum pot offers a large ceramic coated cooking surface
area to caramelize all surfaces of the meat. It is ideal for cooking family size
meals and large cuts of meat.
• Take the guesswork out of slow cooking! Built in programs for beef, pork, poultry
and soup/stew offer auto-programmed cooking times and temperatures.
• Slow cook food safely on LOW all day or night,up to 20 hours;your Programmable
Slow Cooker automatically shifts to WARM for 4 hours before shutting itself OFF.
• An illuminated, blue back-lit digital display ensures easy viewing of the cooking
temperature and remaining cook time.
• The front and back locked lid seals tightly for spill-proof travel.
Before Using for the First Time
1. Carefully unpack your Programmable Slow Cooker. Remove all packaging and
materials from the unit.
2. It is necessary to operate the Programmable Slow Cooker once before cooking
food in the aluminum pot.
3. Press the front lid lock button and lift the lid. (See Figure 1).
4. Pour 4 cups of water into the aluminum pot.
5. Close the glass lid. An audible click can be heard as the lid locks into position.
6. Plug cord into a 120V AC outlet.An audible beep will sound; the blue backlit
screen will illuminate; all numbers and icons on the screen begin to ash.After
60 seconds of inactivity, the slow cooker will turn OFF.
7. Press the POWER button.The default screen (4:00 hours, HIGH) will begin to ash.
(See Figure 3A.)
4

8. Program the Slow Cooker to cook on HIGH for 0:30 minutes.
9. Press and hold the DOWN time arrow until 00:30 minutes appears. (See Figure
3B).
10. If no buttons are pressed in 5 seconds, the Slow Cooker will begin operation,
or press POWER button to begin cooking immediately.The COOK (cooking
pot) icon will illuminate and the timer will count down to 00:00. (See Figure
3C). NOTE: You may notice a slight odor; this is normal and should quickly
disappear.
11.After 30 minutes, the Programmable Slow Cooker will automatically advance
to WARM.
12. Press the POWER button to turn the Slow Cooker OFF; then unplug the Slow
Cooker.
13.Allow the Slow Cooker to cool.
14.Remove the locking lid. Press the front lid lock release button.Grasp the lid knob
and lift the lid.
15.Located on the backside, below the hinge, are 2 lid lock tabs. Squeeze the lid
lock tabs together, then lift the lid off the aluminum pot. (See Figure 4.)
Figure 3A 3B 3C
16.Wearing oven mitts, grasp the aluminum pot handles,lift and remove it from the
slow cooker body; empty the water.
CAUTION: The aluminum pot and aluminum pot side handles will be very hot.
Handle with care by using protective oven mitts.
17.Wash the aluminum pot and tempered glass lid in mild dishwashing soap. Use
a lightly soaped sponge to clean the glass lid.Rinse and dry all parts thoroughly.
Place the aluminum pot inside the slow cooker body.
18.Replace the locking lid. Place the hinge into the rear housing. (See Figure 4.)
Lower the front lid.An audible click can be heard as the lid locks into position.
Figure 4
Hinge
Rear lid lock tabs
Rear housing
5

OPERATING INSTRUCTIONS
IMPORTANT: The programmable Slow Cooker can be programmed in half hour (30
minutes) increments from 00:30 (30 minutes) to 20:00 (20 hours).Press the TIME button
followed by the UP or DOWN arrows to adjust target cook time at any time while the
Slow Cooker is cooking.
Add depth of avor and rich color to your slow cooked dishes by browning and searing
your food in the aluminum pot before slow cooking.
For best results: Remove meat from the refrigerator and set it out at room temperature
for at least 20 minutes before searing.
Browning & Searing in the Aluminum Pot
1. For a avorful, seared crust,generously season meat or poultry with your favorite
spice rub before searing.
2. Add 2 tablespoons of vegetable or peanut oil to the aluminum pot. (Do not use
butter or olive oil as they tend to burn at high temperatures.)
NOTE: The amount of additional fat needed depends on the fattiness of the
meat.
3. Press the lid lock button and lift the lid. Remove the aluminum pot from the slow
cooker body, and place it directly on the stovetop.
4. Turn burner heat to HIGH.
5. When the oil is simmering hot, add meats to the aluminum pot, fat-side down;
place poultry pieces skin-side down. Sear meat for a few minutes until brown,
then turn food until all surfaces are browned. WARNING: Use caution while
searing.Use protective oven mitts.Keep hands and face away from the aluminum
pan opening.Avoid contact with hot oil as it may sputter and spit.
CAUTION: Use protective oven mitts when removing aluminum pot from stovetop
to bring back to slow cooker body.
6. After all food is browned, it may be necessary to de-fat the cooking liquid. Use
a slice of bread, a spoon, or a straining spoon to skim off excess fat prior to slow
cooking. For best results,always add recipe cooking liquid to the aluminum pot
rst.To ensure a avorful cooking liquid and to prevent future burning, use a
plastic or wood spoon to loosen browned avorful bits and deglaze the aluminum
pot.
WARNING: To avoid scratching the non-stick ceramic coating, never use sharp
utensils when stirring foods in the aluminum pot.
7. Prepare ingredients according to recipe instructions. Place food into the
aluminum pot. DO NOT FILL THE POT TO THE TOP WITH FOOD. For best results, the
aluminum pot should be at least half-lled.When cooking soups or stews, allow
a 2-inch space between the food and the top of the cooking pot,so ingredients
can come to a simmer.
NOTE: When cooking a meat and vegetable combination,place the vegetables
in the bottom of the aluminum pot rst.Then add the browned meat and other
ingredients.
NOTE: When cooking on HIGH, check cooking progress, as some recipes may
come to boil and may require additional water.
8. Remember that frequent lifting of the lid during cooking delays the slow cooking
time.
6

USING AUTO-PROGRAM
Most recipes can be prepared effortlessly using the preset times.However,keep in mind
that factors such as size/quantity of the meat, specic cut, meat on the bone versus
boneless,may cause actual cook times to vary.Leaner meats such as boneless-skinless
chicken or pork tenderloin,or meat cut into smaller chunks,may require less cook time
than tougher meats such as beef chuck or pork shoulder. Your Programmable Slow
Cooker allows you the exibility to easily adjust times as you cook.
1. The chart below:Auto-Program Foods,Temps, & Times, lists all auto-programmed
foods, temperatures and corresponding default cooking times.
Press PRESET Button Food Temp Default Time
1 time BEEF HIGH 4:00
2 times BEEF LOW 8:00
3 times PORK HIGH 4:00
4 times PORK LOW 8:00
5 times CHICKEN HIGH 4:00
6 times CHICKEN LOW 7:00
7 times STEW HIGH 5:00
8 times STEW LOW 10:00
Figure 5 Auto-Program Foods,Temps & Times
2. Plug cord into a 120V AC outlet.An audible beep will sound; the blue backlit
screen will illuminate; all numbers and icons on the screen begin to ash.After
60 seconds of inactivity, the slow cooker will turn OFF.
3. Press the POWER button.The default screen (4:00 hours, HIGH) will begin to
ash. (See Figure 8A).
Figure 6 A B C D
4. Press the PRESET button.The default screen (4:00 hours, BEEF, HIGH) will begin to
ash. (See Figure 6A.)
5. If no buttons are pressed in 5 seconds, the Slow Cooker will begin operation, or
press POWER button to begin cooking immediately.The COOK (cooking pot)
icon and CLOCK icon will illuminate; the timer will count down to 00:00. (See
Figure 6B.)
7

6. If another auto-program is desired,press the PRESET button until the desired food:
BEEF, PORK, CHICKEN or STEW illuminates.The auto-programmed TIME and LOW,
HIGH temperature will be displayed on the screen. (See Figure 6C.)
7. As some recipe ingredients are cooked at different times, and reheating to serve
foods does not require as much cook time,the target cook time may be adjusted
at any time while the Slow Cooker is cooking. For example: to change the
CHICKEN cook time to 3-1/2 hours, rst press the TIME button. Press the DOWN
arrow until the target cook time (03:30) is displayed. (See Figure 6C.)
8. After 5 seconds, the Slow Cooker will begin operation or press POWER button to
begin cooking immediately.
9. The COOK (cooking pot) icon and CLOCK icon will illuminate (See Figure 6D.);
the timer will count down to 00:00; 3 audible beeps signal cook time is complete.
10.Temperature will automatically drop to WARM and 04:00 (4 hours) will appear
on the display. When WARM time counts down to 00:00 the Slow Cooker will
automatically turn OFF and the display will turn blank. NOTE: Press the POWER
button at any time to turn the Programmable Slow Cooker OFF.
11.Press front lid lock, then use the lid knob to lift the hinged Slow Cooker lid.
12.Allow a few seconds for all steam to escape.Inspect and test food for doneness
and adjust seasonings if needed.
13.If cooking is completed before the timer reaches 00:00, press the MODE button
until WARM is illuminated.04:00 (4 hours) will appear on the display. Continue to
press the UP or DOWN arrows until the target WARM TIME is displayed.
14. Slow cooked food can be served directly from the aluminum pot, if desired.
NOTE: When serving from the Programmable Slow Cooker, always place a trivet
or protective padding under the slow cooker body before placing it on a table
or countertop.
TO PROGRAM YOUR SLOW COOKER
1. The chart below:Temperatures & Times (Figure 7), lists LOW, HIGH or WARM
temperatures and corresponding default cooking times.
Press MODE Button Temp Default Time
1 time HIGH 4:00
2 times LOW 8:00
3 times WARM 4:00
Figure 7
2. Plug cord into a 120V AC outlet. An audible beep will sound; the blue backlit
screen will illuminate; all numbers and icons on the screen begin to ash. After 60
seconds of inactivity, the slow cooker will turn OFF.
3. Press the POWER button.The default screen (4:00 hours, HIGH) will begin to ash.
(See Figure 8A ).
8
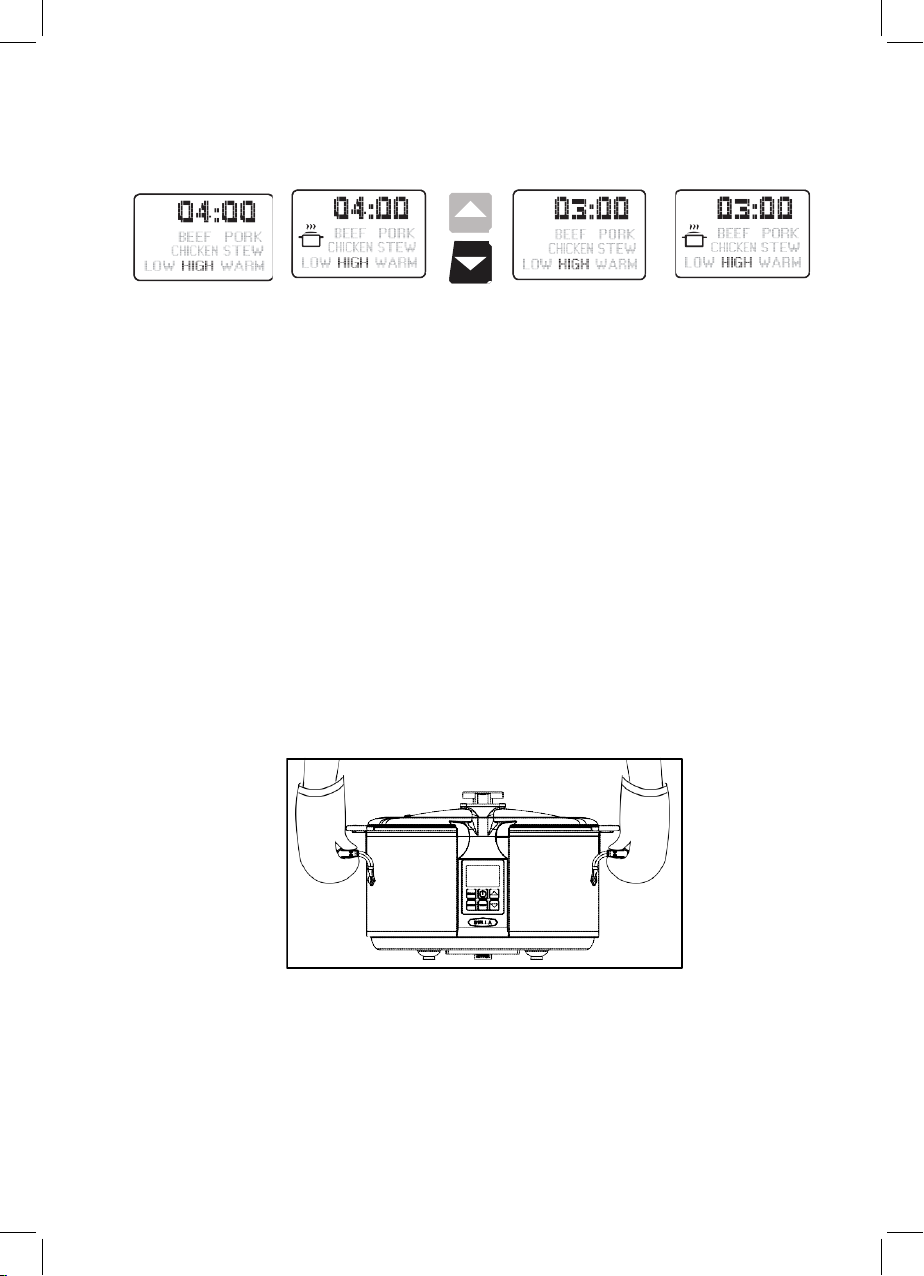
Figure 8
A B C D
4. If no buttons are pressed in 5 seconds, the Slow Cooker will begin operation, or
press POWER button to begin cooking immediately.The COOK (cooking pot) icon
will illuminate; the timer will count down to 00:00. (See Figure 8B).
5. To adjust cook time to 3 hours, press the DOWN arrow until the target cook time
(3:00) is displayed. (See Figure 8C.)
6. If no buttons are pressed in 5 seconds, the Slow Cooker will begin operation, or
press POWER button to begin cooking immediately.
7. The COOK (cooking pot) icon will illuminate. (See Figure 8D.); the timer will count
down to 00:00; 3 audible beeps signal cook time is complete.
8. Temperature will automatically drop to WARM and 04:00 (4 hours) will appear on
the display.WhenWARM time counts down to 00:00 the Slow Cooker will automatically
turn OFF and the display will turn blank.
NOTE: Press the POWER button at any time to turn the Programmable Slow Cooker
OFF.
9. Press front lid lock, then use the lid knob to lift the hinged Slow Cooker lid.
10.Allow a few seconds for all steam to escape. Inspect and test food for doneness
and adjust seasonings if needed.
11.If cooking is completed before the timer reaches 00:00,press the MODE button until
WARM is illuminated. 04:00 (4 hours) will appear on the display.To change the
default WARM time, press then TIME button once, then continue to press the UP or
DOWN arrows until the desired target WARM time is displayed.
Figure 9
CAUTION: The slow cooker body will get very warm during cooking as this is where the
heating elements are located. When moving the Programmable Slow Cooker, grasp
the unit by the slow cooker side handles; use pot holders or oven mitts. (See Figure 9.)
Even when turned OFF and unplugged,the Programmable Slow Cooker body remains
hot for some time after using; set aside and allow unit to cool before cleaning or
storing.
9

12. Slow cooked food can be served directly from the Programmable Slow Cooker,
if desired.
NOTE: When serving from the Programmable Slow Cooker, always place a trivet
or protective padding under the slow cooker body before placing it on a table
or countertop.
13. CAUTION: If serving directly from the aluminum pot, ALWAYS wear protective
oven mitts to remove the aluminum pot from the slow cooker body as the
aluminum pot and aluminum pot handles will be very hot. Handle with care.
HINTS FOR SLOW COOKING
• Less tender, cheaper cuts of meat are better candidates for slow cooking than
more expensive varieties.
• Always brown fatty meats to reduce the amount of fat and to help preserve
color while adding rich avor. Remove the aluminum pot from the slow cooker
body and place directly onto the stovetop. Heat a small amount of oil in the
aluminum pot and brown meats over high heat. Use a slice of bread, a spoon,
or a straining spoon to skim off excess fat prior to slow cooking.
• Whole herbs and spices avor better in slow cooking than crushed or ground.
• When cooking in a Slow Cooker, remember that liquids do not boil away like
they do in conventional cooking. Reduce the amount of liquid in any recipe
that is not designed for a Slow Cooker.The exceptions to this rule would be rice
and soups.Remember,liquids can always be added at a later time if necessary.
• If a recipe results in too much liquid at the end of the cooking time, remove the
aluminum pot from the slow cooker body. Skim any excess fat and boil the
sauce on the stovetop until it thickens and the desired consistency is achieved.
• Foods cut into uniform pieces will cook faster and more evenly than foods left
whole such as roast or poultry.
• Always use a meat thermometer to determine if meats have been cooked to
proper temperature.
• Root vegetables such as carrots, potatoes, turnips and beets require longer
cooking time than many meats. Place them on the bottom of the Slow Cooker
and cover with liquid.Check to see they are fork- tender when meat temperature
is reached. Remove meat and continue cooking vegetables if necessary.
• Add fresh dairy products (milk,sour cream or yogurt) prior to serving.Evaporated
milk or condensed creamed soups may be added at the start of cooking.
• Rice, noodles and pasta are not recommended for long cooking periods.Cook
and serve separately or add to the Slow Cooker during the nal 30 minutes of
cooking.
USER MAINTENANCE INSTRUCTIONS
This appliance requires little maintenance. It contains no user serviceable parts. Do
not try to repair it yourself. Any servicing requiring disassembly other than cleaning,
must be performed by a qualied appliance repair technician.
10

CLEANING INSTRUCTIONS
CAUTION: Never immerse slow cooker body or cord in water or other liquid.
1. Always unplug unit and allow to cool completely before cleaning.
2. Remove the locking lid. Follow the detailed instructions outlined in the Before
Using for the First Time section of this Instruction Manual. (See Figure 4.)
3. The aluminum pot and tempered glass lid may be cleaned in the dishwasher.
To avoid damage, position the glass lid in the dishwasher rack so that it will not
hit other items during cleaning.To clean by hand, wash the aluminum pot and
glass lid in warm, soapy water.
4. Avoid hitting the glass lid against the faucet or other hard surfaces.
CAUTION: Do not use the aluminum pot or glass lid if chipped, cracked, or
severely scratched.
5. If food sticks to the aluminum pot, ll with hot soapy water and allow to soak
before cleaning. For stubborn cooked-on foods, add 1/2 to 1 cup vinegar or
lemon juice to the soapy water.
WARNING: To avoid scratching the aluminum pot’s ceramic coating, never use
abrasives or sharp utensils to remove cooked-on food.
6. Rinse and dry thoroughly.
7. Wipe the interior and exterior of the slow cooker body with a soft, slightly damp
cloth or sponge. Never use abrasive cleansers or scouring pads to clean the
slow cooker body, as they may damage the surfaces.
8. Replace the locking lid. Place the hinge into the rear housing. Lower the front lid.
An audible click can be heard as the lid locks into position. (See Figure 4.)
STORING INSTRUCTIONS
1. Be sure all parts are clean and dry before storing.
2. Store Programmable Slow Cooker with aluminum pot inside slow cooker body,
and the tempered glass lid locked. Store assembled unit its box or in a clean,
dry place.
3. Never store Programmable Slow Cooker while it is hot or wet.
4. Never wrap cord tightly around the appliance; keep it loosely coiled.
USDA COOKING GUIDELINES
PLEASE NOTE: The USDA recommends that meats such as beef and lamb, etc. should
be cooked to an internal temperature of 145ºF/63ºC. Pork should be cooked to an
internal temperature of 160ºF/71ºC and poultry products should be cooked to an
internal temperature of 170ºF/77ºC - 180ºF/82ºC to be sure any harmful bacteria has
been killed. When reheating meat/poultry products, they should also be cooked to
an internal temperature of 165ºF/74ºC.
11

RECIPES
• 5 - 6 lbs. bone-in beef short ribs (6 – 8 short ribs)
• Kosher salt and pepper
• 1/2 cup all purpose our
• 2 tablespoons peanut oil
• 2 medium onions, chopped
• 4 medium carrots, cut into chunks
• 3 cloves garlic, minced
• 2 cups beef broth
• 1-1/2 cups brewed coffee
• 3 oz. tomato paste
• 1 tablespoon balsamic vinegar
• 2 bay leaves
• 1 teaspoon crushed red pepper
1. Season ribs with salt and pepper then dust lightly with our.
2. Remove the aluminum pot from the slow cooker body, and place it directly on
the stovetop.
3. Turn burner heat to MEDIUM-HIGH, add peanut oil. When the oil is simmering
hot, add short ribs. Sear meat for a few minutes on each side until browned.
Remove meat and set aside.
4. Add beef broth to deglaze the aluminum pot, making sure all avorful brown
bits are incorporated.
5. Replace aluminum pot into slow cooker body.
CAUTION: Be sure to use protective oven mitts when returning aluminum pot to
slow cooker body as the the aluminum pot and the aluminum pot handles will
be very hot and may cause injuries such as burns.
6. Add all remaining ingredients into the aluminum pot and mix well.Add short
ribs.
7. Close the lid.
8. Program the Slow Cooker for BEEF.
NOTE: Cooking times may vary based on the amount of meat, and fat content.
Check cooking progress an hour before programmed time expires.
9. Check periodically during slow cooking and add more water, if needed.
10.Using tongs, transfer the short ribs to a platter.
11.If desired, remove the aluminum pot from the slow cooker body and boil the
sauce on the stovetop until it thickens slightly, about 3 to 10 minutes. Skim any
excess fat. Spoon the braising liquid over the short ribs.
Braised Short Ribs
Cook: Auto-Program BEEF
LOW or HIGH.
Serves 6 - 8
12

RECIPES
• 10 hot or sweet Italian sausage links, uncooked
• 4 sweet onions, medium, cut into discs
• 4 red, yellow, or green bell peppers, cut into strips
• 2 (14-1/2 oz.) cans re-roasted diced tomatoes
• 1 (28-oz.) can crushed stewed tomatoes
• 2 tablespoons balsamic vinegar
• 6 cloves garlic, minced
• 1 tablespoon herbs du Provence, crushed
• 1 teaspoon crushed red pepper
1. Remove the aluminum pot from the slow cooker body, and place it directly on
the stovetop.
2. Turn burner heat to MEDIUM-HIGH.Add sausages, Brown on all sides.
3. Remove sausages onto a brown paper bag to drain grease.Add half the onions
and half the sliced peppers to the hot pan. Brown well. Drain veggies on brown
paper.Wipe the aluminum pot down to remove all sausage grease.
4. Replace aluminum pot into slow cooker body.
CAUTION: Be sure to use protective oven mitts when returning aluminum pot to
slow cooker body as the the aluminum pot and the aluminum pot handles will
be very hot and may cause injuries such as burns.
5. Add the remaining raw vegetables and the rest of the ingredients to the
aluminum pot and mix well.Add drained sausages, onions and peppers.
6. Close the lid.
7. Program the Slow Cooker for LOW; set the TIME for 6:00 hours or cook on HIGH
for 3:00 hours. HINT: Make extra and use any leftovers to make fabulous hoagie
sandwiches or home-made pizza.
Italian Sausage, Peppers, and Onions
Cook: 6:00 LOW, or 3:00 HIGH
Serves 8 -10
13

RECIPES
• 1/2 cup all-purpose our
• 3-1/2 - 4 lbs.large,meaty chicken pieces with skins (breast halves,thighs,and drumsticks)
• 2 tablespoons vegetable oil
• 2 cups sliced fresh mushrooms
• 1 cup reduced sodium chicken broth
• 3/4 cup dry white wine
• 1 (14-1/2 oz.) can diced tomatoes, drained
• 1 large red or green bell pepper, chopped
• 1 large onion, chopped
• 2 medium carrots, chopped
• 6 tablespoons capers, drained
• 2 teaspoons salt, or more to taste
• 1-1/2 teaspoons dried oregano
1. Add our to a gallon-sized plastic bag.Add chicken pieces, a few at a time. Shake the
bag until chicken is coated.
2. Remove the aluminum pot from the slow cooker body, and place it directly on the
stovetop.
3. Turn burner heat to MEDIUM HIGH - HIGH, add vegetable oil. When the oil is simmering
hot, add chicken, skin side down. Sear chicken for a few minutes on each side until
browned.Remove chicken and set aside.
4. Add mushrooms to the aluminum pot; cook and stir for 3 minutes. Remove mushrooms.
5. Add chicken broth and wine to deglaze.
6. Replace aluminum pot into the slow cooker body.
CAUTION: Be sure to use protective oven mitts when returning aluminum pot to slow
cooker body as the the aluminum pot and the aluminum pot handles will be very hot
and may cause injuries such as burns.
7. Add the chicken and mushrooms,drained tomatoes,sweet pepper,onion,carrots,capers,
salt, dried oregano.
8. Close the lid.
9. Program the Slow Cooker for CHICKEN.
NOTE: Cooking times may vary based on the amount of meat, and fat content. Check
cooking progress an hour before programmed time expires.
10. Check periodically during slow cooking and add more water, if needed.
11. Using tongs, transfer the chicken to a platter. Remove the aluminum pot from the slow
cooker body. Skim any excess fat and boil the sauce on the stovetop until it thickens
slightly, about 3 minutes. Spoon the sauce over the chicken.
12. Delicious served over white rice.
Searing the meat is key and vital for the rich taste of the stew.
Slow Cooked Chicken Cacciatore
Cook: Auto-Program CHICKEN
LOW or HIGH.
Serves 6 - 8
14

LIMITED ONE-YEAR WARRANTY
Congratulations on your purchase of the Lorena Garcia Slow Cooker. This product is
warranted to be free from defects in material and workmanship under normal use and
service for a period of one year from the date of original purchase with receipt. The
manufacturer’s obligation shall be limited to repairing or replacing,FOB N.Y.,any part of
the product that is defective. Such warranty shall not apply to damages resulting from
accidents,abuse or misuse.This warranty is valid only for rst quality goods purchased
from an authorized selling agent of IDL.
15
Ingenious Designs LLC • 2060 9th Avenue • Ronkonkoma, NY 11779 • (800)248-3002
Table of contents
Popular Slow Cooker manuals by other brands


camry
camry CR 6419 user manual

Tower Hobbies
Tower Hobbies Auto Slo-Cooker Recipes & instructions

HAMILTON BEACH/PROCTOR SILEX
HAMILTON BEACH/PROCTOR SILEX 33430 Use & care guide

Elite Products
Elite Products MST-250R instruction manual

Sanrio
Sanrio Hello Kitty APP-41209 owner's manual

Brentwood Select
Brentwood Select SC-157BK Operating and safety instructions