Innoband 8012-B1 User manual

Version 1.0 Last Revised: 11-07-11
ADSL2/2+ Router
8012-B1
User’s Manual

Version 1.0 Last Revised: 11-07-11
User Manual
Innoband 8012-B1
Information in this document is subject to change without notice and does not represent a commitment on the
part of Innoband Technologies, Inc. The software described in this document is furnished under a license
agreement and may be used or copied only in accordance with the terms of the license agreement. It is against
the law to copy the software on any other medium except as specifically allowed in the license agreement. The
licensee may make one copy of the software for backup purposes. No part of this manual may be reproduced or
transmitted in any form or by any means, electronic or mechanical, including photocopying and recording, for any
purpose without the written permission of Innoband Technologies, Inc.
All contents are Copyright © 2011 Innoband, Inc. All rights reserved.
Manual Version 1.0
Nov 2011
Innoband is a trademark of Innoband Technologies, Inc. The trademarks, logos and service marks (―Marks‖)
displayed on this manual are the property of Innoband or other third parties. Users are not permitted to use these
Marks without the prior written consent of Innoband or such third party that may own the Mark. IBM is a
registered trademark of International Business Machines Corporation. Intel and Pentium are registered
trademarks of Intel Corporation. Microsoft, MS-DOS, Windows, and the Windows logo are registered trademarks
of Microsoft Corporation. All other products are trademarks or registered trademarks of their respective owners.

1
Table of Contents
ADSL2/2+ Router .....................................................................................................1
8012-B1.................................................................................................................1
User‘s Manual..........................................................................................................1
Chapter 1: Product Introduction.....................................................................................3
1.1 Product Overview.................................................................................................... 3
1.2 Product Features..................................................................................................... 3
1.3 Protocols ............................................................................................................... 3
1.4 Packet Encapsulation............................................................................................... 3
1.5 Features ................................................................................................................ 3
Chapter 2: Hardware Description...................................................................................4
2.1 Panel Layout .......................................................................................................... 4
2.1.1 Front Panel ...................................................................................................... 4
2.1.2 Back Panel ....................................................................................................... 4
2.1.3 8012-B1’s Back Panel........................................................................................ 5
2.2 Installation Environment.......................................................................................... 5
2.2.1 Physical Environment Requirement ..................................................................... 5
2.2.2 Recommended Working Environment .................................................................. 5
2.3 Hardware Installation .............................................................................................. 5
2.3.1 Installation Requirement.................................................................................... 5
2.4 Installation Procedures ............................................................................................ 5
Chapter 3: Login to Web Management Interface.................................................................7
3.1Configuring PC ....................................................................................................... 7
3.2 Verifying Connection ............................................................................................... 8
3.3 Login to Router....................................................................................................... 9
Chapter 4: Quick Setup Guide .................................................................................... 10
4.1 Configuring PPPoA ................................................................................................ 10
4.2 Configuring PPPoE................................................................................................. 13
4.3 Configuring MER (MAC Encapsulation Routing) ......................................................... 15
4.4 Configuring IPoA................................................................................................... 18
4.5 Configuring Bridge ................................................................................................ 19
Chapter 5: Configuration Guide................................................................................... 21
5.1 Status ................................................................................................................. 21
5.2 Advanced Setting.................................................................................................. 22
5.2.1 WAN ............................................................................................................. 22
5.2.2 LAN .............................................................................................................. 32
5.2.3 IGMP Proxy .................................................................................................... 32
5.2.4 NAT .............................................................................................................. 33
5.2.5 Security......................................................................................................... 36
5.2.6 Routing ......................................................................................................... 38
5.2.7 DNS .............................................................................................................. 40
5.2.8 DSL .............................................................................................................. 41
5.3 DHCP .................................................................................................................. 42
5.3.1 DHCP Server .................................................................................................. 42
5.3.2 DHCP Client List ............................................................................................. 42
5.4 Diagnostic............................................................................................................ 43
5.5 System Tools ....................................................................................................... 44
5.5.1 Settings......................................................................................................... 44
5.5.2 System Log.................................................................................................... 45
5.5.3 SNMP Agent ................................................................................................... 46
5.5.4 Internet Time ................................................................................................. 46
5.5.5 Access Control................................................................................................ 47
5.5.6 Software Upgrade ........................................................................................... 47
5.5.7 Save/Reboot .................................................................................................. 47
AAppendix A - Configuring the Internet Settings .................................................. 48
Configuring Ethernet PCs .................................................................................................... 48
Before you begin ......................................................................................................... 48
Windows® XP PCs ....................................................................................................... 48

2
Windows 2000 PCs ...................................................................................................... 48
Windows Me PCs ......................................................................................................... 49
Assigning static Internet information to your PCs............................................................. 49
BAppendix B - Troubleshooting .......................................................................... 51
Troubleshooting Suggestions................................................................................................ 51
Diagnosing Problem using IP Utilities ...................................................................................... 53
Ping ........................................................................................................................... 53
nslookup .................................................................................................................... 53
CAppendix C - Glossary..................................................................................... 55
DAppendix D - Specification ............................................................................... 63
EAppendix E –Warranty ................................................................................... 65
FAppendix F - Regulation .................................................................................. 67
GAppendix G - Contact information ..................................................................... 69

3
Chapter 1: Product Introduction
1.1 Product Overview
Our INNOBAND 8012-B1 which complies with ADSL, ADSL2 and ADSL2+ standards is an ADSL terminal with
one Ethernet port. It supports multiple network protocols, up to 24Mbps downstream rate and 1Mbps upstream
rate, as well as NAT Routing and Bridging functions. With stable performance, exquisite appearance and s great
compatibility, it is the best choice for SOHO, small enterprise and individual users to access the Internet. By
using the provided setup wizard, users can achieve fast installation without entering management interface.
1.2 Product Features
Up to 24Mbps downstream rate and 1Mbps upstream rate
Supports Bridge, PPPoE, PPPoA, Dynamic IP and Static IP broadband access ways, etc
6000V enhanced lightning-proof design for lightning-intensive areas
Compatible with mainstream DSLAM equipments, strong adaptability
Wide voltage range design adaptable to areas with unstable voltage
FDM adopted to enable calling, faxing and Internet accessing to proceed simultaneously without mutual interferences
Complies with ADSL, ADSL2 and ADSL2+ standards
Provides Web-based management and supports firmware upgrade
Strong driving capability with up to 6.5Km transmission distance
Setup Wizard provided for simplified installation and configuration
1.3 Protocols
Supports full-rate ADSL2+ standard
ANSI T1. 413 Issue 2
ITU-T G. 992. 1 (G. dmt)
ITU-T G. 992. 2 (G. dmt)
ITU-T G. 992. 3 (G. dmt)
ITU-T G. 992. 5 (G. dmt)
1.4 Packet Encapsulation
Supports RFC 1483 Bridge、RFC 1483 Router
Supports Classical IP over ATM (RFC 1577)
Supports ppp over ATM (RFC 2346)
Supports ppp over Ethernet (RFC 2516)
1.5 Features
enhanced lightning-proof design for lightning-intensive areas
Compatible with mainstream DSLAM equipment, strong adaptability
Strong driving capability with up to 6.5Km transmission distance
Integrated Modem and Router all-in-one
Setup Wizard provided
4
Chapter 2: Hardware Description
2.1 Panel Layout
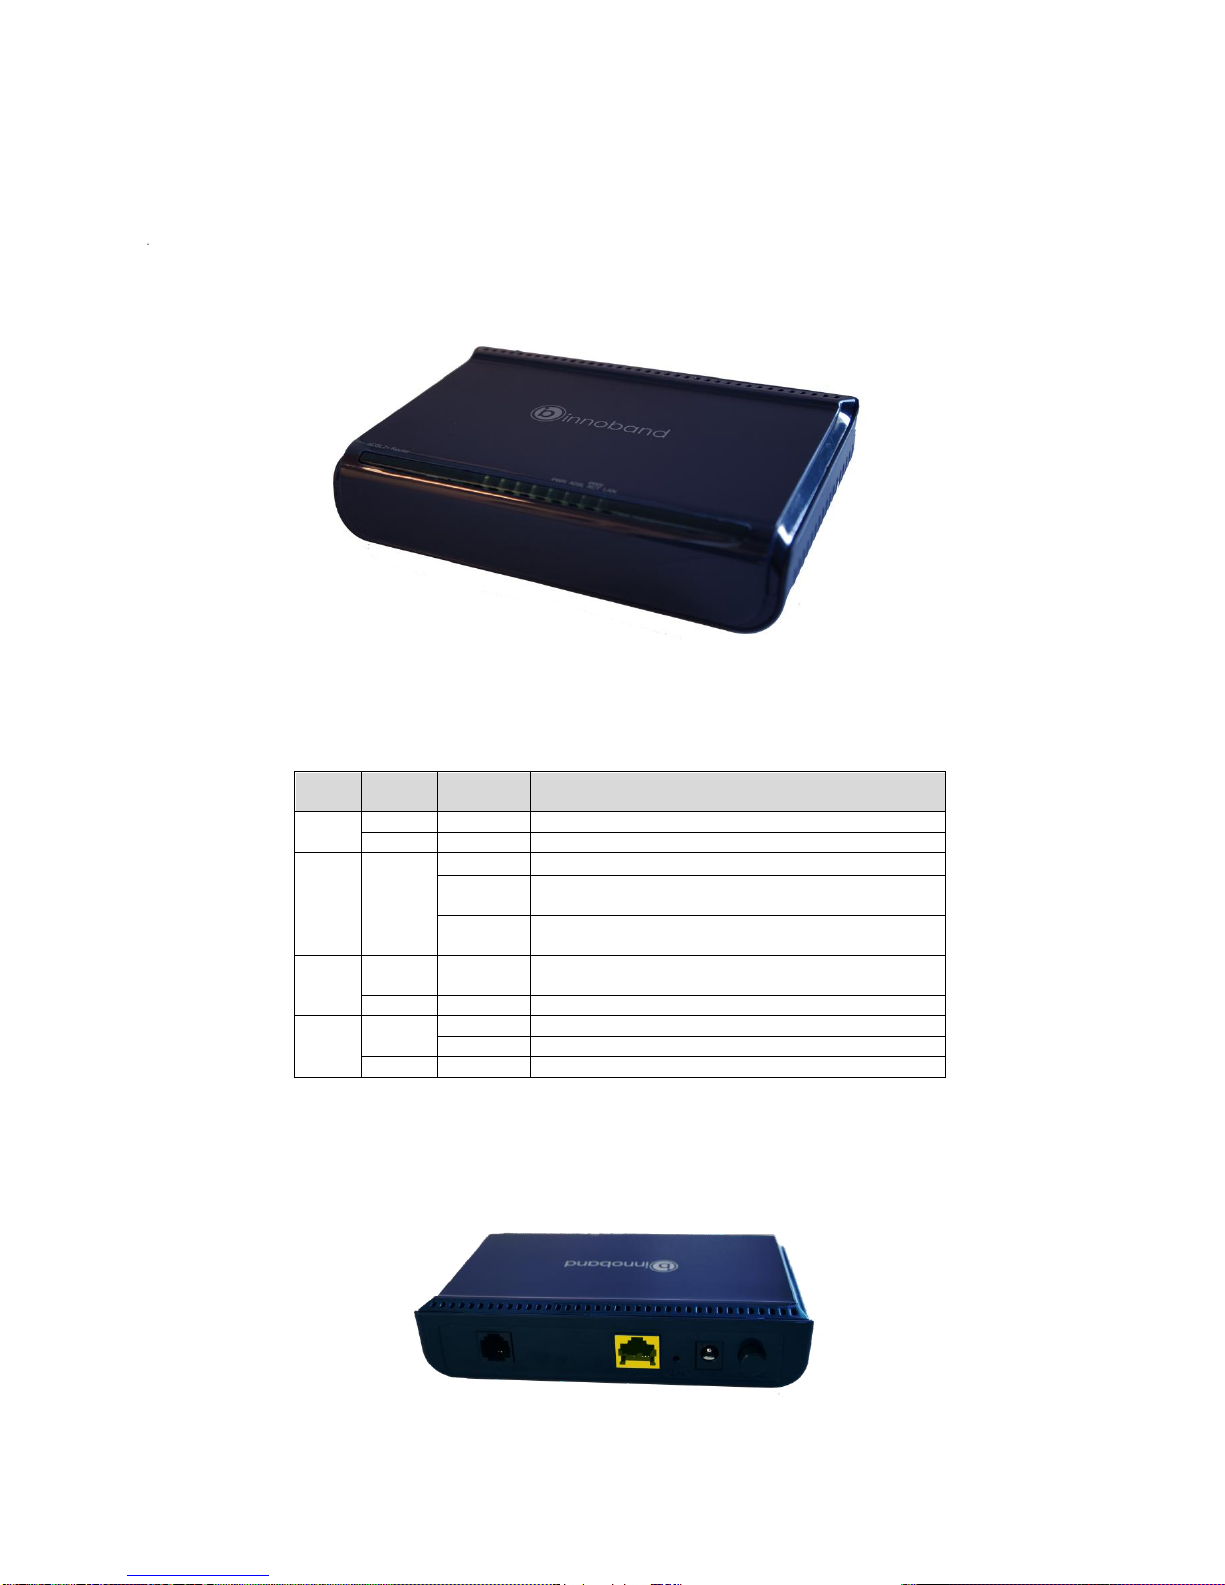
2.1.1 Front Panel
8012-B1‘s Front Panel
On the front panel, there are 4 LED indicators through whose working statuses we can tell whether the Router is
working correctly. Below is the description of them.
LEDs
Color
Status
Description
PWR
Green
ON
Device is on
—
OFF
Power is off
ADSL
Green
ON
DSL line connection is up
Slow
Flashing
Router has not yet been connected to CO devices
Fast
Flashing
DSL line training in progress
PPP/
ACT
Green
Flashing
Router‘s telephone line port is transmitting and
receiving packets
—
OFF
No data traffic over WAN connection
LAN
Green
ON
Ethernet interface is ready to work
Flashing
User data going through Ethernet port
—
OFF
No Ethernet signal is detected
2.1.2 Back Panel

5
2.1.3 8012-B1’s Back Panel
ON/OFF:Power button turning on/off the Router‘s power
PWR:the power socket for power adapter.
Notice: please use the matched power adapter (DC9V600mA). Use of a different adapter may damage your Router.
Reset Button:The reset button for restoring to factory default settings
Caution: do NOT press Reset button unless you want to have current configurations deleted. To reboot the Router and restore factory
default settings, Press and hold the button for 3 seconds with something pointed.
LAN: RJ-45 LAN port for connecting to hub, switch or PC‘s network adapter in your local network.
LINE: Used to connect to the Modem port of Voice Splitter.
2.2 Installation Environment
2.2.1 Physical Environment Requirement
Install the device horizontally
Do not wipe the device with wet cloth
Keep the device far away from hot objects
Keep the environment clean and dry
Power off the device and unplug the power adapter in lighting storm weather
2.2.2 Recommended Working Environment
Temperature: 0˚C ~ 40۫C
Humidity: 10%~90% RH non-condensing
2.3 Hardware Installation
2.3.1 Installation Requirement
Before installing the device, make sure the following requirements are met.
1. Have enabled ADSL service and acquired at least one WAN IP address or user name and password
provided by your ISP
2. One or more PCs with 10Base-T/100Base-T Network Adapter(s)
3. PC supporting Internet Explorer browser 6.0 or above
2.4 Installation Procedures
Connect the Voice Splitter‘s Modem port to 8012-B1Router‘s LINE port with telephone line (RJ11) and ―Phone‖ port to a
telephone. Insert a telephone line to the splitter‘s ―Line‖ port.
Connect one end of a network cable to 8012-B1‘LAN (RJ45) port and the other end to PC‘s NIC.
Plug the included power adapter into the Power socket on 8012-B1 Router and turn on the power switch.
Check all connections as shown in the below figure to see if everything is ready.
8012-B1 Hardware Installation

6
Tip:
To protect the device against thunderbolt attack, disconnect power adapter and telephone line
connection.
7
Chapter 3: Login to Web Management Interface
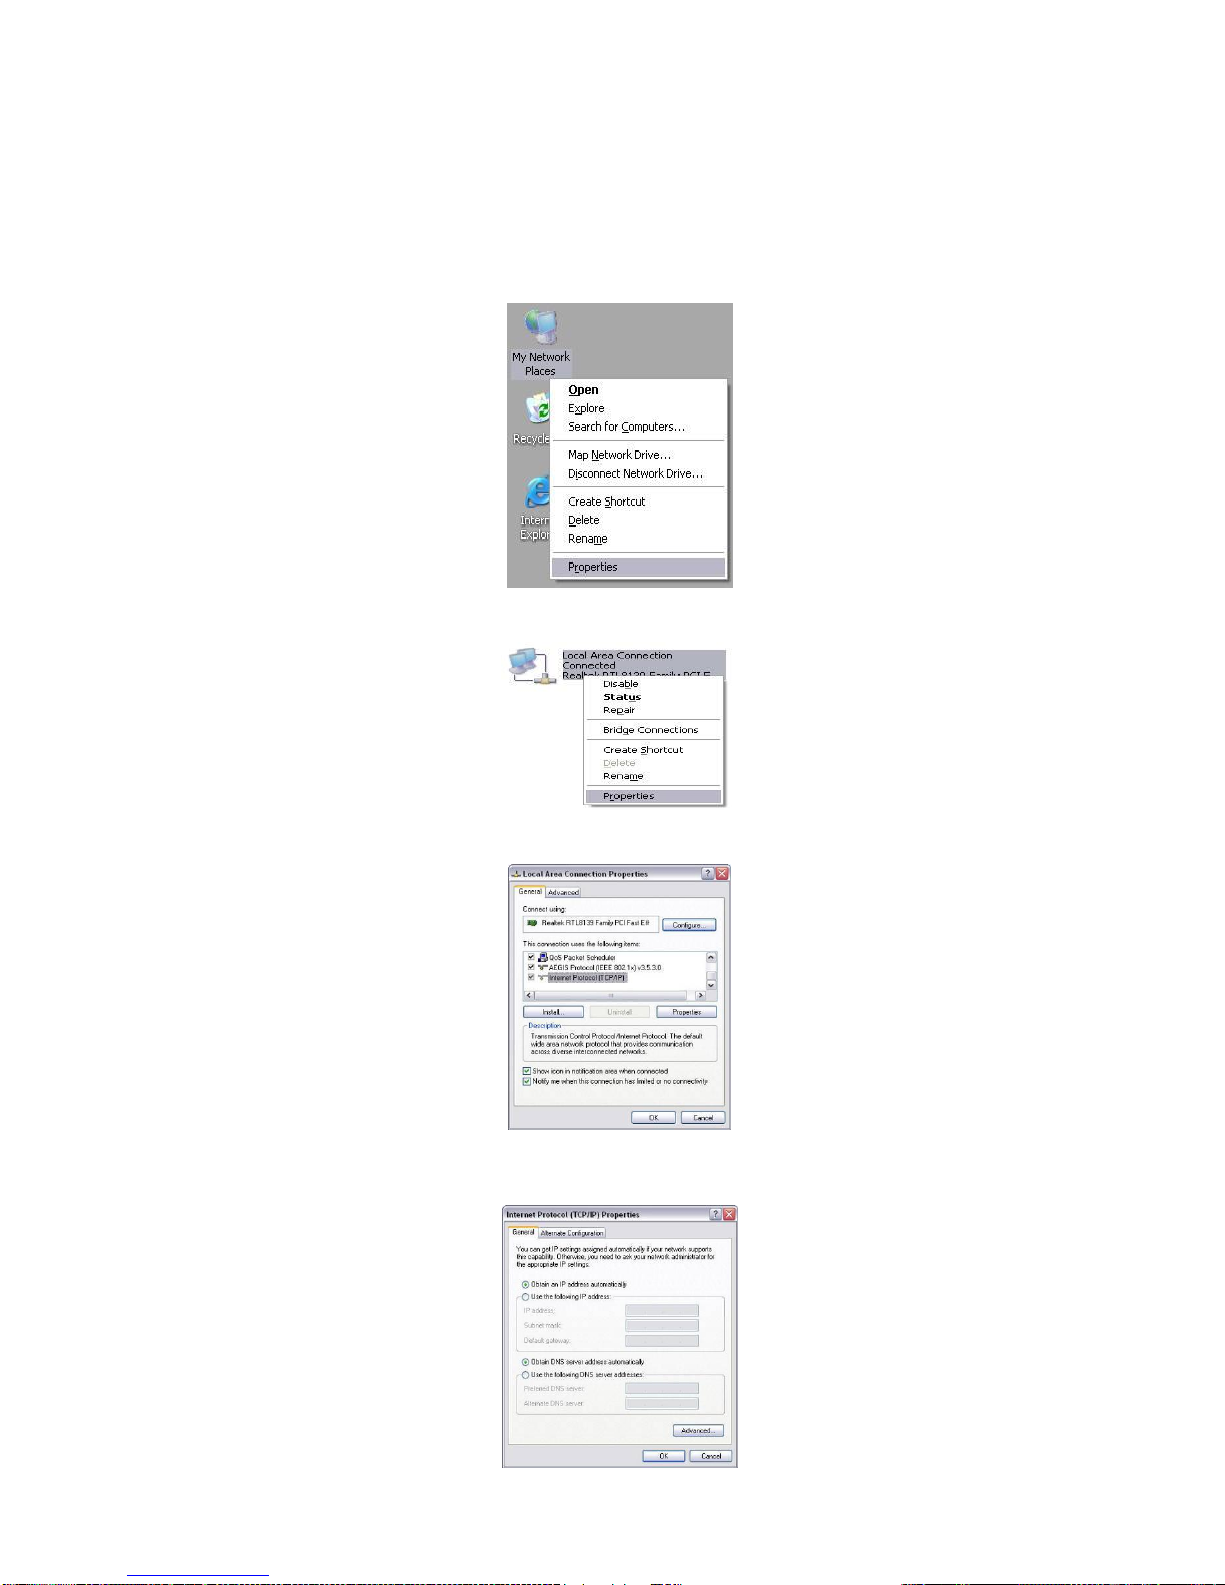
3.1 Configuring PC
1. Right click ―My Network Places‖ on the desktop and select ―Properties‖.
2. Right click ―Local Area Connection‖ in the appearing window and select ―Properties‖.
3. Select ―Internet Protocol (TCP/IP)‖ and click ―Properties‖.
4. Select ―Obtain an IP address automatically‖ or ―Use the following IP address‖.
a. ―Obtain an IP address automatically‖ is shown in the figure below:
8
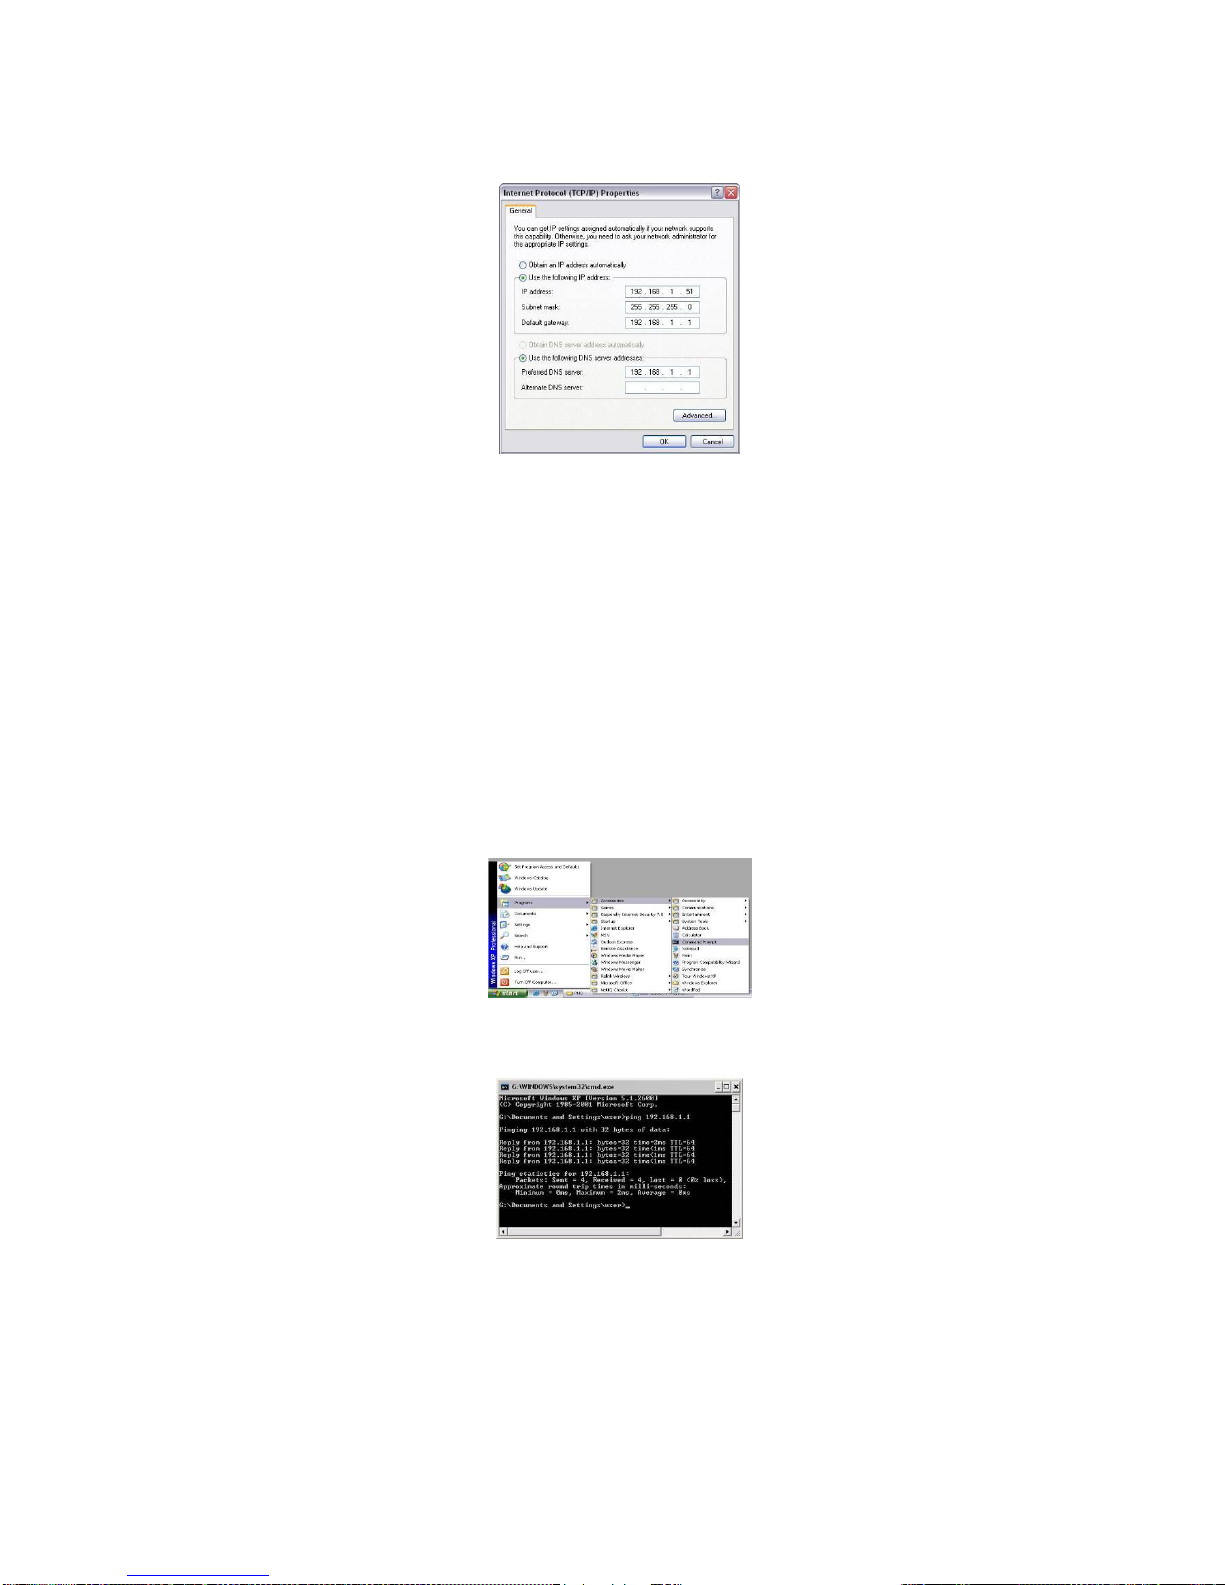
b. ―Use the Following IP Address‖ is shown in the figure below:
IP address:
192.168.1.XXX:(XXX is any number from 2~254)
Subnet Mask:
255.255.255.0
Gateway:
192.168.1.1
DNS server:
Enter your local DNS server address (consult your ISP if necessary). Or use the router as the DNS proxy
server. Then click ―OK‖ to submit and save the configurations.
3.2 Verifying Connection
1. Select ―Start‖→All Programs‖→―Accessories‖→―Command Prompt‖.
2. Input ―ping 192.168.1.1‖ and press ―Enter‖. If the screen displays as shown in below figure, it means
your PC is connected to your router successfully.
9
3.3 Login to Router
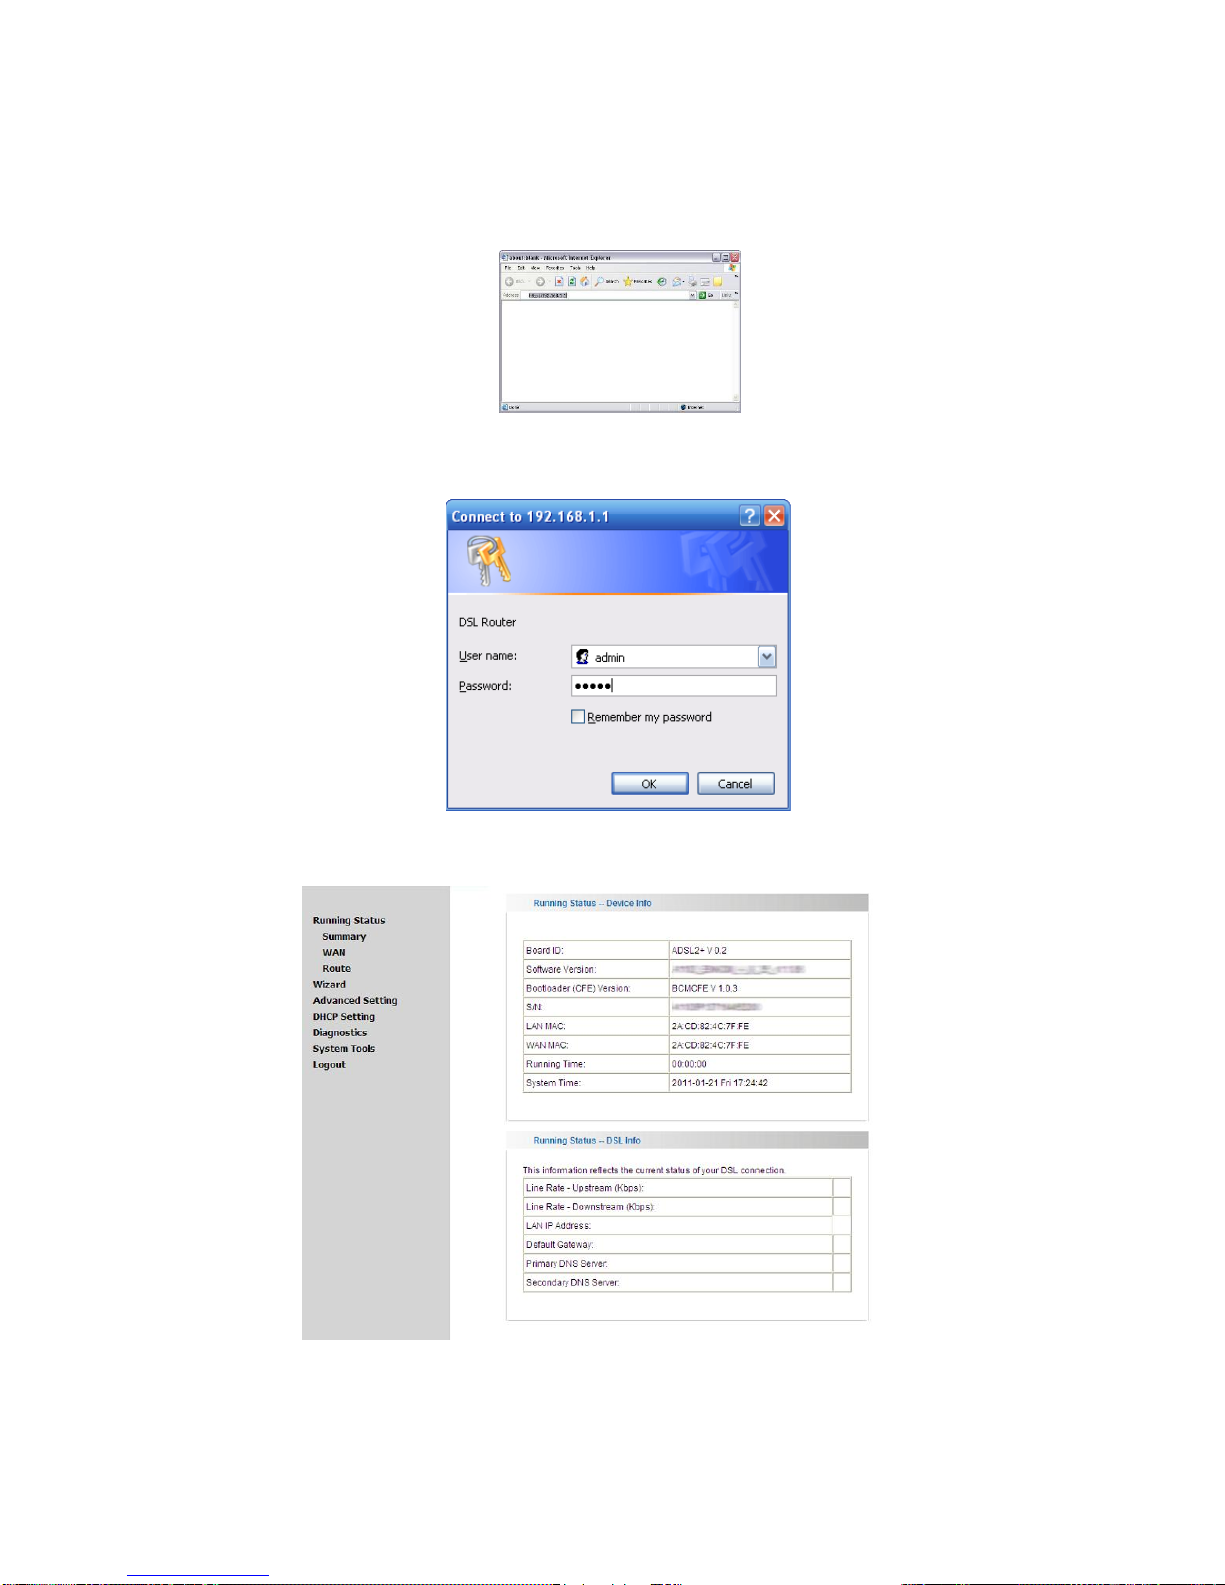
1. To access the router‘s Web-based interface, launch a web browser such as Internet Explorer and enter
the Router‘s default IP address, http://192.168.1.1 and press ―Enter‖.
2. Input ―admin‖ as both the ―User Name‖ and ―Password‖ and then click ―OK‖ (Both user name and
password are admin by default)
.
3. If you entered the correct user name and password, you will see the Page below.

10
Chapter 4: Quick Setup Guide
On the ―wizard‖ page, you are required to enter VPI and VCI values. Consult your ISP or select the
corresponding country and area if you are not clear about your local VCI and VPI. Then click ―Next‖.
4.1 Configuring PPPoA
1. Select PPPoA
2. Click ―Next‖, enter user name and password provided by your ISP and default values for other options.
For detailed information of these parameters, please refer to introductions later.

11
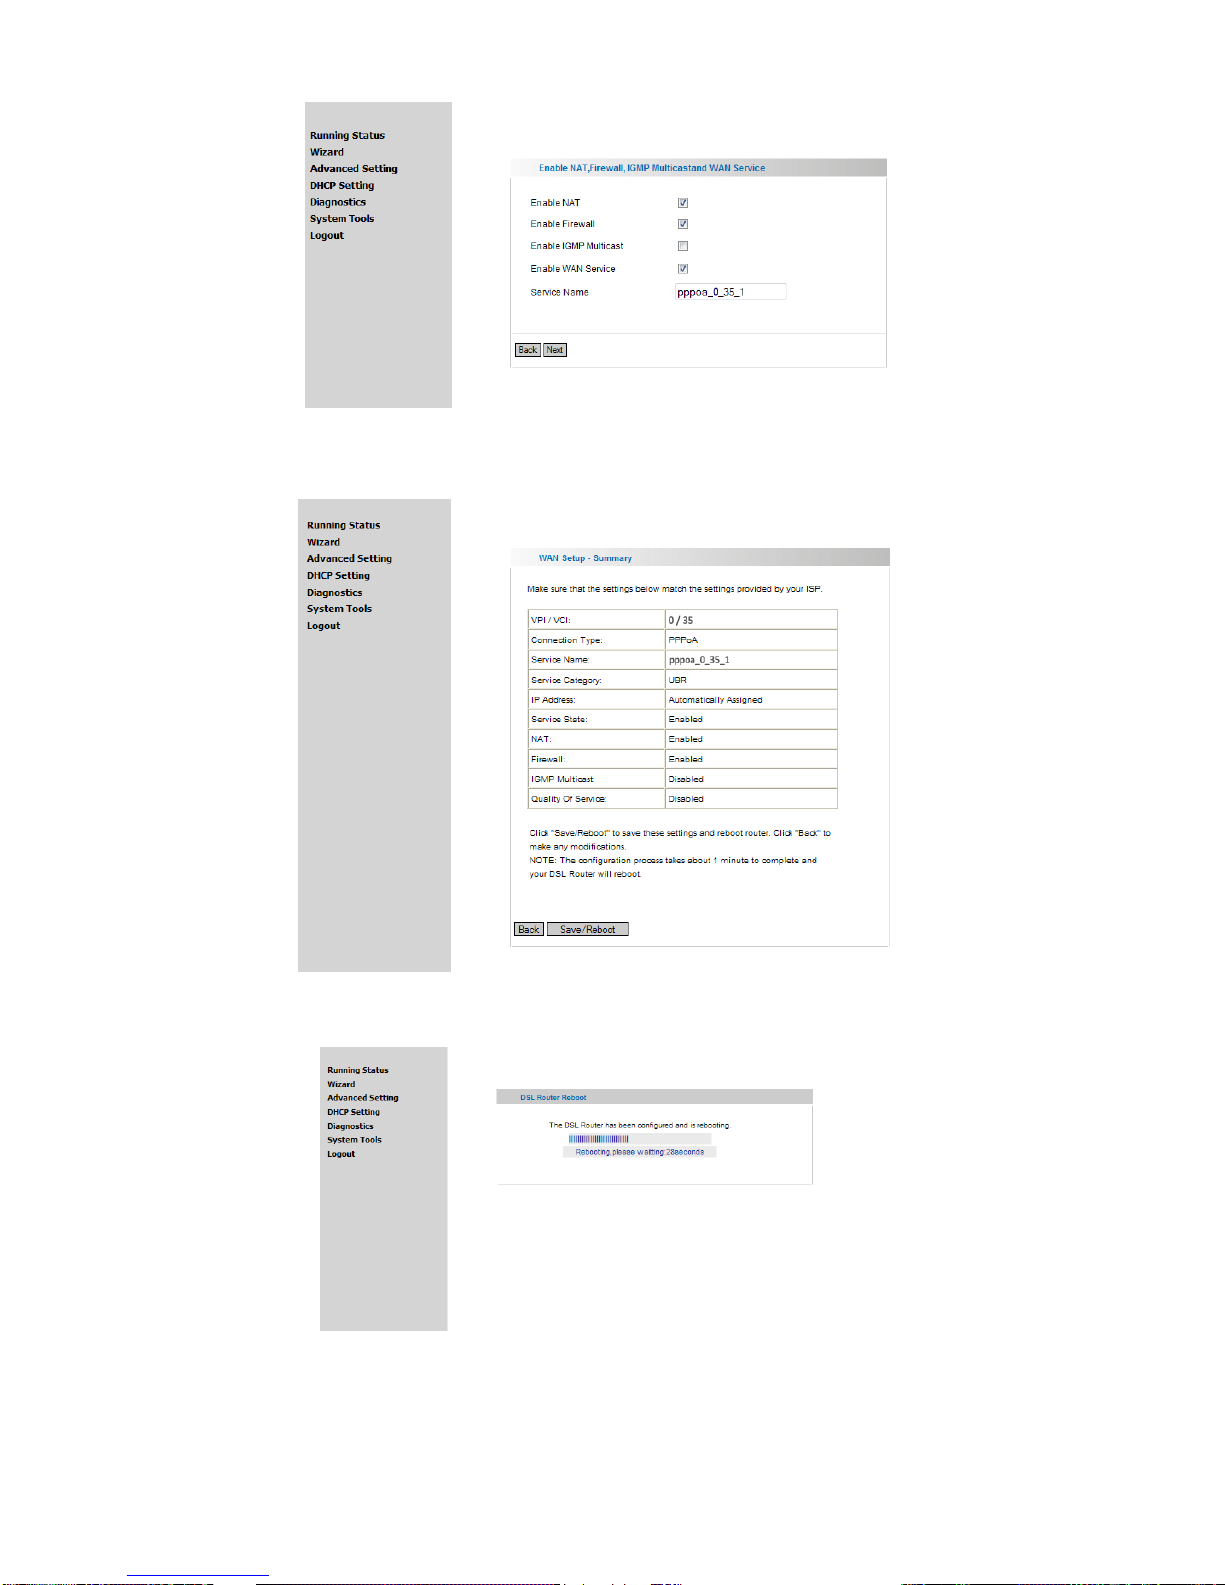
3. Click ―Next‘‘ and enable WAN service (enabled by default).
4. Click ―Next‖ to review your configurations on the following page.

12
5. Click ―Save/Reboot‖ to bring your configurations into effects.

13
4.2 Configuring PPPoE
1. Select PPPoE
2. Click ―Next‖, enter the user name and password provided by your ISP and default values for other
options. For detailed information of these parameters, please refer to introductions later.
3. Click ―Next‘‘ and enable WAN service (enabled by fault).
14
4. Click ―Next‖ to review your configurations on the following page.
5. Click ―Save/Reboot‖ to bring your configurations into effects.
15
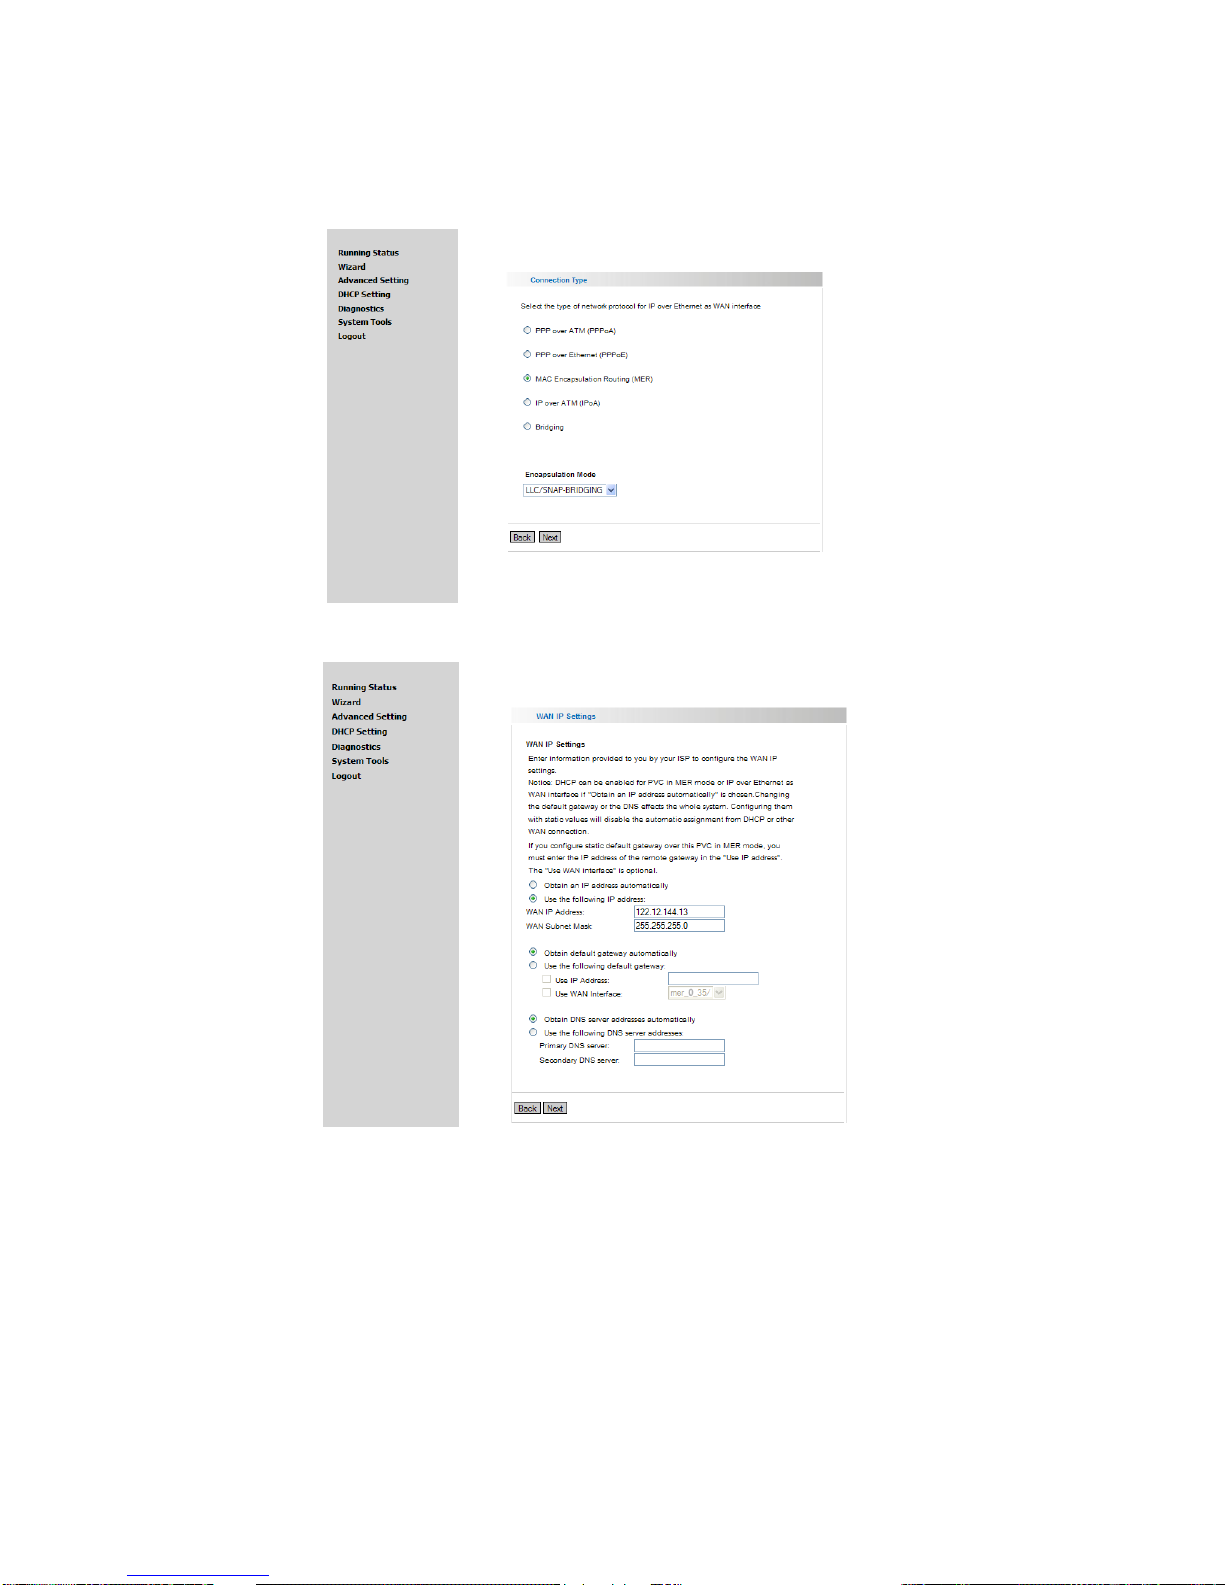
4.3 Configuring MER (MAC Encapsulation Routing)
1. Select MER connection
2. Click ―Next‖ and enter an IP address in the corresponding field if your ISP provided it.
3. Select ―Obtain IP Address Automatically‖ if your ISP didn‘t provide you a static IP address.
16
4. Click ―Next‖. We recommend you to enable NAT and firewall functions.
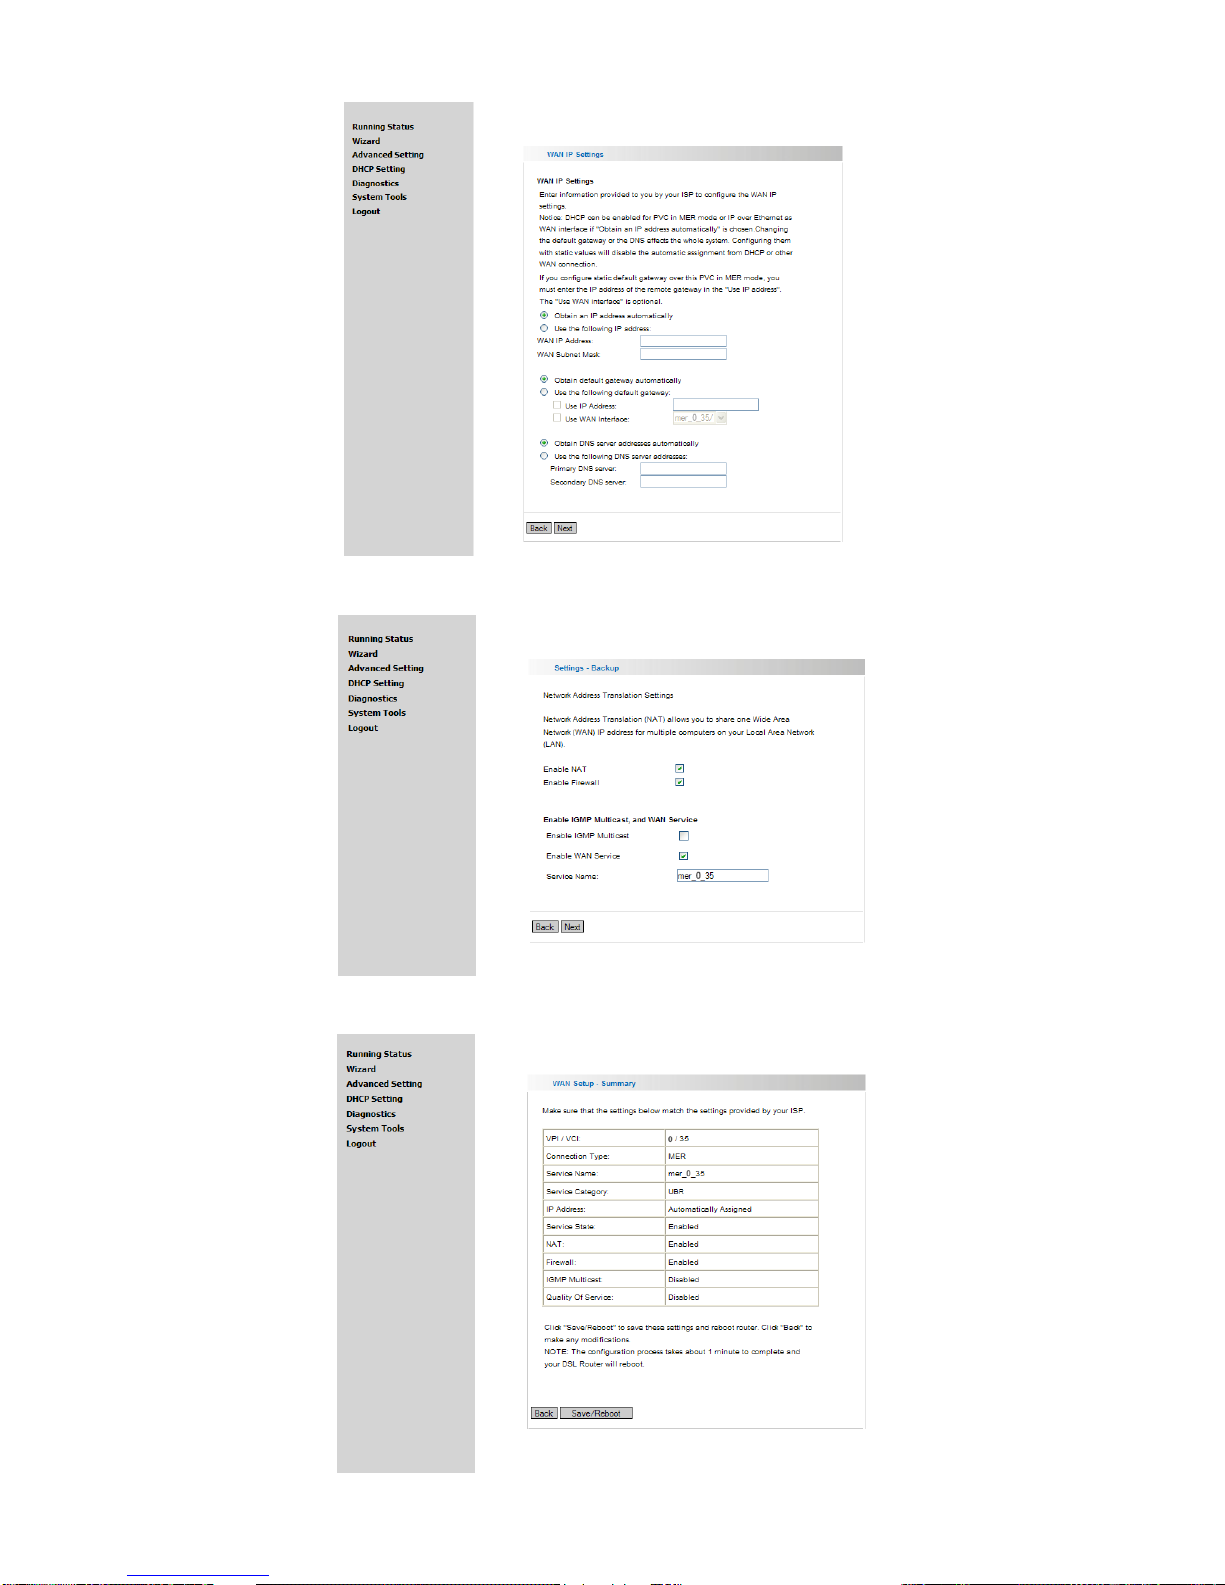
5. Click ―Next‖ to review your configurations on the following page.

17
6. Click ―Save/Reboot‖ to bring your configurations into effects.

18
4.4 Configuring IPoA
1. Select IPoA
2. Click ―Next‖ and enter an IP address and a subnet mask provided by your ISP.
3. Click ―Next‖. We recommend you to enable NAT and firewall functions.
Table of contents
Other Innoband Network Router manuals


Popular Network Router manuals by other brands


HandyWave
HandyWave HandyPort-Serial HPS-120 user manual

Shenzhen Hongdian Technologies
Shenzhen Hongdian Technologies Galaxy Mobile Router H7920 user manual

Allnet
Allnet ALL130DSL user guide

D-Link
D-Link DSL-124 user manual

Accton Technology
Accton Technology ES3016C Specification sheet

Danfoss
Danfoss VLT AutomationDrive manual

Matrix Switch Corporation
Matrix Switch Corporation MSC-XD1616L product manual

Nortel
Nortel VPN Router v7.05 user guide

H3C
H3C S3100-52P Operation manual

NETGEAR
NETGEAR WGT624v2 - 108 Mbps Wireless Firewall Router Specifications

Tenda
Tenda TEG1024G Technical specifications

Digicom
Digicom Modem GSM Dual Band Modem Specifications