InnoMedia InfoTalk 7 User manual

Operating manual
Operating manual
InfoTalk®
7


InfoTalk®
7
Congratulations on your purchase of InnoMedia’s InfoTalk device.
InfoTalk 7 is an intelligent Internet Phone that incorporates our
unique all-in-one solution which enables you to call any phone in the
world via an InnoSphere Call or a Talk-to-Talk Call. By using your
Internet account, you can enjoy significant and long term savings
on your overseas calls through the Internet. Full understanding of
what this product has to offer begins with reading this operating
manual. The first chapter contains a User Quick Start Guide for
easy set-up of your InfoTalk device. Subsequent chapters also
include details of the product information and specifications,
device settings, calling sequences and troubleshooting tips.
Copyright 2002 InnoMedia Inc. All rights reserved.
* Specifications subject to change without notice.

© Copyright 2002 InnoMedia Inc.
Published by InnoMedia, who reserves the right to make improvements in
the products described in this operating manual as well as to revise this
publication at any time and without notice to any person of such revision
or change.
All rights reserved. No part of this publication may be reproduced,
transcribed, stored in any electronic retrieval system, translated into any
language or computer language, or be transmitted in any form whatsoever
without the prior written consent of the published.
For additional information contact:
InnoMedia Ptd Ltd.
10 Science Park Road, #03-04
The Alpha, Singapore Science Park II, SINGAPORE 117684
Tel: (65) 6-872- 0828 Fax: (65) 6-872-0900
InnoMedia, Inc.
186 Topaz Street
Milpitas, CA 95035-5429 USA
Tel: (408) 432-5400 Fax: (408) 432-5404
InnoMedia Technology Inc.
3F, No 3, Industrial East Road IX,
Hsinchu Science-Based Industrial Park, Hsinchu, TAIWAN 300
Tel: (886) 3-564-1299 Fax: (886) 3-564-1589
InnoMedia, Inc.
No. 22 Chao Wai Street, Prime Tower, Suite 1405
Chaoyang District, Beijing 100020, P.R. CHINA
Tel: (86) 10 6588 5141 Fax: (86) 10 6588 5140
InnoMedia Website: www.innomedia.com
InnoSphere Website: www.innosphere.net
TRADEMARKS
All brand and product names are trademarks or registered
trademarks of their respective holders.
NOTICE
All titles, versions, trademarks, claims of compatibility, etc., of hardware
and software products mentioned herein are the sole property and
responsibility of the respective vendors. InnoMedia makes no endorsement
of any particular product for any purpose, nor claims responsibility for its
operation and accuracy.
UPDATES
Updates to the products and the manual are obtainable at
participating InnoMedia dealers and distributors or through
the Innomedia website.
Version 1.0

Chapter 1 User Quick Start Guide 1
Chapter 2 Product Information
& Installation 9
Chapter 3 Setting up InfoTalk 7 15
Chapter 4 Making calls with InfoTalk 7 25
Chapter 5 Tips & Troubleshooting 33
Chapter 6 Glossary 41
Chapter 7 Product Approval Information 47


C h a p t e r · 1
r
USER QUICK START
This chapter contains the essential
information for installing and setting up the
InfoTalk unit, so that users can start using
the InfoTalk to place calls and enjoy great
savings immediately.
r

2
User Quick Start Guide
The aim of this Quick Start Guide is to provide you with sufficient knowledge to
set up and start using your InfoTalk 7 after stepping through the instructions.
I. INSTALLATION
BUTTON FUNCTION
To scroll Backward or Forward
To Confirm selection or to Proceed to the next level
To Exit from selection or Return to previous screen
To remain online when making follow-on Internet calls
For quick access to InnoSphere Call dialing mode
Diagram of overall connection
II. BUTTON FUNCTIONS
Welcome screen
Diagram of
phone keypad

[Important]
III. INFOTALK 7 CONFIGURATION SHEET
Before you proceed to configure your InfoTalk, we suggest that you fill in the information in
column first to serve as your reference.
Sub-Menu
Phone Book
Dial Up
Settings
InnoSphere
Calls
Option
User Phone
Number
Name
ISP Phone No.
Login Name
Login Password
User ID
Password
Explanation
The phone number of the
phone line which is
connected to your InfoTalk.
Please enter the country
code, area code and the
phone number into your
InfoTalk.
Provide a name to your ISP
profile.
Your ISP dial-up phone
number.
Your ISP account User ID
Your ISP account Password
Refer to the given envelope
for the assign User ID
Refer to the given envelope
for the assign password
Example
Phone Number:
8872500
Area Code:
408
Country Code:
1
David - AT&T
4379000
David
apple123
1234567890
1234
Actual

4
[NOTES]
-Login Name and Password are both case sensitive; hence please enter the
exact character whereby lower case “c” is not the same as upper case “C”. If
the wrong information is entered, you will receive “Invalid UserID and
Password” message on your CONNECTIVITY TEST.
-Please note that your ISP Internet account has specific Login Name/UserID
and Password; they are not the same as the Login Name/UserID for your other
email address like your Hotmail or Yahoo Mail. Please enter only the correct
information.
-If you have multiple Dial Up Settings profiles and InnoSphere Calls profiles
stored into your InfoTalk, please go to the SELECT DEFAULT option in each of
the respective sub-menu and choose the profiles you want to use. Without
making your choice, InfoTalk will use the first profile as your default profile.

5
IV. Configuration and Settings
Enter User Phone Number
1. Press at Default Screen.
2. Press at Phone Book mode.
3. Press at User Phone option.
4. Enter the user’s PSTN phone number, area code and
country code into the option, and press to confirm.
5. Press to exit and save all settings.
Configure Dial Up Settings
1. Press at Default Screen.
2. Scroll menu with or to reach Dial Up Settings and press to
enter.
3. Press again to enter Add (default option), otherwise scroll with
or for other options.
4. At Name, key in the name for your dial up profile using the phone
key pad.
5. Press to store entry.
6. Scroll with or to configure remaining settings.
7. Repeat Steps 4-6 to configure other settings which include ISP
Phone Number, Login Name and Login Password using the keypad.
8. Scroll with or to access other options such as Change
Settings, Erase Settings and Select Default Settings.
9. After all Dial Up Settings are completed, press to exit and save
all settings.
Configure InnoSphere Calls Profile
1. Press at Default Screen.
2. Scroll menu with or to reach InnoSphere Calls and press to
enter.
3. Press to select Add (default option), otherwise scroll with or
for other options.
4. Press 2 times to access profile settings.
5. Enter the User ID using the phone keypad.
6. When completed, press to store entry.
7. Scroll with or to configure remaining settings.
8. Repeat Steps 4-6 to access and configure Password. Press to
exit this sub-menu.
9. Scroll with or to access other options such as Change Profile
Settings, Select Default Profile and HotKeys*.
10. After completing all InnoSphere Call configurations, press to
save all settings and exit.
*HotKeys are handy when you want to use your cordless phone to access both
InnoSphere Calls and Talk-to-Talk Calls.
∂
To toggle between lower
case and upper case,
press on the keypad for
about 2 seconds.
u
Wait for 1 second before
entering the next
character.
u
Obtain your User ID
and Password
before configuring
your InnoSphere
Profile
u
Diagram of character
representation
KEY
CHARACTER
1 1~!#$%^
&*()_+|{}:”
<>?`-=\;’/
2 2ABC
3 3DEF
4 4GHI
5 5JKL
6 6MNO
7 7PQRS
8 8TUV
9 9WXYZ
0 0.,@
# Space
*Back space /
Delete
Default screen

6
V. CONNECTIVITY TEST
To perform Connectivity Test
1. Press at Default Screen.
2. Scroll menu with or to reach Connectivity Test.
3.Press at Test Mode.
4.Press to start test, otherwise press to exit.
Once InfoTalk 7 passes the connectivity test, you are ready to make your first
Internet call.
VI. MAKING CALLS
After configuring your InnoSphere accounts, InfoTalk 7 can call to any phone or
another InfoTalk 7 device in the world.
InnoSphere Calls
1.Pick up phone handset.
2.Wait for 1 sec, and the icon will appear on the screen.
3.Press button, InfoTalk will display < InnoSphere Call> on the
screen.
4.Enter the caller’s Country code +Area code +Phone Number +#
Example: To call a phone number in Shanghai
where 86 is the Country code
21 is the Area code
3351234 is the remote phone number
please dial 86 21 3351234 #
5.Your InfoTalk will start the Internet connection automatically.
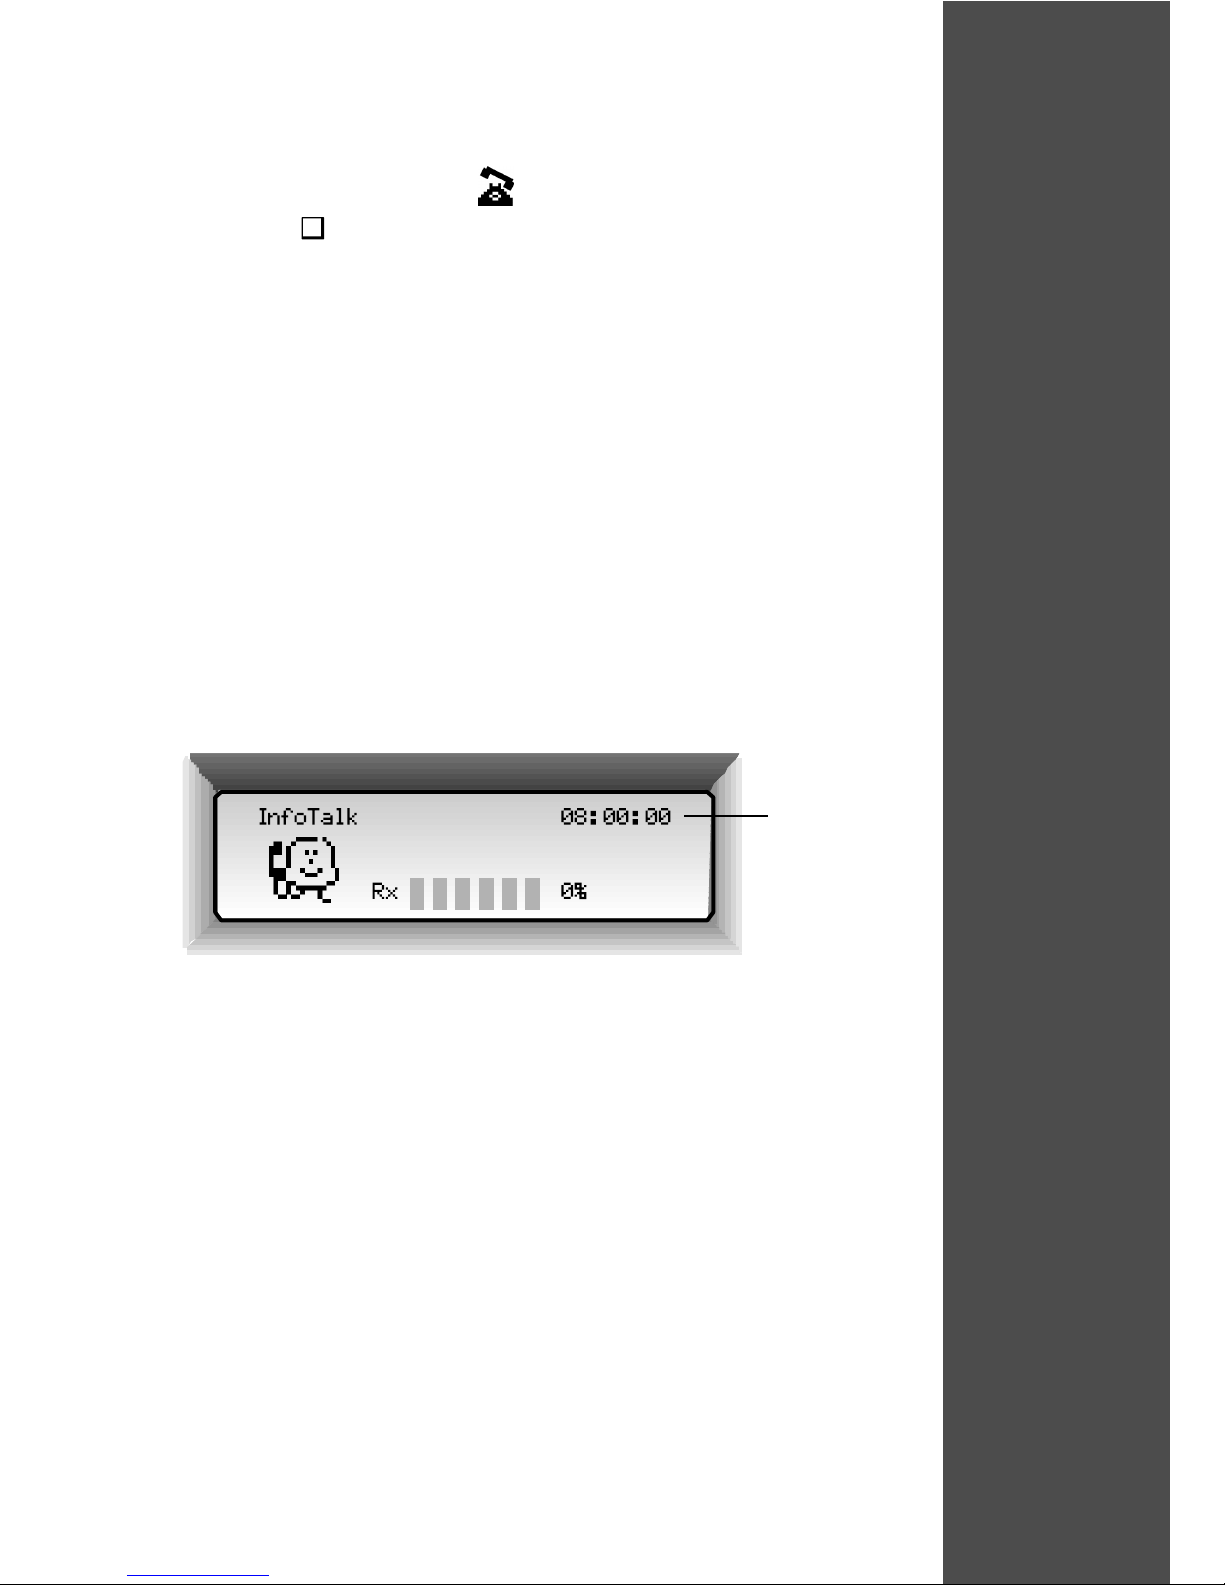
6.Within 1-2 minutes, you will hear a ring back tone and the screen
shown below will appear when InfoTalk has accessed InnoSphere
network successfully.
When the remote party picks up the call, you can start your conversation.
∂
Always press
to confirm selection
and to exit menu.
u
Press
to move forward and
to go backward
when scrolling through
the menu.
u
Press to delete
character
u
Press
to insert character
u
8 Hours of
InnoSphere
talk time
left
7
Talk-to-Talk Call
1.Pick up phone handset.
2.Wait for 1 sec, and the icon will appear on the screen.
3.Press button, InfoTalk will display <Talk2Talk:> on the screen.
4.Enter your IDD prefix +Country code +Area code +Remote phone
number.
Example: Call a phone number in Shanghai
where 001 is the IDD prefix
86 is the Country code
21 is the Area code
3351234 is the remote phone number
please dial 001 86 21 3351234
5.After hearing 2 rings, press # to initiate Internet connection.
6.You can choose to hang up your phone.
7.Both sides can pick up the phone again upon hearing the success tone
8.The screen below will appear when both sides have picked up the
phone.
Enjoy your Internet conversation.
Note: You need a valid InnoSphere account in order to make InfoTalk7-to-
InfoTalk7 calls.
8 Hours of
InnoSphere
talk time
left


C h a p t e r · 2
r
PRODUCT INFORMATION
&
INSTALLATION
In this section, the installation section will
guide users to a successful setup of the unit.
We are providing detailed product
information for reference.
r
10
Product Information & Installation
I PRODUCT INTRODUCTION
Congratulations on your purchase of InfoTalk 7, the next generation
of the InfoTalk product. InfoTalk inherits the primary function
of its predecessor in enabling the user to make long-
distance calls via the Internet. InfoTalk 7 features more
innovative functions and better voice quality that aims to
enhance the intrinsic values of your Internet phone.
With your InfoTalk 7 and a valid InnoSphere account, you can call to anywhere
in the world either via an InnoSphere Call, which does not require the receiving
party to be equipped with an InfoTalk, or you can also reach other InfoTalk 7
units through a Talk-to-Talk Call.
Furthermore, InfoTalk 7 has a built-in LCD screen that can display the
Navigation Menu with your preferred language in either English or Spanish. You
can also enable or disable calling features such as Caller ID, Call Records, Call
Blocking and Call Waiting.
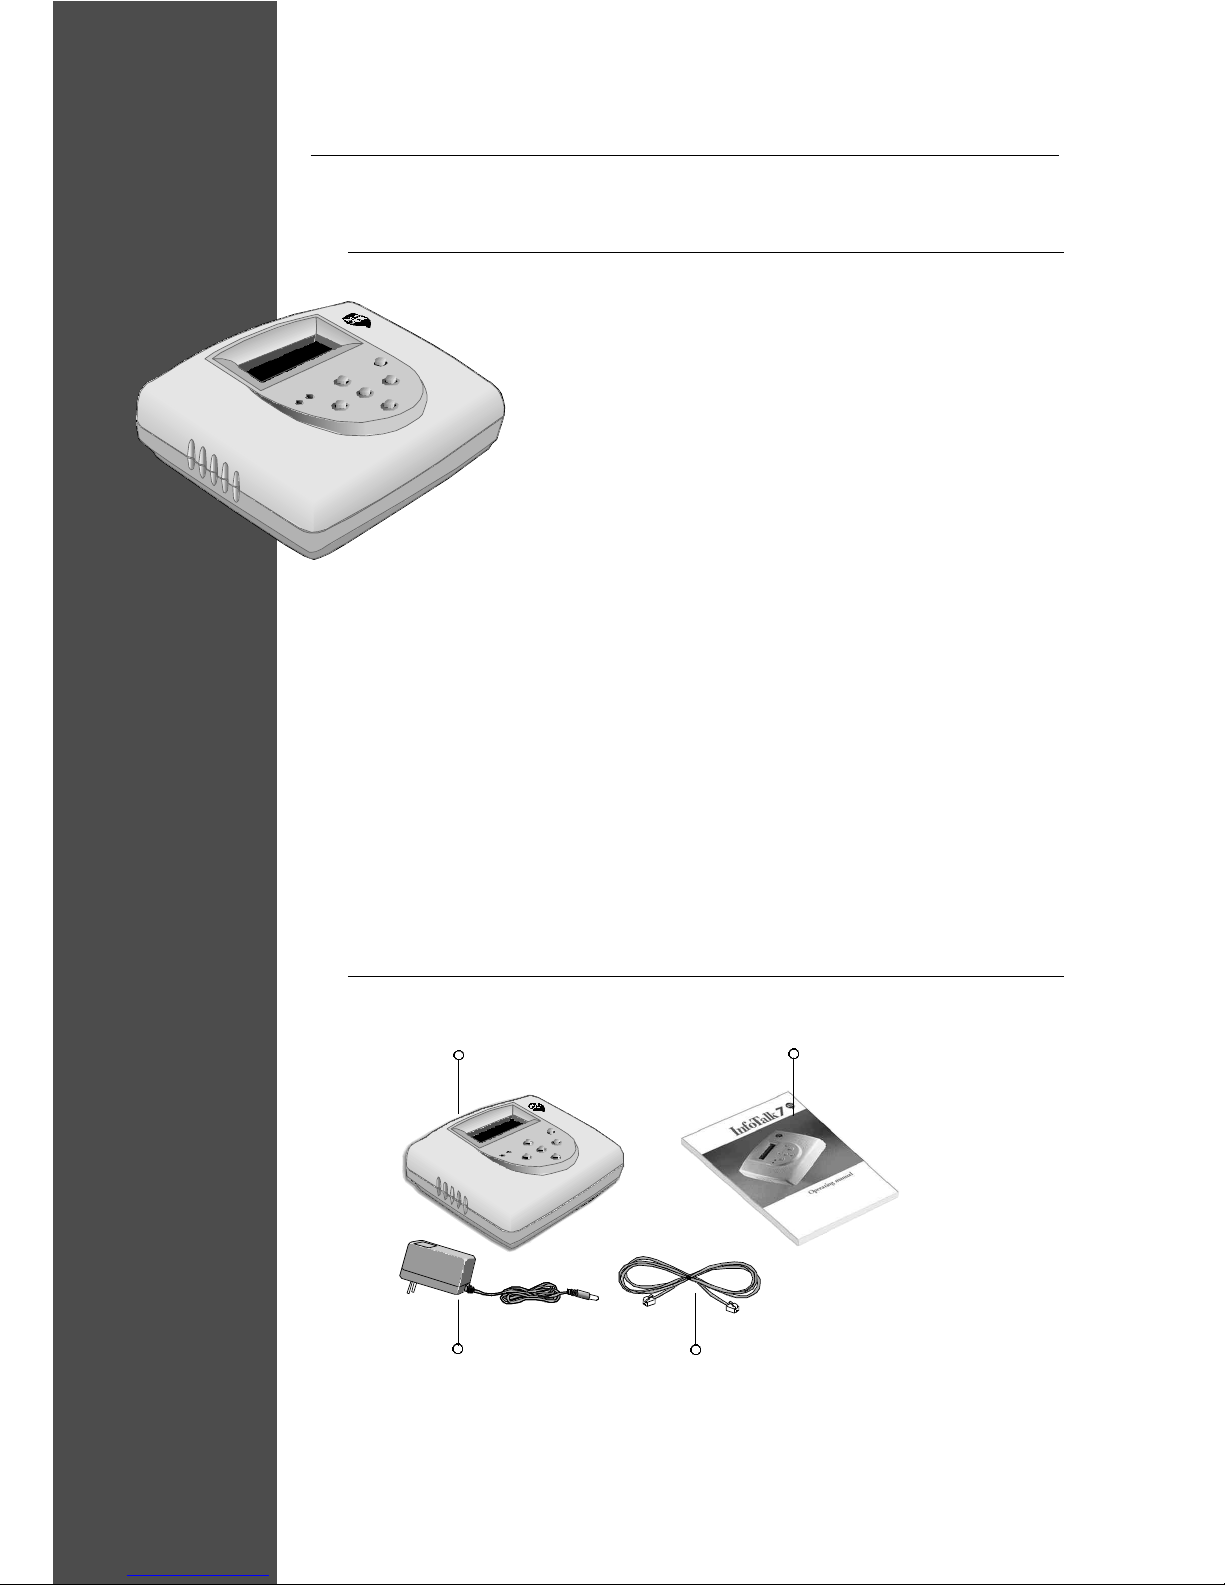
II PACKAGE ITEMS
Diagram of
Package contents
1x InfoTalk 7 Unit 1x Operating Manual
1x RJ11
Phone Cord
1x DC 12V 500mA
Power Adapter
InfoTalk 7
∂
Please refer to
Chapter 1 - User
Quick Start Guide for
Button Functions
u

11
ITEMS FUNCTION DESCRIPTIONS
1. Power switch Flip the switch down to turn ON InfoTalk.
2. Power input DC 12V input power for InfoTalk.
3. Audio output Insert RCA cable for audio output through headset
or speakers.
4. LINE RJ11 Socket for connection of InfoTalk to the wall socket
(RJ11 connector)
5. PHONE RJ11 Socket for connection of InfoTalk to the phone socket
(RJ11 connector)
6. 9-pin serial port Female 9-pin connector for serial connection to PC
or communication device.
IV INSTALLATION
1. Disconnect the phone cord
from phone and connect it to
the back panel
socket labeled
2. Take the phone cord provided,
connect it to your phone and
insert the other end into
the back panel
socket labeled
3. Connect the power adapter to
InfoTalk power input labeled
DC 12V and turn on the power
on your wall socket.
4. Power up your InfoTalk unit by flipping
down the switch.
5. You will see the default screen
as illustrated to the right.
1 2 3 4 5 6
Diagram of InfoTalk setup
III REAR PANEL

12
V PRODUCT SPECIFICATION
General Specifications
- Built-in Telephone Line interface
- Built-in 122 x 32 Dot Matrix LCD message display
- LED display for LCD Message warning
- Built-in push button switch for function selection
- DC Power adapter
- Local/Remote Phone DTMF detection
- Non-volatile memory storage for preset data
- Optional RS232 Host Interface
- Audio Output
Interface
-Telephone line interface (RJ11 Phone Jack) - Two-wire Public
Telephone Line
-Telephone interface (RJ11 Phone Jack) - Analog Telephone with
DTMF dialer
- Host interface (Optional) - RS232 interface 9-Pin female connector
Physical Characteristics
- Dimensions 125mm x 165mm x 45mm
- Weight Approximately 350 gm
- Front Panel LCD display (58mm x 17mm)
Power-on LED (green)
Message LED (red)
6 Function Push Button Switches
- Rear Panel Power switch
Power-Supply Socket
RS232 9-Pin ‘D’ Sub Female Connector
RJ11 (standard) Jack to Telephone Line
RJ11 (standard) Jack to Analog Telephone
- Audio Jack (300 mW max at 8 ohms)
to Speaker

13
Environmental Requirements
- Power Supply DC 12V 500mA - Supplied by DC Power Adapter with
120V 60Hz AC Input >> (North America version)
100V 50/60 Hz AC Input >> (Japan version)
220V 50Hz AC Input >> (Asia Pacific version)
240 50Hz AC Input >> (Australia version)
- Temperature +5 C to +45 C (Operating)
-20 C to +55 C (Non-operating)
- Humidity 20% to 80% RH (Operating)
20% to 80% RH (Non-operating)

14
Table of contents
Other InnoMedia Cordless Telephone manuals


