INNOTECK DS-5358 User manual

Model:DS-5358
2 IN1
ELECTRIC BLENDER AND GRINDER SET
Blender & Grinder

IMPORTANT SAFEGUARDS
HOUSEHOLD USE ONLY
When using the electrical appliance, the below basic safety precautions should be
followed:
Read all instructions.1.
2.
3.
4.
5.
6.
7.
8.
9.
10.
11.
12.
13.
14.
15.
Before using check that the voltage power corresponds to the one shown on the
appliance nameplate.
Do not let cord hang over edge of table or counter.
Do not operate any appliance with a damage power cord or plug or after the appliance
mal-function or has been damaged in any manner.
Never leave this appliance within the reach of children.
This appliance can be used by children aged from 8 years and persons with reduced
physical, sensory or mental capabilities or lack of experience and knowledge if they have
been given supervision or instruction concerning use of the appliance in a safe way and
understand the hazards involved. Children should not play with the appliance. Cleaning
and user maintenance shall not be made by children without supervision.
Avoid contacting moving parts.
Blades are sharp, so handle carefully.
The use of attachment, including Jar, lid, not recommended or sold by manufacture may
cause fire, electric shock or injury.
The appliance cannot be used for blending hard and dry substances, otherwise the
blade could be blunted.
Switch off the appliance before approaching parts which move in use.
Be sure to turn switch to 0 position after each use. Make sure the motor stopped
completely before disassembling. And the power supply cord plug is removed from power
socket.
Do not immerse the Motor Unit into water or any other liquids.
Do not use outdoors.
Save these instructions for future reference
1

2
INDEX
Important Safeguards...........................................................................................................2
Product Overview And Specifications............................................................................4
Before First Use .................................................................................................................... 4
Blending of Fruit And Vegetable .....................................................................................4
Grinder Operation .................................................................................................................5
Cleaning And Maintenance .......................................................................................... ... 6
Cleaning The Grinder ................................................................................................... ... 7
Warranty Card........................................................................................................................8
Warranty...................................................................................................................................9
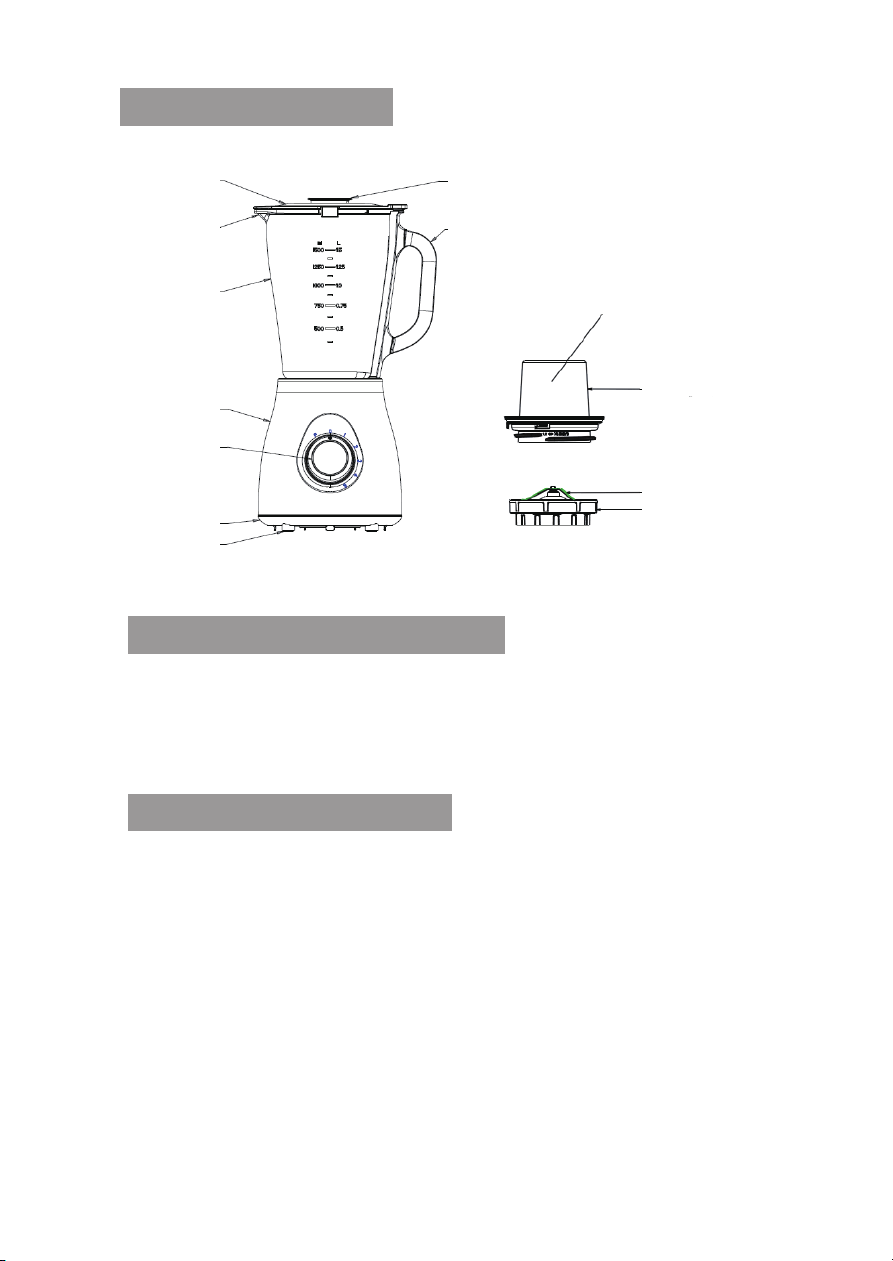
Product Overview
3
PRODUCT SPECIFICATIONS
Voltage/Frequency/Wattage : 220-240V 50/60Hz 500W
Glass Jar Capacity : 1.5 Litre
Grinder Capacity : 60gm
BEFORE THE FIRST USE
1. Unpack the appliance and place all parts on a horizontal surface.
2. Immerse jar, jar cover,in warm soapy water and rinse them and dry. Never immerse
motor unit in water for cleaning to prevent the risk of electric shock.
3. CAUTION: the blade is very sharp! Handle with great care.
4. Proper assembly way will be described in detail as below.
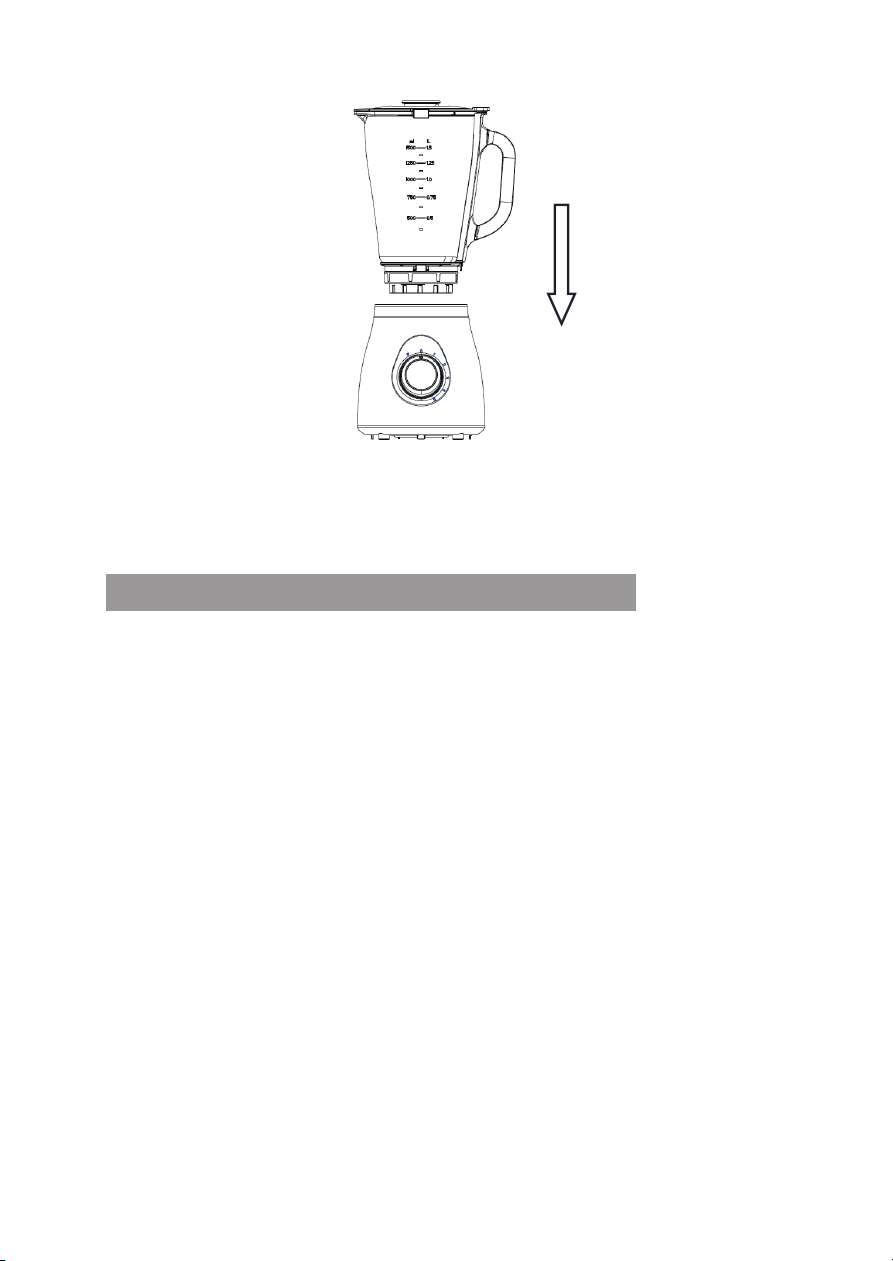
a)Before assembling the jar, be sure the power cord is unplugged from the power socket
and the Switch button is on the 0 position.
b)The jar is suitable for making mixture which the juice and pulp are mixed.
c)For attaching Jar, place the Jar into the motor unit directly in place, (see fig.1).
Grinder attachment
Grinding cup
Grinding blade
Blade base
Jar cover
Spout
Glass jar
Motor unit
Swltch knob
Base
Foot
Measure cup
Handle
BLENDING OF FRUIT AND VEGETABLE
1. Before plugging the power cord in the power socket, make sure the switch button is
in the 0 position.
2. Peeled or cored the fruit or vegetables and then cut it into small dices, put the food
piece into the Jar. Usually certain amount of purified water has to be added to facilitate
the smooth running of appliance. The proportion of the food and water is 2:3.
The amount of mixture should not exceed the max level as indicated on the Jar.
Note: Never use boiling liquids or run the appliance empty. The Jar can be
used for crushing of ice.
3. Turn the Jar cover into the Jar.
4. Turn the Switch button to the desired setting, there are five settings: P, 0, 1,2,3,4,5.
Turn switch to P position and hold it to pulse actuate motor for delicate chopping.
Release it to return the 0 position.
5. The consecutive operation time shall be less than 3 minutes . Minimum 1 minute’s rest
period is required between two consecutive cycles.
6. Turn the Switch button to 0 Position once the mixture has been blended to your
desired consistency.
7. Remove the Jar from the Motor Unit (remove it by directly upward), carefully take
down the Jar cover, then pour and serve.
Note: make sure the Jar is assembled into the motor unit properly, there is interlock switch
on the position, if the Jar is not assembled properly, the blender will not operate.
4
GRINDER OPERATION
5
1. Lay the motor unit on the flat horizontal surface and make sure it is
unplugged.
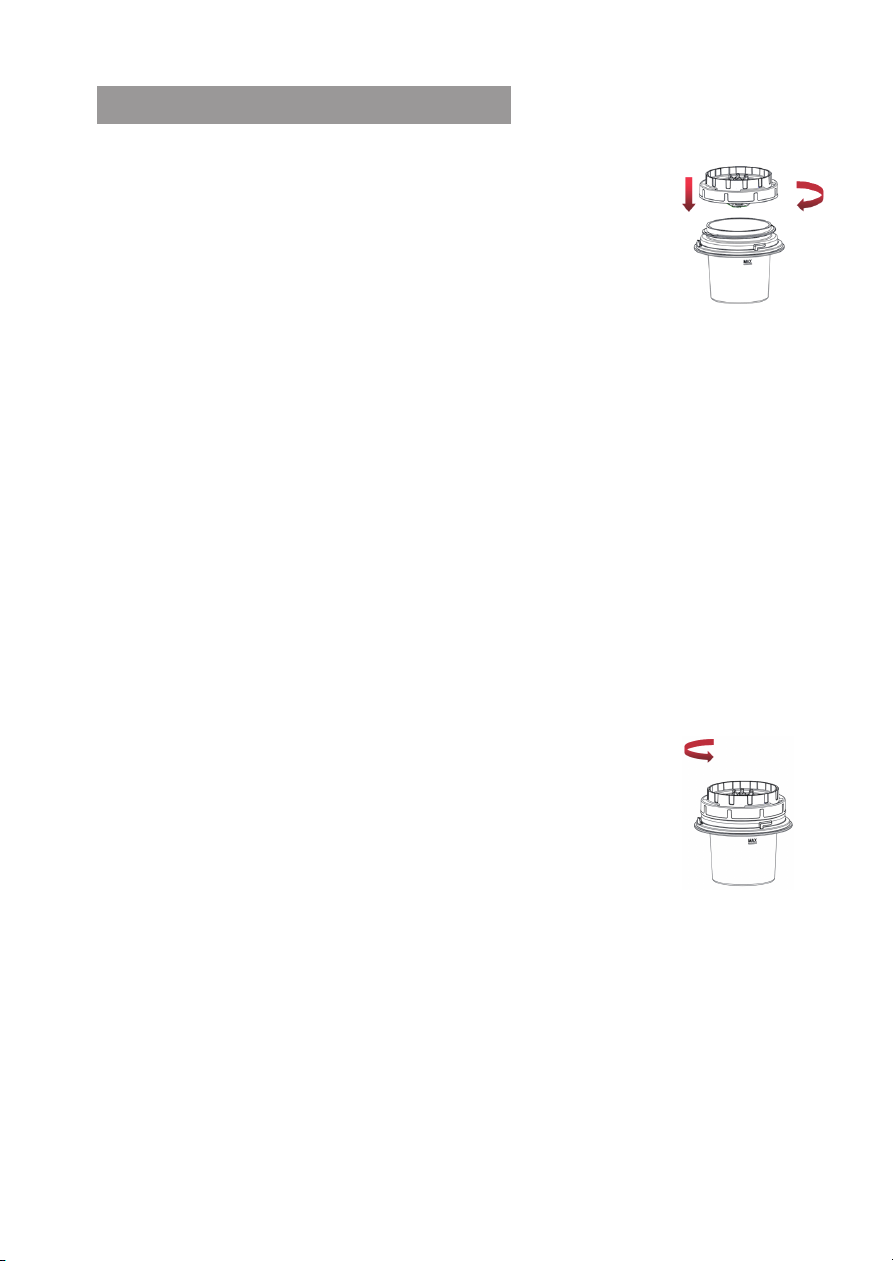
2. Fill the grinding bowl with proper coffee bean, then assemble the
grinding blade assembly and grinding bowl together. Please see Fig.3
NOTE: The quantity of coffee bean the grinding bowl allows to grind
is Max 60g.
8. Do not run the appliance for more than 30s per time, and only
wait until the unit is cooled to room temperature before performing
next operation cycle.
3. Place the grinder attachment on the motor unit, Turn the bowl clockwise until a click will
be heard when locked into position properly.
NOTE: There is a safety interlock device at the bottom of bowl, if the bowl is not assembled
in place, the chopper will not operate.
4. Ensure the Speed Selector to “0” Position, then plug into power outlet.
5. Select the desired speed setting, the appliance will start grinding. During grinding, you
can press down the Pulse button without releasing it if want to accelerate the process of
grinding.
6. Turn the Speed Selector to “0” Position once the coffee has been ground to your desired
result.
7. Disconnect from power supply once finished. Disassemble the grinder attachment from
the unit, keep the grinding bowl downward and turn it anticlockwise
(see fig.5), then empty the bowl and serve.
Fig.3

CLEANING AND MAINTENANCE
6
1. Always disconnect the blender from the mains power supply before cleaning.
Cleaning the grinder
2. The Auto Clean feature can clean the blender and blade assembly easily, rapidly in
complete safety.
3. Pour a little warm soapy water into the Jar and turn the Switch button to P position for a
few seconds.
4. Remove the Jar from the motor unit by directly taking it upward and rinse the Jar, Jar
cover under running water.
5. Wiping the outer surface of Motor Unit with a damp cloth, do not use abrasive cleansers.
Never immerse in water for cleaning .
6. Dry all parts and then replace them.
7. For complete cleaning, you can hold the blade assembly at the bottom of jar carefully, for
it is sharp, take it out by turning coupling on the other side clockwise emphatically then put
the detachable accessories into dishwasher for clean, they are dishwasher safe attach-
ments but the temperature setting shall not exceed 70℃.
If any problem has been encountered during use never disassemble the Motor Base by
yourself, no user serviceable parts inside. Contact only the authorised service centre for
examination and repair.
Detach the bowl base from the grinding blade assembly.
NOTE: While detaching, only grasp the unsharp part of grinding blade or wear glove to
prevent any injury.
Immerse the blade, bowl base and grinding bowl into warm soapy water for cleaning and
then rinse them under running tape water.
Wipe the outer surface with damp cloth.
NOTE: Never immerse the motor unit into water or any other liquid for cleaning.
Dry all parts thoroughly and assemble them in position.
1.
2.
3.
4.

ENVIRONMENT FRIENDLY DISPOSAL
You can help protect the environment!
Please remember to respect the local regulations: hand in
the non-working electrical equipments to an appropriate
waste disposal center.
7

DS-5358
8
2 IN1
ELECTRIC BLENDER AND GRINDER SET
2 IN1
ELECTRIC BLENDER AND GRINDER SET

9
Most warranty repairs are handled routinely but sometimes requests for warranty service may not be
appropriate. For example, warranty service would Not apply if the product damage occurred because of
misuse, lack of routine, maintenance, shipping handling by third party, warehousing, or improper installa-
tion. Similarly, the warranty is void if the manufacturing date or the serial number on the product has been
removed or the equipment has been altered or modified. During the warranty period the authorised service
dealer at its option will repair or replace any part that upon examination is found to be defective under
normal use and service.
The seller's standard 12-month warranty applies to all products unless stated. You are legally covered for
the first 12 months by the retailer. Within the first 12 months of ownership, you are entitled to a replace-
ment or refund the retailers discretion. Due to this being a legal requirement we cannot get involved during
this period.
This warranty does not cover normal wear of any parts or damage resulting from any of the following
negligent use or misuse of this product, improper voltage, or current use contrary to the operation
instructions: deviation from the instructions regarding storage and transportation; repair or alteration by
anyone other than Innoteck or an authorised service center. Further the warranty does not cover acts of
God such as fire, flood, hurricanes, or tornadoes. Innoteck shall not be liable for any incidental or
consequential damages caused by the breach of any express or implied warranty. Except to the extent
prohibited by applicable law any implied warranty of merchantability or fitness for a particular purpose is
limited in duration to the above warranty. This warranty gives you specific legal rights and you may also
have other rights as stated in the UK Consumer rights laws that may vary slightly.
The only time we will replace spare parts under warranty is if they have become defective within the first 12
months warranty. If you require any spare parts after the 12-month warranty has ended, you may be
charged. Warranty does not apply to any accessories i.e. The guarantee is valid in the UK and Isle of Man
only.
If your item has developed a fault the item would need to be returned to us for inspection.
We would require the full item to be returned to us along with your proof of purchase (this can be emailed
to our customer service at service @innoteckcouk) and the completed returns form (you can obtain this
form from our customer service team) which must be included within the parcel. Once the item has been
returned to us our returns department will check the item to confirm the fault. They will then arrange for
your item to be repaired or replaced if required.
If the product you have returned to us is end of line/discontinued or is out of stock may send you a like for
replacement. We would ensure the specification of the item is like the product you have returned.
Within three months of purchase, if any manufacturing defects are discovered the seller will arrange to pick
up the item. After three months the purchaser or customer is required to send the item to us at their own
expense. There may be times when seller may request proof of purchase photo or video to assist us. A
customer who is unable to send a photo or video will need to send the product to us (subject to the 3-month
period).
Please retain your proof of purchase/sales receipt and the packaging box.
The product is void if the product is used for other than single-family household use or subjected to any
voltage and waveform other than as specified on the product rating label. (e.g..220V-50Hz).
Warranty
1.
2.
3.
4.
5.
6.
7.
8.


Customer Service: service@ innoteck.co.uk
DST Holding Ltd, Unit 20B,Calderdale Business Park,
Club Lane, Halifax, West Yorkshire, HX2 8DB.
Table of contents


