Innovience OptoXS User manual

© Copyright 2016
Innovience International BV
Al rights reserved. Whole or partial reproduction is not permitted
without the written authorization of the copyright owner.
User manual OptoXSTM
Wifi module OXS-W11-EU
V 1.0, December 2016
Confidential
1
User manual
OptoXS™ Wifi module
Innovience International BV
Confidential

© Copyright 2016
Innovience International BV
Al rights reserved. Whole or partial reproduction is not permitted
without the written authorization of the copyright owner.
User manual OptoXSTM
Wifi module OXS-W11-EU
V 1.0, December 2016
Confidential
2
Trademarks
Innovience International, OptoXSTM and the Innovience logo are trademarks or registered
trademarks of Innovience International BV or its subsidiaries in The Netherlands or other
countries. All other company or product names mentioned herein are trademarks or
registered trademarks of their respective companies.
Patents
This product is protected under the claims of WO2015187017 A2 and WO2015187017 A3. A
limited implied use license is granted for the personal and non-commercial use of a
consumer to use the product (1) solely in connection with other OptoXSTM components such
as but not limited to an OptoXSTM Switch and/or other products (to be) developed, marketed,
offered for sale or sold either directly or indirectly by Innovience International BV, its
subsidiaries or authorized resellers and (2) in reasonable accordance with the information as
presented in this document and/or other documents related to the installation,
commissioning, use and maintenance of products including embedded software stored
therein as is being published by Innovience International BV or any of its subsidiaries.
Statement
Revision 1.0
© Innovience International BV 2016
Note: All the information contained in this manual was correct at the time of publication.
However, as our engineers are always updating and improving the product, your
device’s software may have a slightly different appearance or modified functionality
than presented in this manual.
The purpose of this product is to create a constant network connection for your devices. As
such, it does not have a standby mode or use a power management mode. If you wish to
power down this product, please simply unplug it from the power outlet.

© Copyright 2016
Innovience International BV
Al rights reserved. Whole or partial reproduction is not permitted
without the written authorization of the copyright owner.
User manual OptoXSTM
Wifi module OXS-W11-EU
V 1.0, December 2016
Confidential
3
Contents
Chapter 1 Introduction 4
1.1 Product overview 4
1.2 Conventions 4
1.3 Main features 4
1.4 Appearance 5
1.4.1 The front panel 5
1.4.2 The rear panel 5
1.4.3 The side panels 5
1.4.4 Cautions 6
1.4.5 Repair 7
1.4.6 Disposing of the module 7
1.4.7 Other 7
Chapter 2 Hardware Installation 8
2.1 Before you begin 8
2.2 Basic requirements 8
2.3 Connecting the device 9
Chapter 3 Quick Installation Guide 10
3.1 Quick setup 10
3.2 Wireless 12
3.3 Wireless security 13
Chapter 4 Advanced mode 15
4.1 Wifi settings 16
4.2 Security 19
4.3 Mac filter 21
4.4 Interface settings 22
4.5 LAN 22
4.6 URL block 26
4.7 Virtual server 26
Chapter 5 Virtual server 27
5.1 ALG 27
Table 5.1 System requirements 27
Table 5.2 Technical specifications (OXS-11n-EU 28
Chapter 6 Recovery and update features 30
6.1 Backup/Flash firmware 30
Chapter 7 Troubleshooting guide 32

© Copyright 2016
Innovience International BV
Al rights reserved. Whole or partial reproduction is not permitted
without the written authorization of the copyright owner.
User manual OptoXSTM
Wifi module OXS-W11-EU
V 1.0, December 2016
Confidential
4
Chapter 1 Introduction
1.1 Product overview
The OptoXSTM Wifi module is dedicated to home and office wireless network solutions. It
allows for greater range and mobility within your wireless network. Increased mobility and
the absence of cabling will be beneficial for your network.
With using IEEE 802.11n wireless technology, your device can transmit wireless data at the
rate of up to 300Mbps. With multiple protection measures, including SSID broadcast control
and wireless LAN 64/128/-bit WEP encryption, Wifi protected Access (WPA2- PSK, WPA- PSK.
This device leverages some 802.11n features to provide improved performance and coverage
compared to 802.11a/g devices and fully interoperates with 802.11n products if they are
Wifi certified, but it does not conform to all of the requirements in the IEEE specification and
is not classified as "n" in a Wifi certified program.
It supports an easy, web-based setup for installation and management. Even though you
may not be familiar with the access point, you can easily configure it with the help of this
guide. Before installing the OptoXSTM Wifi module, please look through this guide to get the
full information.
1.2 Conventions
Parameters provided in the pictures are just references for setting up the product, which
may differ from the actual situation. You can set the parameters according to your demand.
1.3 Main Features
•Wireless speed up to 300 Mbps
•Support access point, multi-SSID, client, repeater(universal repeater)and bridge with
AP modes
•SSID and VLAN support
•Flexible deployment with POF connector
•Supports web management
•Backward compatible with 802.11b/g products
© Copyright 2016
Innovience International BV
Al rights reserved. Whole or partial reproduction is not permitted
without the written authorization of the copyright owner.
User manual OptoXSTM
Wifi module OXS-W11-EU
V 1.0, December 2016
Confidential
5
Tx/Rx optical inputs
Ventilation holes
DO NOT OBSTRUCT!
Reset button
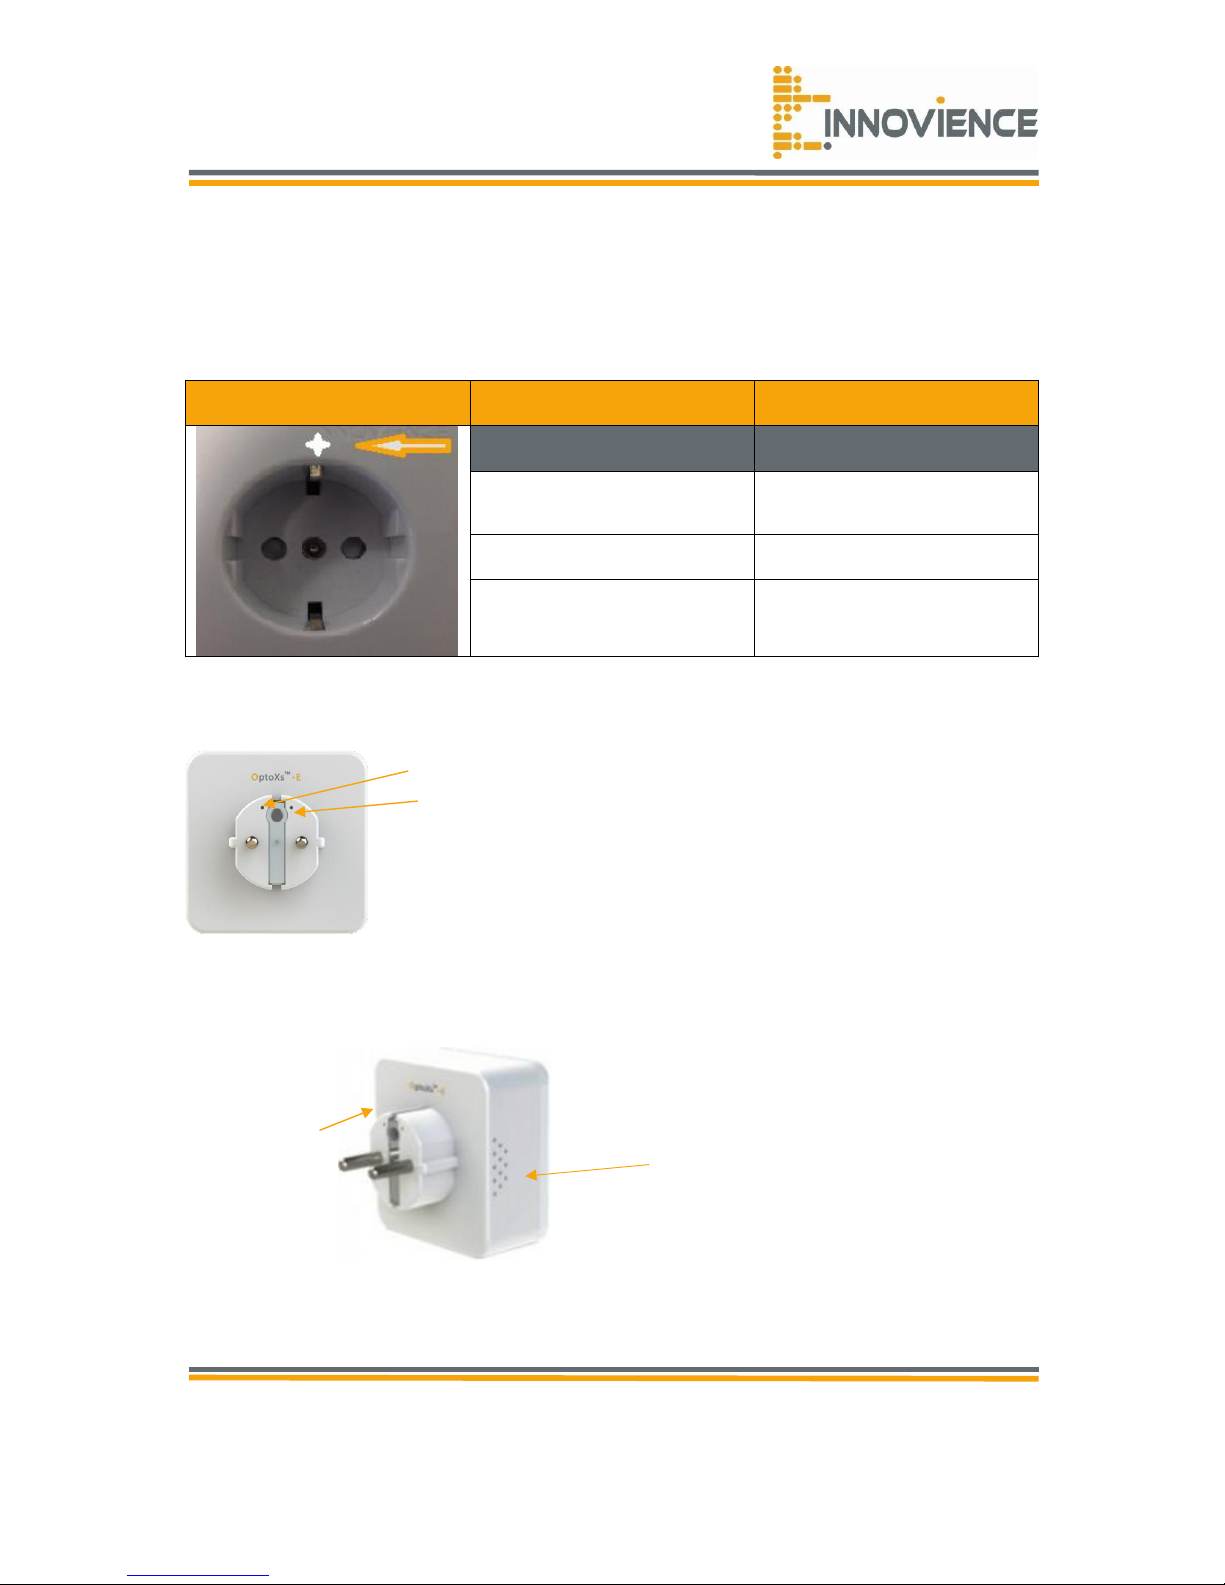
1.4 Appearance
1.4.1 The Front Panel
The front panel of the OptoXSTM Wifi module consists of an LED indicator, which is designed
to indicate its condition. Viewed from left to right, the table bellow describes the LED on the
front panel of the device.
Name
Status
Indication
Off
The device is working
properly
On
The device is initializing
Flashing
The device has a system
error
1.4.2 The Rear Panel
1.4.3 The side panels
Reset
The reset button is used to restore the AP’s factory default settings. There are three ways to
reset the access point’s factory defaults:
Table of contents


