Innovision Braille Me User manual

Copyright Inceptor Technologies Pvt. Ltd.
Braille Me User Guide V 1.2
Last updated on: 7/12/2017
Inceptor Technologies Pvt. Ltd. (Innovision)
Contents
1. Introduction ....................................................................................................................................... 3
1.1 Features of Braille Me ............................................................................................................. 4
1.2 Document conventions.......................................................................................................... 4
1.3 Inside the box ........................................................................................................................... 5
2. Orientation......................................................................................................................................... 5
3. Powering the device....................................................................................................................... 9
3.1. Powering On/Off ...................................................................................................................... 9
3.2. Charging .................................................................................................................................... 9
4. Menu system ................................................................................................................................... 10
4.1. Panning Keys........................................................................................................................... 10
4.2. Edit box ..................................................................................................................................... 11
4.3. Cursor ........................................................................................................................................11
4.3.1. Mode 1..............................................................................................................................11
4.3.2. Mode 2..............................................................................................................................11
4.4. Word wrap................................................................................................................................ 12
5. File manager ................................................................................................................................... 12
5.1. Browse.......................................................................................................................................12
5.1.1. Supported Files ...............................................................................................................12
5.2. Search.......................................................................................................................................12
5.3. Open, Rename and Delete.................................................................................................13
5.4. New File .................................................................................................................................... 13
5.5. Editor..........................................................................................................................................14
5.6. Preparing files for Braille Me ...............................................................................................16
6. Bluetooth ..........................................................................................................................................17
6.1. Pair new device......................................................................................................................17
6.2. Connecting to a smartphone.............................................................................................18
6.3. Using with BrailleBack........................................................................................................... 19

Copyright Inceptor Technologies Pvt. Ltd.
6.4. Using with VoiceOver ........................................................................................................... 19
6.5. Using with Braille Me app ....................................................................................................19
7. USB......................................................................................................................................................20
7.1 Connecting with NVDA ........................................................................................................20
7.2 Connecting with VoiceOver...............................................................................................21
7.3 Connecting with JAWS .........................................................................................................21
7.4 Connecting as mass storage..............................................................................................21
8. Configuration ..................................................................................................................................21
8.1 Language setting ...................................................................................................................21
8.2 Factory reset............................................................................................................................21
8.3 Date and time.........................................................................................................................22
8.4 Braille Test.................................................................................................................................22
8.5 Software version .....................................................................................................................22
8.6 Auto scroll time.......................................................................................................................22
9. Battery level..................................................................................................................................... 22
10. System Shutdown.......................................................................................................................23
11. List of all commands .................................................................................................................23
11.1. Global commands for Braille Me ..................................................................................23
11.2. Braille Back commands................................................................................................... 24
11.3. NVDA commands..............................................................................................................25
12. List of system notifications and errors................................................................................... 27
13. Firmware upgrade .....................................................................................................................29
14. Battery replacement................................................................................................................. 30
15. Specifications..............................................................................................................................31
16. Installing NVDA Add-on and driver ......................................................................................32
17. FAQs...............................................................................................................................................33
17.1. Prospective User.................................................................................................................33
17.2. First time user.......................................................................................................................34
17.3. Existing User .........................................................................................................................36
18. Appendices.................................................................................................................................36
18.1. Warranty information ........................................................................................................36

Copyright Inceptor Technologies Pvt. Ltd.
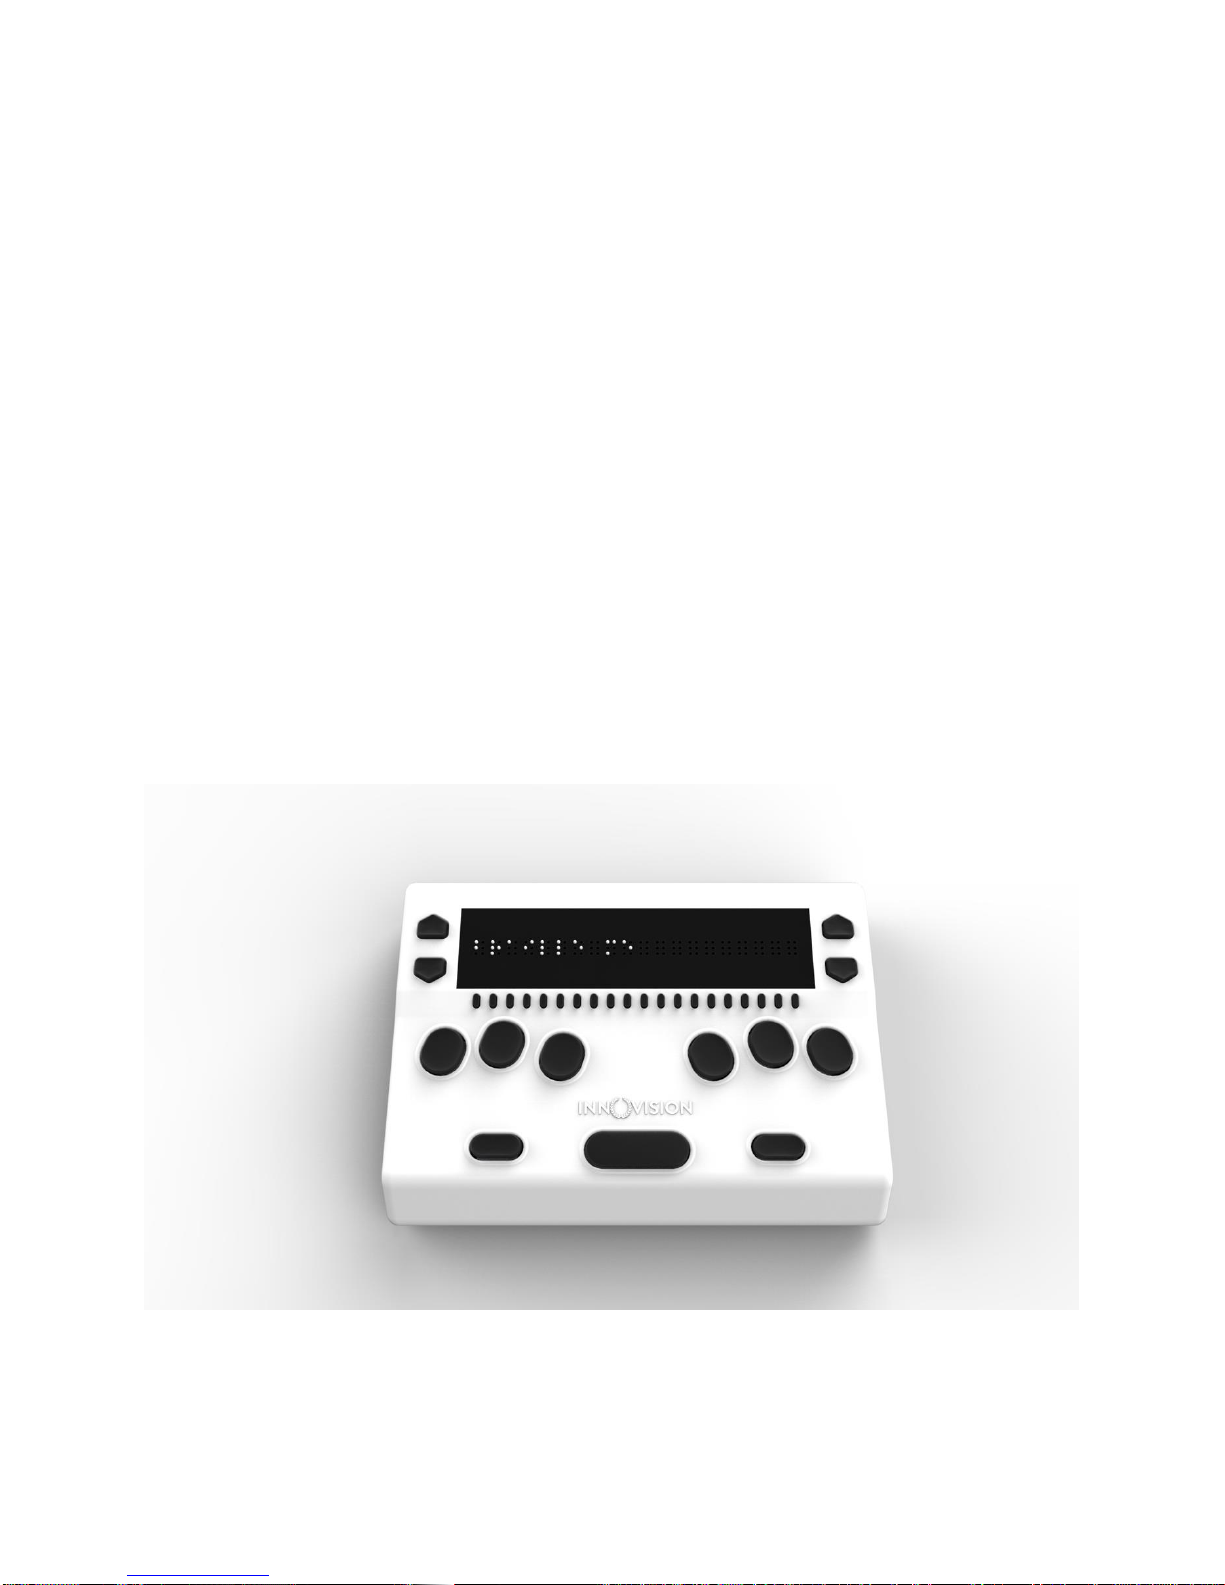
1. Introduction
Braille Me is a sleek, portable and lightweight smart braille display. It is a competent
device specially designed for Visually impaired students and professionals.
With its revolutionary Braille cell technology, Braille Me is highly compact and cost-
effective. At Innovision, we understand the challenges faced daily by students and
professionals, and keeping their recommendations in mind, we have built Braille Me.
Image of Braille Me in isometric view
Braille Me is a compact smart braille display with the following capabilities:
• A line of 20 braille cells with pins that arrange into the required pattern to accurately
represent any six-dot braille code, in any language.
• Capable of reading the contents of files on an SD card for Stand-Alone mode.
• Remote connectivity to PCs and mobile devices for use with a screen reader
• Simple editing functions
It operates in 2 ways –Standalone reader mode and remote mode.
Standalone reader mode:
In this mode, Braille Me displays the content of files stored on an SD card. It does not do
any translation or interpretation. You prepare the files ahead of time on your computer,
then store them on SD card. For example, if you want to read in UEB, prepare the UEB
transcribed title on your computer and then store it on the card. To facilitate this
conversion, Innovision provides a simple software –Braille Me translator.

Copyright Inceptor Technologies Pvt. Ltd.
Remote mode:
You can connect the device to a computer/smartphone/tablet using either Bluetooth
or USB. Once connected, you can navigate, read and edit the content present on the
connected device through Braille Me seamlessly. You can also read books on your
smartphone from Kindle, iBooks, Bookshare, etc.
1.1 Features of Braille Me
Six - dot 20 braille cells with paper like feel
6 key perkins keypad
Removable battery lasting for 10 hours on continuous usage
Upto 32 GB storage through captive SD card
Support for 40+ languages
Remote connectivity to PCs and Smartphones through Bluetooth and USB
Notepad with several editing and navigation functions
1.2 Document conventions
For consistency and clarity, this documentation uses the following conventions.
Braille keys are indicated by number. For example, if the documentation reads Dot 1,
then it means it implies the button corresponding to Dot 1. If multiple braille keys are
required, the documentation indicates those keys by showing the numbers separated
by a space like this: Dots 1 5.
When modifier keys are used, the documentation separates the modifiers from the rest
of the keys with a plus (+) sign like this: Space + Dot 1. Recall that modifiers, like the Shift
key on a regular QWERTY keyboard, are keys you hold down while pressing another key.
This modifies the effect of the pressed key.
When any key combination is pressed, note that the command is executed only when
all the keys are released, i.e., If a user presses space + dot 2 3 to execute a particular
command then until all the keys - space, dot 2 and dot 3 are released the command
will remain on the waiting list and as soon as they are released the command will be
executed. On a braille keyboard, Space is often used as a modifier to alter the effect
of the input keys.
In the descriptions of each Menu option, this documentation indicates the default
setting. Messages, menu items or errors displayed on the braille display are denoted
within quotation marks.
There are 2 types of messages in the software –notifications and errors denoted in the
document using quotation marks.
Errors occur when there is a difference in the expected user input or any of the internal
systems have failed.
Notifications are messages which are intended to inform of any changes to the system.
Copyright Inceptor Technologies Pvt. Ltd.
1.3 Inside the box
Braille Me comes with peripheral devices which are to be used along with Braille Me.
The box contains the following items:
Braille Me
Printed User guide
Braille User guide
Standard –A to Micro-B USB cable
AC charger
SD card pre inserted in your Braille Me
2. Orientation
Orientation to the positioning of buttons, keys, cells, and slots is essential for
understanding how the device operates and how you input and receive information on
the device.
To begin exploration of Braille Me, place the device on a flat surface in front of you with
the row of braille cells farther away from you and the sloping edge nearer to you. This is
the proper operational orientation.
Image of braille Me in top view
Henceforth the guide will refer to this orientation to indicate the position of keys and
slots.

Copyright Inceptor Technologies Pvt. Ltd.
On the right face of the device, you would find a circular button closest to you. This is a
toggle button to power On/Off Braille Me. Going forward on the right face we will find
two ports –A DC jack and a USB slot.
Drawing of the right face of Braille Me
The DC jack is used to insert the power cord from the charger and is positioned just
beside the power button. The USB slot is farthest from you and is used to connect to PCs
via a Standard-A to Micro-B USB cable.
Moving on to the top face, you will find a braille display of 20 cells farthest away from
you. The texture of the braille display area is smoother compared to the body, and it will
have many holes for braille pins. It is accompanied by 20 cursor routing buttons below
each cell.
On both the sides of the braille display, we have a couple of keys used for navigation.
On the right side we have the panning keys named RightUp and RightDown and on the
left side the next item button named LeftDown and previous item button named
LeftUp.
As we move towards the lower section from the braille display we have a Perkins style
keypad which has 6 keys ergonomically arranged representing the six dots of braille.
Dots 3 2 1 on the left and Dots 4 5 6 on the right. It is accompanied by a space bar
which is located in the below these 6 keys in the middle.
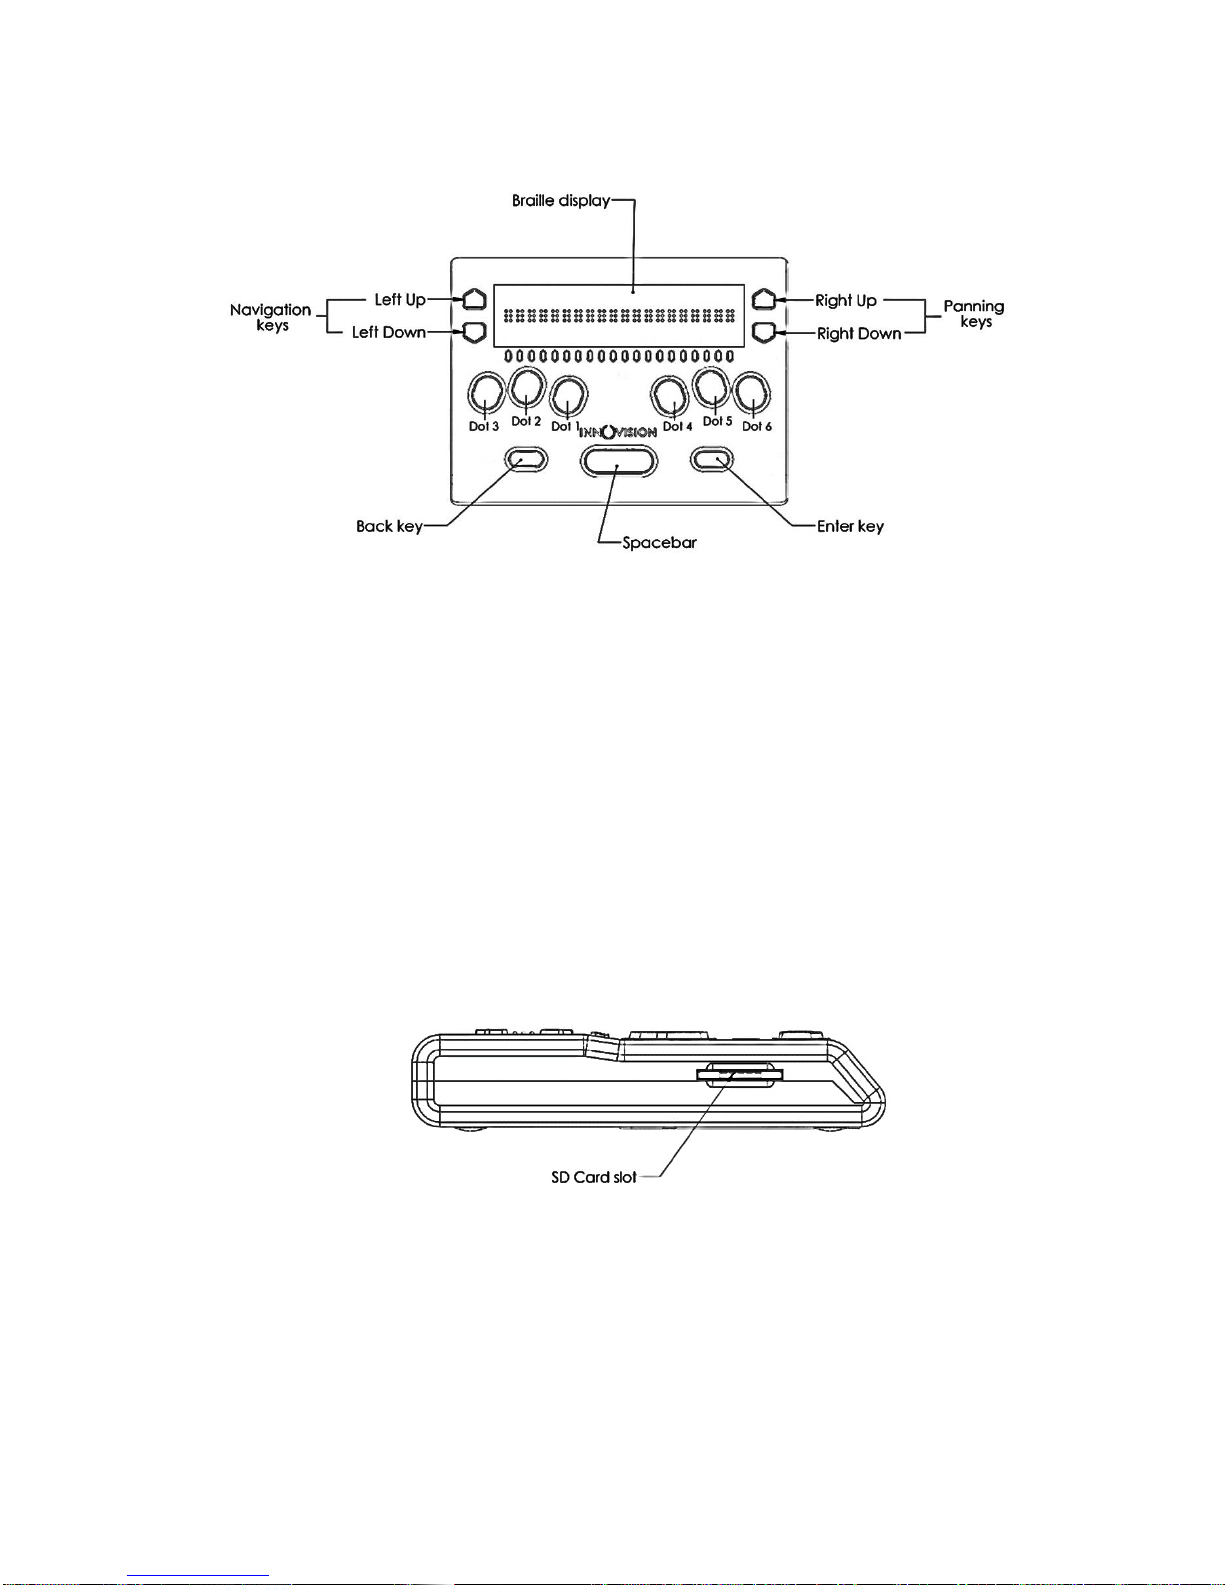
Copyright Inceptor Technologies Pvt. Ltd.
Drawing of top face of braille Me
On the right side of the space bar we have the enter key and on the left side back key.
This concludes our top face. On the left face there is a slot for inserting an SD card.
When you receive the device, it would already have a 4GB SD card inserted.
The SD card slot is a standard slot with spring feedback. The SD card is inserted with the
card connector fingers facing upward. To release the card, press in and remove your
finger to allow the card to pop out.
Drawing of left face of Braille Me
On the bottom of the device a battery compartment is present which is secured with a
set of 4 screws.

Copyright Inceptor Technologies Pvt. Ltd.
Drawing of bottom face of Braille Me
Type of button or port
Function
Placing
Display
Braille dots
Upper most part on the
top face
Ports
SD card slot
Left face
Micro-USB slot
Right face
DC jack
Right face
Battery compartment
Bottom face
Buttons
Dot 1 to 6
Six keys in the middle of
the top face
Dot 1-2-3 on the left side
and Dot 4-5-6 on the right
side
Space
Lower middle part of Top
face
Enter
Lower right part of the top
face
Back
Lower left part of the top
face
20 Routing keys
Placed below braille

Copyright Inceptor Technologies Pvt. Ltd.
display on Top face
2 Panning keys: RightUp
and RightDown
On the Right side of braille
display
2 Navigation keys: LeftUp
and LeftDown
On the Left side of the
braille display
Power button
Right face
3. Powering the device
This section explains how to charge and how to turn on & off the device. Refer to
subsequent section for additional support. BrailleMe has two modes: a Stand-Alone
mode and a Remote mode. In the Stand-Alone mode, the device is a book reader that
uses an SD card as the reading media. In the Remote mode, the device works like other
braille displays and needs to be connected to a computer/smartphone/tablet and a
screen reader. This section explains how to charge, turn the device on and off, insert
the SD card, and enter and exit the menus. Refer to the following sections for additional
support.
3.1. Powering On/Off
To turn on the device just press the power button for 1 sec and instantly the device will
boot and you would hear an audio notification –a short beep. Along with this beep,
the braille display will get activated, and all dots will toggle up and down. Post this
toggling the braille display will show “menu.” As soon as “menu” is displayed, you can
start your work. This entire process should take less than four secs.
There are two ways of shutting down the device. One way is to long press the power
button for three secs and the second is by using the shutdown menu item in the menu.
While using the power button to turn off a double beep is given and in the case of
shutdown menu item a long beep is given. After the beeps all the dots will move down.
3.2. Charging
When you receive Braille Me, it may already have some charge; however, we
recommend charging it fully before or during first use. You can use the device and
charge it at the same time, so this does not hinder your reading time.
When the battery in the Braille Me gets to 15% and 7%, you will receive a notification
indicating that battery is low. At 2% charge, the battery shuts down without notification.
During shutting down Braille Me give a long beep, and all the braille dots will move
down.

Copyright Inceptor Technologies Pvt. Ltd.
To charge the device, use the AC adapter provided. Insert the power cord into the AC
adapter and the circular DC jack into the device. Make sure the AC plug is firmly held
in the slot. If the device is powered on, you could check the charging status under
battery level in the menu. Also, when in power ON state when the charging is complete
a notification will appear indicating battery level full. If the charger is not right or
damaged, the device will notify with the message “invalid charger”. Please use only
the charger supplied with the device. If the device is powered off, no charging
indication will be displayed.
Please note USB charging is not supported and any attempts to do so might damage
the device.
If you have charged the device for 1 or more hours, and it doesn't turn on, contact
Customer Care at +91-8291406811 or customercare@innovisiontech.co.
4. Menu system
An informative yet straightforward menu system is implemented which will help you
explore all the functions and settings. At a time only one menu item is displayed. To use
the device, Braille Me has a set of universal commands which work throughout the
menu system and in its different applications.
Action
Universal command
To go inside/ select a menu item
Enter key
To go 1 step back in the menu hierarchy
Back key
Navigate to the next/ previous menu item
LeftUp/ LeftDown
To Pan left to right
RightUp/ RightDown
Apart from the above-listed commands, you may also need to use the cursor routing
functions to edit names and messages.
Before we go forward let’s understand a few concepts:
4.1. Panning Keys
The Panning keys are keys found on the right side of the braille display. These keys
control how you read the content in a single line of text. A line might have more than 20
letters hence all the letters cannot be to read at once on the 20 cell braille display. So,
to read the contents of the line beyond the 20 characters; you will require moving back
and forth using the panning keys. To read the subsequent 20 characters (panning

Copyright Inceptor Technologies Pvt. Ltd.
forward), press the downward pointing key also named rightDown. To read the prior 20
characters (panning backward), press the upward pointing key also named rightUp.
4.2. Edit box
Braille Me presents a text dialog/ Input field called an Edit Box when you trigger
functions like find the keyword, rename a file, pair a new Bluetooth device etc.
Whenever an edit box appears, it will show a message asking you "enter the
name/keyword." Do not press back, this message is temporary and will vanish when you
start typing. Enter the text using the braille dot keys. Once you are done typing, press
the enter key to proceed forward. The Edit Box permits only 40 characters of text as
input.
4.3. Cursor
Whenever you are editing content in Braille Me, by default a cursor will be displayed.
The cursor marks the position where the editing takes place. So, when the cursor is on a
character and if you type a new character, the cursor with the old character both will
shift by 1 cell to make space for the new character. If you execute backspace then the
character prior to the cursor will be removed. In case you execute the delete
command then the character with the cursor will be deleted.
In order to show the cursor on a six-dot system we offer two different ways:
4.3.1. Mode 1
In this mode, the cursor is shown by blinking dots which are not part of the braille
character. For example, on the braille display the text “welcome braillist”is displayed.
The cursor is positioned on ‘b’ so the dots 1 and 2 will remain steady and in up position
since they make up the letter b, while the dots 3,4,5 and 6 will toggle up and down
indicating the cursor. So at a time the braille cell will contain both the information of the
character and the cursor. This method is the default method.
4.3.2. Mode 2
Another way to display the cursor is to show the cursor only when triggered by the user.
In this mode, when the user presses the combination –LeftUp + LeftDown the braille
display will remove all the characters and only show the cell with the cursor by raising all
six dots. Here, all keys except the cursor routing keys and the Back key are frozen. Upon
pressing the same combination again, it will bring back all the characters and all keys
will become functional. So the combination LeftUp + LeftDown will toggle between the
text and the cursor.
The cursor blinking mode (mode 1) can be switched on/off by pressing the combination
rightUp + rightDown.
Irrespective of the cursor blinking mode turned on or off, you can use the leftUp +
leftDown combination to check the cursor in the mode two formats.

Copyright Inceptor Technologies Pvt. Ltd.
Both the cursor modes work in the editor, edit boxes and also with the screen reader.
To move the cursor from one position to another you can use the cursor routing buttons.
Let say the cursor is on the 10th braille cell and you want to move it to the 2nd braille
cell. Then you would have to simply press the cursor routing buttons below the 2nd
braille cell, and the cursor will route to the same.
4.4. Word wrap
This is a very useful setting in editor. It automatically moves a word that is too long to fit
in 20 cells to the beginning of the next line. This makes sure that words are not broken at
the edge of the 20 cells. This feature is found under configuration.
5. File manager
This is an application which manages the files on the SD card facilitating browsing,
reading and editing the files. To enter the menu item –“file manager,”press the enter
key. This should take you to its sub menu items –
5.1. Browse
This is the first item inside File manager. This function allows you to scroll through all the
files inside the SD card. The submenu items under browse are open/ rename/ delete
which are described in section 5.3.
5.1.1. Supported Files
Note, files stored in the root folder of the SD card are only visible. All other folders are
hidden. Braille Me has certain criteria for files they are as follows. It supports mainly two
formats –BRF and TXT, all other file types are masked and not shown in the browse list.
Also, take care that files with filenames more than 40 characters or characters in
lowercase will not be shown.
When you would try to open a file and if its size exceeds –40kB then the device will give
an error “file size exceeds” and if the encoding is not ASCII (ANSI), then braille Me will
show an error “file not supported”.
The list of permissible files is numbered but unsorted and shown one at a time. If the file
format is TXT then a dot pattern of all 6 dots is preceded to the file name. And if it is BRF
then a dot pattern of dot 1, 2, 3 is preceded.
If the SD card is empty or does not have any files than an error message will be
displayed –File not found. Also, If the SD card format is not FATfs then it will show “sd
card not found”.
5.2. Search

Copyright Inceptor Technologies Pvt. Ltd.
This is the second item on the list. This function allows you to search supported files as
defined in 5.1.1 by keywords. As you enter “search”, Braille Me will show you an edit box
asking you “enter file name”. Enter the first few characters of the file name and press
enter key. A list of files will appear which is numbered but unsorted. The keyword
inserted can be either complete matches or can be the initials of the file name. For
example. If I search with the keyword “harry”then among the files “harry potter”, “the
harry potter”, “harry’s” and “harry”, only “harry potter”, “harry’s” and “harry” will be
enlisted.
Also, when you enter the keyword please enter in lowercase only. If in any
circumstance, there is no match found an error will show up –“file not found”.
5.3. Open, Rename and Delete
Both Search and Browse provide you with a list of files. To open any of the files press
enter when the file name is displayed on the braille display. This will take you to 3
options –open, rename and delete.
When you enter the “open” option, it will take you to the editor which is covered in the
next section. Before the editor, Braille Me can through errors in cases where the file is
not appropriate like file size more than 40kB or encoding is not ASCII or file is corrupt.
Refer to section 5.1.1 for details on supported files.
Files with BRF format cannot be edited and will be shown as it is on the braille display.
Word wrapping, typing and cursor routing functions are automatically turned off while
reading BRF files. You can still use the navigation commands and auto-scroll feature to
read quickly. TXT files, on the other hand, will be editable and support many functions
like auto-scrolling, word wrap, navigation shortcuts, etc.
You can also rename a file. Here, upon selecting this option, an edit box will open
asking you to enter a file name. If successful, it will give a notification –“file rename
successful”. Press back key and now you are on the file list with the renamed file shown
on the braille display.
Note, in the search list suppose you searched for file “harry” and then selected the
enlisted file to rename and then renamed it to “tony” then after renaming is successful
it will be removed from the search list.
Another option is “delete”. This allows you to permanently remove the file from the SD
card. It will show a message –“delete successful” if the file was removed. After deleting
when you go back to the file list, it will show the next file.
5.4. New File
You can use this function to create txt files. When you enter this menu item, it will ask
you “enter file name” which is actually an edit box. After entering the filename, you will

Copyright Inceptor Technologies Pvt. Ltd.
be directed to the editor. Note, the filename is restricted to 40 characters. In the editor,
you will be shown a message –“Start typing.” After that you can start taking your notes.
5.5. Editor
This is one of the most important aspects of Braille Me. It is a simple and easy to use
notepad application which allows you to navigate, read documents and also edit
them. Whenever you open a file using the Search list or browse list or create a new file,
you will be directed to the editor.
As soon as you enter the editor if it’s a new file you will be shown a message – “start
typing” else you will be shown the contents of the file.
The editor opens BRF and TXT files. As mentioned earlier BRF files are read-only files. So,
typing and cursor routing is disabled. All navigation commands will be active. BRF files
are shown with their formatting as it is. Only form feed and blank lines are removed to
ease reading.
In case of TXT files, all editor commands and functions are active. If you only want to
read the document, you can freeze the typing keys, ensuring unwanted characters are
not entered while reading. By default, typing will be on, to toggle press space + back +
enter. While toggling, Braille Me will show a message –“typing on/off,” use the back key
to go back to the file.
While typing, a paragraph is shown by a specific symbol where two adjoining cells with
six dots each are in up position. To insert a paragraph, use the enter key. Note, when
you insert a paragraph, the symbol for paragraph is only inserted and your subsequent
characters will continue on the same line. However, when you see this on your desktop,
it will show as a normal paragraph with the subsequent characters starting in a new line.
Inside the editor there are several options and shortcut keys as given in the table below:
Action
Command
Backspace
Space + Back
Delete
Space + Enter
Previous paragraph
Space + dot 1 + leftUp
Next paragraph
Space + dot 1 + leftDown
Start of File
Space + Enter + dot 1 3
End of File
Space + Enter + dot 1 6
Keyword search
Space + dot 1
Cursor blinking on/off
Space + dot 1 4

Copyright Inceptor Technologies Pvt. Ltd.
Cursor mode 2 toggle
leftUp + leftDown
Toggle typing on/off
Space + Back +Enter
Auto Scroll
Space + dot 2
Save
Space + dot 3
Exit editor
Back key
Save/ close: yes or no
back + dot 3 for yes and enter + dot 6 for no
For basic navigation inside the file, you can use either pan keys or next/ previous keys.
Apart from them to move through paragraphs, you can use Space + dot 1 + leftUp/
leftDown
To go to the top of the file or bottom of the file press Space + Enter + dot 1 3 for start of
file and Space + Enter + dot 1 6 for the end of file. In cases where the files are large
navigation by keyword search would be the best option.
Whenever you want to search a keyword, simply press its shortcut command - Space +
dot 1. This will open an edit box asking you –“enter the keyword”. Type out the initials of
the keyword or the entire keyword. Note, the entered keyword must contain more than
one character. Upon pressing enter, an enumerated list of sentences with the keyword
will be displayed. The list will have all the sentences from top to bottom of the file even if
you are currently positioned in the middle. And the first sentence with the keyword in
the file will be numbered 1. However, when the list comes up, it will first show the
sentence with the keyword just after your current position with its number. To go to the
previous sentence, use the leftUp key which is for the previous item and leftDown to go
to the next sentence. Each sentence that appears in the list will have a total of 40
characters so you can use the pan keys to read it completely. To go to any of the listed
sentences press the enter key.
Braille Me also offers an automatic scrolling feature –Autoscroll which can be activated
by pressing Space + dot 2. On pressing space + dot 2 “auto scroll on” message will pop
up. Now press the back button to exit notification. Also when you again press the same
key then “auto scroll off”message will be displayed. Auto scroll time can be modified
from the configuration settings. User can vary the auto-scroll time from 1sec to 9 sec.
Once activated. The braille display will pan after a set time period going forward.
During this time, all other keys except the back key will be frozen. You can deactivate it
by again pressing Space + dot 2. If you reach the end of the file, then it will
automatically go to the top of file and continue.
To save documents, you can press Space + dot 3 while in the editor it will give you a
notification “File Saved”. If you have made any changes in the file and then pressed
the back key for exit, then Braille Me will prompt you with the message “Save: yes: no”.

Copyright Inceptor Technologies Pvt. Ltd.
You can either input yes by pressing Back key + dot 3 and no by pressing Enter key +
dot 6. You could also press the back key to remain in the file. On selecting yes, your file
will be saved and closed. If You select No, then the file will be closed without saving
your edited content. If the File is not modified, then by pressing back button for exit it
will prompt “Close: Yes: No.”
Whenever you exit a file, the last position is stored and bookmarked. So, whenever you
open that file again, it starts from where you had left. This reduces a lot of hassle while
reading long documents over a period. Note, Bookmark for the last 20 files are only
stored.
5.6. Preparing files for Braille Me
Braille Me as mentioned earlier does not do any translation or interpretation inside the
device, so files need to be prepared beforehand. For this purpose, we have built a
software which is simple to use and does not need any installation. Open the
application –Braille Me translator. This application converts any TXT file stored in UTF8
format into a Braille Me readable TXT file and vice versa. The first option is Interface
language; this is the language for displaying the menu of the Braille Me translator
software. It has a drop-down menu listing all available languages.
Next is conversion type. This has two options forward conversion and backward
conversion. Forward conversion means converting a desktop readable TXT file to Braille
Me readable TXT file. If you want to read documents which are currently on your PC,
use this option to convert and transfer it to Braille Me. The backward conversion option
is used to convert documents that you have edited or created in braille Me into PC
readable version.
Then we have a button to select the file to be converted. Select the file of interest using
the file explorer. Make sure the selected TXT file is stored in UTF8 format.
Then we have a drop-down menu with the title, data conversion table. Here you select
the language and grade to be used for converting the contents of the file. Make sure
the language and grade are appropriately selected, if not then all characters that are
not found in the selected language will be shown by spaces.
After the language selection, there is a button to select the output folder. It can be any
folder on your computer or the Braille Me SD card directory.
After that, again there is a drop-down menu to select the language and grade for the
filename. Please note, the name of the file can be in a different language then the
contents of the file.
The last option is to select between creating a BRF file or a TXT file. This option is only
available during forward conversion. Press Convert button after filling out all the details.
There can be cases where the file format is wrong, or the file path is faulty, or the
contents of the file do not match the conversion language selected, in all of these
cases and several others the software will give an error.

Copyright Inceptor Technologies Pvt. Ltd.
When the conversion is successful, a dialog box with message –successful conversion
will appear. The new files created are encoded in ASCII(ANSI). Please do not edit any
of these files. Also, the names of the files will appear in latin characters in uppercase
and would not be meaningful when read on a computer. But, these files when inserted
in your braille Me will give you the correct braille representation.
Please note the Braille Me translator might convert certain characters incorrectly
especially in grade 2 braille since it is under development.
Let's take an example: An English student wants to edit his assignment for a foreign
language –Spanish provided by his teacher by inserting his answers into the same
document and giving it back to his teacher.
Let's have a look at the process: The student opens the braille Me translator, then select
his language for the interface as English. He selects forward conversion in the menu –
conversion type. After that, he selects the file of interest named –“assignment” in the
Input file menu item.
He selects the language and grade as Spanish with grade 1 in the data conversion
table option. He also selects the output path as the SD card directory.
He then selects the filename conversion table as UEB English since the name of the file is
“assignment” which is in English.
He then chooses to convert to TXT option and clicks convert. As soon as the convert
button is clicked the software shows a dialog box with file conversion successful
message.
Now he opens the file in Braille Me using the file manager. He edits the contents and
again goes for conversion.
This time all the language settings will remain the same, but the conversion type is
changed to backward conversion. Also, the input file has changed to the edited file,
and the output folder has changed to the documents folder on his PC.
He presses the button convert, and the file is ready to be submitted to the teacher
6. Bluetooth
This function allows you to connect Braille Me to iOS and Android smartphones. A total
of 4 devices can be paired, and you can connect to 1 device at a time. The process
of connecting with smartphones is mainly broken into two parts- Pairing process and
connecting process. To start using Braille Me with an Android or iOS device, you will
need to first pair them.
6.1. Pair new device

Copyright Inceptor Technologies Pvt. Ltd.
As soon as you enter the Bluetooth menu item, the Bluetooth will turn on, but it is not yet
visible to other devices for pairing. The first option in the Bluetooth menu is "pair a new
device." As you enter this menu item braille Me will show a message –“waiting for pair
request”. At this point, Braille Me would be visible to other Bluetooth devices. If you had
paired four devices earlier, then it will show an error “pair list full” and will not allow you
to proceed further. In this case, you need to delete any one of the paired devices
before proceeding.
Now on your smartphone, navigate to Bluetooth settings, turn it on and now you will find
Braille Me listed under the available device. Initiate pairing from the smartphone, and
you will hear a sound once pairing is completed on the smartphone. Your smartphone
might ask to confirm the pairing, please go ahead and press OK. Note, that the pairing
time is limited, once initiating the process, you need to complete it within 10-15 secs.
Wait for a few secs until Braille Me changes its message from “waiting for pair request”
to an edit box asking “Enter paired device name.” Enter a short name which you can
use to identify your smartphone. Braille Me allows you to store four devices with distinct
names. This naming is required to identify devices in a situation when more than one
device has Bluetooth on.
Note, until you do not receive a notification on Braille Me saying –“Paired to device
name,” the pairing process is not complete. if your smartphone is showing Braille Me
under the paired list but Braille Me is not showing the message - “Paired to device
name,” even after 5-10 sec then you need to remove Braille Me from the smartphone
pair list and redo the pairing process.
To remove any device from the pair list, select the delete paired device option in the
Bluetooth menu.
6.2. Connecting to a smartphone
After the pairing process is completed, you can connect to your smartphone and start
your work. To do so, navigate to the Bluetooth menu in Braille Me. After “Pair new
device”there will be several options to connect to BrailleBack, Braille Me app or Voice
Over. Select as per your requirement. Upon selecting any one of them, a list of all
paired devices will be displayed. Select the one you want to connect to and press
enter. Now, Braille Me will show a message –Waiting for connection. At this point Braille
Me is ready to be connected to your specified device.
Now, on your smartphone, switch on Brailleback for Android or enable VoiceOver on
iOS. In just a couple of secs Braille Me should get connected with text from the
smartphone being displayed in Braille Me. If they do not get connected, then try to lock
and unlock the smartphone. Note, you also need talkback turned on while trying to
connect.
If the device goes off connection due to some reason, then a “connection lost”
message will be displayed. This happens due to the smartphone turning off or going into

Copyright Inceptor Technologies Pvt. Ltd.
sleep mode or simply going out of Bluetooth range. In case your smartphone comes
back in Bluetooth range then the connection is again established automatically.
To exit the remote mode simply press back key and it asks you to confirm. Press yes by
the key combination –Back + dot 3.
6.3. Using with BrailleBack
Once connected with BrailleBack, you can navigate the entire smartphone using the
Braille Me keypad. Also, you can type using the six-key keypad provided in Braille Me.
To input text with your braille keyboard, first, enable the keyboard in your Android
settings under Language and Input. If you try to use the keyboard before completing
this step, you receive a prompt to change your settings.
To edit a text field, focus and activate the text field. You can then use the Up and
Down Arrow keys to move in the text field. When editing text, BrailleBack switches to
eight-dot braille known as Computer Braille. Currently, BrailleBack does not support any
other braille as input.
By default, Android is set to display English Computer Braille.
Change the language in BrailleBack to display 6-dot braille, follow the steps below:
Go to open the Home screen.
Navigate and select Apps>Settings>Accessibility>BrailleBack>Settings.
Navigate through this screen of items to "Braille type" and select.
Android generates a dialog screen which indicates the type of braille being displayed
and provides two choices: Literary braille or Computer Braille.
Computer Braille is checked by default. Select "Literary braille" by checking this item.
When you check "Literary braille," you are returned to the BrailleBack Settings screen.
Navigate to the "Literary braille table" and select. Another dialog screen opens with a
selection of output translation tables.
Select your preferred language and grade. After that, you are returned to the
BrailleBack Settings screen.
Refer to the BrailleBack commands in section 11.2. While in BrailleBack, you can turn
on/off typing and also use the two cursor modes with the commands mentioned in the
table.
6.4. Using with VoiceOver
Under development
6.5. Using with Braille Me app

Copyright Inceptor Technologies Pvt. Ltd.
This tool would be beneficial when a sighted teacher is teaching a Braille student since
the teacher can see on the smartphone screen all the activity done by the student in
Braille Me.
This is a simple app which displays the contents of the braille display on the connected
smartphone. To activate, you need to have the braille Me app installed on an Android
smartphone. The connection procedure is different from that of BrailleBack, instead of
switching on brailleBack, you need to turn on Braille Me app.
Open the braille me app. On the right side in the app, tap on the Bluetooth icon to
show you the list of paired devices. Select any of the paired device and once the
connection is successful a message - “Connected”will be shown on the smartphone
screen and also on the device. Now, when you press the back button, Braille Me will
automatically change the “connect to Braille Me app” to “disconnect from Braille Me
app”.
Once connected, you can press the back key and go on navigating the Braille Me
menu system. Unlike BrailleBack or VoiceOver, upon pressing back key on Braille Me,
the connection is not lost. So, whatever you see on the braille display like file manager,
file list, the content of files, etc. will also be shown on the smartphone.
7. USB
Braille Me allows you to connect to your Mac computer or Windows computer over
USB. With Braille Me, a standard micro-USB cable has been provided. Insert the small
end of the cable in Braille Me and the larger end into your computer’s USB slot.
Under this menu, if you try to select any option without inserting the USB cable it will give
an error “USB not inserted.”
7.1 Connecting with NVDA
To connect with NVDA, you would require adding our braille display driver. Please see
appendix for installation instructions.
On Braille Me navigate to the USB menu and under it –connect to NVDA. This will show
a message –“waiting for connection.” Now your braille Me is set to get connected to
NVDA.
Switch on NVDA on the computer, go to braille settings and under braille display select
Braille Me. Also, select the Output table as your preferred language and grade. If a six-
dot table is present for your language, prefer it over other tables since it will perfectly
match with Braille Me. As soon as you press OK, you will be connected to NVDA.
Other manuals for Braille Me
2
Table of contents


