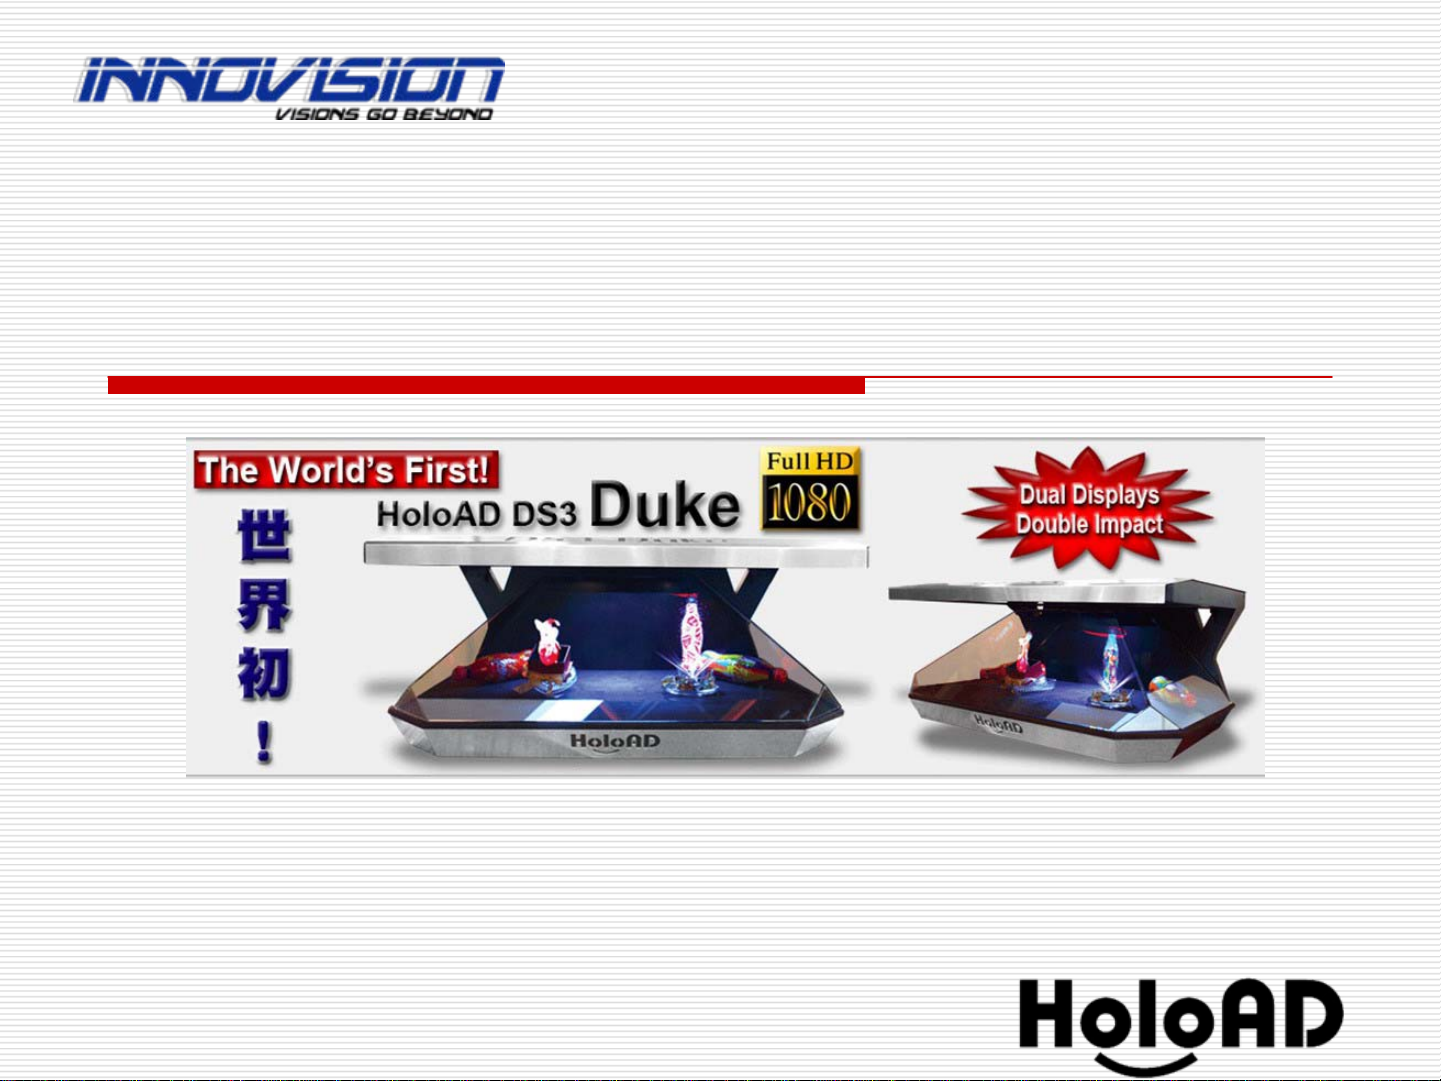
Innovision HoloAD DS3 Duke Technical manual
1
Operation Instruction of
HoloAD DS3_Duke
InnoVision Labs. Co., Ltd.
www.innovision.com.tw

2
■
■
Removing the packing foam
Removing the packing foam
■
■
Start playing
Start playing
■
■
Shutdown
Shutdown
■
■
Calibration
Calibration
■
■
Play videos with real objects inside HoloAD
Play videos with real objects inside HoloAD
■
■
Putting your FLV videos into HoloAD
Putting your FLV videos into HoloAD
Contents
Contents
■
■
Reconfirm your configuration (important)
■
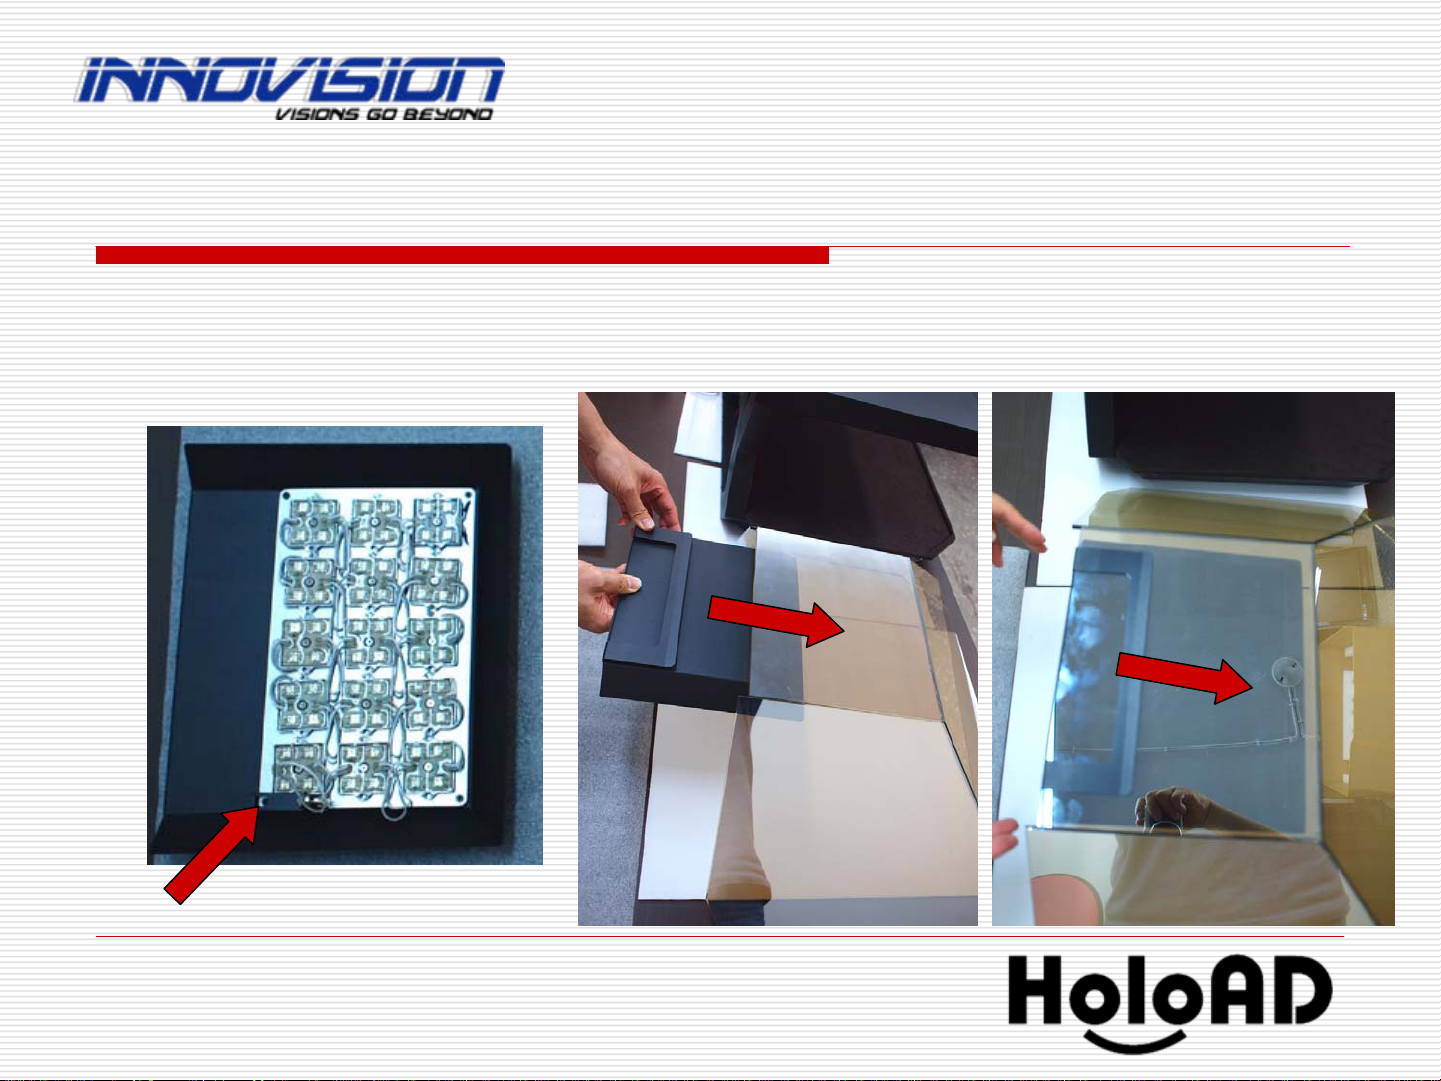
■
Glass and LED light Assembling
Glass and LED light Assembling
■
■
Hardware description
Hardware description

3
Hardware description
Hardware description
Dimension : W 75 x D 52 x H35 cm
Power : 110~240 V 50/60 Hz
Material : Steel / Aluminum / Glass / LCD / CPU
Net Weight : 37 Kg
4
Slide the LED light pad on the top of the glass.
Glass and LED light Assembling
Glass and LED light Assembling
LED Light pad
LED Light pad
Power Jack
Power Jack

5
Put the glass in the unit.
Put the glass in the unit.
Glass and LED light Assembling
Glass and LED light Assembling

6
Glass and LED light Assembling
Glass and LED light Assembling
Open the back door and find the LED connection cable.
Open the back door and find the LED connection cable.

7
Connect the LED cable to the jack.
Connect the LED cable to the jack.
Glass and LED light Assembling
Glass and LED light Assembling
Close the back door and power on the unit.
Close the back door and power on the unit.
Power Jack
Power Jack

8
Start playing
Start playing
Plug the power cord to socket.
Plug the power cord to socket.
Unplug any USB disk if exists.
Unplug any USB disk if exists.
Press RED Power
Press RED Power-
-on/off button Wait for videos auto
on/off button Wait for videos auto-
-playback.
playback.
Player
Player’
’s Power on/off button
s Power on/off button
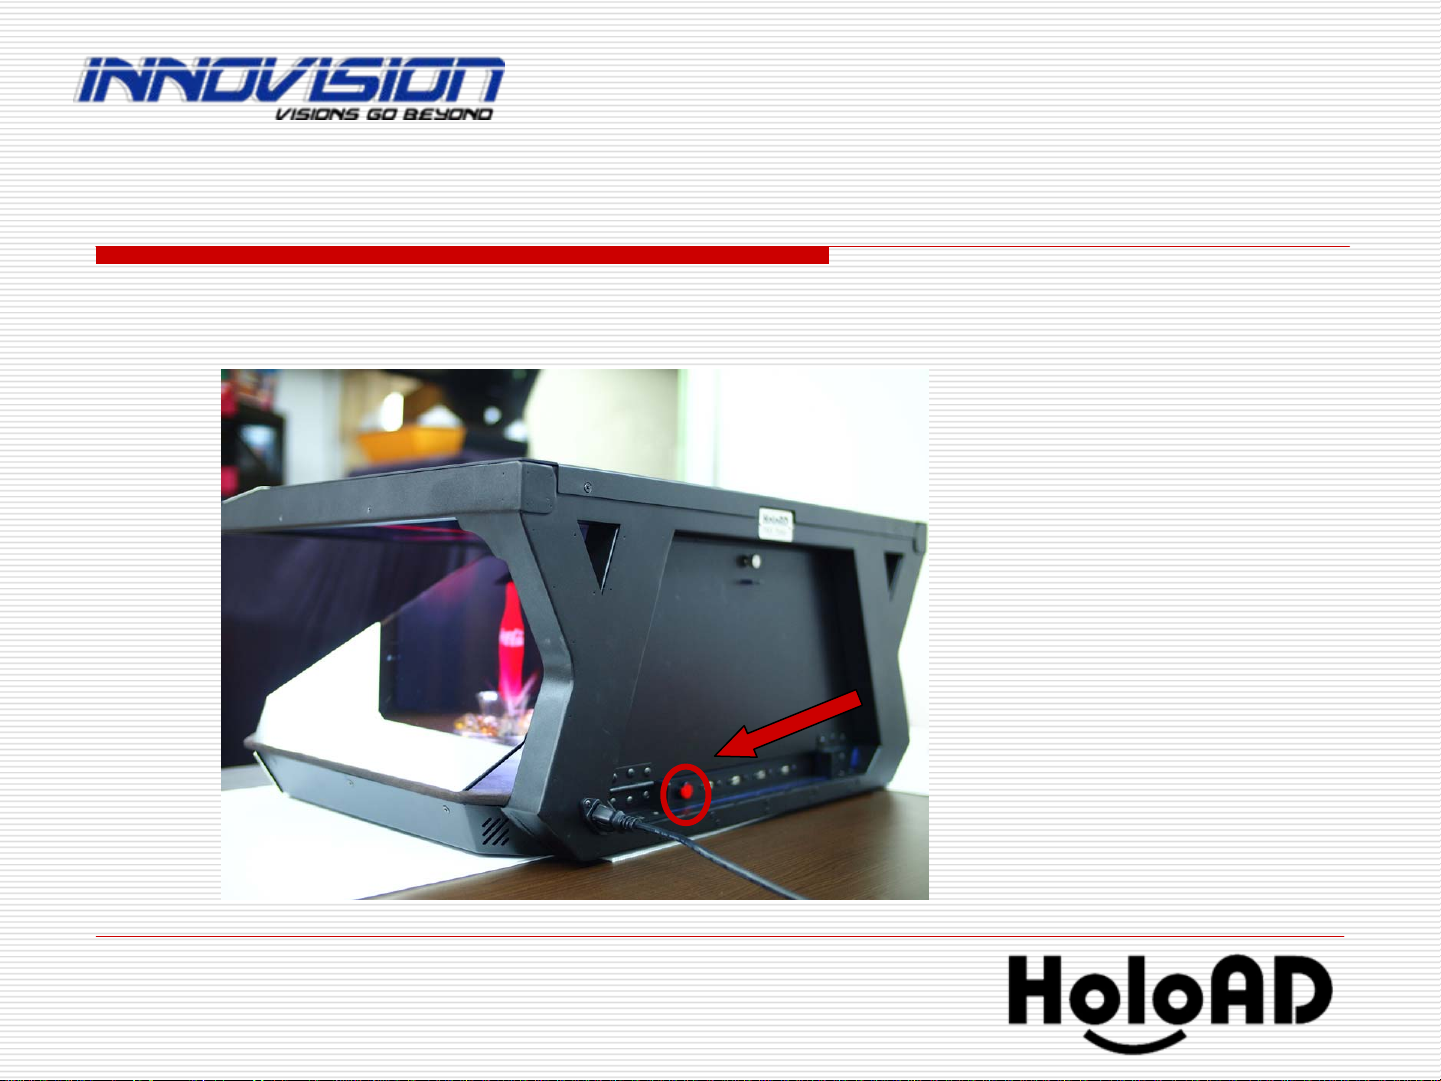
9
Shutdown
Shutdown
Press RED Power
Press RED Power-
-on/off button Wait for Shutting down itself.
on/off button Wait for Shutting down itself.
Player
Player’
’s Power on/off button
s Power on/off button

10
Playback Control
Playback Control
■
■
Once power on, it will play all video files automatically by seq
Once power on, it will play all video files automatically by sequence.
uence.
There are 2 side different videos playing.
There are 2 side different videos playing.
For right side video control:
For right side video control:
■
■
“
“1
1“
“ key : Play 1st video and repeat.
key : Play 1st video and repeat.
■
■
“
“2
2“
“ key : Play 2nd video and repeat.
key : Play 2nd video and repeat.
■
■
“
“3
3“
“ key : Play 3rd video and repeat.
key : Play 3rd video and repeat.
■
■
“
“4
4“
“ key : Play 4th video and repeat.
key : Play 4th video and repeat.
■
■
“
“5
5“
“ key : Play 5th video and repeat.
key : Play 5th video and repeat.
■
■
“
“6
6“
“ key : Play 6th video and repeat.
key : Play 6th video and repeat.
■
■
“
“7
7“
“ key : Play 7th video and repeat.
key : Play 7th video and repeat.
■
■
“
“8
8“
“ key : Play 8th video and repeat.
key : Play 8th video and repeat.
■
■
“
“9
9“
“ key : Play 9th video and repeat.
key : Play 9th video and repeat.
■
■
“
“0
0“
“ key : Resume to play from 1st by sequence
key : Resume to play from 1st by sequence
Notice: Use number keys,
Notice: Use number keys,
(Do not use Number pad on the right side of the
(Do not use Number pad on the right side of the keyboard)
keyboard)
■
■
“
“O
O“
“ key : toggle to
key : toggle to repeat current single video
repeat current single video
Right Video
Right Video
Left Video
Left Video

11
Playback Control
Playback Control
For left side video control:
For left side video control:
■
■
”
”Shift
Shift”
” +
+ “
“1
1“
“ key : Play 1st video and repeat.
key : Play 1st video and repeat.
■
■
”
”Shift
Shift”
” +
+ “
“2
2“
“ key : Play 2nd video and repeat.
key : Play 2nd video and repeat.
■
■
”
”Shift
Shift”
” +
+ “
“3
3“
“ key : Play 3rd video and repeat.
key : Play 3rd video and repeat.
■
■
”
”Shift
Shift”
” +
+ “
“4
4“
“ key : Play 4th video and repeat.
key : Play 4th video and repeat.
■
■
”
”Shift
Shift”
” +
+ “
“5
5“
“ key : Play 5th video and repeat.
key : Play 5th video and repeat.
■
■
”
”Shift
Shift”
” +
+ “
“6
6“
“ key : Play 6th video and repeat.
key : Play 6th video and repeat.
■
■
”
”Shift
Shift”
” +
+ “
“7
7“
“ key : Play 7th video and repeat.
key : Play 7th video and repeat.
■
■
”
”Shift
Shift”
” +
+ “
“8
8“
“ key : Play 8th video and repeat.
key : Play 8th video and repeat.
■
■
”
”Shift
Shift”
” +
+ “
“9
9“
“ key : Play 9th video and repeat.
key : Play 9th video and repeat.
■
■
”
”Shift
Shift”
” +
+ “
“0
0“
“ key : Resume to play from 1st by sequence
key : Resume to play from 1st by sequence
Notice: Use number keys,
Notice: Use number keys,
(Do not use Number pad on the right side of the
(Do not use Number pad on the right side of the keyboard)
keyboard)
■
■
”
”Shift
Shift”
” +
+ “
“O
O“
“ key : toggle to
key : toggle to repeat current single video
repeat current single video
12
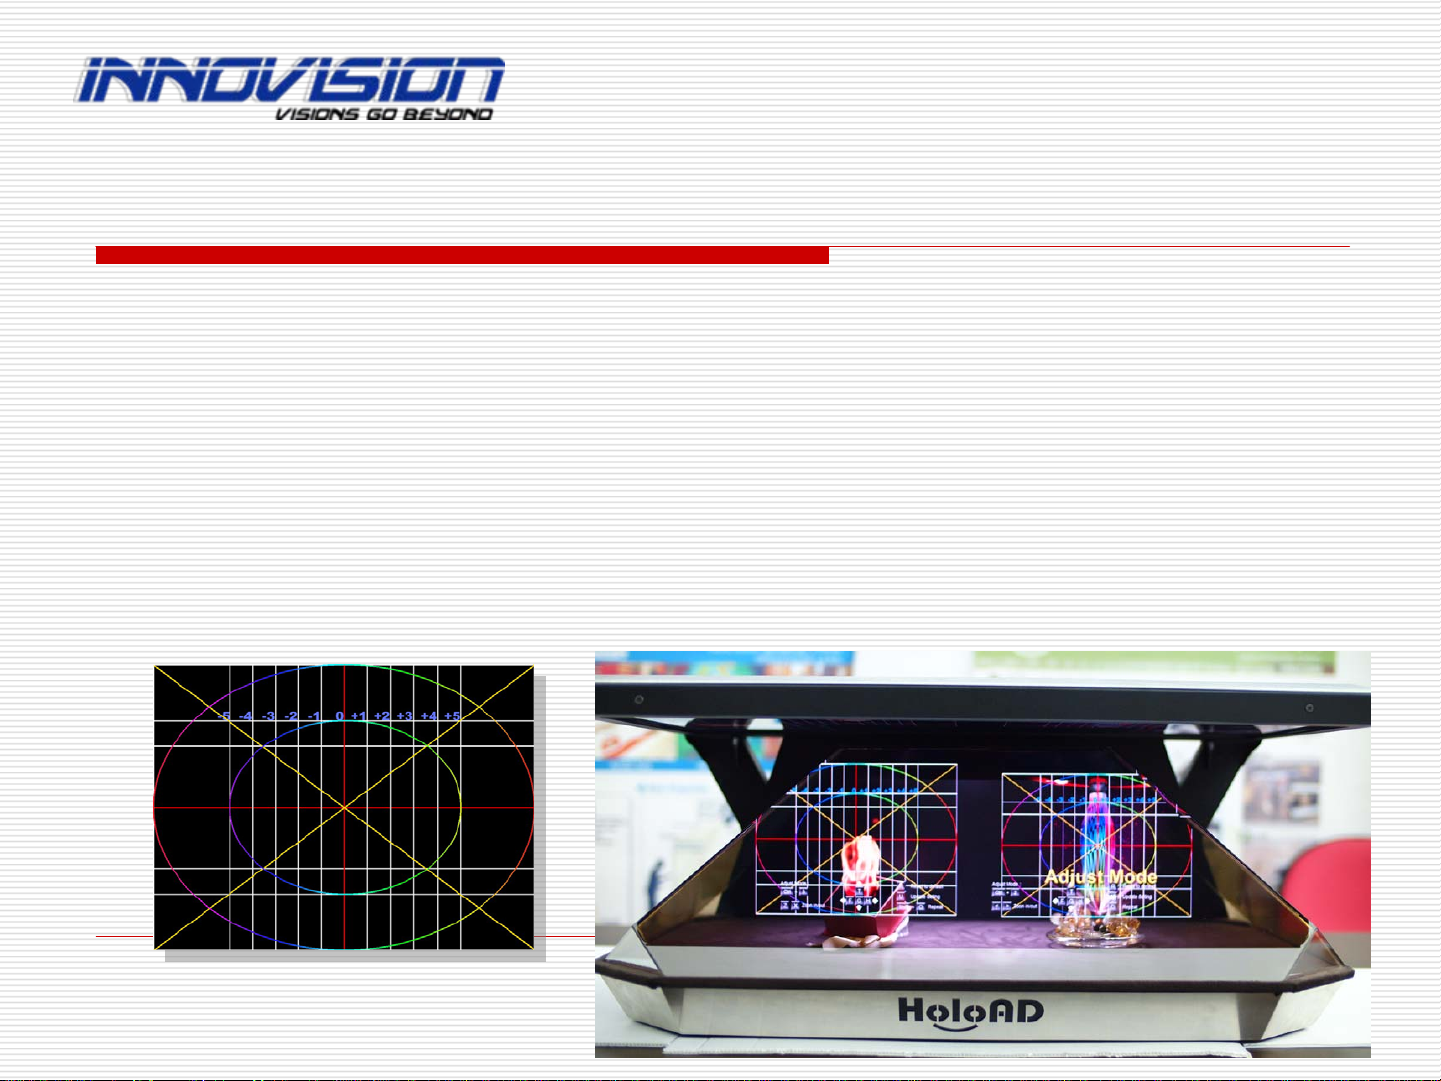
Calibration (if need)
Calibration (if need)
Already calibrated when shipping. Normally no need to calibrate!
Already calibrated when shipping. Normally no need to calibrate!!
!
Power on the system, wait for playing videos.
Power on the system, wait for playing videos.
Make sure the keyboard connected to the USB jack on the back.
Make sure the keyboard connected to the USB jack on the back.
Press
Press “
“F8
F8”
”key will show calibration picture, then use next pages
key will show calibration picture, then use next pages
to adjust the position and scale.
to adjust the position and scale.
Press
Press “
“F8
F8”
”key again when completed.
key again when completed.
13
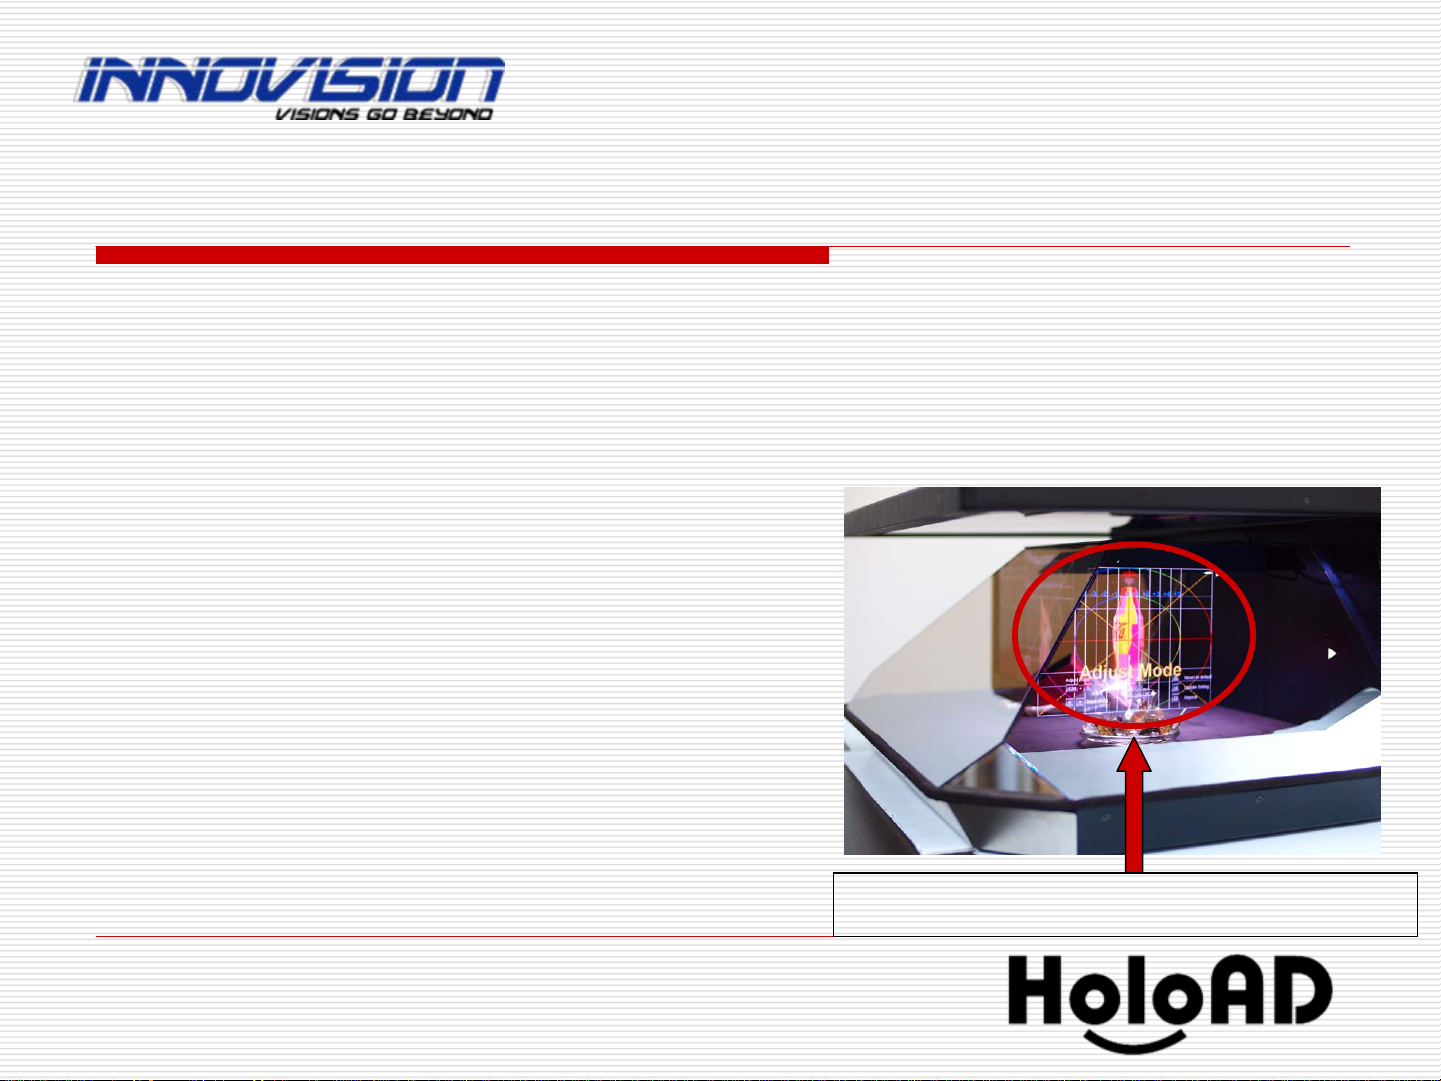
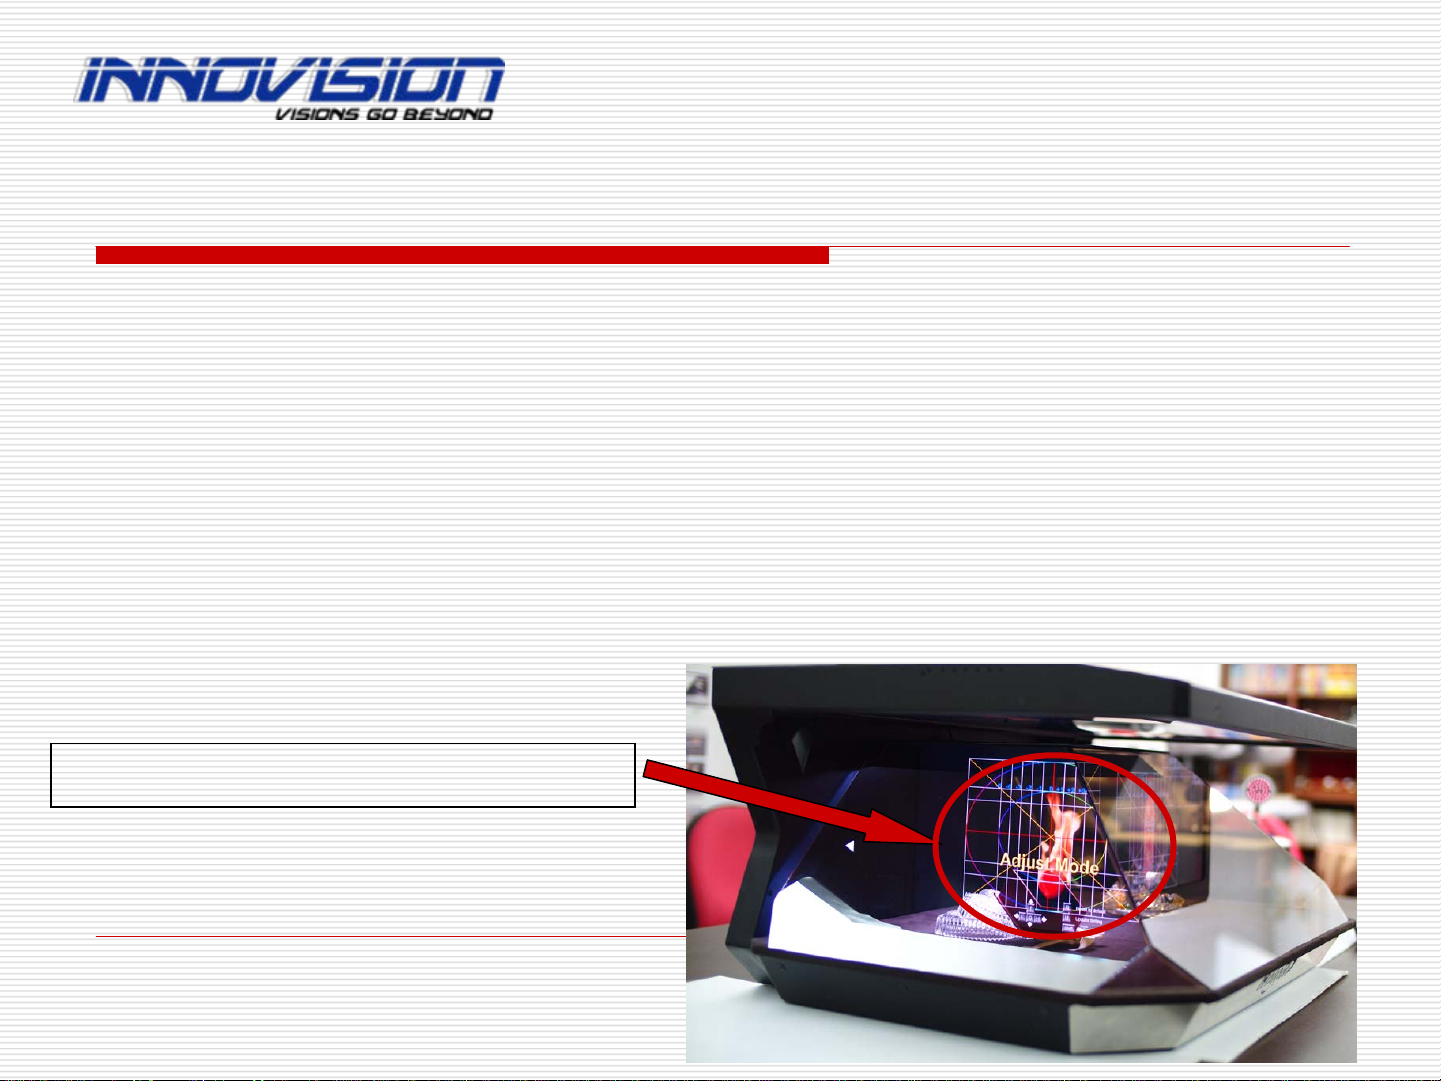
Calibration
Calibration -
-1 (if need)
1 (if need)
■
■
“
“SPACEBAR
SPACEBAR“
“ key : toggle 2 side videos play and pause
key : toggle 2 side videos play and pause
■
■
”
”Ctrl
Ctrl”
” +
+ “
“1
1“
“ key :
key :
Adjust Mode for the
Adjust Mode for the “
“Right View
Right View”
” of the Right Video
of the Right Video
Position adjust keys:
Position adjust keys:
■
■
“
“T
T“
“ key : move video upward
key : move video upward
■
■
“
“G
G“
“ key : move video downward
key : move video downward
■
■
“
“F
F“
“ key : move video leftward
key : move video leftward
■
■
“
“H
H“
“ key : move video rightward
key : move video rightward
Adjust Mode
Adjust Mode ”
”Ctrl
Ctrl”
” +
+ “
“1
1“
“ key
key

14
Calibration
Calibration -
-2 (if need)
2 (if need)
■
■
”
”Ctrl
Ctrl”
” +
+ “
“2
2“
“ key :
key :
Adjust Mode for the
Adjust Mode for the “
“Left View
Left View”
” of the Right Video
of the Right Video
Position adjust keys:
Position adjust keys:
■
■
“
“T
T“
“ key : move video upward
key : move video upward
■
■
“
“G
G“
“ key : move video downward
key : move video downward
■
■
“
“F
F“
“ key : move video leftward
key : move video leftward
■
■
“
“H
H“
“ key : move video rightward
key : move video rightward
Adjust Mode
Adjust Mode ”
”Ctrl
Ctrl”
” +
+ “
“2
2“
“ key
key

15
Calibration
Calibration -
-3 (if need)
3 (if need)
■
■
”
”Ctrl
Ctrl”
” +
+ “
“3
3“
“ key :
key :
Adjust Mode for the
Adjust Mode for the “
“Right View
Right View”
” of the Left Video
of the Left Video
Position adjust keys:
Position adjust keys:
■
■
“
“T
T“
“ key : move video upward
key : move video upward
■
■
“
“G
G“
“ key : move video downward
key : move video downward
■
■
“
“F
F“
“ key : move video leftward
key : move video leftward
■
■
“
“H
H“
“ key : move video rightward
key : move video rightward
Adjust Mode
Adjust Mode ”
”Ctrl
Ctrl”
” +
+ “
“3
3“
“ key
key
16
Calibration
Calibration -
-4 (if need)
4 (if need)
■
■
”
”Ctrl
Ctrl”
” +
+ “
“4
4“
“ key :
key :
Adjust Mode for the
Adjust Mode for the “
“Left View
Left View”
” of the Left Video
of the Left Video
Position adjust keys:
Position adjust keys:
■
■
“
“T
T“
“ key : move video upward
key : move video upward
■
■
“
“G
G“
“ key : move video downward
key : move video downward
■
■
“
“F
F“
“ key : move video leftward
key : move video leftward
■
■
“
“H
H“
“ key : move video rightward
key : move video rightward
Adjust Mode
Adjust Mode ”
”Ctrl
Ctrl”
” +
+ “
“4
4“
“ key
key

17
For
For Right
Right Video SCREENS:
Video SCREENS:
■
■
“
“→
→“
“ key : Play next
key : Play next Right
Right video
video
■
■
“
“←
←“
“ key : Play previous
key : Play previous Right
Right video
video
For
For Left
Left Video SCREENS:
Video SCREENS:
■
■
“
“Shift
Shift”
” +
+ “
“→
→“
“ key : Play next
key : Play next Left
Left video
video
■
■
“
“Shift
Shift”
” +
+ “
“←
←“
“ key : Play previous
key : Play previous Left
Left video
video
For Volume Control:
For Volume Control:
■
■
“
“F11
F11“
“ key : Turn down the volume
key : Turn down the volume
■
■
“
“F12
F12“
“ key : Turn up the volume
key : Turn up the volume
To Rest to the default Values:
To Rest to the default Values:
■
■
“
“R
R“
“ key : Reset to the default setting.
key : Reset to the default setting.
Calibration
Calibration -
-5 (if need)
5 (if need)

18
■
■
“
“U
U“
“ key : Update and Save the setting you adjusted,
key : Update and Save the setting you adjusted,
it will shows
it will shows “
“Configuration Updated
Configuration Updated”
” in the central of the displays:
in the central of the displays:
(important!!!!)
(important!!!!)
Calibration
Calibration -
-6
6

19
Play videos with real objects inside HoloAD
Play videos with real objects inside HoloAD
Open the back door.
Open the back door.
Put the real objects inside
Put the real objects inside
and adjust their position
and adjust their position
in the center.
in the center.
Use keyboard to adjust the
Use keyboard to adjust the
horizontal / vertical shifting
horizontal / vertical shifting
to ideal position.
to ideal position.
Close the back door.
Close the back door.

20
Putting your FLV videos into HoloAD
Putting your FLV videos into HoloAD -
-1
1
Prepare your FLV videos
Prepare your FLV videos (
(640*480
640*480 pixels)
pixels) at the USB disk
at the USB disk
root directory as following format:
root directory as following format:
For
For Right
Right Videos:
Videos:
\
\hoload_001_R.flv
hoload_001_R.flv
\
\hoload_002_R.flv
hoload_002_R.flv
\
\hoload_003_R.flv
hoload_003_R.flv
…
….. and so on.
.. and so on.
For
For Left
Left Videos:
Videos:
\
\hoload_001_L.flv
hoload_001_L.flv
\
\hoload_002_L.flv
hoload_002_L.flv
\
\hoload_003_L.flv
hoload_003_L.flv
…
….. and so on.
.. and so on.
Power off the HoloAD.
Power off the HoloAD.
Plug the USB disk into HoloAD on the back.
Plug the USB disk into HoloAD on the back.
4 USB jacks
4 USB jacks
Table of contents
Other Innovision Monitor manuals


