INOXA GENIUS 835A User manual

TEMPO
MONTAGGIO
ASSEMBLY
TIME
8
min
P
Pag.1
Art.
835A
INDICAZIONI DI MONTAGGIO
ASSEMBLY INSTRUCTIONS
Contenuto della confezione - BOX CONTENT
A : Supporto inferiore / bottom support
B : Tubo / pole
C : braccio / arm
D : Ripiano / shelf
E : supporto superiore / top support
F : piastra di aggancio / hook plate
G : perno / pin
H : clip / clip
I : viti - screws
L : blocco di sicurezza / safety block
Nr.4
Nr.4
Nr.4
INOXA S.r.l
Via dell' Industria, 28
60020 POLVERIGI (AN) ITALY
Tel. +39 071 906324 - 906090 Fax +39 071 906096
http: www.inoxa.it
e-mail: [email protected]
(=)
(=)
E’ consigliato per evitare la flessibilità della base del
mobile, l’uso di un piedino centrale (P), in
linea con il supporto inferiore del Genius (A).
In order to maintain the cabinet base stability, we
recommend the use of an extra central foot (P) in
line with the Genius bottom support (A).
Nr.2
Nr.2
Nr.4
Nr.4
A
D
F
G
H
B
E
Carico massimo per ogni ripiano Kg.15
Maximum load per shelf kg. 15
C
I
L

Fissare il supporto inferiore (A)
alla base del mobile e la piastra di
aggancio (F) alla parete frontale.
Utilizzare le viti pre-posizionate
rispettando le distanze
come da disegni.
Fix the bottom support (A)
onto the base of the cabinet and
the hook plate (F) onto the front wall.
Use the pre-fitted screws,
respecting the distances,
as shown in the drawings.
Mobile senza montante.
Cabinet without upright. Mobile con montante.
Cabinet with upright.
Infilare il perno (G)
nel primo foro in basso del
tubo (B) fino a battuta.
Insert the pin (G)
into the lower hole
of the pole (B)
until it stops.
Inserire il braccio (C) nel tubo fino
a fissarlo sul perno (G).
Insert the arm (C) into the pole
until it is fixed into the pin (G).
Pag.2
1
23
Assicurarsi di accoppiare il
perno (G) nella sede come disegno.
Make sure the pin (G) is correctly
placed as shown in the drawing.
Mobile / Cabinet Anta/Door Quota / Size
900-1000 450 450
1200 600 600
A
18
18
515
1080
1250
515
1080
1250
G
B
A
C
G
F
G
A
F
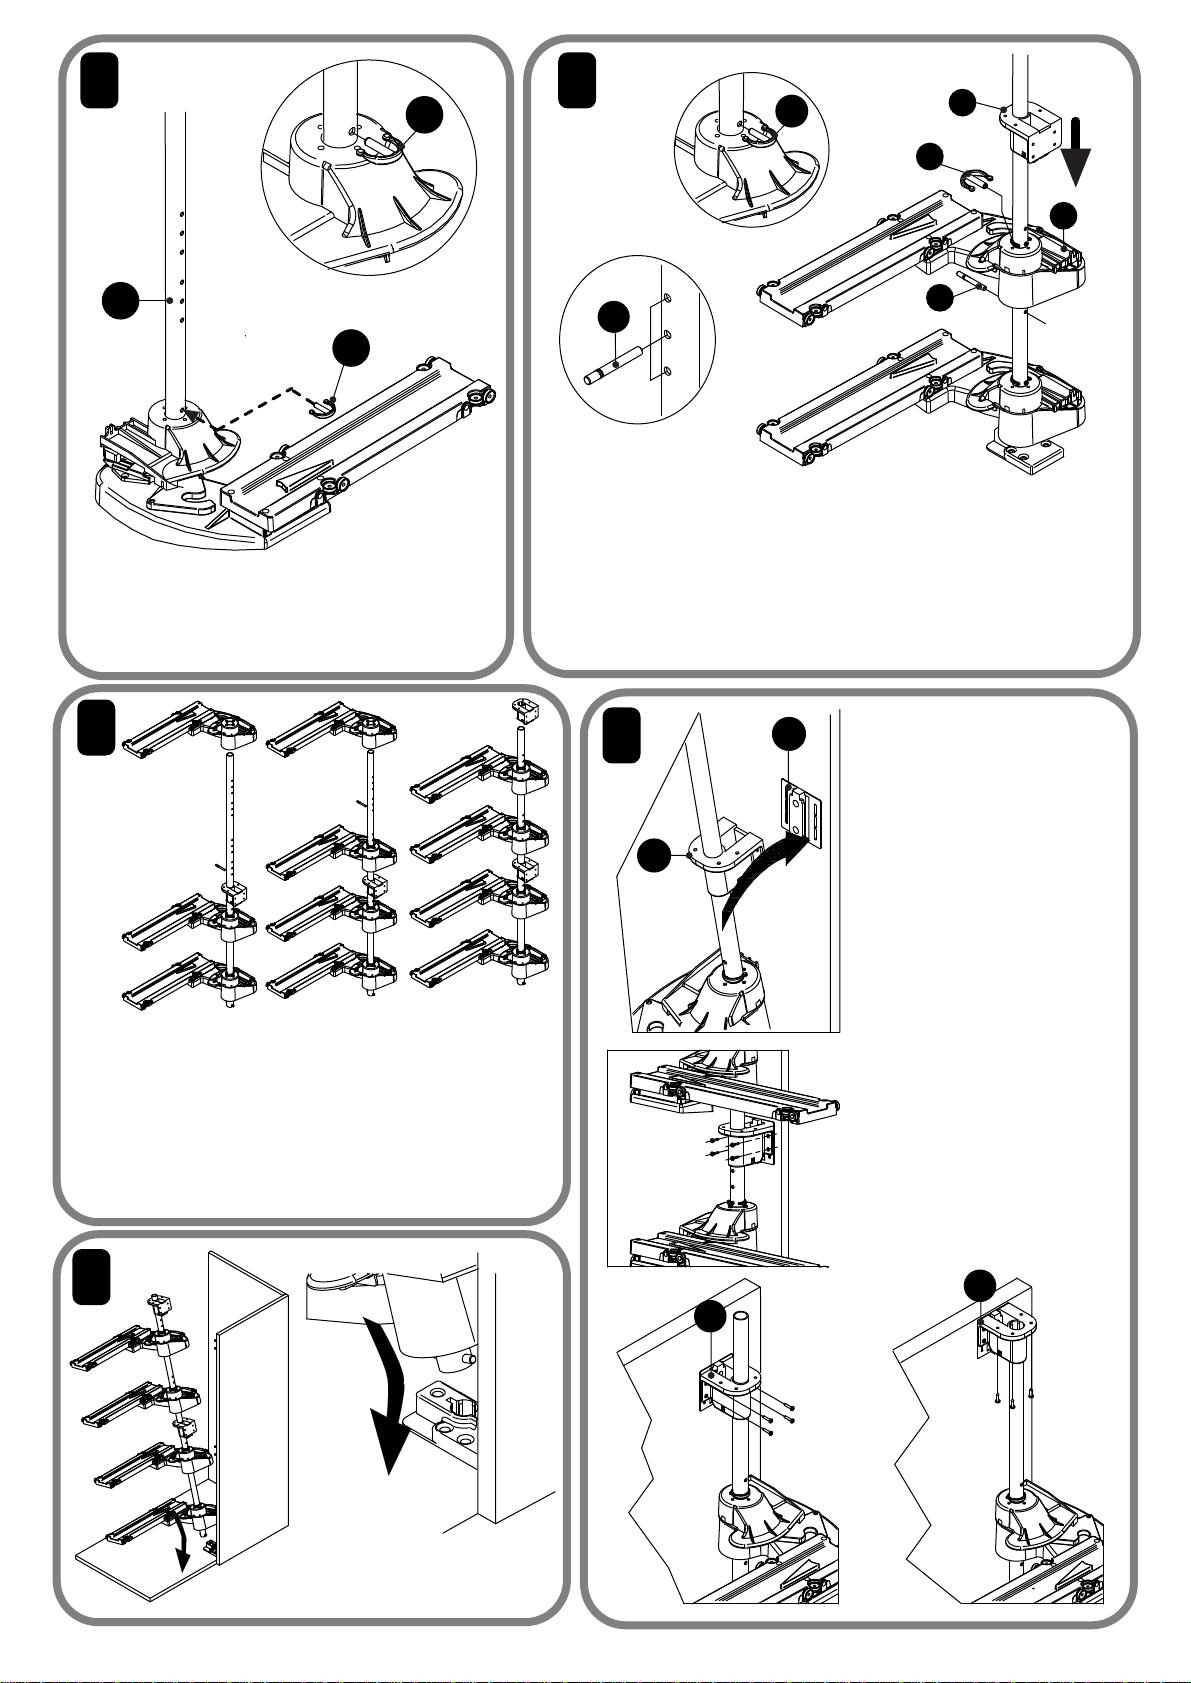
Inserire il piede
del tubo nel
supporto inferiore.
Insert the foot of
the pole into the
lower support.
Pag.3
4
6
7
Inserire la clip (H) nel foro del tubo in modo
da bloccare la posizione del braccio (C).
In order to block the arm position (C),
place the clip (H) into the hole of the pole.
5
Posizionare il secondo perno (G) in uno dei fori all'altezza desiderata ed
infilare il secondo braccio (C) fino a bloccarlo sul perno come in precedenza.
Inserire la seconda clip (H) in uno dei fori in modo
da bloccare la posizione del secondo braccio.
Inserire il supporto superiore (E).
Place the second pin (G) in one of the holes at the desired height
and insert the second arm until ti is fixed into the pin, as before
Insert the second clip (H) into one of the holes to block
the position of the second arm.
Insert the top support (E).
Posizionare il terzo perno (G) e infilare il terzo braccio (C),
posizionare il quarto perno (G) e infilare il quarto braccio (C)
fino a bloccarlo sul perno come in precedenza.
Inserire le clip (H) in uno dei fori in modo
da bloccare la posizione dei bracci.
Inserire il supporto superiore (E).
Place the third pin (G) and insert the third arm,
place the fourth pin and insert the fourth arm
until it is fixed onto the pin, as before.
Insert the clips (H) into one of the holes to block
the position of the arms.
8
H
E
H
E
BH
G
H
C
E
G
F
E
Incastrare i supporti alti (E)
alle piastre di aggancio (F) fissate
in precedenza sul mobile.
L’incastro fra il supporto (E) e la
piastra di aggancio (F) può
avvenire o con inserimento a
baionetta o tramite una
leggera pressione frontale.
Fissare il supporto alto (E) al
mobile mediante le n.4 viti
pre-posizionate.
In caso di posizionamento del
supporto superiore al massimo
dell’altezza è consigliabile
l’utilizzo di altre n.4 viti (I) in
dotazione per il fissaggio al top.
Fit the top support (E)
onto the hook plate (F) previously
fixed on the cabinet.
The joint between the top
support (E) and the hook plate (F)
can be made by bayonet
coupling or by front pressure.
Fix the top support (E) to the cabinet
using the pre-fitted 4 screws (I) .
To position the top support at the
maximum height, we suggest
the use of 4 more screws (I),
supplied to fix it to the top.

Pag.4
Premere il cursore
ed estrarre
i ripiani per la pulizia.
Push the lock and pull out
the shelves for cleaning.
In caso di trasporto si raccomanda
di inserire il blocco di sicurezza (L)
per impedire la rotazione del ripiano.
Il blocco di sicurezza (L) deve essere
rimosso prima dell’uso.
In case of transfer we recommend
to apply the safety block (L) to
prevent the rotation of the shelf.
The safety block (L) must be
removed before use.
Ruotare i bracci fino a fondo corsa e
ruotare il componente di blocco (M).
Montare i ripiani (D) sui bracci facendo
scorrere i profili al di sotto di essi sulle ruote.
Rotate arms until end-run, then rotate
the interlock component (M).
Assemble the shelves on the arms by sliding the
profiles beneath the shelf on the wheels.
9
Spingere i ripiani a fondo corsa, fino al “click” del cursore,
in modo da bloccare l’uscita del ripiano.
Spingere i ripiani e ruotarli fino a farli entrare completamente nel mobile.
Push the shelves until the end-run and the lock clicks to block the shelf out.
Push the shelves and rotate them until they fit completely into the cabinet.
CLICK
10
M
D
L
CLICK
CURSORE
LOCK
Other INOXA Indoor Furnishing manuals


Popular Indoor Furnishing manuals by other brands

The Land of Nod
The Land of Nod Storage Cube Bench Assembly instructions

Rosdorf Park
Rosdorf Park LIM1176 Assembly instruction

Alice's Home
Alice's Home Loft ILFLIFTCT100 manual

Home Decorators Collection
Home Decorators Collection NOVA 21038-VS61EW-ST Assembly instructions

Coaster
Coaster 700345 Assembly instructions

VonHaus
VonHaus 2500311 manual


