INQ T2-218U User manual

INQ T2-218U
User Guide

i
Contents
1Your phone ................................................ 1
Phone overview ............................................ 1
2Installation and Charging...........................2
Install the SIM card....................................... 2
Install the microSD card ................................ 2
Install the battery ......................................... 3
Charge the battery........................................ 3
3Getting Started ..........................................5
Turn phone on/off ......................................... 5
Set up screen lock ........................................ 5
Home screen................................................ 5
Monitor your phone’s status............................ 6
Open and switch applications .......................... 9
PIN and PUK .............................................. 10
4Calls ........................................................ 11
Make a call ................................................ 11
In-call options ............................................ 12
Answer & reject a call .................................. 12
Manage multiple calls .................................. 13
Work with the call log .................................. 14
Dial by voice .............................................. 15
5Text Entry................................................ 16
Use the onscreen keyboard .......................... 16
Edit text .................................................... 17

ii
Enter text by speaking................................. 18
6Messaging ............................................... 19
Create and send a text message ................... 19
Create and send a multimedia message.......... 19
Change messaging settings .......................... 20
7Email ....................................................... 21
Open email and the accounts screen .............. 21
Read and respond to a message.................... 21
Compose and send email ............................. 22
Add and edit email accounts ......................... 22
8Browser ................................................... 23
Open browser............................................. 23
Connect .................................................... 24
Download files............................................ 24
Change browser settings.............................. 25
9Contacts .................................................. 26
Open your contacts ..................................... 26
Create a contact ......................................... 27
Search for a contact .................................... 27
Import, export and share contacts................. 27
Call, text or email contacts ........................... 28
Synchronize contacts................................... 28
10 Settings ................................................... 29
Wireless & networks .................................... 29
Call settings ............................................... 29
Sound settings ........................................... 30

iii
Display settings .......................................... 30
Location & security settings .......................... 30
Application settings ..................................... 30
Account & sync settings ............................... 31
Privacy settings .......................................... 31
SD card & phone storage settings.................. 31
Language & keyboard settings ...................... 31
Voice input & output settings ........................ 31
Accessibility settings ................................... 31
Date & time settings.................................... 32
About phone .............................................. 32
11 Music ....................................................... 33
Open and play music ................................... 33
Use a song as a ringtone.............................. 35
12 Camera & camcorder................................ 36
Start camera & camcorder............................ 36
Camera ..................................................... 36
Camcorder................................................. 37
13 Gallery..................................................... 39
Open Gallery and view your albums ............... 39
Work with albums ....................................... 40
Work with pictures ...................................... 40
Work with videos ........................................ 41
14 Tools ....................................................... 42
Calculator .................................................. 42
Calendar ................................................... 42

iv
Clock ........................................................ 43
15 Applications ............................................. 45
FM Radio ................................................... 45
Google search ............................................ 45
Latitude .................................................... 46
Maps......................................................... 47
Navigation ................................................. 48
News and Weather ...................................... 48
Places ....................................................... 48
SIM Toolkit ................................................ 48
Warning

1
1Your phone
Phone overview
The following figure shows the appearance of your
phone and it is for your reference only.
1.
i key
7.
Camera
2.
Menu key
8.
Speaker
3.
Home key
9.
Earpiece
4.
Back key
10.
Power key
5.
Volume key
11.
Headset connector
6.
Camera key
12.
Micro USB connector
Tip: i key-press it first then press power key to come
into recovery mode.
2
2Installation and Charging
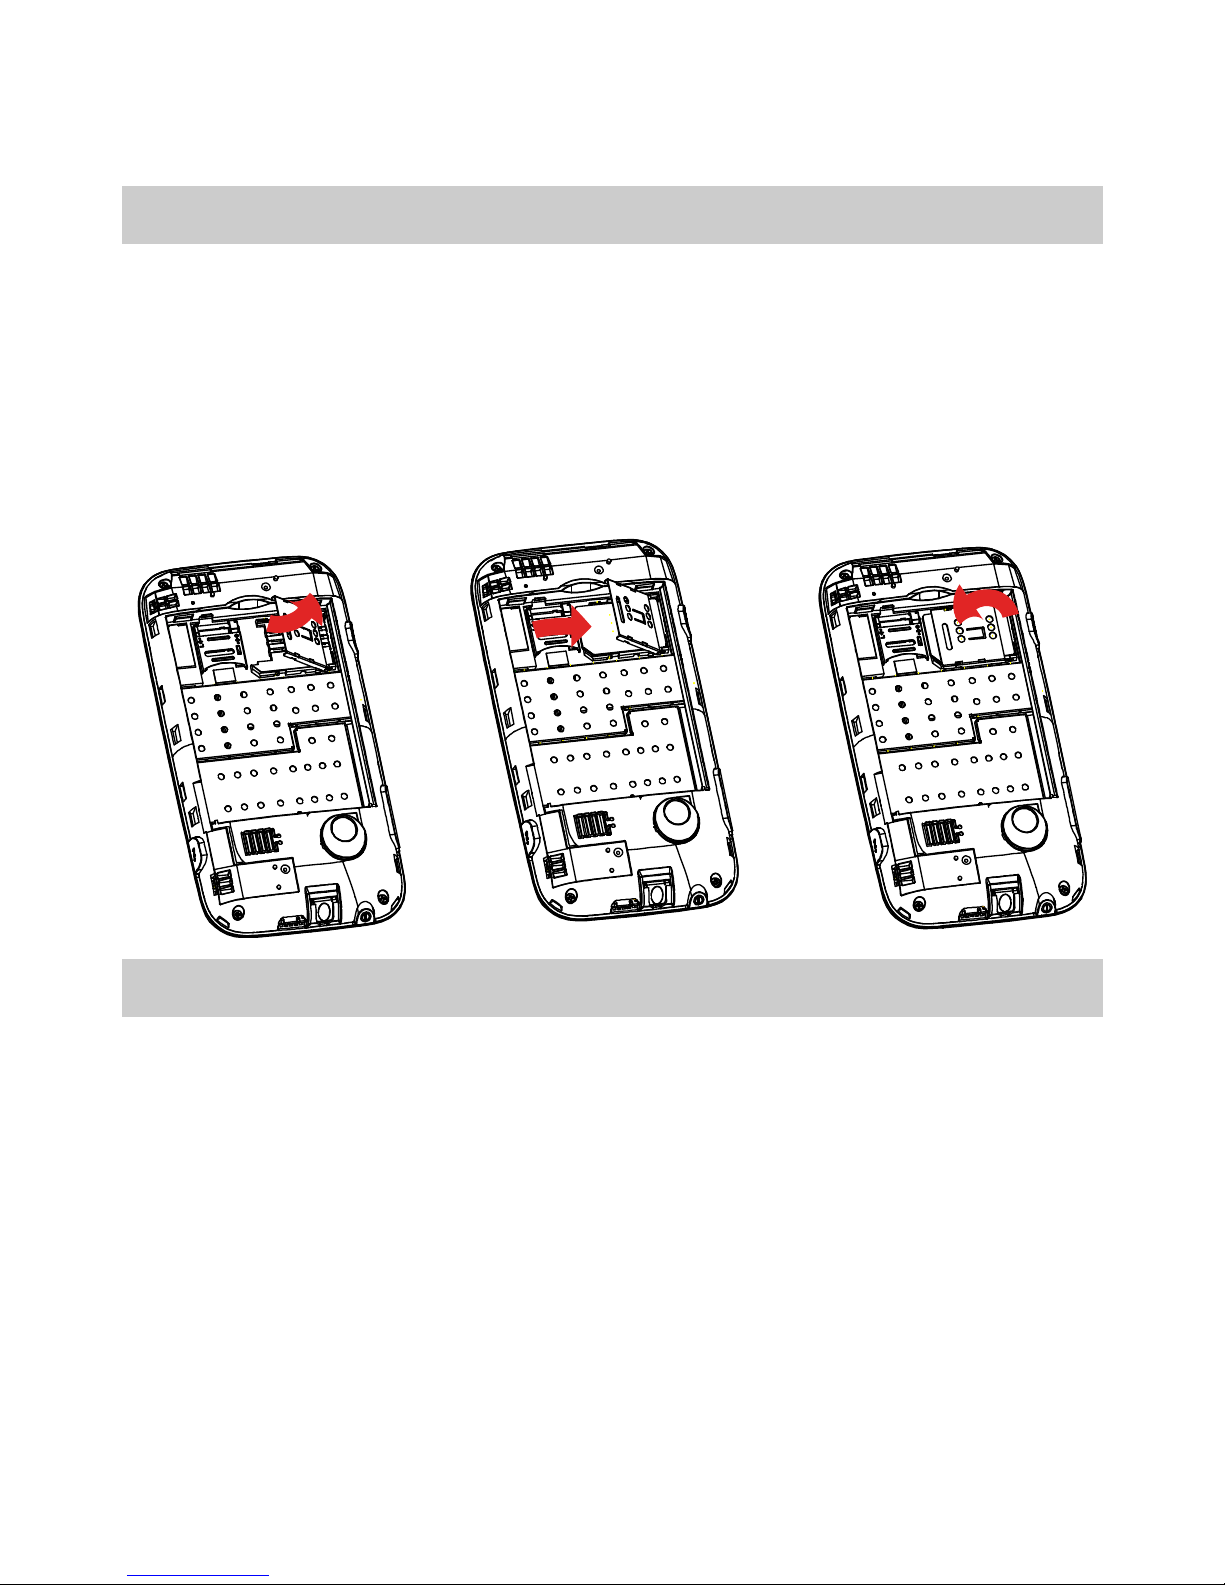
Install the SIM card
1. First unlock the cover shown as the graphic.
2. Install the SIM card, ensure that the golden contact
area on the SIM card is facing downward and that the
beveled edge of the SIM card is properly aligned with
that of the SIM card slot.
3. Finally, lock the cover.
Install the microSD card
1. Push up to unlock the back cover of the slot and then
open it.
2. Place the microSD card in the slot.
3. Close the back cover of the slot and then push down
to lock it.
Shown as the graphics:

3
Note:If no microSD card is included in the packing box,
a microSD card might be provided as a giveaway or you
need to purchase a microSD card separately.
Install the battery
1. Remove the back cover.
2. Insert the battery.
Do as follows:
Charge the battery
1. Connect the charger to the charger jack on the
phone.

4
2. Connect the charger to a power socket. The charging
starts, with the charging icon displayed in an
animated state.
Note:If the battery power is exhausted when you
charge the battery, the charging icon might appear on the
screen a few minutes later when charger is connected to
the power socket.
3. When the charging icon becomes static, indicating
that the battery is full, disconnect the charger from
the power socket.
4. Disconnect the charger from the phone.
5
3Getting Started
Turn phone on/off
To turn on your phone, press and hold the Power key
(on top of the phone). To turn off your phone, press and
hold the Power key, then touch Power off on the
screen.
Set up screen lock
Select > Settings > Location & security > Set
up screen lock. You can choose Pattern, PIN, or
Password to set up screen lock.
Home screen
If you don’t use the phone for a while, press the power
key to wake up the phone, then drag the lock icon to the
right.
6
To view other parts of the Home screen
Slide your finger left or right across the Home screen, or
touch & hold the small dots on the lower left or right of
the screen to view thumbnails of the Home screen and
its extensions, which you can touch to open.
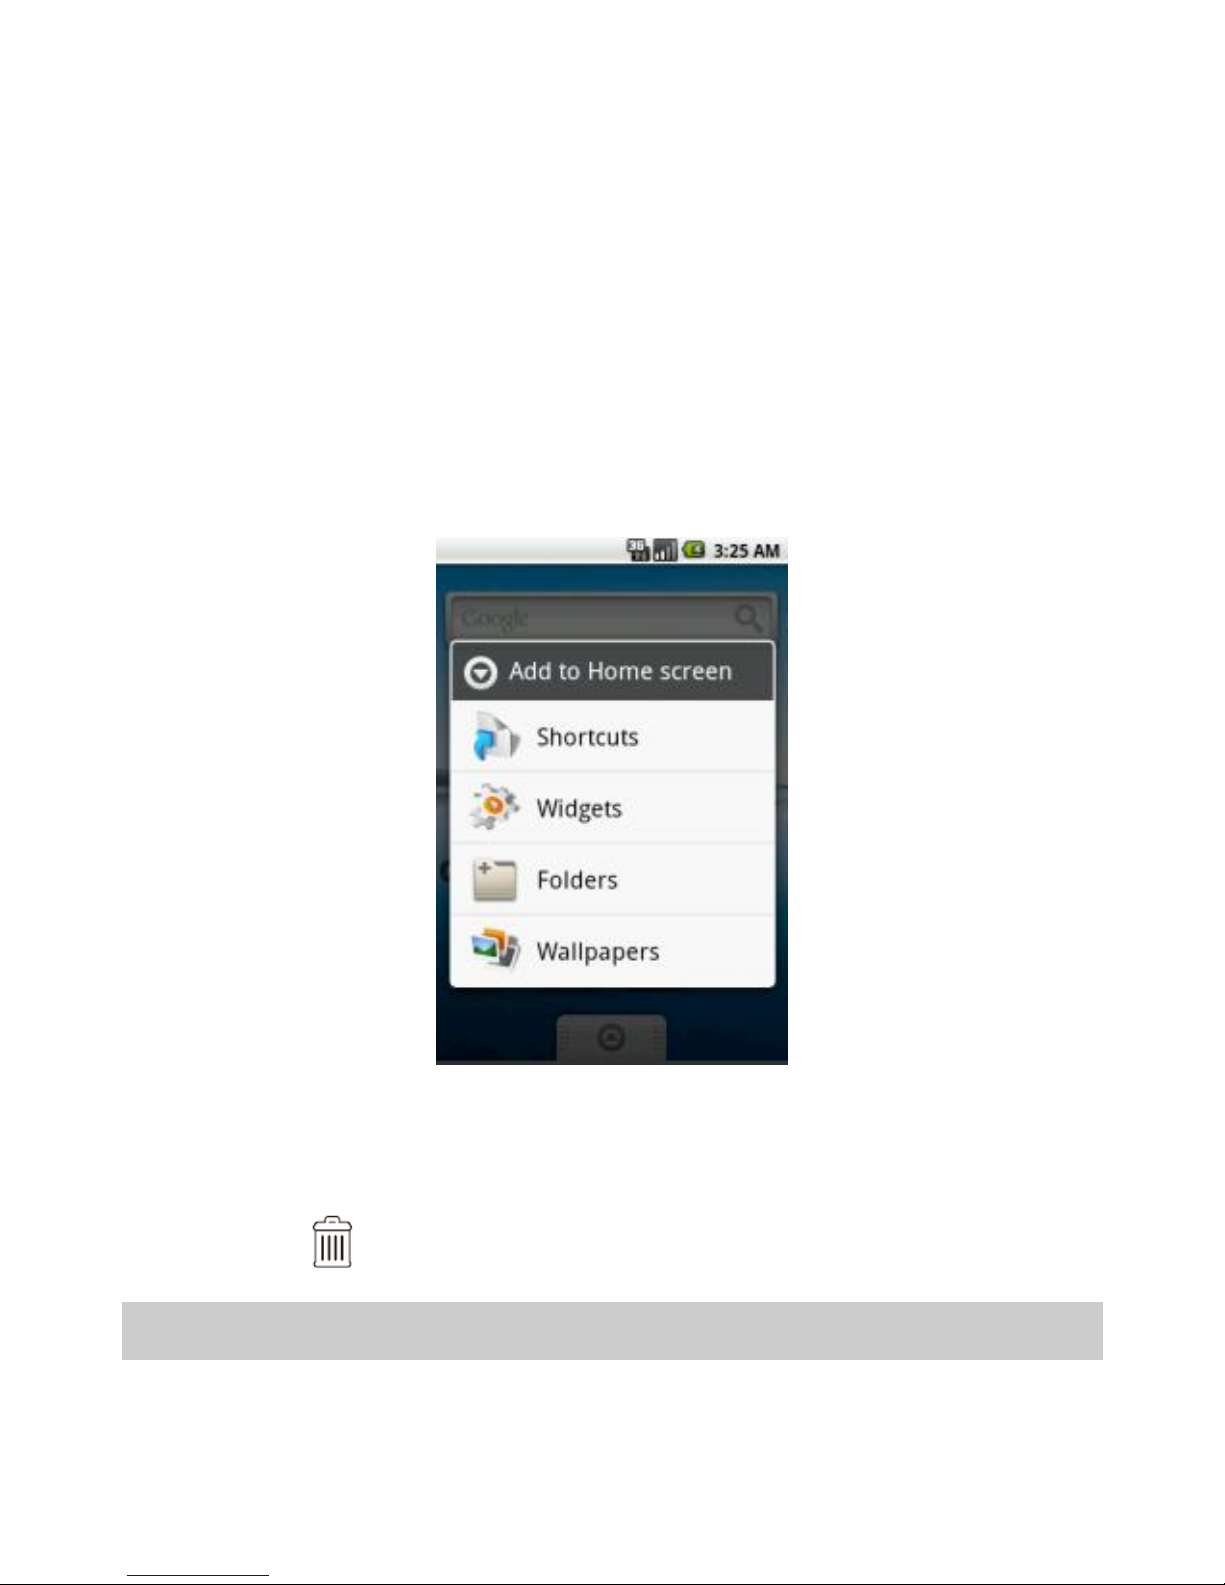
To add to Home screen
You can add widget, shortcut and so on to the home
screen. Press Menu key and touch Add, or you can
touch and hold the home screen until the options appear,
and then select the one you use frequently.
To move or delete from Home screen
touch and hold the application until you feel a vibration,
then drag it to another place, another panel, or to the
trash can on bottom of the screen.
Monitor your phone’s status
At the top of the screen, icons on the left notify you
about new messages or events (flick the bar down

7
for details). Icons on the right tell you about phone
status.
Tip: To see today’s date, touch and hold the status
Indicators. To open the notification panel, drag the
Status bar down from the top of the screen.
Status icons
Connected to GPRS
mobile network
Roaming
GPRS in use
No signal
Connected to EDGE
mobile network
No SIM card installed
EDGE in use
Vibrate mode
Connected to 3G
mobile network
Ringer is silenced
3G in use
Phone microphone is
mute
Mobile network signal
strength
Battery is very low
Connected to a Wi-Fi
network
Battery is low
Bluetooth is on
Battery is partially
drained
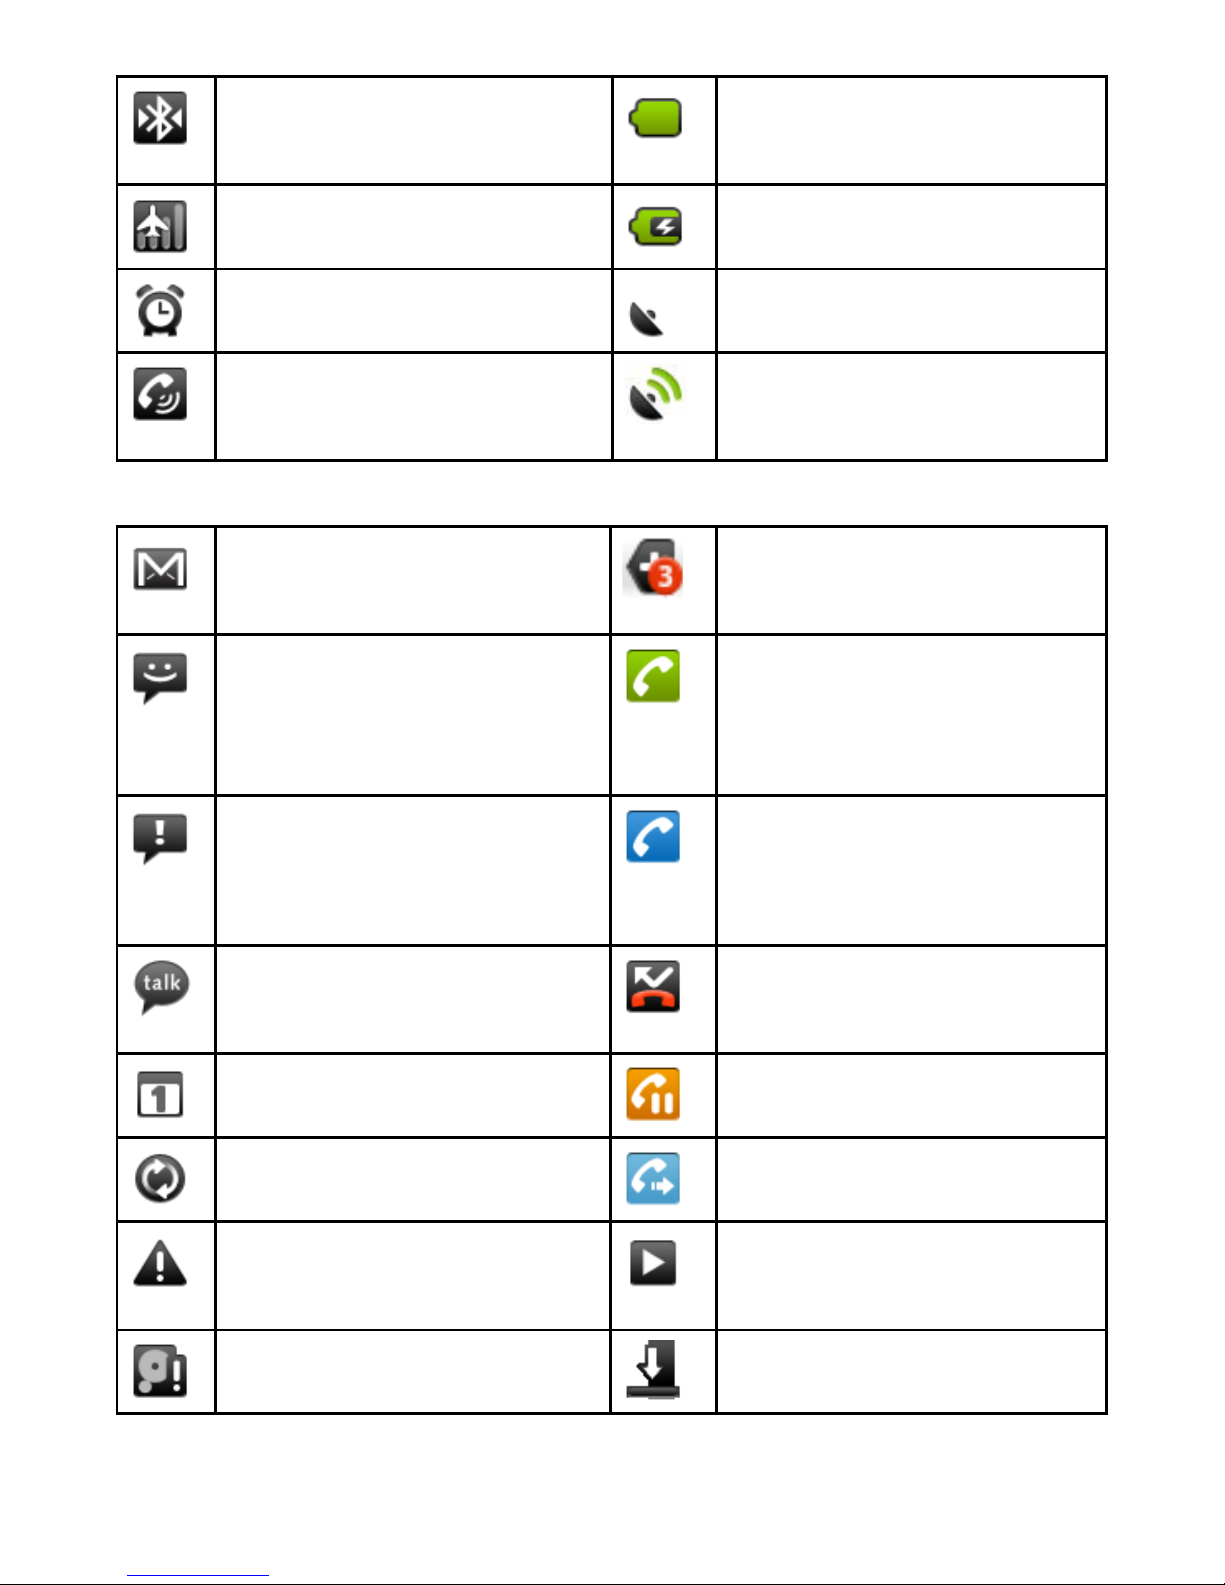
8
Connected to a
Bluetooth device
Battery is full
Airplane mode
Battery is charging
Alarm is set
GPS is on
Speakerphone is on
Receiving location
data from GPS
Notification icons
New Gmail message
3 more notifications
not displayed
New text or
multimedia message;
New voicemail
Call in progress
Problem with text or
multimedia message
delivery
Call in progress using
a Bluetooth headset
New Google Talk
message
Missed call
Upcoming event
Call on hold
Data is syncing
Call forwarding is on
Problem with sign-in
or sync
Song is playing
SD card is full
Downloading data

9
An open Wi-Fi
network is available
Download finished
Phone is connected
via USB cable
Connected to VPN
Phone is sharing its
data connection via
USB (USB tethering)
Disconnected from
VPN
Phone is sharing its
data connection as a
Wi-Fi hotspot (Wi-Fi
tethering)
Application update
available
Phone is tethered in
multiple ways
System update
available
Open and switch applications
To open and close the launcher
The Launcher , which you open from the Home
screen, holds icons for all of the applications on your
phone, including any applications that you downloaded
and installed from Android Market or other sources.
•On Home screen, touch to open the launcher.
You can slide the Launcher up or down to bring more
icons into view. You can add an application icon to the
Home screen by touching & holding it on the Launcher
until it vibrates and then dragging it to a location on
the Home screen.
•Touch the Home icon on the Launcher or the
Home key to close the Launcher.

10
To open an application
Touch an application's icon on the Launcher, or Touch an
application’s icon on the Home screen.
To switch to a recently used application
Press & hold the Home key, a small window opens, with
icons of applications that you’ve used recently.
PIN and PUK
The personal identification number (PIN) protects your
SIM card from unauthorized use. The PIN unblocking
key (PUK) is used to unlock the blocked PIN. Both the
PIN and the PUK are provided with the SIM card. For
details, contact your service provider.
If you enter wrong PINs thrice consecutively, the phone
prompts you to enter the PUK.
If you enter wrong PUKs ten times consecutively, the
SIM card becomes permanently invalid. In this case,
contact your service provider for a new SIM card.
11
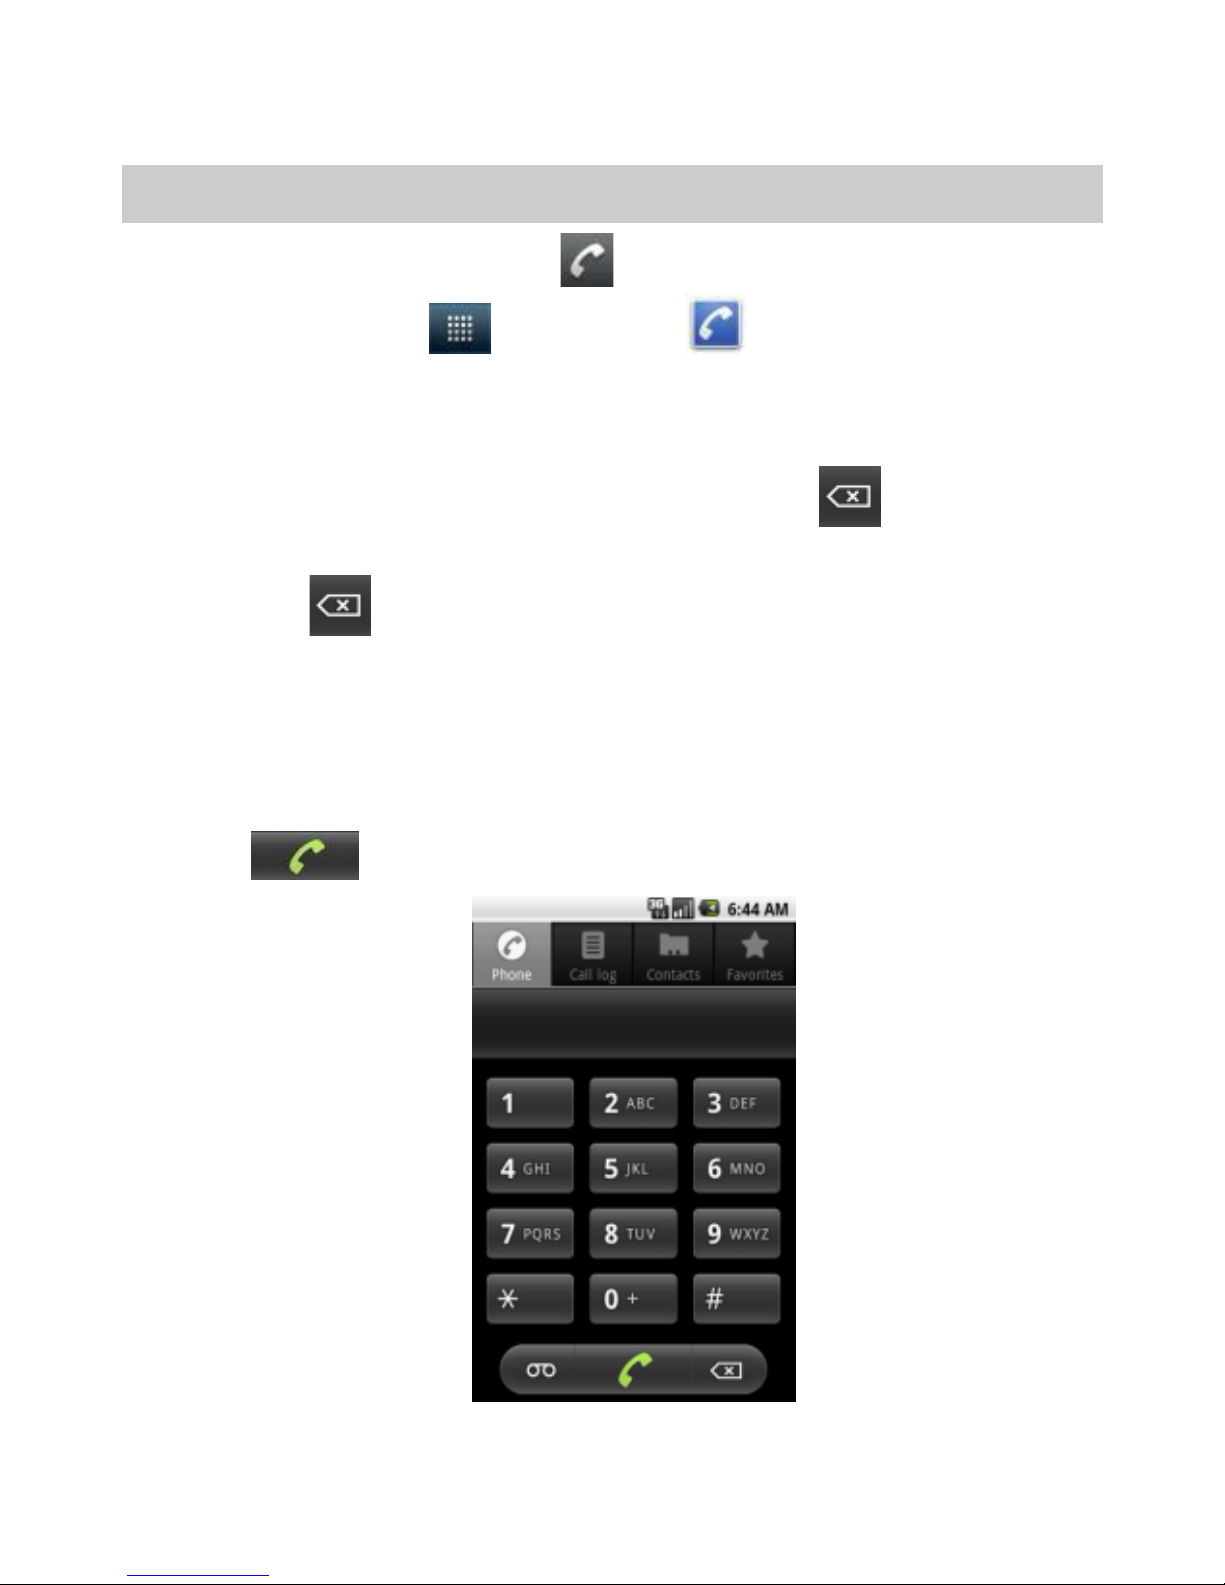
4Calls
Make a call
1. Touch the Phone icon on the Home screen or tap
the launcher > Phone to access the dial
pad.
2. Enter the phone number.
If you enter a wrong number, touch to erase
digits one by one. To erase the entire number, touch
& hold .
3. To make an international call, tap the 0 key till +
appear on the screen. Then enter the country or
region code, area code, and phone number in
sequence.
4. Tap to dial the number.

12
In-call options
During a call:
To mute a call, touch Mute.
To use the speakerphone, touch Speaker.
To end a call, touch .
Tip: You can touch Home or Back to leave the active
call display. To reopen it, touch Home > Phone >
Return to call in progress.
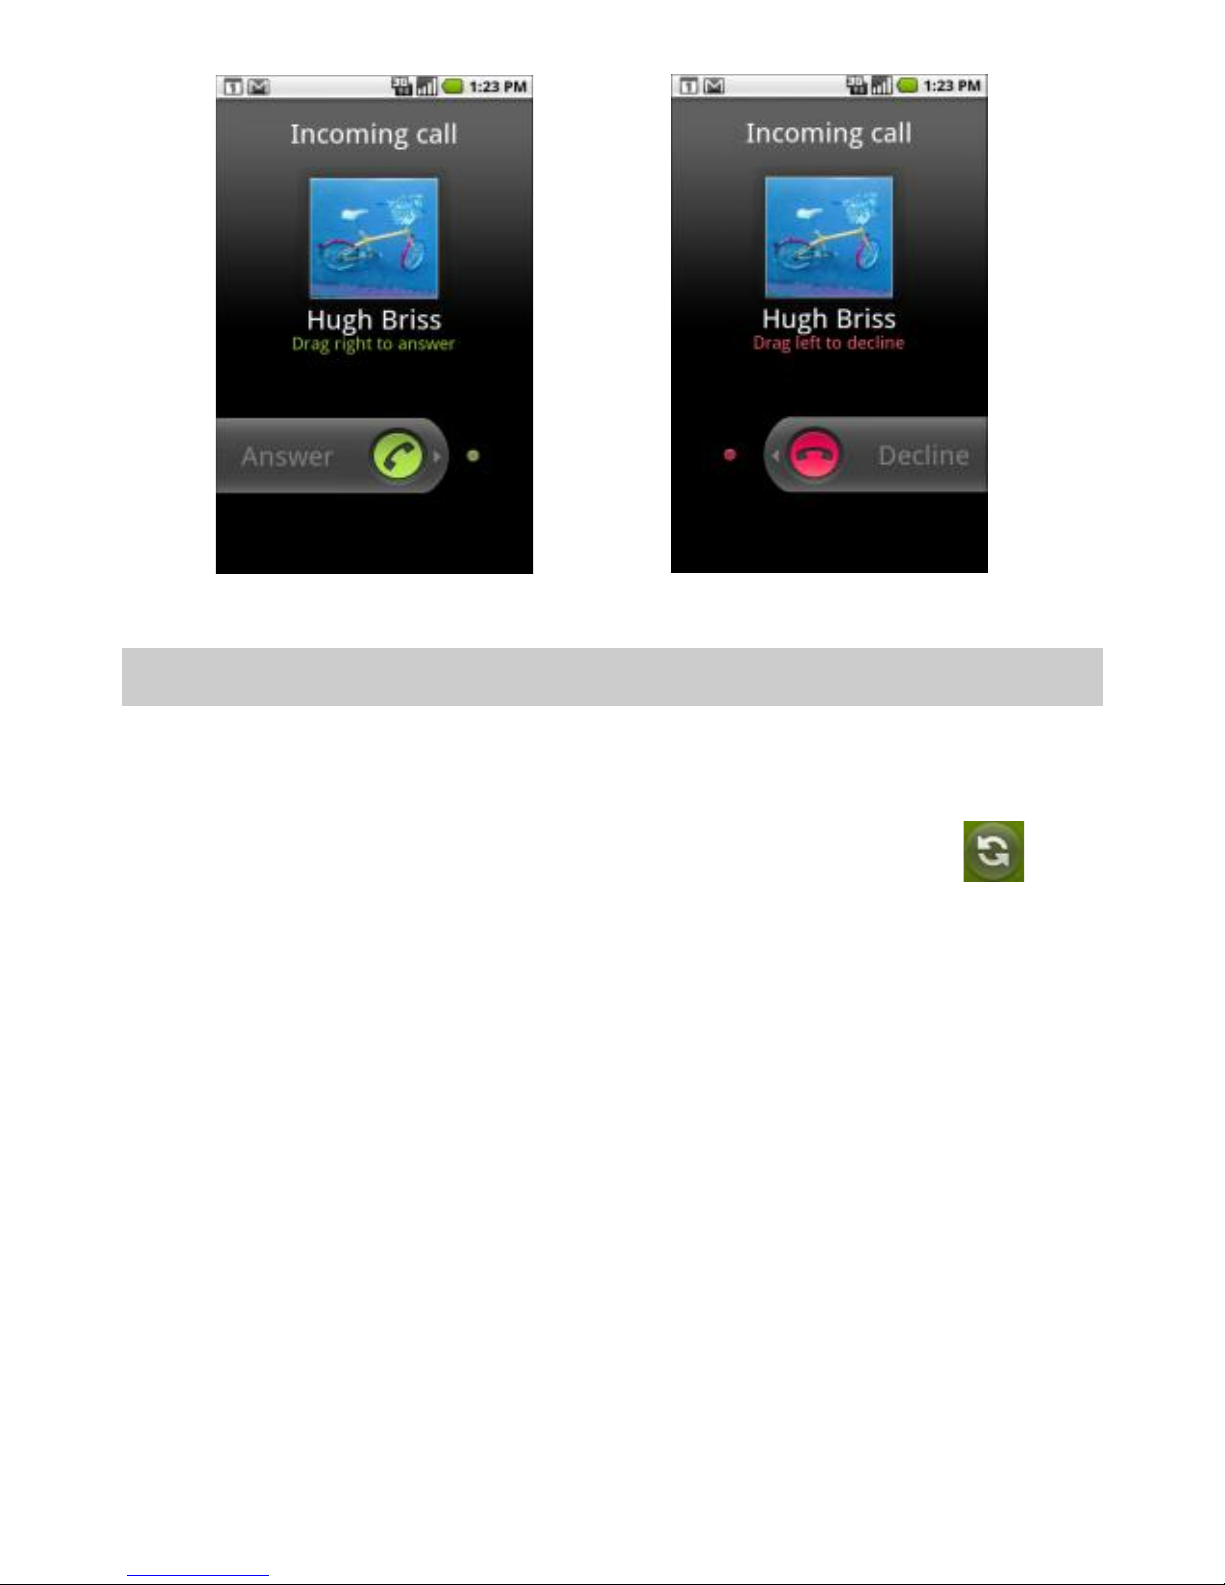
Answer & reject a call
When there is an incoming call, you can drag the green
phone icon to the right to answer the call or drag the red
phone icon to the left to reject the call.
Tip: To silence the ringer before answering the call,
press the Volume key.
13
Answer the call Reject the call
Manage multiple calls
To switch between current calls
If you accept a new call when you’re already on a call:
To answer the other call, touch the Swap icon .
To merge the calls into a conference call, touch Merge
calls.
To set up a conference call
1. Place a call to the first participant.
2. When you’re connected, touch Add call.
3. Place the next call, using the Phone tab, the Call log,
or your contacts.
4. When you’re connected, touch Merge calls.
Note: Contact your wireless service provider to learn
whether they support conference calls and how many
participants you can include.
14
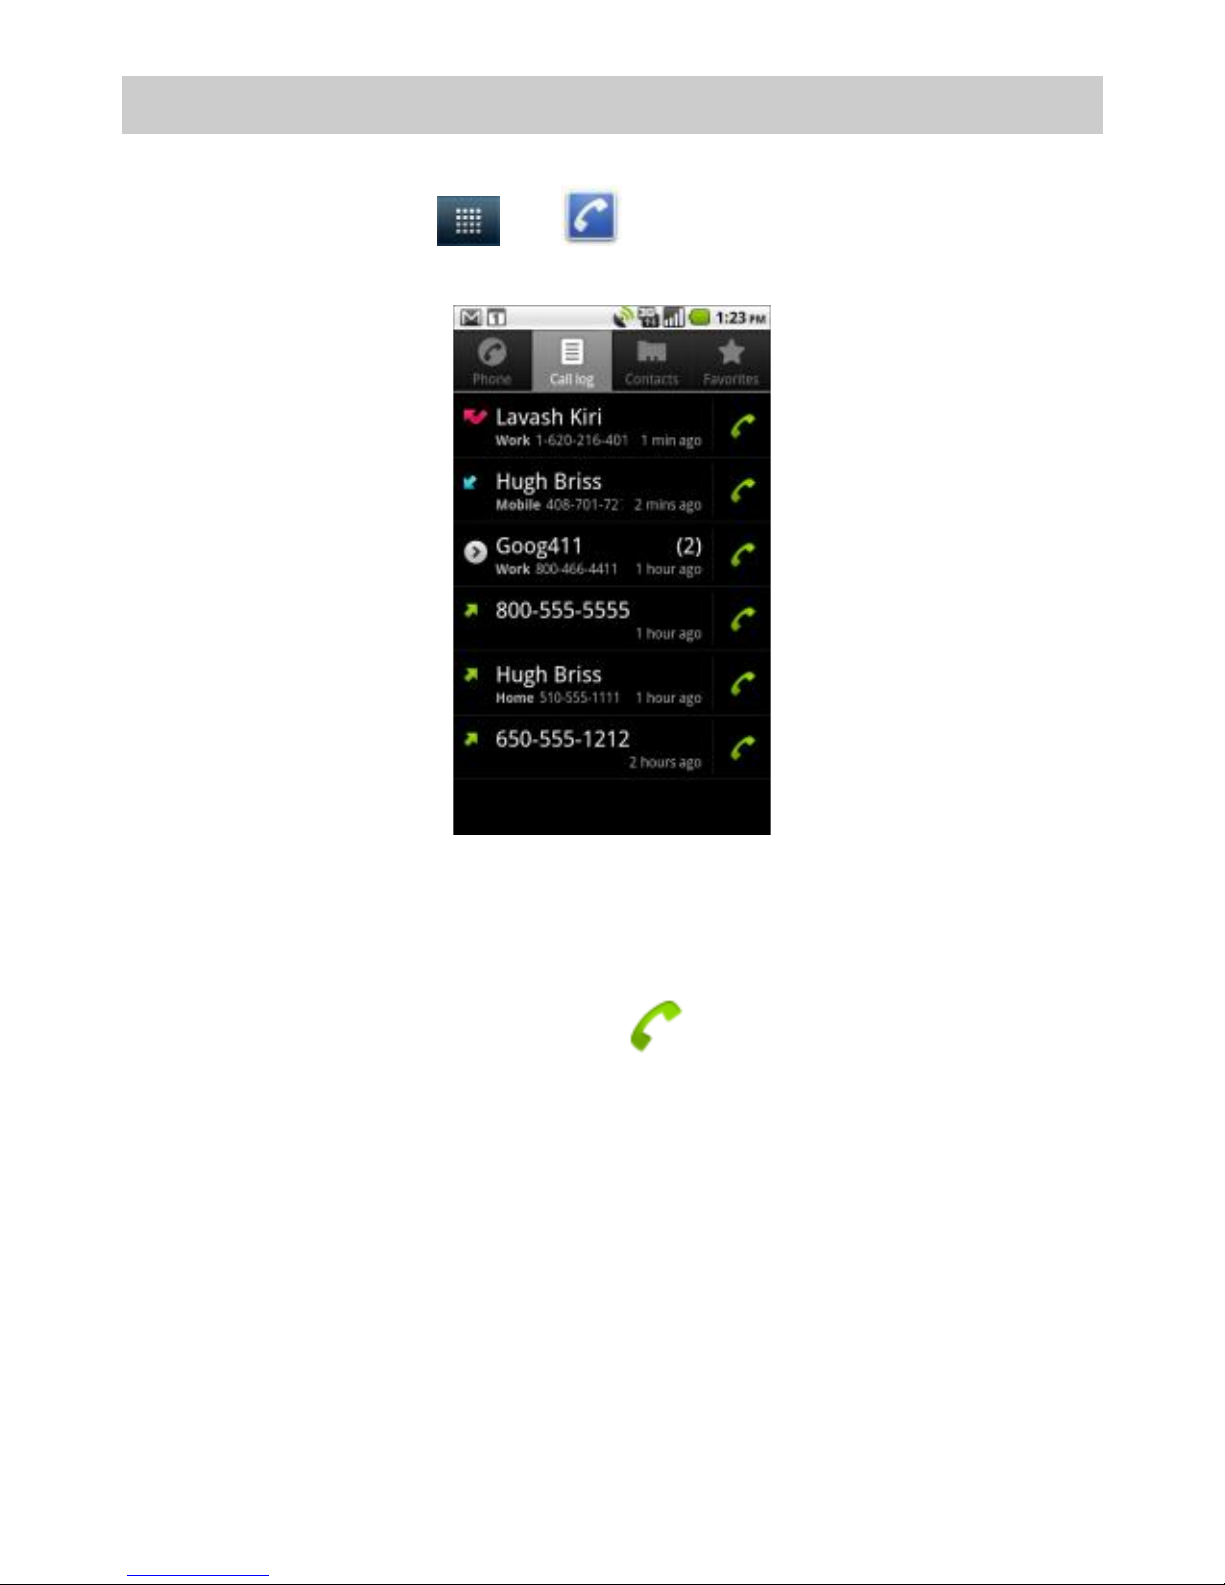
Work with the call log
The Call log is a list of all the calls you’ve placed, received,
or missed. Touch > > Call log to open the call
log.
To clear the call log, press Menu key and touch Clear
call log.
Touch the green phone icon at the right of the entry
to dial.
Touch a number (such as an outgoing call number) to
open a screen, you can call again, send text message
and add to contacts.
You can also touch and hold an entry for more options.
15
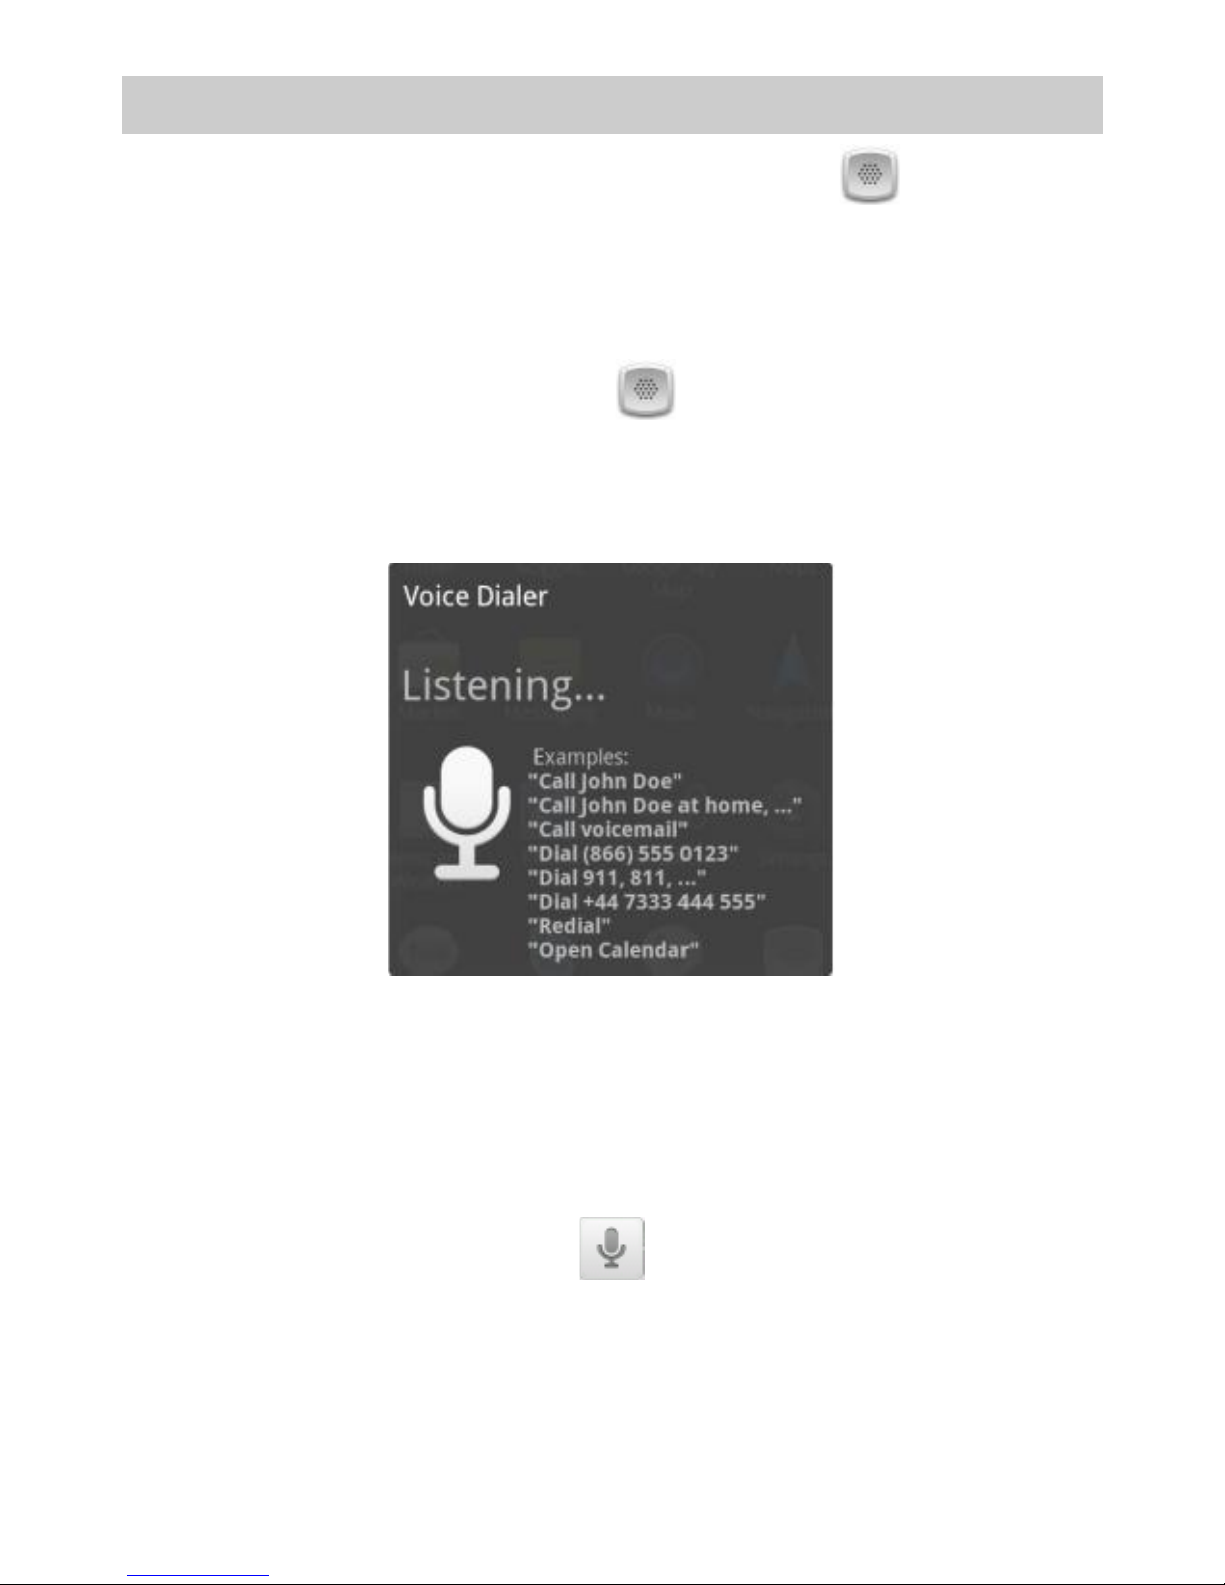
Dial by voice
You can use the Voice Dialer application to place a
phone call by speaking the name of a contact or a phone
number.
To open the voice dialer
Touch the Voice Dialer icon in the Launcher or on
the Home screen. The Voice Dialer opens, listening for
your spoken instructions, and displaying some hints for
how to use it.
To call
Say “Call” followed by the name of the contact, or say
“Dial”followed by a number.
Note: You can also control your phone by voice in other
ways, such as the application in the launcher - Voice
search and voice search in Google search.
Table of contents
Other INQ Cell Phone manuals


