INQ Cloud Touch User manual

INQ Cloud TouCh
USER GUIDE

2
ThE BaSIcS
The Basics overview p6
Your phone p7
Remove the back cover p9
Insert SIM, microSD & battery p10
Charge the battery p11
Power on/off p12
First-time setup p13
Lock & unlock your screen p14
Screen orientation p15
YoUR INQ homE ScREENS
INQ Home screen overview p16
Navigate your INQ Home screens p17
Status bar and notifications p19
Launcher bar p22
Add items to the Home screens p24
Move, remove & uninstall items p25
Set your wallpaper p26
Home screen preferences p27
INQ homE LIvE IcoNS
INQ Home live icons overview p28
Set up INQ Home live icons p29
Navigate INQ Home live icons p30
People p31
Events p32
Notifications p33
Places p34
News Feed p35
coNTacTS
Contacts overview p36
Open Contacts p37
Navigate Contacts p38
Add a new contact p41
Edit a contact p42
Remove a contact p43
Use Favourites p44
Join & separate contacts p45
Import & sync contacts p46
Share contacts p48
Facebook Contacts p49
Contacts settings p50
caLLS
Calls overview p52
Open Phone p53
Navigate Phone p54
Make a call p55
Receive a call p56
Check your missed calls p57
Navigate Call log p58
Call log options p59
Use Call features p60
Manage multiple calls p61
Call settings p62
mESSaGING
Messaging overview p63
Open Messaging p64
Navigate Messaging p65
Create a new message p67
Respond to a message p68
Delete a message p69
Attach items to a message p70
Messaging settings p71
OVERVIEW

3
GmaIL
Gmail overview p72
Open Gmail p73
Navigate Gmail p74
Create a new Gmail message p76
Respond to a message in Gmail p77
Manage Gmail messages p78
Gmail settings p80
EmaIL
Email overview p82
Open Email p83
Set up Email account p84
Navigate Email p85
Create a new Email message p87
Respond to a message in Email p88
Manage Email messages p89
Email settings p90
caLENDaR
Calendar overview p92
Open Calendar p93
Navigate Calendar p94
Create a new event p96
Edit an event p97
Remove an event p98
Responding to reminders p99
Facebook in your Calendar p100
Manage calendars p101
Calendar settings p102
BRowSER
Browser overview p103
Open Browser p104
Navigate Browser p105
Use multiple windows p107
Search p108
Use Bookmarks & History p109
Share web pages p110
Download files p111
Browser settings p112
FacEBook
Facebook on INQ overview p115
Open People p116
Navigate People p117
Choose People p118
Facebook Contacts p119
Facebook in your Calendar p120
Facebook links p121
Facebook for Android p122
INQ TYpE
INQ Type overview p123
Open INQ Type p124
Navigate INQ Type p125
Search p126
Share p127
Save p128
OVERVIEW
CONTINUED

4
INQ kEYBoaRD
INQ Keyobard overview p129
Use INQ Keyboard p130
Download new language pack p131
INQ Keyboard settings p132
Switch to Android Keyboard p133
INFo paNEL
Info Panel overview p134
Open Info Panel p135
Navigate Info Panel p136
wI-FI aND coNNEcTIoNS
Wi-Fi & connections overview p138
Open Wi-Fi p139
Add a new Wi-Fi connection p140
Remove a Wi-Fi connection p141
Wi-Fi settings p142
Data connection and roaming p143
Use Bluetooth p144
Bluetooth settings p145
Transfer files from computer p146
Use Portable Wi-Fi Hotspot p147
Tethering & Portable Hotspot settings p148
VPN settings p149
phoToS & vIDEoS
Photos & videos overview p150
Open Camera p151
Navigate Camera p152
Take photos p153
Take videos p154
Camera settings p155
Open Gallery p156
Navigate Gallery p157
Edit & delete photos p161
Import photos & videos p162
Share photos and videos p163
mUSIc & RaDIo
Music & radio overview p164
Open Music p165
Navigate Music p166
Play music p167
Use Playlists p168
Import music p169
Set track as ringtone p170
Open Radio p171
Use Radio p172
Radio settings p173
OVERVIEW
CONTINUED

5
cLockS & aLaRmS
Clocks & alarms overview p174
Open Clock p175
Navigate Clock p176
Clock settings p177
Navigate Alarms p178
Set an alarm p179
Alarm settings p180
caLcULaToR
Calculator overview p181
Open Calculator p182
Use Calculator p183
moRE appS
More apps overview p184
Latitude p185
Maps p186
Market p187
Messenger p188
Navigation p189
Opera Mini p190
Places p191
Shazam p192
Talk p193
Twitter p194
Voice Dialer & Voice Search p195
YouTube p196
SEcURITY & pRIvacY
Security & privacy overview p197
Set up screen lock p198
Set up SIM lock p199
Back up your data p200
Reset your phone p201
SETTINGS
Settings overview p202
Open Settings p203
Wireless and networks settings p204
Call settings p206
Sound settings p207
Display settings p208
Location and security settings p209
Applications settings p210
Accounts & sync settings p211
Privacy settings p212
SD card & phone storage settings p213
Language & keyboard settings p214
Voice input & output settings p216
Accessibility settings p217
Date & time settings p218
About phone settings p219
SoFTwaRE UpDaTES
Software updates overview p220
Update applications p221
Update INQ software p222
SUppoRT & TRoUBLEShooTING
Support overview p223
Help p224
INQ Mobile online support p225
OVERVIEW
CONTINUED
6
ovERvIEw
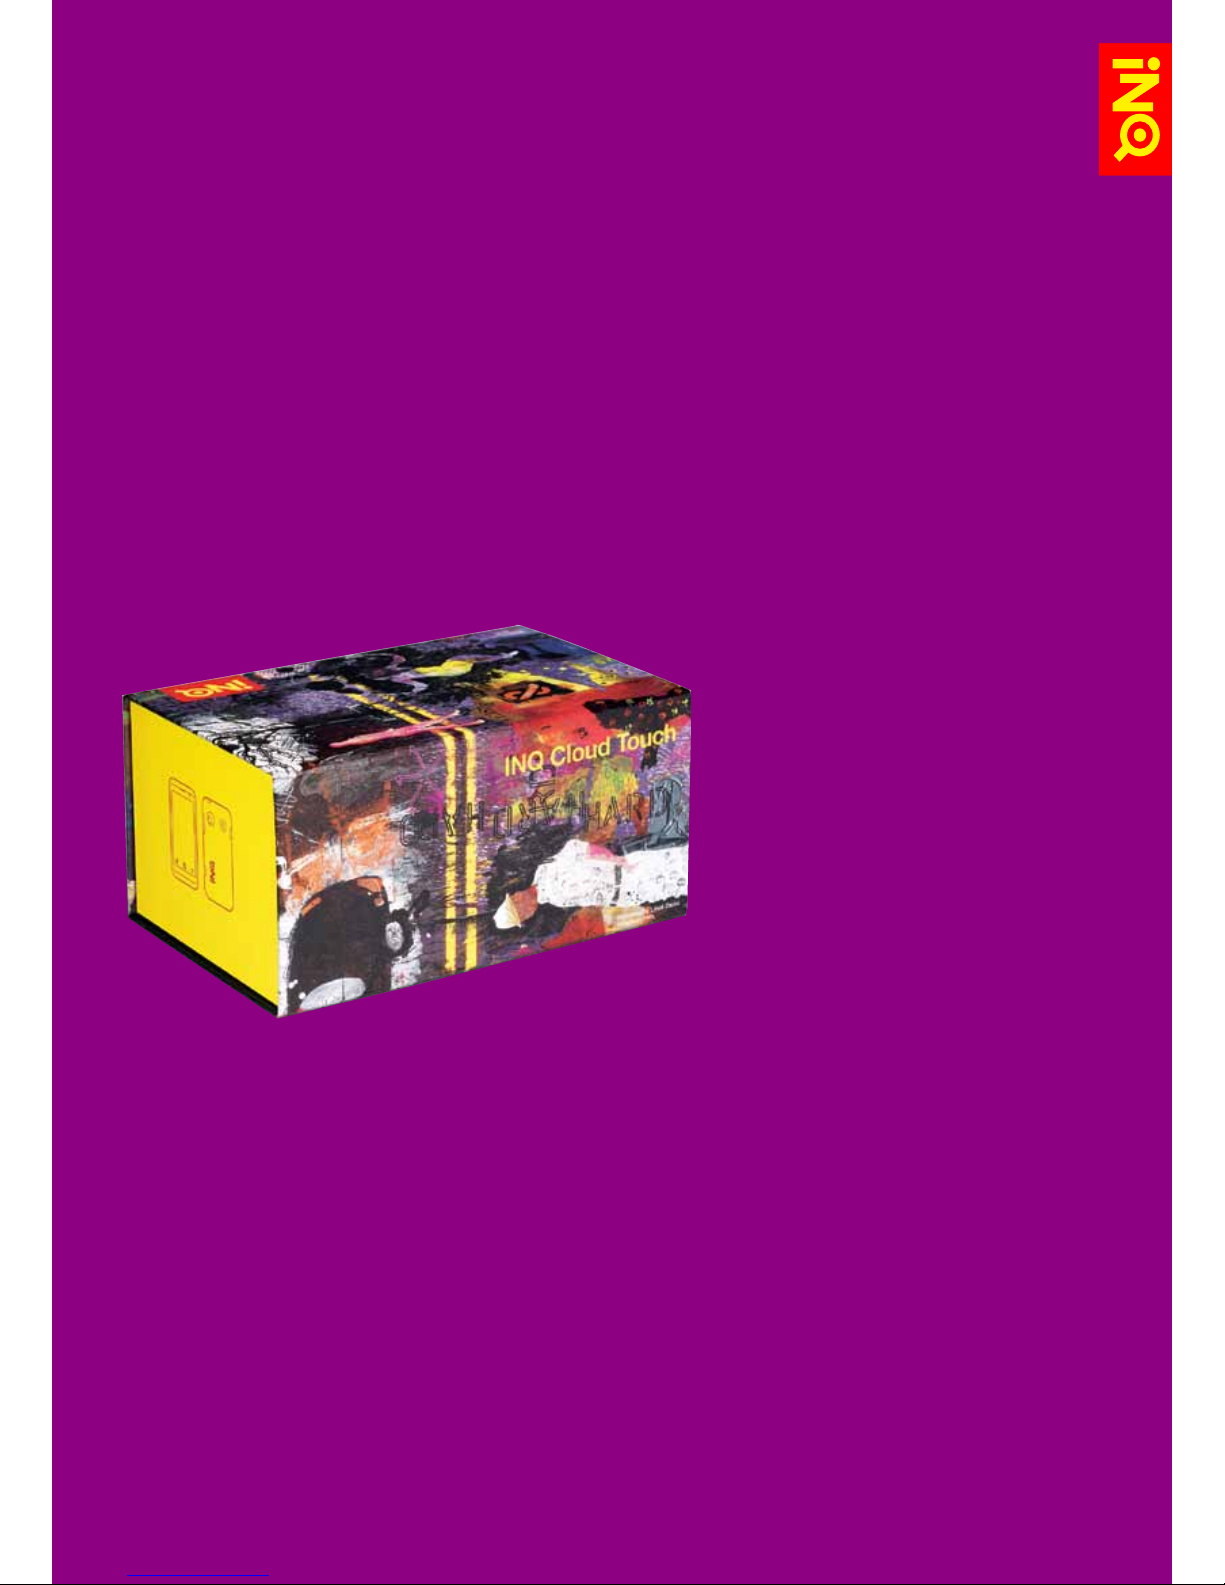
Inside your INQ Cloud Touch
box, you’ll find:
- Your phone
- Quick Start Guide
- Safety and Warranty leaflet
- Battery (preinstalled)
- 4GB microSD card
(preinstalled)
- Power adapter
- USB cable
- Headset with 3.5mm jack
ThE BasICs
7
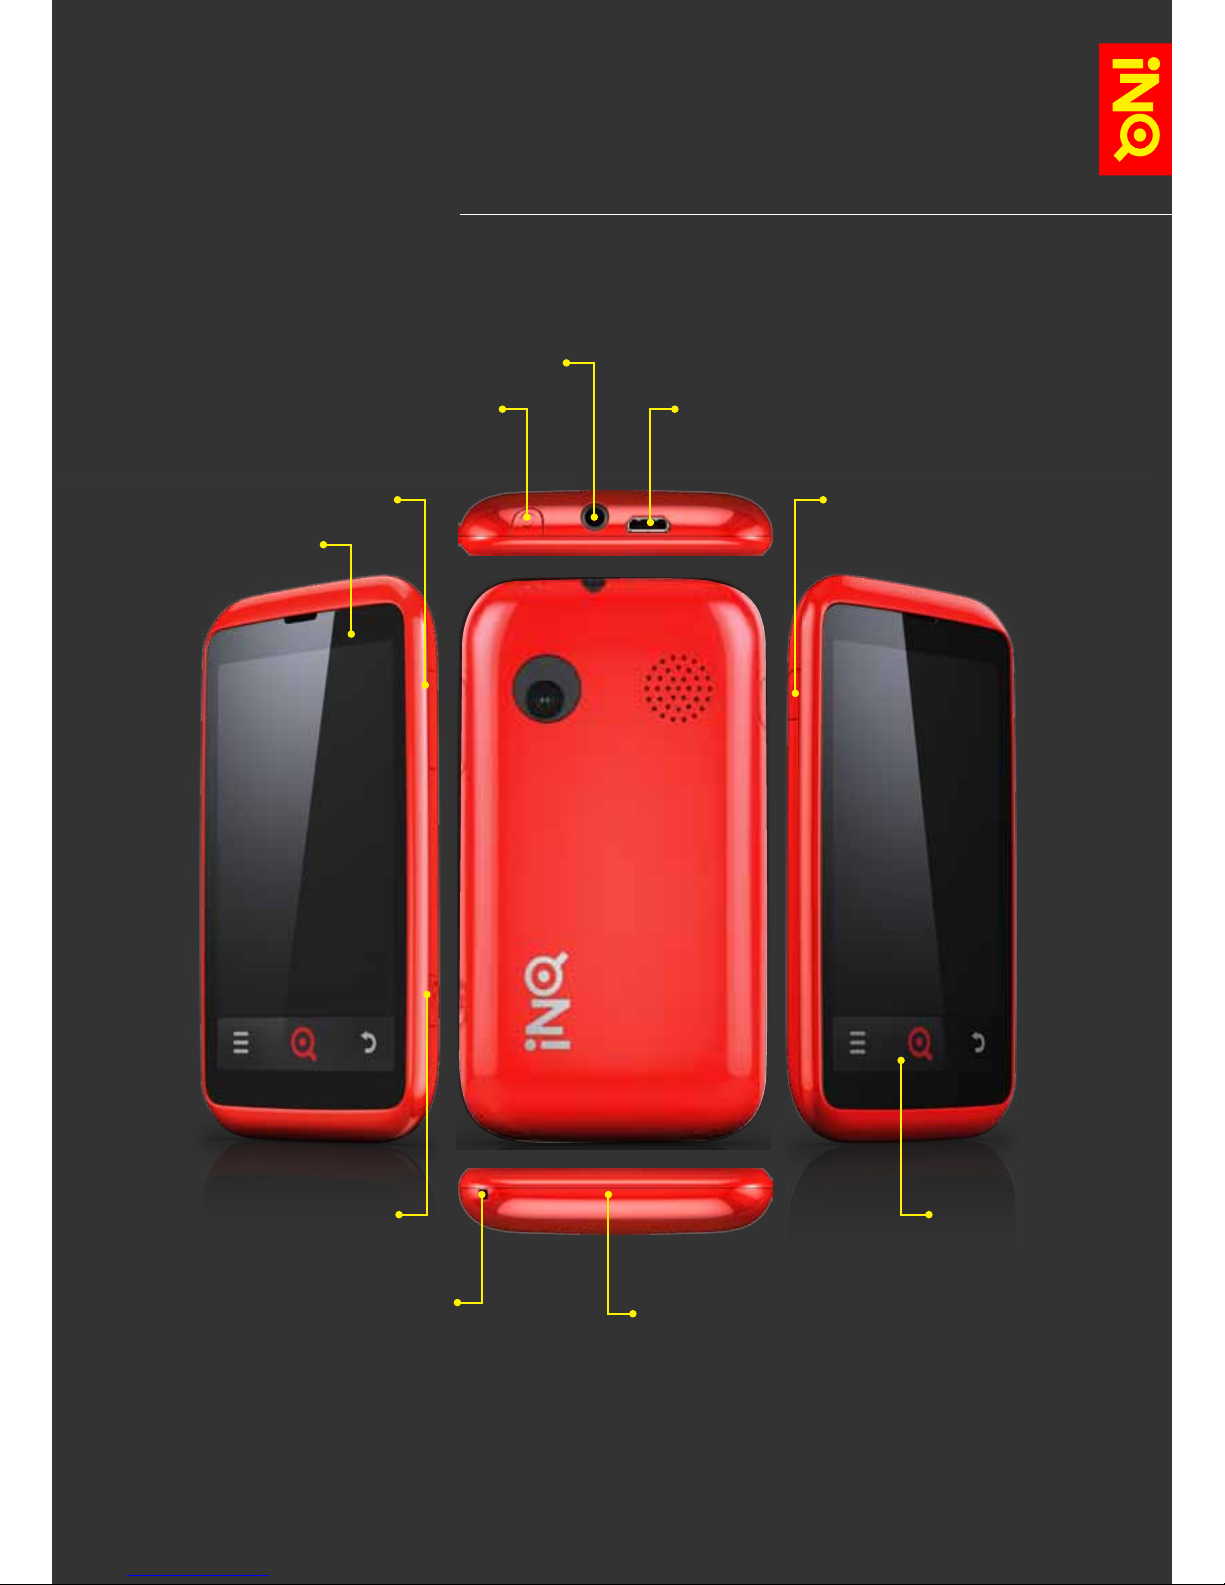
The
basICs YoUR phoNE haS a NUmBER
oF haRD-kEYS & ToUch-kEYS:
ToUch STRIp kEYS:
opTIoNS kEY
INQ kEY
Back kEY
mUSIc kEY
mIcRophoNE BaTTERY
covER TaB
INFo kEY
mIcRo USB SockET
hEaDphoNE Jack
powER oN/oFF
LED LIGhT
voLUmE kEYS

8
The
basICs
kEYS & FUNcTIoNS
powER oN/oFF kEY
Press and hold the Power on/off key to switch your phone on
and off. Pressing it quickly will turn the phone’s screen on and
off, unlocking and locking the handset.
INFo kEY
Pressing the Info key opens up the Info Panel where you can
quickly access your phone’s remaining battery life, alarms, Wi-
Fi connection and sound profiles.
voLUmE kEYS
Press these keys to turn the volume of your phone up and
down, whether it’s your ringtone, media or in-call.
mUSIc kEY
Press and hold the Music key all the way down to open your
default music application. When you’re playing a track, you
can pause it by quickly pressing the Music key all the way
down. Press it again to continue playing the track. A quick
double-press will skip to the next track.
opTIoNS kEY
Pressing the Options key will open a pop-up menu with
options specific to the application you’re in.
INQ kEY
Press the INQ key to go back to the Home screen. You
can also multitask and switch between applications by
pressing and holding the INQ key; this will open a view of the
applications you’ve used most recently (up to a maximum of
eight) and allow you to switch between them.
Back kEY
Press the Back key to go back to the previous screen. If your
keyboard is open, pressing the Back key will close it.

9
REmovE & REpLacE ThE Back covER
The
basICs
To REmovE YoUR phoNE’S Back covER aND GET accESS To YoUR
phoNE’S BaTTERY, SIm aND mIcRo-SD caRD:
Starting at the base of your phone, slide your fingernail
underneath the back cover
Lift the cover away from the phone
To REpLacE ThE Back covER:
Place the cover over the back of the phone
Press down the edges of the cover to snap it back
into place

10
Your phone comes with its battery and a 4GB microSD card
preinstalled. If you buy your phone with a contract, your SIM
card may also have been installed.
To REach YoUR phoNE’S SIm aND mIcRoSD caRD, YoU’LL NEED
To REmovE YoUR phoNE’S BaTTERY:
Remove the phone’s back cover
Starting from the notch at the base of the battery, lift out
the battery
To INSERT a SIm caRD:
Slide the SIM door along to the left to open the
SIM slot
Place the SIM card into the slot with the gold contacts
facing down and the slanted corner at the top-right
Close the SIM door and slide it back to the right to lock it
The SIM door will click when it’s locked into place
To INSERT a mIcRo-SD caRD:
Slide the microSD door down towards the base of the
phone to open the microSD slot
Place the microSD card into the slot with the gold contacts
facing down and the notched edge on the left
Close the microSD door and slide it back up to lock it
The microSD door will click when it’s locked into place
To REpLacE YoUR phoNE’S BaTTERY:
Check that the battery is the right way up - the gold
contacts should be on the top edge of the battery with the
INQ logo towards the front
Starting with the top edge, push the battery back into place
INSERT SIm, mIcRo-SD & BaTTERY
The
basICs

11
chaRGE ThE BaTTERY
The
basICs
Your phone’s battery should be partially charged when you
first take it out of the box. To get the most out of it in the
long-run, we recommend you charge the battery fully before
switching it on.
To chaRGE YoUR phoNE’S BaTTERY:
Using the power adapter and USB cable that came with
your phone, plug the USB cable into the power adapter
Plug the power adapter into an electric socket
Plug the other end of the USB cable into your phone’s
microUSB socket
When your phone is plugged in, the battery icon will change
to show that it is charging. You’ll also see a green LED just
above the screen
Once the battery is full, you’ll see a popup saying that your
battery is charged
Two hours charging will give you about 90% battery power,
assuming you use the standard INQ charger that came with
the phone.
SkIp To STaTUS BaR & NoTIFIcaTIoNS
12
To SwITch YoUR phoNE oN aND oFF:
Press and hold the Power on/off key
If your phone’s screen is off, briefly press the Power on/off
key to turn it back on, then unlock the screen by dragging the
Lock icon up on the screen.
SkIp To Lock & UNLock YoUR ScREEN
powER oN/oFF
The
basICs
powER oN/oFF

13
The first time you switch on your phone, you’ll go through a
series of steps to help you set up your preferences. These
include choosing your location, preferred language and Wi-Fi
settings. You’ll also be able to create or sign in to your Google
and Facebook accounts and start synchronising contact
details, calendars and messages across to your phone.
First, you will be asked to choose your phone’s language. You
can change this at a later time in your phone’s settings.
SkIp To LaNGUaGE & kEYBoaRD SETTINGS
Next you will be asked if you want to connect to a Wi-Fi
network to set up your phone. Select an available network
from the list or add your own.
SkIp To wI-FI & coNNEcTIoNS
By creating or signing in with your Google account, you’ll be
able to access the Android Market and download applications
to your phone, as well as synchronising your Google contacts,
calendar and email. Please note that a Google account is
required in order to access software updates through Android
Market.
SkIp To GmaIL
SkIp To accoUNTS & SYNc
By creating or signing in to your Facebook account during set-
up, you’ll be able to use Facebook from your phone’s Home
screen, sync your contacts in your address book and see
Facebook events in your calendar.
SkIp To INQ homE LIvE IcoNS
SkIp To FacEBook
SkIp To accoUNTS & SYNc
FIRST-TImE SETUp
The
basICs

14
To Lock YoUR phoNE’S ScREEN:
Briefly press the Power on/off key to switch off the screen
and save battery life or avoid pressing keys by accident
Your phone’s screen will also switch off automatically after a
few minutes of sitting idle. This will switch off your phone’s
screen and require you to unlock the screen when you
switch it back on. You can change these settings in your
phone’s settings
SkIp To DISpLaY SETTINGS
To UNLock YoUR phoNE’S ScREEN:
Briefly press the Power on/off key again to switch your
phone’s screen back on
On the Lock screen, drag the Lock icon up on the screen
If you’ve set up a screen lock - whether it’s a PIN, password
or pattern lock - you’ll need to enter your details to
complete the screen unlock
SkIp To SET Up ScREEN Lock
From the Lock screen, you can also quickly open the Camera
or INQ Type applications just by dragging the icons up on the
screen
SkIp To camERa
SkIp To INQ TYpE
Lock & UNLock YoUR ScREEN
The
basICs
camERa
IcoN
Lock
IcoN
INQ TYpE
IcoN

15
Some applications and screens allow you to view and interact
with them in landscape mode when you turn the phone onto
its side.
When you’re writing, turning the phone on its side will open
a larger keyboard for easier typing.
Other applications - like viewing videos in Gallery or YouTube -
will automatically open in landscape mode.
ScREEN oRIENTaTIoN
The
basICs

16
ovERvIEw
Out of the box, your INQ
Cloud Touch has five Home
screens available for you to
customise.
Here you can move or delete
some of the preinstalled
icons and apps as well as
add your own selections, set
new wallpaper and change
the order or number of Home
screens.
INQ hOmE
sCREENs

FaR RIGhT
BLaNk
FIRST RIGhT
wITh GooGLE
SEaRch aND
ShoRTcUTS
maIN INQ homE
ScREEN wITh INQ
homE LIvE IcoNS
FIRST LEFT
wITh hELp
wIDGET aND
ShoRTcUTS
FaR LEFT
BLaNk
To navigate between your Home screens, swipe your finger to
the left or right across the screen.
Pinching together will open up a view of all five home screens,
then tap to select the one you want to view.
SkIp To INQ homE LIvE IcoNS
17
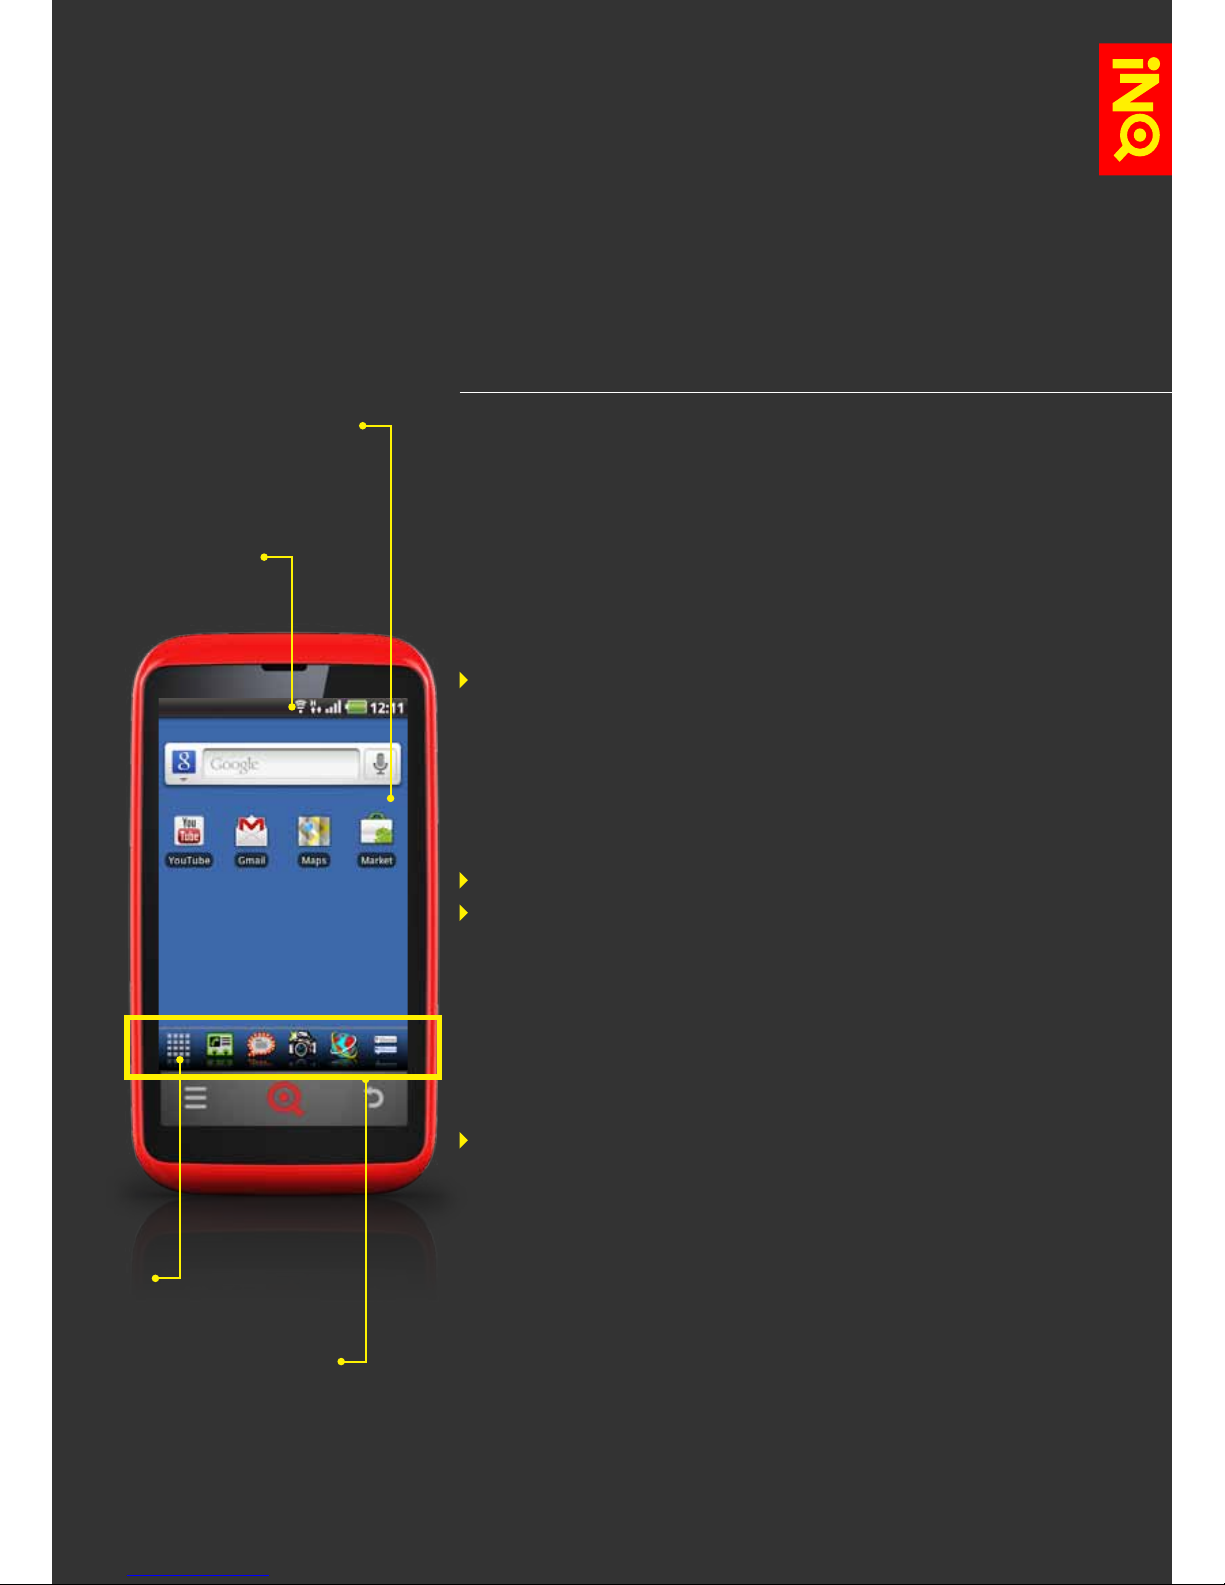
INQ home
sCreeNs whEN YoU SwITch oN YoUR phoNE,
YoUR homE ScREENS wILL appEaR LIkE ThIS:
18
INQ home
sCreeNs
NavIGaTE INQ homE ScREEN
homE ScREEN
woRkSpacE
STaTUS BaR aND
NoTIFIcaTIoNS
LaUNchER BaR
maIN
mENU
IcoN
Each of your Home screens is made up of three areas:
STaTUS BaR & NoTIFIcaTIoNS
Your phone’s status bar is split into two sections:
On the right are icons indicating your phone’s status,
including the time, battery and signal strength and data
connection
On the left are icons showing your notifications and alerts
SkIp To STaTUS BaR & NoTIFIcaTIoNS
homE ScREEN woRkSpacE
This is the main area of your Home screens that you can
customise by choosing your own wallpaper, widgets and
shortcuts.
SkIp To aDD ITEmS To ThE homE ScREENS
SkIp To SET YoUR waLLpapER
LaUNchER BaR
The Launcher gives you quick access to applications like
Camera, Browser and Contacts, as well as deep links into the
Facebook application. On the far left is the Main Menu icon -
press this to see all of the applications on your phone.
SkIp To LaUNchER BaR

19
INQ home
sCreeNs YoUR phoNE’S STaTUS IcoNS aRE
ShowN aND ExpLaINED aS FoLLowS:
IcoN STaTUS
Network signal strength - the more white bars you have, the
stronger your network signal
No signal
Roaming signal strength
Airplane mode is on
HSDPA is connected (and in use)
3G is connected (and in use)
EDGE is connected (and in use)
GPRS is connected (and in use)
Wi-Fi signal strength - the more white bars, the stronger your
Wi-Fi signal
Portable Wi-Fi hotspot is on
Battery status - red indicates you have less than 15% battery
life remaining, yellow means you have less than 30% and
green is 30-100%
Low battery - you have less than 5% battery life remaining
Battery charging
Silent is on
Vibrate is on
Headset is plugged in
Speaker is on (when on a call)
Mute is on (when on a call)
Sync is on - your phone is synchronising data with an account
(e.g. email)
Bluetooth is on (and in use)
GPS is on (and in use)
20
INQ home
sCreeNs YoUR NoTIFIcaTIoNS aND aLERTS IcoNS aRE
ShowN aND ExpLaINED aS FoLLowS:
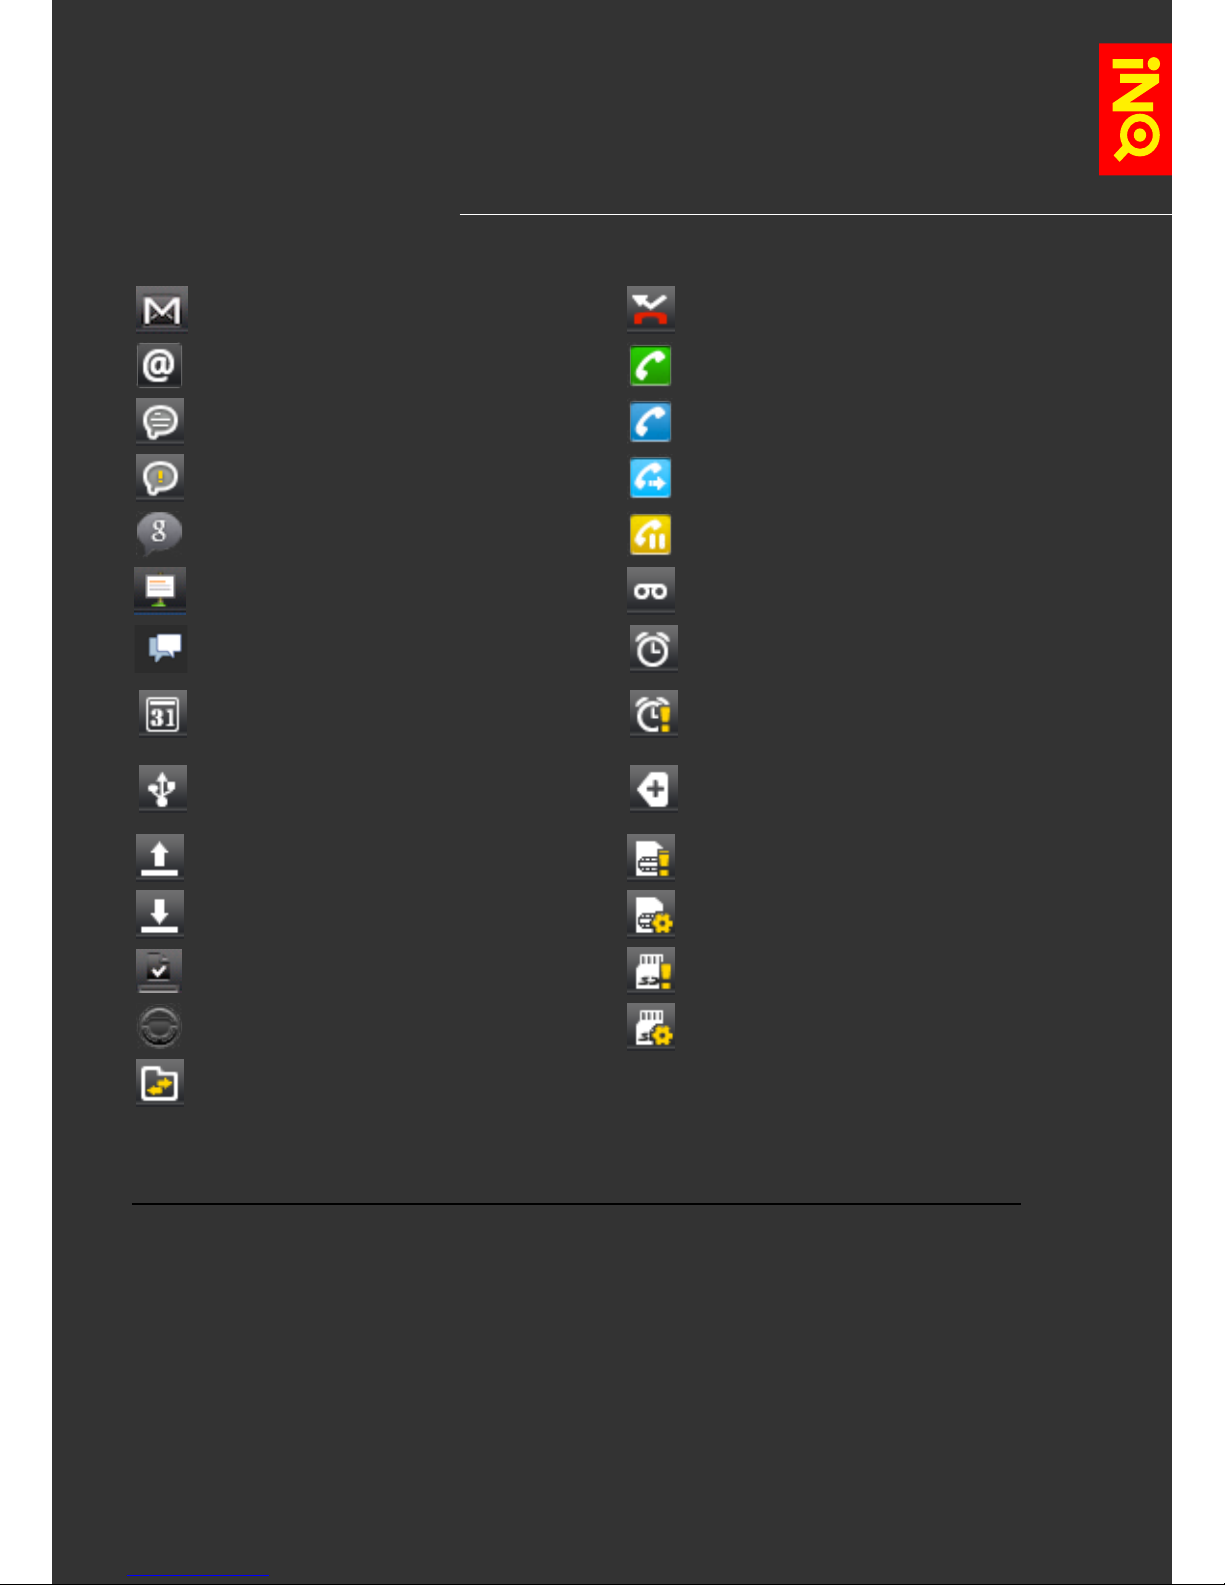
IcoN STaTUS IcoN STaTUS
New Gmail message received Missed call
New email message received Call in progress
New SMS or MMS
message received
Call in progress using Bluetooth
headset
Message sending failed Call forwarding is on
New Google Talk message
received Call on hold
New Facebook notification New voicemail received
New Facebook chat message Alarm is set
New Calendar event Alarm is on snooze
USB connected More notifications received (shows once
you have eight or more notifications)
Uploading data SIM card missing
Downloading data SIM card preparing
Download completed successfully
and installed MicroSD card missing
Car mode is on MicroSD card preparing
Software updates are available
for download
Table of contents
Other INQ Cell Phone manuals


