Insnrg inTouch Portal Installation instructions

1
Y:\Installation and Operating Manuals\IOM Print Copies
Installation & Operating Manual
inTouch App & Portal Installation
A GUIDE TO YOUR POOL
AUTOMATION SYSTEM
Updated September 2022

2
Y:\Installation and Operating Manuals\IOM Print Copies
THE IMPORTANT BITS
3 Pool Owner Pre-Check
4 Warning
5 Planning your Wi-Fi Connection
INSTALLATION (Portal)
6 Installation (Portal)
7 Check List
10 inTouch Automation Connection
INTOUCH APP SET UP & OPERATION
11 inTouch App Set Up & Operation
14 App Menu Layout
15 Add new System
16 Equipment set up through inTouch App
17 Set Operating Times
18 Set Pool and Spa Temperatures
19 Pool Chemistry
20 Trouble Shooting
21 Warranty

3
Y:\Installation and Operating Manuals\IOM Print Copies
POOL OWNER PRE CHECK FOR INTOUCH
AUTMATION CONNECTION
BEFORE CONNECTING YOUR INTOUCH AUTOMATION APP PLEASE ENSURE THE
FOLLOWING:
Requirements:
1. Ensure your home Wi-Fi has a 2.4G band.
2. Ensure you know your home Wi-Fi connection name (2.4G) and you have your home Wi-Fi
password.
3. Registration process, download app process etc.
Once your Insnrg internet Portal is connected to your home Wi-Fi system, you will be able to
connect and control your inTouch App from 5G Wi-Fi, 2.4G Wi-Fi and over your telecom provider’s
mobile data network. In other words anywhere your phone has an internet connection.
Please read the inTouch installation instructions for Portal Installation location and connection.
What equipment works with the App?
InTouch works best with a complete Insnrg Equipment pad which is connected to each other via
Cat 5e Cable so that it can read and write values such as chlorine and pH settings, Temperature
settings and readings and pool/spa lighting control to each appliance however, any pool or
spa equipment which is powered from the Vi, Ri or Expansion module will operate in timer or on/off
modes.
These instructions should be read in conjunction with the Vi Chlorinator, Ri Dosing unit or Insnrg
Expansion Box.

4
Y:\Installation and Operating Manuals\IOM Print Copies
WARNING
WE CARE ABOUT YOUR SAFETY
IMPORTANT WARNINGS
WARNINGS: Please read and follow all instructions in this owner’s manual and on the equipment.
Failure to follow instructions can cause severe injury and/or death.
INSTALLERS: Insnrg highly recommend the installation of all their equipment by suitably qualified
pool professional who will ensure your high performance Insnrg products are installed to your local
standards and codes to ensure optimum safety and performance.
The inTouch Portal connects your Vi Chlorinator and/or your Insnrg Expansion Relay Module to
your home Wi-Fi and allows you to control your pool automation system after downloading the
inTouch Automation App from the Google Play or iOS App Store.
CONGRATULATIONS ON
PURCHASING YOUR INSNRG POOL AUTOMATION SYSTEM.
This manual has been carefully developed to give you all the information you need to get the best
value from your purchase.
It is important that you read through the manual to identify the key areas you need to understand,
particularly the following:
Health and Safety Concerns
Installation requirements
How to operate the major features of your system
The importance of maintenance
If you have a problem, what to trouble short before you contact your pool professional
DO NOT CONNECT any Insnrg Appliance, including the Portal to
the home router or modem by data cable.
THIS IS A WI-FI DEVICE ONLY
THIS APPLIANCE MUST BE INSTALLED IN A POSITION THAT IS
ACCESSIBLE FOR MAINTENANCE AND SERVICE. INSNRG WILL NOT
PUT TECHNICIANS AT RISK OF INJURY TO MAINTAIN OR SERVICE AN
INACCESSABL
E APPLIANCE.

5
Y:\Installation and Operating Manuals\IOM Print Copies
Finally, your entitlements under your product warranty
Insnrg have developed their product to provide you with a great experience and are sure you will
be delighted with your purchase.
PLANNING YOUR WI-FI CONNECTION
Before locating the inTouch Portal, check that you have stable 2.4G Wi-Fi with at least 2 bars where
the Portal is being installed.
If building a new pool and the equipment is located more than 20 metres from your home Wi-Fi
source, in a plantroom or other enclosure that is surrounded by thick walls, metal or steel
reinforcement the best result will be achieved if a Cat 5e or Cat 6e cable is installed and terminated
at the equipment and near your home Wi-Fi source.
The inTouch portal operates on the 2.4G Wi-Fi band as this frequency has a longer range than 5G.
Generally, the portal will connect wirelessly to the home Wi-Fi system when installed up to 30 or 40
metres from the Wi-Fi device however, there are many factors affecting Wi-Fi strength including
but not limited to:
Age and quality of the Wi-Fi device
Type of construction of the home and walls in which the Wi-Fi signal has to pass through
The location of the Portal ie: if surrounded by a metal or steel frame a Wi-Fi signal may not
pass thourhg or reach the portal
The Wi-Fi signal can be improved or extended in the following ways:
1. Move the Portal closer to the Wi-Fi system. The Portal data cable connecting to the Insrng
equipment system can be up to 50 metres using a Cat 5e cable. A 10m, 20m or 50 m Cat
5e data cable can be purchased from Insnrg.
2. A Wi-Fi range extender, booster or repeater that places the extended between the Wi-Fi
Source and the inTouch Portal
3. A Cat5e or Cat 6e cable run from near the Wi-Fi source to the equipiment pad and plugged
into the Insnrg Equipment. In this case the portal can be located inside the home closer to
the Wi-Fi source.
4. Install a Wi-Fi over power line extender.
In general, if you can achieve a 2 bar Wi-Fi signal on your smjart phone at the location of the
inTouch Portal the signal will be sufficient.

6
Y:\Installation and Operating Manuals\IOM Print Copies
PORTAL INSTALLATION
The inTouch Portal is supplied with the following:
An integral mounting plate
2 x 10g x 1 ¼” Philips head 316 SS screws
2 x plastic wall plugs
1 x 3m Cat 5e data cable
Ensure the inTouch Portal is installed our of direct sun and mounted so that water cannot ingress
the underside (cable connection point).
The portal will obtain its power from the Cat 5e or Cat 6e data cable that connects it to the Insnrg
equipment system.

7
Y:\Installation and Operating Manuals\IOM Print Copies
CHECK LIST
Portal is securely mounted out of direct sun with connections facing down
Cat 5e or Cat 6e cable plugged into portal underneath
Other end of Data Cable plugged into Insnrg Vi, Expansion relay hub or Insnrg Heater
Both lights on bottom of Portal are now flashing rapidly (before Wi-Fi connection is made)
Wi-Fi is stable using Smart Phone to Connect
8
Y:\Installation and Operating Manuals\IOM Print Copies
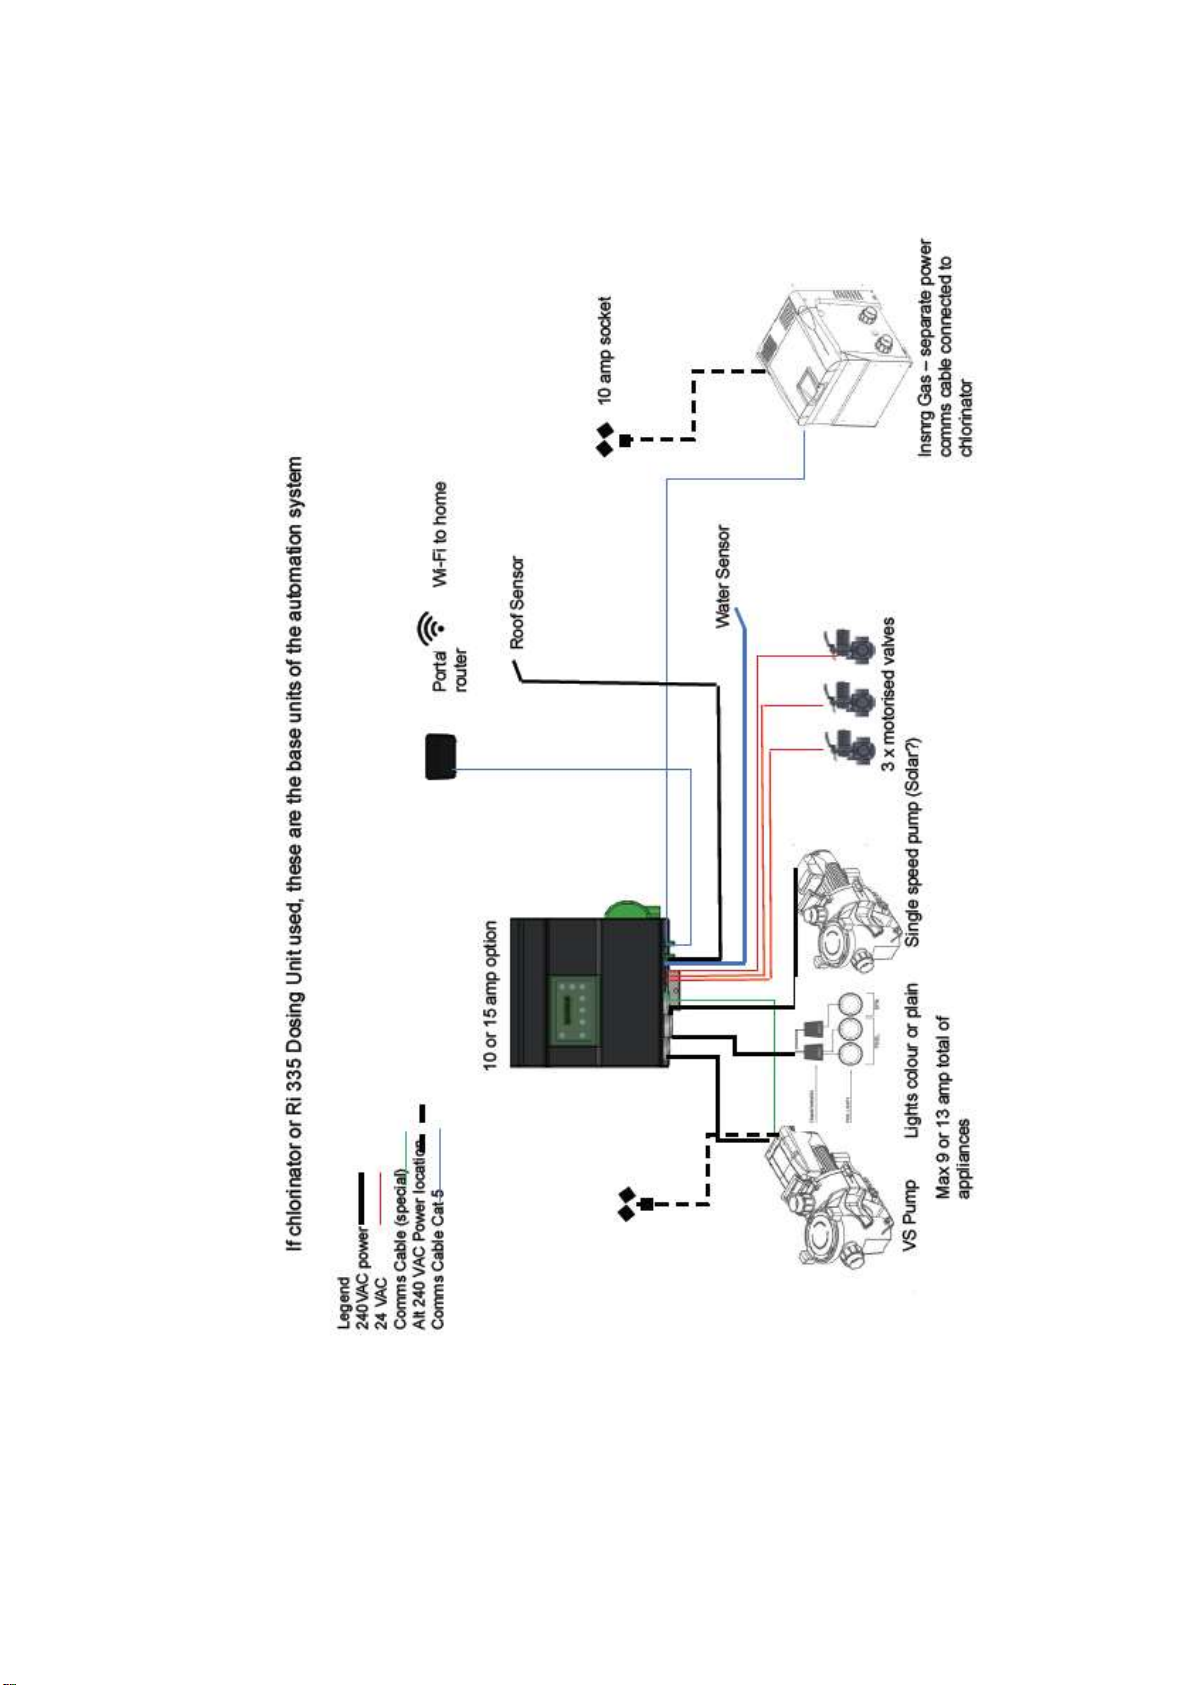
EXAMPLE Vi AUTOMATION INSTALLAION

9
Y:\Installation and Operating Manuals\IOM Print Copies

10
Y:\Installation and Operating Manuals\IOM Print Copies
1
MODE
3
4
2
ENTER
5
6
7
8
CONNECTING YOUR INTOUCH PORTAL
The initial Wi-Fi connection must be made using (1) your Insnrg Vi Chlorinator/Automation system
or (2) from your Insnrg Relay Hub (if installed without the Vi Chlorinator).
From your Chlorinator or Relay Hub control Screen:
Press Mode (1), (first press illuminates the back light on LCD), continue to press Mode until
“Service” menu is displayed.
Using the Up (3) button enter the SERVICE MENU password. Select 2 and press ENTER. Repeat
this process until 2, 2, 2, 2 is displayed.
Press ENTER repeatedly until the screen displays “SET UP WiFi”.
Using the Up button select YES and press ENTER.
The unit will now search for available Wi-Fi bands. Using the UP or DOWN buttons select your
Wi-Fi name and press ENTER. You will now be prompted for your Wi-Fi Password.
The POOL/SPA button will now select:
a (lower case letters)
A (upper case letters)
1 (numerals)
. (symbols)
After selecting the correct digit style (upper, lower case, number or symbol) use the UP or DOWN
arrow to select the correct password. Once selected wait a second or two for the cursor to move
to the next position. If a mistake is made, use the back arow (5) to move the cursor a previous
position.
When the password is entered, allow the cursor to move to the next position then press ENTER.
The unit will now display “CONNECTING TO Wi-fi” and once connected display CONNECTED.

11
Y:\Installation and Operating Manuals\IOM Print Copies
Press the back arrow (5) a few times and navigate to VIEW WI FI. Use the UP or DOWN arrow to
determine the connection strength, connection to AWS server and that your internet connection is
ON LINE. You can now use the BACK button (5) until you return to the home screen.
INTOUCH APP SET UP AND OPERATION
Your Insnrg Equipment is now ready for connection to the inTouch Automation App.
iPhone or iPad using Safari as web browser:
Open Safari Web Browser on your iPhone or iPad
Type https://www.insnrgapp.com/home
Tap this Icon

12
Y:\Installation and Operating Manuals\IOM Print Copies
Close Browser and find inTouch App Icon on home screen
Select “Add to Home Screen”
Open inTouch App by tapping icon

13
Y:\Installation and Operating Manuals\IOM Print Copies
You will now be promoted to
register
by entering your email, creating a
password. Tip: use a password that
you remember, you will be prompted
for the password when logging in, or
changing significant settings.
14
Y:\Installation and Operating Manuals\IOM Print Copies
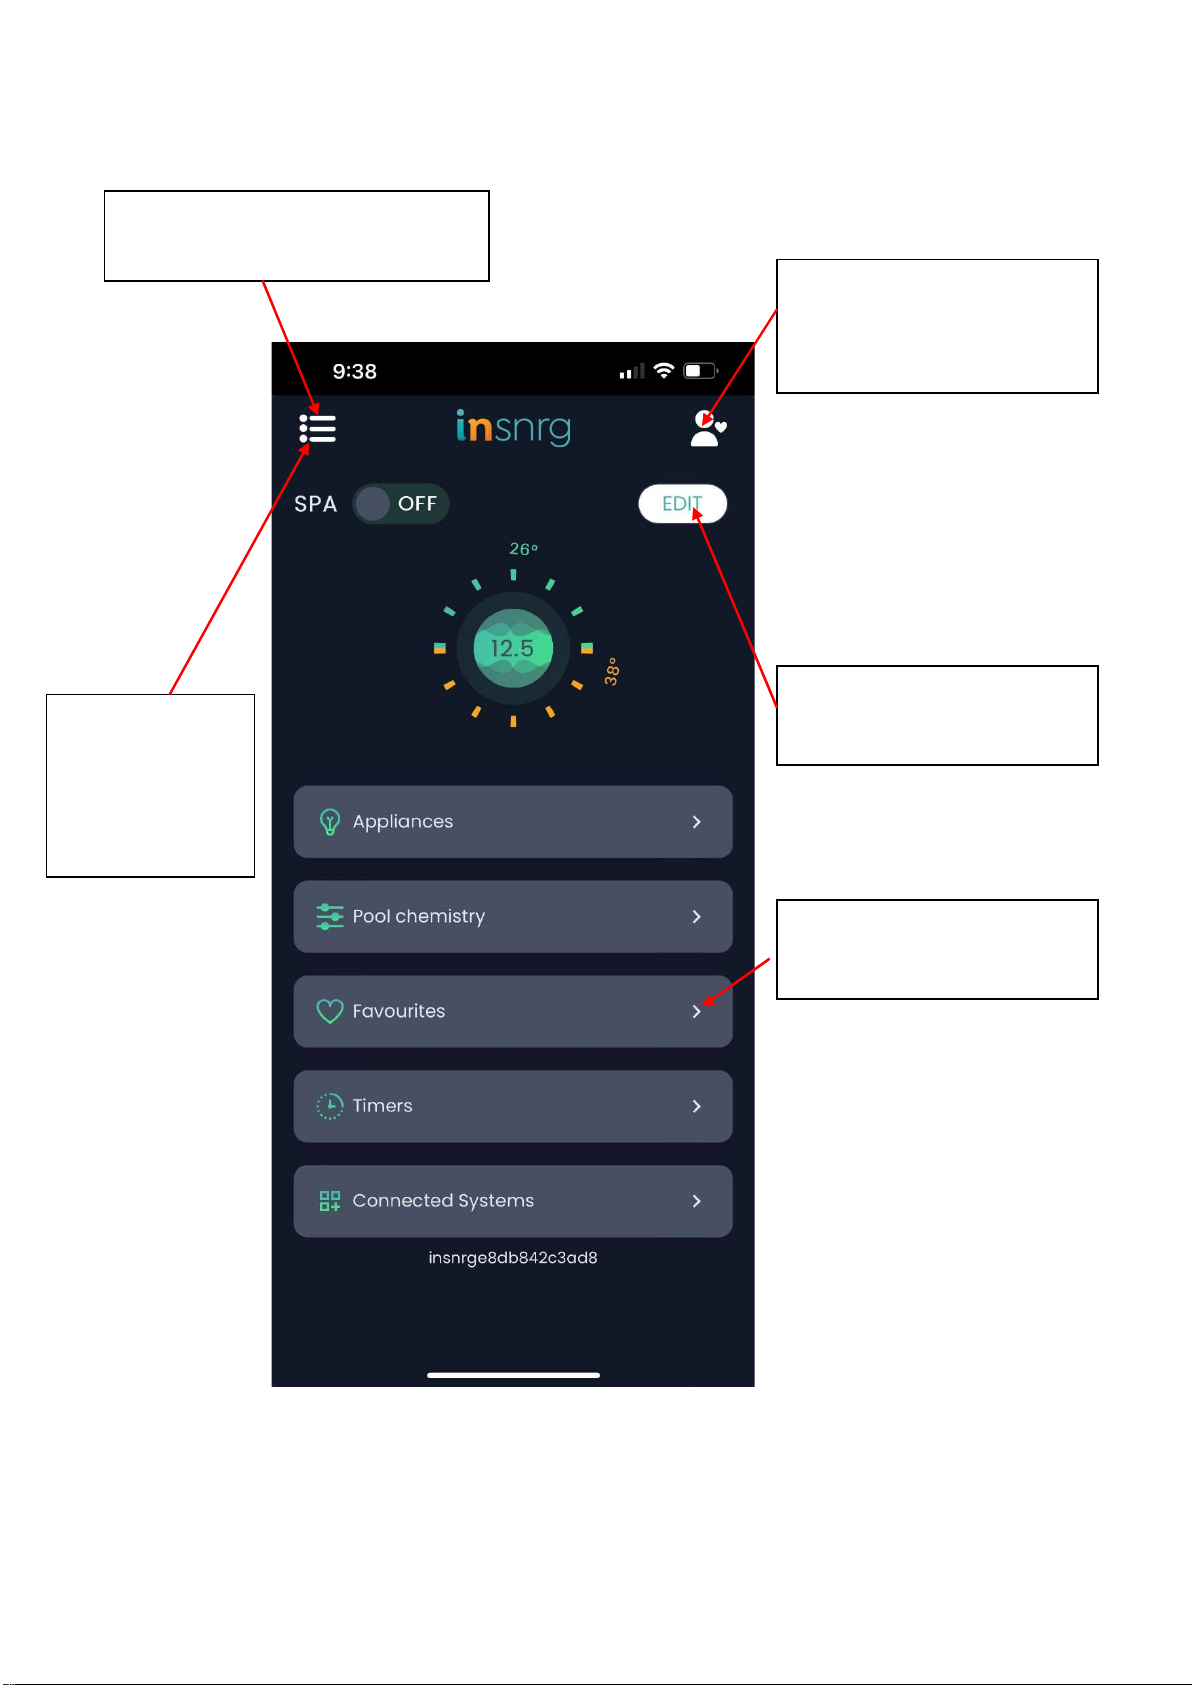
GENERAL LAYOUT OF INTOUCH AUTOMATION APP
Tap Perso
nne
l Icon to change
password
Tap
Drop down menu to select
Connected System>Add New System
Tap Edit
to Expand, hide,
collapse Icons on home screen
Tap drop down
menu to create or
edit favourite
configurations
Tap on Arrows to expand menu
selection
15
Y:\Installation and Operating Manuals\IOM Print Copies
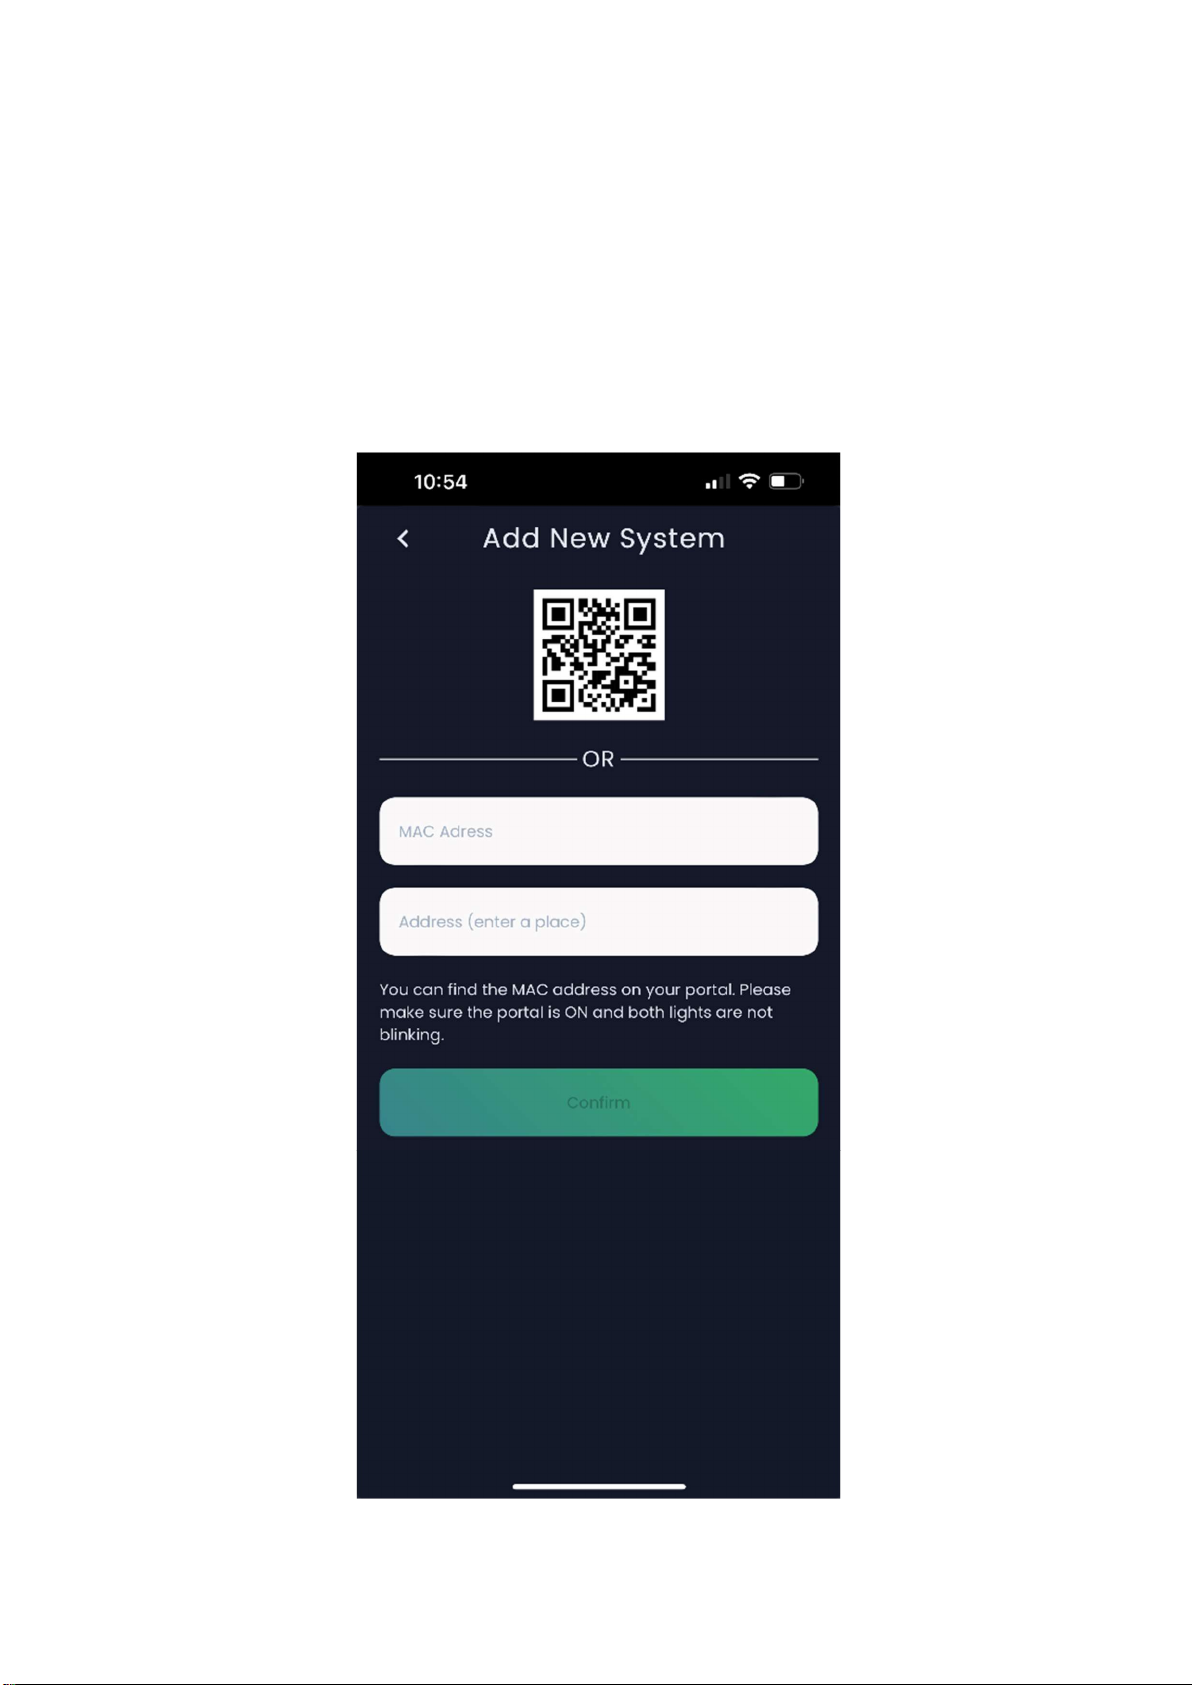
ADD NEW SYSTEM CONNECTION
Press the drop down menu and select Connected Systems. Tap on Add New System to display
System connection menu.
On the rear of your inTouch Portal you will find the unique MAC address. Tap on the QR code
icon, and use the phone camera to capture the MAC address, then enter the street address of your
pool.
Alternatively, you can type the MAC address into the screen.

16
Y:\Installation and Operating Manuals\IOM Print Copies
EQUIPMENT SET UP THROUGH INTOUCH APP
Tap the drop down menu, select System Setting, then System Installation. This will enable the
system to be set up and configured to run your equipment.
Check and note which appliances are plugged in, data cabled and operated by the Vi Chlorinator
and Relay Hub.
On completion check the INSTALLATIO MENU of the Vi Chlorinator and Relay hub and ensure that
all assignments were received and saved by the hardware.
Enable data communication with Insrnrg Variable Speed Pump
when green data cable connected between Chlorinator or Relay
Hub controller and pump. When enabled, select the model of
the variable speed pump and the RPM of each speed setting.
Enable data communication with Insnrg Gas Heater when data
cables are installed between heater and Insnrg Chlorinator or
Relay Hub.
Calcium Level will change the frequency of reversing cell polarity
– leave at 100 unless you have high calcium levels in your
pool/spa water. (greater than 200 ppm)
If you have a relay hub and Vi Chlorinator, Tap on RELAY HUB to
assign appliances to this controller.

17
Y:\Installation and Operating Manuals\IOM Print Copies
SETTING OPERATING TIMES (TIMER CONFIGURATION)
Timer periods are set in the 24:00 hr format. ie: 00:00 hrs to 23:59 hrs.
Never have timer periods crossing another timer period. Always start the next timer period at the
same time the previous timer finishes or leave a break. For examples
Timer 1
Start: 08:00 Stop: 16:00
Timer 2
Start: 16:00 Stop: 18:00
Timer 3
Start: 19:30 Stop: 22:00
Each Timer can be enabled or disabled. This can be
helpful when reducing operating hours in winter, or
allow automatic light operation in summer and turning
off during winter.
Enabling Spa during a timer period will put the system
into spa mode for the timer duration. Handy if using
the spa regularly each day.
Selecting Chlorinator means the filter system and
Chlorination will operate for the duration of the timer.
Turn Chlorinator ON when filtration or heating is
required. Turn off if only wanting water features or
lighting is required with no filtration.
Each Timer will display which appliances are selected
during the timer period and which are not

18
Y:\Installation and Operating Manuals\IOM Print Copies
SETTING POOL AND SPA OPERATING TEMPERATURES
Temperatures will only be displayed in the following set ups:
1. if an Insnrg Gas Heater is installed and data cabled to the controller or
2. if a water temperature sensor is connected to the Controller and plumbed into the pool
water circulating pipework.
3. Solar Control can be achieved if a water sensor and roof sensor are installed and enabled
in the Installation Menu and a pump or motorised valve is assigned to solar.
Accurate temperatures will only be displayed when the circulating pump is operating. If the
circulating pump is off, the temperatures sensor in the pipework or within the gas heater can only
display the stagnant water temperature which is usually quite different to the pool/spa water
temperature.
If more than one heater is installed and assigned to
the Insnrg Controller, and you have a automated spa
as part of your swimming pool, you can select which
heater is used to heat the pool and which heater is
used to heat the spa.
For automatic heating, ensure Insnrg Gas is on during
timer periods and VF Contact (usually heat pump) is
on during each timer period.

19
Y:\Installation and Operating Manuals\IOM Print Copies
POOL CHEMISTRY
The pH of your pool water is very important to create a comfortable swimming environment and for the
longevity of your pool surface and pool equipment. Follow these guidelines.
Fibreglass Pool – pH between 7.2 and 7.5.
Other Pools – pH between 7.5 and 7.8
ORP (oxidization reduction potential) measures the activity of the
chlorine or sanitizer in your water. ORP readings are affected by
many chemicals in your pool.
As a guide, your swimming pool should have a chlorine reading of
1ppm to 3 ppm. The ORP may have to be adjusted at different
times of the year to keep your chlorine between 1 and 3 ppm.
Adjust slowly and wait for several days before testing chlorine
levels again.
ORP readings will vary during the course of the days in response
to sunlight, bather load and chlorinator operating hours.
As a guide we recommend the following settings for your system however, each pool is different and
may require fine adjustment over time to achieve the best results.
Pool Type pH range
Cyanuric
Acid
(Suncreen) ORP
Total
Alkalinity
Salt or
mineral
Level
Calcium
Hardness
Fibreglass 7.2 to 7.5
20 - 30
ppm 650 to 700 50 - 120 4000 ppm 150 - 250
Concrete/Vinyl Liner 7.5 to 7.8
20 - 30
ppm 640 to 710 80- 120 4000 ppm 200 - 250
Insnrg strongly recommends you obtain advice from a pool professional about your water chemistry.
Refer to Vi Manual for more detailed chemistry guidelines.

20
Y:\Installation and Operating Manuals\IOM Print Copies
ADDITIONAL FEATURES
The inTouch App has many additional features such as setting up favourite menus where you can turn
on and off multiple appliances with one touch, Master Rule configurations, Notifications and Alerts. We
are constantly developing and adding new functionality and features to your App so expect to see the
App evolve over time. Please consult with your pool professional or Insnrg for additional information.
TROUBLE SHOOTING
Problem Possible Cause Solution
Move Portal closer to Wi-Fi, install Wi-Fi
extender
Esnure both orange and green light on
Portal underside are both blinking rapidly
Check all Data Cables and replace if
necessary
Reset Wi-Fi in Vi or Relay Hub and
reconnect
Portal has lost connection to Wi-Fi after
power interruption
Turn power off to all pool equiment and
then on again. Wait 2 minutes for
reconnection
Wi-fi has been rebooted
Internet provider or Wi-Fi has been
changed
Reset Wi-Fi in Vi or Relay Hub and
reconnect using new Wi-Fi name and pwd
Pool Equipment power supply is off
Check all power points, fuse box and
isolation switches
Appliance set to OFF
Tap on Appliance and set to Timer
Appliance not set to run in Timer Periods
Open Timers and select appliances to
operate during each timer period
Cannot Connect Portal to Home Wi-fi
Poor Wi-Fi signal at Portal location
Data cable faulty
App has lost connection to equipment
Appliance not turning on during Timer
Table of contents


