INTEGRATED PAVING CONCEPTS StreetHeat SR-28 User manual
Updated: April 2010
www.integratedpaving.com
1.800.688.5652
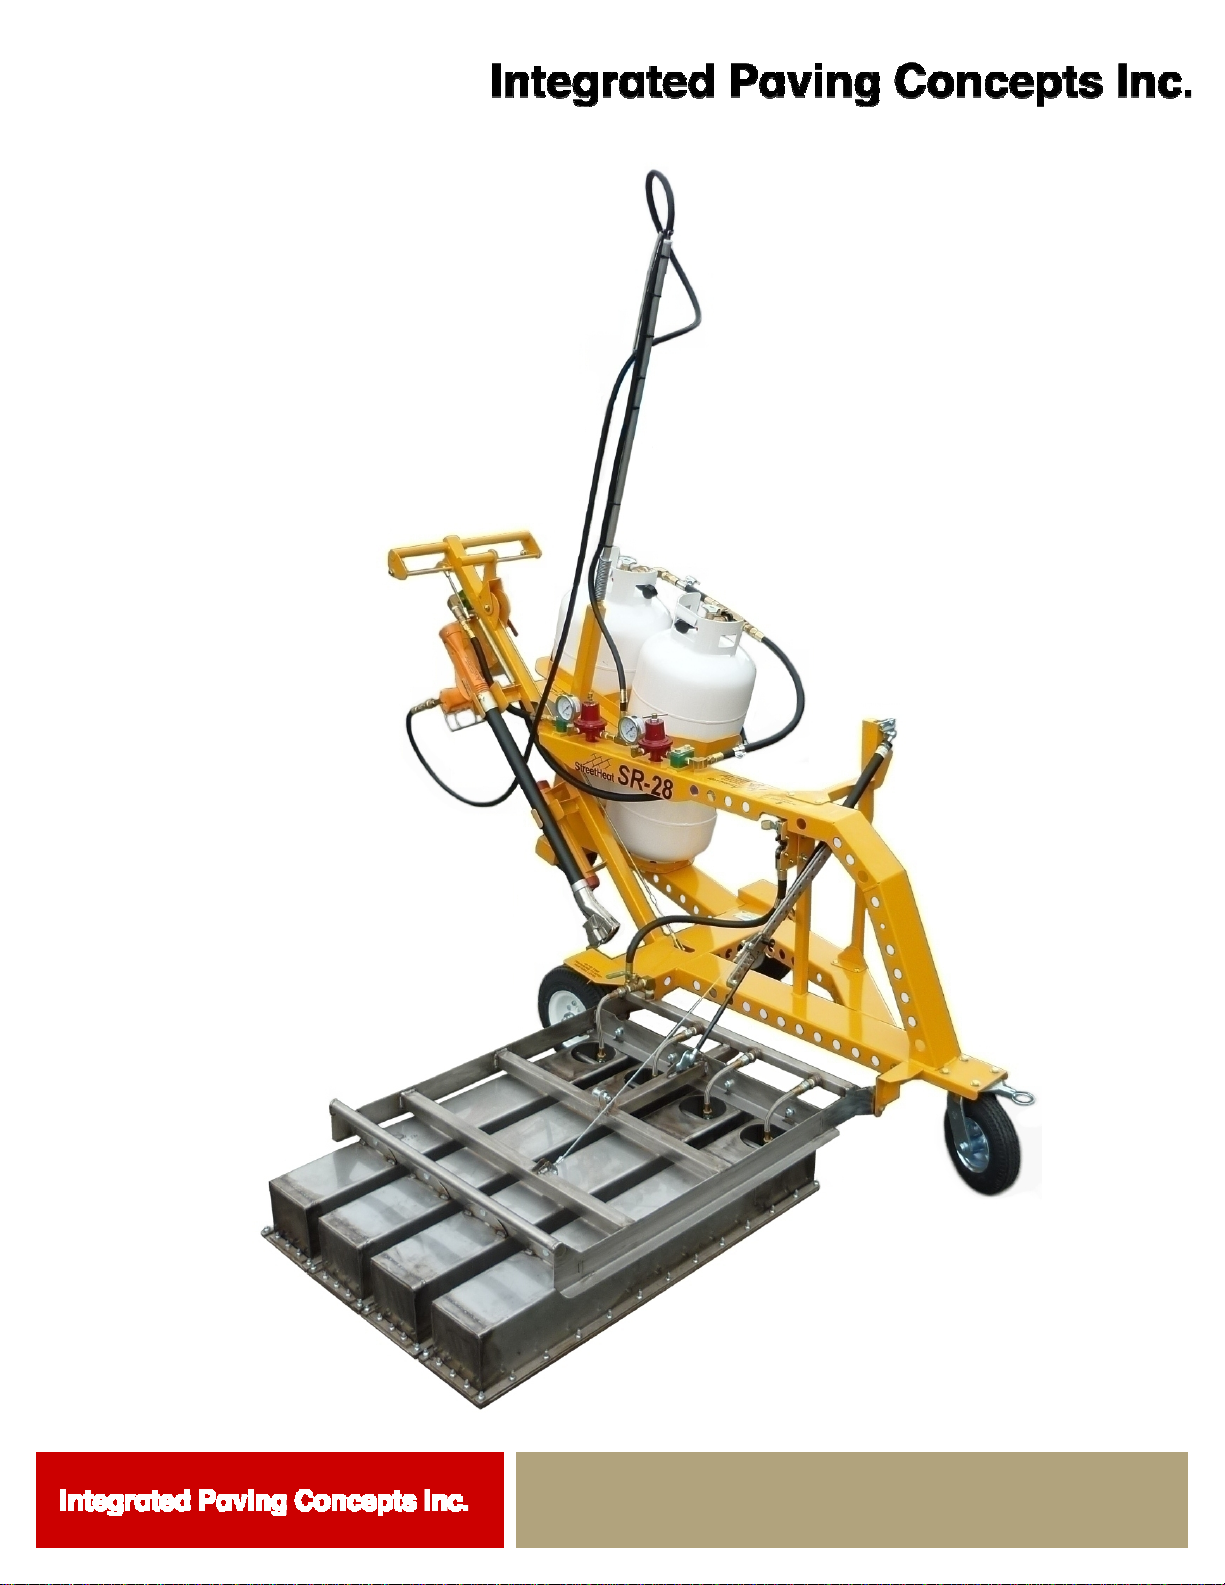
StreetHeat SR-28
Infrared Heater
(With Flint 2000EX Heat Torch)
Operations Manual

2
Contents
1. Safety
2. Main Operating Components
3. Specifications and Dimensions
4. Preparing for Work
5. Operating Procedure
6. Preparing for Transport
3
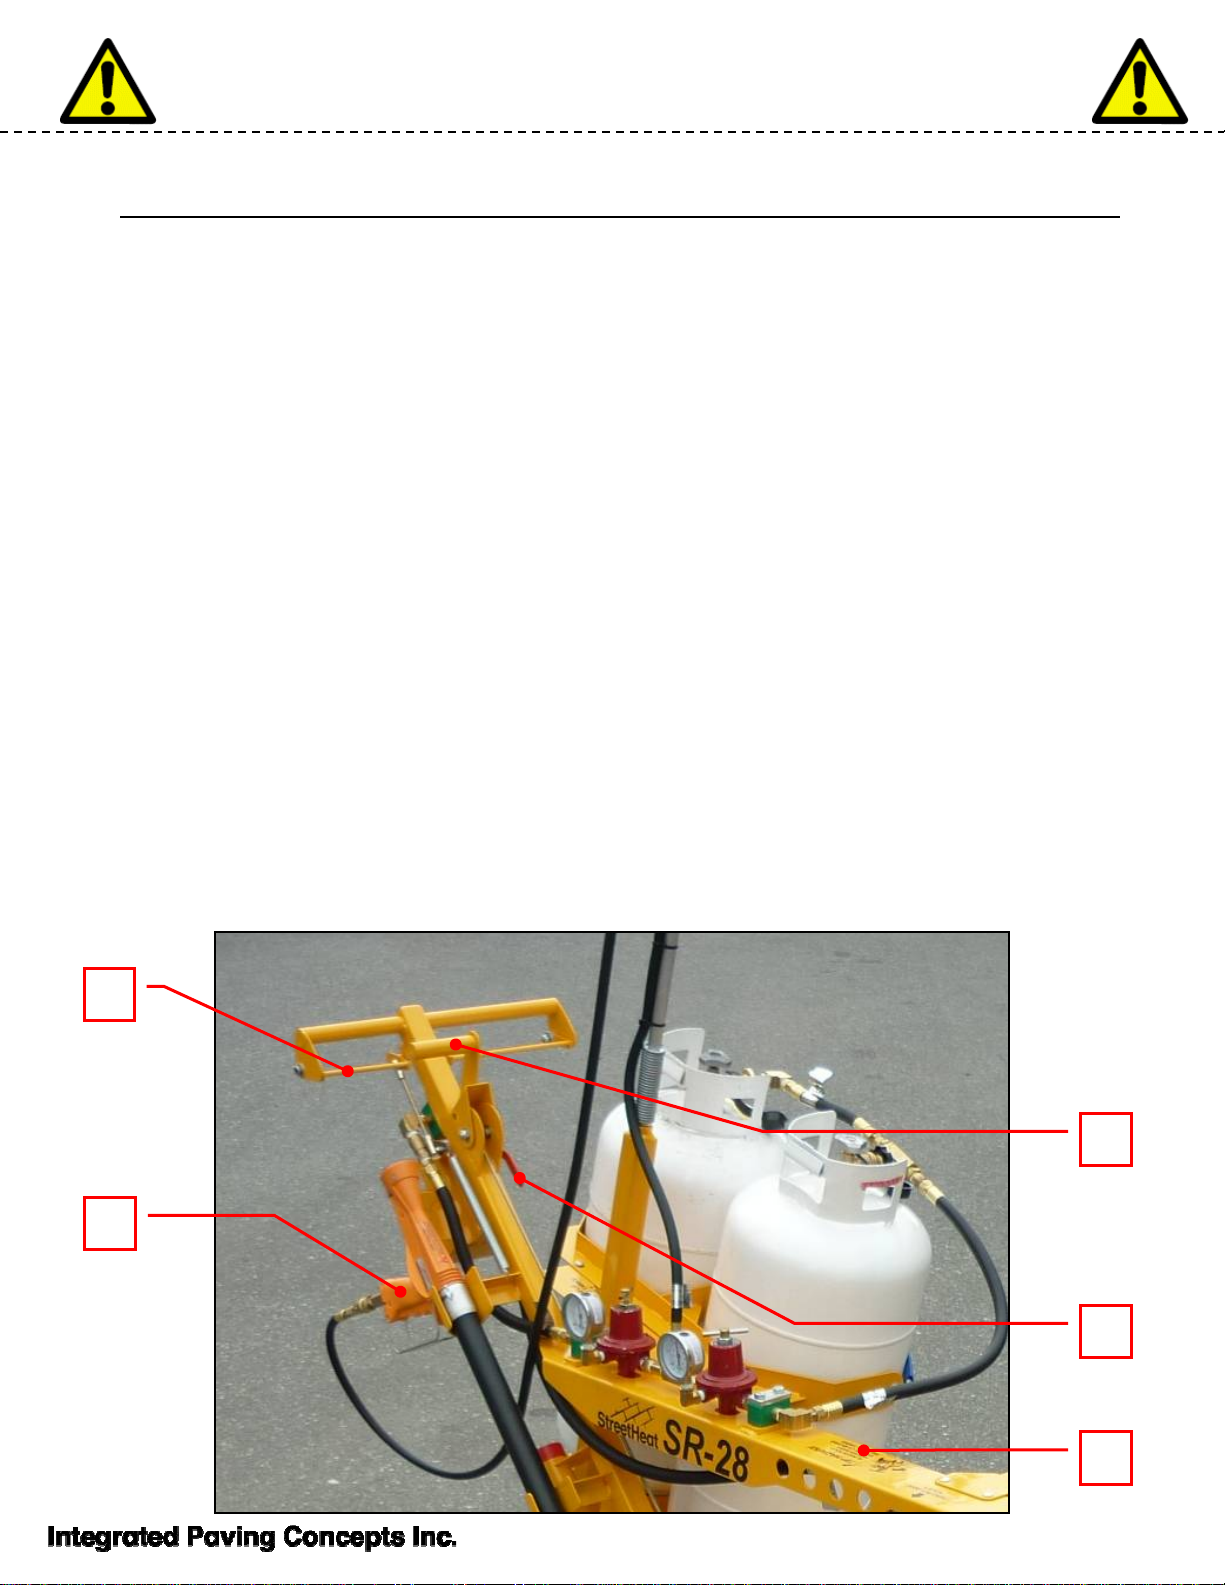
a
b
c
Safety
WARNING: Propane is HIGHLY FLAMMABLE and potentially EXPLOSIVE! Never smoke or allow
an open flame when setting up, dismantling, or switching the propane tank on the equipment.
Ensure that everyone who operates this machine has read and understood this manual.
Safety Wear – To avoid injury, always wear safety glasses, ear protection, long pants and steel toed
boots when operating this equipment. Always keep a fire extinguisher nearby.
Emergency Shutoff (a) – If a fire is present or there is any risk simply let go of the lever and the
safety valve will spring closed and shut off the heaters. Never mechanically fasten the valve
lever in the open position!
Main Propane Shutoff Valve (b) – In case the safety valve lever fails to spring closed there is a
second back up shut off valve on the left side of the handle that will shut off propane to the
burners. This will not shut off the propane to the Flint 2000EX Heat Torch
Flint 2000EX Heat Torch (c) – Read the separate Operations Manual for the torch before
using. To avoid risk of serious injury, take care when lighting the torch that it is pointed away
from other people and the machine, especially the hoses and fittings. When heating the ground
near the machine avoid heating close to the pneumatic tires to avoid overheating and bursting
them.
Risk of burn injuries – the heat generated by the SR28 is enough to cause very serious burns. Use
with extreme care.
Operation – never drive over any area that has just been heated. This could overheat and burst a
tire causing serious injury. Never operate this equipment indoors. When the heaters are lit
never leave the machine standing in one place, but always keep it moving. Rock the machine
back onto its rear wheel when not in use so the heaters are elevated off the ground for cooling.
Hand Brake (d) - Always set the hand brake whenever the machine is left unattended. NOTE:
breaking effectiveness is directly related to tire pressure. Always keep the main tires properly
inflated.
Tipping Hazard (e) – The SR28 needs the propane tanks installed to be properly balanced.
CAUTION: Never remove the tanks with the heater bank extended as the machine could tip
over causing damage and potential serious injury (see warning label on the machine)
d
b
4
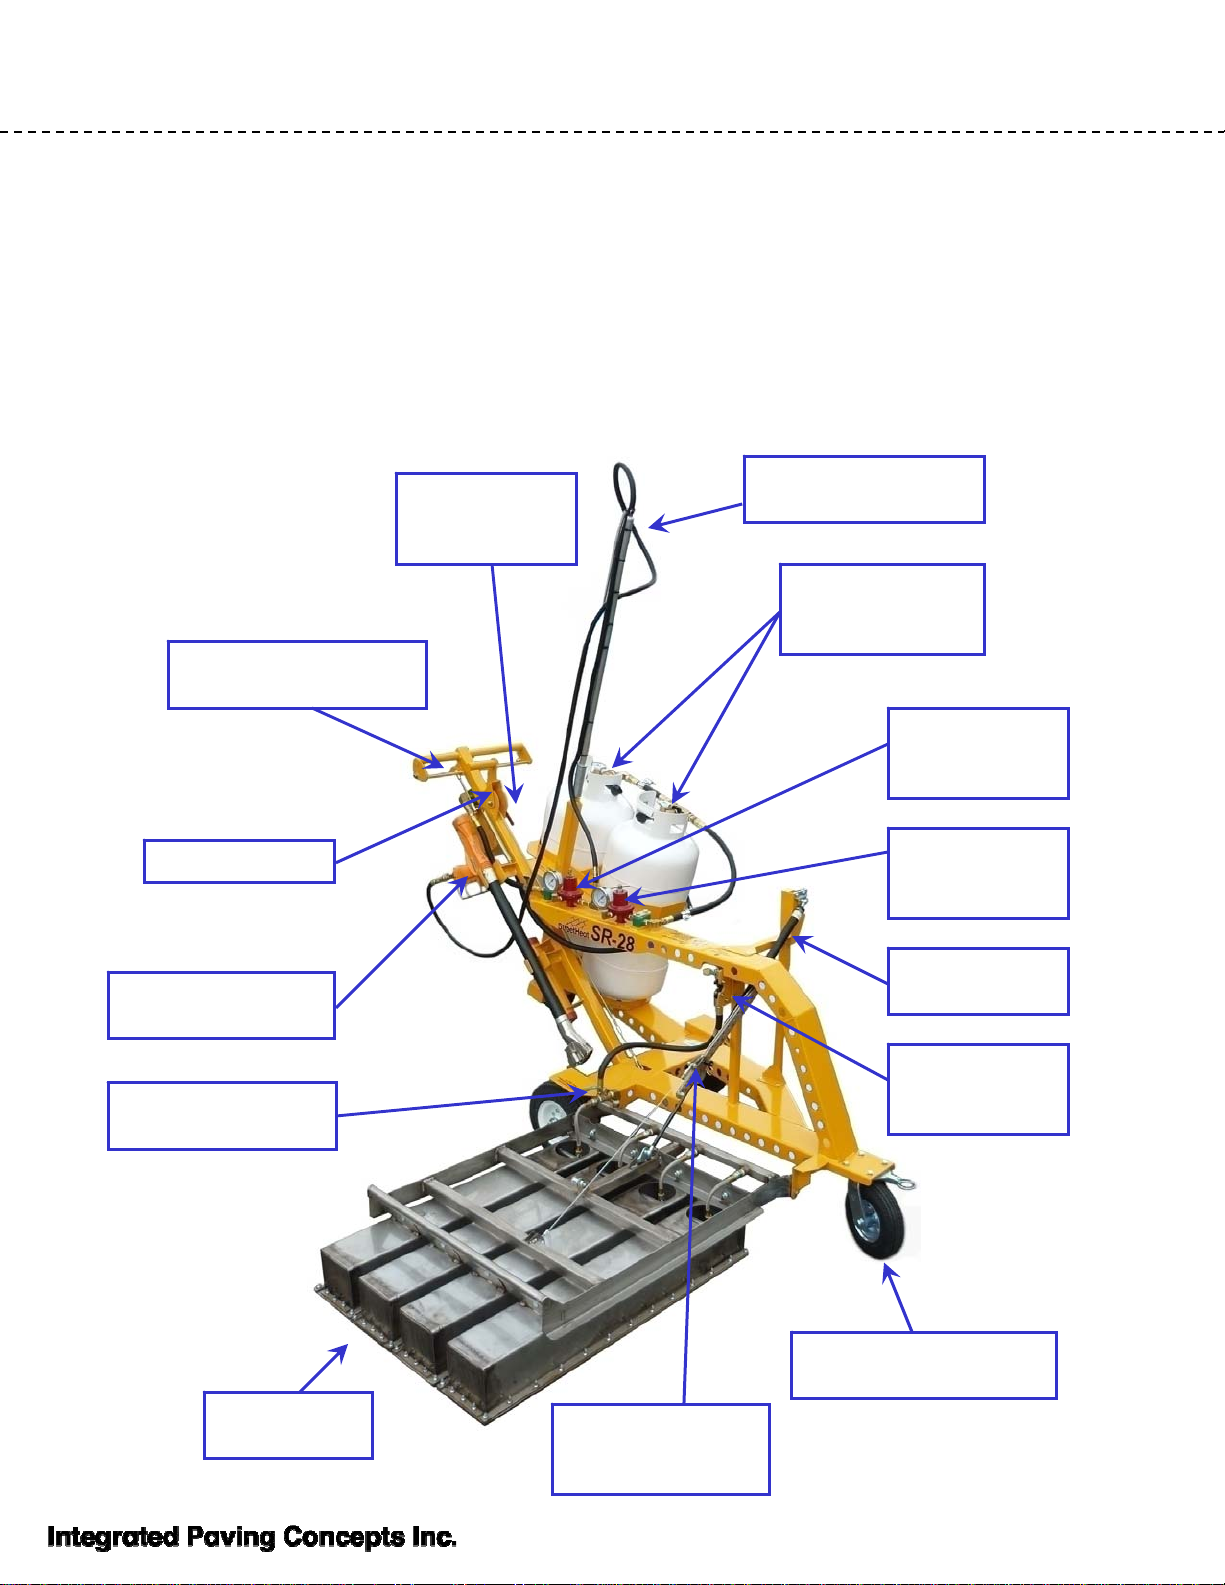
Main Operating Components
Heater Bank
(4 Heaters)
4th Heater Shut-Off
Valve
Front Castering Wheel
with Swivel Lock
Heater Bank
Fold Rotary
Latch
Flint Torch
Regulator and
Gauge
Heater Bank
Regulator and
Gauge
Hand Brake
Standard Vapor
Withdraw 40 lb
Propane Cylinders
Hose “Whip” and Hose
for Flint Torch
Heater Bank Burner
Valve Lever
Flint 2000EX Heat
Torch
Adjustable Stay
(Heater Bank
Camber)
Traction Gas
Spring
Heater Bank
Manual Shut-Off
Valve
OPERATING PRINCIPLE
The StreetHeat SR28 Infrared Heater is a fully self contained infrared heating machine for use
in reheating asphalt, installing preformed thermoplastic, drying and curing on asphalt surfaces,
and other heating jobs. It is designed for maximum heating control because the heating
motion is not static but the operator moves the machine back and forth so that the surface
temperatures can be closely monitored and controlled.
Infrared heat is effective because much of the heat energy penetrates below the surface
making it ideal for its intended use, especially melting and bonding preformed thermoplastic

5
SR28 Specifications
280,000 BTU-Hr
(250 kW-Hr)
Amount of Heat
(SR28) 90,000 - 190,000
BTU-Hr
(27-55 kW-Hr)
Amount of Heat (Flint
2000EX Heat Torch)
260 lbs
(118 kg)
Machine Weight
(Without Propane
Cylinders)
PropaneInfrared Heat Source
Dimensions
with Heater
Bank Extended
Dimensions with
Heater Bank Folded
68.5”
1.74 m
31”
0.79 m
47.5”
1.21 m 50.5”
1.28 m
73.5”
1.87 m
26.5”
0.68 m
36”
0.91 m
73.5”
1.87 m
Heater Bank Dimensions
Specifications and Dimensions

6
Preparing for Work
Propane Tanks
The SR28 requires two standard 40 lb propane
tanks (not included). USE ONLY 40 LB TANKS –
THE MACHINE’S BALANCE IS OPTIMIZED FOR
THIS TANK ALONE. Use only the more common
vaporized propane cylinders. DO NOT USE THE
LIQUID PROPANE TYPE AND NEVER USE
WITH THE TANKS LYING ON THEIR SIDES. It is
advisable to purchase a second set of tanks to
have as back up when needed.
Latch the bottles in place as shown. NEVER USE
OR TRANSPORT THE MACHINE WITHOUT THE
BOTTLES LATCHED SECURELY!.
Attach the propane lines
as shown turning the
hand wheel POL fittings to
the left. Open the tank
valves slowly making sure
there are no leaks
CAUTION:
TIP HAZARD!
Never lower the heater
bank without propane tanks
on board and secured! The
machine is not balanced
without the tanks and could
tip over can cause serious
injury
Make sure the heater
bank is closed and latched
in the up position before
changing propane tanks!
Always set the hand
brake before changing the
propane tanks

7
Preparing for Work – Cont’d
Folding out the Heater Bank
CAUTION:
Always set the brake before raising or
lowering the heater bank!
Never lower the heater bank without the
propane bottles installed!
Never attempt to lower the heaters
when standing on the opposite side of the
machine from the heaters! This could
result in injury or damage the SR28!
Position yourself with one foot on the heater side of
the machine. Straddle the nose of the SR28, hold
the heater bank handle with you left hand and
unlatch the bank with your right hand, letting the
bank down gently. NEVER LET THE HEATER
BANK DROP ON ITS OWN
8
Preparing for Work – Cont’d
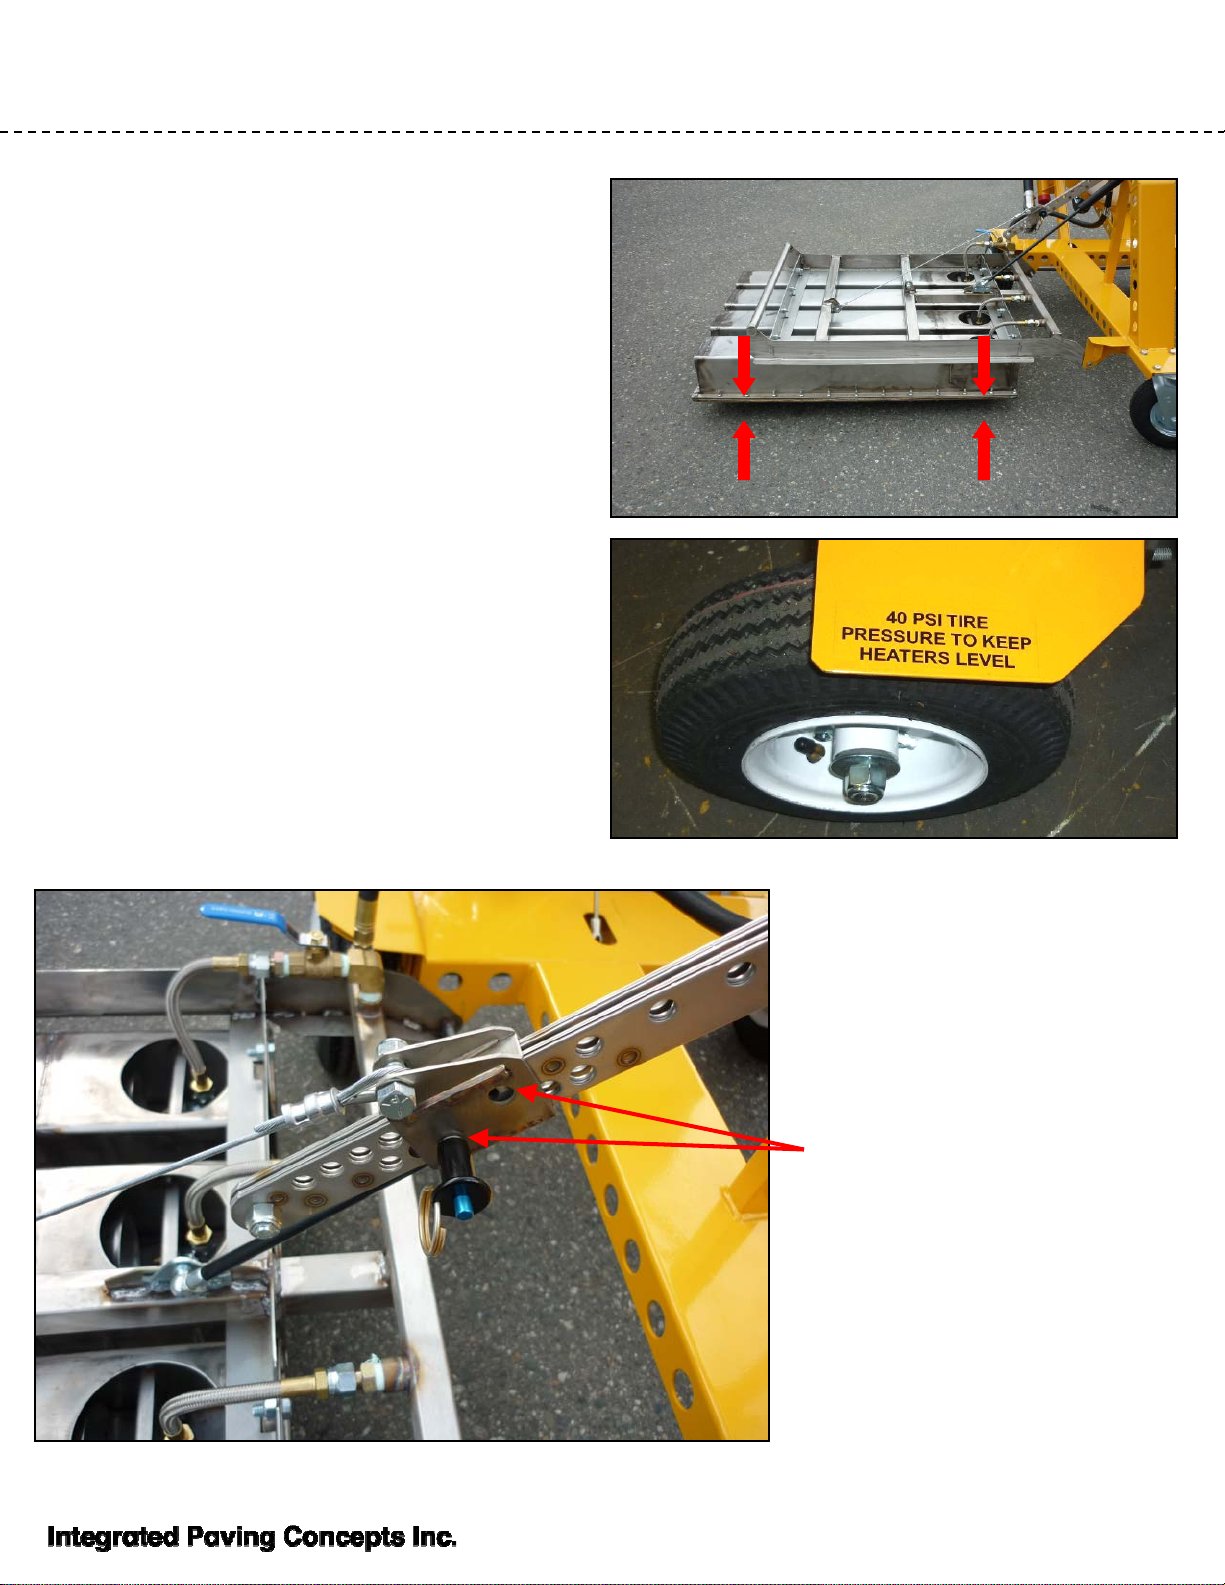
Leveling the Heaters
First, ensure that the pressure on the main
tires is at 40 psi, especially the right hand tire.
(Note: Most of the weight of the entire
machine rests on this wheel)
Then raise or lower the heater by
adjusting the stay. By alternating
inserting the ball lock pin between
the upper and lower holes on the
stay sleeve, the stay length can
be adjusted in ¼” (13 mm)
increments for very precise height
control. Folding the heater bank
makes it easier to make these
adjustments.
Leveling the heaters will ensure that you get
the most effective and even heating results
and at the same time prevent the heaters
scraping the ground

9
Operating Procedure
Lighting the Heaters
Once the propane bottles are installed
and the heater bank lowered and
leveled, open the valves on the propane
tanks. Ensure that the pressure on the
heater regulator (see above) is between
6 and 7 PSI (41 - 48 kPa). Rock the
machine onto its front wheel. Check that
the nearest burner valve is open if you
want all four heaters to light, and that the
main shut off valve to the left of the
handle bar is open.
Open the burner valve by pulling the
valve lever against the handlebar (red
circle at right). While holding the valve
open, light the heaters by waving the
Flint 200EX Heat Torch back and forth
under the heaters for about 5 seconds.
CAUTION: To avoid lighting the heaters internally (which will damage them), always light from
UNDERNEATH the heaters
To shut off the heaters simply let go of the valve lever
Tilt the machine onto its rear wheel to avoid burning the pavement surface as the heaters cool
Flint 2000EX Heat Torch
IMPORTANT: READ THE FLINT 2000EX MANUAL
BEFORE OPERATING. The Flint 2000EX torch is
necessary for both lighting the heaters and to heat areas
which the SR28 cannot reach because of obstacles.
Connect and mount the torch as shown using the quick
connect coupler. Set the torch regulator pressure (see
right) to between 21 and 45 PSI (145 – 310 kPa). There is
no separate shut off valve for the torch, but if the torch is
disconnected, the valve in the quick connect coupling will
shut and prevent any gas flow. Heater Bank
Regulator Flint Torch
Regulator
10
Heating
The advantage of infrared heat is its
ability to penetrate below the surface to
heat at depth without overheating the
surface. To do this effectively, begin
heating by walking VERY SLOWLY
forward (about 10-20 feet per minute).
After one “stroke”, rock the machine
back and return quickly to the start line
and repeat, walking a little faster each
time (as the surface will reach
maximum temperature more quickly)
until the asphalt reaches the desired
depth of heat. (Note: when heating, the
handle height has be optimized for
pushing, not pulling the machine; it is
also easier to maintain a straight line by
pushing the machine.)
Monitor the surface temperature with an
IR thermometer. Try to bring the
surface temperature up as high as
possible with each stroke without
exceeding the maximum allowable
temperature of the material you are
heating and causing it to burn.
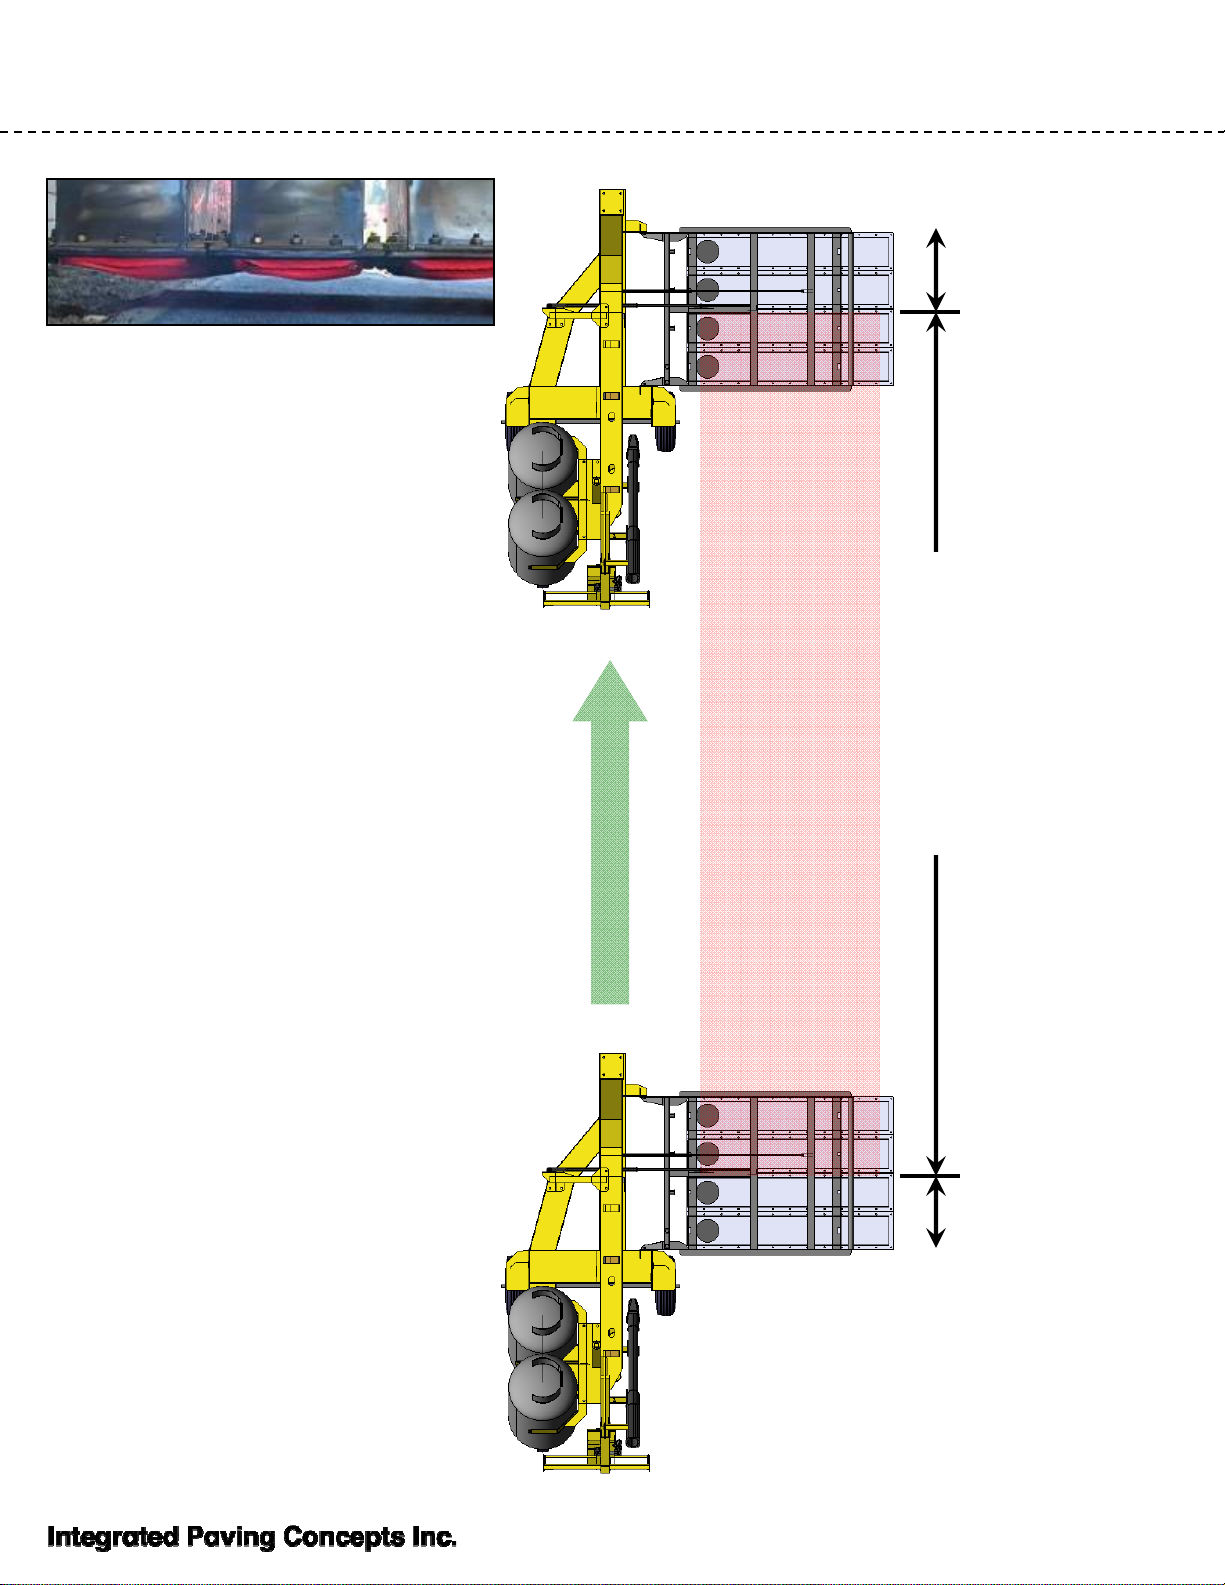
To ensure that you have heated
adequately along the entire length, start
and end each stroke at least ½ the
bank width at the start and end of the
desired heating area.
Operating Procedure – Cont’d
Extend Stroke
at least ½ bank
width beyond
desired heating
area
Start Stroke at
least ½ bank
width before
desired heating
area
Desired Heat Area
Optimum heating length is
about 6-12 feet (2-4
meters); if the heat length
is less than 6 feet (2
meters) close the shut-off
valve to the nearest
heater to prevent
overheating the surface
11
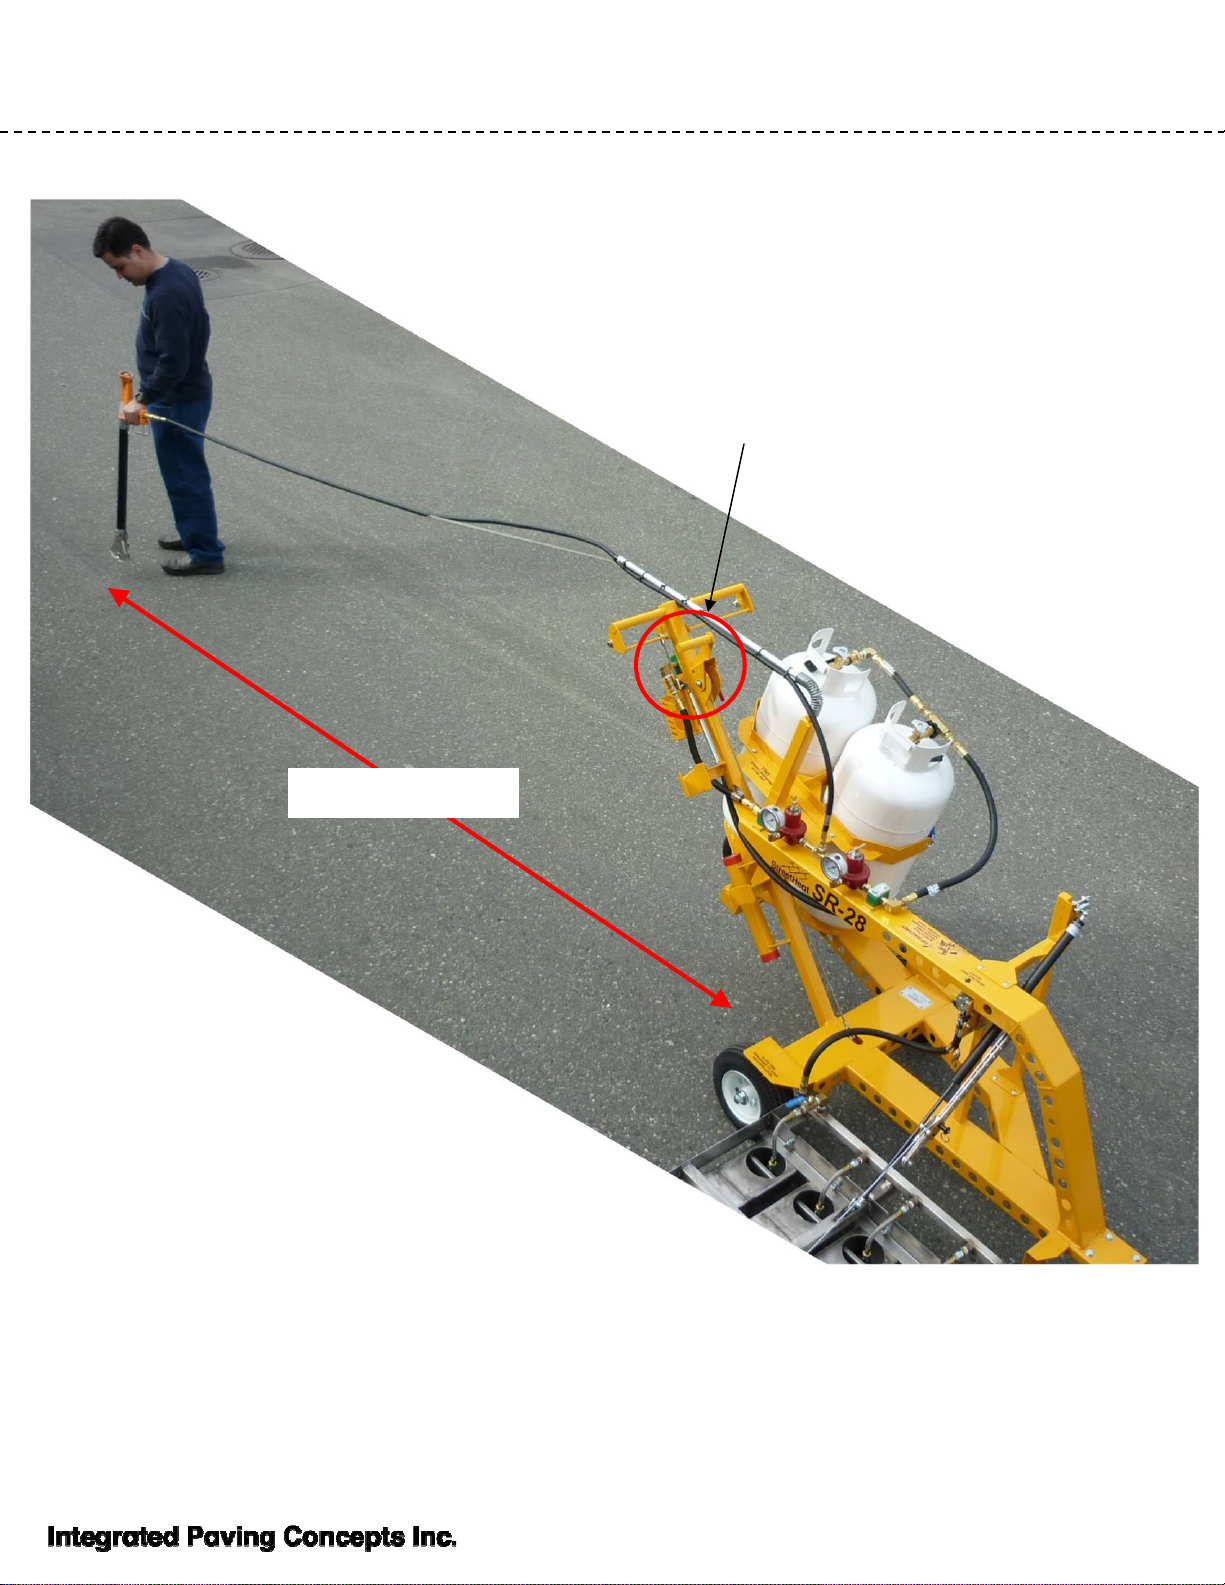
Operating Procedure – Cont’d
12’ Radius
The Flint 2000EX Heat Torch can be operated in a 12’ radius in all
directions from the SR28 if you need to heat those hard-to-get-at
places.
Do not pull too hard on the hose
or it could rupture and cause a
dangerous propane leak.
Always make sure that the hand brake is
set first.
Take care when using the Heat Torch close to the machine
that you do not overheat a tire and cause it to burst

12
Preparing for Transport
1. Propane Tank – Caution EXPLOSION HAZARD! Never transport the SR28 with
the propane hose attached to the tanks! Never transport or store propane
tanks inside an enclosed trailer! Make sure the shut off valve on the tank is
closed tightly and that the tanks are securely latched to the machine or
transport.
2. Fold up the Heater Bank - The heavy duty rotary latch will hold the heater bank in
place securely for transportation. Make sure it is closed securely.
3. Secure the Flint 2000EX Heat Torch – The heat torch should be either removed
from the SR28 and stowed separately or held in its cradle securely using bungee
cords.
4. Brake – When transporting always set the hand brake.
5. Strapping – Strap the SR28 down so that it cannot move in any direction, nor rock
from front to rear wheels. Avoid placing strapping on to or over the heater
bank.

13
Trouble-Shooting and Repair Contents
1. Trouble-Shooting Guide
2. Parts List
3. Parts List Illustrations
4. Removing Traction Spring Cylinder
5. Adjusting Brake
6. Regular Maintenance
7. Service

14
Trouble Shooting
Problem will correct itself when winds subside.This can occur in high winds
Use a pressure washer to clean the screen. Allow
to dry before lighting
Check for build up of dirt or asphalt on the screen
Tighten Bolts. There is a ceramic gasket around
the perimeter that must be sealed
Check that all the nuts and bolts around the
perimeter of each heater are tightened.
Tighten or reseat and tighten flare fittings until leaks
are sealed
Check for leaks in the tube running from the
manifold to the heaters using soapy water and
blowing compressed air into the system (DO NOT
USE PROPANE; EXPLOSION HAZARD!)
Set to between 6 and 7 PSI. Too high pressure can
cause gas to leak out of the bell, fall to the ground
and ignite inside the heater.
Check that the pressure is not set too high
Propane is burning inside the heater: If you hear a continuous “whooshing” sound and
the top of the heater is turning blue, it is because it is burning internally. Here are some
things you can do:
Heater is lit but is not glowing red: Here are some things to check for:
Set between 6 and 7 PSI.2. Check that the pressure is not too low.
If it is still blocked there may be a larger piece that
necessitates the removal of the tip altogether (See the
Maintenance Section of this manual for instructions).
Use the supplied tip cleaner to clean out the orifice.
To do this, blow compressed air into the system and
run tip cleaner in and out while the air is blasting out
(DO NOT USE PROPANE; EXPLOSION HAZARD!)
1. Check that there is no blockage in the orifice
(the tip that injects the propane into the heater).

15
Parts List
(See the Following Page for Illustrations)
1Tip Cleaner Kit (Not Shown)80-0-432A62
1SR-28 Operations Manual (Not Shown)80-0-4500461
OTHER PARTS
1Flint 2000EX Heat Torch80-0-450U37
1- 3/8 Manual Shut off ValveMC-0-0-14136A
1Heater Bank Manifold AssemblyN/A36
4Infrared Heater Assembly (with 8" Braided Hose)80-0-416E35
1POL Propane Hose Sub-Assembly80-0-416N34
1Hose Whip Sub Assembly80-0-416G33
1- Heater Bank Pressure GaugeMC-0-0-13432B
1- StreetHeat Pressure GaugeMC-0-0-13532A
1Regulator Train Sub-Assembly80-0-416C32
1Propane Valve Sub-Assembly80-0-416D31
PROPANE
1Traction Gas Spring PostN/A23
1Heater Bank Frame AssemblyN/A22
1Main Frame AssemblyN/A21
STRUCTURAL
1- Ball Lock PinMC-0-0-27113A
1Heater Stay Sub Assembly80-0-416K13
1Brake Handle Sub Assembly80-0-416P12
1Traction Gas SpringMC-0-0-27511
1Brake Bar (Not Shown)N/A10
1Brake Rod Assembly80-0-416F9
1Rotary Latch Striker StudMC-0-0-2038
1Rotary LatchMC-0-0-2027
1Valve Extension SpringMC-0-0-2016
1Valve Linkage ArmN/A5
1Valve Handle LeverN/A4
18" Pneumatic Swivel Caster with Swivel LockMC-0-0-2003
18" Pneumatic Swivel CasterMC-0-0-1992
310" Pneumatic WheelsMC-0-0-1371
MECHANICAL
Qty Per
SR28
DescriptionPart Number
REF.
No.

16
Parts List - Illustrations
1
2
3
4
33
5
7
36
9
13A
22
32
34
32A
31
13
12
35
8
37
32B
36A
611
21
23

17
Removing the Traction Gas Spring
VERY IMPORTANT: Disassembling or operating the traction spring cylinder
incorrectly could result in severe injury. Please read these instructions
carefully.
To remove the traction gas spring cylinder, THE
CYLINDER MUST BE RETRACTED COMPLETELY. To
do this, the rotary latch assembly (circled left) will need to
be removed by undoing these two nuts and bolts.
Now the heater bank can be folded until the traction
spring is fully retracted
ONLY WHEN THE CYLINDER IS FULLY RETRACTED
should the clips holding the cylinder to the balls on both
ends be removed. See below.
Reverse the process to reinstall, taking care to line the rotary latch with the rotary latch stud on the
folding bank so that it latches properly.
CAUTION: NEVER OPERATE THE TRACTION GAS SPRING WITHOUT THE CLIPS
PROPERLY ATTACHED ON BOTH ENDS!
18
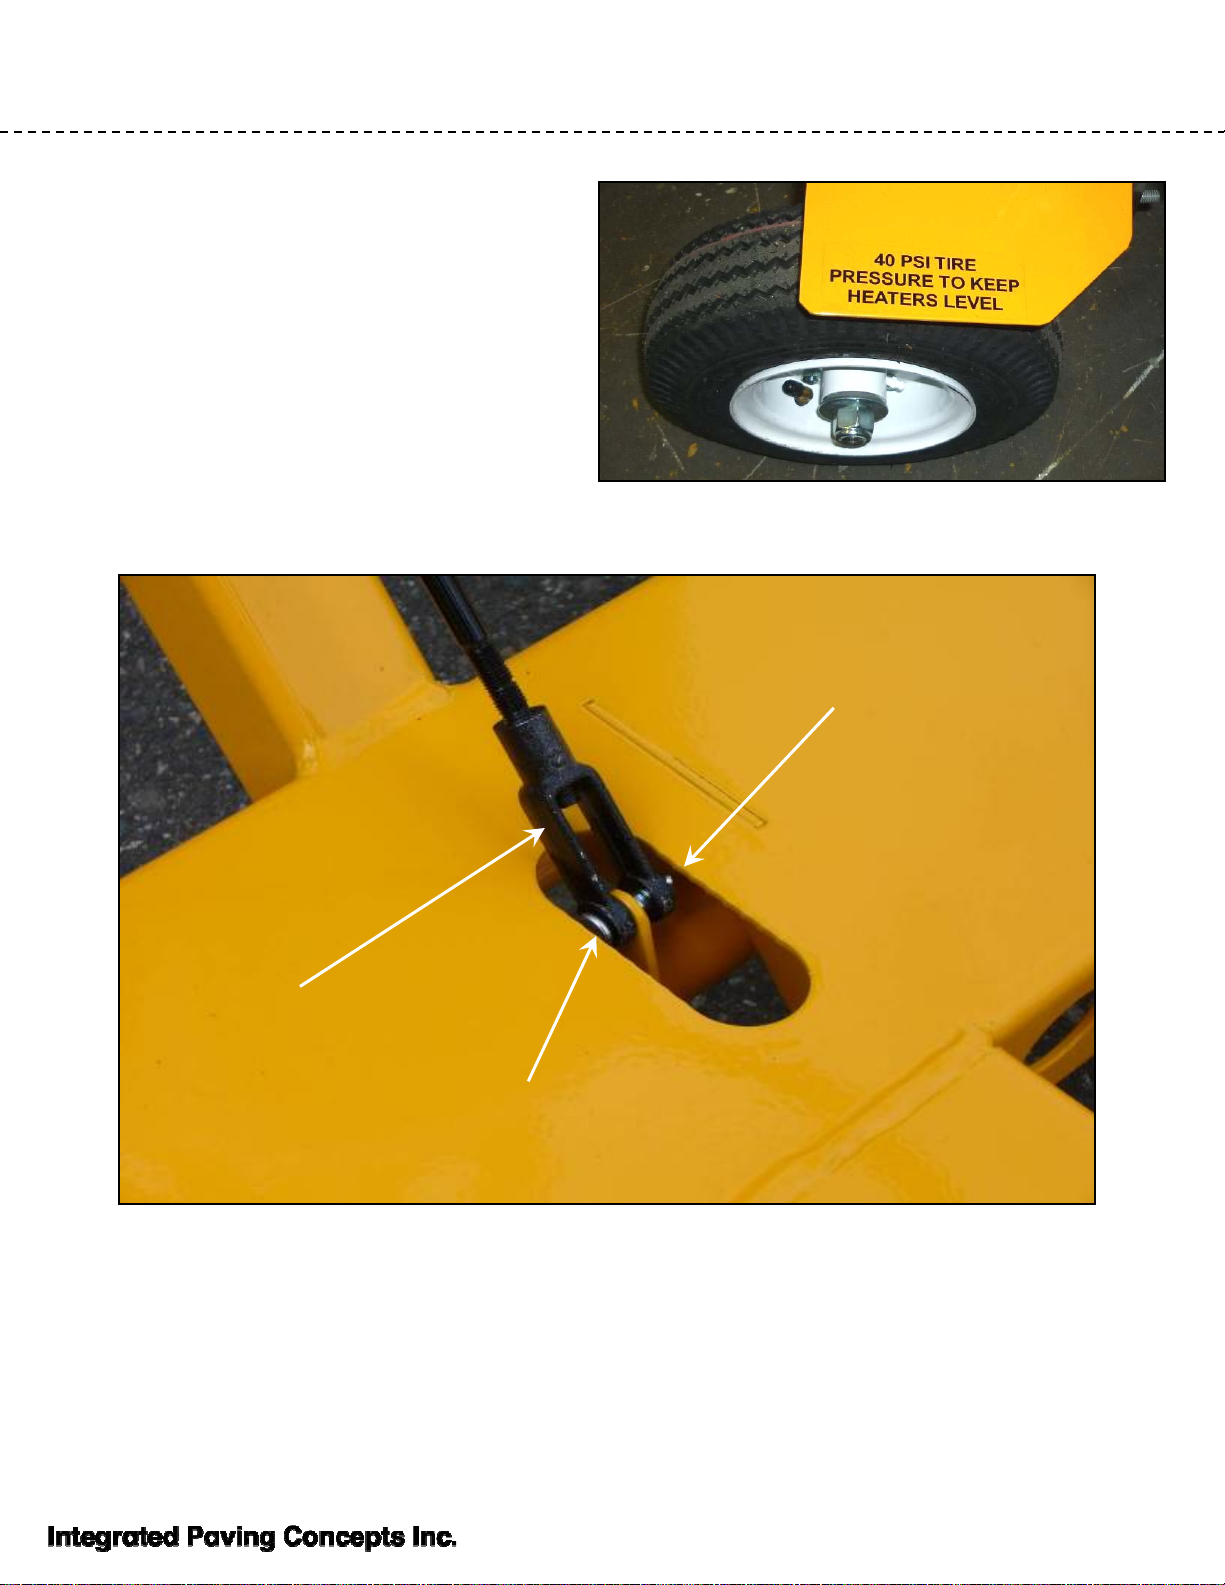
Adjusting Brake
Once the tire pressure is set properly the brake can be adjusted:
1. Remove the split pin and clevis pin on the Brake Rod
2. Screw Yoke on to tighten brake or off to loosen. Reassemble.
Split Pin
Yoke
Clevis Pin
The brake bar on the SR28 presses
against the tire tread. Therefore brake
effectiveness is related to tire pressure.
Make sure the main wheels are kept at 40
psi pressure.
19
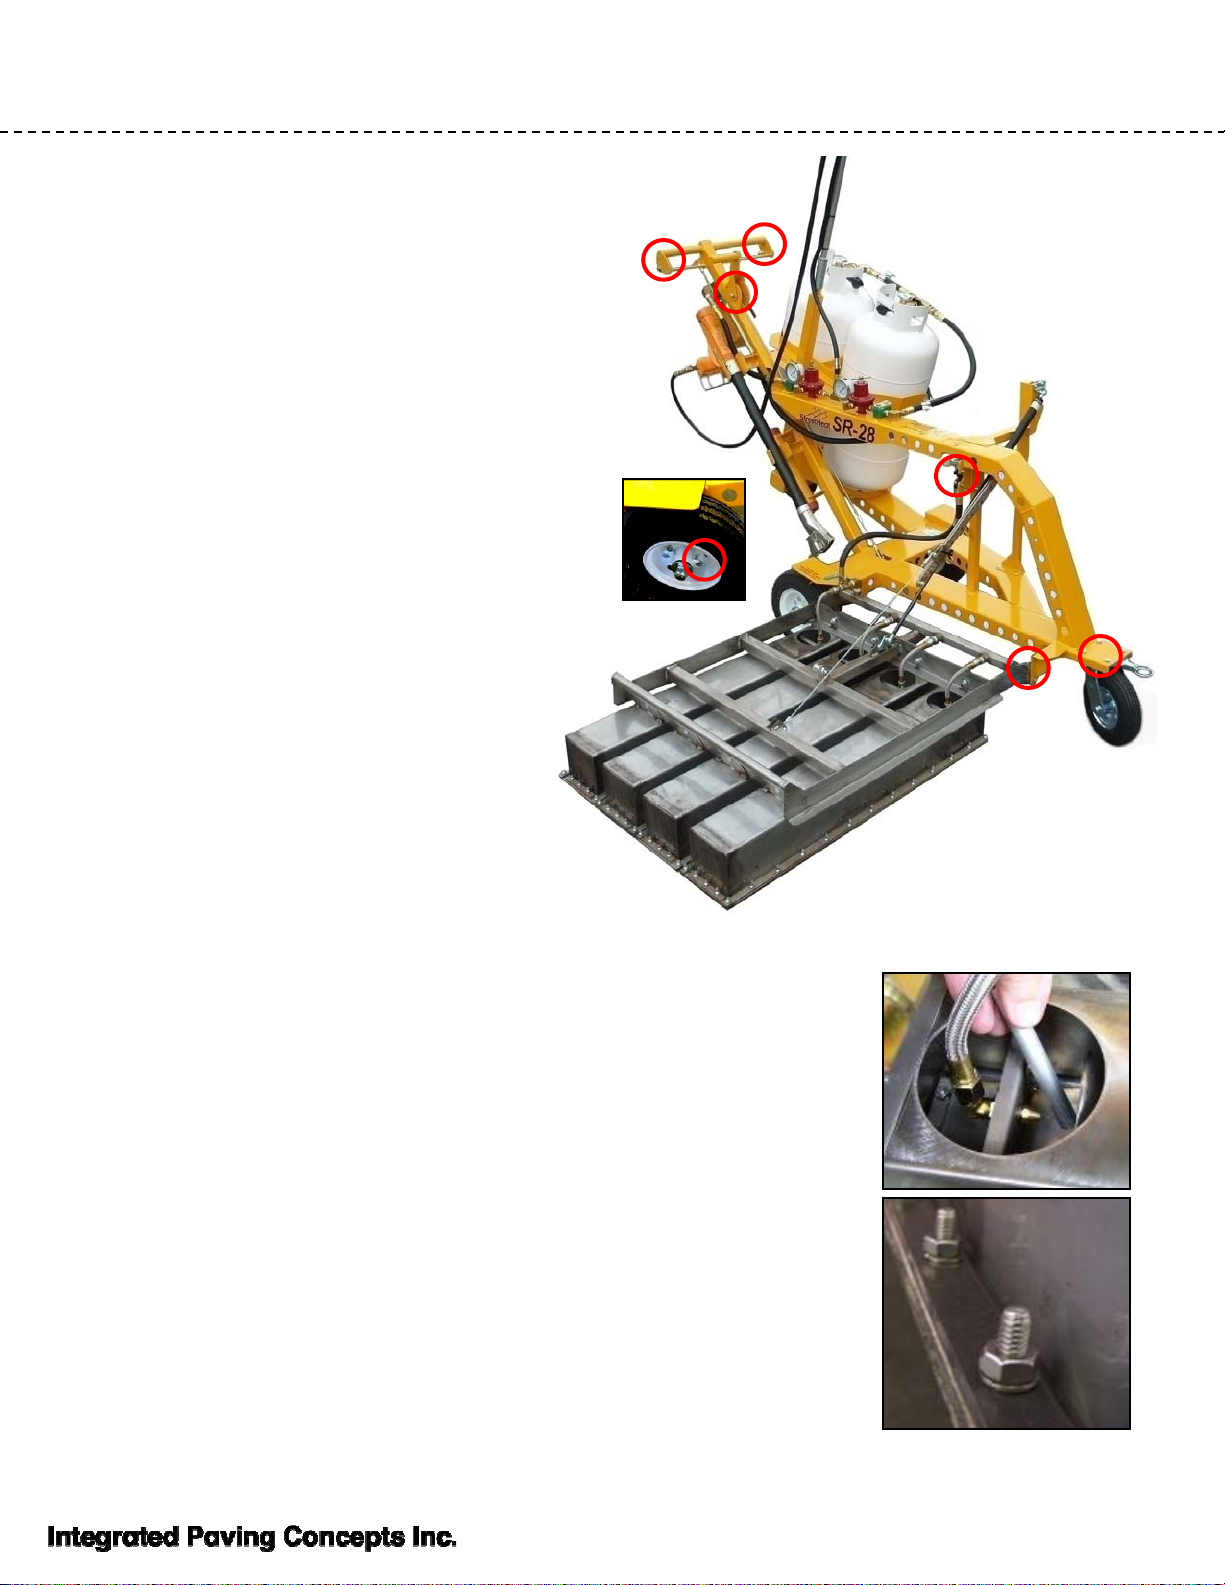
Regular Maintenance
Lubrication
At least once a season apply grease to all
the rotation points on the SR28. Use a
grease gun to apply grease to the grease
nipples on the wheels and caster bearings
and spray white lithium grease to lubricate
the remaining points. (circled at right).
Hoses and Fittings
Do a visual check at least once a month of
all hoses and fittings to make sure there is
no damage or risk of perforation. Replace
any parts BEFORE they fail.
Tires
Check tire pressures frequently. Check the
tread, especially on the right hand 10” wheel
that takes most of the weight of the
machine. Replace the wheel if necessary.
Heaters
Over time the heaters may begin to lose some of their original glow so
that it takes longer to heat the asphalt. One way to prevent this is to
keep the propane tips (orifices) clear of debris. The orifice is the small
tip that injects the propane into the heater. Use the supplied tip cleaner
to clean out the orifice.
To do this, attach compressed air onto the quick coupler on the hose
leading into the heater bank. Run the tip cleaner in and out of the tip
while air is blowing through it. CAUTION: DO NOT USE PROPANE;
EXPLOSION HAZARD!
Once a year, using a 7/16” wrench and ratchet with an extension,
check that all the bolts on the heater perimeter are tight. This will
prevent propane leaking out the sides and causing internal combustion.

20
1. Using a 11/16” wrench,
loosen and disconnect the
braided hose
4. Remove fitting and tip
assembly from burner.
2. Using a 3/4” wrench,
loosen the backing bolt that
keeps the tip assembly in
place.
3. Once the backing nut is
loose, you will be able to
unscrew by hand.
5. Using the tip cleaner or a
welding tip cleaner, clean
the tip. This will dislodge
any debris that may be
clogging the tip.
6. Blow compressed air
through the tip to remove
debris from behind the
orifice.
Reverse steps for re-assembly. When fully assembled, apply soapy water, blow compressed
air through system to check for leaks. Tighten any fitting that leaks.
Regular Maintenance –Cont’d
Heaters (cont’d) - If cleaning the tip still doesn’t restore the glow on the heater, you may need to
remove the whole fitting assembly on which the tip is mounted to dislodge any debris that has
accumulated behind the tip.
Table of contents


