Intelix TRB-2V1AD User manual

USER MANUAL
MODEL:
TRB-2V1AD
Round table box with power, HDMI, VGA,
3.5mm audio, and RJ45 inputs

TRB-2V1AD – Contents
i
Contents
1 Introduction 1
2Getting Started 2
2.1 Achieving the Best Performance 2
2.2 Safety Instructions 3
2.3 Recycling Products 3
3Overview 4
3.1 Defining the TRB-2V1AD Round table box with power, HDMI, VGA, 3.5mm audio,
and RJ45 inputs 4
4Installing the TRB-2V1AD 7
4.1 Drilling a Hole in the Table 7
4.2 Mounting the TRB-2V1AD in the Table 8
4.3 Connecting the Cables 10
5Using the TRB-2V1AD 12
6Technical Specifications 13
Figures
Figure 1: TRB-2V1ADRound table boxwith power, HDMI, VGA, 3.5mm audio, and RJ45 inputs 5
Figure 2: TRB-2V1ADConnecting Surface 6
Figure 3: Connecting the Cables 10
Figure 4: TRB-2V1ADBoardroom Installation 12

TRB-2V1AD - Introduction
1
1Introduction
Congratulations on purchasing your TRB-2V1AD Round table box with
power, HDMI, VGA, 3.5mm audio, and RJ45 inputs, which is ideal for
the following typical applications:
Boardrooms
Conference rooms
Training rooms
Your TRB-2V1AD is available in two models: in black (model TRB-2V1AD-
B) and in aluminum (model TRB-2V1AD-A).

2
TRB-2V1AD - Getting Started
2Getting Started
We recommend that you:
Unpack the equipment carefully and save the original box and
packaging materials for possible future shipment
Review the contents of this user manual
2.1 Achieving the Best Performance
To achieve the best performance:
Use only good quality connection cables (we recommend high-
performance, high-resolution cables) to avoid interference,
deterioration in signal quality due to poor matching, and elevated
noise levels (often associated with low quality cables)
Do not secure the cables in tight bundles or roll the slack into tight
coils
Avoid interference from neighboring electrical appliances that may
adversely influence signal quality
Position your TRB-2V1AD away from moisture, excessive sunlight
and dust
This equipment is to be used only inside a building. It may
only be connected to other equipment that is installed
inside a building.
!

TRB-2V1AD - Getting Started
3
2.2 Safety Instructions
Caution:
There are no operator serviceable parts inside
the unit
Warning:
Use only the power cord that is supplied with
the unit
Warning:
Do not open the unit. High voltages can cause
electrical shock! Servicing by qualified
personnel only
Warning:
Disconnect the power and unplug the unit from
the wall before installing
2.3 Recycling Products
The Waste Electrical and Electronic Equipment (WEEE) Directive
2002/96/EC aims to reduce the amount of WEEE sent for disposal to
landfill or incineration by requiring it to be collected and recycled. To
comply with the WEEE Directive, we have made arrangements with the
European Advanced Recycling Network (EARN) and will cover any costs
of treatment, recycling and recovery of waste Electronics branded
equipment on arrival at the EARN facility.
!

4
TRB-2V1AD - Overview
3Overview
The TRB-2V1AD is an elegant furniture-mounted, round connection bus,
featuring a pneumatic mechanism for automatic lifting and smooth
closing of its lid. The TRB-2V1AD is easily installed into a table or podium
top for the USA (Power Input - 110V AC). The TRB-2V1AD enables you to
connect any equipment to systems installed in a room via cable access
or passive interfaces.
In addition, the TRB-2V1AD includes the following pass-through
connectors:
1 VGA on a 15-pin HD connector
1 HDMI connector
1 stereo audio on a 3.5mm connector
1Ethernet port on an RJ-45 connector
C14 power socket
The TRB-2V1AD supports HDMI with Deep Color, x.v.Color™, Lip Sync,
HDMI Uncompressed Audio Channels, Dolby TrueHD, DTS-HD, and CEC.
The TRB-2V1AD surface is available in black anodized or brushed clear.
3.1 Defining the TRB-2V1AD Round table box with power, HDMI,
VGA, 3.5mm audio, and RJ45 inputs
This section defines the TRB-2V1AD.

TRB-2V1AD - Overview
5
Figure 1: TRB-2V1AD Round table box with power, HDMI, VGA, 3.5mm audio, and RJ45 inputs

6
TRB-2V1AD - Overview
#
Feature
Function
1
Black Anodized or Brushed
Aluminum semi-automatic Lid
Covers the connecting surface, leaving the table surface neat
and tidy
2
Outer Rim
Fits over the table surface
3
Pneumatic Mechanism
Enables automatic lifting and smooth closing of the lid
4
Connecting Surface
See Figure 2
5
Rubber Protectors
Protect the table surface when mounting the unit (one on
each side)
6
Mounting Screws (2)
For securing the TRB-2V1AD to the table
7
Locking Butterfly Nuts
Tighten to lock the mounting butterfly screw (one on each
side)
8
Mounting Brackets (2 units)
Place in the bracket slits after inserting the enclosure into the
table –for securing the unit to the table surface (one on each
side)
9
Mounting Butterfly Nuts
Tighten to secure the unit to the table surface (one on each
side)
10
Mounting Bracket Slits (two sets
on each side)
Insert the mounting brackets to the slits when installing the
TRB-2V1AD (see Section 4.2)
11
HDMI Connector
Connect to an HDMI source
12
PC 15-pin HD Connector
Connect to a computer graphics source
13
Audio 3.5mm Mini Jack
Connect to an analog audio source
14
C14 power socket
Connect to the mains power
Figure 2: TRB-2V1AD Connecting Surface
#
Feature
Function
1
ETHERNET RJ-45 Connector
Connect to a network
2
PC 15-pin HD Connector
Connects to a VGA source
3
HDMI Connector
Connect to HDMI source
4
5A MAX. Power Socket
Connect to a 110V AC power consuming device
5
AUDIO 3.5mm Mini Jack
Connects to an unbalanced stereo audio source
6
Lid Latch
For safely closing the lid

TRB-2V1AD - Installing the TRB-2V1AD
7
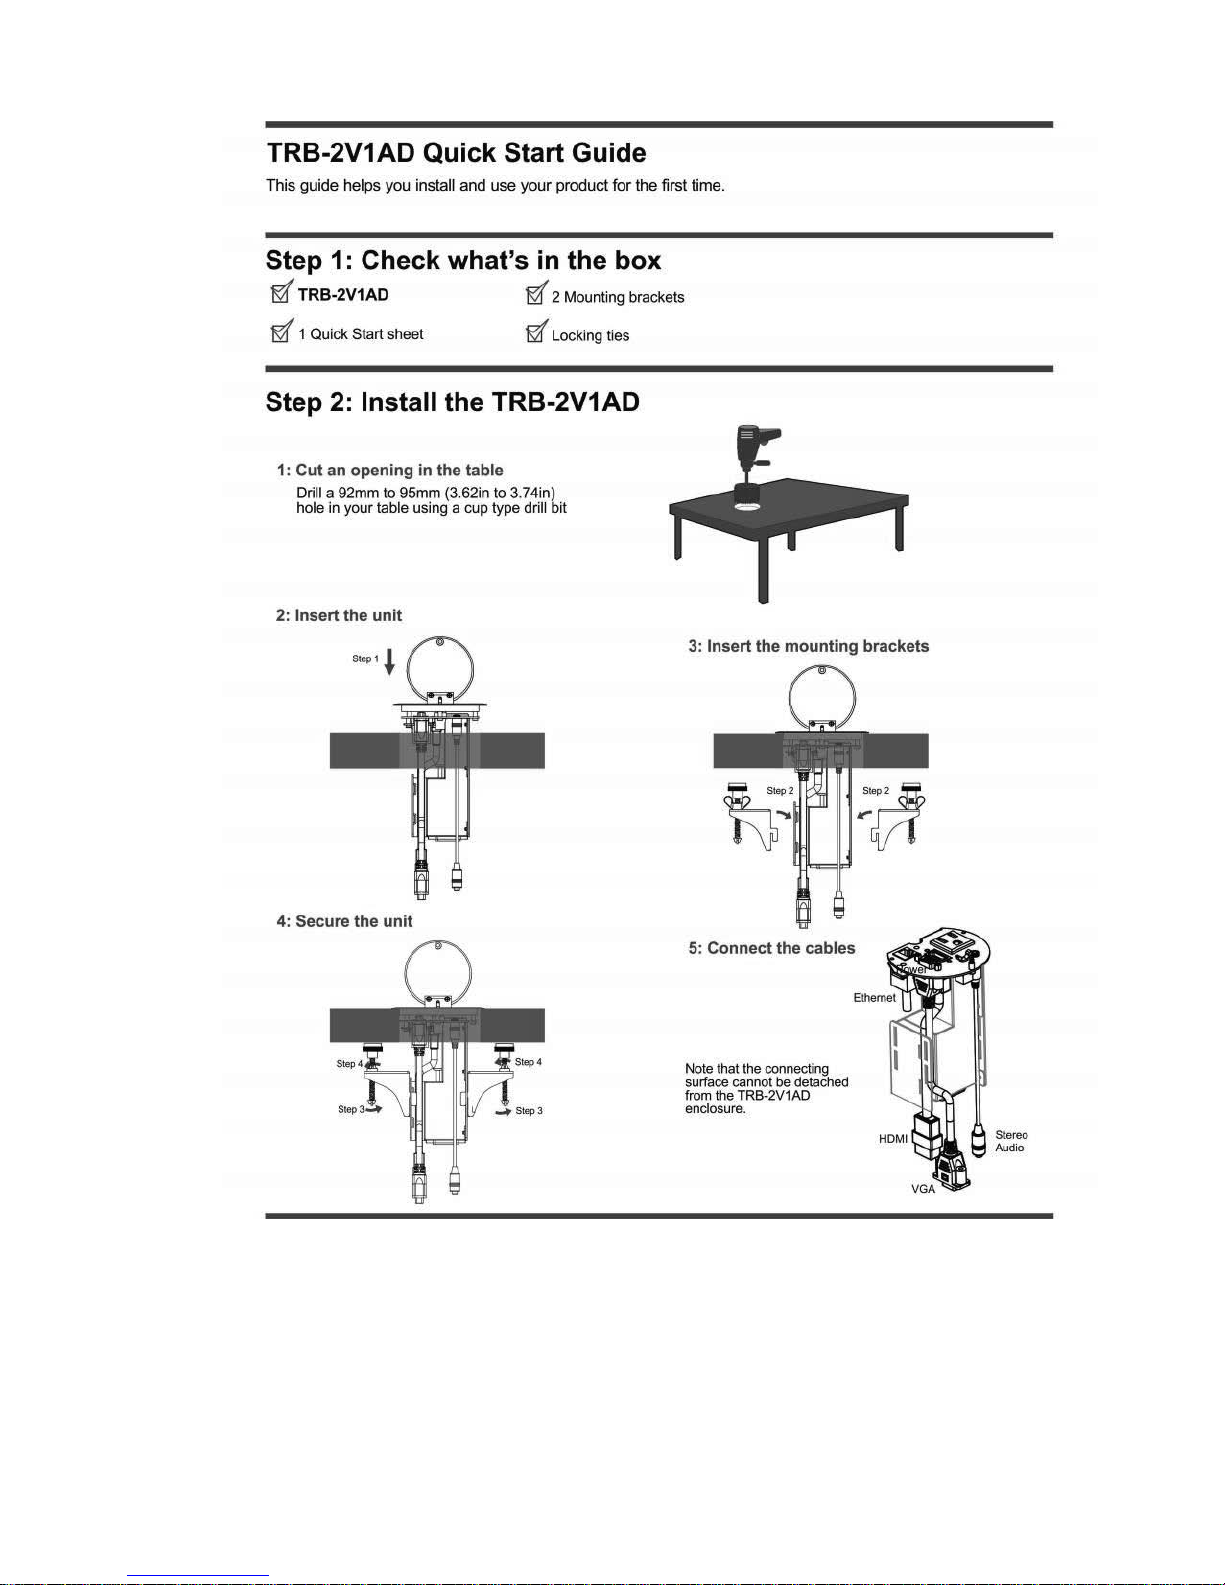
4Installing the TRB-2V1AD
To install the TRB-2V1AD perform the following steps:
1. Drill a hole in the table (see Section 4.1).
2. Insert the unit through the hole and secure the unit to the table
(see Section 4.2).
3. Connect the cables (see Section 4.3).
4.1 Drilling a Hole in the Table
To drill an opening in the table:
1. Using any standard cup bit drill with a diameter ranging from 92mm
to 95mm (3.62in to 3.74in), drill a hole in the table in the desired
location.
Note: The thickness of the table should be 3in (76mm) or less.
2. Clean the table surface.
Take care not to damage the table.
We are not responsible for any damage caused to the
table.
!
8
TRB-2V1AD - Installing the TRB-2V1AD
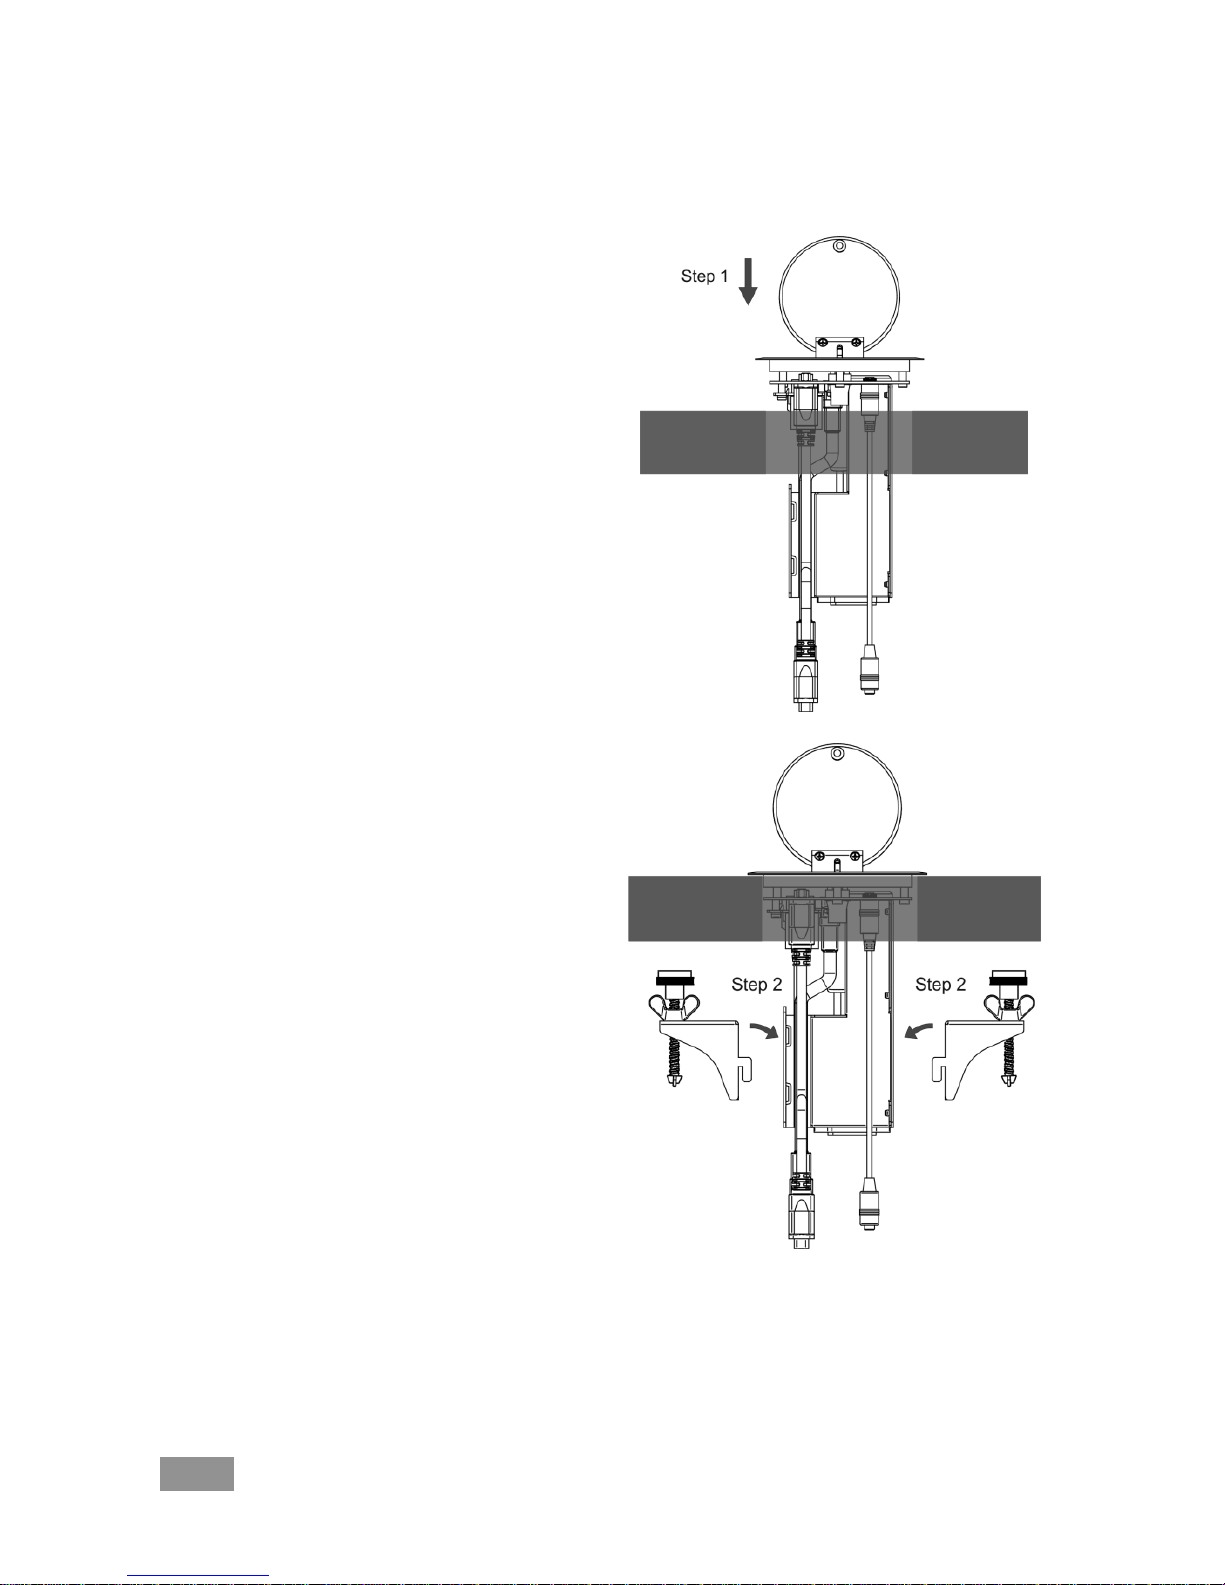
4.2 Mounting the TRB-2V1AD in the Table
To mount the unit, follow these steps:
Step 1: Insert the TRB-
2V1AD into the hole cut
into the table making sure
the outer rim is firm against
the surface of the table.
Step 2: From underneath
the table, slide the
mounting brackets into the
appropriate slots.
TRB-2V1AD - Installing the TRB-2V1AD
9
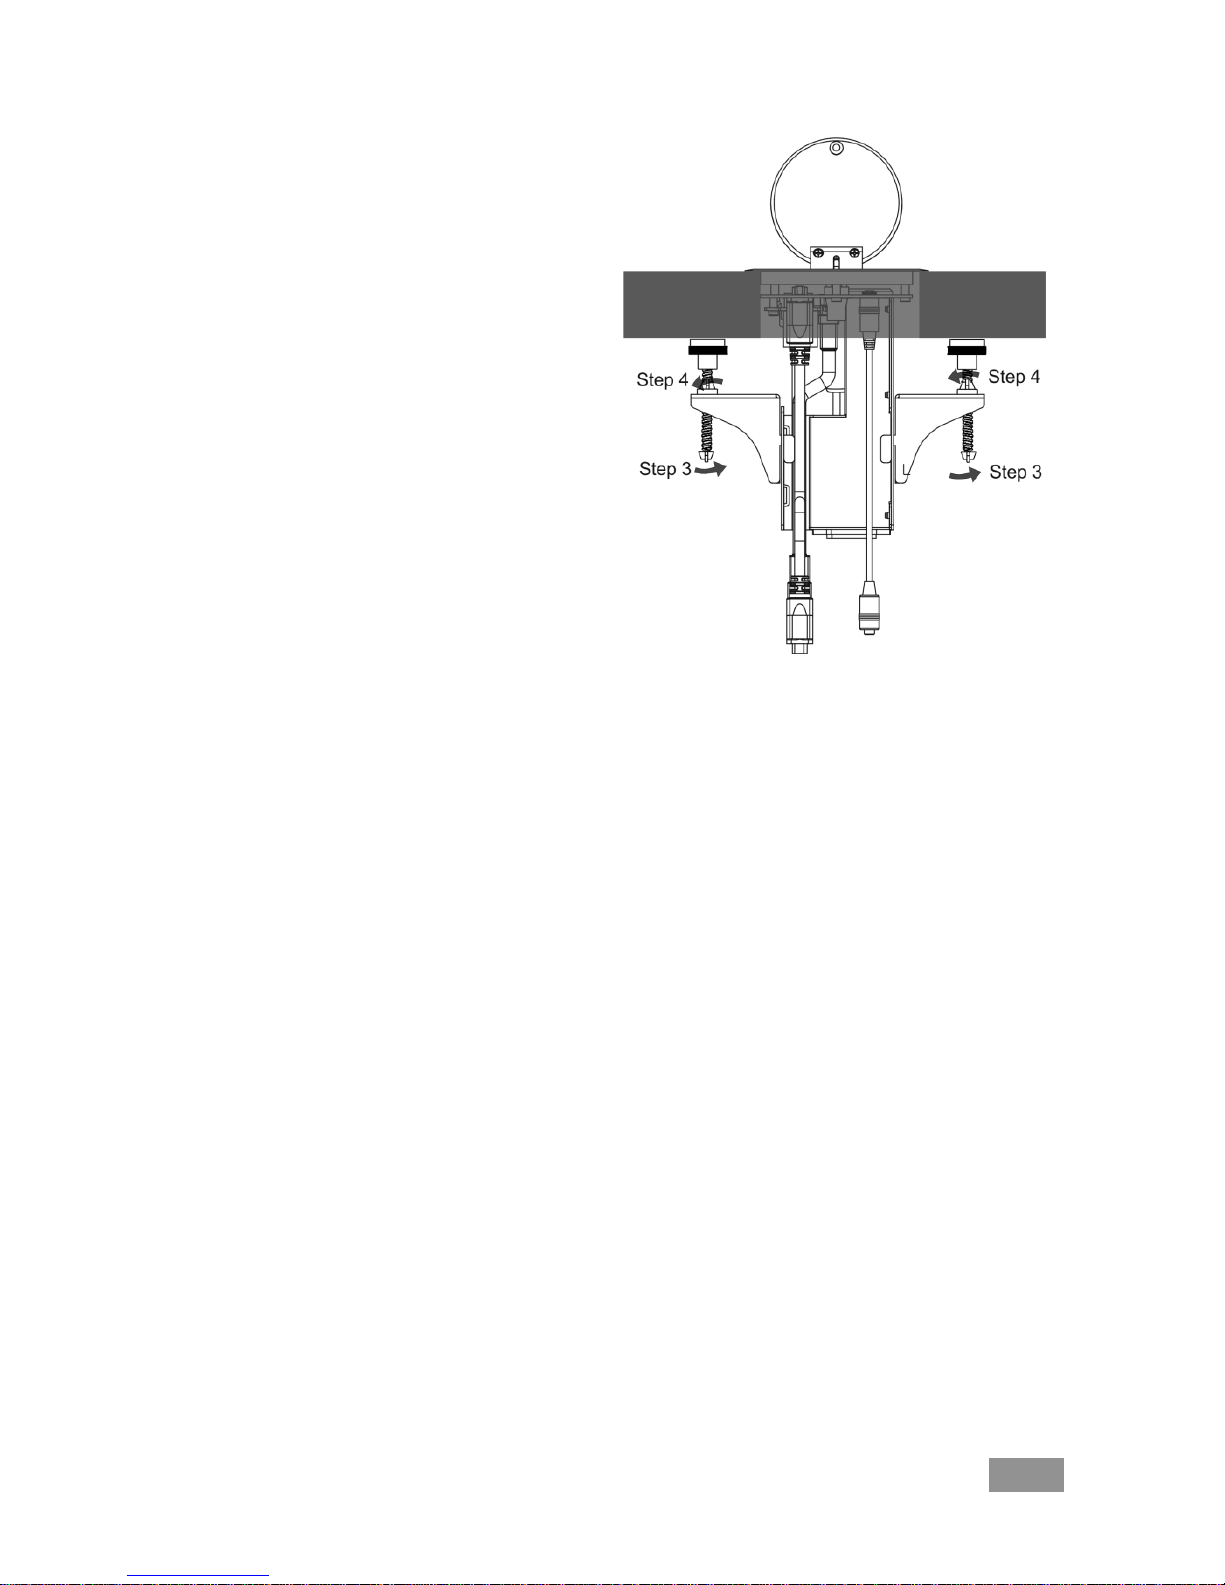
Step 3: Tighten the
butterfly mounting screws
securely upward against
the table.
Step 4: Lock the mounting
screws into position with
the locking butterfly
screws.

10
TRB-2V1AD - Installing the TRB-2V1AD
4.3 Connecting the Cables
Figure 3 illustrates how to connect the cables to the underside of the
unit:
Note that the connecting surface is an integral part of the RTBUS-11
enclosure and cannot be detached.
Figure 3: Connecting the Cables

TRB-2V1AD - Installing the TRB-2V1AD
11
We recommend that you use the C-AC/US AC Power Cord - 6ft USA
110V AC to power the unit.
12
TRB-2V1AD - Using the TRB-2V1AD
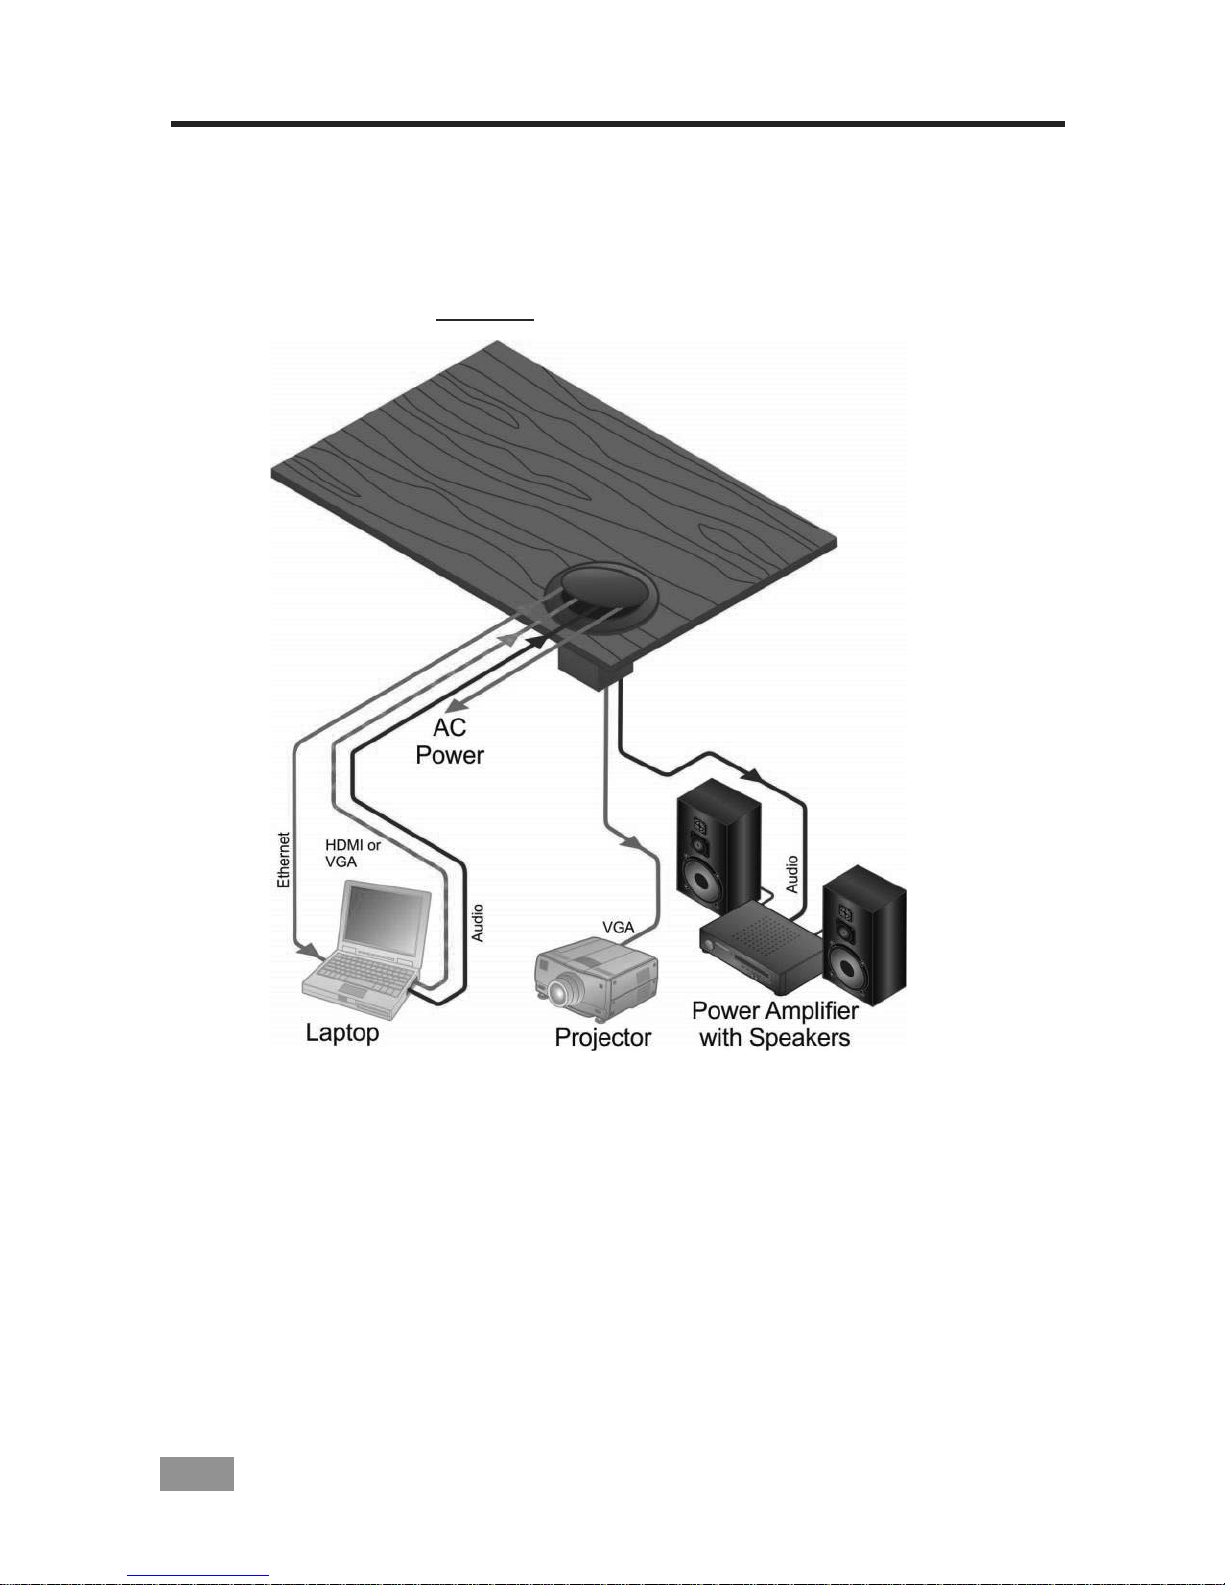
5Using the TRB-2V1AD
Once the TRB-2V1AD is installed, you can easily customize it to your
own needs by plugging in the required AV equipment, as illustrated in
the example in Figure 4.
Figure 4: TRB-2V1AD Boardroom Installation

TRB-2V1AD - Technical Specifications
13
6Technical Specifications
PORTS:
1 HDMI connector, 1 15-pin HD connector, 1 3.5mm mini jack, 1
RJ-45 connector
OPERATING TEMPERATURE:
0° to +40°C (32° to 104°F)
STORAGE TEMPERATURE:
-40° to +70°C (-49° to 158°F)
HUMIDITY:
10% to 90%, RHL non-condensing
POWER SOURCE (AC power limits):
115V AC, 50/60Hz, 5A Max
FUSE RATING:
T 6.3A 250V
DIMENSIONS:
10.5cm x 16cm (4.1" x 6.3") Diameter, H
WEIGHT:
0.85kg (1.9lbs) approx.
1.2kg (2.6lbs) approx. with mounting brackets
INCLUDED ACCESSORIES:
Six self-locking ties

This page is intentionally left blank

!
SAFETY WARNING
Disconnect the unit from the power
supply before opening and servicing
Table of contents
Popular Indoor Furnishing manuals by other brands

Easy Camp
Easy Camp MOVIE SEATS instruction manual

Wampat
Wampat W02W2111E Assembly instructions

TIMBER ART DESIGN
TIMBER ART DESIGN BR 990083-B Assembly instructions

Woood
Woood GUST Dining chair manual

emob
emob Elvis Glass Cabinet BC 70097G-S5V Assembly instruction

Verco
Verco Select 24 operating instructions


Living Spaces
Living Spaces JAXON 81480 owner's manual

avaks nabytok
avaks nabytok TETRIS TYP 05 manual

Moveis Estrela
Moveis Estrela MP 1430 instruction manual

Amart Furniture
Amart Furniture CONNELLAN 67428 Assembly instruction

Ercol
Ercol Chiltern 877/34230 manual

NOA & NANI
NOA & NANI BE-LG-SD Assembly instructions