Intenza 550TE2 User manual

INTENZA TREADMILL 550TE2
INTENZA TREADMILL 550TI
INTENZA TREADMILL 450TI2
INTENZA TREADMILL 450TI2S
Owner’s Manual
Treadmills

1
Intenza Treadmills Handbook. Table of Contents
Table of Contents
EN
DE
Treadmills Owner’s Manual
Laufband Bedienungshandbuch
2
36
EN

2 Intenza Treadmills Handbook. Important Safety Instructions And Precautions
IMPORTANT SAFETY INSTRUCTIONS
When using an electrical appliance, basic precautions should always be followed, including the following:Read all
instructions before operation
DANGER
To reduce the risk of electric shock—
· Always unplug this appliance from the electrical outlet immediately after using and before cleaning.
WARNING
To reduce the risk of burns, fire, electric shock, or injury to persons—
· The appliance should never be left unattended when plugged in.
· Unplug from outlet when not in use and before putting on or removing parts.
· Do not operate the equipment under any kind of blanket or pillow: excessive heating can occur and cause fire, electric
shock or injury to persons.
· Close supervision is necessary when this equipment is used by, on, or near children, invalids or disabled persons.
· Only use this equipment for its intended use as described in this manual. Do not use attachments not recommended
by the manufacturer.
· Never operate this appliance if it has a damaged cord or plug, if it is not working properly, if it has been dropped, damaged or
dropped into water. Please contact authorised dealer/distributor or service provider service centre for examination and repair.
· Do not carry this appliance by its supply cord, or use the cord as a handle.
· Keep the appliance, its equipment and the cord away from hot or heated surfaces.
· Never operate the equipment if air openings are blocked. Keep air openings free of dust, lint, hair and the like.
· Never drop or insert any object into any opening.
· Do not use the equipment outdoors.
· Do not operate the equipment where aerosol (spray) products are being used, or where oxygen is being administered.
· To disconnect the equipment, turn all controls to the “off” position, then remove plug from outlet.
· Below mentioned sound pressure level is measured under the condition when the trainer is operating with highest
speed with no load. Sound pressure level (dB) < 70dB. Noise emission under load is higher than without load.
· Heart rate monitoring system may be inaccurate. Over exercise may result in injury or death. If you feel faint stop
exercising immediately.
IMPORTANT OPERATION INSTRUCTIONS
· NEVER operate this treadmill without reading and completely understanding the results of any operational change
you request from the console.
· Understand that changes in resistance do not occur immediately. Set your desired resistance level on the computer
console and release the adjustment key. The console will obey the command gradually.
· Use caution while participating in other activities while pedaling on your treadmill, such as watching television, reading, etc.
These distractions may cause you to lose balance which may result in serious injury.
· Always hold on to the handlebar while making control changes.
· Do not use excessive pressure on console control keys. They are precision set to function properly with gentle finger pressure.
If you feel the buttons are not functioning properly with normal pressure contact your dealer.
EN

GROUNDING PIN
GROUNDING
OUTLET
NEMA5—20R
GROUNDING PIN
GROUNDING
OUTLET
GROUNDING METHODS—
AMERICA AND OTHER COUNTRIES
USING 120 VOLTAGE
GROUNDING METHODS—
EUROPE AND OTHER COUNTRIES
USING 220—240 VOLTAGE
3
Intenza Treadmills Handbook: Important Safety Instructions And Precautions
SAVE THESE INSTRUCTIONS
WARNING
GROUNDING INSTRUCTIONS
This product must be grounded. If it should malfunction or breakdown, grounding provides the path of least
resistance for an electric current to reduce the risk of electric shock. This product is equipped with a cord
having a grounding conductor and plug. The plug must be plugged into an appropriate outlet that is properly
installed and grounded in accordance with all local codes and ordinances.
This equipment will be wired for either 120V AC nominal power input or 220—240V AC nominal input. It
is factory—equipped with a specific electric cord and plug to permit connection to the proper electric circuit.
Make sure that each equipment is connected to a dedicated circuit inserted into an outlet with
the same configuration as that of the plug. If you are uncertain about the type of suitable power
plug, please contact your distributor or a qualified local electrician. Do not use an adapter or
extension cord with this equipment.
DANGER
Improper installation may result in risk of electric shock. Check with a qualified electrician or serviceman if
you are in doubt as to whether the product is properly grounded. Do not modify the plug provided with the
product. If it does not fit the outlet, have a proper outlet installed by a qualified electrician.
Frequency (Hz) Current (Amps)
Supply Voltage (VAC)
220—240 50/60 9
Power Consumption (KW)
2.0
EUROPE AND OTHERCOUNTRIES USING 220—240 VOLTAGE
...................................................................................................................................................................................................
Frequency (Hz) Current (Amps)
Supply Voltage (VAC)
120 50/60 16
Power Consumption (KW)
1.84
AMERICA AND OTHER COUNTRIESUSING 120 VOLTAGE (SKETCH A,SKETCH B)
...................................................................................................................................................................................................
EN

WARNING
Important Safety Precautions
4Intenza Treadmills Handbook. Important Safety Precautions
EN
· The Intenza Treadmills are designed for cardiovascular exercise in a commercial environment.
· Health—related injuries may result from incorrect or excessive use of exercise equipment. Please check with your physician prior to
beginning any exercise program.
· Heart rate monitoring systems may be inaccurate. “Over” exercise may result in serious injury or death. If you feel faint, stop
exercising immediately.
SAFETY PRECAUTIONS
· Unsupervised children must be kept away from this equipment.
· Assemble and operate the equipment on a stable base which has been leveled correctly.
· Retain an open area of 6.5 feet by 3 feet (2000mm x 1000mm) behind the treadmill, which is clear of any obstructions, including
walls, furniture and other equipment.
· Keep equipment away from sources of heat, such as radiators, heat registers or stoves. Avoid extreme temperature changes.
· Do not use outdoors or in an enclosed swimming pool environment.
· Keep equipment away from water and moisture. Avoid dropping anything on, or spilling anything inside, the equipment to prevent
electric shock or damage to the electronics.
· Never leave the equipment unattended when it is plugged in. Unplug the equipment from its power source when not in use for a
prolonged period.
· Do not drop or insert any object, including hands, or feet into any opening, or underneath the equipment.
· Do not attempt to remove the cover or modify the equipment. Service should only be conducted by an authorised Service Technician.
If there is a problem or need to replace parts (such as running belt and related electronic parts, etc), you cannot replace or repair the
parts by yourself. You must contact a technician for repair.
· Do not use the equipment with bare feet. Do not use shoes with heels, leather soles, cleats or spikes. Wear shoes with rubber or
high—traction soles and ensure that no stones, or foreign objects, are embedded in shoe soles.
· Do not operate the equipment until any defective components are repaired.
· Use the handrails whenever additional stability is required. User should attach safety key in case of emergency, such as tripping, the
user should grab the handrails and place his/her feet on the side platforms. The handrails may be held to enhance stability as needed,
but are not for continuous use. And stop the equipment by pressing STOP button.Step backwards and ensure to grab
handlebars on both sides.
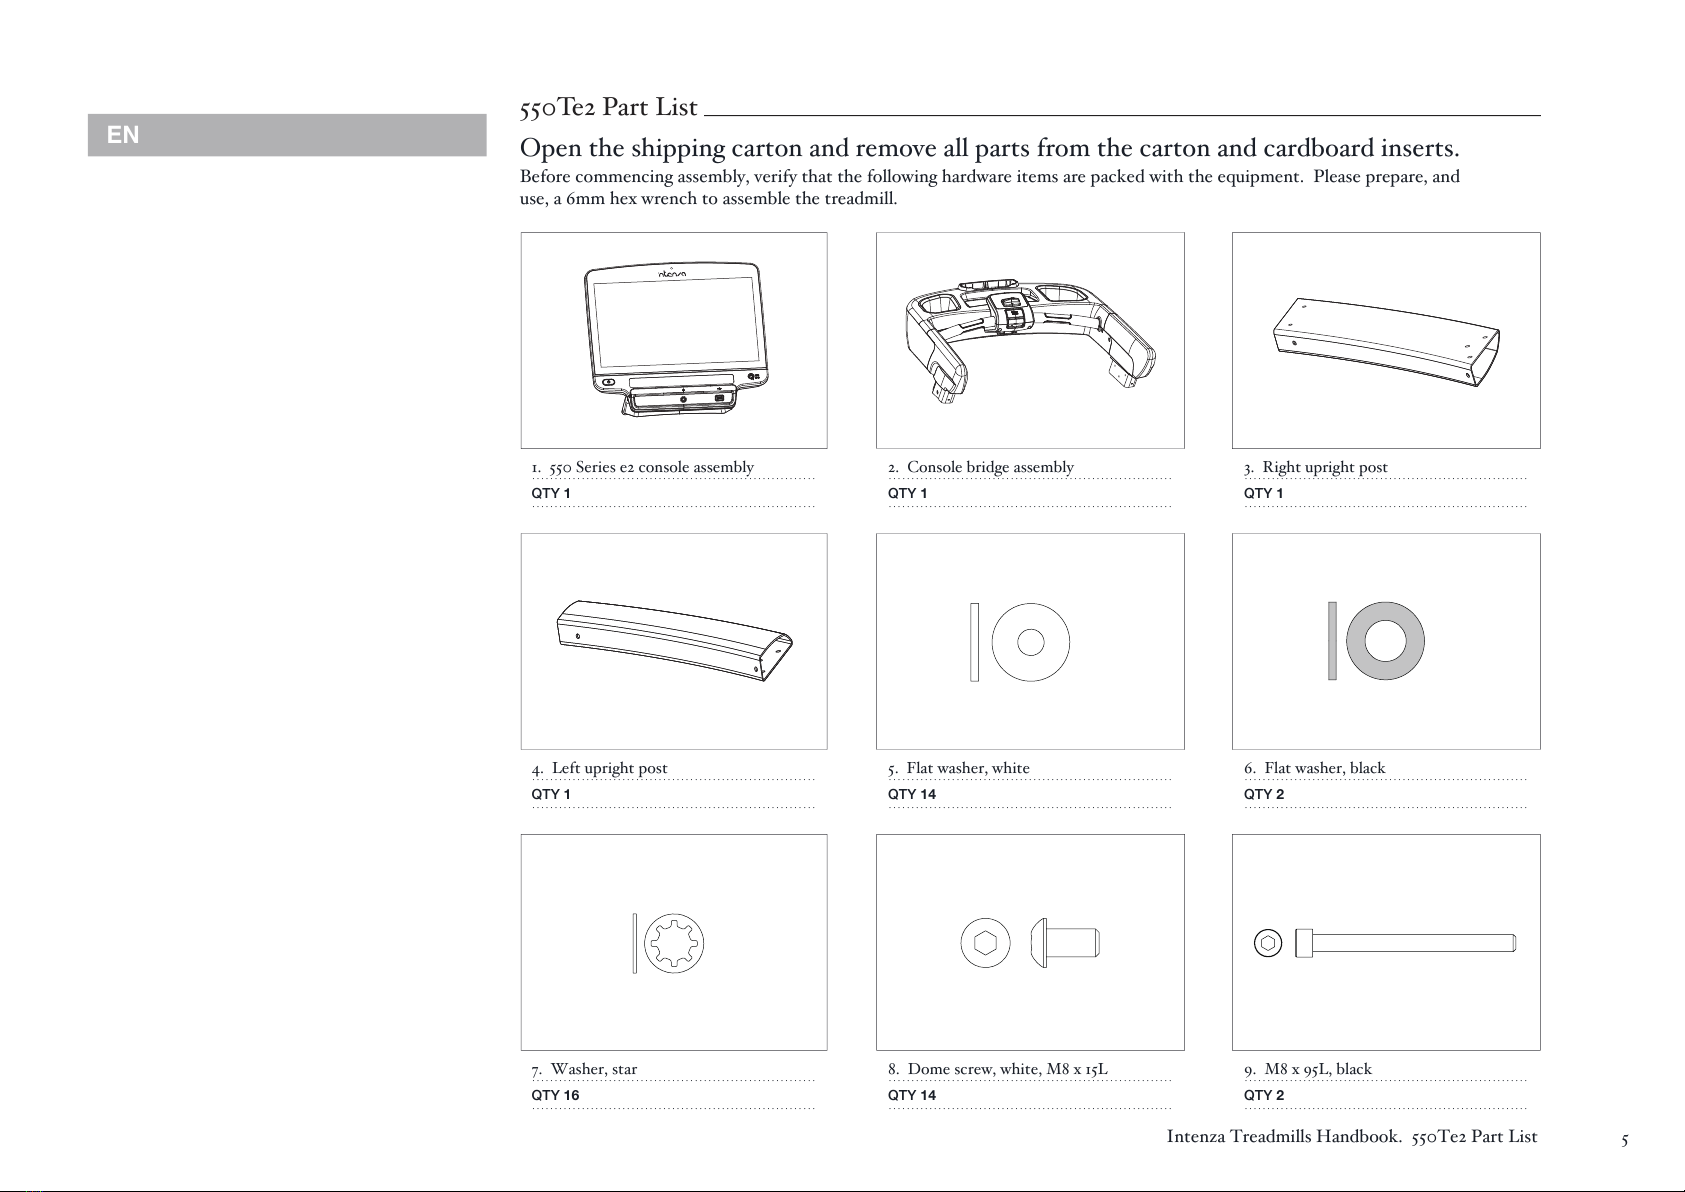
Open the shipping carton and remove all parts from the carton and cardboard inserts.
Before commencing assembly, verify that the following hardware items are packed with the equipment. Please prepare, and
use, a 6mm hex wrench to assemble the treadmill.
5
Intenza Treadmills Handbook. 550Te2 Part List
1. 550 Series e2 console assembly
QTY1
...............................................................
...............................................................
2. Console bridge assembly
QTY1
...............................................................
...............................................................
3. Right upright post
QTY1
.............................................................. .
.............................................................. .
4. Left upright post
QTY1
...............................................................
...............................................................
5. Flat washer, white
QTY14
...............................................................
...............................................................
6. Flat washer, black
QTY2
.............................................................. .
.............................................................. .
7. Washer, star
QTY16
...............................................................
...............................................................
8. Dome screw, white, M8 x 15L
QTY14
...............................................................
...............................................................
9. M8 x 95L, black
QTY2
.............................................................. .
.............................................................. .
550Te2 Part List
EN
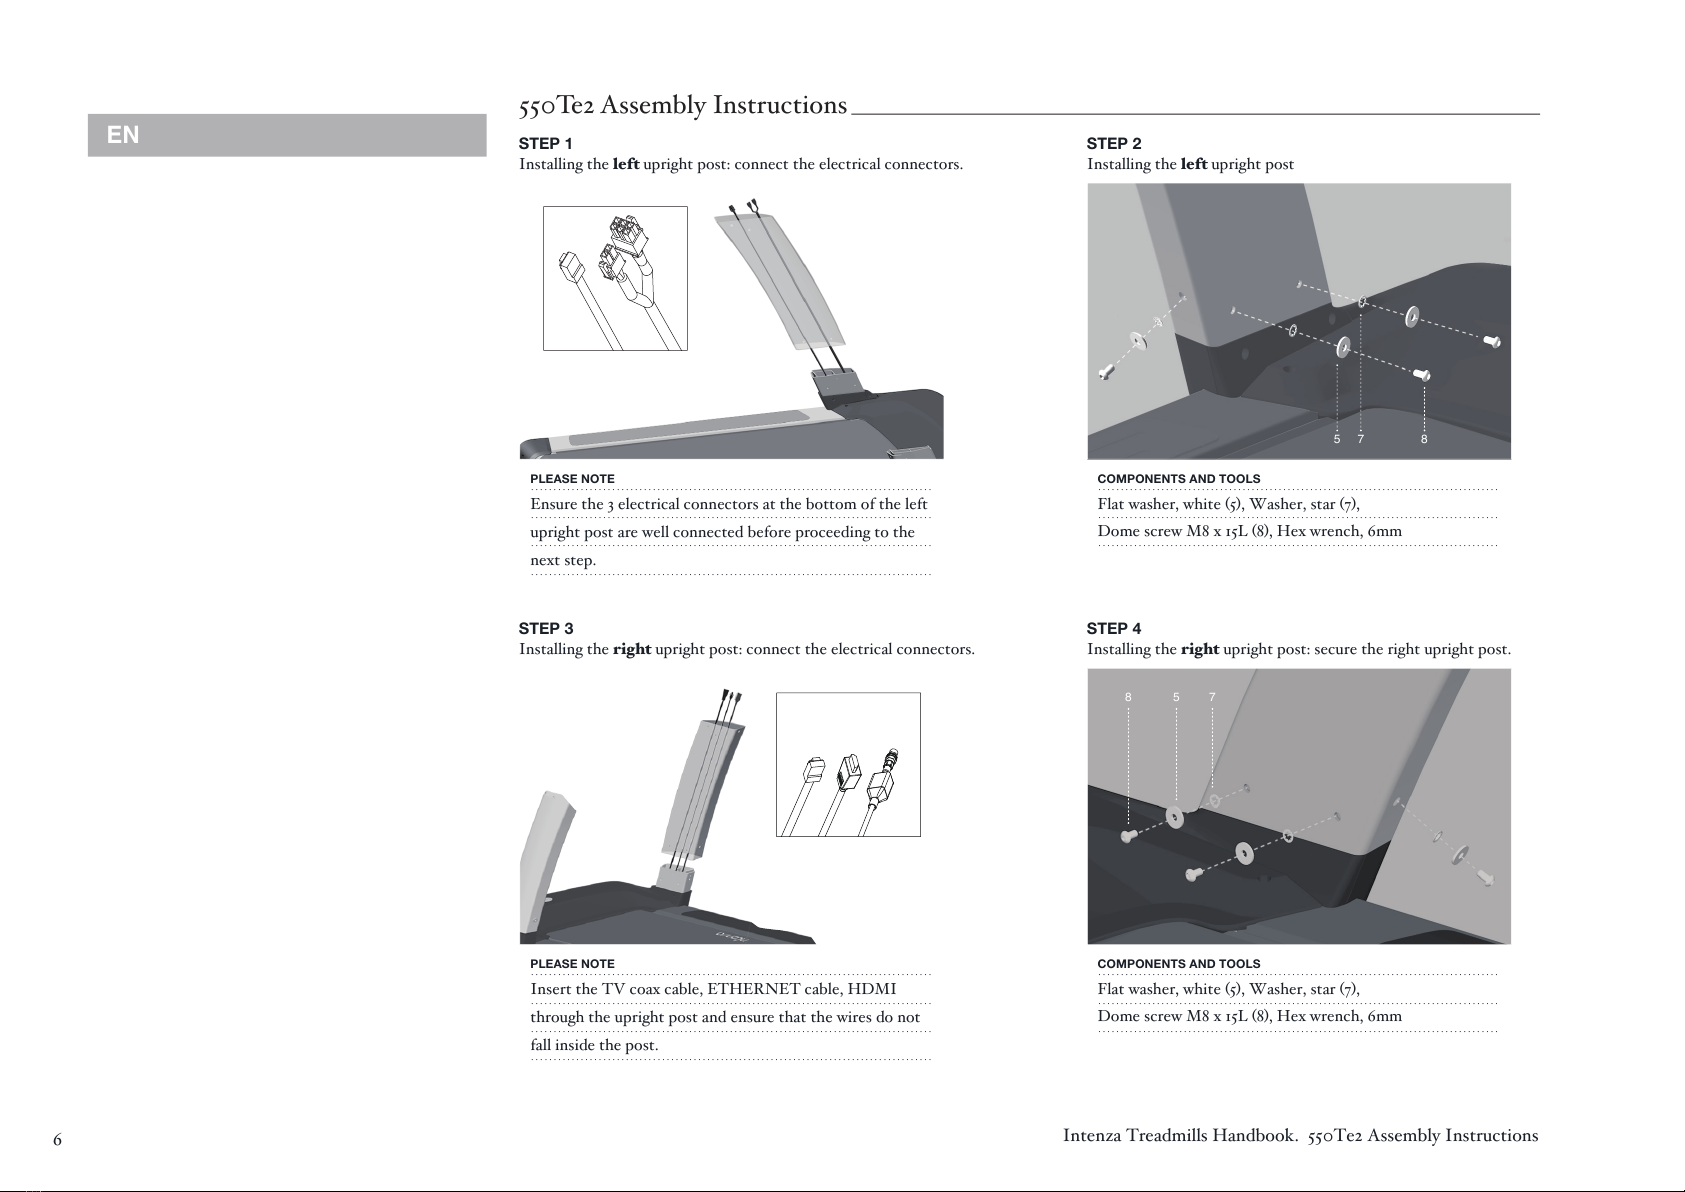
6Intenza Treadmills Handbook. 550Te2 Assembly Instructions
STEP 1
Installing the left upright post: connect the electrical connectors.
STEP 2
Installing the left upright post
PLEASE NOTE
Ensure the 3 electrical connectors at the bottom of the left
upright post are well connected before proceeding to the
next step.
........................................................................................ .
........................................................................................ .
........................................................................................ .
........................................................................................ .
COMPONENTS ANDTOOLS
Flat washer, white (5), Washer, star (7),
Dome screw M8 x 15L (8), Hex wrench, 6mm
.........................................................................................
.........................................................................................
.........................................................................................
PLEASE NOTE
Insert the TV coax cable, ETHERNET cable, HDMI
through the upright post and ensure that the wires do not
fall inside the post.
........................................................................................ .
........................................................................................ .
........................................................................................ .
........................................................................................ .
STEP 3
Installing the right upright post: connect the electrical connectors.
STEP 4
Installing the right upright post: secure the right upright post.
COMPONENTS ANDTOOLS
Flat washer, white (5), Washer, star (7),
Dome screw M8 x 15L (8), Hex wrench, 6mm
.........................................................................................
.........................................................................................
.........................................................................................
550Te2 Assembly Instructions
7 85
8 5 7
EN

7
Intenza Treadmills Handbook. 550Te2 Assembly Instructions
STEP 5
Installing the console bridge: connect the electrical connectors.
STEP 6
Installing the console bridge: connect the electrical connectors.
PLEASE NOTE
Ensure the 3 electrical connectors at the top of the left
upright post are well—connected before moving to the
next step.
........................................................................................ .
........................................................................................ .
........................................................................................ .
........................................................................................ .
PLEASE NOTE
Ensure the TV coax cable, electrical connector,
ETHERNET cable and HDMI cable at the top of the
right upright post are well—connected before moving
to the next step.
.........................................................................................
.........................................................................................
.........................................................................................
.........................................................................................
.........................................................................................
PLEASE NOTE
When connecting the TV coax cable, be sure to tighten the
connectors, then push the jacket cover over the connectors.
........................................................................................ .
........................................................................................ .
........................................................................................ .
STEP 7
Installing the console bridge: TV coax cable connections.
STEP 8
Installing the console bridge: position the bridge on top of the upright posts.
PLEASE NOTE
Be sure to push any excess wires inside the right and left
upright posts.
.........................................................................................
.........................................................................................
.........................................................................................
550Te2 Assembly Instructions
EN

8Intenza Treadmills Handbook. 550Te2 Assembly Instructions
STEP 9
Installing the console bridge: secure the left side of the console bridge.
STEP 10
Installing the console bridge: secure the right side of the console bridge.
COMPONENTSAND TOOLS
Flat washer, white (5), Washer, star (7),
Dome screw M8 x 15L (8), Hex wrench, 6mm
........................................................................................ .
........................................................................................ .
........................................................................................ .
COMPONENTS ANDTOOLS
Flat washer, white (5), Washer, star (7),
Dome screw M8 x 15L (8), Hex wrench, 6mm
.........................................................................................
.........................................................................................
.........................................................................................
PLEASE NOTE
Ensure the 5 electrical connectors, TV coax cable and
ETHERNET cable at the console bottom are well—
connected before moving to the next step. When
connecting TV coax cable, be sure to tighten the connector,
then push jacket cover over connector. Please refer to step 7.
........................................................................................ .
........................................................................................ .
........................................................................................ .
........................................................................................ .
........................................................................................ .
........................................................................................ .
........................................................................................ .
STEP 11
Installing the 550Te2 Entertainment console: connect the electrical connectors.
STEP 12
Installing the 550Te2 Entertainment console: secure the console.
COMPONENTS ANDTOOLS
Washer, star (7), Flat washer, black (6), M8 x 95L, Black (9),
Hex wrench, 6mm
.........................................................................................
.........................................................................................
.........................................................................................
550Te2 Assembly Instructions
75 8
7
6
9
58 7
EN

9
Intenza Treadmills Handbook. 550Ti and 450Ti2&Ti2S Part List
Open the shipping carton and remove all parts from the carton and cardboard inserts.
Before commencing assembly, verify that the following hardware items are packed with the equipment. Please prepare, and
use, a 6mm hex wrench to assemble the treadmill.
1. 550 Series i console assembly
QTY1
..............................................................
...............................................................
2. Console bridge assembly
QTY 1
.............................................................. .
.............................................................. .
3. Right upright post
QTY1
.............................................................. .
.............................................................. .
4. Left upright post
QTY1
...............................................................
...............................................................
5. Flat washer, white
QTY 14
.............................................................. .
.............................................................. .
6. Flat washer, black
QTY2
.............................................................. .
.............................................................. .
7. Washer, star
QTY16
...............................................................
...............................................................
8. Dome screw, white, M8 x 15L
QTY 14
.............................................................. .
.............................................................. .
9. M8 x 95L, black
QTY2
.............................................................. .
.............................................................. .
550Ti and 450Ti2&Ti2S Part List
EN

10. 450 Series i2 console assembly
QTY1
...............................................................
...............................................................
11. 450 Series i2S console assembly
QTY1
...............................................................
...............................................................
10 Intenza Treadmills Handbook. 550Ti and 450Ti2&Ti2S Part List
550Ti and 450Ti2&Ti2S Part List
EN
11Intenza Treadmills Handbook. 550Ti and 450Ti2&Ti2S Assembly Instructions
550Ti and 450Ti2&Ti2S Assembly Instructions
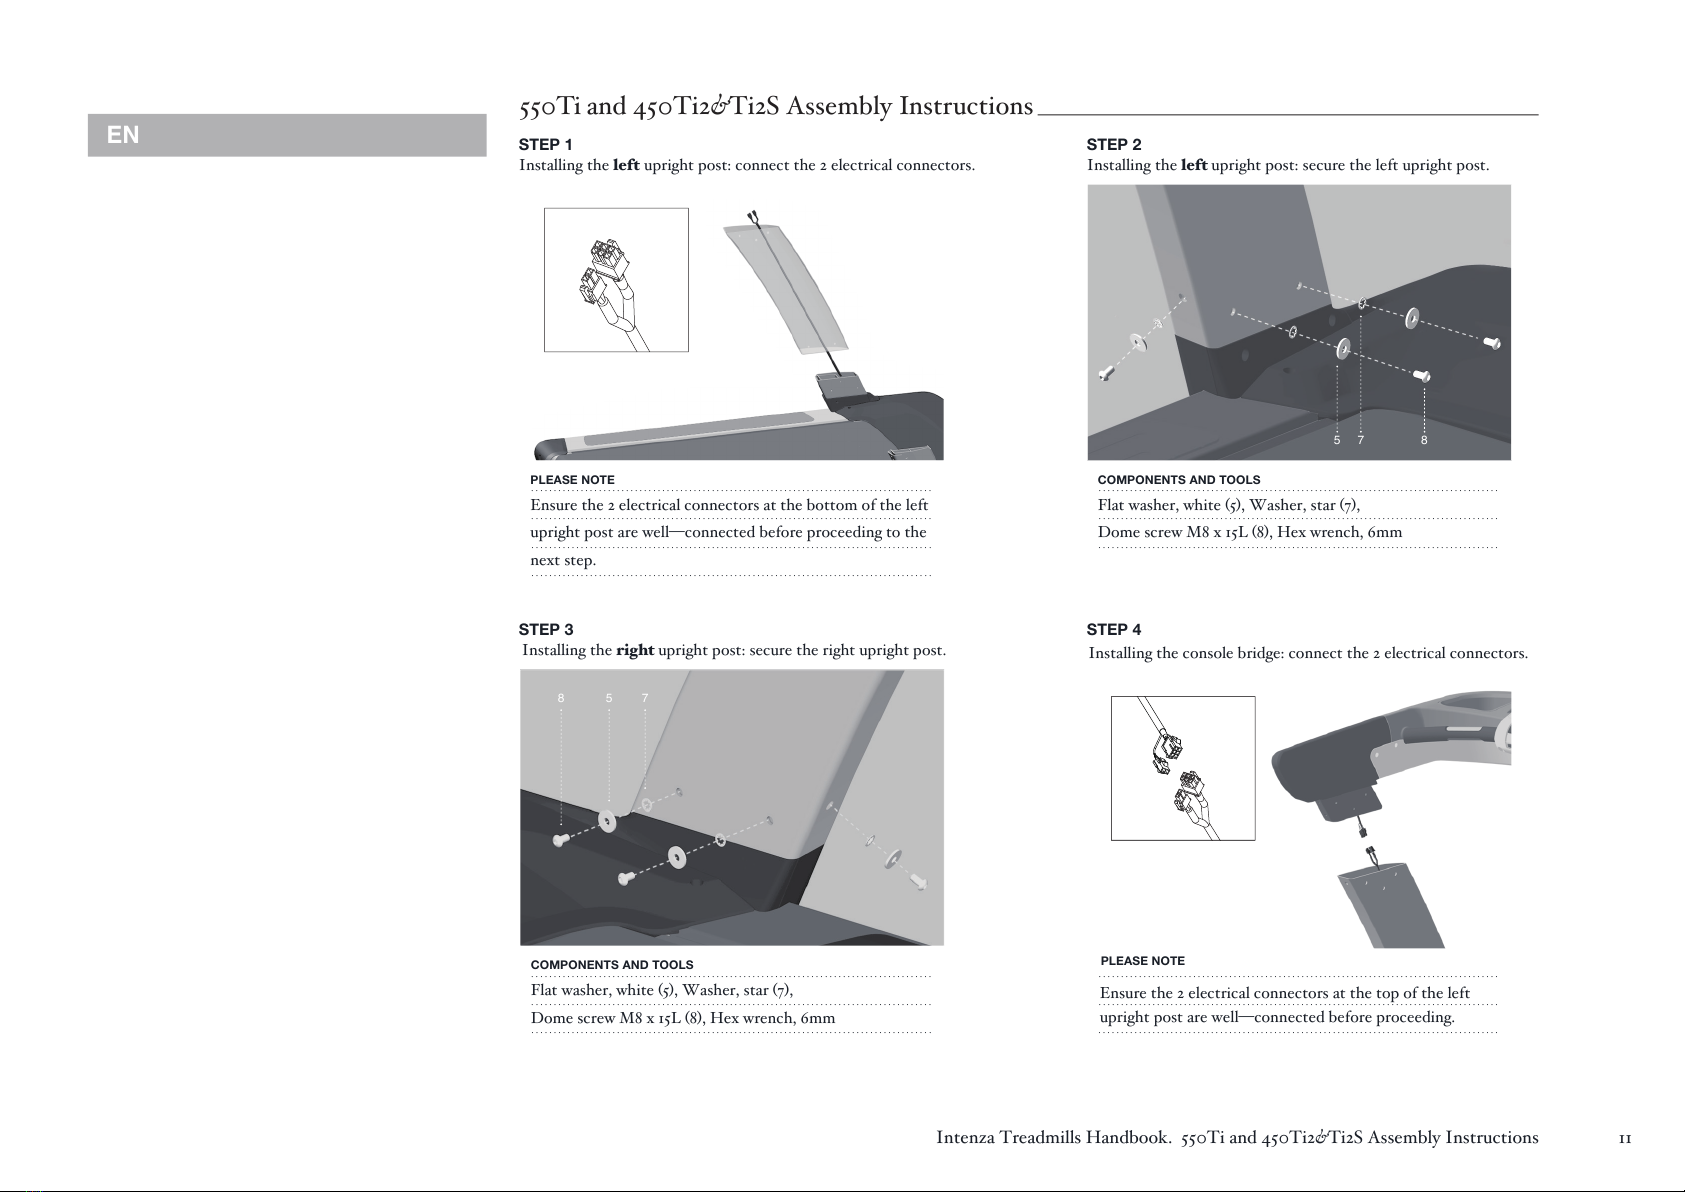
STEP 1
Installing the left upright post: connect the 2 electrical connectors.
STEP 2
Installing the left upright post: secure the left upright post.
PLEASE NOTE
Ensure the 2 electrical connectors at the bottom of the left
upright post are well—connected before proceeding to the
next step.
........................................................................................ .
........................................................................................ .
........................................................................................ .
........................................................................................ .
COMPONENTS ANDTOOLS
Flat washer, white (5), Washer, star (7),
Dome screw M8 x 15L (8), Hex wrench, 6mm
.........................................................................................
.........................................................................................
.........................................................................................
........................................................................................ .
........................................................................................ .
........................................................................................ .
STEP 4
Installing the right upright post: secure the right upright post.
COMPONENTS ANDTOOLS
Flat washer, white (5), Washer, star (7),
Dome screw M8 x 15L (8), Hex wrench, 6mm
.........................................................................................
.........................................................................................
.........................................................................................
STEP 3
7 85
8 5 7
Installing the console bridge: connect the 2 electrical connectors.
PLEASE NOTE
Ensure the 2 electrical connectors at the top of the left
upright post are well—connected before proceeding.
EN
12 Intenza Treadmill Handbooks. 550Ti and 450Ti2&Ti2S Assembly Instructions
STEP 5 STEP 6
........................................................................................ .
........................................................................................ .
.........................................................................................
.........................................................................................
.........................................................................................
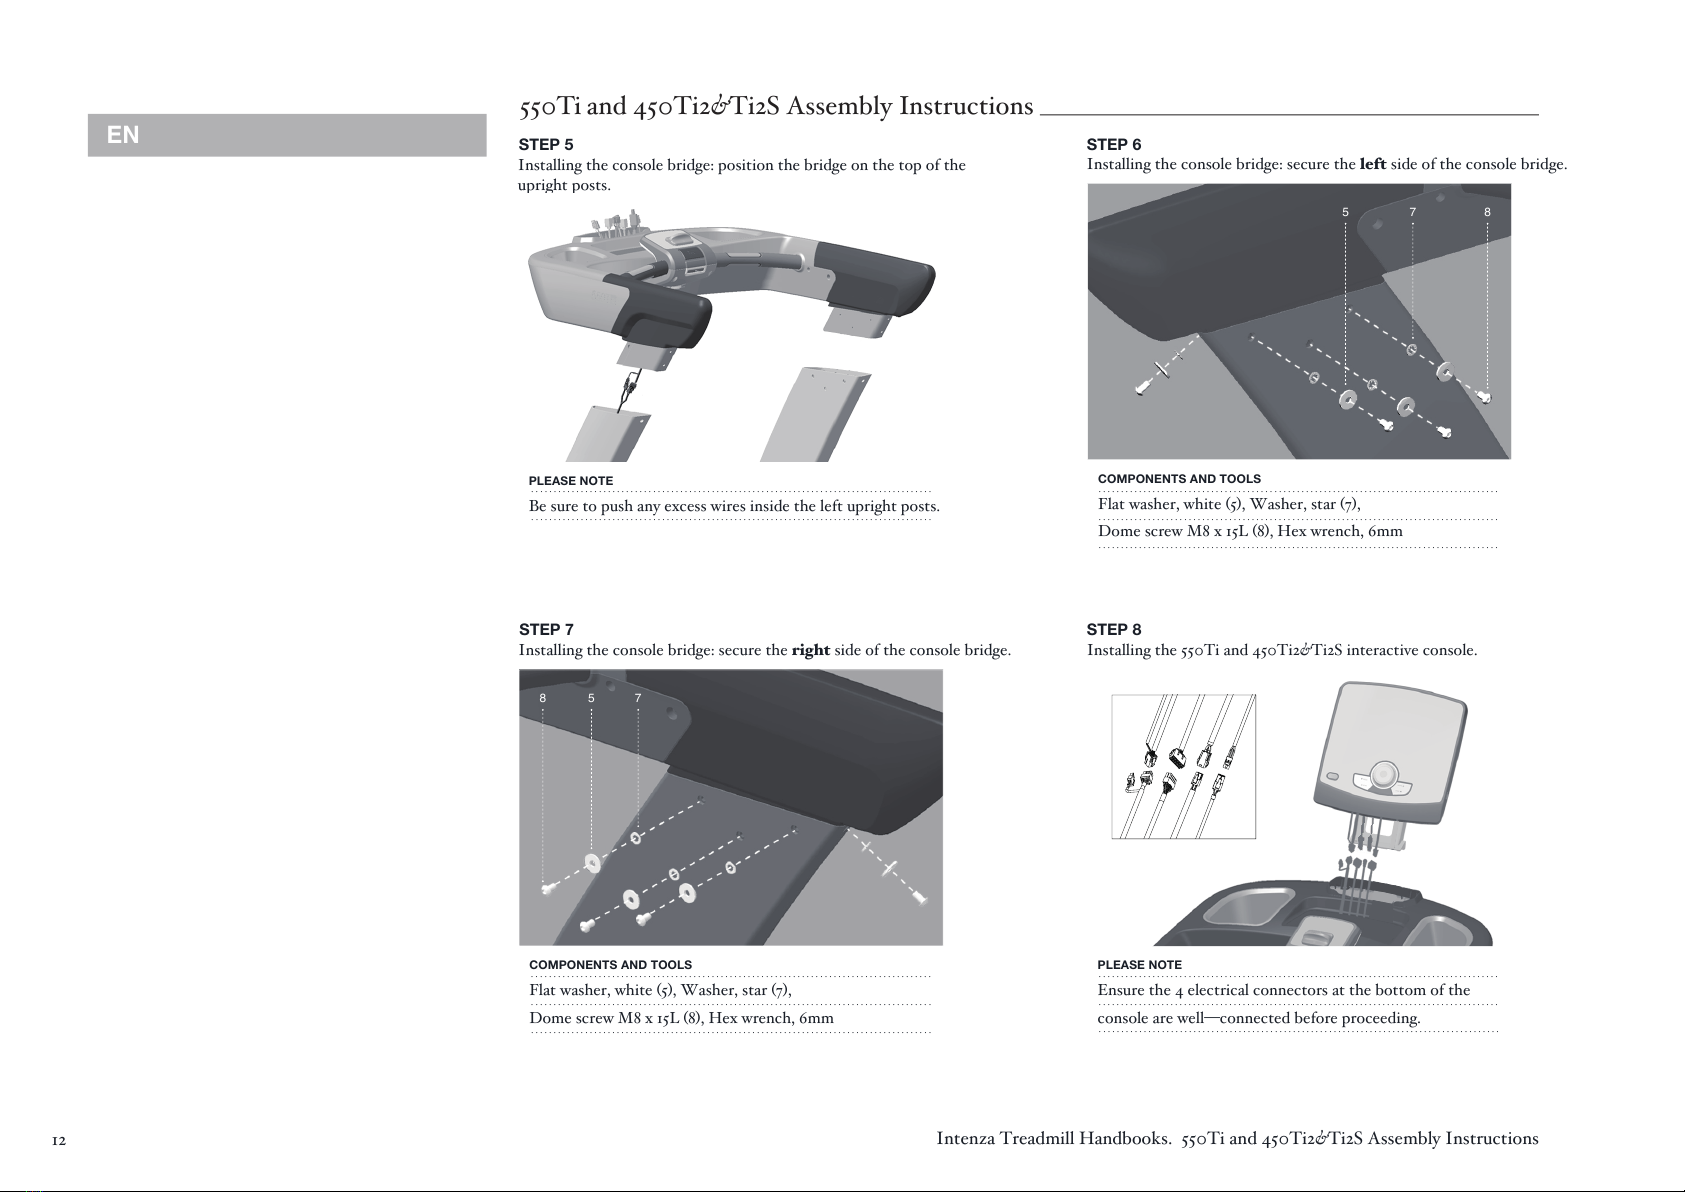
STEP 8
Installing the console bridge: position the bridge on the top of the
upright posts.
PLEASE NOTE
Be sure to push any excess wires inside the left upright posts.
.........................................................................................
.........................................................................................
STEP 7
........................................................................................ .
........................................................................................ .
........................................................................................ .
550Ti and 450Ti2&Ti2S Assembly Instructions
Installing the console bridge: secure the left side of the console bridge.
Installing the console bridge: secure the right side of the console bridge.
COMPONENTSAND TOOLS
Flat washer, white (5), Washer, star (7),
Dome screw M8 x 15L (8), Hex wrench, 6mm
COMPONENTS ANDTOOLS
Flat washer, white (5), Washer, star (7),
Dome screw M8 x 15L (8), Hex wrench, 6mm
Installing the 550Ti and 450Ti2&Ti2S interactive console.
PLEASE NOTE
Ensure the 4 electrical connectors at the bottom of the
console are well—connected before proceeding.
........................................................................................ .
8
............................................................
75 8
58 7
EN
13
Intenza Treadmills Handbook. 550Ti and 450Ti2&Ti2S Assembly Instructions
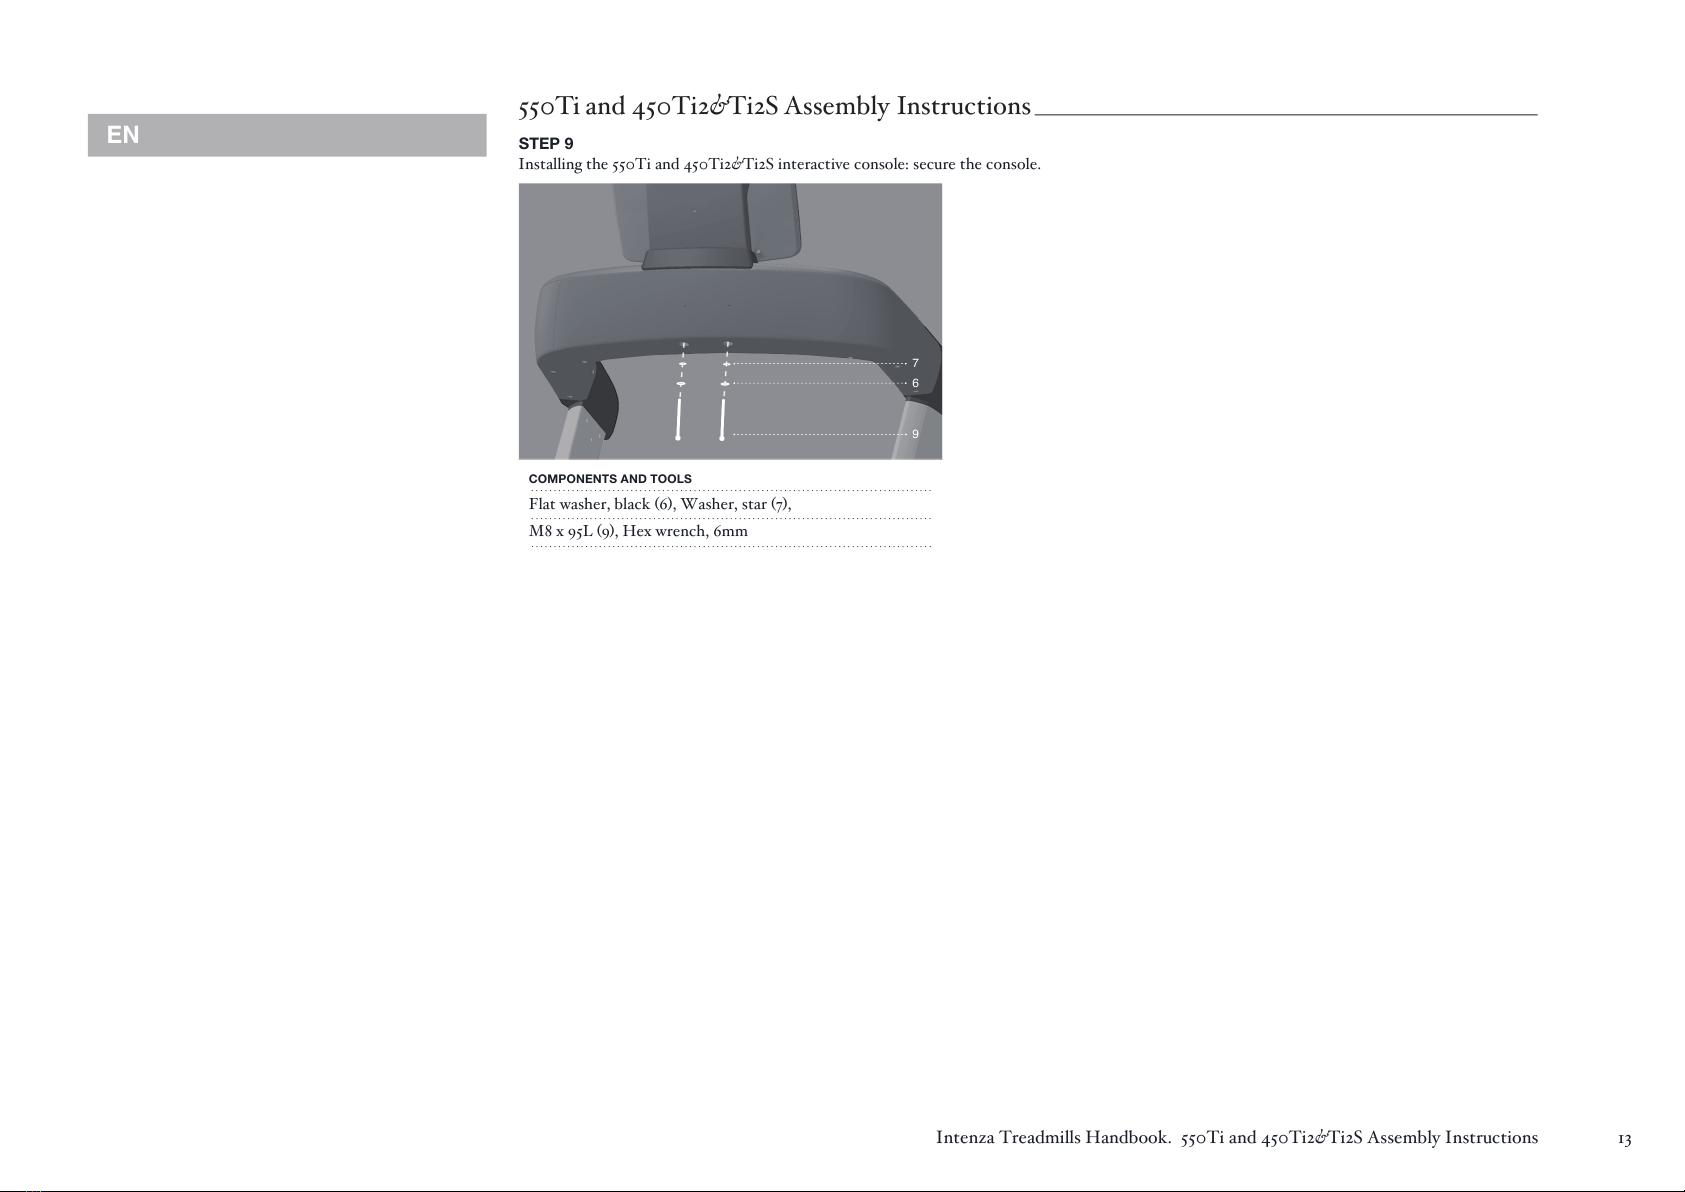
STEP 9
........................................................................................ .
........................................................................................ .
........................................................................................ .
Installing the 550Ti and 450Ti2&Ti2S interactive console: secure the console.
COMPONENTS ANDTOOLS
Flat washer, black (6), Washer, star (7),
M8 x 95L (9), Hex wrench, 6mm
550Ti and 450Ti2&Ti2S Assembly Instructions
7
6
9
EN

Please make sure that you preserve the correct safety space around the equipment.
14 Intenza Treadmills Handbook. Setup: Safety Space
Safety Space
After placing the unit where it will be used, please check its stability.
If the slightest rocking motion is detected, or if the unit is not stable, determine immediately which stabilising leg is not resting
on the floor. To adjust, turn stabilising leg A or B until the rocking motion ceases and both stabilizing legs are resting firmly
on the floor. Then secure each leg by tightening the locking nut.
How To Stabilise The Intenza Treadmills
PLEASE NOTE It is extremely important that the
stabilising legs be correctly adjusted to ensure correct
treadmill operation.
200cm/75inches
200cm/75inches
100cm/40inches
100cm/40inches
100cm/40inches
200cm/75inches
260cm/100inches
260cm/100inches
260cm/100inches
100cm/40inches
160cm/64inches
160cm/64inches
Training Area—
Free Area—
EN

15
Intenza Treadmills Handbook. Setup: Checking The Belt And Power Switch
After the Intenza Treadmill has been installed and stabilised, the belt must be checked to
confirm proper tracking.
Firstly, ensure the power cord is plugged into a suitable outlet. And secondly, turn on the treadmill. Stand on the side landing of the
treadmill and straddle the belt. To start the belt, press the 4mph button. If the striding belt appears off—centre, please refer to section
How To Align The Running Belt.
Checking The Belt
The power switch is located on the front panel at the base of Intenza Treadmill.
The ON/OFF switch has 2 positions:
Power Switch
“ ” represents ON and “ ” represents OFF.
CENTERED OFF—CENTERED
EN

How To Use Intenza Treadmills
16 Intenza Treadmills Handbook. 550Te2 e2 Console Overview
AENERGY SAVER
Energy saver mode is used to minimise power consumption when the Intenza 550Te2 is not in use.
Press this button to put the 550Te2 into energy saver mode after ending a workout. Press
this button to “wake up” the Intenza 550Te2.
BMOBILE AND TABLET RACK
Place traditional reading material, as well as mobile devices and tablets, in this built—in holder.
COPTIONAL RFID/NFC
Fitness facility owners can order this option for their users, allowing them to swipe facility
identification card on the console.
D
HEADPHONE JACK
Allows users to plug in headphones.
E
USB PORT
Facilitates data download. Read and play audio/video files.
F
HOME SCREEN
See home screen table to the left.
550Te2 Entertainment Console Overview
F
E
A
B
D
C
“Press” to login
Language
...................................................................................................
Login
...................................................................................................
USB
...................................................................................................
Swipe
...................................................................................................
Homepage
Picture
...................................................................................................
Quick Start
...................................................................................................
Favourite
Programs
...................................................................................................
Exercises
...................................................................................................
Favourite
...................................................................................................
Entertainment
Arabic, British English, Dutch,
Finnish, German, Hungarian,
Japanese, Korean, Persian,
Polish, Portuguese, Russian,
Spanish, Simplified Chinese,
Traditional Chinese, Turkish,
US English, lithuania, Danish,
Italian, French
21 languages are offered.
Displays USB connection
status.
HR Control/Preset/Target
(Time/Distance/Calories)/
Custom/Race/Fitness Test.
Allows users to select programs
to setup “goal” or “customise”
programs. Please refer to
section 5 Workout Option.
Swipe screen horizontally to
jump to next available screen.
Homepage picture changes
according to machine, eg.
running picture for treadmill.
Allows users to start a workout
immediately, by passing any
setup or goal setting.
Allows users easy access to
frequently used programs.
Allows users easy access to
frequently used entertainment.
TV/Intenzacast™/
Internet/Video/Audio/Virtual
scenery/YouTube* **/HDMI.
During workouts users can
switch between different
entertainment types on the
console.
EN
*Similar operation for Youku (China). **Similar operation for Aparat (Iran).

17Intenza Treadmills Handbook. 550Ti Interactive Console Overview
550Ti Interactive Console Overview
F
A
G
H
C
B
E
J
I
D
A
...................................................................................................
B
...................................................................................................
C
...................................................................................................
D
E
...................................................................................................
F
...................................................................................................
G
...................................................................................................
H
I
...................................................................................................
J
Profile Window
Light columns show the information for setting up
a workout.
Speed Scale
This scale displays the speed: increase/decrease
speed from 0.8 km/h—20 km/h for 550Ti, and
0.8km/h—25 km/h (0.5 mph—16 mph) Increment
is at 0.1 km/h and can be adjusted by using the
stick shift during the workout.
Message Bar
During the program set—up, operating instruc-
tions will be displayed in the message bar. During
workouts exercise data listed below will be
displayed for reference—
HR heart rate can be detected if users wear
the Polar heart rate chest strap or consistently
hold onto the contact heart rate grips.
INCLINE incline percentage of the workout
being used.
PACE how fast a specific distance is covered.
TIME amount of time elapsed since beginning
the workout.
METs ratio of work metabolic rate to resting
metabolic rate.
CALORIES number of calories burned since
workout beginning.
DISTANCE total number of miles or km run so
far.
SPEED current running speed, in miles/hr or
km/hr.
During program set up, press this key to go
back to previous selection for correction.
During the name setting, press this key to
correct wrong input.
During workout display information toggles
between both exercise parameters in each
message bar. Press SCAN to display the
statistic continuously throughout the workout.
Energy Saver
This mode is used to minimise power being used
from the wall when Intenza 550Ti is not in use.
Press this button to put Intenza 550Ti into energy
saver mode after ending a workout or to “wake up”
the Intenza 550Ti.
Press this key to enter the workout mode
promptly, without having to select a workout
program. The default speed is at 1 km/h (0.6
mph) with no incline.
During program set up, press this key to
confirm selection or value.
Press this key to go back to the first layer
when necessary. During the setting of saving
confirmation, press this key to double confirm.
Please refer to Section 5 Exercise Workout
Option.
This key is only effective when a selected
program is operating. Press stop once will end
the workout program and the message bar
will show the workout summary. Press stop
again to exit the workout program promptly.
InZone™ Uni—Dial™ skirting light indicates the
workout intensity. Please refer to Section 4.4
How To Effectively Workout At Your Own Level.
EN
Back/ iSCAN
Smart Workrate
Green light indicates Smart Workrate.
USB Icon
This icon lights up when the Intenza console
detects a USB device.
Programs
Refer to Section 5 Exercise Workout Option.
Quick Start/Enter
Home/Stop Key
18 Intenza Treadmills Handbook. How To Effectively Workout At Your Own Level
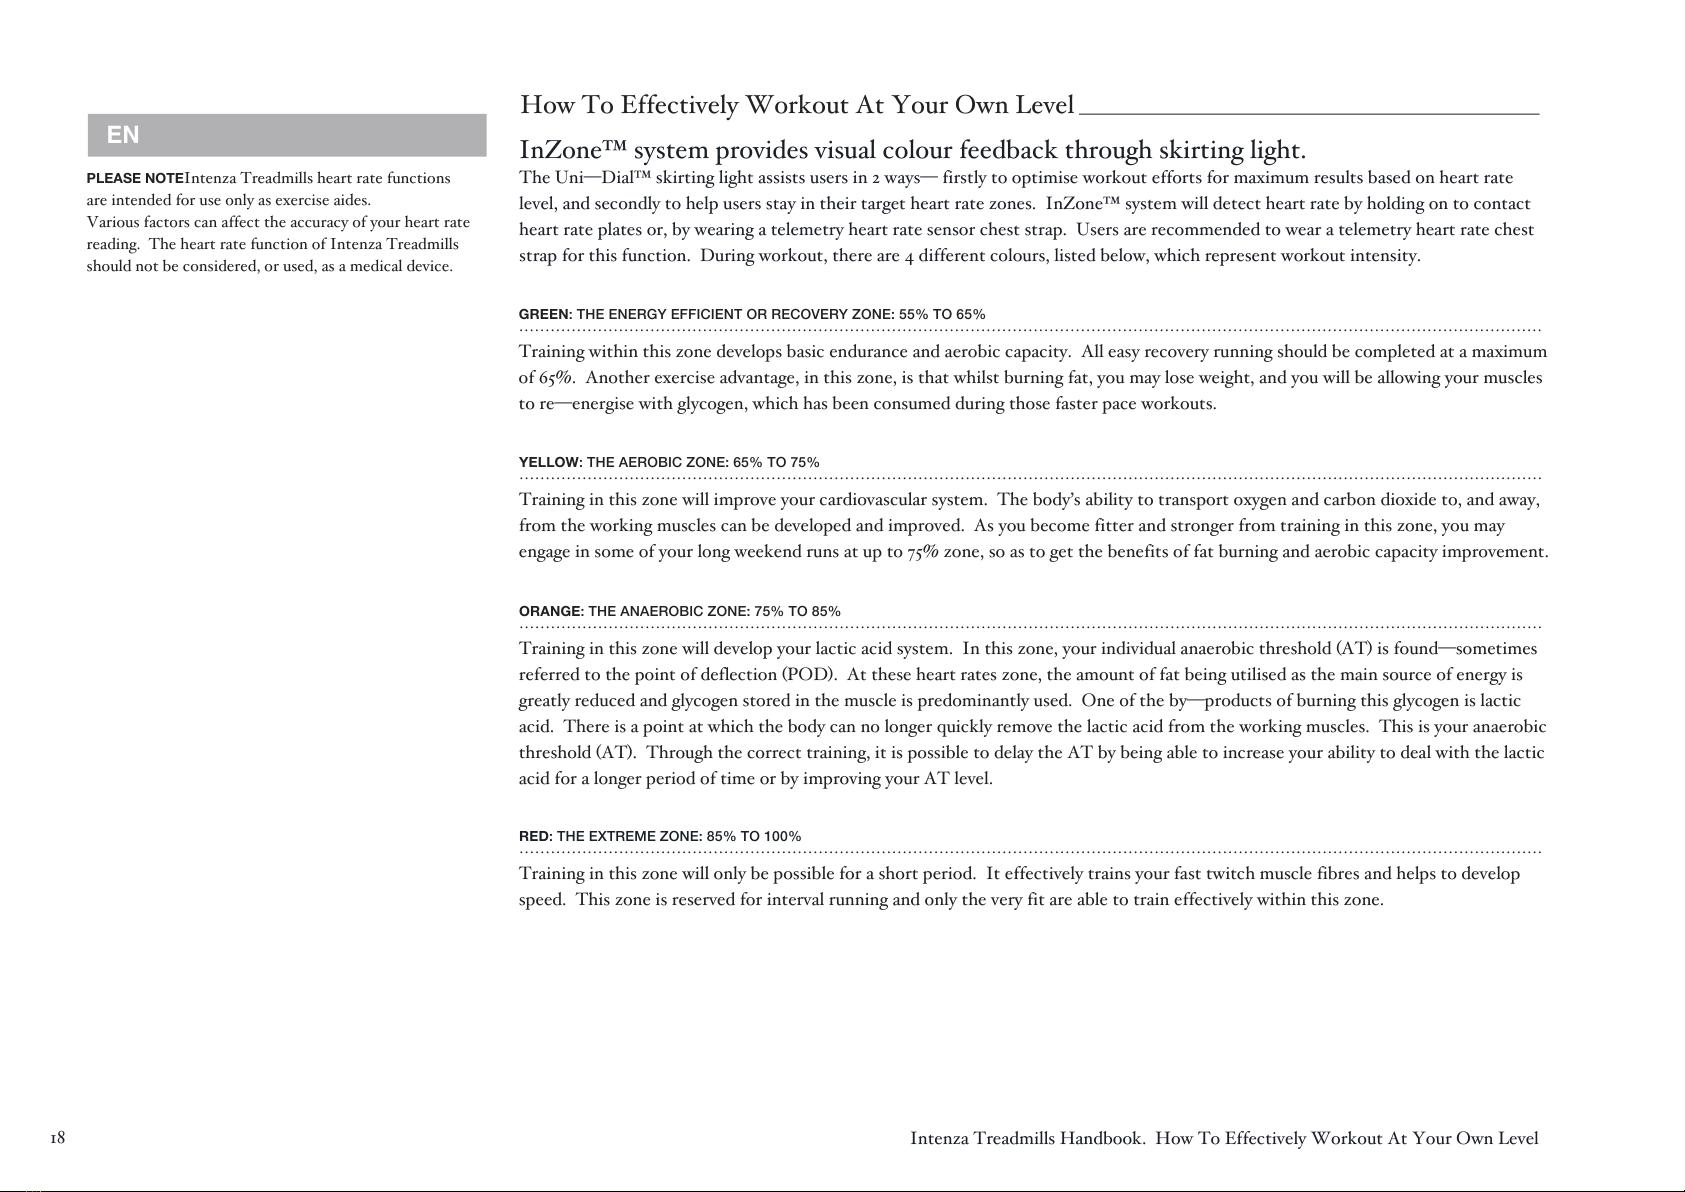
InZone™ system provides visual colour feedback through skirting light.
How To Effectively Workout At Your Own Level
EN
The Uni—Dial™ skirting light assists users in 2 ways— firstly to optimise workout efforts for maximum results based on heart rate
level, and secondly to help users stay in their target heart rate zones. InZone™ system will detect heart rate by holding on to contact
heart rate plates or, by wearing a telemetry heart rate sensor chest strap. Users are recommended to wear a telemetry heart rate chest
strap for this function. During workout, there are 4 different colours, listed below, which represent workout intensity.
PLEASE NOTEIntenza Treadmills heart rate functions
are intended for use only as exercise aides.
Various factors can affect the accuracy of your heart rate
reading. The heart rate function of Intenza Treadmills
should not be considered, or used, as a medical device.
Training within this zone develops basic endurance and aerobic capacity. All easy recovery running should be completed at a maximum
of 65%. Another exercise advantage, in this zone, is that whilst burning fat, you may lose weight, and you will be allowing your muscles
to re—energise with glycogen, which has been consumed during those faster pace workouts.
GREEN: THE ENERGY EFFICIENT OR RECOVERY ZONE: 55% TO 65%
...................................................................................................................................................................................................
Training in this zone will improve your cardiovascular system. The body’s ability to transport oxygen and carbon dioxide to, and away,
from the working muscles can be developed and improved. As you become fitter and stronger from training in this zone, you may
engage in some of your long weekend runs at up to 75% zone, so as to get the benefits of fat burning and aerobic capacity improvement.
YELLOW:THE AEROBIC ZONE:65% TO 75%
...................................................................................................................................................................................................
Training in this zone will only be possible for a short period. It effectively trains your fast twitch muscle fibres and helps to develop
speed. This zone is reserved for interval running and only the very fit are able to train effectively within this zone.
RED: THE EXTREME ZONE:85% TO 100%
...................................................................................................................................................................................................
Training in this zone will develop your lactic acid system. In this zone, your individual anaerobic threshold (AT) is found—sometimes
referred to the point of deflection (POD). At these heart rates zone, the amount of fat being utilised as the main source of energy is
greatly reduced and glycogen stored in the muscle is predominantly used. One of the by—products of burning this glycogen is lactic
acid. There is a point at which the body can no longer quickly remove the lactic acid from the working muscles. This is your anaerobic
threshold (AT). Through the correct training, it is possible to delay the AT by being able to increase your ability to deal with the lactic
acid for a longer period of time or by improving your AT level.
ORANGE:THE ANAEROBIC ZONE:75% TO85%
...................................................................................................................................................................................................
19
Intenza Treadmills Handbook. 450Ti2 Interactive Console Overview
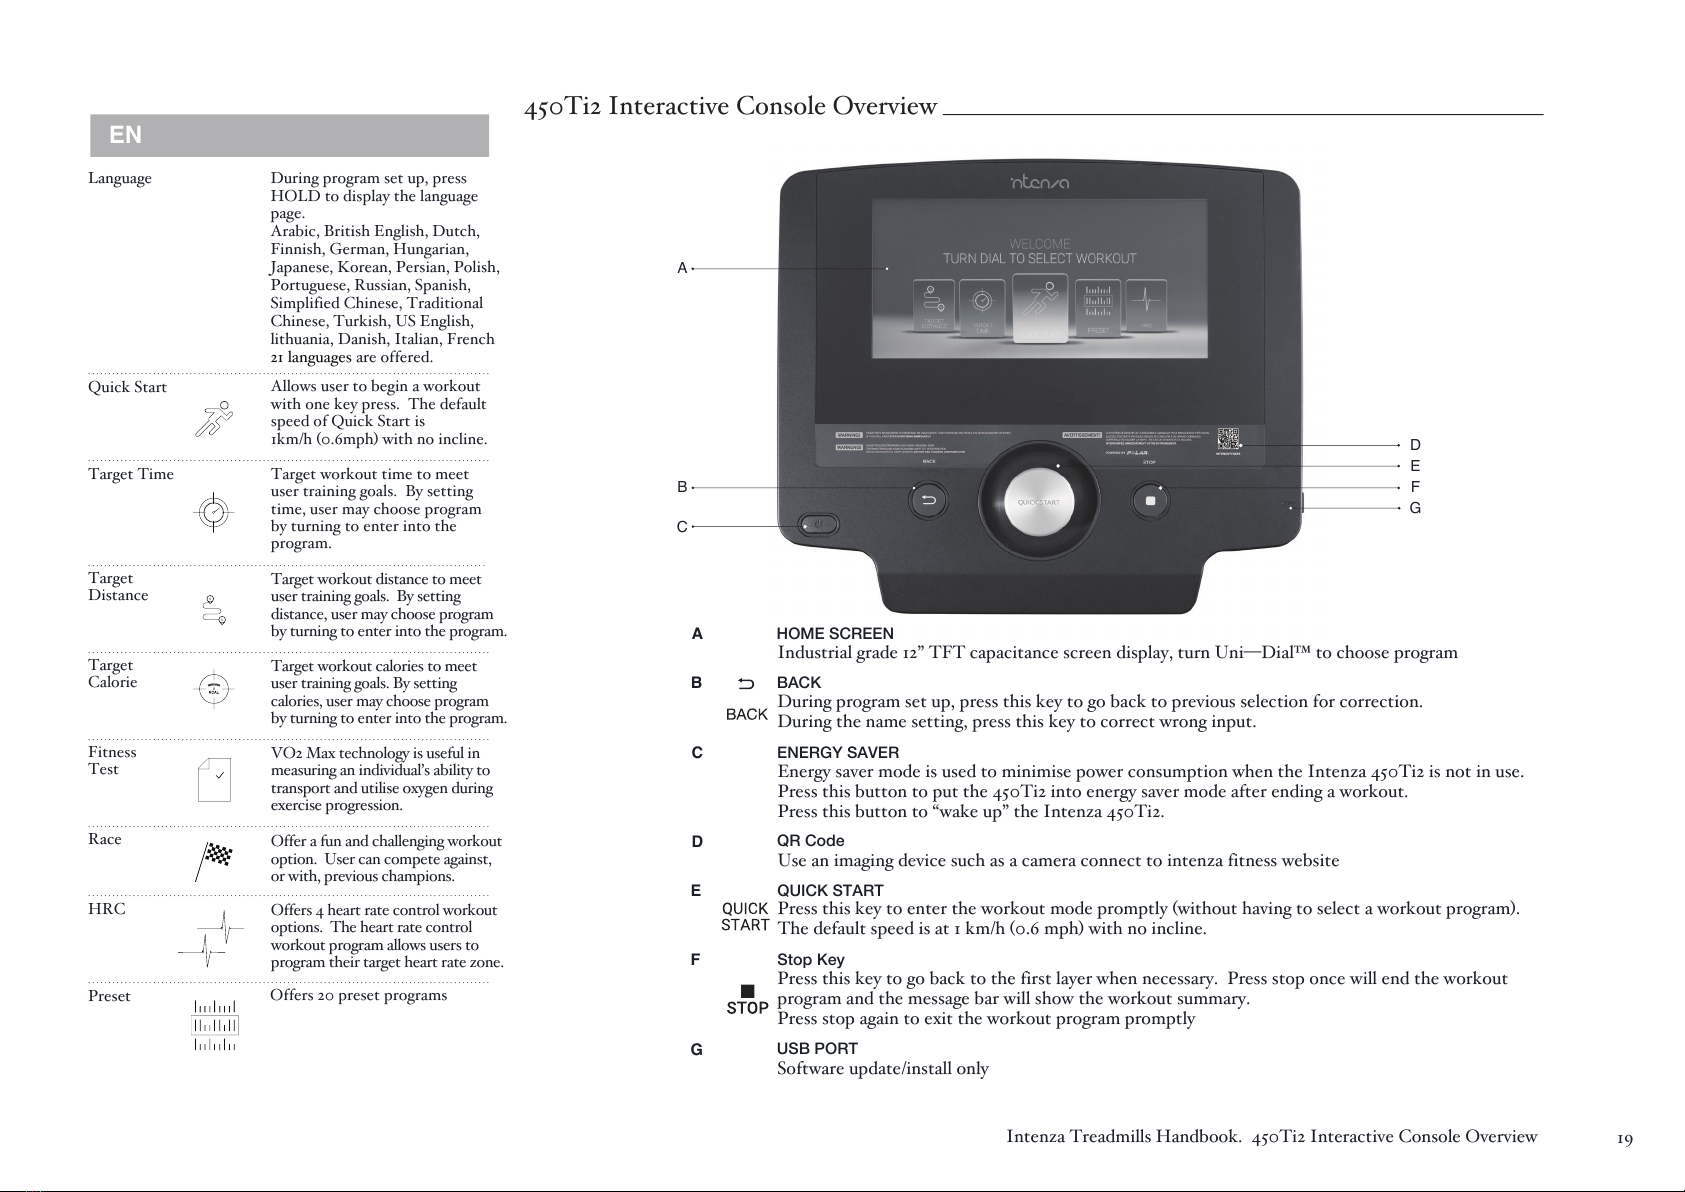
450Ti2 Interactive Console Overview
B
A
G
F
E
D
C
EN
A
ENERGY SAVER
QUICK START
Energy saver mode is used to minimise power consumption when the Intenza 450Ti2 is not in use.
Press this button to put the 450Ti2 into energy saver mode after ending a workout.
Press this button to “wake up” the Intenza 450Ti2.
B
C
E
F
USB PORT
Software update/install only
G
Language
...................................................................................................
Quick Start
...................................................................................................
Target Time
..................................................................................................
Target
Distance
...................................................................................................
Target
Calorie
...................................................................................................
Fitness
Test
...................................................................................................
Race
...................................................................................................
HRC
...................................................................................................
Preset
BACK
Stop Key
During program set up, press
HOLD to display the language
page.
Arabic, British English, Dutch,
Finnish, German, Hungarian,
Japanese, Korean, Persian, Polish,
Portuguese, Russian, Spanish,
Simplified Chinese, Traditional
Chinese, Turkish, US English,
lithuania, Danish, Italian, French
21 languages are offered.
Allows user to begin a workout
with one key press. The default
speed of Quick Start is
1km/h (0.6mph) with no incline.
Target workout time to meet
user training goals. By setting
time, user may choose program
by turning to enter into the
program.
Target workout distance to meet
user training goals. By setting
distance, user may choose program
by turning to enter into the program.
Target workout calories to meet
user training goals. By setting
calories, user may choose program
by turning to enter into the program.
VO2 Max technology is useful in
measuring an individual’s ability to
transport and utilise oxygen during
exercise progression.
Offer a fun and challenging workout
option. User can compete against,
or with, previous champions.
Offers 4 heart rate control workout
options. The heart rate control
workout program allows users to
program their target heart rate zone.
Offers 20 preset programs
HOME SCREEN
Industrial grade 12” TFT capacitance screen display, turn Uni—Dial™ to choose program
During program set up, press this key to go back to previous selection for correction.
During the name setting, press this key to correct wrong input.
Press this key to enter the workout mode promptly (without having to select a workout program).
The default speed is at 1 km/h (0.6 mph) with no incline.
Press this key to go back to the first layer when necessary. Press stop once will end the workout
program and the message bar will show the workout summary.
Press stop again to exit the workout program promptly
QR Code
Use an imaging device such as a camera connect to intenza fitness website
D
Other manuals for 550TE2
1
This manual suits for next models
3
Table of contents
Languages:
Other Intenza Treadmill manuals


